SlideShare a Scribd company logo
1 of 4
Download to read offline
2090 Thornton Street
Ferndale, WA USA 98248
(T) 360.384.4669
(F) 360.384.0572
www.samsonrope.com
© 2007 Samson Rope Technologies, Inc. All rights reserved.
Page 1 of 4
eye splice double braid Class I
Class I ropes are made from any or all of the following fibers: olefin, polyester, or nylon.
*This splice is not suitable for core-dependent double braid constructions (Double Braid Class II).
The eye splice is used to place a permanent loop in the end of a rope, generally for attachment
purposes to a fixed point. An eye is also used to form the rope around a thimble, which is used
to protect the rope, especially when it is to be attached to a shackle, chain or wire rope.
1
step
marking the measurements
Tape end to be spliced with one thin layer of tape. Then measure
one (1) tubular fid length or two (2) wire fid lengths (because a
wire fid is half size) from the end of the rope and mark.
This is point R (Reference).
From R form a loop the size of the eye desired and mark.
This is point X where you extract the core from inside the
cover. If using a thimble, form the loop around the thimble.
Tie a tight slip knot approximately five (5) fid lengths from X.
Tie a slipknot about 5 fid length from "X"
Core must be extracted from
cover at this point
X
R
1 layer of tape
1 fid length
-or-
2 wire fids – up to 13" circ.
From loop
desired size
Additional rope needed for splice:
Circ. of rope in feet plus length of eye;
with thimble: 1-1/2 x circ. of the
rope in feet.
step
3Again slide the cover toward the slipknot to expose more
core. From Mark 1, measure along the core toward X
a distance equal to the short section of a tubular fid
(two short sections if using a wire fid) and make two
heavy marks. This is Mark 2.
From Mark 2 measure in the same direction one fid
length plus another short section of the fid (with a wire
fid, double measurements) make three (3) heavy marks.
This is Mark 3.
marking the core
2 Bend the rope sharply at X. With the pusher or any sharp tool such as an ice pick, awl,
or marlin spike, spread the cover strands to expose core. First pry, then pull the core
completely out of cover from X to the taped end of the rope. Put one layer only of tape
on the end of the core. Note: Do not pull cover strands away from rope when spread-
ing cover as this will distort the rope unnecessarily.
To assure correct positioning of Mark 1 do the following:
Holding the exposed core, slide cover as far back as possible
toward the tightly tied slipknot. Then, firmly smooth the cover
back from the slipknot toward the taped end. Smooth again
until all cover slack is removed. Then, mark the core where it
come out of the cover. This is Mark 1.
extracting the core
step
cover
Mark 3
core
X
R
Mark 2 Mark 1
R
core
cover
X
Mark 1
1 layer of tape
Mark on Fid
Short
section
of lid
One fid length plus another short section
Prying out the core
2 short sections with wire fid
2090 Thornton Street
Ferndale, WA USA 98248
(T) 360.384.4669
(F) 360.384.0572
www.samsonrope.com
© 2007 Samson Rope Technologies, Inc. All rights reserved.
Page 2 of 4
eye splice double braid Class I
5Insert the fid into the core at Mark 2. Slide it through and out at Mark 3.
Add extra tape to the cover end; then jam it tightly into the hollow end of
the fid (see insert). Hold core lightly at Mark 3, place pusher joint into taped
end and push fid and cover through at Mark 2 and out at Mark 3 (with a
wire fid, first press prongs into cover, then tape over. Then, after fid is on,
milk braid over fid while pulling fid through from Mark 2 to Mark 3).
Take the fid off the cover; continue pulling cover tail through the core until
Mark R on the cover emerges from Mark 3. Then remove the tape from the
end of the cover.
step
putting the cover inside core
4 Note the nature of the cover braid. It is made up of
strands­ with either one, two or three ends. By inspec-
tion you can see half the strands revolve to the right
around the rope and half revolve to the left.
Beginning at R and working toward the taped end of
the cover, count eight (8) consecutive strands (single or
pairs) which revolve to the right (or left). Mark the eighth
(8th) strand. This is point T. Make point T go completely
around the cover. Starting at T and working toward the
taped cover end, count and mark every fifth (5th) right and left strand until you reach the end of
the taped cover. For those ropes with a 20 strand cover, count and mark the fifth (5th) right and
left strand. From that mark count to the fourth (4th) right and left strand. Proceed in this manner,
marking the fifth (5th) right and left strand and then marking the fourth (4th) right and left strand,
until you reach the end of the taped cover.
marking the cover for tapering
step
cover
Mark 3
core
X
TR
Mark 2 Mark 1
Mark 3 Mark 2
Mark 1
X
Cover
Core
Pinch
taped end
to insert
into lid.
*If splicing an eye with
a thimble with “ears”,
insert thimble prior to
inserting cover into core.
Put core through ears
and slide past Mark 3.
6 Make sure the tape is removed from the cover end. Start with the last marked pair of cover strands toward the end,
cut and pull them completely out (Fig. 6A). Cut and remove next marked strands and continue with each right and left
marked strands until you reach point T. Do not cut beyond this point.
The result should be a gradual taper ending in a point. Very carefully pull the cover back through the core until point T
emerges from Mark 2.
performing taper
step
6A
6B
cover
core
Mark 2Mark 3
core Mark 1
Mark cover for tapering
as described in Step 4
X
T
R cover
core
Mark 2Mark 3
core Mark 1
Tapered Cover
X
T
R
2090 Thornton Street
Ferndale, WA USA 98248
(T) 360.384.4669
(F) 360.384.0572
www.samsonrope.com
© 2007 Samson Rope Technologies, Inc. All rights reserved.
Page 3 of 4
7 reinserting core into cover
step
From X on the cover, measure approximately one-third (1/3) a tubular fid length
toward the slip knot on the rope and mark this as Z.
You are now ready to put the core back into the cover from T to Z. Insert the fid
at T, jam the taped core end tightly into the end of the fid. With the pusher, push
the fid and core through the cover tunnel, past X and through the cover at Z.
When pushing the fid past X to Z, make sure the fid does not catch any internal
core strands.
note: Depending on the eye size, a fid may
not be long enough to reach from T to Z in one
pass. If not, bring the fid out through the cover,
pull the core through and reinsert the fid into
exactly the same hole it came out of. Do this
as many times as needed to reach Z.
Cover
Core CoreMark 1
Mark 2
Cover tail
Mark 3X1/3 fid
length
Z
Fid and end of core
comes out at Z.
Insert core into
cover at point T.
R
T
eye splice double braid Class I
8
step
Alternately pull on the core tail at Z, then pull on the tapered cover at
Mark 3. The crossover should be tightened until it is approximately equal
to the diameter of the rope.Smooth out the cover of the eye completely,
from crossover T toward X to get all the slack out of the eye area.
Mark the core tail through the cover at Point X.
Pull the core tail out until the mark just made on the core is exposed at Z.
Reduce the core volume at this point by cutting and removing one strand
at each group, progressing around the circumference
of the rope.
marking reduce volume tail core
Pull core tail out until
mark of X is exposed
Cover Taper
R
T
Mark core tail
at X
Smooth out and cover
taper will disappear
Smooth out
Crossover
Mark 3
Point Z
1/3 fid from
Point X
8A
Cutting and
removing
One half the
ends from
each core
strand.
Do this at mark made
on core (through
cover at X).
1/3 Fid
45º angle cut
core
Measure 1/3 fid from start of reduction cuts
(mark) toward end and mark. Cut off remain-
ing tail at this point. Make cut on a 45º angle to
prevent a blunt end (see insert).
With one hand, hold crossover — MARK T.
Smooth cover section of eye out firmly and
completely from crossover toward X; reduced
volumn core tail should disappear into cover at Z.
Smooth out core section from crossover towards
Mark 3 and cover taper will disappear into core.
2090 Thornton Street
Ferndale, WA USA 98248
(T) 360.384.4669
(F) 360.384.0572
www.samsonrope.com
© 2007 Samson Rope Technologies, Inc. All rights reserved.
Page 4 of 4
eye splice double braid Class I
9
step
Hold the rope at the slipknot and with the other hand milk the cover toward the splice,
gently at first, them more firmly. The cover will slide over Mark 3, Mark 2 and crossover
T up to R (it may be necessary to occasionally smooth out eye during milking to prevent
reduced volume tail catching in the throat of the splice).
If bunching occurs at the crossover preventing full burying, smooth cover from T to X.
Grasp crossover at T with one hand and then firmly smooth cover slack (female side
of eye) with the other hand toward the throat (X).
Repeat as necessary until bunching disappears.
Continue milking until all cover slack between the
knot and the throat of the eye has been removed.
burying the exposed core
Beginining at slipknot "milk" cover by
sliding hand toward loop.
Bury to Mark R
Mark 2
R
T
Cross–over
A. Anchor the loop of the slipknot by tying it to a stationary object before starting to
bury. You can then use both hands and the weight of your body to more easily bury
the cover over the core and crossover (see Figure 1 and Figure 2).
B. Holding the crossover tightly, milk all the excess cover from R to X.
Flex and loosen the rope at the crossover point during the final burying process.
Hammering the cover at X will help loosen the strands.
With larger ropes it is helpful to securely anchor the slipknot, attach a small line
to the braided core at the crossover and mechanically apply tension with either a
block and tackle, capstan, come-a-long, or power winch.
Tension will reduce the diameter of the core and
crossover for easier burying (see Figure 2).
In order to prevent no-load opening of
your eye splice, Samson recommends
lock-stitching the eye.
Please download lock stitch instructions
to complete this splice.
TIP: BEFORE burying the core
Figure 1
Figure 2
cross-over
core
pull
firmly secured
cross-over
core
pull
small line
10
step
mechanical tension

More Related Content

Similar to How to splice an eye in double braid rope

F-F-Fiddle Assembly Instructions
F-F-Fiddle Assembly InstructionsF-F-Fiddle Assembly Instructions
F-F-Fiddle Assembly Instructionsdsp39
 
F-F-Fiddle Assembly Instructions
F-F-Fiddle Assembly InstructionsF-F-Fiddle Assembly Instructions
F-F-Fiddle Assembly Instructionsdsp39
 
How to Fit Wooden Blinds
How to Fit Wooden BlindsHow to Fit Wooden Blinds
How to Fit Wooden BlindsEnglish Blinds
 
Wire Wrapped Sweetheart Round Cabochon Pendant
Wire Wrapped Sweetheart Round Cabochon PendantWire Wrapped Sweetheart Round Cabochon Pendant
Wire Wrapped Sweetheart Round Cabochon PendantThe Beading Gem's Journal
 
12 taping and techniques
12 taping and techniques12 taping and techniques
12 taping and techniquesKeno Kynt
 
Victory rig
Victory rigVictory rig
Victory rigJLRev
 
ELECTRONICSv bswsgfdtyugwftyudfwtfedtyufgscqtyfdsfghadc
ELECTRONICSv bswsgfdtyugwftyudfwtfedtyufgscqtyfdsfghadcELECTRONICSv bswsgfdtyugwftyudfwtfedtyufgscqtyfdsfghadc
ELECTRONICSv bswsgfdtyugwftyudfwtfedtyufgscqtyfdsfghadcArhgelDelosReyes
 
How to Fit Faux Wood Blinds
How to Fit Faux Wood BlindsHow to Fit Faux Wood Blinds
How to Fit Faux Wood BlindsEnglish Blinds
 
Gabions installation guideline
Gabions installation guidelineGabions installation guideline
Gabions installation guidelineMadhav Jung Karki
 
Making A Tissue Paper Hot Air Balloon
Making A Tissue Paper Hot Air BalloonMaking A Tissue Paper Hot Air Balloon
Making A Tissue Paper Hot Air Balloonsstoffre
 
bandaging-140511011904-phpapp02.pdf
bandaging-140511011904-phpapp02.pdfbandaging-140511011904-phpapp02.pdf
bandaging-140511011904-phpapp02.pdfOWAIS sheikh
 
Centrifugal pump fabrication
Centrifugal pump fabricationCentrifugal pump fabrication
Centrifugal pump fabricationKhiem Vo Duy
 
bandaging-140511011904-phpapp02.pptx
bandaging-140511011904-phpapp02.pptxbandaging-140511011904-phpapp02.pptx
bandaging-140511011904-phpapp02.pptxfernandopajar1
 
BANDAGING: TRIANGULAR BANDAGING AND CRAVAT, TYPES OF KNOTS
BANDAGING: TRIANGULAR BANDAGING AND CRAVAT, TYPES OF KNOTSBANDAGING: TRIANGULAR BANDAGING AND CRAVAT, TYPES OF KNOTS
BANDAGING: TRIANGULAR BANDAGING AND CRAVAT, TYPES OF KNOTSManisha Thakur
 
howtospliceelectricalwires-160915075216.pdf
howtospliceelectricalwires-160915075216.pdfhowtospliceelectricalwires-160915075216.pdf
howtospliceelectricalwires-160915075216.pdfJhoanaTamondong
 

Similar to How to splice an eye in double braid rope (20)

F-F-Fiddle Assembly Instructions
F-F-Fiddle Assembly InstructionsF-F-Fiddle Assembly Instructions
F-F-Fiddle Assembly Instructions
 
F-F-Fiddle Assembly Instructions
F-F-Fiddle Assembly InstructionsF-F-Fiddle Assembly Instructions
F-F-Fiddle Assembly Instructions
 
How to Fit Wooden Blinds
How to Fit Wooden BlindsHow to Fit Wooden Blinds
How to Fit Wooden Blinds
 
Wire Wrapped Sweetheart Round Cabochon Pendant
Wire Wrapped Sweetheart Round Cabochon PendantWire Wrapped Sweetheart Round Cabochon Pendant
Wire Wrapped Sweetheart Round Cabochon Pendant
 
12 taping and techniques
12 taping and techniques12 taping and techniques
12 taping and techniques
 
Victory rig
Victory rigVictory rig
Victory rig
 
push edu batam
push edu batampush edu batam
push edu batam
 
ELECTRONICSv bswsgfdtyugwftyudfwtfedtyufgscqtyfdsfghadc
ELECTRONICSv bswsgfdtyugwftyudfwtfedtyufgscqtyfdsfghadcELECTRONICSv bswsgfdtyugwftyudfwtfedtyufgscqtyfdsfghadc
ELECTRONICSv bswsgfdtyugwftyudfwtfedtyufgscqtyfdsfghadc
 
How to Wire Wrap a Coin Pendant
How to Wire Wrap a Coin PendantHow to Wire Wrap a Coin Pendant
How to Wire Wrap a Coin Pendant
 
How to Fit Faux Wood Blinds
How to Fit Faux Wood BlindsHow to Fit Faux Wood Blinds
How to Fit Faux Wood Blinds
 
Designer Wire Wrapped Clasp Hooks
Designer Wire Wrapped Clasp HooksDesigner Wire Wrapped Clasp Hooks
Designer Wire Wrapped Clasp Hooks
 
Gabions installation guideline
Gabions installation guidelineGabions installation guideline
Gabions installation guideline
 
Making A Tissue Paper Hot Air Balloon
Making A Tissue Paper Hot Air BalloonMaking A Tissue Paper Hot Air Balloon
Making A Tissue Paper Hot Air Balloon
 
ppt on Bandaging
ppt on Bandagingppt on Bandaging
ppt on Bandaging
 
bandaging-140511011904-phpapp02.pdf
bandaging-140511011904-phpapp02.pdfbandaging-140511011904-phpapp02.pdf
bandaging-140511011904-phpapp02.pdf
 
Measuring device
Measuring deviceMeasuring device
Measuring device
 
Centrifugal pump fabrication
Centrifugal pump fabricationCentrifugal pump fabrication
Centrifugal pump fabrication
 
bandaging-140511011904-phpapp02.pptx
bandaging-140511011904-phpapp02.pptxbandaging-140511011904-phpapp02.pptx
bandaging-140511011904-phpapp02.pptx
 
BANDAGING: TRIANGULAR BANDAGING AND CRAVAT, TYPES OF KNOTS
BANDAGING: TRIANGULAR BANDAGING AND CRAVAT, TYPES OF KNOTSBANDAGING: TRIANGULAR BANDAGING AND CRAVAT, TYPES OF KNOTS
BANDAGING: TRIANGULAR BANDAGING AND CRAVAT, TYPES OF KNOTS
 
howtospliceelectricalwires-160915075216.pdf
howtospliceelectricalwires-160915075216.pdfhowtospliceelectricalwires-160915075216.pdf
howtospliceelectricalwires-160915075216.pdf
 

More from Jeffery Flower

BMC Avila Retirement Page 7
BMC Avila Retirement Page 7BMC Avila Retirement Page 7
BMC Avila Retirement Page 7Jeffery Flower
 
PDX Letter of Commedation
PDX Letter of CommedationPDX Letter of Commedation
PDX Letter of CommedationJeffery Flower
 
PDX Employee of the Quarter
PDX Employee of the QuarterPDX Employee of the Quarter
PDX Employee of the QuarterJeffery Flower
 
ALDER Employee of the Quarter
ALDER Employee of the QuarterALDER Employee of the Quarter
ALDER Employee of the QuarterJeffery Flower
 
Double_Braid_Inspection_and_Retirement
Double_Braid_Inspection_and_RetirementDouble_Braid_Inspection_and_Retirement
Double_Braid_Inspection_and_RetirementJeffery Flower
 

More from Jeffery Flower (10)

Navigation Rules1-5
Navigation Rules1-5Navigation Rules1-5
Navigation Rules1-5
 
BMC Avila Retirement Page 7
BMC Avila Retirement Page 7BMC Avila Retirement Page 7
BMC Avila Retirement Page 7
 
PDX Page 7
PDX Page 7PDX Page 7
PDX Page 7
 
PDX Letter of Commedation
PDX Letter of CommedationPDX Letter of Commedation
PDX Letter of Commedation
 
PDX Employee of the Quarter
PDX Employee of the QuarterPDX Employee of the Quarter
PDX Employee of the Quarter
 
ALDER Employee of the Quarter
ALDER Employee of the QuarterALDER Employee of the Quarter
ALDER Employee of the Quarter
 
A School Page 7
A School Page 7A School Page 7
A School Page 7
 
Fid Information
Fid InformationFid Information
Fid Information
 
Double_Braid_Inspection_and_Retirement
Double_Braid_Inspection_and_RetirementDouble_Braid_Inspection_and_Retirement
Double_Braid_Inspection_and_Retirement
 
My SOQ Nomination
My SOQ NominationMy SOQ Nomination
My SOQ Nomination
 

How to splice an eye in double braid rope

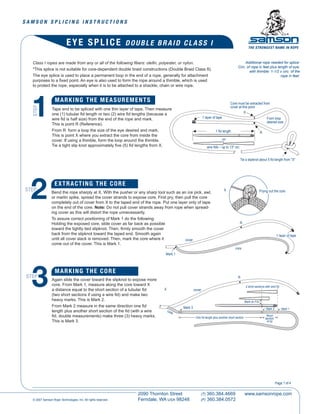
  • 1. 2090 Thornton Street Ferndale, WA USA 98248 (T) 360.384.4669 (F) 360.384.0572 www.samsonrope.com © 2007 Samson Rope Technologies, Inc. All rights reserved. Page 1 of 4 eye splice double braid Class I Class I ropes are made from any or all of the following fibers: olefin, polyester, or nylon. *This splice is not suitable for core-dependent double braid constructions (Double Braid Class II). The eye splice is used to place a permanent loop in the end of a rope, generally for attachment purposes to a fixed point. An eye is also used to form the rope around a thimble, which is used to protect the rope, especially when it is to be attached to a shackle, chain or wire rope. 1 step marking the measurements Tape end to be spliced with one thin layer of tape. Then measure one (1) tubular fid length or two (2) wire fid lengths (because a wire fid is half size) from the end of the rope and mark. This is point R (Reference). From R form a loop the size of the eye desired and mark. This is point X where you extract the core from inside the cover. If using a thimble, form the loop around the thimble. Tie a tight slip knot approximately five (5) fid lengths from X. Tie a slipknot about 5 fid length from "X" Core must be extracted from cover at this point X R 1 layer of tape 1 fid length -or- 2 wire fids – up to 13" circ. From loop desired size Additional rope needed for splice: Circ. of rope in feet plus length of eye; with thimble: 1-1/2 x circ. of the rope in feet. step 3Again slide the cover toward the slipknot to expose more core. From Mark 1, measure along the core toward X a distance equal to the short section of a tubular fid (two short sections if using a wire fid) and make two heavy marks. This is Mark 2. From Mark 2 measure in the same direction one fid length plus another short section of the fid (with a wire fid, double measurements) make three (3) heavy marks. This is Mark 3. marking the core 2 Bend the rope sharply at X. With the pusher or any sharp tool such as an ice pick, awl, or marlin spike, spread the cover strands to expose core. First pry, then pull the core completely out of cover from X to the taped end of the rope. Put one layer only of tape on the end of the core. Note: Do not pull cover strands away from rope when spread- ing cover as this will distort the rope unnecessarily. To assure correct positioning of Mark 1 do the following: Holding the exposed core, slide cover as far back as possible toward the tightly tied slipknot. Then, firmly smooth the cover back from the slipknot toward the taped end. Smooth again until all cover slack is removed. Then, mark the core where it come out of the cover. This is Mark 1. extracting the core step cover Mark 3 core X R Mark 2 Mark 1 R core cover X Mark 1 1 layer of tape Mark on Fid Short section of lid One fid length plus another short section Prying out the core 2 short sections with wire fid
  • 2. 2090 Thornton Street Ferndale, WA USA 98248 (T) 360.384.4669 (F) 360.384.0572 www.samsonrope.com © 2007 Samson Rope Technologies, Inc. All rights reserved. Page 2 of 4 eye splice double braid Class I 5Insert the fid into the core at Mark 2. Slide it through and out at Mark 3. Add extra tape to the cover end; then jam it tightly into the hollow end of the fid (see insert). Hold core lightly at Mark 3, place pusher joint into taped end and push fid and cover through at Mark 2 and out at Mark 3 (with a wire fid, first press prongs into cover, then tape over. Then, after fid is on, milk braid over fid while pulling fid through from Mark 2 to Mark 3). Take the fid off the cover; continue pulling cover tail through the core until Mark R on the cover emerges from Mark 3. Then remove the tape from the end of the cover. step putting the cover inside core 4 Note the nature of the cover braid. It is made up of strands­ with either one, two or three ends. By inspec- tion you can see half the strands revolve to the right around the rope and half revolve to the left. Beginning at R and working toward the taped end of the cover, count eight (8) consecutive strands (single or pairs) which revolve to the right (or left). Mark the eighth (8th) strand. This is point T. Make point T go completely around the cover. Starting at T and working toward the taped cover end, count and mark every fifth (5th) right and left strand until you reach the end of the taped cover. For those ropes with a 20 strand cover, count and mark the fifth (5th) right and left strand. From that mark count to the fourth (4th) right and left strand. Proceed in this manner, marking the fifth (5th) right and left strand and then marking the fourth (4th) right and left strand, until you reach the end of the taped cover. marking the cover for tapering step cover Mark 3 core X TR Mark 2 Mark 1 Mark 3 Mark 2 Mark 1 X Cover Core Pinch taped end to insert into lid. *If splicing an eye with a thimble with “ears”, insert thimble prior to inserting cover into core. Put core through ears and slide past Mark 3. 6 Make sure the tape is removed from the cover end. Start with the last marked pair of cover strands toward the end, cut and pull them completely out (Fig. 6A). Cut and remove next marked strands and continue with each right and left marked strands until you reach point T. Do not cut beyond this point. The result should be a gradual taper ending in a point. Very carefully pull the cover back through the core until point T emerges from Mark 2. performing taper step 6A 6B cover core Mark 2Mark 3 core Mark 1 Mark cover for tapering as described in Step 4 X T R cover core Mark 2Mark 3 core Mark 1 Tapered Cover X T R
  • 3. 2090 Thornton Street Ferndale, WA USA 98248 (T) 360.384.4669 (F) 360.384.0572 www.samsonrope.com © 2007 Samson Rope Technologies, Inc. All rights reserved. Page 3 of 4 7 reinserting core into cover step From X on the cover, measure approximately one-third (1/3) a tubular fid length toward the slip knot on the rope and mark this as Z. You are now ready to put the core back into the cover from T to Z. Insert the fid at T, jam the taped core end tightly into the end of the fid. With the pusher, push the fid and core through the cover tunnel, past X and through the cover at Z. When pushing the fid past X to Z, make sure the fid does not catch any internal core strands. note: Depending on the eye size, a fid may not be long enough to reach from T to Z in one pass. If not, bring the fid out through the cover, pull the core through and reinsert the fid into exactly the same hole it came out of. Do this as many times as needed to reach Z. Cover Core CoreMark 1 Mark 2 Cover tail Mark 3X1/3 fid length Z Fid and end of core comes out at Z. Insert core into cover at point T. R T eye splice double braid Class I 8 step Alternately pull on the core tail at Z, then pull on the tapered cover at Mark 3. The crossover should be tightened until it is approximately equal to the diameter of the rope.Smooth out the cover of the eye completely, from crossover T toward X to get all the slack out of the eye area. Mark the core tail through the cover at Point X. Pull the core tail out until the mark just made on the core is exposed at Z. Reduce the core volume at this point by cutting and removing one strand at each group, progressing around the circumference of the rope. marking reduce volume tail core Pull core tail out until mark of X is exposed Cover Taper R T Mark core tail at X Smooth out and cover taper will disappear Smooth out Crossover Mark 3 Point Z 1/3 fid from Point X 8A Cutting and removing One half the ends from each core strand. Do this at mark made on core (through cover at X). 1/3 Fid 45º angle cut core Measure 1/3 fid from start of reduction cuts (mark) toward end and mark. Cut off remain- ing tail at this point. Make cut on a 45º angle to prevent a blunt end (see insert). With one hand, hold crossover — MARK T. Smooth cover section of eye out firmly and completely from crossover toward X; reduced volumn core tail should disappear into cover at Z. Smooth out core section from crossover towards Mark 3 and cover taper will disappear into core.
  • 4. 2090 Thornton Street Ferndale, WA USA 98248 (T) 360.384.4669 (F) 360.384.0572 www.samsonrope.com © 2007 Samson Rope Technologies, Inc. All rights reserved. Page 4 of 4 eye splice double braid Class I 9 step Hold the rope at the slipknot and with the other hand milk the cover toward the splice, gently at first, them more firmly. The cover will slide over Mark 3, Mark 2 and crossover T up to R (it may be necessary to occasionally smooth out eye during milking to prevent reduced volume tail catching in the throat of the splice). If bunching occurs at the crossover preventing full burying, smooth cover from T to X. Grasp crossover at T with one hand and then firmly smooth cover slack (female side of eye) with the other hand toward the throat (X). Repeat as necessary until bunching disappears. Continue milking until all cover slack between the knot and the throat of the eye has been removed. burying the exposed core Beginining at slipknot "milk" cover by sliding hand toward loop. Bury to Mark R Mark 2 R T Cross–over A. Anchor the loop of the slipknot by tying it to a stationary object before starting to bury. You can then use both hands and the weight of your body to more easily bury the cover over the core and crossover (see Figure 1 and Figure 2). B. Holding the crossover tightly, milk all the excess cover from R to X. Flex and loosen the rope at the crossover point during the final burying process. Hammering the cover at X will help loosen the strands. With larger ropes it is helpful to securely anchor the slipknot, attach a small line to the braided core at the crossover and mechanically apply tension with either a block and tackle, capstan, come-a-long, or power winch. Tension will reduce the diameter of the core and crossover for easier burying (see Figure 2). In order to prevent no-load opening of your eye splice, Samson recommends lock-stitching the eye. Please download lock stitch instructions to complete this splice. TIP: BEFORE burying the core Figure 1 Figure 2 cross-over core pull firmly secured cross-over core pull small line 10 step mechanical tension