SlideShare a Scribd company logo
15’ x 15’ Frame Tent Directions

          Corner
          F01COR
                                                                       Frame Tent Poles
                                                     Description          Size              Color         Qty.
                                                     Spreader             14’4”              Red           4
                                                     Hip Rafter           10’6”             Green          4
                                                     Legs               6’8”(7’8”)       Brown (Black)     4


      Spreader
                                 4 Way Crown
                                   F064WC
                                                            Frame Fittings
                                                     Description                  Qty.
                                                     Corner                        4
                                                     4 Way Crown                   1
                   Hip Rafters
                                                     Base Plates                   4
                                                     R Pin (Pin & Bail)           28


1. The layout begins with the frame parts being laid out on the ground in the approximate location that they will be when
the frame is assembled. The perimeter parts are laid out to form the perimeter, and the roof support parts are placed in the
interior in their general locations. Laying out the parts in this way facilitates the assembly. (See Diagram)

2. Begin with the 4 way crown. Attach the hip rafters (10’6’’ green) to the 4 way crown by sliding the pole over the fit-
ting and lining up the holes in the pole with those in the fitting. Place a pin in the first hole to secure the 	pole in place.
	
3. Attach the corner fitting to the hip rafters by sliding the pole over the fitting. Line up the hole of the pole with those
of the fitting and place a pin.

4. Now, the perimeter is ready for assembly. Connect the corners to the corners using the spreaders (14’4” red). Slide
the poles over the fittings, line up the holes, and pin the pole and fitting together. When all of the spreaders have
been secured in place, the frame will be complete.

5. Place the tent top over the frame, by spreading the tent out on one end and “flapping” the tent top while pulling it over
the top.

6. Secure the tent top to the frame by fastening the straps on the inside of the tent at each corner location.

7. Attach all of the base plates to the legs by sliding the leg (6’8” brown / 7’8” black) over the base plate and securing it
with a pin. Now the tent is ready to be raised.

8. Start at one corner and manually lift the frame so that the leg (6’8” brown / 7’8” black) can slide over the corner fitting.
Pin the leg to the fitting.

9. Proceed to work your way around the tent putting one leg in at a time until all legs are standing and pinned.

10. Now that the frame tent is standing, fasten the tent top completely to the frame, using the straps on the inside of the
tent. Make sure that all of the straps are tight and that the tent top is sitting evenly over the frame.

11. Fasten either a ratchet strap or rope to the fitting at each leg location. Drive a stake approximately four feet out from
each leg.

                                            www.GetTent.com/instructions.htm                                     Page 1 of 2
15’ x 15’ Frame Tent Directions

12. Attach the anchoring device (ratchets or ropes) to the stakes at each leg location.

- Ratchets- turn the 6” loop at the end of the ratchet inside out and pull the strap through the loop to create a noose
and pull tight over the stake. Take the strap from the tent and pull it through the reel bars slot of the ratchet (ratchet
buckle needs to have handle facing upward at all time) and pull the strap back towards the tent approximately 1 ½ feet.
Hold the strap at this point with one hand and begin to crank the ratchet handle back and forth with the other hand until
the reel bars have turned at least 2 times, this eliminates the chance of slippage. Repeat at all leg locations.

- Ropes- use a Double Loop Clove Hitch Knot - grip the rope in your left hand approximately 8’ down from the grommet,
at this point, take your right hand and create a loop (approximately 6”) with the excess rope and place it in your left hand.
Repeat and create another loop and place on the right side of the previous loop (should have 2 and half loops in your left
hand). Take the right loop and pull it up and over so it is now on the left side. Now place both loops over the stake and
pull tight with the excess rope. Repeat at all leg locations.

13. The tent top should now be complete! If sidewalls are desired, unroll the sidewalls between the stakes and the side
poles around the perimeter of the tent. Starting at a side pole, clip the sidewall snap hooks to the rope line that is attached
to the tent top.


                                  Why two sets of holes in frame fittings?
Two holes are located in each protrusion of almost every frame tent fitting. The first hole (furthest from the center of the
fitting) is for the pin that holds the pole in place. The second pin (located closest to the center of the fitting) is an alignment
hole. When a pin is placed in this alignment hole, it prevents the frame pole from moving to far.

1.	     Insert the pin in the hole closest to the center of the fitting (alignment hole).
2.	     Slide the pole on the protrusion until it meets the pin.
3.	     Rotate the pole until the holes on the pole and fitting is aligned properly.
4.	     Insert the pin through the pole and fitting.
5.	     Remove the first pin (the alignment pin).


  If you have any questions, please contact Celina Tents support department at:
                                              support@celinatent.com
                                          1-866-GET-TENT /419-586-3610
                                                 www.GetTent.com                                                 Page 2 of 2

More Related Content

Viewers also liked

Tupperware june 2014
Tupperware june 2014Tupperware june 2014
Tupperware june 2014
Akmal Ishak
 
자료구조1보고서
자료구조1보고서자료구조1보고서
자료구조1보고서KimChangHoen
 
Social mediatoolbelt msr
Social mediatoolbelt msrSocial mediatoolbelt msr
Social mediatoolbelt msredSocialMedia
 
About Marwan Wahbi
About Marwan WahbiAbout Marwan Wahbi
About Marwan Wahbi
Marwan Wahbi
 
Proposal For Action Research - D Leadership
Proposal For Action Research - D LeadershipProposal For Action Research - D Leadership
Proposal For Action Research - D Leadershipgstreet
 
33. vocabulary quiz, newspaper, 5 b
33. vocabulary quiz, newspaper, 5 b33. vocabulary quiz, newspaper, 5 b
33. vocabulary quiz, newspaper, 5 bIECP
 
Food
FoodFood
World Bank Water project for Andhra Pradesh
World Bank Water project for Andhra PradeshWorld Bank Water project for Andhra Pradesh
World Bank Water project for Andhra Pradesh
guest0bc3481b
 
2011 09 19 Radiss Tech Services
2011 09 19 Radiss Tech Services2011 09 19 Radiss Tech Services
2011 09 19 Radiss Tech Servicesssphelps
 
Master mibe social media lesson abstract
Master mibe social media lesson abstractMaster mibe social media lesson abstract
Master mibe social media lesson abstract
Elena Giannopolo
 
Let traffic lights dance
Let traffic lights danceLet traffic lights dance
Let traffic lights dance晗 鲁
 
Webinar: Comprehensive ESRD Care Initiative - How to Apply
Webinar: Comprehensive ESRD Care Initiative - How to ApplyWebinar: Comprehensive ESRD Care Initiative - How to Apply
Webinar: Comprehensive ESRD Care Initiative - How to Apply
Centers for Medicare & Medicaid Services (CMS)
 
The power of one benefits and drawbacks of centralised share plan data slide...
The power of one benefits and drawbacks of centralised share plan data  slide...The power of one benefits and drawbacks of centralised share plan data  slide...
The power of one benefits and drawbacks of centralised share plan data slide...
Andrea Huck-Esposito
 
~Networking Events in Chicago by Yamuna~ September 2015 -- updated 09.08.15
~Networking Events in Chicago by Yamuna~  September 2015 -- updated 09.08.15~Networking Events in Chicago by Yamuna~  September 2015 -- updated 09.08.15
~Networking Events in Chicago by Yamuna~ September 2015 -- updated 09.08.15Yamuna Reddi
 
Blockbuster movie
Blockbuster movieBlockbuster movie
Blockbuster movieJack Dixon
 
Don't let your business become digital road kill - 250614
Don't let your business become digital road kill - 250614Don't let your business become digital road kill - 250614
Don't let your business become digital road kill - 250614
Vanguard Visions
 
Xmas.2014.blog
Xmas.2014.blogXmas.2014.blog
Xmas.2014.blog
John Wible
 

Viewers also liked (20)

Tupperware june 2014
Tupperware june 2014Tupperware june 2014
Tupperware june 2014
 
자료구조1보고서
자료구조1보고서자료구조1보고서
자료구조1보고서
 
Social mediatoolbelt msr
Social mediatoolbelt msrSocial mediatoolbelt msr
Social mediatoolbelt msr
 
About Marwan Wahbi
About Marwan WahbiAbout Marwan Wahbi
About Marwan Wahbi
 
Proposal For Action Research - D Leadership
Proposal For Action Research - D LeadershipProposal For Action Research - D Leadership
Proposal For Action Research - D Leadership
 
33. vocabulary quiz, newspaper, 5 b
33. vocabulary quiz, newspaper, 5 b33. vocabulary quiz, newspaper, 5 b
33. vocabulary quiz, newspaper, 5 b
 
Food
FoodFood
Food
 
Hsp bm sk_y1a
Hsp bm sk_y1aHsp bm sk_y1a
Hsp bm sk_y1a
 
World Bank Water project for Andhra Pradesh
World Bank Water project for Andhra PradeshWorld Bank Water project for Andhra Pradesh
World Bank Water project for Andhra Pradesh
 
2011 09 19 Radiss Tech Services
2011 09 19 Radiss Tech Services2011 09 19 Radiss Tech Services
2011 09 19 Radiss Tech Services
 
Master mibe social media lesson abstract
Master mibe social media lesson abstractMaster mibe social media lesson abstract
Master mibe social media lesson abstract
 
Let traffic lights dance
Let traffic lights danceLet traffic lights dance
Let traffic lights dance
 
Webinar: Comprehensive ESRD Care Initiative - How to Apply
Webinar: Comprehensive ESRD Care Initiative - How to ApplyWebinar: Comprehensive ESRD Care Initiative - How to Apply
Webinar: Comprehensive ESRD Care Initiative - How to Apply
 
The power of one benefits and drawbacks of centralised share plan data slide...
The power of one benefits and drawbacks of centralised share plan data  slide...The power of one benefits and drawbacks of centralised share plan data  slide...
The power of one benefits and drawbacks of centralised share plan data slide...
 
~Networking Events in Chicago by Yamuna~ September 2015 -- updated 09.08.15
~Networking Events in Chicago by Yamuna~  September 2015 -- updated 09.08.15~Networking Events in Chicago by Yamuna~  September 2015 -- updated 09.08.15
~Networking Events in Chicago by Yamuna~ September 2015 -- updated 09.08.15
 
Blockbuster movie
Blockbuster movieBlockbuster movie
Blockbuster movie
 
LDR 310 Week one
LDR 310 Week oneLDR 310 Week one
LDR 310 Week one
 
Don't let your business become digital road kill - 250614
Don't let your business become digital road kill - 250614Don't let your business become digital road kill - 250614
Don't let your business become digital road kill - 250614
 
Xmas.2014.blog
Xmas.2014.blogXmas.2014.blog
Xmas.2014.blog
 
My yfu org
My yfu orgMy yfu org
My yfu org
 

Similar to 15 x 15 Frame Tent Installation Instructions

8 x 10 Frame Tent Installation Instructions
8 x 10 Frame Tent Installation Instructions8 x 10 Frame Tent Installation Instructions
8 x 10 Frame Tent Installation Instructions
celinatent
 
12 x 20 Frame Tent Installation Instructions
12 x 20 Frame Tent Installation Instructions12 x 20 Frame Tent Installation Instructions
12 x 20 Frame Tent Installation Instructions
celinatent
 
8 x 12 Frame Tent Installation Instructions
8 x 12 Frame Tent Installation Instructions8 x 12 Frame Tent Installation Instructions
8 x 12 Frame Tent Installation Instructions
celinatent
 
Solar cooker installation
Solar cooker installationSolar cooker installation
Solar cooker installationPrabhat Kumar
 
Victory rig
Victory rigVictory rig
Victory rigJLRev
 
F-F-Fiddle Assembly Instructions
F-F-Fiddle Assembly InstructionsF-F-Fiddle Assembly Instructions
F-F-Fiddle Assembly Instructions
dsp39
 
Build-It: Bicycle Hacksaw
Build-It: Bicycle HacksawBuild-It: Bicycle Hacksaw
4. How to build shed roof rafters
4. How to build shed roof rafters4. How to build shed roof rafters
4. How to build shed roof rafters
icreatablesseo
 
Build instructions Homeslice Tower ver 070514
Build instructions   Homeslice Tower ver 070514Build instructions   Homeslice Tower ver 070514
Build instructions Homeslice Tower ver 070514
Jeff Vetterick
 
Construção de Violões
Construção de ViolõesConstrução de Violões
Construção de Violões
Gabriel Vandresen
 
F-F-Fiddle Assembly Instructions
F-F-Fiddle Assembly InstructionsF-F-Fiddle Assembly Instructions
F-F-Fiddle Assembly Instructions
dsp39
 
Mitra Stats Project Final
Mitra Stats Project FinalMitra Stats Project Final
Mitra Stats Project Finalshonabunch1
 
How to Make and Wire a Lamp
How to Make and Wire a LampHow to Make and Wire a Lamp
How to Make and Wire a Lamp
medo41
 

Similar to 15 x 15 Frame Tent Installation Instructions (13)

8 x 10 Frame Tent Installation Instructions
8 x 10 Frame Tent Installation Instructions8 x 10 Frame Tent Installation Instructions
8 x 10 Frame Tent Installation Instructions
 
12 x 20 Frame Tent Installation Instructions
12 x 20 Frame Tent Installation Instructions12 x 20 Frame Tent Installation Instructions
12 x 20 Frame Tent Installation Instructions
 
8 x 12 Frame Tent Installation Instructions
8 x 12 Frame Tent Installation Instructions8 x 12 Frame Tent Installation Instructions
8 x 12 Frame Tent Installation Instructions
 
Solar cooker installation
Solar cooker installationSolar cooker installation
Solar cooker installation
 
Victory rig
Victory rigVictory rig
Victory rig
 
F-F-Fiddle Assembly Instructions
F-F-Fiddle Assembly InstructionsF-F-Fiddle Assembly Instructions
F-F-Fiddle Assembly Instructions
 
Build-It: Bicycle Hacksaw
Build-It: Bicycle HacksawBuild-It: Bicycle Hacksaw
Build-It: Bicycle Hacksaw
 
4. How to build shed roof rafters
4. How to build shed roof rafters4. How to build shed roof rafters
4. How to build shed roof rafters
 
Build instructions Homeslice Tower ver 070514
Build instructions   Homeslice Tower ver 070514Build instructions   Homeslice Tower ver 070514
Build instructions Homeslice Tower ver 070514
 
Construção de Violões
Construção de ViolõesConstrução de Violões
Construção de Violões
 
F-F-Fiddle Assembly Instructions
F-F-Fiddle Assembly InstructionsF-F-Fiddle Assembly Instructions
F-F-Fiddle Assembly Instructions
 
Mitra Stats Project Final
Mitra Stats Project FinalMitra Stats Project Final
Mitra Stats Project Final
 
How to Make and Wire a Lamp
How to Make and Wire a LampHow to Make and Wire a Lamp
How to Make and Wire a Lamp
 

More from celinatent

40 x 300 Pole Tent Installation Instructions
40 x 300 Pole Tent Installation Instructions40 x 300 Pole Tent Installation Instructions
40 x 300 Pole Tent Installation Instructions
celinatent
 
40 x 280 Pole Tent Installation Instructions
40 x 280 Pole Tent Installation Instructions40 x 280 Pole Tent Installation Instructions
40 x 280 Pole Tent Installation Instructions
celinatent
 
40 x 260 Pole Tent Installation Instructions
40 x 260 Pole Tent Installation Instructions40 x 260 Pole Tent Installation Instructions
40 x 260 Pole Tent Installation Instructions
celinatent
 
40 x 240 Pole Tent Installation Instructions
40 x 240 Pole Tent Installation Instructions40 x 240 Pole Tent Installation Instructions
40 x 240 Pole Tent Installation Instructions
celinatent
 
40 x 220 Pole Tent Installation Instructions
40 x 220 Pole Tent Installation Instructions40 x 220 Pole Tent Installation Instructions
40 x 220 Pole Tent Installation Instructions
celinatent
 
40 x 200 Pole Tent Installation Instructions
40 x 200 Pole Tent Installation Instructions40 x 200 Pole Tent Installation Instructions
40 x 200 Pole Tent Installation Instructions
celinatent
 
40 x 180 Pole Tent Installation Instructions
40 x 180 Pole Tent Installation Instructions40 x 180 Pole Tent Installation Instructions
40 x 180 Pole Tent Installation Instructions
celinatent
 
40 x 160 Pole Tent Installation Instructions
40 x 160 Pole Tent Installation Instructions40 x 160 Pole Tent Installation Instructions
40 x 160 Pole Tent Installation Instructions
celinatent
 
40 x 140 Pole Tent Installation Instructions
40 x 140 Pole Tent Installation Instructions40 x 140 Pole Tent Installation Instructions
40 x 140 Pole Tent Installation Instructions
celinatent
 
40 x 120 Pole Tent Installation Instructions
40 x 120 Pole Tent Installation Instructions40 x 120 Pole Tent Installation Instructions
40 x 120 Pole Tent Installation Instructions
celinatent
 
40 x 100 Pole Tent Installation Instructions
40 x 100 Pole Tent Installation Instructions40 x 100 Pole Tent Installation Instructions
40 x 100 Pole Tent Installation Instructions
celinatent
 
40 x 80 Pole Tent Installation Instructions
40 x 80 Pole Tent Installation Instructions40 x 80 Pole Tent Installation Instructions
40 x 80 Pole Tent Installation Instructions
celinatent
 
40 x 60 Pole Tent Installation Instructions
40 x 60 Pole Tent Installation Instructions40 x 60 Pole Tent Installation Instructions
40 x 60 Pole Tent Installation Instructions
celinatent
 
40 x 40 Pole Tent Installation Instructions
40 x 40 Pole Tent Installation Instructions40 x 40 Pole Tent Installation Instructions
40 x 40 Pole Tent Installation Instructions
celinatent
 
30 x 255 Pole Tent Installation Instructions
30 x 255 Pole Tent Installation Instructions30 x 255 Pole Tent Installation Instructions
30 x 255 Pole Tent Installation Instructions
celinatent
 
30 x 210 Pole Tent Installation Instructions
30 x 210 Pole Tent Installation Instructions30 x 210 Pole Tent Installation Instructions
30 x 210 Pole Tent Installation Instructions
celinatent
 
30 x 195 Pole Tent Installation Instructions
30 x 195 Pole Tent Installation Instructions30 x 195 Pole Tent Installation Instructions
30 x 195 Pole Tent Installation Instructions
celinatent
 
30 x 180 Pole Tent Installation Instructions
30 x 180 Pole Tent Installation Instructions30 x 180 Pole Tent Installation Instructions
30 x 180 Pole Tent Installation Instructions
celinatent
 
30 x 165 Pole Tent Installation Instructions
30 x 165 Pole Tent Installation Instructions30 x 165 Pole Tent Installation Instructions
30 x 165 Pole Tent Installation Instructions
celinatent
 
30 x 150 Pole Tent Installation Instructions
30 x 150 Pole Tent Installation Instructions30 x 150 Pole Tent Installation Instructions
30 x 150 Pole Tent Installation Instructions
celinatent
 

More from celinatent (20)

40 x 300 Pole Tent Installation Instructions
40 x 300 Pole Tent Installation Instructions40 x 300 Pole Tent Installation Instructions
40 x 300 Pole Tent Installation Instructions
 
40 x 280 Pole Tent Installation Instructions
40 x 280 Pole Tent Installation Instructions40 x 280 Pole Tent Installation Instructions
40 x 280 Pole Tent Installation Instructions
 
40 x 260 Pole Tent Installation Instructions
40 x 260 Pole Tent Installation Instructions40 x 260 Pole Tent Installation Instructions
40 x 260 Pole Tent Installation Instructions
 
40 x 240 Pole Tent Installation Instructions
40 x 240 Pole Tent Installation Instructions40 x 240 Pole Tent Installation Instructions
40 x 240 Pole Tent Installation Instructions
 
40 x 220 Pole Tent Installation Instructions
40 x 220 Pole Tent Installation Instructions40 x 220 Pole Tent Installation Instructions
40 x 220 Pole Tent Installation Instructions
 
40 x 200 Pole Tent Installation Instructions
40 x 200 Pole Tent Installation Instructions40 x 200 Pole Tent Installation Instructions
40 x 200 Pole Tent Installation Instructions
 
40 x 180 Pole Tent Installation Instructions
40 x 180 Pole Tent Installation Instructions40 x 180 Pole Tent Installation Instructions
40 x 180 Pole Tent Installation Instructions
 
40 x 160 Pole Tent Installation Instructions
40 x 160 Pole Tent Installation Instructions40 x 160 Pole Tent Installation Instructions
40 x 160 Pole Tent Installation Instructions
 
40 x 140 Pole Tent Installation Instructions
40 x 140 Pole Tent Installation Instructions40 x 140 Pole Tent Installation Instructions
40 x 140 Pole Tent Installation Instructions
 
40 x 120 Pole Tent Installation Instructions
40 x 120 Pole Tent Installation Instructions40 x 120 Pole Tent Installation Instructions
40 x 120 Pole Tent Installation Instructions
 
40 x 100 Pole Tent Installation Instructions
40 x 100 Pole Tent Installation Instructions40 x 100 Pole Tent Installation Instructions
40 x 100 Pole Tent Installation Instructions
 
40 x 80 Pole Tent Installation Instructions
40 x 80 Pole Tent Installation Instructions40 x 80 Pole Tent Installation Instructions
40 x 80 Pole Tent Installation Instructions
 
40 x 60 Pole Tent Installation Instructions
40 x 60 Pole Tent Installation Instructions40 x 60 Pole Tent Installation Instructions
40 x 60 Pole Tent Installation Instructions
 
40 x 40 Pole Tent Installation Instructions
40 x 40 Pole Tent Installation Instructions40 x 40 Pole Tent Installation Instructions
40 x 40 Pole Tent Installation Instructions
 
30 x 255 Pole Tent Installation Instructions
30 x 255 Pole Tent Installation Instructions30 x 255 Pole Tent Installation Instructions
30 x 255 Pole Tent Installation Instructions
 
30 x 210 Pole Tent Installation Instructions
30 x 210 Pole Tent Installation Instructions30 x 210 Pole Tent Installation Instructions
30 x 210 Pole Tent Installation Instructions
 
30 x 195 Pole Tent Installation Instructions
30 x 195 Pole Tent Installation Instructions30 x 195 Pole Tent Installation Instructions
30 x 195 Pole Tent Installation Instructions
 
30 x 180 Pole Tent Installation Instructions
30 x 180 Pole Tent Installation Instructions30 x 180 Pole Tent Installation Instructions
30 x 180 Pole Tent Installation Instructions
 
30 x 165 Pole Tent Installation Instructions
30 x 165 Pole Tent Installation Instructions30 x 165 Pole Tent Installation Instructions
30 x 165 Pole Tent Installation Instructions
 
30 x 150 Pole Tent Installation Instructions
30 x 150 Pole Tent Installation Instructions30 x 150 Pole Tent Installation Instructions
30 x 150 Pole Tent Installation Instructions
 

Recently uploaded

UNIVERSAL HUMAN VALUES- Harmony in the Nature
UNIVERSAL HUMAN VALUES- Harmony in the NatureUNIVERSAL HUMAN VALUES- Harmony in the Nature
UNIVERSAL HUMAN VALUES- Harmony in the Nature
Chandrakant Divate
 
Ethical_dilemmas_MDI_Gurgaon-Business Ethics Case 1.pptx
Ethical_dilemmas_MDI_Gurgaon-Business Ethics Case 1.pptxEthical_dilemmas_MDI_Gurgaon-Business Ethics Case 1.pptx
Ethical_dilemmas_MDI_Gurgaon-Business Ethics Case 1.pptx
TANMAYJAIN511570
 
CHUYÊN ĐỀ READING ÔN THI HSG THPT HAY.docx
CHUYÊN ĐỀ READING ÔN THI HSG THPT HAY.docxCHUYÊN ĐỀ READING ÔN THI HSG THPT HAY.docx
CHUYÊN ĐỀ READING ÔN THI HSG THPT HAY.docx
ngochaavk33a
 
SOCIOLOGY PPT. SOCIAL SECURITY POWER POINT
SOCIOLOGY PPT. SOCIAL SECURITY POWER POINTSOCIOLOGY PPT. SOCIAL SECURITY POWER POINT
SOCIOLOGY PPT. SOCIAL SECURITY POWER POINT
ssuser8d5e2d1
 
Program Your Destiny eBook - Destiny University.pdf
Program Your Destiny eBook - Destiny University.pdfProgram Your Destiny eBook - Destiny University.pdf
Program Your Destiny eBook - Destiny University.pdf
Michael Herlache, MBA
 
Collocation thường gặp trong đề thi THPT Quốc gia.pdf
Collocation thường gặp trong đề thi THPT Quốc gia.pdfCollocation thường gặp trong đề thi THPT Quốc gia.pdf
Collocation thường gặp trong đề thi THPT Quốc gia.pdf
ngochaavk33a
 
ÔN TẬP CỤM THÀNH NGỮ TIẾNG ANH CỰC HAY.docx
ÔN TẬP CỤM THÀNH NGỮ TIẾNG ANH CỰC HAY.docxÔN TẬP CỤM THÀNH NGỮ TIẾNG ANH CỰC HAY.docx
ÔN TẬP CỤM THÀNH NGỮ TIẾNG ANH CỰC HAY.docx
ngochaavk33a
 

Recently uploaded (7)

UNIVERSAL HUMAN VALUES- Harmony in the Nature
UNIVERSAL HUMAN VALUES- Harmony in the NatureUNIVERSAL HUMAN VALUES- Harmony in the Nature
UNIVERSAL HUMAN VALUES- Harmony in the Nature
 
Ethical_dilemmas_MDI_Gurgaon-Business Ethics Case 1.pptx
Ethical_dilemmas_MDI_Gurgaon-Business Ethics Case 1.pptxEthical_dilemmas_MDI_Gurgaon-Business Ethics Case 1.pptx
Ethical_dilemmas_MDI_Gurgaon-Business Ethics Case 1.pptx
 
CHUYÊN ĐỀ READING ÔN THI HSG THPT HAY.docx
CHUYÊN ĐỀ READING ÔN THI HSG THPT HAY.docxCHUYÊN ĐỀ READING ÔN THI HSG THPT HAY.docx
CHUYÊN ĐỀ READING ÔN THI HSG THPT HAY.docx
 
SOCIOLOGY PPT. SOCIAL SECURITY POWER POINT
SOCIOLOGY PPT. SOCIAL SECURITY POWER POINTSOCIOLOGY PPT. SOCIAL SECURITY POWER POINT
SOCIOLOGY PPT. SOCIAL SECURITY POWER POINT
 
Program Your Destiny eBook - Destiny University.pdf
Program Your Destiny eBook - Destiny University.pdfProgram Your Destiny eBook - Destiny University.pdf
Program Your Destiny eBook - Destiny University.pdf
 
Collocation thường gặp trong đề thi THPT Quốc gia.pdf
Collocation thường gặp trong đề thi THPT Quốc gia.pdfCollocation thường gặp trong đề thi THPT Quốc gia.pdf
Collocation thường gặp trong đề thi THPT Quốc gia.pdf
 
ÔN TẬP CỤM THÀNH NGỮ TIẾNG ANH CỰC HAY.docx
ÔN TẬP CỤM THÀNH NGỮ TIẾNG ANH CỰC HAY.docxÔN TẬP CỤM THÀNH NGỮ TIẾNG ANH CỰC HAY.docx
ÔN TẬP CỤM THÀNH NGỮ TIẾNG ANH CỰC HAY.docx
 

15 x 15 Frame Tent Installation Instructions

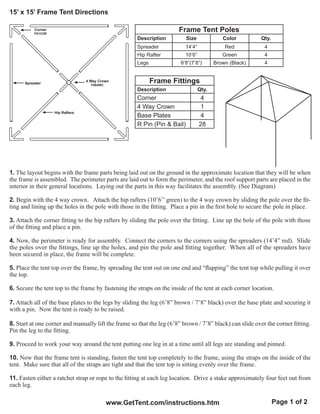
  • 1. 15’ x 15’ Frame Tent Directions Corner F01COR Frame Tent Poles Description Size Color Qty. Spreader 14’4” Red 4 Hip Rafter 10’6” Green 4 Legs 6’8”(7’8”) Brown (Black) 4 Spreader 4 Way Crown F064WC Frame Fittings Description Qty. Corner 4 4 Way Crown 1 Hip Rafters Base Plates 4 R Pin (Pin & Bail) 28 1. The layout begins with the frame parts being laid out on the ground in the approximate location that they will be when the frame is assembled. The perimeter parts are laid out to form the perimeter, and the roof support parts are placed in the interior in their general locations. Laying out the parts in this way facilitates the assembly. (See Diagram) 2. Begin with the 4 way crown. Attach the hip rafters (10’6’’ green) to the 4 way crown by sliding the pole over the fit- ting and lining up the holes in the pole with those in the fitting. Place a pin in the first hole to secure the pole in place. 3. Attach the corner fitting to the hip rafters by sliding the pole over the fitting. Line up the hole of the pole with those of the fitting and place a pin. 4. Now, the perimeter is ready for assembly. Connect the corners to the corners using the spreaders (14’4” red). Slide the poles over the fittings, line up the holes, and pin the pole and fitting together. When all of the spreaders have been secured in place, the frame will be complete. 5. Place the tent top over the frame, by spreading the tent out on one end and “flapping” the tent top while pulling it over the top. 6. Secure the tent top to the frame by fastening the straps on the inside of the tent at each corner location. 7. Attach all of the base plates to the legs by sliding the leg (6’8” brown / 7’8” black) over the base plate and securing it with a pin. Now the tent is ready to be raised. 8. Start at one corner and manually lift the frame so that the leg (6’8” brown / 7’8” black) can slide over the corner fitting. Pin the leg to the fitting. 9. Proceed to work your way around the tent putting one leg in at a time until all legs are standing and pinned. 10. Now that the frame tent is standing, fasten the tent top completely to the frame, using the straps on the inside of the tent. Make sure that all of the straps are tight and that the tent top is sitting evenly over the frame. 11. Fasten either a ratchet strap or rope to the fitting at each leg location. Drive a stake approximately four feet out from each leg. www.GetTent.com/instructions.htm Page 1 of 2
  • 2. 15’ x 15’ Frame Tent Directions 12. Attach the anchoring device (ratchets or ropes) to the stakes at each leg location. - Ratchets- turn the 6” loop at the end of the ratchet inside out and pull the strap through the loop to create a noose and pull tight over the stake. Take the strap from the tent and pull it through the reel bars slot of the ratchet (ratchet buckle needs to have handle facing upward at all time) and pull the strap back towards the tent approximately 1 ½ feet. Hold the strap at this point with one hand and begin to crank the ratchet handle back and forth with the other hand until the reel bars have turned at least 2 times, this eliminates the chance of slippage. Repeat at all leg locations. - Ropes- use a Double Loop Clove Hitch Knot - grip the rope in your left hand approximately 8’ down from the grommet, at this point, take your right hand and create a loop (approximately 6”) with the excess rope and place it in your left hand. Repeat and create another loop and place on the right side of the previous loop (should have 2 and half loops in your left hand). Take the right loop and pull it up and over so it is now on the left side. Now place both loops over the stake and pull tight with the excess rope. Repeat at all leg locations. 13. The tent top should now be complete! If sidewalls are desired, unroll the sidewalls between the stakes and the side poles around the perimeter of the tent. Starting at a side pole, clip the sidewall snap hooks to the rope line that is attached to the tent top. Why two sets of holes in frame fittings? Two holes are located in each protrusion of almost every frame tent fitting. The first hole (furthest from the center of the fitting) is for the pin that holds the pole in place. The second pin (located closest to the center of the fitting) is an alignment hole. When a pin is placed in this alignment hole, it prevents the frame pole from moving to far. 1. Insert the pin in the hole closest to the center of the fitting (alignment hole). 2. Slide the pole on the protrusion until it meets the pin. 3. Rotate the pole until the holes on the pole and fitting is aligned properly. 4. Insert the pin through the pole and fitting. 5. Remove the first pin (the alignment pin). If you have any questions, please contact Celina Tents support department at: support@celinatent.com 1-866-GET-TENT /419-586-3610 www.GetTent.com Page 2 of 2