SlideShare a Scribd company logo
1 of 2
Download to read offline
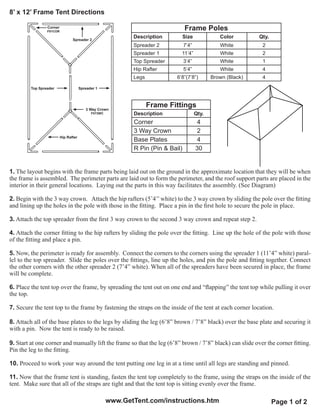
8’ x 12’ Frame Tent Directions

                 Corner
                 F01COR
                                                                                   Frame Poles
                                 Spreader 2
                                                             Description           Size             Color        Qty.
                                                             Spreader 2            7’4”             White         2
                                                             Spreader 1         11’4”               White         2
                                                             Top Spreader          3’4”             White         1
                                                             Hip Rafter            5’4”             White         4
                                                             Legs             6’8”(7’8”)         Brown (Black)    4

         Top Spreader                  Spreader 1


                                          3 Way Crown
                                                                    Frame Fittings
                                             F073WC           Description                 Qty.
                                                              Corner                       4
                                                              3 Way Crown                  2
                          Hip Rafter
                                                              Base Plates                  4
                                                              R Pin (Pin & Bail)          30


1. The layout begins with the frame parts being laid out on the ground in the approximate location that they will be when
the frame is assembled. The perimeter parts are laid out to form the perimeter, and the roof support parts are placed in the
interior in their general locations. Laying out the parts in this way facilitates the assembly. (See Diagram)

2. Begin with the 3 way crown. Attach the hip rafters (5’4’’ white) to the 3 way crown by sliding the pole over the fitting
and lining up the holes in the pole with those in the fitting. Place a pin in the first hole to secure the pole in place.

3. Attach the top spreader from the first 3 way crown to the second 3 way crown and repeat step 2.

4. Attach the corner fitting to the hip rafters by sliding the pole over the fitting. Line up the hole of the pole with those
of the fitting and place a pin.

5. Now, the perimeter is ready for assembly. Connect the corners to the corners using the spreader 1 (11’4” white) paral-
lel to the top spreader. Slide the poles over the fittings, line up the holes, and pin the pole and fitting together. Connect
the other corners with the other spreader 2 (7’4” white). When all of the spreaders have been secured in place, the frame
will be complete.

6. Place the tent top over the frame, by spreading the tent out on one end and “flapping” the tent top while pulling it over
the top.

7. Secure the tent top to the frame by fastening the straps on the inside of the tent at each corner location.

8. Attach all of the base plates to the legs by sliding the leg (6’8” brown / 7’8” black) over the base plate and securing it
with a pin. Now the tent is ready to be raised.

9. Start at one corner and manually lift the frame so that the leg (6’8” brown / 7’8” black) can slide over the corner fitting.
Pin the leg to the fitting.

10. Proceed to work your way around the tent putting one leg in at a time until all legs are standing and pinned.

11. Now that the frame tent is standing, fasten the tent top completely to the frame, using the straps on the inside of the
tent. Make sure that all of the straps are tight and that the tent top is sitting evenly over the frame.

                                                      www.GetTent.com/instructions.htm                                  Page 1 of 2
8 x 12’ Frame Tent Directions

12. Fasten either a ratchet strap or rope to the fitting at each leg location. Drive a stake approximately four feet out from
each leg.

13. Attach the anchoring device (ratchets or ropes) to the stakes at each leg location.

- Ratchets- turn the 6” loop at the end of the ratchet inside out and pull the strap through the loop to create a noose and
pull tight over the stake. Take the strap from the tent and pull it through the reel bars slot of the ratchet (ratchet buckle
needs to have handle facing upward at all time) and pull the strap back towards the tent approximately 1 ½ feet. Hold
the strap at this point with one hand and begin to crank the ratchet handle back and forth with the other hand until the
reel bars have turned at least 2 times, this eliminates the chance of slippage. Repeat at all leg locations.

- Ropes- use a Double Loop Clove Hitch Knot - grip the rope in your left hand approximately 8’ down from the grom-
met, at this point, take your right hand and create a loop (approximately 6”) with the excess rope and place it in your
left hand. Repeat and create another loop and place on the right side of the previous loop (should have 2 and half loops
in your left hand). Take the right loop and pull it up and over so it is now on the left side. Now place both loops over
the stake and pull tight with the excess rope. Repeat at all leg locations.

14. The tent top should now be complete! If sidewalls are desired, unroll the sidewalls between the stakes and the side
poles around the perimeter of the tent. Starting at a side pole, clip the sidewall snap hooks to the rope line that is attached
to the tent top.


                                  Why two sets of holes in frame fittings?
Two holes are located in each protrusion of almost every frame tent fitting. The first hole (furthest from the center of the
fitting) is for the pin that holds the pole in place. The second pin (located closest to the center of the fitting) is an alignment
hole. When a pin is placed in this alignment hole, it prevents the frame pole from moving to far.

1.	     Insert the pin in the hole closest to the center of the fitting (alignment hole).
2.	     Slide the pole on the protrusion until it meets the pin.
3.	     Rotate the pole until the holes on the pole and fitting is aligned properly.
4.	     Insert the pin through the pole and fitting.
5.	     Remove the first pin (the alignment pin).


  If you have any questions, please contact Celina Tents support department at:
                                              support@celinatent.com
                                          1-866-GET-TENT /419-586-3610
                                                 www.GetTent.com                                                 Page 2 of 2

More Related Content

What's hot

8 x 8 Frame Tent Setup Directions
8 x 8 Frame Tent Setup Directions8 x 8 Frame Tent Setup Directions
8 x 8 Frame Tent Setup Directionscelinatent
 
15 x 15 Frame Tent Installation Instructions
15 x 15 Frame Tent Installation Instructions15 x 15 Frame Tent Installation Instructions
15 x 15 Frame Tent Installation Instructionscelinatent
 
10 x 10 Frame Tent Installation Instructions
10 x 10 Frame Tent Installation Instructions10 x 10 Frame Tent Installation Instructions
10 x 10 Frame Tent Installation Instructionscelinatent
 
Basic ShoreMaster Kit Dock Instruction
Basic ShoreMaster Kit Dock InstructionBasic ShoreMaster Kit Dock Instruction
Basic ShoreMaster Kit Dock InstructionKurt Welch
 
Omega Denali Adjustable-Height Desk Manual
Omega Denali Adjustable-Height Desk ManualOmega Denali Adjustable-Height Desk Manual
Omega Denali Adjustable-Height Desk ManualiMovR
 
F-F-Fiddle Assembly Instructions
F-F-Fiddle Assembly InstructionsF-F-Fiddle Assembly Instructions
F-F-Fiddle Assembly Instructionsdsp39
 
F-F-Fiddle Assembly Instructions
F-F-Fiddle Assembly InstructionsF-F-Fiddle Assembly Instructions
F-F-Fiddle Assembly Instructionsdsp39
 
Vignola Gazebo Assembly Manual
Vignola Gazebo Assembly ManualVignola Gazebo Assembly Manual
Vignola Gazebo Assembly ManualGiller Doit
 
Chess Lesson
Chess LessonChess Lesson
Chess Lessonsinaptiq
 
Saunders Residence Landscape Plan
Saunders Residence Landscape PlanSaunders Residence Landscape Plan
Saunders Residence Landscape PlanMark Saunders
 

What's hot (11)

8 x 8 Frame Tent Setup Directions
8 x 8 Frame Tent Setup Directions8 x 8 Frame Tent Setup Directions
8 x 8 Frame Tent Setup Directions
 
15 x 15 Frame Tent Installation Instructions
15 x 15 Frame Tent Installation Instructions15 x 15 Frame Tent Installation Instructions
15 x 15 Frame Tent Installation Instructions
 
10 x 10 Frame Tent Installation Instructions
10 x 10 Frame Tent Installation Instructions10 x 10 Frame Tent Installation Instructions
10 x 10 Frame Tent Installation Instructions
 
Basic ShoreMaster Kit Dock Instruction
Basic ShoreMaster Kit Dock InstructionBasic ShoreMaster Kit Dock Instruction
Basic ShoreMaster Kit Dock Instruction
 
Omega Denali Adjustable-Height Desk Manual
Omega Denali Adjustable-Height Desk ManualOmega Denali Adjustable-Height Desk Manual
Omega Denali Adjustable-Height Desk Manual
 
TRU-FIT
TRU-FITTRU-FIT
TRU-FIT
 
F-F-Fiddle Assembly Instructions
F-F-Fiddle Assembly InstructionsF-F-Fiddle Assembly Instructions
F-F-Fiddle Assembly Instructions
 
F-F-Fiddle Assembly Instructions
F-F-Fiddle Assembly InstructionsF-F-Fiddle Assembly Instructions
F-F-Fiddle Assembly Instructions
 
Vignola Gazebo Assembly Manual
Vignola Gazebo Assembly ManualVignola Gazebo Assembly Manual
Vignola Gazebo Assembly Manual
 
Chess Lesson
Chess LessonChess Lesson
Chess Lesson
 
Saunders Residence Landscape Plan
Saunders Residence Landscape PlanSaunders Residence Landscape Plan
Saunders Residence Landscape Plan
 

Viewers also liked

8 шагов
8 шагов8 шагов
8 шаговmalfermu
 
Ektron CMS400 8.02
Ektron CMS400 8.02Ektron CMS400 8.02
Ektron CMS400 8.02Alpesh Patel
 
Pipe line Component & Valves
Pipe line Component & ValvesPipe line Component & Valves
Pipe line Component & ValvesGoel Scientific
 
80ο δημοτικο σχολειο θες
80ο δημοτικο σχολειο θες80ο δημοτικο σχολειο θες
80ο δημοτικο σχολειο θεςpagouri
 
8000x FttH aansluiting Meppel
8000x FttH aansluiting Meppel8000x FttH aansluiting Meppel
8000x FttH aansluiting MeppelRickSpijkerboer
 
802.15.4+system+design+proposa
802.15.4+system+design+proposa802.15.4+system+design+proposa
802.15.4+system+design+proposaLuis Orozco
 
800 música fauna y consejos
800 música  fauna y consejos800 música  fauna y consejos
800 música fauna y consejosBRIAN MOORE
 
8 марта экспетро
8 марта экспетро8 марта экспетро
8 марта экспетроEXPETRO!
 
80w led retrofit kit - www.ngtlight.com
80w led retrofit kit - www.ngtlight.com80w led retrofit kit - www.ngtlight.com
80w led retrofit kit - www.ngtlight.comngt led
 
제3회 이그나이트 광주 1-8 김진영
제3회 이그나이트 광주 1-8 김진영제3회 이그나이트 광주 1-8 김진영
제3회 이그나이트 광주 1-8 김진영daesung choi
 
80’s
80’s80’s
80’smaiduo
 

Viewers also liked (16)

806 6
806   6806   6
806 6
 
8 шагов
8 шагов8 шагов
8 шагов
 
Богатырева Анна, 5В
Богатырева Анна, 5ВБогатырева Анна, 5В
Богатырева Анна, 5В
 
Ektron CMS400 8.02
Ektron CMS400 8.02Ektron CMS400 8.02
Ektron CMS400 8.02
 
Pipe line Component & Valves
Pipe line Component & ValvesPipe line Component & Valves
Pipe line Component & Valves
 
80ο δημοτικο σχολειο θες
80ο δημοτικο σχολειο θες80ο δημοτικο σχολειο θες
80ο δημοτικο σχολειο θες
 
8000x FttH aansluiting Meppel
8000x FttH aansluiting Meppel8000x FttH aansluiting Meppel
8000x FttH aansluiting Meppel
 
802.15.4+system+design+proposa
802.15.4+system+design+proposa802.15.4+system+design+proposa
802.15.4+system+design+proposa
 
800 música fauna y consejos
800 música  fauna y consejos800 música  fauna y consejos
800 música fauna y consejos
 
8 марта экспетро
8 марта экспетро8 марта экспетро
8 марта экспетро
 
80w led retrofit kit - www.ngtlight.com
80w led retrofit kit - www.ngtlight.com80w led retrofit kit - www.ngtlight.com
80w led retrofit kit - www.ngtlight.com
 
제3회 이그나이트 광주 1-8 김진영
제3회 이그나이트 광주 1-8 김진영제3회 이그나이트 광주 1-8 김진영
제3회 이그나이트 광주 1-8 김진영
 
802.16.Traffic Model
802.16.Traffic Model802.16.Traffic Model
802.16.Traffic Model
 
80’s
80’s80’s
80’s
 
8086 20217-1-pb (1)
8086 20217-1-pb (1)8086 20217-1-pb (1)
8086 20217-1-pb (1)
 
807 4
807   4807   4
807 4
 

Similar to 8 x 12 Frame Tent Installation Instructions

Similar to 8 x 12 Frame Tent Installation Instructions (20)

Solar cooker installation
Solar cooker installationSolar cooker installation
Solar cooker installation
 
Victory rig
Victory rigVictory rig
Victory rig
 
4. How to build shed roof rafters
4. How to build shed roof rafters4. How to build shed roof rafters
4. How to build shed roof rafters
 
How to Make and Wire a Lamp
How to Make and Wire a LampHow to Make and Wire a Lamp
How to Make and Wire a Lamp
 
Construção de Violões
Construção de ViolõesConstrução de Violões
Construção de Violões
 
소형베틀도면
소형베틀도면소형베틀도면
소형베틀도면
 
Mitra Stats Project Final
Mitra Stats Project FinalMitra Stats Project Final
Mitra Stats Project Final
 
Installing deck joists
Installing deck joistsInstalling deck joists
Installing deck joists
 
apeluri ieftine internationale
apeluri ieftine internationaleapeluri ieftine internationale
apeluri ieftine internationale
 
Cadeira de jardin
Cadeira de jardinCadeira de jardin
Cadeira de jardin
 
Build-It: Bicycle Hacksaw
Build-It: Bicycle HacksawBuild-It: Bicycle Hacksaw
Build-It: Bicycle Hacksaw
 
Break down bow
Break down bowBreak down bow
Break down bow
 
Build instructions Homeslice Tower ver 070514
Build instructions   Homeslice Tower ver 070514Build instructions   Homeslice Tower ver 070514
Build instructions Homeslice Tower ver 070514
 
3. How to install floor sheeting
3. How to install floor sheeting3. How to install floor sheeting
3. How to install floor sheeting
 
Measuring device
Measuring deviceMeasuring device
Measuring device
 
Epee buildingandreferencemanual
Epee buildingandreferencemanualEpee buildingandreferencemanual
Epee buildingandreferencemanual
 
접이식 자가제작 베틀제작 도면
접이식 자가제작 베틀제작 도면접이식 자가제작 베틀제작 도면
접이식 자가제작 베틀제작 도면
 
Hope Wire Woven Necklace Tutorial
Hope  Wire Woven Necklace Tutorial Hope  Wire Woven Necklace Tutorial
Hope Wire Woven Necklace Tutorial
 
Mobile Wire Shelving Installation Instructions
Mobile Wire Shelving Installation InstructionsMobile Wire Shelving Installation Instructions
Mobile Wire Shelving Installation Instructions
 
Bbpdf0404106
Bbpdf0404106Bbpdf0404106
Bbpdf0404106
 

More from celinatent

40 x 300 Pole Tent Installation Instructions
40 x 300 Pole Tent Installation Instructions40 x 300 Pole Tent Installation Instructions
40 x 300 Pole Tent Installation Instructionscelinatent
 
40 x 280 Pole Tent Installation Instructions
40 x 280 Pole Tent Installation Instructions40 x 280 Pole Tent Installation Instructions
40 x 280 Pole Tent Installation Instructionscelinatent
 
40 x 260 Pole Tent Installation Instructions
40 x 260 Pole Tent Installation Instructions40 x 260 Pole Tent Installation Instructions
40 x 260 Pole Tent Installation Instructionscelinatent
 
40 x 240 Pole Tent Installation Instructions
40 x 240 Pole Tent Installation Instructions40 x 240 Pole Tent Installation Instructions
40 x 240 Pole Tent Installation Instructionscelinatent
 
40 x 220 Pole Tent Installation Instructions
40 x 220 Pole Tent Installation Instructions40 x 220 Pole Tent Installation Instructions
40 x 220 Pole Tent Installation Instructionscelinatent
 
40 x 200 Pole Tent Installation Instructions
40 x 200 Pole Tent Installation Instructions40 x 200 Pole Tent Installation Instructions
40 x 200 Pole Tent Installation Instructionscelinatent
 
40 x 180 Pole Tent Installation Instructions
40 x 180 Pole Tent Installation Instructions40 x 180 Pole Tent Installation Instructions
40 x 180 Pole Tent Installation Instructionscelinatent
 
40 x 160 Pole Tent Installation Instructions
40 x 160 Pole Tent Installation Instructions40 x 160 Pole Tent Installation Instructions
40 x 160 Pole Tent Installation Instructionscelinatent
 
40 x 140 Pole Tent Installation Instructions
40 x 140 Pole Tent Installation Instructions40 x 140 Pole Tent Installation Instructions
40 x 140 Pole Tent Installation Instructionscelinatent
 
40 x 120 Pole Tent Installation Instructions
40 x 120 Pole Tent Installation Instructions40 x 120 Pole Tent Installation Instructions
40 x 120 Pole Tent Installation Instructionscelinatent
 
40 x 100 Pole Tent Installation Instructions
40 x 100 Pole Tent Installation Instructions40 x 100 Pole Tent Installation Instructions
40 x 100 Pole Tent Installation Instructionscelinatent
 
40 x 80 Pole Tent Installation Instructions
40 x 80 Pole Tent Installation Instructions40 x 80 Pole Tent Installation Instructions
40 x 80 Pole Tent Installation Instructionscelinatent
 
40 x 60 Pole Tent Installation Instructions
40 x 60 Pole Tent Installation Instructions40 x 60 Pole Tent Installation Instructions
40 x 60 Pole Tent Installation Instructionscelinatent
 
40 x 40 Pole Tent Installation Instructions
40 x 40 Pole Tent Installation Instructions40 x 40 Pole Tent Installation Instructions
40 x 40 Pole Tent Installation Instructionscelinatent
 
30 x 255 Pole Tent Installation Instructions
30 x 255 Pole Tent Installation Instructions30 x 255 Pole Tent Installation Instructions
30 x 255 Pole Tent Installation Instructionscelinatent
 
30 x 210 Pole Tent Installation Instructions
30 x 210 Pole Tent Installation Instructions30 x 210 Pole Tent Installation Instructions
30 x 210 Pole Tent Installation Instructionscelinatent
 
30 x 195 Pole Tent Installation Instructions
30 x 195 Pole Tent Installation Instructions30 x 195 Pole Tent Installation Instructions
30 x 195 Pole Tent Installation Instructionscelinatent
 
30 x 180 Pole Tent Installation Instructions
30 x 180 Pole Tent Installation Instructions30 x 180 Pole Tent Installation Instructions
30 x 180 Pole Tent Installation Instructionscelinatent
 
30 x 165 Pole Tent Installation Instructions
30 x 165 Pole Tent Installation Instructions30 x 165 Pole Tent Installation Instructions
30 x 165 Pole Tent Installation Instructionscelinatent
 
30 x 150 Pole Tent Installation Instructions
30 x 150 Pole Tent Installation Instructions30 x 150 Pole Tent Installation Instructions
30 x 150 Pole Tent Installation Instructionscelinatent
 

More from celinatent (20)

40 x 300 Pole Tent Installation Instructions
40 x 300 Pole Tent Installation Instructions40 x 300 Pole Tent Installation Instructions
40 x 300 Pole Tent Installation Instructions
 
40 x 280 Pole Tent Installation Instructions
40 x 280 Pole Tent Installation Instructions40 x 280 Pole Tent Installation Instructions
40 x 280 Pole Tent Installation Instructions
 
40 x 260 Pole Tent Installation Instructions
40 x 260 Pole Tent Installation Instructions40 x 260 Pole Tent Installation Instructions
40 x 260 Pole Tent Installation Instructions
 
40 x 240 Pole Tent Installation Instructions
40 x 240 Pole Tent Installation Instructions40 x 240 Pole Tent Installation Instructions
40 x 240 Pole Tent Installation Instructions
 
40 x 220 Pole Tent Installation Instructions
40 x 220 Pole Tent Installation Instructions40 x 220 Pole Tent Installation Instructions
40 x 220 Pole Tent Installation Instructions
 
40 x 200 Pole Tent Installation Instructions
40 x 200 Pole Tent Installation Instructions40 x 200 Pole Tent Installation Instructions
40 x 200 Pole Tent Installation Instructions
 
40 x 180 Pole Tent Installation Instructions
40 x 180 Pole Tent Installation Instructions40 x 180 Pole Tent Installation Instructions
40 x 180 Pole Tent Installation Instructions
 
40 x 160 Pole Tent Installation Instructions
40 x 160 Pole Tent Installation Instructions40 x 160 Pole Tent Installation Instructions
40 x 160 Pole Tent Installation Instructions
 
40 x 140 Pole Tent Installation Instructions
40 x 140 Pole Tent Installation Instructions40 x 140 Pole Tent Installation Instructions
40 x 140 Pole Tent Installation Instructions
 
40 x 120 Pole Tent Installation Instructions
40 x 120 Pole Tent Installation Instructions40 x 120 Pole Tent Installation Instructions
40 x 120 Pole Tent Installation Instructions
 
40 x 100 Pole Tent Installation Instructions
40 x 100 Pole Tent Installation Instructions40 x 100 Pole Tent Installation Instructions
40 x 100 Pole Tent Installation Instructions
 
40 x 80 Pole Tent Installation Instructions
40 x 80 Pole Tent Installation Instructions40 x 80 Pole Tent Installation Instructions
40 x 80 Pole Tent Installation Instructions
 
40 x 60 Pole Tent Installation Instructions
40 x 60 Pole Tent Installation Instructions40 x 60 Pole Tent Installation Instructions
40 x 60 Pole Tent Installation Instructions
 
40 x 40 Pole Tent Installation Instructions
40 x 40 Pole Tent Installation Instructions40 x 40 Pole Tent Installation Instructions
40 x 40 Pole Tent Installation Instructions
 
30 x 255 Pole Tent Installation Instructions
30 x 255 Pole Tent Installation Instructions30 x 255 Pole Tent Installation Instructions
30 x 255 Pole Tent Installation Instructions
 
30 x 210 Pole Tent Installation Instructions
30 x 210 Pole Tent Installation Instructions30 x 210 Pole Tent Installation Instructions
30 x 210 Pole Tent Installation Instructions
 
30 x 195 Pole Tent Installation Instructions
30 x 195 Pole Tent Installation Instructions30 x 195 Pole Tent Installation Instructions
30 x 195 Pole Tent Installation Instructions
 
30 x 180 Pole Tent Installation Instructions
30 x 180 Pole Tent Installation Instructions30 x 180 Pole Tent Installation Instructions
30 x 180 Pole Tent Installation Instructions
 
30 x 165 Pole Tent Installation Instructions
30 x 165 Pole Tent Installation Instructions30 x 165 Pole Tent Installation Instructions
30 x 165 Pole Tent Installation Instructions
 
30 x 150 Pole Tent Installation Instructions
30 x 150 Pole Tent Installation Instructions30 x 150 Pole Tent Installation Instructions
30 x 150 Pole Tent Installation Instructions
 

Recently uploaded

Authentic No 1 Amil Baba In Pakistan Amil Baba In Faisalabad Amil Baba In Kar...
Authentic No 1 Amil Baba In Pakistan Amil Baba In Faisalabad Amil Baba In Kar...Authentic No 1 Amil Baba In Pakistan Amil Baba In Faisalabad Amil Baba In Kar...
Authentic No 1 Amil Baba In Pakistan Amil Baba In Faisalabad Amil Baba In Kar...Authentic No 1 Amil Baba In Pakistan
 
Ahmedabad Escorts Girl Services For Male Tourists 9537192988
Ahmedabad Escorts Girl Services For Male Tourists 9537192988Ahmedabad Escorts Girl Services For Male Tourists 9537192988
Ahmedabad Escorts Girl Services For Male Tourists 9537192988oolala9823
 
西伦敦大学毕业证学位证成绩单-怎么样做
西伦敦大学毕业证学位证成绩单-怎么样做西伦敦大学毕业证学位证成绩单-怎么样做
西伦敦大学毕业证学位证成绩单-怎么样做j5bzwet6
 
Breath, Brain & Beyond_A Holistic Approach to Peak Performance.pdf
Breath, Brain & Beyond_A Holistic Approach to Peak Performance.pdfBreath, Brain & Beyond_A Holistic Approach to Peak Performance.pdf
Breath, Brain & Beyond_A Holistic Approach to Peak Performance.pdfJess Walker
 
Call Girls in Govindpuri Delhi 💯Call Us 🔝8264348440🔝
Call Girls in Govindpuri Delhi 💯Call Us 🔝8264348440🔝Call Girls in Govindpuri Delhi 💯Call Us 🔝8264348440🔝
Call Girls in Govindpuri Delhi 💯Call Us 🔝8264348440🔝soniya singh
 
南新罕布什尔大学毕业证学位证成绩单-学历认证
南新罕布什尔大学毕业证学位证成绩单-学历认证南新罕布什尔大学毕业证学位证成绩单-学历认证
南新罕布什尔大学毕业证学位证成绩单-学历认证kbdhl05e
 
Dhule Call Girls #9907093804 Contact Number Escorts Service Dhule
Dhule Call Girls #9907093804 Contact Number Escorts Service DhuleDhule Call Girls #9907093804 Contact Number Escorts Service Dhule
Dhule Call Girls #9907093804 Contact Number Escorts Service Dhulesrsj9000
 
Powerpoint on Writing a Newspaper Report.pptx
Powerpoint on Writing a Newspaper Report.pptxPowerpoint on Writing a Newspaper Report.pptx
Powerpoint on Writing a Newspaper Report.pptxNeelamMulchandani1
 
Postal Ballot procedure for employees to utilise
Postal Ballot procedure for employees to utilisePostal Ballot procedure for employees to utilise
Postal Ballot procedure for employees to utiliseccsubcollector
 
办理西悉尼大学毕业证成绩单、制作假文凭
办理西悉尼大学毕业证成绩单、制作假文凭办理西悉尼大学毕业证成绩单、制作假文凭
办理西悉尼大学毕业证成绩单、制作假文凭o8wvnojp
 
E J Waggoner against Kellogg's Pantheism 8.pptx
E J Waggoner against Kellogg's Pantheism 8.pptxE J Waggoner against Kellogg's Pantheism 8.pptx
E J Waggoner against Kellogg's Pantheism 8.pptxJackieSparrow3
 
REFLECTIONS Newsletter Jan-Jul 2024.pdf.pdf
REFLECTIONS Newsletter Jan-Jul 2024.pdf.pdfREFLECTIONS Newsletter Jan-Jul 2024.pdf.pdf
REFLECTIONS Newsletter Jan-Jul 2024.pdf.pdfssusere8ea60
 
Call Girls In Karkardooma 83770 87607 Just-Dial Escorts Service 24X7 Avilable
Call Girls In Karkardooma 83770 87607 Just-Dial Escorts Service 24X7 AvilableCall Girls In Karkardooma 83770 87607 Just-Dial Escorts Service 24X7 Avilable
Call Girls In Karkardooma 83770 87607 Just-Dial Escorts Service 24X7 Avilabledollysharma2066
 
《塔夫斯大学毕业证成绩单购买》做Tufts文凭毕业证成绩单/伪造美国假文凭假毕业证书图片Q微信741003700《塔夫斯大学毕业证购买》《Tufts毕业文...
《塔夫斯大学毕业证成绩单购买》做Tufts文凭毕业证成绩单/伪造美国假文凭假毕业证书图片Q微信741003700《塔夫斯大学毕业证购买》《Tufts毕业文...《塔夫斯大学毕业证成绩单购买》做Tufts文凭毕业证成绩单/伪造美国假文凭假毕业证书图片Q微信741003700《塔夫斯大学毕业证购买》《Tufts毕业文...
《塔夫斯大学毕业证成绩单购买》做Tufts文凭毕业证成绩单/伪造美国假文凭假毕业证书图片Q微信741003700《塔夫斯大学毕业证购买》《Tufts毕业文...ur8mqw8e
 
(No.1)↠Young Call Girls in Sikanderpur (Gurgaon) ꧁❤ 9711911712 ❤꧂ Escorts
(No.1)↠Young Call Girls in Sikanderpur (Gurgaon) ꧁❤ 9711911712 ❤꧂ Escorts(No.1)↠Young Call Girls in Sikanderpur (Gurgaon) ꧁❤ 9711911712 ❤꧂ Escorts
(No.1)↠Young Call Girls in Sikanderpur (Gurgaon) ꧁❤ 9711911712 ❤꧂ EscortsDelhi Escorts Service
 

Recently uploaded (20)

Authentic No 1 Amil Baba In Pakistan Amil Baba In Faisalabad Amil Baba In Kar...
Authentic No 1 Amil Baba In Pakistan Amil Baba In Faisalabad Amil Baba In Kar...Authentic No 1 Amil Baba In Pakistan Amil Baba In Faisalabad Amil Baba In Kar...
Authentic No 1 Amil Baba In Pakistan Amil Baba In Faisalabad Amil Baba In Kar...
 
escort service sasti (*~Call Girls in Paschim Vihar Metro❤️9953056974
escort service  sasti (*~Call Girls in Paschim Vihar Metro❤️9953056974escort service  sasti (*~Call Girls in Paschim Vihar Metro❤️9953056974
escort service sasti (*~Call Girls in Paschim Vihar Metro❤️9953056974
 
Cheap Rate ➥8448380779 ▻Call Girls In Mg Road Gurgaon
Cheap Rate ➥8448380779 ▻Call Girls In Mg Road GurgaonCheap Rate ➥8448380779 ▻Call Girls In Mg Road Gurgaon
Cheap Rate ➥8448380779 ▻Call Girls In Mg Road Gurgaon
 
Ahmedabad Escorts Girl Services For Male Tourists 9537192988
Ahmedabad Escorts Girl Services For Male Tourists 9537192988Ahmedabad Escorts Girl Services For Male Tourists 9537192988
Ahmedabad Escorts Girl Services For Male Tourists 9537192988
 
西伦敦大学毕业证学位证成绩单-怎么样做
西伦敦大学毕业证学位证成绩单-怎么样做西伦敦大学毕业证学位证成绩单-怎么样做
西伦敦大学毕业证学位证成绩单-怎么样做
 
Breath, Brain & Beyond_A Holistic Approach to Peak Performance.pdf
Breath, Brain & Beyond_A Holistic Approach to Peak Performance.pdfBreath, Brain & Beyond_A Holistic Approach to Peak Performance.pdf
Breath, Brain & Beyond_A Holistic Approach to Peak Performance.pdf
 
Call Girls in Govindpuri Delhi 💯Call Us 🔝8264348440🔝
Call Girls in Govindpuri Delhi 💯Call Us 🔝8264348440🔝Call Girls in Govindpuri Delhi 💯Call Us 🔝8264348440🔝
Call Girls in Govindpuri Delhi 💯Call Us 🔝8264348440🔝
 
南新罕布什尔大学毕业证学位证成绩单-学历认证
南新罕布什尔大学毕业证学位证成绩单-学历认证南新罕布什尔大学毕业证学位证成绩单-学历认证
南新罕布什尔大学毕业证学位证成绩单-学历认证
 
Dhule Call Girls #9907093804 Contact Number Escorts Service Dhule
Dhule Call Girls #9907093804 Contact Number Escorts Service DhuleDhule Call Girls #9907093804 Contact Number Escorts Service Dhule
Dhule Call Girls #9907093804 Contact Number Escorts Service Dhule
 
Powerpoint on Writing a Newspaper Report.pptx
Powerpoint on Writing a Newspaper Report.pptxPowerpoint on Writing a Newspaper Report.pptx
Powerpoint on Writing a Newspaper Report.pptx
 
Postal Ballot procedure for employees to utilise
Postal Ballot procedure for employees to utilisePostal Ballot procedure for employees to utilise
Postal Ballot procedure for employees to utilise
 
办理西悉尼大学毕业证成绩单、制作假文凭
办理西悉尼大学毕业证成绩单、制作假文凭办理西悉尼大学毕业证成绩单、制作假文凭
办理西悉尼大学毕业证成绩单、制作假文凭
 
E J Waggoner against Kellogg's Pantheism 8.pptx
E J Waggoner against Kellogg's Pantheism 8.pptxE J Waggoner against Kellogg's Pantheism 8.pptx
E J Waggoner against Kellogg's Pantheism 8.pptx
 
Model Call Girl in Lado Sarai Delhi reach out to us at 🔝9953056974🔝
Model Call Girl in Lado Sarai Delhi reach out to us at 🔝9953056974🔝Model Call Girl in Lado Sarai Delhi reach out to us at 🔝9953056974🔝
Model Call Girl in Lado Sarai Delhi reach out to us at 🔝9953056974🔝
 
young Call girls in Neb Sarai 🔝 9953056974 🔝 Delhi escort Service
young Call girls in Neb Sarai 🔝 9953056974 🔝 Delhi escort Serviceyoung Call girls in Neb Sarai 🔝 9953056974 🔝 Delhi escort Service
young Call girls in Neb Sarai 🔝 9953056974 🔝 Delhi escort Service
 
🔝9953056974🔝!!-YOUNG BOOK model Call Girls In Aerocity Delhi Escort service
🔝9953056974🔝!!-YOUNG BOOK model Call Girls In Aerocity Delhi Escort service🔝9953056974🔝!!-YOUNG BOOK model Call Girls In Aerocity Delhi Escort service
🔝9953056974🔝!!-YOUNG BOOK model Call Girls In Aerocity Delhi Escort service
 
REFLECTIONS Newsletter Jan-Jul 2024.pdf.pdf
REFLECTIONS Newsletter Jan-Jul 2024.pdf.pdfREFLECTIONS Newsletter Jan-Jul 2024.pdf.pdf
REFLECTIONS Newsletter Jan-Jul 2024.pdf.pdf
 
Call Girls In Karkardooma 83770 87607 Just-Dial Escorts Service 24X7 Avilable
Call Girls In Karkardooma 83770 87607 Just-Dial Escorts Service 24X7 AvilableCall Girls In Karkardooma 83770 87607 Just-Dial Escorts Service 24X7 Avilable
Call Girls In Karkardooma 83770 87607 Just-Dial Escorts Service 24X7 Avilable
 
《塔夫斯大学毕业证成绩单购买》做Tufts文凭毕业证成绩单/伪造美国假文凭假毕业证书图片Q微信741003700《塔夫斯大学毕业证购买》《Tufts毕业文...
《塔夫斯大学毕业证成绩单购买》做Tufts文凭毕业证成绩单/伪造美国假文凭假毕业证书图片Q微信741003700《塔夫斯大学毕业证购买》《Tufts毕业文...《塔夫斯大学毕业证成绩单购买》做Tufts文凭毕业证成绩单/伪造美国假文凭假毕业证书图片Q微信741003700《塔夫斯大学毕业证购买》《Tufts毕业文...
《塔夫斯大学毕业证成绩单购买》做Tufts文凭毕业证成绩单/伪造美国假文凭假毕业证书图片Q微信741003700《塔夫斯大学毕业证购买》《Tufts毕业文...
 
(No.1)↠Young Call Girls in Sikanderpur (Gurgaon) ꧁❤ 9711911712 ❤꧂ Escorts
(No.1)↠Young Call Girls in Sikanderpur (Gurgaon) ꧁❤ 9711911712 ❤꧂ Escorts(No.1)↠Young Call Girls in Sikanderpur (Gurgaon) ꧁❤ 9711911712 ❤꧂ Escorts
(No.1)↠Young Call Girls in Sikanderpur (Gurgaon) ꧁❤ 9711911712 ❤꧂ Escorts
 

8 x 12 Frame Tent Installation Instructions

  • 1. 8’ x 12’ Frame Tent Directions Corner F01COR Frame Poles Spreader 2 Description Size Color Qty. Spreader 2 7’4” White 2 Spreader 1 11’4” White 2 Top Spreader 3’4” White 1 Hip Rafter 5’4” White 4 Legs 6’8”(7’8”) Brown (Black) 4 Top Spreader Spreader 1 3 Way Crown Frame Fittings F073WC Description Qty. Corner 4 3 Way Crown 2 Hip Rafter Base Plates 4 R Pin (Pin & Bail) 30 1. The layout begins with the frame parts being laid out on the ground in the approximate location that they will be when the frame is assembled. The perimeter parts are laid out to form the perimeter, and the roof support parts are placed in the interior in their general locations. Laying out the parts in this way facilitates the assembly. (See Diagram) 2. Begin with the 3 way crown. Attach the hip rafters (5’4’’ white) to the 3 way crown by sliding the pole over the fitting and lining up the holes in the pole with those in the fitting. Place a pin in the first hole to secure the pole in place. 3. Attach the top spreader from the first 3 way crown to the second 3 way crown and repeat step 2. 4. Attach the corner fitting to the hip rafters by sliding the pole over the fitting. Line up the hole of the pole with those of the fitting and place a pin. 5. Now, the perimeter is ready for assembly. Connect the corners to the corners using the spreader 1 (11’4” white) paral- lel to the top spreader. Slide the poles over the fittings, line up the holes, and pin the pole and fitting together. Connect the other corners with the other spreader 2 (7’4” white). When all of the spreaders have been secured in place, the frame will be complete. 6. Place the tent top over the frame, by spreading the tent out on one end and “flapping” the tent top while pulling it over the top. 7. Secure the tent top to the frame by fastening the straps on the inside of the tent at each corner location. 8. Attach all of the base plates to the legs by sliding the leg (6’8” brown / 7’8” black) over the base plate and securing it with a pin. Now the tent is ready to be raised. 9. Start at one corner and manually lift the frame so that the leg (6’8” brown / 7’8” black) can slide over the corner fitting. Pin the leg to the fitting. 10. Proceed to work your way around the tent putting one leg in at a time until all legs are standing and pinned. 11. Now that the frame tent is standing, fasten the tent top completely to the frame, using the straps on the inside of the tent. Make sure that all of the straps are tight and that the tent top is sitting evenly over the frame. www.GetTent.com/instructions.htm Page 1 of 2
  • 2. 8 x 12’ Frame Tent Directions 12. Fasten either a ratchet strap or rope to the fitting at each leg location. Drive a stake approximately four feet out from each leg. 13. Attach the anchoring device (ratchets or ropes) to the stakes at each leg location. - Ratchets- turn the 6” loop at the end of the ratchet inside out and pull the strap through the loop to create a noose and pull tight over the stake. Take the strap from the tent and pull it through the reel bars slot of the ratchet (ratchet buckle needs to have handle facing upward at all time) and pull the strap back towards the tent approximately 1 ½ feet. Hold the strap at this point with one hand and begin to crank the ratchet handle back and forth with the other hand until the reel bars have turned at least 2 times, this eliminates the chance of slippage. Repeat at all leg locations. - Ropes- use a Double Loop Clove Hitch Knot - grip the rope in your left hand approximately 8’ down from the grom- met, at this point, take your right hand and create a loop (approximately 6”) with the excess rope and place it in your left hand. Repeat and create another loop and place on the right side of the previous loop (should have 2 and half loops in your left hand). Take the right loop and pull it up and over so it is now on the left side. Now place both loops over the stake and pull tight with the excess rope. Repeat at all leg locations. 14. The tent top should now be complete! If sidewalls are desired, unroll the sidewalls between the stakes and the side poles around the perimeter of the tent. Starting at a side pole, clip the sidewall snap hooks to the rope line that is attached to the tent top. Why two sets of holes in frame fittings? Two holes are located in each protrusion of almost every frame tent fitting. The first hole (furthest from the center of the fitting) is for the pin that holds the pole in place. The second pin (located closest to the center of the fitting) is an alignment hole. When a pin is placed in this alignment hole, it prevents the frame pole from moving to far. 1. Insert the pin in the hole closest to the center of the fitting (alignment hole). 2. Slide the pole on the protrusion until it meets the pin. 3. Rotate the pole until the holes on the pole and fitting is aligned properly. 4. Insert the pin through the pole and fitting. 5. Remove the first pin (the alignment pin). If you have any questions, please contact Celina Tents support department at: support@celinatent.com 1-866-GET-TENT /419-586-3610 www.GetTent.com Page 2 of 2