
Recommended
More Related Content
What's hot
What's hot (20)
Similar to F-F-Fiddle Assembly Instructions
Similar to F-F-Fiddle Assembly Instructions (20)
Recently uploaded
Recently uploaded (20)
F-F-Fiddle Assembly Instructions
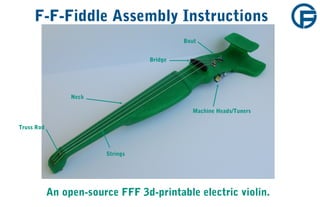
- 1. F-F-Fiddle Assembly Instructions An open-source FFF 3d-printable electric violin. Bout Machine Heads/Tuners Bridge Strings Neck Truss Rod
- 2. 1. Assemble materials PARTS 1. Bout part (Print 3 shells at least 10% infill) 2. Neck part (Print 3 shells at least 10% infill) 3. Bridge part (Print at least 2 shells, 5% infill) 4. 5/16 drill rod cut to 355mm +/- 2mm 5. Gotoh Stealth machine head tuners, 2 left hand, 2 right hand 6. Set of violin strings for full size (4/4) instrument 7. K&K Twin Spot pickup, internal or regular 8. Female mono plug for 1/4” cable 9. 2X SHCS 8-32x1.5” 10. 2X SHCS 8-32x1” 11. 4X 8-32 Nut 1 2 3 4 5 67 8 9,10,1 1
- 3. 1. Assemble materials TOOLS - Needle-nose pliers - Small files (I use a triangular one 90%) - Deburring tool (much easier and safer than a knife for cleaning parts) -Exacto knife -Small philips screwdriver -Small flathead screwdriver (for poking things) -Wire cutter/stripper -General purpose file -Sandpaper (I use 220 and 600 grit) -Soldering station with variety of heat shrink -English allen keys (just need the 9/64) -Safety glasses -Dremel (for cutting drill rod) -Drill with 5/16” bit (for opening up truss rod and tuner holes) -Calipers or a decent ruler -Sharpie
- 4. 2. Prepare Truss Rod If you haven't already, cut down 5/16” drill rod to about 355mm. I use a dremel with a fiber cutoff tool. Be sure you wear safety glasses! WEAR SAFETY GLASSES Clean off rod ends so that they aren't too sharp to the touch. Keep some edge, though, to allow the rod to cut through any excess plastic. Lightly sand any burrs on the rod.
- 5. 3. Check Truss Rod Fit If the truss rod hole on your part is too small or too large, it may mean that you need to print new parts. It's good to check this early in the assembly process. Insert the rod into both parts. You don't need to go all the way, but you'll need to make sure that the rod inserts with some pressure. If the rod is just slightly loose this could result in warp over time. I would recommend moving forward without reprinting. You could try using a bit of epoxy to secure the rod in place. If the rod is too tight (takes a hammer to install), you risk cracking the parts -- I’ve done it! You can drill out the nut area to make sure it won't crack. If you are unable to insert the rod at all, try drilling out the parts. How does this rod sleeve print on your machine? Let me know!
- 6. 4. Clean and Deburr Parts Use a combination of a flat file, deburring tool, and exacto knife to clean off skirt (if used) and all support material. Repeat process on neck. Don't worry about getting the neck totally smooth, we will work on that later. If your printer is dialed, you may not need to do much cleaning. Carefully clean support material out of amp plug area. Remove any drooping strands of plastic. WEAR SAFETY GLASSES
- 7. 5. Flatten Ends These two ends contact, and it's good to make them as flat as possible. While sanding doesn't make things perfectly flat, it works well enough for our purposes. I use 220 grit paper. With darker materials, you can check flatness visually. Don't worry about getting it perfect, just make sure there aren't any noticeable bumps and most of the surface area has been touched with sandpaper. I’ve improved my prints and no longer need this step.
- 8. 6. Install Truss Rod WEAR SAFETY GLASSES You should already know how well the truss rod fits in the parts. Install the rod into the bout of the instrument until it stops. Then, connect the bout and neck parts together with the rod. The rod should extend to the nut. A little long or short will be OK.
- 9. 6. Install Truss Rod WEAR SAFETY GLASSES This is the hardest part of the build!
- 10. 7. Fasten Parts Due mainly to part warp during printing, the neck and bout parts may not meet perfectly. This is OK. Insert four 8-32 nuts into slots as shown. Some may slide down on their own. Poke nuts all the way down with a small screwdriver. This gap is OK.
- 11. 7. Fasten Parts Insert socket head fasteners. The 1.5” screws go in the topside, the 1” screws on the bottom. Insert all fasteners before you tighten any. It may help to hold the parts a bit away from each other to allow some wiggle room as you insert the four screws. Tighten all fasteners until just barely snug. Then, begin to tighten in an X pattern. This helps ensure that the fasteners tighten evenly and securely. Very carefully tighten in this manner until you're as tight as you can comfortably get with the short end of the allen wrench, as shown at top. You should hear the plastic creaking, but not breaking or cracking. Now the two faces should be contacting evenly!
- 12. 8. Install Machine Heads (Tuners) The F-F-Fiddle CAD has been updated to include counterbored areas for the Gotoh Stealth guides. These aren’t functionally necessary, but they add a nice aesthetic and provide some functional value as well. Drill out the counterbore with the 5/16” bit if necessary, but be careful not to go all the way through. The guides should insert with strong finger pressure.
- 13. 8. Install Machine Heads (Tuners) These machine heads come in a pack of six, three designed for mounting on the right side of a guitar and three for the left. They have been designed to fit efficiently and to allow you to tighten all strings with clockwise rotation of the knobs. You will use two of each right and left hand tuners. Go ahead and insert them into the fiddle as shown. Pay attention to the position of the tuning knobs relative to the bodies.
- 14. 8. Install Machine Heads (Tuners) Take them all out, but remember the correct orientation. Now install machine heads one at a time with included screws. The holes should not require any drilling. Get both screws started and screwed in about halfway. Then tighten screws down carefully and evenly until snug. Check to see if there is any play in the tuner. Tighten screws until there is no play between the tuner and the bout. Repeat for each tuner, checking each one for play. Double check the orientation of your tuners against the previous slide once complete.
- 15. 9. Prepare Pickups Whether you have the internal or external K-Spot Twin pickups, you will need to cut off the provided plug. Unthread and remove the plastic casing (for the external) and cut the wires off about half an inch above the solder joint. Set the old plug aside, you may want to refer to it later. Check to see if the pickups lay flat in their homes. Clean up the area with a small file and knife if necessary.
- 16. 10. Prepare Bridge You'll need (OR NOT) to flatten the bridge part much the same way you did the bout and neck parts. Sand down the base of the bridge for flatness. File off print defects and clean up all edges and corners. I’ve improved my prints and no longer need this step. If you find that you need to perform this and the other flattening step on your parts, you may want to try reducing your print speed and playing with your other settings.
- 17. 11. Prepare Bridge Area Clean up the bridge area as shown with a file and exacto knife. The bridge needs to rest only on the piezo pickups. WEAR SAFETY GLASSES
- 18. 12. Install Pickups Install pickups one at a time by threading wires through internal routing channel. Wires will come out by the plug pocket.
- 19. 13. Solder Pickup Wires Cut wires to approximately the length shown, left. Strip the outer sheath of the wires to about the length of an exacto blade. I do this by carefully cutting around the wire—try to avoid cutting any of the grounding (exposed copper) wires. Strip the white sheathed wires about halfway back to the black sheathing.
- 20. 13. Solder Pickup Wires Twist the conductors (white) together, and twist the grounding wires together. Pass everything through a piece of heat shrink. Pass a small diameter piece of heat shrink over the grounding wires—this will act as a sheath to protect them. Pass a larger diameter piece of heat shrink over that—this will cover the tab on the plug. Pass a similar larger piece over the conductive wires (NOT SHOWN).
- 21. 13. Solder Pickup Wires Solder the conductive wires to the tab that is sandwiched between the non-conductive layers. Solder the grounding wire to the other tab. If you're unsure of how to solder the wires, take a look at the plug that you previously cut off. Tuck the plug into the pocket in the bout as shown. Tighten down the hex nut as best you can—it's an awkward combination of rotating the plug and holding the nut with pliers or a small screwdriver...needs improvement!
- 22. 14. Neck Detailing Now is the time to sand down your neck if you'd like to. I've played both sanded and un- sanded necks—sanded is better. For dark parts, clean thoroughly after sanding, and perhaps even use a small amount of vegetable oil to restore the part’s luster. Sand it down (or not) to your preference. File light but definite marks on the nut for your strings. The G and E strings should be 16mm apart, with the A and D strings positioned evenly in- between. I like to mark the positions with a sharpie before I file. File lightly! If you file too far, you may need to add some epoxy and start over in order to build a instrument that feels right. This ridge is the nut.
- 23. Almost Done! These should be your remaining parts—you're almost done! Lay out and identify your strings, from thick to thin they are: G, D, A, E. Violin strings are also color coded: here we have Red for G, Yellow for D, Black for A, and Green for E.
- 24. 15. Install Strings Thread the strings through the neck of the instrument as shown. Take care with the E string, if it sticks, blunt the tip by doubling it over. Pull the strings through, the ball ends should rest against the neck as shown.
- 25. 15. Install Strings Pay close attention to the direction of the wrap of each string—it alternates. This allows a clockwise turn on any tuning peg to tighten its string. I have the hardest time getting this right the first time...so don't worry if it takes a few tries! To install a string: 1. Pass the covered end of the string through the hole in the tuner. Allow enough slack in the string to get 2-3 complete turns around the tuner. 2. Pass the string over the tuner to make the first wrap, send the string under the tag end for the first wrap. 3. You should still have enough slack to pass the string around again. For this second wrap, cross over the first wrap and pass above the tag end. Crossing the string ensures that the string's tension will lock it in place. 4. Now it should be too tight to wrap by hand. Turn the tuning peg (clockwise) to tighten the string. Tighten until lightly snug so the string won't unwrap.
- 26. 16. Install the Bridge Slide the bridge in underneath the strings. Ensure that the bridge rests properly on the two pickups and that the pickups seat properly in their pockets. Lay the strings across the bridge. Space them evenly across a 34mm span. Like you did at the nut, lightly file a groove into the bridge to locate each string.
- 27. 17. Tuning Tune it up! Tighten the strings together, don't tune them one at a time. Increase tension on the strings by turning the pegs slowly. If you tighten too quickly strings may slip or break. As you tune the instrument, you'll notice that the tension on one string significantly influences the tension on the others. Because this instrument flexes more than a wooden violin, this effect is more pronounced. Once the instrument is tuned and everything is looking good, trim off those tag ends, plug it in, and go learn some tunes!