
Recommended
Recommended
More Related Content
What's hot
What's hot (20)
Similar to Kindergarten lesson plan 2
Similar to Kindergarten lesson plan 2 (20)
More from aeccheri
More from aeccheri (20)
Recently uploaded
Recently uploaded (20)
Kindergarten lesson plan 2
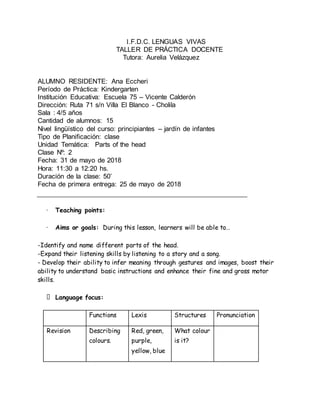
- 1. I.F.D.C. LENGUAS VIVAS TALLER DE PRÁCTICA DOCENTE Tutora: Aurelia Velázquez ALUMNO RESIDENTE: Ana Eccheri Período de Práctica: Kindergarten Institución Educativa: Escuela 75 – Vicente Calderón Dirección: Ruta 71 s/n Villa El Blanco - Cholila Sala : 4/5 años Cantidad de alumnos: 15 Nivel lingüístico del curso: principiantes – jardín de infantes Tipo de Planificación: clase Unidad Temática: Parts of the head Clase Nº: 2 Fecha: 31 de mayo de 2018 Hora: 11:30 a 12:20 hs. Duración de la clase: 50’ Fecha de primera entrega: 25 de mayo de 2018 · Teaching points: · Aims or goals: During this lesson, learners will be able to… -Identify and name different parts of the head. -Expand their listening skills by listening to a story and a song. - Develop their ability to infer meaning through gestures and images, boost their ability to understand basic instructions and enhance their fine and gross motor skills. Language focus: Functions Lexis Structures Pronunciation Revision Describing colours. Red, green, purple, yellow, blue What colour is it?
- 2. New Describing parts of the head. Face, hair, nose, eyes, ears, mouth, teeth she/he has my……. /θ/ sound mouth teeth · Teaching approach: The lesson is based on the Natural Approach. The focus is primarily on listening as a way to provide learners with the opportunity to get familiar and internalize the sound system naturally, without any demand from the teacher to make learners to produce the language orally. The lesson is also arranged following the steps of the PPP approach. · Integration of skills: Students will be integrating listening, visual and gross as well as fine motor skills by watching a video, listening to a story and trying to match sounds with images and parts of their own bodies. · Materials and resources: Flashcards featuring different characters, 2 youtube videos, a poster, bags with six coloured cards each, boxes containing templates of face shapes and assorted head parts, a set of pictures arranged as a storybook, sheets of hard paper featuring a basic face template, play dough. - Pedagogical use of ICT in class or at home: During the lesson, two youtube videos will be used to enhance an contextualize the teaching points. Blending audio and visual resources has the intention of facilitating learner’s language acquisition. · Seating arrangement: Children will sit in a circle on the floor as a means to encourage interaction and facilitate visual contact. At some point, during the lesson students will be required to seat at their tables to work in groups and also to stand up and follow the movements of a song. · Assessment: students` comprehension will be assessed not only by their verbal productions but by any other means of expression like nodding, pointing, miming or following instructions.
- 3. Routine -5’: To start the lesson moving, I will greet the children singing the same hello song I used on the first class as a way not only to create a pattern they can recognize and recycle but also to make each one of them welcomed and to establish a relaxed atmosphere while using the target language as well. “Hello everybody! So nice to see you! “Hello to Nehuen! So nice to see you!” “Hello to Tatiana!” So nice to see you!” ………………….. So nice to see you!” Lead-in or Warm-up 5’ : Purpose: To introduce the topic and the teaching points Now, I will say: ‘‘Everybody has a face”, and touching my nose I will add: “Look, I have a nose”, then opening and closing my eyes I will say: “and I have eyes”, I will continue pointing and saying: ” I also have ears, a mouth, and teeth”. Gesturing and touching my hear, I will finish: “ and also I have hair!” “Now look!”, I’ll show you a video: While the children watch the video I will encourage them to mime and point to their eyes, noses, mouths and ears. eyes, nose, mouth, ears eyes, nose, mouth, ears eyes, nose, mouth, ears ………………………………….
- 4. https://www.youtube.com/watch?v=B2pmcJPQW3Q Trying to assess comprehension, I will ask some questions as: Can you show me your noses, that’s right!” “Nico, show me your eyes? … that’s right!” I will point at my mouth and asks:” What’s this?”.... Quimey?” … “yes, that’s it! my mouth! “Well done kids!” Transition: I’ll ask the children “Do you know what a monster is? “ And creating some curiosity I will take a book from my bag pretending I’ve got scared. “A monster! A green monster! A very scary one!” Presentation - 10’: Purpose: To provide a context and to expand the exposure to the target language by means of an easy to understand the story that can facilitate comprehension by enabling learners to relate the sounds of new words to their matching images while recycling the previous vocabulary. The story I will tell the children is based on the book: Go away, big green monster! By Ed Emberly. While telling the story I will be showing the following images one by one: Big green monster has two big yellow eyes
- 5. And has a greenish blue nose too! Has a big red mouth with white teeth Has pointy purple hair And has a big and scary green face You don’t scare me so…… Go away!: Pointy purple hair
- 6. Two little ears Greenish blue nose Big green face big red mouth and sharp white teeth Two yellow eyes Bye bye, big green monster!
- 7. …..and don’t come back ! Until we say so! After the story is finished, I will spread the following pictures and pointing at selected ones, I will say: “look at this dog’s picture do you remember what it was? No? A nose! What is it? Yes! a blue nose!” “Now, look at this mouse, it has……..orange? “…. “Orange …? Ears! That’s right!” Pointing at the mouth and teeth, I will ask: ‘And this shark?.....”
- 8. I will follow the same strategy and as I go along with the rest of the cards, I will encourage coral repetition to promote oral production in a controlled manner.
- 9. Transition: “Well done kids! Now, look what I have here?” I will take from my bag two boxes with six coloured cards each and give to the pair of kids in front of me as a way to divide the class into two groups. “Ramiro, Olivia, open the bag” ‘What’s inside? More cards!’ This time coloured cards”. “We are going to play a game” I show them the following board and try to elicit some answers by pointing and asking: “What do we have here?” “Eyes? Show me the eyes….” Are those eyes or ears? “Ears, right!” “And this? Is it a nose? Yes or no?”... “Yes! Great!”
- 10. I will tell the children: “Stand up! Let’s go to your tables and sit on your chairs, we are going to play a make a face game”! Make a face
- 11. Development -15’: Purpose: to practise target vocabulary and to recycle previous knowledge in a different setting while playing a game. Activity 1- 5’: I will give each group six boxes containing the templates of each round:
- 12. faces eyes noses mouth and teeth ears hair I will ask a member of each group to shake the bag of cards and in turns to take a card without watching. “Olivia, what colour is it? Purple?” “Well then your group will get the face that is under the purple square ”, I will point and show to the children the shape and I will ask them to find it in their faces’ box. I will go through the same procedure with the second group, prompting them to infer how to play the game. Transition: “Well, now let’s start playing!” Activity 2 – 10’: I will tell the children “We have the face, now we have to stick the eyes (giving them some glue and pointing at the poster) then the nose, then the mouth and teeth…………….”
- 13. The groups will take turns to take their rounds until they have finished completing their face. Once they have finished I will invite both groups to show and share their faces with the rest and then I will ask one group after the other: ” show me the nose……”, “yes! that’s the nose! “show me the mouth and teeth” (emphasizing the target sound /θ/)”………”That’s right, those are the mouth and teeth!”...... Transition: I’ll praise the children for how well they have played and how their faces have come up. Activity 3: 10’: Each student is giving a sheet of hard paper displaying a basic face template and they are asked to make their own face using nontoxic homemade playdough. This is intended to be a free activity, so while they are working, I’ll walk around to monitor and help when it’s required. When the time to do the activity is out, I’ll congratulate them for the hard work: “ Well done!” Your faces are very interesting! ” While praising their work:“I like that mouth! And those teeth!”….. I will be covering each face with plastic wrap to make it easier for the children to take it home and show them to their families. Closure – 5’:
- 14. Purpose: to further practice the target language and to introduce students to some of the vocabulary they will be exposed on the following lesson. I will invite children to stand up and students to stand up and I will tell them: “We will watch another video and we will sing along and mime together, right? Let’s see how much we can say, Let’s start doing it now!” https://www.youtube.com/watch?v=QkHQ0CYwjaI Head, eyes, nose, Mouth, ears, chin, Arms, hands, fingers, Legs, feet toes, This is me! Here we go! My head, my eyes, my nose, This is me1 My mouth, my ears, my chin, This is me! This is me! This is me! This is me! Arms, hands fingers,
- 15. Legs, feet toes, This is me! My arms, my hands, my fingers, Count with me: One, two, three, four, five, six, seven, Eight, nine, ten. My legs, my feet, my toes, Count with me: One, two, three, four, five, six, seven, Eight, nine, ten. This is me! Here we go! This is me! This is me! This is me! This is me! ………………………… This is me! This is me! This is me! This is me! ,,,,,,,,,,,,,,,,,,,,,,,,,,,,,,,,,,,,,,,,,,,,,,,,,,,,,,,,,,,,,,,,,,,,,,,,,,,,,,,,,,,,,,,,,,,,,,,,,,,,,,,,,,,,,,,,,,,,,,,,,,,,,,,,,,,,,, Lesson plan component Excellent 5 Very Good 4 Good 3 Acceptable 2 Below Standard
- 16. 1 Visual organization x Coherence and sequencing x Variety of resources – Learning styles x Stages and activities x Teaching strategies x Language accuracy x 25/30 Great job! I hope you find my comments and suggestions useful. Have a great time!! I