
Recommended
More Related Content
What's hot
What's hot (20)
Similar to Website ancillary editing process
Similar to Website ancillary editing process (20)
Recently uploaded
Recently uploaded (20)
Website ancillary editing process
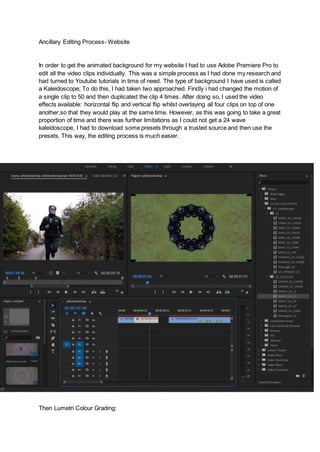
- 1. Ancillary Editing Process- Website In order to get the animated background for my website I had to use Adobe Premiere Pro to edit all the video clips individually. This was a simple process as I had done my research and had turned to Youtube tutorials in time of need. The type of background I have used is called a Kaleidoscope; To do this, I had taken two approached. Firstly i had changed the motion of a single clip to 50 and then duplicated the clip 4 times. After doing so, I used the video effects available: horizontal flip and vertical flip whilst overlaying all four clips on top of one another,so that they would play at the same time. However, as this was going to take a great proportion of time and there was further limitations as I could not get a 24 wave kaleidoscope, I had to download some presets through a trusted source and then use the presets. This way, the editing process is much easier. Then Lumetri Colour Grading:
- 2. I had to create a more in depth, colourful and eye catching approach to attracting my EDM audience and therefore had to colour bgrade all the frames used in the Kaleidescope to ensure they fit into the common codes and conventions of the electronic dance music genre. Furthermore, I also had to carefully choose all the convenient video clips I wanted to add the Kaleidoscope preset to checking each and every scene. I had used features such as: “intensity, sharpen, vibrance and saturation” as well as adding a “shadow tint and highlight tint to those clips which needed it. Website production: Wix
- 3. I had to start the creation from a blank state and add all the features I wanted on my website. At this stage I had not taken the pictures needed for my website so as a placeholder had used free stock images from Wix. The purpose of this part of the production was to ensure that I had the structure and content set for the website leaving me to add the images as soon as I had taken them. The structure of the website had been determined by the target audience feedback which showed me that more simplistic websites with more images gained more attention than complex websites with too much on the page. As you can see here, I had to create my own cart whereby users can place orders for the This is a link to the payment page from the checkout button. The checkout button had to be placed on top of another button due to liking issues from pre built button. merchandise. By creating a button and hyper-linking it to another page where I uses html code to create a form. The shortlisted images:
- 10. After this shoot, I had taken pictures and videos of Alex every day in order to use in my gallery as I wanted the audience to really connect to the artist and build a strong foundation of a relationship, thus encouraging branding of my artist, thus gaining revenue.
- 11. Image Manipulation-Photoshop As my music video had included the “scribble effect” it was essentially an effect that I wanted to cross reference and use on my website so I had to use photoshop to manipulate and colour grade all the images. I decided to keep him black and the world white to show that he had been an outsider.
- 12. As you can see I have effectively used the saturation feature as well as colour grading to intensify the colours. I have done this in order for the audience to have something a bit more intense. In addition I wanted the ancillary products to correlate with the music video and the music video has very vibrant greens and saturated colours causing me to transfer these characteristics in my ancillary product. I have created a world tour poster through using image manipulation I had created these geometric triangle shapes, as they were a convention to our electro dance music genre. In order to add a more visually aesthetic effects I had to screen the layers and remove the white backgrounds present. After this I had to add text in a corresponding font; this I changed through double clicking the layer and using trial and effect to see what looks more suitable.
- 13. Advert production- Photoshop I had to create an online advert to include on my website on the opening page, using Adobe premiere Photoshop, here is the process:
- 15. In order to have a double exposure it was a very simplistic process yet required the right amount of equilibrium between the RGB colours. I removed the red scope and kept the blue and green scopes to produce the final product. I also had to use the lasso tool to remove Alex and then add him on top of the same picture yet transforming the picture by adding him slightly above the actual picture. The reason for this was to connote his other personalities and how one can be more overpowering than the other, this could have further associations with the maintenance of the “sane” persona. The background: I had used a free to use image from google and then added a RGB overlay to it to have the colourful effect to make it seem as if the smoke was coloured. Furthermore, I had then changed the opacity of it to increase realism. After this, I had used the “multiply” effect which removed the colours from the background and kept the colours of the smoke at RGB. The merchandise: The images of the merchandise I have created through photoshop using the following effects: “skew” and “perspective”. By sing all the basic features as well as the more complex features of Wix, it allowed me to create my final website:
- 21. After completing the whole website editing ancillary project. I had added a few extra things such as cool videos and GIF’s incorporating DJSOTO as a brand to be consumed by the target audience aged 16-24.