1. How did you use media technologies in the construction and
research, planning and evaluation stages?
Blog:
Throughout the course I uploaded work,
ideas and suggestions via my blog
which can be found here
http://jamiefisher1994.blogspot.co.uk/. I
used this blog to express my ideas and
work on the areas of planning and
research, construction, editing and
evaluation. Blogger was extremely
useful in keeping all my work
organised, however when producing a
text based document I found it much
more useful to create the document on either open office or Microsoft Word before then
uploading it to slide share and then posting this on my blog. Although this sounds more
complex than simply blog posting, however it turned out that this was in fact much easier and
simpler. This also meant that the presentation of my documents was much more
sophisticated and aesthetically pleasing. Also, I used 'labels' to organise the layout of my blog
even nicer, by having different labels for different sections of work. This helps both me and
the viewer of my blog to navigate around my work much easier, finding relevant posts quicker.
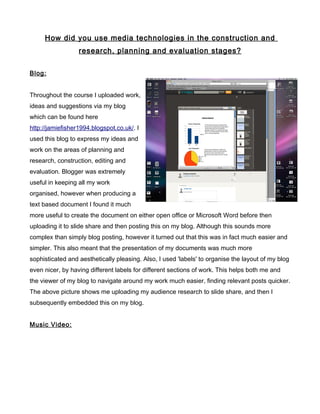
The above picture shows me uploading my audience research to slide share, and then I
subsequently embedded this on my blog.
Music Video:
2. Camera:
We shot our music video using 2 different cameras,
as we felt this would offer us the opportunity to cover
a wide variety of shots and also to ensure that we
could shoot scenes from two different angles,
meaning we could flip between shots, to add to the
excitement of the video. This is shown on the right, where we have an example of us using
both cameras to film the same sequence. It offered us
continuity whereas if we had one camera, to achieve
this we would have had to film it twice and continuity
errors may well have occurred.
We used a Sony HVR-HD1000E video camera to
record most of our shots, as this offered us greater
stability and less shake would be visible in our shots,
which would have
made it look
unprofessional.
However, we also
used a Sony handy
cam which enabled
us to film from two
angles. We loaned this from our college, and the
Sony HVR-HD1000E video camera, although heavier, enabled us to film at a higher quality,
which was vital to ensure professionalism and to make it easier to use when editing. The
smaller handy camera was used sparingly, but was still useful in certain scenes.
3. We had used the handy cam previously to shoot our thriller opening for our AS media
coursework, however we had not used the Sony HVR-HD1000E video camera before and so
me and Jordan used our set shoot (linked in an earlier evaluation question) as an opportunity
to explore the location and also to familiarise ourselves with this new, more complicated video
camera. We picked the functions up fairly quickly, finding it easy to use, and we decided
whilst on that set shoot which camera we would use for which shot, so as to make the actual
shoot go smoothly. We used digital DV tapes within these cameras, and these were easy to
use, and easy and quick to get the footage off and onto our Mac's.
Lighting:
Whilst deciding on specifications for the shoot, we decided against using any artificial lighting
whilst shooting. This decision was made based on a number of reasons. Firstly, we had no
source of electricity (even though we filmed in a house), thus meaning we would have had to
hire a mobile generator which would have been extremely expensive. Also, hiring lights would
have been very costly. Another reason was that we realised from last year's work that we
could manipulate shots to give them the desired effect, whilst editing. This required us to
carefully shoot our shots, to ensure that there was no sunlight in the shots or any brightness,
so at make editing easier for us. We wanted to tap into the convention of Drum and Bass
videos by making our video shot in a dark, grim environment and we couldn't really have used
artificial lighting to aid us with this, we would have to do this at the editing stage, so we
decided unanimously on using no artificial lighting, mainly because of the impracticalities of
this idea.
Sound:
When commencing editing, we first downloaded our artist's track for free, with a link he
provided in his YouTube video 'Mirrored Theory- I dare you', and we then imported this sound
track into Final Cut Pro. It was important that we did this first, before we started editing, as we
wanted to (as mentioned previously) base the editing around the beat of the music, and make
it integrate quite nicely. So, once we had imported this we removed all diegetic sound from
our actual footage, as we wanted just the song, and none of the dialogue or any sounds that
4. had been going on in our footage when we shot it.
Editing:
When editing our music video,
technology was absolutely
instrumental. Editing was completed
on Final Cut Pro alone, using an
Apple iMac. When I had started this
media course in year 12 I had
absolutely no knowledge of how to
use this software, but as the course
progressed I became more and more
familiar with Final Cut Pro. Most of
this knowledge was gained in year
13, as I took a much more involved role in editing than I had in year 12. Also, I only used
basic functions in year 12 editing, whereas in year 13 we used much more complicated
practical elements of editing, so this was particularly challenging, but a challenge I felt I
adapted to well. By the end of editing, I was very comfortable with using Final Cut Pro and
enjoyed being able to navigate around the software much more easily than before.
We used several of the Final Cut Pro pre installed filters and effects to add effect to our music
video. The above effect was particularly useful. It was called 'earthquake' and added a
shaking effect whilst brightening up the shot too, thus making scenes where we had a heavy
beat in the music coinciding with this effect. It worked quite well and we used it a couple of
times in our video.
For the most part, we only altered colour in our shots, by turning most black and white by
filtering colour. However we also added a couple of filters to other shots, to add to the effect
that it was a dream, we brought in filters that made shots go blurry or that disorientated the
viewer. This was a deliberate effort to add intrigue and mystery, whilst also trying to add some
5. interesting creativity to our editing.
However, most shots we didn't add these kind of effects as we wanted them to disorientate
the viewer but not so much that they had no idea what was happening in the video. We also
altered the colour filters on shots such as the burning shots where we wanted to lighten them
up to make them noticeable, as they only took up a small percentage of our total video, and
were cut between very quickly.
Internet:
I used a variety of websites when constructing and uploading my work, and also for collecting
vital audience feedback. I used Blogger and Slideshare to upload my work, and these were
particularly useful because they were a good place to collect all of my work, and were easy to
use, having used them previously already.
I also used Social Media extensively to try and gather audience feedback. I used Survey
monkey to create my questionnaire, and then I linked this survey to the description boxes in
our video, which was subsequently uploaded to facebook and YouTube. This enabled us to
reach our target audience, as social media sites such as the aforementioned are
predominately used by people who fit into our target audience. This meant that we could
gather focused audience feedback, which would be very useful towards our music video.
Print Productions:
When constructing my Digipak and my Magazine Advertisement, I used Adobe Photoshop
CS3 entirely for the production of these print productions.
For my digipak, I used Adobe Photoshop CS3 to edit my main image, of the still image of our
main character through the small window. I enlarged it so it took center stage in my A4
advertisement, and then added a filter that gave a blurry effect (representing how this could
be interpreted as a dream, and how Nelson’s mind is messed up). I also went for a black
background so that the image would stand out, and that the black would signify mystery or
6. darkness to the viewer. The text was also created on Adobe Photoshop CS3, with a font
called ‘Copperplate’ which I felt was very suitable for the genre.
For my magazine advertisement, I used Adobe Photoshop CS3 to edit all 4 of my images that
were included, and I added effects to three of them, to blur them, to once again give the effect
and impression that this is a confusing music video, with the characters being very confused.
Also, for my fourth image, I changed the opacity of the picture to ensure that it looked faded
and worn.
Adobe Photoshop CS3 was used for all of my construction work throughout the construction
of my print productions, and it was an easy, useful tool to use, aided by the simplicity of the
iMac.
Conclusion:
To conclude, I feel that I used technology extensively throughout all stages of my coursework,
and it was an essential part, as I have always preferred to use technology as opposed to
using hand made techniques.