Download as PDF, PPTX
![# load libraries, scripts, data
shinyServer(function(input, output) {
# make user specific variables
output$text <- renderText({
input$title
})
output$plot <- renderPlot({
x <- mtcars[ , input$x]
y <- mtcars[ , input$y]
plot(x, y, pch = 16)
})
})
Shiny Cheat Sheet
learn more at shiny.rstudio.com
Shiny 0.10.0 Updated: 6/14
1. Structure Each app is a directory that
contains a server.R file and usually a ui.R file
(plus optional extra files)
app-name
!
!
!
!
!
.r
.r
"
server.R
ui.R
DESCRIPTION
README
<other files>
www
(optional) used in
showcase mode
(optional) data,
scripts, etc.
(optional) directory of files to share with
web browsers (images, CSS, .js, etc.)
Must be named "www"
The directory name is
the name of the app
C
B
D
E
F
A
3. Execution Place code where it will be
run the minimum necessary number of times
server.R
Run once - code placed outside of shinyServer will be run
once, when you first launch your app. Use this code to set
up the tools that your server will only need one copy of.
Run once per user - code placed inside shinyServer will
be run once each time a user visits your app (or refreshes
his or her browser). Use this code to set up the tools that
your server will need a unique copy of for each user.
Run often - code placed within a render*, reactive, or
observe function will be run many times. Place here only the
code that the server needs to rebuild a UI component after a
widget changes.
4. Reactivity When an
input changes, the server
will rebuild each output that
depends on it (even if the
dependence is indirect). You
can control this behavior by
shaping the chain of
dependence.
Reactive expression - use reactive to
create objects that will be used in
multiple outputs.
isolate - use use isolate to use an input
without depending on it. Shiny will not
rebuild the output when the isolated
input changes.
render* - An output will automatically
update whenever an input in its
render* function changes.
output$z <- renderText({
input$a
})
x <- reactive({
input$a
})
output$y <- renderText({
x()
})
output$z <- renderText({
x()
})
output$z <- renderText({
paste(
isolate(input$a),
input$b
)
)
input$a output$z input$a x
output$y
output$z
input$a
input$b
output$z
observe - use observe to create code
that runs when an input changes, but
does not create an output object.
input$a observer
observe({
input$a
# code to run
})
RStudio® and Shiny™ are trademarks of RStudio, Inc.
CC BY RStudio info@rstudio.com
844-448-1212 rstudio.com
2. server.R A set of instructions that build
the R components of your app. To write server.R:
• Provide server.R with the minimum necessary code,
shinyServer(function(input, output) {})
• Define the R components for your app between the
braces that follow function(input, output)
• Save each R component in your UI as
output$<component name>
• Create each output component with a render*
function.
• Give each render* function the R code the server
needs to build the component. The server will note
any reactive values that appear in the code and will
rebuild the component whenever these values
change.
• Refer to widget values with input$<widget name>
A
B
C
D
F
E
renderDataTable any table-like object DataTables.js table
renderImage list of image attributes HTML image
renderPlot plot plot
renderPrint any printed output text
renderTable any table-like object plain table
renderText character string text
renderUI Shiny tag object or
HTML
UI element (HTML)
function expects creates
render* functions
input values are reactive.
They must be surrounded with one of:
render* - creates a shiny UI component
reactive - creates a reactive expression
observe - creates a reactive observer
isolate - creates a non-reactive copy of a reactive object](https://image.slidesharecdn.com/shiny-cheatsheet-160608185543/85/R-Shiny-Cheat-sheet-1-320.jpg)
![# load libraries, scripts, data
shinyServer(function(input, output) {
# make user specific variables
output$text <- renderText({
input$title
})
output$plot <- renderPlot({
x <- mtcars[ , input$x]
y <- mtcars[ , input$y]
plot(x, y, pch = 16)
})
})
Shiny Cheat Sheet
learn more at shiny.rstudio.com
Shiny 0.10.0 Updated: 6/14
1. Structure Each app is a directory that
contains a server.R file and usually a ui.R file
(plus optional extra files)
app-name
!
!
!
!
!
.r
.r
"
server.R
ui.R
DESCRIPTION
README
<other files>
www
(optional) used in
showcase mode
(optional) data,
scripts, etc.
(optional) directory of files to share with
web browsers (images, CSS, .js, etc.)
Must be named "www"
The directory name is
the name of the app
C
B
D
E
F
A
3. Execution Place code where it will be
run the minimum necessary number of times
server.R
Run once - code placed outside of shinyServer will be run
once, when you first launch your app. Use this code to set
up the tools that your server will only need one copy of.
Run once per user - code placed inside shinyServer will
be run once each time a user visits your app (or refreshes
his or her browser). Use this code to set up the tools that
your server will need a unique copy of for each user.
Run often - code placed within a render*, reactive, or
observe function will be run many times. Place here only the
code that the server needs to rebuild a UI component after a
widget changes.
4. Reactivity When an
input changes, the server
will rebuild each output that
depends on it (even if the
dependence is indirect). You
can control this behavior by
shaping the chain of
dependence.
Reactive expression - use reactive to
create objects that will be used in
multiple outputs.
isolate - use use isolate to use an input
without depending on it. Shiny will not
rebuild the output when the isolated
input changes.
render* - An output will automatically
update whenever an input in its
render* function changes.
output$z <- renderText({
input$a
})
x <- reactive({
input$a
})
output$y <- renderText({
x()
})
output$z <- renderText({
x()
})
output$z <- renderText({
paste(
isolate(input$a),
input$b
)
)
input$a output$z input$a x
output$y
output$z
input$a
input$b
output$z
observe - use observe to create code
that runs when an input changes, but
does not create an output object.
input$a observer
observe({
input$a
# code to run
})
RStudio® and Shiny™ are trademarks of RStudio, Inc.
CC BY RStudio info@rstudio.com
844-448-1212 rstudio.com
2. server.R A set of instructions that build
the R components of your app. To write server.R:
• Provide server.R with the minimum necessary code,
shinyServer(function(input, output) {})
• Define the R components for your app between the
braces that follow function(input, output)
• Save each R component in your UI as
output$<component name>
• Create each output component with a render*
function.
• Give each render* function the R code the server
needs to build the component. The server will note
any reactive values that appear in the code and will
rebuild the component whenever these values
change.
• Refer to widget values with input$<widget name>
A
B
C
D
F
E
renderDataTable any table-like object DataTables.js table
renderImage list of image attributes HTML image
renderPlot plot plot
renderPrint any printed output text
renderTable any table-like object plain table
renderText character string text
renderUI Shiny tag object or
HTML
UI element (HTML)
function expects creates
render* functions
input values are reactive.
They must be surrounded with one of:
render* - creates a shiny UI component
reactive - creates a reactive expression
observe - creates a reactive observer
isolate - creates a non-reactive copy of a reactive object](https://image.slidesharecdn.com/shiny-cheatsheet-160608185543/75/R-Shiny-Cheat-sheet-1-2048.jpg)
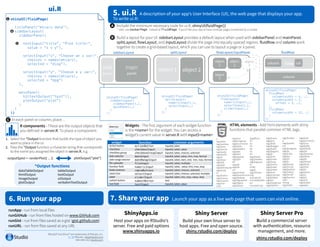

The document provides a comprehensive guide for creating Shiny applications in R, detailing the structure and components required in both server.r and ui.r files. It explains how to provide reactivity using render functions, reactive expressions, and observers, as well as how to deploy applications on various platforms. Additionally, it offers examples and best practices for layout design and widget usage.