
Recommended
More Related Content
What's hot
What's hot (19)
Similar to Ceramic / Porcelain Floor tile laying - Methodology
Similar to Ceramic / Porcelain Floor tile laying - Methodology (20)
Recently uploaded
Recently uploaded (20)
Ceramic / Porcelain Floor tile laying - Methodology
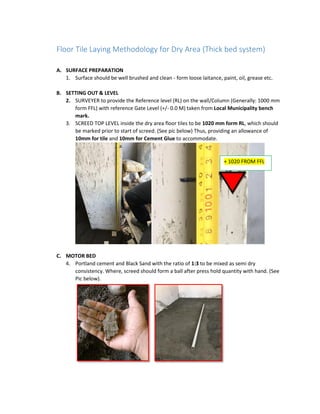
- 1. Floor Tile Laying Methodology for Dry Area (Thick bed system) A. SURFACE PREPARATION 1. Surface should be well brushed and clean - form loose laitance, paint, oil, grease etc. B. SETTING OUT & LEVEL 2. SURVEYER to provide the Reference level (RL) on the wall/Column (Generally: 1000 mm form FFL) with reference Gate Level (+/- 0.0 M) taken from Local Municipality bench mark. 3. SCREED TOP LEVEL inside the dry area floor tiles to be 1020 mm form RL, which should be marked prior to start of screed. (See pic below) Thus, providing an allowance of 10mm for tile and 10mm for Cement Glue to accommodate. C. MOTOR BED 4. Portland cement and Black Sand with the ratio of 1:3 to be mixed as semi dry consistency. Where, screed should form a ball after press hold quantity with hand. (See Pic below). + 1020 FROM FFL
- 2. 5. The mixed mortar screed to be laid directly over the Structural Slab leveled with Horizontal Bar (3 meter Aluminum RHS) to achieve flat uniform surface. (See pic above) D. SELECTION OF THE CORRECT TILE 6. In order to achieve correct approved color, type and size the reference number should verified with the approval. The same caliber to be used at a particular floor or Villa in order to achieve adulations in floor due to shape &/ bend irregularities and finally (most important) it is strongly recommended to use tile of same Batch no. for Particular Space/flat/house to avoid Shade/Tone difference. E. FIXING OF TILE - Conventional method (Thick bed system) 7. The floor tile to be started at the set dimension (SP) which is approved by the Consultant / Client in the Tile layout shop drawing. (Also the site conditioned to be considered and minor adjustment to be made to avoid cut piece) 8. Fixing the Approved tile (porcelain / Ceramic tile) of right type and Color with even tone on the fresh cement mortar bed with Tile Glue (Polymer modified Tile Adhesive – As bonding agent) with cement paste of 1:2 ratio Tile Glue with Ordinary Portland Cement respectively.(Note: Cement paste should have paste consistency (like peanut butter) formed by Mechanical mixer. As per pic below)
- 3. 9. Only 1.0 square meter of tile lay at one time only. 10. TILE CUT PIECE – The right method to achieve tile cut piece without broken enamel 10.1 Trained labor to perform the tile cutting to achieve the uniform press load applied while performing mechanical cut. (See pic below) 10.2 The perfect tile edge with clean enamel cut at the surface will be only achieved by the sharp tile cutting wheel. This assembly should be changed every, 20 days when using the machine on daily basis. (See pic below)
- 4. 11. Tile should be dry & fixed by pressing into the place with slight twist motion, ensuring the tile back achieves full contact with the Cement Glue adhesive 12. The laid tile to be then tapped with rubber hammer to achieve set level. 13. 3mm spacer to be used to keep the same line on floor and skirting. 14. Excess Cement Glue adhesive should be removed from the face of the tile by using damp sponge. 15. Joints to be racked out in readiness for grouting. 16. Allow setting time of 3 days for this “Conventional thick bed system’’ of tile laying. F. GROUTING 17. Approved grout to be used after 24 hours of tile fix. 18. Joint depth to be 3-4mm. 19. Grout should be applied with squeegee, brush or sponge. 20. Surplus grout should be removed by damp sponge. 21. Tile should be polished by dry cloth when grout has completed. G. PROTECTION 22. Adequately protect and keep clean all the completed areas. 23. Protective sheet to be laid over the finished floor for light traffic.