
Recommended
More Related Content
What's hot
What's hot (20)
Viewers also liked
Similar to Installing rubber stair profiles
Similar to Installing rubber stair profiles (20)
Installing rubber stair profiles
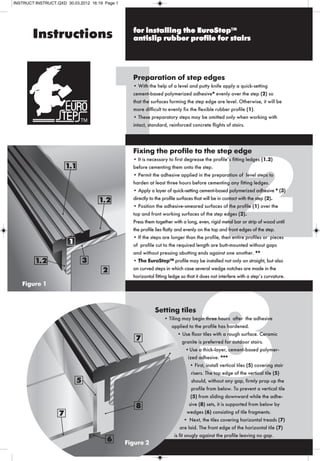
- 1. 3 2 1 3 1.2 1.2 1 1.1 2 Preparation of step edges • With the help of a level and putty knife apply a quick-setting cement-based polymerized adhesive* evenly over the step (2) so that the surfaces forming the step edge are level. Otherwise, it will be more difficult to evenly fix the flexible rubber profile (1). • These preparatory steps may be omitted only when working with intact, standard, reinforced concrete flights of stairs. Fixing the profile to the step edge • It is necessary to first degrease the profile’s fitting ledges (1.2) before cementing them onto the step. • Permit the adhesive applied in the preparation of level steps to harden at least three hours before cementing any fitting ledges. • Apply a layer of quick-setting cement-based polymerized adhesive * (3) directly to the profile surfaces that will be in contact with the step (2). • Position the adhesive-smeared surfaces of the profile (1) over the top and front working surfaces of the step edges (2). Press them together with a long, even, rigid metal bar or strip of wood until the profile lies flatly and evenly on the top and front edges of the step. • If the steps are longer than the profile, then entire profiles or pieces of profile cut to the required length are butt-mounted without gaps and without pressing abutting ends against one another. ** • The EuroStep™ profile may be installed not only on straight, but also on curved steps in which case several wedge notches are made in the horizontal fitting ledge so that it does not interfere with a step’s curvature. Setting tiles • Tiling may begin three hours after the adhesive applied to the profile has hardened. • Use floor tiles with a rough surface. Ceramic granite is preferred for outdoor stairs. •Use a thick-layer, cement-based polymer- ized adhesive. *** • First, install vertical tiles (5) covering stair risers. The top edge of the vertical tile (5) should, without any gap, firmly prop up the profile from below. To prevent a vertical tile (5) from sliding downward while the adhe- sive (8) sets, it is supported from below by wedges (6) consisting of tile fragments. • Next, the tiles covering horizontal treads (7) are laid. The front edge of the horizontal tile (7) is fit snugly against the profile leaving no gap. Instructions for installing the EuroStep™ antislip rubber profile for stairs 8 6 7 5 7 Figure 1 Figure 2 INSTRUCT:INSTRUCT.QXD 30.03.2012 16:19 Page 1
- 2. NOTES D A B C B EuroStep™ experts caution you to avoid certain serious application mistakes that could result in a material reduction in the profile’s effectiveness *The quick-setting adhesive must be water- and frost- resistant. EuroStep™ experts recommend the following tile adhesives, each of which requires a setting time of three hours: “QuickFix” by Danish firm ALFIX and “Granirapid” by the multinational concern MAPEI. While the use of other tile adhesives is acceptable, it is necessary to increase their curing times from three to twenty-four hours. ** If abutting ends are pressed against each other, the profiles may shift before the adhesive sets due to the resulting stress. *** The tiles are laid on top of the profile’s fitting ledges (1.2), which are about five (5) mm thick, so that the profile’s working ele- ment (1.1) and tile surface are flush with each other. To achieve this result, given a tile thickness of eight (8) mm, the adhesive coating (8) between the tile and the underlying concrete step should be at least ten (10) mm thick. However, the recommended maximum coating thickness for most tile adhesives is less, five mm, as a thicker coating tends to crack during curing. This problem could be resolved, conventionally, by first cementing the rubber profile onto the step surface and then applying a level layer of mortar over the fitting ledges so that they are firmly embedded within the mortar. After this layer has completely hardened, the tiles are then attached on top of it with a thin coat of adhesive. Such a procedure, however, greatly lengthens the tiling process by several days or even weeks, depending on the mortar used. A better solution is to smooth out the step surfaces at the same time the tiles are attached. To do so, EuroStep™ experts recommend using the adhesive “Kerafloor” by MAPEI. This water- and frost-resistant adhesive is specially designed for both cementing tiles and smoothing out the surfaces to which they are attached. The recommended maximum thickness for the adhesive coating is fifteen (15) mm and is applied to both the step surface and back side of the tile (in which case, a toothed putty knife, e.g., 5x5 mm, is used). **** The level adhesive coating must completely cover the fitting ledges (1.2). The risk of tile failure increases under increased loads or impact stresses whenever the back surface of a tile is in direct contact with a fitting ledge (that is, without its intervening layer of adhesive) and, especially, whenever there are any voids either above or below the fitting ledge. ***** The tile (5) is an important load-bearing element and supports the front overhanging part of the rubber profile from below. The weight of a person stepping onto the front edge of the soft profile is borne by the vertical tile (5) tending to shift it downward. For this reason, it should not be mounted as shown in Figure 3. If, instead, a vertical tile is mounted after and above the horizontal tile immediately below it, a gap will inevitably form between the top edge of the vertical tile and the profile. The vertical tile (5) will remain fixed only because of the adhesive coating attaching it to the stair riser. In order to prevent the vertical tile (5) from breaking off due to the high vertical load, it is necessary to support its lower edge. This is achieved by following the instructions described in the section Setting Tiles. Move the vertical tile (5) upwards along the fresh adhesive coating until its upper edge is set against the profile. Fill the small gap (one to two mm) formed between the lower edge of the vertical tile and the horizontal surface of the step with several small supportive wedges (6) made of tile fragments. Next, apply a level adhesive layer along the horizontal surface of the step and then attach a horizontal tile (7) onto it. The lower edge of the vertical tile (5) will be safely walled in together with the wedges (6) supporting it. Notes Attention! Figure 3 А. DON’T leave any voids under tiles or either above or below fitting ledges. **** B. DON’T leave any gaps where tiles abut the profile. Any grout used to fill in such gaps will crumble out. C. DON’T alter the sequence of mounting vertical (5) before horizontal tiles (7). ***** D. To avoid retaining water on steps, mount the horizon- tal tile flush with the surface of the profile’s working ele- ment (1.1) or slightly higher, but never lower. For the same reason, EuroStep™ experts provide their steps with a slight frontal and longitudinal inclination. INSTRUCT:INSTRUCT.QXD 30.03.2012 16:19 Page 2