BEST ✨ Call Girls In Indirapuram Ghaziabad ✔️ 9871031762 ✔️ Escorts Service...
Word processed production diary
1. Santana Stewart
Word Processed Production Diary – Print screens of Editing
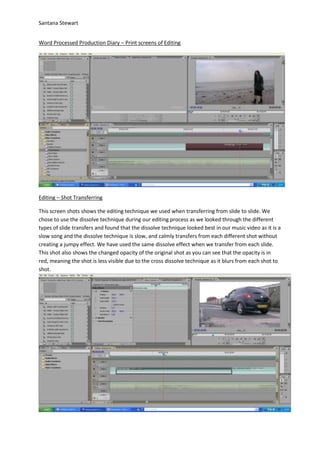
Editing – Shot Transferring
This screen shots shows the editing technique we used when transferring from slide to slide. We
chose to use the dissolve technique during our editing process as we looked through the different
types of slide transfers and found that the dissolve technique looked best in our music video as it is a
slow song and the dissolve technique is slow, and calmly transfers from each different shot without
creating a jumpy effect. We have used the same dissolve effect when we transfer from each slide.
This shot also shows the changed opacity of the original shot as you can see that the opacity is in
red, meaning the shot is less visible due to the cross dissolve technique as it blurs from each shot to
shot.
2. Santana Stewart
Editing – Scale
When we imported the original video shots the shots were not up to scale with the editing software
we used. So we had to click on to Video effects and change the scale of the video by unclicking
‘uniform scale ’and changing the scale width to 133, you can see this on the left hand side of the
page where it says video effects. We had to do this with every shot we used as none of the shots we
had matched the sale. We chose to do this with the shots so they all the sizes matched and when
you’re watching the video the shots were not all different sizes, which would be really confusing to
watch.
Editing – Speed
This screen shot here shows that we chose to change the speed of some of our shots. Due to the
speed of some of the shots were too fast for the music we had, or we had to speed up shots of the
singing as the singer was rather to slow or too fast. This particular shot we chose to change the
speed to 50% which makes the shot slower by 50% of the speed, you can see this as there is a pop
3. Santana Stewart
up box in the middle of the page which shows the speed of the image. If we would want to speed
the shot up we would change the speed to 120% which makes the shot faster by 20% of the original
speed.
Editing – Shot Transferring / Colour
This screen shot shows again shot transferring as we used cross dissolve a lot throughout our editing
process as it stopped the shots looking jumpy when transferring. Also it shows that we changed the
colour in one part of the video. One shot of the video we chose to change it into black and white to
create a better effect of heartbreak. As when you think of heartbreak you think of dull skies and
unhappy faces, and this is the effect we were trying to create. The left hand side of the image shows
a ticked black and white box under image control. This is how we edited the colour.