1. The on/off button is used to switch
the camera on or off.
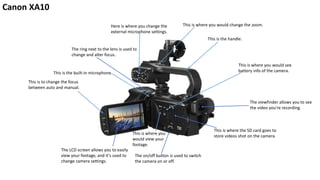
This is where the SD card goes to
store videos shot on the camera.
The viewfinder allows you to see
the video you're recording.
The LCD screen allows you to easily
view your footage, and it's used to
change camera settings.
The ring next to the lens is used to
change and alter focus.
This is the built-in microphone.
This is to change the focus
between auto and manual.
This is the handle.
This is where you would see
battery info of the camera.
This is where you
would view your
footage.
Here is where you change the
external microphone settings.
This is where you would change the zoom.
Canon XA10
2. This is used to change white
balance.
This is used to change
focus.
This is used to change and adjust
exposure.
This is used for accessing
different programs for
recording.
3. This is used to change
the zoom.
This is used to reduce shake in
video.
This is where the function
button is to access the
different function of a
camera.
4. This is to change the type of focus
This ring is to adjust focus
This is to manually adjust
zoom
Canon E700D
5. This button is to adjust the ISO
This is to adjust some of the
settings on the camera e.g. ISO
This is the recording mode on the
camera
6. This button is to access the Q menu
This button is to access the
different camera settings
This button is to view recorded
footage
This button is to delete recorded
footage
This is the view finder
This is the record button
7. This is where you plug in an
external microphone
This is where you would plug in an
AV out
This is where you would plug in a
mini-HDMI
8. This option is to change
The image quality of
the video
This is where you
would change white
balance
This is to change the
different video
modes and frame
rates
9. This is to select
the different ISO
options
This is to change exposure
This is to change the shutter speed
10. This is where you change the
focus
This is where you zoom in
and out
This is where the lens
cap is
This is where the
external mic is
11. This is the screen
where you would
see your footage
and change any
settings on
camera
This is the AV input
This is the micro-USB input
This is the HDMI input
This is where you would insert the
battery
This is the eyepiece
This is where you adjust zoom
This is where you open
and close the lens
cover
This is where you would insert
memory cards
This is the record button
13. •Explain the difference in settings between exposing a shot for
indoor compared to outdoor, when answering this also consider
the change in white balance and how this would change the look
of the image?
Exposing a shot indoor you would use the
indoor white balance setting as the
outdoor white balance setting would
overexpose the video.
https://hpocrunit18.wordpress.com/lo1/
•What would you have to do to film a fast-moving image consider
the settings and the impact these have on the camera, what
would you have to change and increase, this will cover: shutter
speed, exposure, iso and depth of field.
You would have to increase the shutter speed to
film a fast-moving image as a low shutter speed
would blur the image. You would also have to
increase the iso as shutter speed decreases the
amount of light in the camera. But you also
must decrease the gain as this will make the
image look grainy.
14. •What is three-point lighting?
Three-point lighting is where you have a
key light, a back light and a fill light which
light up a subject and depending on
which light source is being used, the
scene will be lit differently. You can also
move or change the type of lighting on
the lights to create different moods.
•What are the uses of this source of
lighting in video?
The uses of using this source of
lighting in video is that you can
achieve different effects and levels of
depth. It can also be used to make
your subject stand out from the
background. You can also create a film
noir effect with three-point lighting by
putting a gobo on the key light.