Micro-Scholarship, What it is, How can it help me.pdf
Canon 700 d
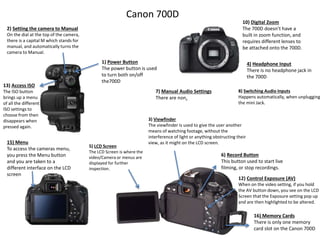
1. Canon 700D
1) Power Button
The power button is used
to turn both on/off
the700D
2) Setting the camera to Manual
On the dial at the top of the camera,
there is a capital M which stands for
manual, and automatically turns the
camera to Manual.
5) LCD Screen
The LCD Screen is where the
video/Camera or menus are
displayed for further
inspection.
3) Viewfinder
The viewfinder is used to give the user another
means of watching footage, without the
interference of light or anything obstructing their
view, as it might on the LCD screen.
6) Record Button
This button used to start live
filming, or stop recordings.
10) Digital Zoom
The 700D doesn’t have a
built in zoom function, and
requires different lenses to
be attached onto the 700D.
4) Headphone Input
There is no headphone jack in
the 700D
13) Access ISO
The ISO button
brings up a menu
of all the different
ISO settings to
choose from then
disappears when
pressed again.
12) Control Exposure (AV)
When on the video setting, if you hold
the AV button down, you see on the LCD
Screen that the Exposure setting pop up
and are then highlighted to be altered.
15) Menu
To access the cameras menu,
you press the Menu button
and you are taken to a
different interface on the LCD
screen
16) Memory Cards
There is only one memory
card slot on the Canon 700D
8) Switching Audio Inputs
Happens automatically, when unplugging
the mini Jack.
7) Manual Audio Settings
There are non.
2. 9) Manual White Balance Controls
If you press the Q button an interface pops
up which displays various settings to alter,
and the default setting is the white balance
alteration.
14) Control Shutter Speed
When you open up the menu, the first
option that is highlighted is the
shutter speed.
11) Control Focus/Manual Focus
When an appropriate lens is
attached, turn the lens to adjust the
focus accordingly.