Incoming and Outgoing Shipments in 1 STEP Using Odoo 17
Canon 700 d 2
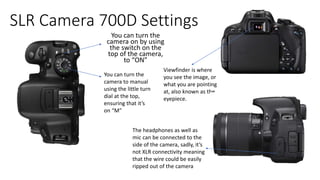
1. SLR Camera 700D Settings
You can turn the
camera on by using
the switch on the
top of the camera,
to “ON”
You can turn the
camera to manual
using the little turn
dial at the top,
ensuring that it’s
on “M”
Viewfinder is where
you see the image, or
what you are pointing
at, also known as the
eyepiece.
The headphones as well as
mic can be connected to the
side of the camera, sadly, it’s
not XLR connectivity meaning
that the wire could be easily
ripped out of the camera
2. This is an LCD screen, this is
where you can view what is
seen through the lens and
you can also control the
settings of the camera
through touch screen.
To press record
you simply use
this button
You can’t control audio setting
on a Canon 700D, you’d
ultimately have you record
sound separately from the video
and then match them up in post.
Though the camera does have
built in microphones.
The hotshoot is
where you can
insert a light or a
microphone to the
camera
3. The manual white balance
control can be changed by
going onto “Q” and simply
scrolling left or right
depending on what white
balance you need for the
shot.
There is no digital zoom
available on the camera, you
can zoom in depending on the
lens that you use. You use the
largest ring on the lens in order
to zoom in or out.
The focus can be controlled
by the smallest ring on the
camera, that can be turned
into auto-focus directly on
the lens.
4. The exposure can be altered
using the small ring at the top of
the camera and by selecting the
Av button next to the LCD.
The Gain/ISO can be adjusted
by selecting the ISO button and
selecting right or left to change
the value.
Shutter speed is the same
as exposure, however you
don’t have to select the Av
button
This is where you can access the
camera menus, or use “Q” for most
of the settings
5. You insert the
memory card on
the right side of the
camera
The camera also includes
a USB port as well as a
mini HDMI Port