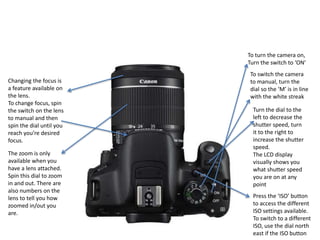
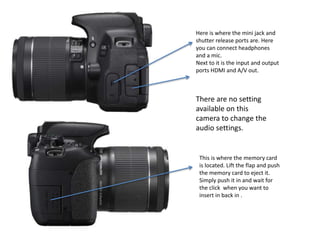
Canon 700D
To turn the camera on,
Turn the switch to ‘ON’
To switch the camera
to manual, turn the
dial so the ‘M’ is in line
with the white streak
Press the ‘ISO’ button
to access the different
ISO settings available.
To switch to a different
ISO, use the dial north
east if the ISO button
Turn the dial to the
left to decrease the
shutter speed, turn
it to the right to
increase the shutter
speed.
The LCD display
visually shows you
what shutter speed
you are on at any
point
The zoom is only
available when you
have a lens attached.
Spin this dial to zoom
in and out. There are
also numbers on the
lens to tell you how
zoomed in/out you
are.
Changing the focus is
a feature available on
the lens.
To change focus, spin
the switch on the lens
to manual and then
spin the dial until you
reach you’re desired
focus.
To change the
exposure, hold down
the AV button and spin
the dial on the top front
right of the camera.
The LCD display shows
what exposure you are
on/changing to.
Here is the view finder,
looking through this
shows you what you are
looking at without
camera effects on it/IRL
Its surrounded by a
rubber lip so that when
you look trough it, less
light leaks into the lens
so the image is clearer.
Here is the LCD screen, it
acts as the control panel
where you access the
majority of the settings on
the camera.
You are able to move the
LCD screen and twist is
because of the hinge
Pressing the ‘MENU’
button brings up a
range of settings
including brightness
and date and time
shown on the LCD
screen.
To navigate the
setting, use the
control dial or
directional
controllers.
Here is the record button for video mode. Press once
to start recording, press again to stop recording. You
will know when you are recording because a red circle
will appear on the top right of the LCD screen
Here is where the mini jack and
shutter release ports are. Here
you can connect headphones
and a mic.
Next to it is the input and output
ports HDMI and A/V out.
This is where the memory card
is located. Lift the flap and push
the memory card to eject it.
Simply push it in and wait for
the click when you want to
insert in back in .
There are no setting
available on this
camera to change the
audio settings.

Canon 700 d

  • 1.
  • 2.
    To turn thecamera on, Turn the switch to ‘ON’ To switch the camera to manual, turn the dial so the ‘M’ is in line with the white streak Press the ‘ISO’ button to access the different ISO settings available. To switch to a different ISO, use the dial north east if the ISO button Turn the dial to the left to decrease the shutter speed, turn it to the right to increase the shutter speed. The LCD display visually shows you what shutter speed you are on at any point The zoom is only available when you have a lens attached. Spin this dial to zoom in and out. There are also numbers on the lens to tell you how zoomed in/out you are. Changing the focus is a feature available on the lens. To change focus, spin the switch on the lens to manual and then spin the dial until you reach you’re desired focus.
  • 3.
    To change the exposure,hold down the AV button and spin the dial on the top front right of the camera. The LCD display shows what exposure you are on/changing to. Here is the view finder, looking through this shows you what you are looking at without camera effects on it/IRL Its surrounded by a rubber lip so that when you look trough it, less light leaks into the lens so the image is clearer. Here is the LCD screen, it acts as the control panel where you access the majority of the settings on the camera. You are able to move the LCD screen and twist is because of the hinge Pressing the ‘MENU’ button brings up a range of settings including brightness and date and time shown on the LCD screen. To navigate the setting, use the control dial or directional controllers. Here is the record button for video mode. Press once to start recording, press again to stop recording. You will know when you are recording because a red circle will appear on the top right of the LCD screen
  • 4.
    Here is wherethe mini jack and shutter release ports are. Here you can connect headphones and a mic. Next to it is the input and output ports HDMI and A/V out. This is where the memory card is located. Lift the flap and push the memory card to eject it. Simply push it in and wait for the click when you want to insert in back in . There are no setting available on this camera to change the audio settings.