Automating Business Process via MuleSoft Composer | Bangalore MuleSoft Meetup...
Web commander faq on product
1. FAQ on Product
(Click on the Question and the Answer would expand)
How to add a product in Web Commander?
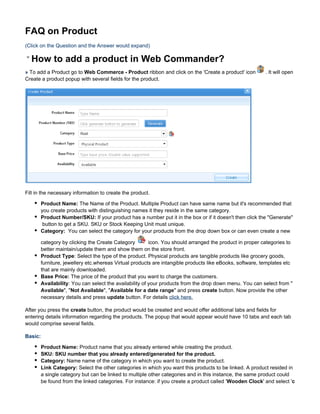
» To add a Product go to Web Commerce - Product ribbon and click on the 'Create a product' icon . It will open
Create a product popup with several fields for the product.
Fill in the necessary information to create the product.
Product Name: The Name of the Product. Multiple Product can have same name but it's recommended that
you create products with distinguishing names it they reside in the same category.
Product Number/SKU: If your product has a number put it in the box or if it doesn't then click the "Generate"
button to get a SKU. SKU or Stock Keeping Unit must unique.
Category: You can select the category for your products from the drop down box or can even create a new
category by clicking the Create Category icon. You should arranged the product in proper categories to
better maintain/update them and show them on the store front.
Product Type: Select the type of the product. Physical products are tangible products like grocery goods,
furniture, jewellery etc.whereas Virtual products are intangible products like eBooks, software, templates etc
that are mainly downloaded.
Base Price: The price of the product that you want to charge the customers.
Availability: You can select the availability of your products from the drop down menu. You can select from "
Available", "Not Available", "Available for a date range" and press create button. Now provide the other
necessary details and press update button. For details click here.
After you press the create button, the product would be created and would offer additional tabs and fields for
entering details information regarding the products. The popup that would appear would have 10 tabs and each tab
would comprise several fields.
Basic:
Product Name: Product name that you already entered while creating the product.
SKU: SKU number that you already entered/generated for the product.
Category: Name name of the category in which you want to create the product.
Link Category: Select the other categories in which you want this products to be linked. A product resided in
a single category but can be linked to multiple other categories and in this instance, the same product could
be found from the linked categories. For instance: if you create a product called ' Wooden Clock' and select 'c
2. lock' as it's parent category, from the store the product could be found under the ' clock' category only. Now if
you want this same products to be available if customers are browsing ' Wooden Work', 'Home decoration' &
'Wall Clock' categories, you should link the later three categories as the link categories for this product. Thus
the same product could be found no matter which category customer visits.
Product Type: Select the type of the product. Physical products are tangible products like grocery goods,
furniture, jewellery etc.whereas Virtual products are intangible products like eBooks, software, templates etc
that are mainly downloaded. Physical products usually requires you to ship to the customer location while
virtual products are downloaded by the customers to their computers.
Brand/Manufacturer: If you have created brands / Manufacturers from Web Commerce -
Brand/Manufacturer, those brands and manufacturers would be available in this drop-down. If you select a
brand/manufacturer to a product, on the product details page this information is shown. Furthermore, using
the Shop by Brand widgets you can show the products based on Brand or manufacturer if you select the
brand/manufacturer for the products.
Availability: This options determines whether a products would be available for the customers to view and
purchase. You can select the availability of your products from this drop down menu. You can select from "Av
ailable", "Not Available", "Available for a date range" options. If a product is 'available', this is shown to all
customers. Not available products are not shown on the store front. You should mark a product' Not
Available, if you want to hide a products from the store front. To avail a product for a particular date range,
select the option 'Available for a date range' from this filed. Two additional fields would appear for this
selection and you can specify the date range for which the product would be available. After the Date expired,
the product would be automatically Unavailable from the store.
Mark Product As: Tick mark the New Product option if this is a new product. To make this product a
Featured Product, select the second option. If a product is marked as New product and/or Featured product,
a label is shown on the product to highlight it to the customers.
Product Summery: Enter a short summery of the product that would be shown on the product details page.
Sometimes customers want to get an overview of a product quickly rather than reading the detailed product
description and to serve those customers, you should enter a short and informative Product Summery.
Product Description: The WYSIWYG editor lets you enter the detailed product description. You can enter a
large amount of information, rich content like images, video using the Editor. Click on the maximize button
to have a bigger editor environment. Clicking on the HTML button to open the HTML editor.
Price & Quantity:
Base Price: Price of the product that you want to charge the Customer. This price does not include any tax,
shipping cost, discount or any other cost. They are separately added or deducted from the product base
price.
Cost Price: You cost/purchase price for the product. It's an optional field. This is used to generate the profit
related statistics for your store.
Track Inventory: Tick mark this option if you want to track inventory of this product. Enabling this option
would present three additional options. Clicking the Track Inventory would open the Inventory details popup.
Clicking the Inventory History action icon from this popup would show the history of the inventory for this
product. To add product stock enter the quantity and type a note and click on Adjust button. Since you have
chosen to track the product inventory, you should enter the current available stock in the ' Available Stock'
field. Specify the Low stock level quantity for the inventory tracked product. If the product reached to the low
stock level, in the CMS they would be marked using a yellow bubble and the admin would be notified by
emails.
Enable Multiple Order Quantity: Usually you want your customers to purchase any quantity of your
products. But if you want them to purchase products minimum half dozen and then 12, 18, 24 etc, you should
mark this field enabled and enter the quantity. For instance, if you enter 5 in this field, a customer would be
able to order 5,10,15,20... of this product but not 4,6,8... etc.
Minimum Order Quantity: Default value is 1. This value determines the minimum number of quantity a
customer must order to purchase. If you enter 3, for instance, for the product; from the store a customer
3. would not be able to order 2 quantity for this product but either 3 or more than three quantity would be
allowed to purchase.
Maximum Order Quantity: By default this field is empty and that means no maximum order limit is set for
this product. If you enter a value, a customer would not be able to purchase more than that quantity in an
order.
Discount Profile: Select a discount profile from the list. The selected discount would be applicable for this
product.
Tax Profile: Select a tax profile that you want to apply to this product.
Shipping Profile: Similar to tax and discount profile, choose a Shipping profile for the product. Based on the
selected shipping profile the products' shipment cost would be determined.
Gift Wrapping: If you offer a Gift Wrapping for the product then select one from this drop-down. There are
three option to chose from : 'Gift Wrapping is not available for this product' is the default value and in this
case no gift wrapping would be offered to the customer. If you select the second option which is 'Fixed Gift
Wrapping Option' , you would have to select a Gift Wrapping option from the available list and on the
product details page this gift wrapping options would be offered to the customers. If the customers specifically
select this Gift Wrapping option, the additional charges would be added to the order total and from the Order
management workspace, you would find out for which products the the customers have chosen to take this
service. If you select the third option, i.e. 'Let customer select a Gift Wrapping Option' the available gift
wrapping options would be offered to the customers and based on their selection, the cost would be adjusted.
Again this would be marked in the Order so that you can easily distinguish for which products customers have
chosen to receive the Gift Wrapping option.
On Sale: If you want to mark a product as an 'On Sale' product, tick mark this option. Tick marking this would
bring another field called "Sale Price". Enter the sale price and this is the new price that would be offered to
the customers for this product. Tax, discount, shipment cost etc. everything would be calculated and adjusted
based on the Sale Price and not the Base Price if the ' On Sale' is enabled for a product. On sale products are
shown using labels in the store front.
Enable Call for Price: Enable this option if you want to showcase a product on the store but don't want to
sell it yet. Enabling this feature hides the add to cart, product price from the product and thus the customers
can't see the price of the product and can't add it to the shopping cart.
Properties:
Model: Field to enter the Model name of the product. This is an optional field and if a model name is entered,
this is shown on the product details page.
Height: Height of the product.
Width: Width of the product.
Depth: Depth of the product.
Weight: Enter the weight of the product.
Product Properties
You should enter the Product Properties for the physical products specifically if you want them to
be shipped via AusPost or any third party courier service. Without the proper product weight and
dimensions, you can't expect to calculate the shipment cost properly for those third party courier
services. The units that is used for the measurement comes from the Administration -
eCommerce- settings.
Attribute:
Select the Attributes from the list and the attribute values would be shown on the left panel. From the left panel you
can select the attribute values you want to avail for this products and those would be added to the right panel. For
each selected attribute value, you can mention the price differences than the original product price. To add price
select the Add option and enter the impacted price. This price would be added to the product base price and if a
customer selects this attribute, the price would be adjusted accordingly. To reduce price for an attribute select the
4. option 'Reduce' and enter the amount that you want to deduct if this attribute is selected. If you want to enter the fix
price for an attribute then select the 'Fix' option and enter the price that you want to change the customer if s/he
selects this attribute.
For instance, if you have a 'Shirt' as a product and then 3 colours and 3 size variation, you would like the customers
to pick the size and color while purchasing it. To do so first go to Web Commerce - Attributes and create 2 attributes
called 'Colours' and 'Sizes' . Create Yellow, Red and Green as the attribute values for Colours and then Small, Me
dium and Large as the values of the Sizes. Now on the product create/edit popup click on the 'Colours' and 'Sizes'
attributes and the values of this attributes would be listed in the left panel. Pick the colors and sizes you want to avail
for the product' shirt' and either add or reduce prices for the attributes values. Alternatively you can enter the fix
prizes as well.
At the bottom of the Attribute tab there is a check box option called " Show Price with Attributes". If this is ticked
marked, the prices would be shown on the attribute selection. Select the radio option ' Show Impacted Price' if you
only want to show how much more or less would be required for this attribute. If you want to show the exact price
that the customer would be charged, select the second radio option ' Show Full Price'
Meta Tag:
To add Meta tags, click on the plus icon placed under the Action column and that would open two fields for
entering meta tag name and meta content. simply type in the meta name and content and press the plus icon again
to add another meta tag.
You can add multiple images to a product. It's always a good idea to add multiple images so that the customers can
view the product images and can have a vivid understanding of the product. You can add product images from your
local PC, from WebDav (the images that you already uploaded and are stored in the CMS server side ) and from
other websites. Simply select from one of those three available option and press the ' Select Images' button. The
images would be selected and shown with the progress bar. After you click the ' update' button the images would be
uploaded and attached with the product. The added images would be shown under the ' Existing Image'. You can
mark the default image among the multiple images and this default product images would be used as the main
image of the product. Other images would be shown bellow the default image as thumbnail images in the product
details page. Clicking a thumbnail would open the image in full product view. To change the default image simply
click on the icon placed left of the thumbnail view. the default image has a different icon and a bluish background
than the other images. To remove an added image click on the remove icon.
5. Video:
Similar to Product Images, you can add product videos and those added videos would be shown on the store front
product details page. To upload a video simple choose from one of the 3 available options : Local Video, WebDav,
and Embed Video. To upload a video from your computer select the Local Video tab, to reuse already uploaded
video select WebDav video and to embed a video from video sharing sites like YouTube,Vimeo etc.
For local video simply upload the video from one of the supported video format and for embedded video simply
copy paste the embed code and place in the text area.
6. Product Video
If you are using a large number of product videos for many of your products, embedding video
would be a better choice to save the bandwidth uses.
Resources:
To add a resource file to a product choose the file, pick a name for it and browse an icon to be shown. In the product
details page this resource file would be available for the customers to save to their local computer. Using the
resource feature you can let your customers save the technical detail, manual etc. large volume of files from the
product details page. Resource name and Resource icon are optional and if you don't provide the name or icon, the
default file name and a default pdf icon would be used to represent the resource file
Related Product:
From this tab you can select the related products and those related products would be shown on the product details
page. This is a great way of cross-selling and can actually increase your sell volume. The related products are nicely
presented at the bottom of the product details page.
7. Product Collection:
You can present similar products as a collection of products and it is a great way presenting the similar products and
when a customer changes the product type from the product details page, the product description, images etc. all
are changed to show the details of this newly selected product. Thus a customer can make a more informed
purchase from the product collection. For instance: if you have a product called ' Wooden chair' that has different
types, you can create an attributes and enter values for the types as the attributes values. Now it a customer selects
an attribute from the store, only the price would be impacted and nothing else. Now if you create 3-4 different
products and place them as the product collection, when a customer changes the product type, the whole product
details page is changed and the selected product's description as well as images, videos etc. would be shown to the
customers.
8. To add collection products, mark the product as the Base product of the collection and that would bring the option
for selecting the other collection products. You can change the name of the collection product from the 'Label in
Collection' filed.
Now that products have been created and are shown under the product ribbon. But that does not mean that those
products are visible in the store and customer can purchase them. To show products in the store you need to edit
the content of a page in which you want to show the product.
Now you Need to add product Widget. To add Product Widget you have to select the Image Widget and drag and
drop it on the layout.
9. Now you will have to click on the Configure button and a new window will appear
Now you can select as many products as you want. The Products will be sorted in the same order as you have
added the product on the widget. To move up click on button. For Up press and for down press button.
Finally Press Apply button to save the selection.
Finally Press Save Button . Now the product is added to the Website.
How can I manage product inventory?
10. » In WebCommander you can manage inventory for each individual products or for selective products. To track
inventory of a product, simply right click on that product from Web Commerce - Product and select ' Properties'
option. From the 'Edit Product' tab, click on the 'Price & Quantity' tab. If the Track Inventory check-box is not tick
marked, that means you have not enabled track inventory for this product.
Tick mark the 'Track Inventory' checkbox and that would present three additional fields: Track Inventory, Available
Stock & Low Stock Level. Clicking the Track Inventory would open the Inventory details popup. Clicking the
Inventory History action icon from this popup would show the history of the inventory for this product. To add
product stock enter the quantity and type a note and click on Adjust button. Since you have chosen to track the
product inventory, you should enter the current available stock in the 'Available Stock' field. Specify the Low stock
level quantity for the inventory tracked product. If the product reached to the low stock level, in the CMS they would
be marked using a yellow bubble and the admin would be notified by emails.
11. If you track inventory for a product, the product stock level is shown using a visual indicator. Green circle means the
product has a good stock level and you don't need to be concerned about it's stock whereas the Yellow circle means
the product stock level is low. Red Circle means the product is out of stock and you should immediately put your
concern on the stock.
Adding some notes while adjusting the product stock manually is always a good idea as ti would save from any
future confusion.
How the product stock level would be adjusted when they are sold from the store is depended upon the settings you
selected from the Administration - eCommerce - Inventory. There are several product stock related settings
among which the 'Inventory Adjustment' determines when and how the product would be adjusted
automatically. There are 5 options to pick from:
1. I'll manually adjust product inventory: If this option is chosen, the system won't adjust the product
inventory after they are ordered from the store. It would be the store owner/stock keeper's responsibility to
manually adjust the inventory.
2. After an Order is Placed: For this option the product inventory would be auto adjusted as soon as the order
is placed. Even if the payment was not made or the product are pending to be delivered, this option reduce
the order quantity from the product stock level as soon as the order is placed from the store.
3. After Payment is Complete: This would reduce the product stock level only after the product is ordered and
the payment has been completely paid.
4. After Shipment is Complete: Product stock level would be adjusted after the products are marked as
shipped from the CMS.
5. After an order is marked as Complete: Select this options if you want the product stock level to be adjusted
only after you manually mark the order status as 'Completed'.
12. Tick mark the option 'Adjust Inventory for the cancelled Orders' if you want the product inventory to be auto
adjusted after an order is cancelled. To adjust product inventory for the orders that were refunded, tick mark the
option 'Adjust Inventory for Refunded Orders'.
Can I assign a product in more than one category?
» Yes, you can assign a product in more than one categories using the Link Category feature. To assign a single
product in more than one category, go to product edit popup and from the Basic tab - Link Category field select the
categories in which you want the products to be available.
13. A product resided in a single category but can be linked to multiple other categories and in this instance, the same
product could be found from the linked categories. For instance: if you create a product called ' Wooden Clock' and
select 'clock' as it's parent category, from the store the product could be found under the ' clock' category only. Now
if you want this same products to be available if customers are browsing ' Wooden Work', 'Home decoration' & 'Wall
Clock' categories, you should link the later three categories as the link categories for this product. Thus the same
product could be found no matter which category customer visits.
I want to upload product manual with the products. How
can I do it?
» If you want to upload the product manual, technical details or any other file, then you have to go to Web
Commerce - Products. Now select the product and right click on it. Now you have to select the Properties option
and a new window will appear. Now select the Resource tab. Now select the file and upload it. You will have two
additional fields called Resource Name and Resource Icon where you can place a name for the file and upload an
icon that would be shown as the resource icon on the store front. Resource name and Resource icon are optional
and if you don't provide the name or icon, the default file name and a default .pdf icon would be used to represent
the resource file. In the store front - product details page bellow the product image, an additional tab would be
present called 'Resources' and clicking this tab would show the uploaded resource file that the customer would be
able to download to their computer.
14. The maximum allowed file size is 2 GB. If you need to add multiple files, add them as a single zip file and upload as
resource with the product.
There are so many information to fill in to create a
product! What are mandatory fields?
» The mandatory fields to create product are the Product Name, Product Number/ SKU, Category, Product
Type, Base Price.
There are 2 steps of creating a product. When you click on the 'Create Product' action icon, a popup with only few
15. fields appear and lets you create the product without entering so many information to that product. But as a product
needs so many information even images, videos, that are offered to be added just after the product is created. You
can skip adding those information instantly though and can edit them later. But it's always recommended that you
enter the comprehensive product information as they would not only give the customers what they are looking for
but would also encourage them to actually purchase it.
Can I create and sell downloadable products in
WebCommander?
» Yes, you can create and sell downloadable Products in WebCommander. If you select the " Product Type" as "Vir
tual Product" it will be considered as a downloadable product. Downloadable products/ Virtual products are
tangible products that are usually downloaded after they are purchased. Creating the Virtual products is pretty
similar of creating the Physical products with very few exceptions.
First: virtual products won't have any weight or dimensions and hence the ' Properties' tab would not be presented.
Second: the shipping profile field would not be present as assigning shipping profile would not be required for virtual
products. Finally, after you mark the product as virtual product, you would have to upload the file itself as it's a
mandatory field.
What If I have created several products and don't want to
show them in the website?
» If you do not want to show products that you have already created then you will have to go to Web Commerce and
select product. From there you will have to select the product which you do not want to show. Now right click on the
16. products and click on the properties option and a new window will appear. From the Availability combo box select
Not Available option and press update. Now this product will not be displayed at your website.
In addition to that, go to Administration - CMS Settings - Search tab and Select 'Product Added to Widgets'
option from the Show Product fields. This would make sure that when the customers search the products, only
products that you have deliberately added to pages would be shown in the search results.
How can I add product video to be displayed in prodct
details page?
» To add product video, right click on the product and select 'Properties'. The product edit popup would appear.
From this popup select the 'Video' tab and that would bring the option to let you attach videos to the product. You
can add multiple videos to a single product and all of the videos would be shown on the product details page. The
default video would be shown in the videos frame and other videos would be shown as the thumbnail videos like you
browse video in YouTube. Clicking the play option on a video would run it from the store front.
You can add videos from 3 different sources:
Local Video: Upload videos that are residing in your local PC.
WebDav Video: If you have already uploaded video for other products, you can reuse those videos. If
17. WebDav Video option is selected, you will get the list of already uploaded video and you can pick videos from
this list.
Embed Video: To embed video from popular video sharing sites like YouTube or Vimeo, select this option
and copy-paste embed code in the text-area.
After you have selected videos, press update button and the video would be added to the product. You can mark a
default video like you do for the default image. To remove a video from a product , simply press the delete icon from
the video thumbnails under the 'Existing Videos' and this video will no longer be shown with this product.
On the store front - product details page the added video would be shown under the 'Video' tab. The default marked
video would be shown as the large video whereas the other videos would be shown as the thumbnail videos on the
right side of the default video. If a customer clicks on a video thumbnail, this video would be played then.
18. Which image & video formats are supported?
» All the popular and widely used image and video formats are supported in WebCommander. Following is the list of
image and video formats you can use for the product:
Image Formats:.jpg, .jpeg, .bmp, .png
Video Formats: .flv, .mov, .rm, .mp4, .3gp, .mkv, .dat, .wmv
Can I retrive a product I have removed?
» The products that you remove are stored in the Trash before they are permanently removed. So if you have
removed products from the Web Commerce - Product, you can find them in the Trash under Administration. To
find a deleted product easily, filter the trash item by selecting Product from the right-top and only the removed
products would be shown. Click on the 'Restore' icon from from 'Action' column and the product would be restored
to the original category from which you have actually removed it.
If you have removed the category in which the product used to reside, the product would be restored under the R
oot category.
Can I copy a product to create a similar product quickly?
» In WebCommander you can copy a product and thus create a similar product very easily. For instance: If you have
a product called 'Chair' and to create another product called 'Wooden Chair', you can either create it from the
19. scratch or simply copy the product 'chair' and change the information to have a completely new product quickly.
Product copy option is available in the list view and to copy a product switch to the list view by clicking the 'List View
' action icon. Now click on the 'product copy' icon under the action column and a new product would be
created.
The newly created product would have the same name but a slightly different SKU as SKU must be unique. The
product would be created under the same category and would have same product summery, description, price, meta
tags, stock level, properties (i.e. weight, height etc.).
How can I move a product from one category to another?
» To move a product from one category to another one, right click on the product and select the ' Properties' option.
From the Basic tab select the new category from the 'Category' drop-sown. After you press the 'update' button, the
Product would be moved the the newly selected categories.
Can I import Products in the CMS? If so how can I do that?
» Yes, WebCommander supports the Excel product & Category import. You can mass import the products in the
CMS by clicking the 'Import Product' icon from the Web Commerce menu - Product ribbon. Clicking the icon
would bring a popup and would let you browse the product excel file. If the excel file is properly formatted, the
products would be imported in the CSM.
Download sample excel product import file: Sample Excel import file.xlsx
How can I customize the way products are displayed in the
website?
» WebCommander offers a range of options to customize the way your products are displayed on the store including
the product image dimensions and what to show on the product details page. Meanwhile you can control how you
want your products to be listed.
First start with the product image customization that would can find under Administration - CMS Settings - Image &
Video. Here you can determine the width and height of the Product details page image, product listing image and
product image zooming percentage. Additionally you can control the pop-up image size, whether to show the image
zooming or not, list view and image view image size.
WebCommander offers you every flexibility to design and represent your products the way you like. You can show
products in list view in one page whereas in image view in another page. The switchable view lets customer switch
the views of the products as well as the filtering, pagination and sorting option. All these features makes your store
visually attractive and easy to navigate for customers.Furthermore you can decide where to show the product
description, add to cart button, price and where not to. While adding products to a product widget, click on the
setting icon of the widget and you can configure how your products would be listed.
20. Finally, you can control how the product details page would be presented to the customers and which information
regarding the product you want to show. To configure your product details page go to Administration -
eCommerce - and then the Product Detail Page tab. You can select/unselect the options you want to show,
enable/disable Add to Cart feature, let customers use social share, show /hide discount details, related products and
many aspects of the product displaying as per your preferences and business needs.
21. How can I let my customers comment/review my
products?
» To enabled commenting/reviewing on your products, go to Administration - eCommerce ribbon - eCommerce tab
and enable the 'Product Review and Rating' option. There are three additional settings that would appear after
you enable this feature:
Who can Review & Rate: This settings determine whether you want anyone to review your products or only
the registered customer to do so.
Show Reviews: This settings determines if the customer reviews would be shown immediately or would wait
for the admin approval.
Review Per Page: Select how many previously added reviews you want to show in the product detail page. If
there are more reviews than your selection, they can be accessed using the pagination.