
Recommended
More Related Content
What's hot
What's hot (20)
Similar to sample lesson plans.pdf
Similar to sample lesson plans.pdf (20)
Recently uploaded
Recently uploaded (20)
sample lesson plans.pdf
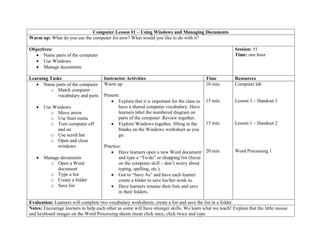
- 1. Computer Lesson #1 – Using Windows and Managing Documents Warm up: What do you use the computer for now? What would you like to do with it? Objectives: Name parts of the computer Use Windows Manage documents Session: #1 Time: one hour Learning Tasks Instructor Activities Time Resources Name parts of the computer o Match computer vocabulary and parts Use Windows o Move arrow o Use Start menu o Turn computer off and on o Use scroll bar o Open and close windows Manage documents o Open a Word document o Type a list o Create a folder o Save list Warm up Present: Explain that it is important for the class to have a shared computer vocabulary. Have learners label the numbered diagram on parts of the computer. Review together. Explore Windows together, filling in the blanks on the Windows worksheet as you go. Practice: Have learners open a new Word document and type a “To-do” or shopping list (focus on the computer skill – don’t worry about typing, spelling, etc.). Got to “Save As” and have each learner create a folder to save his/her work in. Have learners rename their lists and save in their folders. 10 min. 15 min. 15 min. 20 min. Computer lab Lesson 1 – Handout 1 Lesson 1 – Handout 2 Word Processing 1 Evaluation: Learners will complete two vocabulary worksheets, create a list and save the list in a folder. Notes: Encourage learners to help each other as some will have stronger skills. We learn what we teach! Explain that the little mouse and keyboard images on the Word Processing sheets mean click once, click twice and type.
- 2. Computer Lesson #2 – Using a Keyboard & Editing Text and Spaces Warm up: How many of you have taken typing or word processing courses? Do you use those skills now? Objectives: Use a keyboard Edit text and spaces Session: #2 Time: one hour Learning Tasks Instructor Activities Time Resources Use a keyboard o Match names with keys on keyboard diagram o Type sentences Edit text and spaces o Insert text and spaces o Highlight text o Delete text and spaces Warm up Review: Have learners open a new Word document. Point out the task bar and document name. Present: Have learners number the keyboard diagram. Review together. Then have them type the sentences on weight loss. Show learners how to highlight text, insert text and lines, and delete text and lines using the delete and backspace keys. Practice: Have learners open the Bean Salad recipe and make the corrections given. More advanced learners can then edit the Apple Muffin recipe. Have learners save the recipes in their folders (and print them if they want to try the recipe at home). 5 min. 5 min. 10 min. 10 min. 30 min. Computer lab Lesson 2 – Handouts 1 & 2 Word Processing 2 Lesson 2 – Handouts 3 & 4 Evaluation: Learners will number a keyboard diagram and edit a recipe. Notes: Be sure to download the recipes in advance so they are available to the class. Giving learners an already typed document allows them to focus on the computer skill being taught rather than worrying about whether or not they can type!
- 3. Computer Lesson #3 – Typing Paragraphs and Checking Spelling Warm up: How many of you use the computer to write letters or send email messages? How do you check for spelling errors? Objectives: Type paragraphs Check spelling Session: #3 Time: one hour Learning Tasks Instructor Activities Time Resources Type paragraphs o Use tab and enter keys o Type sentences Check Spelling o Open Spell-check o Use Spell-check Warm up Review: Have learners fill in the blanks on the Typing Paragraphs handout. Review how to use the tab and enter keys. Have them type the paragraphs and the next paragraph on the handout (or they can write their own). Tell them not to worry about errors. Present: Point out the Review tab on the ribbon. Show learners how to use Spell-check. Have them use it to check their paragraphs. Practice: Have learners use Spell-check to correct the newsletter article. Have them save the article in their folder. Advanced students can type and check a newspaper article. 5 min. 15 min. 20 min. 20 min. Computer lab Lesson 3 – Handout 1 Word Processing 3 Lesson 3 – Handout 2 Newspaper article copies Evaluation: Learners will type a paragraph and check spelling in a newsletter article. Notes: Spell-check is found in the Proofing group on the Review tab. Be sure to download the article in advance so it is available.
- 4. Computer Lesson #4 – Using Tabs & Typing Friendly Letters Warm up: How many of you still write letters? How many just use email? Objectives: Use tabs Type friendly letter Session: #4 Time: one hour Learning Tasks Instructor Activities Time Resources Use tabs o Create a personal schedule Type a friendly letter o Indent using tab key o Write a letter to a friend Warm up Review: Have learners create a personal schedule using the tab key to make two columns – one for time and one for activity. Present: Show learners how to use the tab key to indent lines using the ruler to measure. Practice: Have learners copy the sample letter. Have them write a letter to a friend. Show learners how to print their letters. 5 min. 10 min. 5 min. 40 min. Computer lab Lesson 4 – Handout 1 Lesson 4 – Handout 2 Letter to copy Evaluation: Learners will create a personal schedule and type a letter to a friend. Notes: Some learners may not be comfortable thinking of something to say and learning a new skill. Its okay for them to copy the sample letter again or you could bring another longer letter for them to copy.
- 5. Computer Lesson #5 – Using Fonts Warm up: What is a font? Do fonts affect how we respond to text? Objectives: Use fonts Session: #5 Time: one hour Learning Tasks Instructor Activities Time Resources Use fonts o Identify the formatting toolbar o Use different font styles o Underline, bold and italicise text Warm up Review: Have learners write a list of names and phone numbers of friends and family using the tab key to create two columns. Present: Show learners the Font group on the Home tab. Demonstrate how to change the font style by highlighting a line of text and choosing a different font style. Show how to choose the font style before beginning to type. Then show how you can also use the B,I, and U icons to format text. Practice: Have learners copy the garage sale poster using different font styles. More advanced learners can create a second poster using the information on Handout 2. 5 min. 10 min. 10 min. 35 min. Computer lab Word Processing 5 Lesson 5 – Handouts 1 & 2 Evaluation: Learners will create a phone list and copy a poster using different fonts and font styles. Notes: Encourage creativity. This is the fun part!
- 6. Computer Lesson #6 – Using Alignments & Inserting Pictures Warm up: What is an alignment? Is a picture really worth a 1000 words? Objectives: Use alignments Insert pictures Session: #6 Time: one hour Learning Tasks Instructor Activities Time Resources Use alignments o Align text right, left and centre o Create an invitation using all three alignments Insert Pictures o Search for pictures o Insert a picture o Move, resize and position a picture Warm up Review: Have learners write a sentence about their day. Highlight and change the font style. Use B, I, and U. Undo the changes. Present: Point out the Paragraph group. Discuss alignment. Demonstrate by having learners write their names and then align them right, left and centre. Practice: Have learners fill in and then type the invitation on Handout 1. Present: Demonstrate how to insert a picture. Have learners search for a picture and insert it in their invitation. Demonstrate how to move, resize and position pictures. Have learners save their invitations. 5 min. 10 min. 10 min. 15 min. 20 min. Computer lab Word Processing 6-1 Lesson 6 – Handout 1 Word Processing 6-2 Evaluation: Learners will create an invitation with aligned text and a picture. Notes: Be sure to show learners how to change the wrapping style of the picture so the picture is easy to move.
- 7. Computer Lesson #7 – Cut, Copy and Paste Warm up: Do we always have to retype things if we want to use them again? Objectives: Use cut and paste Use copy and paste Session: #7 Time: one hour Learning Tasks Instructor Activities Time Resources Use copy and paste o Copy text o Paste text Use cut and paste o Cut text o Paste text Warm up Review: Have learners open a new Word document, search for a picture in Clip Art that reflects their day and insert the picture in their document. Present: Have learners type a caption for their picture. Demonstrate how to cut the caption and paste it lower on the page, then how to copy it and paste it lower on the page, using the Clipboard group. Practice: Have learners copy and paste the childhood diseases into the table on Handout 7-1 using Handout 7-2 as a guide. Have learners cut and past the recyclables/not recyclables into the table in Handout 7-3. 5 min. 10 min. 15 min. 15 min. 15 min. Computer lab Word Processing 7 Lesson 7 – Handouts 1 & 2 Lesson 7 – Handout 3 Evaluation: Learners will copy and cut items and paste them into tables. Notes: Show learners how they can paste the last cut/copied item multiple times (useful for the childhood disease activity).
- 8. Computer Lesson #8 – Numbered & Bulleted Lists Warm up: When do we use bulleted and numbered lists? Objectives: Use numbered lists Use bulleted lists Session: #8 Time: one hour Learning Tasks Instructor Activities Time Resources Use numbered lists o Type article o Create a numbered list Use bulleted lists o Type article o Create a bulleted list Warm up Review: Copy a “quote of the day” on the board. Have learners open a new Word document and type the quote. Have them copy and paste it ten times. Present: Have learners type a list of towns/cities. Demonstrate how to highlight the list and then use the number/bullet icons in the Paragraph group on the Home tab to format the list. Demonstrate how to first click on the icon and then type a new list. Show how to highlight the list and click on the icon to undo. Practice: Have learners copy Handouts 8-1 & 8-2 using the bullet and number icons on the formatting toolbar to format the text. Have learners save their work. 5 min. 10 min. 20 min. 25 min. Computer lab Lesson 8 – Handouts 1 & 2 Evaluation: Learners will copy two documents, using the bullet and number icons to format the text. Notes: Use bullets when items are of equal value and numbered lists when there is a sequence or difference in importance.
- 9. Computer Lesson #9 – Typing Business Letters Warm up: When do you write a business letter? Is it always a complaint letter? Do you ever write “good news” business letters? Objectives: Type business letter Session: #9 Time: one hour Learning Tasks Instructor Activities Time Resources Type business letter o Identify parts of a business letter o Write a business letter Warm up Review: Have learners type a list of foods they enjoy and number it using the number icon. Present: Discuss the parts of a business letter. Discuss how the conventions have changed since many people learned to write a business letter (block format, province format, etc.) and how the computer has shaped that change. Practice: Have learners write a complaint or “good news” letter to their MP, MLA or mayor. Have learners print their letters. Extend the activity by having more advanced learners look up the address on the internet and showing them how to print an envelope. 5 min. 10 min. 15 min. 30 min. Computer lab Lesson 9 – Handout 1 Evaluation: Learners will write a business letter and print an envelope. Notes: If you are sharing a printer make sure that everyone is printing letters and/or envelopes at one time!
- 10. Computer Lesson #10 – Creating Tables Warm up: When do we use tables? How can they help us organize information? Objectives: Create tables Session: #10 Time: one hour Learning Tasks Instructor Activities Time Resources Create tables o Identify parts of a table o Create a table o Type information into cells Warm up Present: Discuss when to use tables. Have learners identify the parts of a table. Demonstrate how to create a table using the Tables group in the Insert tab. Demonstrate how to type information in the cells and how to move around in the table (using tab key, arrows and/or mouse). Practice: Have learners create the table in Lesson 10 – Handout 1 and input the words in the correct columns. A quick review of parts of speech may be necessary! Have learners save their table in their folder. 5 min. 20 min. 35 min. Computer lab Word Processing 10 Lesson 10 – Handout 1 Evaluation: Learners will create a table and type information in the cells. Notes: In the lesson yesterday is an adverb. Yesterday can be an adverb, noun or adjective.
- 11. Computer Lesson #11 – Formatting Tables Warm up: How can formatting help us understand documents? Objectives: Format tables Session: #11 Time: one hour Learning Tasks Instructor Activities Time Resources Format tables o Insert and delete columns and rows o Format rows, columns and cells o Format borders, size, fonts and alignment Warm up Review: Have learners create a table with three columns, eight rows and the headings Spring, Summer and Fall. Have them type names of plants that flower in each season. Present: Click in a cell and point out the Layout and Design tabs located in Table Tools. Use the Seasons table to demonstrate how to change the height, delete and insert, highlight, and put borders around rows and columns. Practice: Have learners format the table in Lesson 11 – Handout 1. Have learners save their tables in their folders. 5 min. 15 min. 10 min. 30 min. Computer lab Word Processing 10 Lesson 11 – Handout 1 Evaluation: Learners will format a table and type information in the cells. Notes: Don’t forget to download the table for learners to format. The table will get too wide and the sides of the page will no longer be visible. To avoid this, show learners how they can double click at the top of the line between columns and the column will automatically fit to the contents. You must click in a cell to access the Layout and Design tabs in Table Tools.
- 12. Computer Lesson #12 – Page Set-up Warm up: What is portrait? What is landscape? What is a margin? Objectives: Set up page Session: #12 Time: one hour Learning Tasks Instructor Activities Time Resources Set up page o Discuss default settings o Change margins o Change paper size o Change paper orientation Warm up Present: Discuss default settings on the computer and when it is appropriate to change those settings. Have learners open a new Word document and click on the Page Layout tab. Have learners change the paper size, margins and orientation of the document. Close the document. Practice: Have learners create the table in Lesson 12 – Handout 1. Have them input information from memory, the phone book, or, for more advanced learners, from the internet. Have learners save their table in their folder. More advanced learners can also do the resume if appropriate 5 min. 15 min. 40 min. Computer lab Word Processing 12 Lesson 12 – Handout 1 Lesson 12 – Handout 2 Evaluation: Learners will change the page set-up on a document and then create a phone list. Notes: More advanced learners can use www.mytelus.com or www.canada411.ca to find phone numbers of friends and family.