SlideShare a Scribd company logo
1 of 255
SESSION 2015/2016
SBEC1122
CONSTRUCTION TECHNOLOGY II
COURSEWORK REPORT
FLOOR AND WALL FINISHES
EDUCITY SPORTS COMPLEX
GROUP MEMBERS:
NO. FULL NAME MATRIC NUMBER
1 LAI YONG HONG A15BE0063
2 MUHAMMAD HAZIQ AZHAR BIN MAT NAZRI A15BE0100
3 NUR NAZRINA HUMAIRA’ BINTI NADZRUDDIN A15BE0137
4 SARIMAH BINTI OSMAN A15BE0231
SUBMISSION DATE: WEEK 11, WEDNESDAY, 25th APRIL 2016
PREPARED FOR: MR. SYAMSUL HENDRA BIN MAHMUD
Department of Quantity Surveying,
Faculty of Built Environment,
University Technology of Malaysia.
Group 14 Floor And Wall Finishes Construction Technology II SBEC1122
.
i
ACKNOWLEDGEMENT
lmost two months, we tried our best to keep progressing this course work report
although it is not good enough to compare to the other academic reports in
construction area. Despite having a lot of obstacles, and stressful feelings, we barely
managed to keep our pedal on to complete this report, thankfully to ‘those’ who always stand
by our side and available for lending their hand to us.
Therefore, we would like to take this chance to express our greatest gratitude
towards Allah (God) who gave us life and breath every seconds no matter where we are and
always gave us guide and strength to do our responsibility, to dealt with difficulties and also to
do our job as his servant and of course as a student in here.
Secondly, we would like to give a huge appreciation to our parents who gave us a
non-stop advices to make us always remember, keen to study and finish our assignment, and
also very supportive in terms of money to buy stationaries, food and so on. Their helps and
assistances always will be kept in our hearts and will never be erased.
Thirdly, we would like to deeply express our gratefulness to Mr. Syamsul Hendra
Bin Mahmud, our lecturer and advisor of this report, who continuously giving us support in
writing this information without coercion and help us to find new project site after we lost our
hope in the previous site, Teega Puteri Harbour. His help are unrequited and very beneficial
for us. Hence, we are very grateful to have his help.
Following, we would like to give a big thanks to our advisor, K.A.S Juruukur Bahan
Sdn. Bhd. team, who provide us explanation and countless information about our project site
such as Bill of quantities (BQ), drawings, and program details. We also would like to give
appreciation towards Educity Sports Complex management team that allow us to visit the site
and make some academic research and also scarification in time to brief us about the site.
Afterwards, we want to thanks our dear friends and course mates that always have
our thoughts and listen to our words, and also giving us a good response when we appointing
question, and also giving us advices in completing the task. Not to forget, to the ‘two groups’
A
Department of Quantity Surveying,
Faculty of Built Environment,
University Technology of Malaysia.
Group 14 Floor And Wall Finishes Construction Technology II SBEC1122
.
ii
who are also helps us in identifying new site, helping to photocopy the drawings, lending hands
in managing appointment with the site manager, and many more.
Last but not least, we would like to send our thanks to ourselves, starting from Lai
Yong Hong, who drove us to the site, and helping us in initial travelling expenses. Next,
Nazrina who always give quick response in giving opinion and Sarimah, who help a lot in
finding information and Haziq, who leading us towards this end. We hope that our course work
report are enough and sit well with the requirements need in this task. We also hope that we
will succeed in this report.
Department of Quantity Surveying,
Faculty of Built Environment,
University Technology of Malaysia.
Group 14 Floor And Wall Finishes Construction Technology II SBEC1122
.
iii
TABLE OF CONTENT
ACKNOWLEDGEMENT....................................................................................................... I
TABLE OF CONTENT........................................................................................................ III
LIST OF FIGURES ...............................................................................................................VI
LIST OF TABLES ..............................................................................................................XIV
1.0 INTRODUCTION.......................................................................................................1
1.1 BUILDING FINISHES ...........................................................................................1
1.2 INTERNAL AND EXTERNAL FINISHES ...........................................................7
1.3 INTERIOR AND EXTERIOR OF FLOOR FINISHES .........................................7
1.4 INTERIOR AND EXTERIOR OF WALL FINISHES ...........................................8
1.5 HISTORY OF FINISHES .......................................................................................8
1.5.1 THE WOOD FLOORING AS FINISHES ..........................................................8
1.5.2 THE WAXING FLOOR AS FINISHES .............................................................9
1.5.3 THE CONCRETE FLOORING AS FINISHES ................................................11
1.5.4 THE TILES FLOORING AS FINISHES ..........................................................12
1.5.5 THE NATURAL STONE FLOORING AS FINISHES ....................................15
2.0 THEORETICAL STUDY .........................................................................................17
2.1 FLOOR FINISHES ........................................................................................17
2.1.1 GENERAL FACTORS OF FLOOR FINISHES SELECTION .................18
2.1.2 CLASSIFICATION OF FLOOR FINISHES .............................................22
2.1.2.1 IN-SITU FLOOR FINISHES ................................................................22
2.1.2.1.1CEMENT SCREED.........................................................................22
2.1.2.1.2TERRAZZO.....................................................................................42
2.1.2.1.3FLOOR PAINT................................................................................52
2.1.2.2 APPLIED FLOOR FINISHES ..............................................................63
2.1.2.2.1PLASTIC BASED........................................................................63
2.1.2.2.2NATURAL STONES...................................................................73
2.1.2.2.3CERAMIC....................................................................................94
2.1.2.3 TIMBER FLOOR FINISHES ..............................................................101
Department of Quantity Surveying,
Faculty of Built Environment,
University Technology of Malaysia.
Group 14 Floor And Wall Finishes Construction Technology II SBEC1122
.
iv
2.2 WALL FINISHES........................................................................................111
2.2.1 WALLPAPER ..........................................................................................111
2.2.2 TILE..........................................................................................................116
2.2.3 PLASTER .................................................................................................123
2.2.4 CERAMICS..............................................................................................129
2.2.5 PAINT.......................................................................................................134
3.0 CASESTUDY.........................................................................................................139
3.1 FOCUS OF THE CASE STUDY.................................................................139
3.2 PROJECT PROFILE....................................................................................140
3.3 PROPOSED DRAWINGS AND BILL OF QUANTITIES ........................149
3.4 SYNTHETIC RUNNING TRACK CONSTRUCTION..............................155
3.4.1 TYPES ......................................................................................................155
3.4.2 DESIGN BENEFITS ................................................................................157
3.4.3 COMPONENT .........................................................................................159
3.4.4 CONSTRUCTION METHODS ...............................................................164
3.4.5 MATERIALS AND COST.......................................................................173
3.4.6 SPECIFICATIONS...................................................................................177
3.5 SWIMMING POOL CONSTRUCTION.....................................................179
3.5.1 TYPES ......................................................................................................179
3.5.2 DESIGN BENEFITS................................................................................182
3.5.3 COMPONENTS .......................................................................................183
3.5.4 CONSTRUCTION METHODS ...............................................................190
3.5.5 MATERIALS AND COST.......................................................................196
3.5.6 SPECIFICATIONS...................................................................................199
3.5.7 METHOD STATEMENT ........................................................................200
3.6 PLANTS AND EQUIPMENT.....................................................................205
3.7 COST............................................................................................................217
3.8 LABOUR AND COST.................................................................................221
3.9 CONSTRUCTION SAFETY.......................................................................225
4.0 SUITABILITY STUDIES.......................................................................................227
5.0 BUDGET AND EXPENSES...................................................................................229
6.0 CONCLUSION .......................................................................................................232
Department of Quantity Surveying,
Faculty of Built Environment,
University Technology of Malaysia.
Group 14 Floor And Wall Finishes Construction Technology II SBEC1122
.
v
7.0 REFERENCES.....................................................ERROR! BOOKMARK NOT DEFINED.
8.0 APPENDIX .............................................................................................................238
Department of Quantity Surveying,
Faculty of Built Environment,
University Technology of Malaysia.
Group 14 Floor And Wall Finishes Construction Technology II SBEC1122
.
vi
LIST OF FIGURES
Figure 1 Residential building.....................................................................................................3
Figure 2 High rise building in a city ..........................................................................................4
Figure 3 Example of machinery building ..................................................................................6
Figure 4 Wood flooring as finishes............................................................................................9
Figure 5 Waxing as floor finishes makes floor look shiny and clean......................................10
Figure 6 Concrete flooring as the easiest finishes to install for floor finishing .......................11
Figure 7 Tiling can be match from variety of types, colour and patterns. ...............................13
Figure 8 Stones are famous with its durability against distortion............................................15
Figure 9 Cement screed as floor finishes.................................................................................22
Figure 10 Dark colour often becoming people’s choice nowadays. ........................................23
Figure 11 Cement screed can be done into variety different colours ......................................23
Figure 12 Forming levelling strips...........................................................................................26
Figure 13 A screed cut perpendicularly at the point where laying has been interrupted .........27
Figure 14 Sealing a chase in existing flooring by applying bonding slurry on the contact
surfaces between the existing and repaired surfaces................................................................27
Figure 15 Reinforcing a screed by bridging fine mesh over pipe-work ..................................28
Figure 16 Placing zinc-plated metallic mesh at the mid-point of the screed ...........................28
Figure 17 Float-finishing the surface of a screed.....................................................................29
Figure 18 Finishing the surface of a screed with a power float ...............................................29
Figure 19 Forming check joints in a screed .............................................................................30
Figure 20 Cracked screed.........................................................................................................32
Figure 21 Opening cracks in a screed with an angle grinder...................................................32
Figure 22 Sealing fractures with EPORIP ...............................................................................33
Figure 23 Sprinkling sand on the surface of fresh EPORIP ....................................................33
Figure 24 A depression in an underfloor screed in correspondence with pipe-work ..............34
Figure 25 The thickness of the screed over pipe-work is insufficient (<2.5 cm) ....................34
Figure 26 Applying bonding slurry made from epoxy resin (PRIMER MF) ..........................35
Figure 27 Filling fractures with MAPEFLOOR EP19 ............................................................35
Figure 28 Sectional view of a screed with surface bleeding....................................................36
Department of Quantity Surveying,
Faculty of Built Environment,
University Technology of Malaysia.
Group 14 Floor And Wall Finishes Construction Technology II SBEC1122
.
vii
Figure 29 ULTRAPLAN detached from a screed with surface bleeding ................................36
Figure 30 Applying PRIMER MF on the surface of a screed..................................................38
Figure 31 Dusting the surface of a screed with sand after applying a coat of PRIMER MF ..38
Figure 32 Applying PRIMER MF on the surface of a screed..................................................40
Figure 33 Dusting the surface of a screed with sand after applying a coat of PRIMER MF ..40
Figure 34 Brush-applying PRIMER G diluted with water on the surface of a screed.............41
Figure 35 Creating a flat surface on a screed by applying a layer of ULTRAPLAN ..............41
Figure 36 Terrazzo finishes brings luxurious look in a home .................................................42
Figure 37 Terrazzo uses in late 90’s ........................................................................................42
Figure 38 Uses of Epoxy Terrazzo ..........................................................................................44
Figure 39 Cement Terrazzo as finishes....................................................................................45
Figure 40 Rustic Terrazzo found in hotel areas .......................................................................45
Figure 41 Sand cushion Terrazzo looks very elegant in corporate area ..................................46
Figure 42 Determining the tile measurement for the outside edge ..........................................48
Figure 43 Cutting the edge tiles ...............................................................................................48
Figure 44 Spreading the adhesive ............................................................................................49
Figure 45 Securing the tile with floor roller ............................................................................49
Figure 46 Floor paint gives a shiny look with reflected light ..................................................52
Figure 47 Acrylic resin as a binding agent ..............................................................................53
Figure 48 Differences in look of water-based and oil-based paint ..........................................54
Figure 49 Shellac, natural product as floor finishes ................................................................54
Figure 50 Preparing the base....................................................................................................55
Figure 51 Painting the base coat ..............................................................................................56
Figure 52 Measuring and marking the pattern.........................................................................56
Figure 53 Making the first square............................................................................................57
Figure 54 Completing the pattern ............................................................................................57
Figure 55 Masking the squares ................................................................................................57
Figure 56 Cutting tape with putty knife...................................................................................58
Figure 57 Completing the tape outline.....................................................................................58
Figure 58 Painting the pattern..................................................................................................58
Figure 59 Removing the tape...................................................................................................59
Figure 60 Finishing the coat floor............................................................................................59
Department of Quantity Surveying,
Faculty of Built Environment,
University Technology of Malaysia.
Group 14 Floor And Wall Finishes Construction Technology II SBEC1122
.
viii
Figure 61 Tile as floor finishes ................................................................................................63
Figure 62 Vinyl Composition Tiles as floor finishes...............................................................64
Figure 63 Vinyl Asbestos tile as floor finishes........................................................................65
Figure 64 Sheet Vinyl as floor finishes....................................................................................66
Figure 65 Linoleum as floor finishes .......................................................................................66
Figure 66 Putting down underlayment.....................................................................................68
Figure 67 Trimming the door and casing.................................................................................68
Figure 68 Laying out the room in quadrants............................................................................69
Figure 69 Tiling starts at the centre .........................................................................................69
Figure 70 Scribing tiles to fit along walls................................................................................70
Figure 71 Cutting tiles to size ..................................................................................................70
Figure 72 Trimming tiles around heat registers.......................................................................70
Figure 73 Installing shoe molding ...........................................................................................71
Figure 74 Natural stones as floor finishes................................................................................73
Figure 75 Natural cleft .............................................................................................................73
Figure 76 Polishing look on crystalized stones........................................................................74
Figure 77 Low maintenance, smooth honed stones .................................................................75
Figure 78 Flamed finish...........................................................................................................76
Figure 79 Sandblasted finish....................................................................................................76
Figure 80 Leather Finish..........................................................................................................77
Figure 81 Split face finish........................................................................................................77
Figure 82 Veneer stones finish ................................................................................................78
Figure 83 Antiqued finish........................................................................................................78
Figure 84 Bush hammered finish.............................................................................................79
Figure 85 Tumbled finish.........................................................................................................79
Figure 86 Fleuri Cut.................................................................................................................80
Figure 87 Gauged looks ...........................................................................................................80
Figure 88 Chiseled stone as finishes........................................................................................81
Figure 89 Granite .....................................................................................................................82
Figure 90 Marble......................................................................................................................83
Figure 91 Limestone ................................................................................................................83
Figure 92 Travertine.................................................................................................................84
Department of Quantity Surveying,
Faculty of Built Environment,
University Technology of Malaysia.
Group 14 Floor And Wall Finishes Construction Technology II SBEC1122
.
ix
Figure 93 Soapstone.................................................................................................................84
Figure 94 Onyx ........................................................................................................................85
Figure 95 Removing old tiles...................................................................................................86
Figure 96 Removing old thinset...............................................................................................87
Figure 97 Cleaning the area .....................................................................................................87
Figure 98 Measuring the area...................................................................................................87
Figure 99 Mixing thinset..........................................................................................................88
Figure 100 Setting cut tiles ......................................................................................................88
Figure 101 Spreading the thinset .............................................................................................88
Figure 102 Setting and spacing the tiles ..................................................................................89
Figure 103 Creating the pattern ...............................................................................................89
Figure 104 Cutting old tiles .....................................................................................................89
Figure 105 Applying the thinset and setting the tiles ..............................................................90
Figure 106 Applying the sealer................................................................................................90
Figure 107 Applying the grout.................................................................................................90
Figure 108 Cleaning the grout .................................................................................................91
Figure 109 Ceramic as floor finishes .......................................................................................94
Figure 110 Unglazed ceramic tiles...........................................................................................96
Figure 111 Glazed ceramic tiles...............................................................................................96
Figure 112 Porcelain ceramic tiles...........................................................................................97
Figure 113 Timber floor finishes ...........................................................................................101
Figure 114 Hardwood flooring ..............................................................................................102
Figure 115 Solid wood flooring.............................................................................................103
Figure 116 Rotary-peel ..........................................................................................................104
Figure 117 Sliced-peel...........................................................................................................104
Figure 118 Dry solid-sawn.....................................................................................................105
Figure 119 Engineered wood floors.......................................................................................105
Figure 120 Parquet floor ........................................................................................................106
Figure 121 Floor board ..........................................................................................................106
Figure 122 Timber board .......................................................................................................107
Figure 123 Educity Sports Complex front view ....................................................................142
Figure 124 Educity Sports Complex side view......................................................................143
Department of Quantity Surveying,
Faculty of Built Environment,
University Technology of Malaysia.
Group 14 Floor And Wall Finishes Construction Technology II SBEC1122
.
x
Figure 125 Educity Sports Complex site location .................................................................143
Figure 126 Educity Sports Complex construction timeframe................................................145
Figure 127 Educity Sports Complex in construction on 2011 ...............................................146
Figure 128 Educity Sports Complex in construction on 2011 ...............................................146
Figure 129 The construction phase of Educity Sports Complex in 2010 ..............................147
Figure 130 Educity Sports Complex completely done on 2013 ............................................147
Figure 131 Designated Model of Educity Sports Complex ...................................................148
Figure 132 Bill of Quantities .................................................................................................149
Figure 133 Contract document front page example...............................................................150
Figure 134 Some of the first element content of a contract document ..................................151
Figure 135 Front page of bill of quantities ............................................................................152
Figure 136 Elements in bill of quantities...............................................................................153
Figure 137 Bill of quantities descriptions..............................................................................154
Figure 138 Running track in Educity Sports Complex..........................................................155
Figure 139 EPDM rubber granules for running tracks surfaces ............................................156
Figure 140 EPDM granules ...................................................................................................156
Figure 141 Damage on running track surfaces ......................................................................158
Figure 142 Running in running track .....................................................................................159
Figure 143 Drainage...............................................................................................................159
Figure 144 Curbing................................................................................................................160
Figure 145 Paving..................................................................................................................160
Figure 146 Event areas...........................................................................................................161
Figure 147 In-ground equipment ...........................................................................................162
Figure 148 Surfacing..............................................................................................................162
Figure 149 Professional stripping ..........................................................................................163
Figure 150 Custom graphics ..................................................................................................163
Figure 151 Site inspection .....................................................................................................164
Figure 152 Certified CAD designated ...................................................................................164
Figure 153 Clearing the site...................................................................................................164
Figure 154 Site balancing ......................................................................................................165
Figure 155 Curbing and drainage ..........................................................................................165
Figure 156 Track paving........................................................................................................165
Department of Quantity Surveying,
Faculty of Built Environment,
University Technology of Malaysia.
Group 14 Floor And Wall Finishes Construction Technology II SBEC1122
.
xi
Figure 157 Constructing first layer ........................................................................................166
Figure 158 Polyurethane set...................................................................................................166
Figure 159 Polyurethane mixing............................................................................................166
Figure 160 Pouring polyurethane...........................................................................................167
Figure 161 Levelling..............................................................................................................167
Figure 162 Levelling..............................................................................................................167
Figure 163 Constructing second layer ...................................................................................168
Figure 164 Preparing EPDM .................................................................................................168
Figure 165 Sprinkling EPDM granules..................................................................................169
Figure 166 Levelling..............................................................................................................169
Figure 167 Track cleaning .....................................................................................................170
Figure 168 Track cleaning .....................................................................................................170
Figure 169 Adjusting track ....................................................................................................170
Figure 170 Paint mixing.........................................................................................................171
Figure 171 Line marking........................................................................................................171
Figure 172 Line marking........................................................................................................172
Figure 173 Crusher.................................................................................................................173
Figure 174 Bituminous prime coat ........................................................................................173
Figure 175 Asphalt.................................................................................................................173
Figure 176 Bituminous tack coat ...........................................................................................174
Figure 177 Polyurethane ........................................................................................................174
Figure 178 EPDM granules ...................................................................................................174
Figure 179 synthetic black rubber..........................................................................................175
Figure 180 Precast half round glaze ware drain.....................................................................175
Figure 181 Precast concrete kerbing......................................................................................175
Figure 182 Polyurethane paint ...............................................................................................176
Figure 183 Anodised aluminium kerbing ..............................................................................176
Figure 184 Specifications of synthetic running track ............................................................177
Figure 185 Specifications of synthetic running track ............................................................178
Figure 186 Olympic swimming pool in Educity Sports Complex.........................................179
Figure 187 Installing finishes in swimming pool ..................................................................180
Figure 188 Terracotta tiles has been used in Educity Sports Complex .................................180
Department of Quantity Surveying,
Faculty of Built Environment,
University Technology of Malaysia.
Group 14 Floor And Wall Finishes Construction Technology II SBEC1122
.
xii
Figure 189 Components in swimming pool...........................................................................183
Figure 190 Pool plant and filtration .......................................................................................184
Figure 191 Ladders ................................................................................................................185
Figure 192 Exits.....................................................................................................................185
Figure 193 Handrails..............................................................................................................186
Figure 194 Hydraulic lifts......................................................................................................186
Figure 195 Lifeguard chair ....................................................................................................187
Figure 196 Starting block.......................................................................................................187
Figure 197 Float lines ............................................................................................................188
Figure 198 Main drain............................................................................................................188
Figure 199 Skimmers.............................................................................................................189
Figure 200 Overflow grating..................................................................................................189
Figure 201 LED Pool lights ...................................................................................................190
Figure 202 Laying the tiles ....................................................................................................190
Figure 203 Sealing the joints .................................................................................................192
Figure 204 Washing...............................................................................................................193
Figure 205 Finishing..............................................................................................................194
Figure 206 Hard dry broken bricks........................................................................................196
Figure 207 Concrete grade 15 blinding .................................................................................197
Figure 208 High tensile reinforcement ..................................................................................197
Figure 209 Mild steel reinforcement......................................................................................197
Figure 210 Polythene sheet moisture.....................................................................................198
Figure 211Specifications of swimming pool .........................................................................199
Figure 212 Plant and equipment of Educity Sports Complex 1.............................................205
Figure 213 Plant and equipment of Educity Sports Complex 2.............................................206
Figure 214 Plant and equipment of Educity Sports Complex 3.............................................207
Figure 215 Plant and equipment of Educity Sports Complex...............................................208
Figure 216 Bulldozer .............................................................................................................209
Figure 217 Blade....................................................................................................................210
Figure 218 Ripper ..................................................................................................................210
Figure 219 Grader ..................................................................................................................210
Figure 220 Bucket..................................................................................................................211
Department of Quantity Surveying,
Faculty of Built Environment,
University Technology of Malaysia.
Group 14 Floor And Wall Finishes Construction Technology II SBEC1122
.
xiii
Figure 221 Paver ....................................................................................................................212
Figure 222 Dump truck..........................................................................................................212
Figure 223 Mobile crane........................................................................................................212
Figure 224 Road roller ...........................................................................................................213
Figure 225 Dragline excavator...............................................................................................214
Figure 226 Rock breaker........................................................................................................214
Figure 227 Excavator.............................................................................................................215
Figure 228 Wheeled Loader...................................................................................................215
Figure 229 Backhoe ...............................................................................................................216
Figure 230 Prime cost ............................................................................................................217
Figure 231 Prime cost detail ..................................................................................................218
Figure 232 Provisional sum ...................................................................................................219
Figure 233 Provisional sum detail .........................................................................................220
Figure 234 Day work rates of labour .....................................................................................221
Figure 235 Day work rates of labour .....................................................................................222
Figure 236 Johor payment of labour ranges ..........................................................................224
Figure 237 Gloves..................................................................................................................225
Figure 238 Safety googles .....................................................................................................226
Figure 239 Sandwich track system ........................................................................................227
Department of Quantity Surveying,
Faculty of Built Environment,
University Technology of Malaysia.
Group 14 Floor And Wall Finishes Construction Technology II SBEC1122
.
xiv
LIST OF TABLES
Table 1 Installation methods of cement screed ........................................................................30
Table 2 Types of thixotropic and self-levelling compounds ...................................................31
Table 3 Maintenance of cement screed 1.................................................................................33
Table 4 Maintenance of cement screed 2.................................................................................35
Table 5 Maintenance of cement screed 3.................................................................................36
Table 6 Maintenance of cement screed 4.................................................................................37
Table 7 Maintenance of cement screed 5.................................................................................38
Table 8 Maintenance of cement screed 6.................................................................................39
Table 9 Maintenance of cement screed 7.................................................................................40
Table 10 Maintenance of cement screed 8...............................................................................40
Table 11 Maintenance of cement screed 9...............................................................................41
Table 12 Installation methods of Terrazzo ..............................................................................50
Table 13 Installation method of floor paint .............................................................................60
Table 14 Applications of floor paint........................................................................................62
Table 15 Installation method of plastic tiles ............................................................................71
Table 16 Advantages and disadvantages of natural stones ......................................................86
Table 17 Installation methods of natural stones ......................................................................91
Table 18 the do’s and don’ts in maintenance of natural stones ...............................................93
Table 19 Advantages and disadvantages of ceramic tiles........................................................98
Table 20 Maintenance of ceramic tiles ....................................................................................99
Table 21 Installation methods of timber floor .......................................................................109
Table 22 Project profile of Educity Sports Complex.............................................................142
Table 23 Installation methods of Educity Sports Complex running track .............................172
Table 24 Materials and cost of running track ........................................................................176
Table 25 Components in swimming pool ..............................................................................183
Table 26 Materials and cost of swimming pool of Educity Sports Complex ........................198
Table 27 Method statement of surface preparation................................................................200
Table 28 Method statement of steel mesh application...........................................................200
Table 29 Method statement of guniting works ......................................................................201
Department of Quantity Surveying,
Faculty of Built Environment,
University Technology of Malaysia.
Group 14 Floor And Wall Finishes Construction Technology II SBEC1122
.
xv
Table 30 Briefing about all plant and equipment...................................................................216
Table 31 Common labour based on CIDB.............................................................................223
Table 32 Labour involved in finishes ....................................................................................223
Table 33 Budget.....................................................................................................................229
Table 34 Stationaries expenses ..............................................................................................230
Table 35 Telephone bills expenses ........................................................................................230
Table 36 Travelling expenses ................................................................................................230
Table 37 Balance....................................................................................................................231
Group 14 Floor And Wall Finishes Construction Technology II SBEC1122
1
INTRODUCTION
1.1 BUILDING FINISHES
uilding Finishes is comprise those non-structural parts of the building. The
finish is divided into exterior finish (located principally on the outside of the
structure) and interior finish (located inside). The work involved in the
installation of non-structural members on the structure is called finish carp
entry. In construction, a group of construction operations relating to the exterior and exterior
finishing of building and structures to enhance their service and aesthetic qualities. Finishing
work is the concluding stage of construction; in many cases, the overall quality of a building
or structure being put into service depends on the quality of its execution. The main types off
finishing work include facing, plastering, flooring, (and parquetry), painting, wallpapering, and
glazing.
Finishing works is a fine job in building construction process where it
forms the beauty of a building. Several types of finishes can be used based on the
materials used, environmental conditions and costs. Finishing of a building can be divided into
several sections; Floor finishing, Wall finishing and Ceiling finishing. In modern construction
practise for residential, public, and industrial buildings, the technology of finishing work has
changed substantially. Increasingly widespread use is being made of large prefabricated units,
structures, and parts that are delivered to the construction site in final finishes form (for
example, wall panels and roof slabs, sanitary facilities, and window and door units). This
substantially reduces the post assembly finishing work. Industry has mastered production of a
number of effective finishing materials that make it possible to eliminate the most laborious
and time-consuming processes (the ‘wet’ process) and to improve the quality of the finish
(sheets of thistle board, facing slabs, plastic shingles, and water-resistant wallpaper).
Finishing work is carried out at construction sites by means of various types of
mechanized equipment (movable plastering and panting equipment, units for installing floors
made of polymeric materials, puttying apparatus, polishing machines, smoothing machines,
paint sprayers, and vibration pumps) that substantially facilitate and accelerate the processes
of finishing buildings and reduce the number of operations.
B
Group 14 Floor And Wall Finishes Construction Technology II SBEC1122
2
However, finishing work is still very labour-intensive, and for residential
construction it accounts for up to35 percent of all labour expenditures in construction and
assembly operations.
Among the most labour-intensive types of finishing work are facing operations, for
the purpose of covering the front surfaces of structures with in laid products made of natural
or artificial materials. All facing products are usually delivered to a construction site in ready
to use form, in predetermined sizes, colouring, and textures. Facing operations may be the
exterior or interior type, depending on the kind of products being used and the means of
attaching them to the surfaces.
Exterior facing operations consist mainly in finishing the fronts of buildings and
structures with slabs and parts made of natural stone, facing brick, or ceramic blocks; they are
usually done with interior scaffolding at the same times as the walls are being laid. The space
between the wall and the facing is filled with cement mortar. Stone facing is sometimes applied
to finished walls; in this case exterior scaffolding is used. The facing is attached to the wall by
means of fasteners, which are embedded in holes drilled in the wall, and by filling the recesses
with mortar. Facings are also attached by means of steel bars or rods. Facing must be
constructed to avoid the possibility of penetration of moisture through seams and joints of the
facing products.
In modern mass construction, an assortment of materials and products are used for
interior facing work, which is mainly the facing of walls, floors, and ceilings. Such products
make it possible to vary and improve the interior finishing of buildings; they include ceramic
and plastic tiles, chipboard, fibreboard, asbestos-cement boards (including those with
enamelled surfaces), decorative plywood, paper-laminated plastic, and decorative acoustic
panels. The finishing operations inside a building are usually done after the general
construction work has been completed. Before the facing work is begun, all buried wiring must
be laid; the installation of the risers, water pipes, and drain pipes must be completed; the
surfaces to be faced must be even and dry; the products must be sorted according to shape, size,
and colour and if necessary, the edges must be ground in and holes must be drilled. The facing
articles are attached by means of mortars, mastics, shaped framing moldings, and drift bolts.
In machine building, the group of final operations on metals that result in high
accuracy of the dimensions and shape of parts and improve the surface quality. The processes
used in finishing a surface may be mechanical (machining and pressure working),
Group 14 Floor And Wall Finishes Construction Technology II SBEC1122
3
electrochemical, or electro physical. Machining operations that remove a small chip are the
most common finishing methods; they include fine turning, reaming, milling, shaving,
grinding, lapping, polishing, honing, and superfinishing. Surface finishing methods that do not
remove a chip include drawing and stamping, which are performed in a cold state by pressure,
without disrupting the continuity of the material. Also used are such methods of finishing as
rolling, precision forging, burnishing with rollers and balls, and shot-blasting, which harden
the surface as a result of plastic deformation and reduce its surface roughness. Electro physical
and electrochemical treatments, which are often called dimensional machining, are used mostly
for finishing materials that are not amenable to machining, as well as for the production of
complex contours. The main process involved in this type of finishing are electro machining,
spark machining, and electric-pulse machining.
Finishing work is a fine job in building construction process were it forms the
beauty of a building. Several types of finishes can be used based on the materials used,
environmental conditions and costs. Finishing of a building can be divided into several
conditions which is floor finishing, wall finishing, and ceiling finishing.
Common buildings (residential & high rise building)
Figure 1 Residential building
Group 14 Floor And Wall Finishes Construction Technology II SBEC1122
4
Figure 2 High rise building in a city
High Rise Buildings
In construction field, finishes refer to a group of construction operations relating to
the exterior and interior finishing of buildings and structures to enhance their service and
aesthetic qualities. Finishing work is the concluding stage of construction; in many cases, the
overall quality of a building or structure being put into service depends on the quality of its
execution. The main types of finishing work include facing, plastering, flooring (and parquetry),
painting, wallpapering, and glazing.
Nowadays modern construction practice for residential, public, and industrial
buildings, the technology of finishing work has changed substantially. Increasingly widespread
use is being made of large prefabricated units, structures, and parts that are delivered to the
construction site in final finished form (for example, wall panels and roof slabs, sanitary
facilities, and window and door units). This substantially reduces the finishing work. Industry
has mastered production of a number of effective finishing materials that make it possible to
eliminate the most laborious and time-consuming processes (the “wet” processes) and to
improve the quality of the finish (sheets of thistle board, facing slabs, plastic shingles, and
water-resistant wallpaper).
Finishing work is carried out at construction sites by means of various types of
mechanized equipment (movable plastering and painting equipment, units for installing floors
Group 14 Floor And Wall Finishes Construction Technology II SBEC1122
5
made of polymeric materials, puttying apparatus, polishing machines, smoothing machines,
paint sprayers, and vibration pumps) that substantially facilitate and accelerate the processes
of finishing buildings and reduce the number of operations. However, finishing work is still
very labour intensive, and for residential construction it accounts for up to 35 percent of all
labour expenditures in construction and assembly operations.
Among the most labour intensive types of finishing work are facing operations, for
the purpose of covering the front surfaces of structures with inlaid products made of natural or
artificial materials. All facing products are usually delivered to a construction site in ready-to-
use form, in predetermined sizes, colouring, and textures. Facing operations may be of the
exterior or interior type, depending on the kind of products being used and the means of
attaching them to the surfaces.
Exterior facing operations consist mainly in finishing the fronts of buildings and
structures with slabs and parts made of natural stone, facing brick, or ceramic blocks; they are
usually done with interior scaffolding at the same time as the walls are being laid. The space
between the wall and the facing is filled with cement mortar. Stone facing is sometimes applied
to finished walls; in this case exterior scaffolding is used. The facing is attached to the wall by
means of fasteners, which are embedded in holes drilled in the wall, and by filling the recesses
with mortar. Facings are also attached by means of steel bars or rods. Facing must be
constructed to avoid the possibility of penetration of moisture through seams and joints of the
facing products.
In modern mass construction, an assortment of materials and products are used for
interior facing work, which is mainly the facing of walls, floors, and ceilings. Such products
make it possible to vary and improve the interior finishing of buildings; they include ceramic
and plastic tiles, chipboard, fibre board, asbestos-cement boards (including those with enamel
surfaces), decorative plywood, paper-laminated plastic, and decorative acoustic panels. The
finishing operations inside a building are usually done after the general construction work has
been completed. Before the facing work is begun, all buried wiring must be laid; the installation
of the risers, water pipes, and drain pipes must be completed; the surfaces to be faced must be
even and dry; the products must be sorted according to shape, size, and colour; and, if necessary,
the edges must be ground in and holes must be drilled. The facing articles are attached by
means of mortars, mastics, shaped framing mouldings, and drift bolts.
Group 14 Floor And Wall Finishes Construction Technology II SBEC1122
6
Machine building (specify uses)
Figure 3 Example of machinery building
While this type of building refer to the group of final operations on metals that
result in high accuracy of the dimensions and shape of parts and improve the surface quality.
The processes used in finishing a surface may be mechanical (machining and pressure working),
electro chemical, or electro physical. Machining operations that remove a small chip are the
most common finishing methods; they include fine turning, reaming, milling, shaving, grinding,
lapping, polishing, honing, and superfinishing. Surface finishing methods that do not remove
a chip include drawing and stamping, which are performed in a cold state by pressure, without
disrupting the continuity of the material. Such methods of finishing as rolling, precision forging,
burnishing with rollers and balls, and shot-blasting, which harden the surface as a result of
plastic deformation and reduce its surface roughness.
Electro physical and electro chemical treatments, which are often called
dimensional machining, are used mostly for finishing materials that ’are not amenable to
machining, as well as for the production of complex contours. The main processes involved in
this type of finishing are electro machining, spark machining, and electric-pulse machining.
Group 14 Floor And Wall Finishes Construction Technology II SBEC1122
7
1.2 INTERNAL AND EXTERNAL FINISHES
nternal finishes are important in creating a sense of place and in helping to ensure
a healthy indoor environment. The quality of the internal environment is
particularly important in ensuring a sense of wellbeing and enjoyment. Materials
will be touched, experienced visually and will give off scent, which combined with furnishings
and appliances will influence our perception of the space in which we live or work.
The functional requirements are aesthetics, durability and flexible ability to with
stand thermal and moisture movement, ease of maintenance and cleaning, strong mechanical
or chemical bond to structural substrate and expel water from the surface that forms as
condensation (particularly in kitchens and bathrooms).
External finishes are important in determining the aesthetic appeal of the building.
The external finishes will also, in conjunction with the detailing, determine how the building
will weather over time. The quality of the materials used for external finishes and the manner
in which they are applied will determine the durability of the building fabric.
The functional requirements are aesthetic appeal, durability, strong mechanical or
chemical bond to structural substrate, flexibility, the ability to withstand thermal and moisture
movement (via control joints) and health and safety considerations.
1.3 INTERIOR AND EXTERIOR OF FLOOR FINISHES
he type of floor finishes that will be used are depending on several factors.
Such as type of base, room/space usage, degree of comfort required,
maintenance problems, cost, appearance, safety and individual preferences.
Floor finishes can be classified under three headings. Firstly in-situ floor finishes, mixed on
site, laid in a fluid state, allowed to dry, and set to form a hard joint less surface. For the example
cement screed, terrazzo and floor paint.
Second applied floor finishes, supplied in tile or sheet form and are laid onto a suitably prepared
based. For the example ceramic likes homogeneous (homogeneous tile) and non-homogeneous
(mosaic, ceramic). Natural stones likes marble, granite, quartz and slates. Cement based, likes
terrazzo and concrete tiles. Plastic based likes linoleum, carpet, PVC tile and vinyl tile. Lastly
timber floor finishes, it is boards, sheets and blocks or timber laid on or attached to a suitable
structural frame or base. For the example, parquet, floor board and timber board.
I
T
Group 14 Floor And Wall Finishes Construction Technology II SBEC1122
8
1.4 INTERIOR AND EXTERIOR OF WALL FINISHES
he type of wall finishes that will be used are depending on several factors.
Such as type of base, room/space usage, degree of comfort required,
maintenance problems, cost, appearance and individual preferences. External
brickwork with an exposed face of facing bricks is a self-finish and requires no further
treatment. External walls of common bricks or blocks can be treated to give an acceptable
appearance by the application of paint or an applied wall finish such as rendering, or can be
clad with boards or tiles. Internal walls or partitions can be built with a fair face of natural
materials such as bricks or stone but much cheaper by using plaster or glazed tiles. Types of
wall finishes is wallpaper, ceramic wall tiles, cement screed, and painting.
1.5 HISTORY OF FINISHES
1.5.1 THE WOOD FLOORING AS FINISHES
Before looking at the products on the market, is useful to understand what finishes
might have been on your floors in the past. The earliest wood floors usually softwoods such as
pine were often never finished. In the North, tight-grained, old-growth Eastern white pine is
still going strong in many homes. Often referred to as pumpkin pine because it has aged to a
warm, amber colour, this wide-board, flat-sawn flooring was left natural and maintained by
regular washing with water and homemade lye. Later on, these floors may have been finished
with linseed oil or hand-rubbed with wax for colour and protection. In the South, flooring was
often made from dense, resinous heart pine and left equally bare. Whatever the species, lesser
grade wood was commonly used on floors in less important rooms, particularly above the first
floor, and usually painted. From the colonial to the early Victorian era, homeowners also
enjoyed decorative floors produced by stencilling borders or painting faux mosaics and rugs.
T
Group 14 Floor And Wall Finishes Construction Technology II SBEC1122
9
Figure 4 Wood flooring as finishes
As manufacturing and railroads made paints and coatings more available after
1860, varnish, shellac, and other clear, hard finishes became popular for woodwork.
Homeowners enjoyed both the shiny presentation of varnish and the protection it offered for
the increasingly popular hardwood floors particularly oak, which develops a deep, blue stain
upon contact with water. Varnish was a product of natural oils and resins until the 1910s when
the first man-made resins appeared. The 1960s brought a new generation of tough, synthetic
resins and the first wave of exceptionally strong (albeit then plastic-looking) polyurethane
varnishes and Swedish finishes.
1.5.2 THE WAXING FLOOR AS FINISHES
Much of the terminology and the traditional procedures in floor care come from
the early history of floor finishes. So it is important to understand their history and the evolution
of modern technology used today. This technology is a combination of floor finish evolution
and floor machine advances that have increased the speed for buffing resulting in a higher shine
in less time. The advances in floor care technology we enjoy today are due to progressive
manufacturers competing to provide a product and process superior to their peers. The building
service industry and end users are the beneficiaries of these advances.
Group 14 Floor And Wall Finishes Construction Technology II SBEC1122
10
Figure 5 Waxing as floor finishes makes floor look shiny and clean
Today many people still talk about “waxing” the floor, even though it has been 50
years since natural waxes were widely used as a floor finish. The first floor finishes were
carnauba waxes, made from the leaves of a tropical plant. Carnauba is a natural wax emulsion
blend combined with a resin. Carnauba waxes were buff able and gave a great shine. They
dried to a slight haze and left deep, rich swirls on the floor when buffed. They were extremely
abrasive resistant but, because carnauba wax was very expensive and difficult to obtain,
manufacturers began using other natural materials that were less costly, like beeswax, shellac
and paraffin. Although some natural wax finishes are still used today, synthetic materials have
largely replaced them in floor maintenance.
Synthetic wax or polymer finishes followed carnauba wax. In the late 1940s, a
synthetic floor finish using a water-based and a plastic called polystyrene was developed. The
first polystyrene finishes were colourless and had a very high gloss. But, they were also very
brittle and tended to turn yellow after a period of time. When the wax-like plastic polyethylene
was mixed with the polystyrene, however, a very durable, buff able, non-brittle floor finish was
created.
Today, synthetic materials are much more commonly used in floor finishes than
natural waxes. Synthetic water-based finishes are collectively called polymer finishes. The
improved result was a dry, bright finish. The "buffability" of the finish depended on the type
Group 14 Floor And Wall Finishes Construction Technology II SBEC1122
11
of synthetic wax and polymers that were put into them. Synthetic wax or polymer finishes in
liquid form are a milky white colour.
1.5.3 THE CONCRETEFLOORING AS FINISHES
The word concrete refers to a construction material which is made by mixing
cement, an adhesive which is able to harden and set over time, with dense chemically inert
aggregate particles, usually comprised of sand or gravel. This is then churned with water in
order to create a substance which is extremely hard, easy to mold, and useful for a variety of
building applications, including flooring.
Figure 6 Concrete flooring as the easiest finishes to install for floor finishing
The oldest evidence we have of the use of concrete comes from the remains of what
is believed to be a concrete mix found in Syria, dating back to 6500 BC. Archaeologists have
also found evidence for the ancient use of concrete in sites up and down the Danube River in
Yugoslavia dating around 5000 BC. The oldest, and some of the arguably most impressive
remains of concrete construction can be found in Egypt. There, at around 3000 BC they began
using a primitive form of concrete that consisted of straw mixed with mud, to create dried
bricks for monuments, tombs, and even the iconic pyramids of Giza. They also pioneered the
use of lime and gypsum as binding agents.
Group 14 Floor And Wall Finishes Construction Technology II SBEC1122
12
By 1000 BC the Greeks were setting colourful pebbles and later, bits of flat pottery
and stone into concrete floors before they set, to create the first mosaic surfaces. These efforts
would grow more elaborate and detailed with time. The use of concrete in flooring and
construction reached its pinnacle during the late Roman Republic and throughout the span of
the Roman Empire. During this time engineers were able to concoct a concrete mix that used
lime, sand, and volcanic ash, along with milk and animal fat, to create a material that is
estimated to be as hard as modern, un-reinforced Portland concrete. This allowed the
construction of massive architectural achievements such as the Parthenon.
While concrete construction continued to be used in various forms throughout the
Eastern and Middle Eastern World, it was largely lost to Europe after the fall of the Roman
Empire. During the Dark Ages and the middle Ages, European peasants reverted to making
primitive mud mixes that produced walls and floors which were not nearly as strong as their
Roman predecessors.
The modern age of concrete dawned at the beginning of the industrial revolution
with a series of innovations. First, in 1756 a British engineer named John Smeaton added
pebbles and powdered brick to the concrete mix as coarse aggregate, in order to make the first
hydraulic cement. Then in 1824 another Englishman named Joseph Aspdin found that burning
limestone and clay together changed their chemical properties and resulted in a much stronger
material which he named Portland cement. This is still the dominant cement used in the
manufacture of concrete flooring and building materials.
1.5.4 THE TILES FLOORING AS FINISHES
Historically, the use of ceramic floor tiles goes back to the fourth millennium B.C.
in the near and Far East. The Romans introduced tile-making in Western Europe as they
occupied territories. However, that art was eventually forgotten in Europe for centuries until
the 12th century when Cistercian monks developed a method of making encaustic floor tiles
with inlaid patterns for cathedral and church floors. But, this skill was again lost in the 16th
century following the Reformation. Except for finely decorated wall tiles made in Turkey and
the Middle East, and Delft tiles made in Holland in the 17th century, ceramic floor tiles were
not made again in Europe until almost the mid-19th century.
Group 14 Floor And Wall Finishes Construction Technology II SBEC1122
13
Figure 7 Tiling can be match from variety of types, colour and patterns.
The modern tile industry was advanced by Herbert Minton in 1843 when he revived
the lost art of encaustic tile-making in England. The industry was further revolutionized in the
1840s by the "dust-pressing" method which consisted of compressing nearly dry clay between
two metal dies. Dust-pressing replaced tile-making by hand with wet clay, and facilitated
mechanization of the tile-making industry.
Throughout the rest of the 19th century, dust-pressing enabled faster and cheaper
production of better quality floor tiles in a greater range of colours and designs. In the 1850s
encaustic tiles were selected for such important structures as the new Palace at Westminster in
London, and Queen Victoria's Royal Residence on the Isle of Wight. By the latter part of the
19th century, despite the fact that encaustic tiles were still quite expensive, they had become a
common flooring material in many kinds of buildings.
The majority of ceramic floor tile made in the U.S. before 1890 was encaustic, but
various factories gradually began to develop and produce other kinds of tiles. The Trent Tile
Company, among others, started to manufacture both white and coloured ceramic mosaic tiles
by the mid-1890s. White vitreous wall tile became available, as well as more decorative tiles
with coloured glazes, such as the variegated faience glazes intended to give a more hand-crafted
appearance that were originated by the Grueby Faience and Tile Company in 1894, and soon
adopted by other potteries.
Group 14 Floor And Wall Finishes Construction Technology II SBEC1122
14
In the 19th and early-20th century, many ceramic tile firms had their own engraving
departments, while some used commercial designs supplied by professional printers. Well-
known designers were often commissioned to work on specific product lines for a particular
firm. These designers worked for one firm after another which resulted in similar designs being
produced by different companies. (Historic ceramic floor tiles were usually identified by a
manufacturer's or designer's mark on the back, if they were marked at all.) By the latter part of
the 19th century ready-mixed glazes and colours were also available.
During the 20th century, the floor tile industry continued to evolve as much as it
had in the previous century. Modern methods of production employed sophisticated machinery,
new materials and decorating techniques. In the years following World War II, there were many
advances in the industry. Commercially manufactured dust-pressed tiles, which had previously
required more than 70 hours just in the kiln, could be made in less than two hours from the raw
material stage to finished tiles, boxed and ready to ship. Dried, unglazed tiles were sprayed
with coloured glaze evenly and automatically as conveyors carried the tiles into the tunnel
kilns, and the extrusion process ensured that the tiles were cut to a uniform thickness and size.
The changes and developments in the production of floor tile brought forth a wide range of
shapes and sizes, along with new colours, glazes and decorating techniques.
After the turn of the century, fewer encaustic floor tiles were used, particularly in
residential architecture. The introduction of ceramic mosaic floor tiles was a factor in their
decline. The development of rubber interlocking floor tiles in 1894, along with other, more
resilient, flooring materials, was instrumental in the decreased popularity not only of encaustic
tiles, but also other ceramic tile flooring. These new materials were not only cheaper, they were
not as fragile; they were also lighter and thinner, and easier to install.
Ceramic mosaic tiles remained in common use through the 1930s in part because
an innovative development had made laying such small tiles easier. The tiles were pre-mounted
in decorative patterns on 12" x 12" sheets of paper, and sold ready to lay in cement. This greatly
simplified the tile setter's work, and no doubt was a significant factor in the increased popularity
of ceramic mosaic tiles. Sophisticated mosaic floor designs became common in entrance foyers
of public and private buildings. Small, white, unglazed tiles in round, square, octagonal or
hexagonal shapes were promoted for their sanitary qualities, particularly for bathroom floors,
while larger, rectangular, white, glazed tiles were used for bathroom walls or wains cotting.
Group 14 Floor And Wall Finishes Construction Technology II SBEC1122
15
Coloured tiles were also popular, especially for bathrooms, and even kitchens. Quarry tile,
which was larger and thicker than other ceramic floor tile of this period, was often used in
public buildings, as well as for entrance halls, small studies, libraries, dining rooms and even
living rooms in private homes. But, by the 1930s, the fashion for art tile had diminished to the
point where floor tiles were, for the most part, generally regarded as primarily utilitarian, as
opposed to important decorative elements.
1.5.5 THE NATURAL STONE FLOORING AS FINISHES
Any solid stone flooring ever stepped on came into existence millions of years ago.
Stone comes from the earth, where it forms deep beneath the surface under intense heat and
pressure. This heat and pressure created massive blocks of natural stones like marble,
granite, limestone, slate, and travertine, used then and now as stone flooring.
These stone blocks have been mined as building material from quarries since the dawn of
civilization. Many surviving stone buildings and floors are thousands of years old. The Greek
and Roman temples or the pyramids of Egypt are the evidence of stone's longevity. Enormous
blocks of limestone and granite were used to construct Djoser's Step Pyramid in Egypt, the
oldest remaining structure created entirely out of natural stone.
Figure 8 Stones are famous with its durability against distortion
Group 14 Floor And Wall Finishes Construction Technology II SBEC1122
16
Ancient European floors have been found with pebble mosaics, a trend that started
with the Greeks and spread over the rest of Europe. Engineers during the Roman Empire
enhanced the usage of stone flooring even further. They developed a floor heating system to
heat stone floors from beneath using controlled fire and vents, creating a warm stone surface
to walk on.
Stone flooring has been consistently popular since. While the extreme class divide
of centuries past made stone floors too expensive for common use, these days there is no such
problem. Stone is abundant in quarries all over the world. Modern developments like diamond
studded cutting tools have made the quarrying process much easier, further lowering the price
point. For the modern consumer, a beautiful stone floor is a worthwhile investment that will
last the lifetime. In fact, it may last several lifetimes.
Group 14 Floor And Wall Finishes Construction Technology II SBEC1122
17
THEORETICAL
STUDY
heories are formulated to explain, predict, and understand phenomena and, in many
cases, to challenge and extend existing knowledge within the limits of critical
bounding assumptions. The theoretical framework is the structure that can hold and
support a theory of a research study. The theoretical framework introduces and describes the
theory that explains why the research problem under study exists. (Swason, 2013)
In this theoretical study, we make a research about Floor and Wall finishes based
on books, articles, journals and some other sources from the internet. We try to find some
information from various sources, and classify it into some parts based on their characteristics
and compare it with the application that has been made in construction site. This outcome
information on site is called case study. The case study is an application based on the theory.
Hence, part of the theory displays or visualises the actual condition.
Therefore, in this theoretical study, it is divided into two main parts:
i. Floor finishes and;
ii. Wall finishes.
2.1 FLOOR FINISHES
Flooring is the general term for a permanent covering of a floor, or for the work of
installing such a floor covering. Floor covering is the term to describe any finish material
applied over a floor structure to provide a walking surface. Type of base, room usage, degree
of comfort required, maintenance problems, cost, appearance, safety and individual appearance
are among of selection factors in applying floor finishes. Whereas the sub floor must be finished
with can make it usable without any extra work, some types of flooring must not installed at
below grade (lower than ground level), and laminate or hardwood should be avoided where
there will be moisture and condensation.
T
Group 14 Floor And Wall Finishes Construction Technology II SBEC1122
18
However, floor finishes can be considered by three main groupings; in-situ floor
finishes, applied floor finishes, and timber floor finishes. In terms of flooring materials, it can
be classified to several headings; soft coverings, wood flooring, hard flooring, resilient
flooring, and seamless chemical flooring.
2.1.1 GENERAL FACTORS OF FLOOR FINISHES
SELECTION
a) Appearance
Attractiveness of the material, colour range, texture and its decorative values in an
architectural sense are considered as appearance. There are many floor surfaces which are
attractive when suitably used, such as hardwood when properly finished, terrazzo, ceramic tile,
marble, and, to a somewhat less degree, vinyl plastic, rubber tile, cork tile, linoleum tile, asphalt
tile, linoleum, cork carpet, sheet rubber, slate, and magnesite composition. Concrete without
special treatment and industrial wood blocks are not suitable for use where appearance is a
factor. Concrete floors may be painted or waxed and are not unattractive as long as the surface
is maintained, but this is difficult to do where the traffic is at all heavy.
b) Initial Cost
One of the first factors in selecting a floor surface is the initial cost, but even the
most expensive materials do not possess all the desirable features. Flooring materials may be
roughly divided into classes according their cost in place. In the following list, the most
expensive materials are given first;
i. Ceramic tile, marble, vinyl tile and rubber tile.
ii. Terrazzo, magnesite composition, cork tile, and hardwood.
iii. Cork carpet, linoleum, and asphalt tile.
iv. Concrete.
This list assumes that a concrete base is available to receive the wearing surface.
Brick and wood block floors are not included in these lists, for they are used for a different
class of traffic from that to which the materials included, except concrete, are subjected, and a
comparison would be of no value.
Group 14 Floor And Wall Finishes Construction Technology II SBEC1122
19
c) Degree of Comfort
Comfort under foot is determined by the shock-absorbing quality, sure-footedness,
evenness of surface, and conductivity. A good floor which is a good heat conductor will always
feel cold. The most comfortable floors to work on are cork tile, cork carpet, and rubber. Wood,
linoleum, vinyl plastic, magnesite composition, and asphalt tile, are very satisfactory but
concrete, terrazzo, ceramic tile, marble, slate and brick are tiresome and cold.
d) Noiselessness
Cork tile, cork carpet, and rubber are practically noiseless, while wood, linoleum,
vinyl plastic, magnesite composition, and asphalt tile are slightly less satisfactory but still very
good; but concrete, ceramic tile, marble, slate and brick are the noisiest of flooring materials.
e) Fire Resistance
Materials may be non-combustible but still suffer severely in case of fire. Concrete,
ceramic tile, and brick are probably the most fire-resistance floor surfaces, but terrazzo, marble
and slate are very satisfactory. Magnesite composition, or asphalt tile, will not burn but may
suffer seriously in fire. Linoleum, cork carpet, rubber, vinyl plastic, and wood are combustible
but if laid it on fire-resistant base, they are not considered a serious defect in a fire resistance
building.
f) Sanitation
To be sanitary, a floor surface must be non-absorbent and easily cleaned. Joints
which are not watertight are unsanitary feature. The most sanitary feature are terrazzo, ceramic
tile, marble and slate. Magnesite composition, asphalt tile, rubber, vinyl plastic and linoleum
are quite satisfactory. Cork carpet is unsatisfactory because of its porosity, concrete because of
the difficulty in cleaning, and wood because of its porosity and the presence of open joints.
g) Acid and Alkali Resistance
The factors that should be considered are immunity from damage by occasional
spilling of strong acid solutions and resistance to the continuous use of soap, lye, cleaning and
scouring compounds, and disinfectants. Ceramic tile is the most satisfactory floor surface in
this respect; asphalt tile and vinyl plastic are quite resistant; rubber, terrazzo, marble, concrete,
and magnesite composition are sufficiently resistant for ordinary purposes; but linoleum, cork
carpet, and cork tile should not be subjected to the action of acids and alkalises.
Group 14 Floor And Wall Finishes Construction Technology II SBEC1122
20
h) Grease and Oil Resistance
Grease and oil are not absorbed by ceramic tile and by vinyl coverings and do not
affect these materials. They are absorbed by wood, brick, concrete, terrazzo, linoleum, cork
carpet, and cork tile and therefore detract from their appearance, but they do not seriously affect
their durability. Asphalt and rubber floors, except greaseproof asphalt tile, are seriously
affected by grease, oil, and gasoline.
i) Dampness
Ceramic tile, brick, concrete, terrazzo, and asphalt tile are not affected by dampness
and are suitable for use on floors located on the ground such as basement floors but wood,
rubber, linoleum, cork carpet and cork tile are not suitable for use in such locations.
j) Indentation
The hard flooring materials, such as ceramic tiles, concrete terrazzo, and brick, do
not suffer indentation from chair legs, heels of shoes, and other objects which rest on them or
strike them. Maple and oak flooring yield very little and not retain imprints. Other materials
such as linoleum and rubber yield considerably under such loads but recover quite well when
the load is removed. Asphalt and vinyl asbestos tile may become permanently intended.
k) Trucking
Three factors are pertinent when considering the suitability of a floor for trucking.
It must stand the abrasive action of the truck wheels, the tractive effort required to pull the
truck must not be excessive, and the flooring must have structural resistance sufficient to carry
the load transmitted to it by the truck wheels. Concrete, heavy maple flooring and industrial
wood blocks are satisfactory in all three respects if the materials are of high quality and if the
trucking parallel to the length of the maple flooring rather than crosswise. The maple flooring
must be heavy enough so that the weight of the trucks will not break the tongued-and-grooved
joint. The aggregate in the concrete may have to be specially selected so as to have a high
resistance to abrasion. Rubber-tired wheels are much easier on all types of flooring than wheels
which are steel-tired.
Group 14 Floor And Wall Finishes Construction Technology II SBEC1122
21
l) Maintenance
Maintenance means the ease of which floor can be cleaned, needs for the floor to
surface treatment and care, such as waxing and painting, needs for the floor to be repaired and
the cost of the operations.
Ceramic tile, marble, terrazzo, slate, vinyl plastic, and rubber tile floors are easily
cleaned and require very little care. Linoleum, asphalt tile, and magnesite composition are
easily cleaned but should receive surface treatment occasionally. Cork carpet is not easy to
clean and requires surface treatment. Hardwood floors are fairly easy to clean if in good
condition, but require frequent surface treatment. Concrete is not as easy to clean as ceramic
tile, linoleum if it is not painted or waxed. Painting makes cleaning better but requires frequent
renewal.
The monolithic floors such as terrazzo, magnesite composition, and concrete are
difficult to repair satisfactorily. Floors composed of separate units of tile, slate, or marble are
more easily repaired, but require skilled mechanics. Linoleum, cork tile, and cork carpet may
be easily repaired by replacing the damaged parts.
The maintenance costs of wood block, heavy asphalt mastic, brick, and concrete
are relatively low except under extremely severe traffic. With the exception of concrete, these
materials are easily repaired. They receive no further treatment.
m) Weight
More heavily the floor surfaces, more cost it needs to add to because of requiring
stronger floor constructions, beams, girders, columns, and foundations. Ceramic tile, marble,
and slate are bedded on ½ in. or more cement mortar which has no structural value; terrazzo
requires 1 ¼ in. of material which is simply a dead weight; and hard-wood flooring usually
requires about 2 in. of filling between the nailing strips if placed over concrete. Rubber tile,
magnesite composition, cork tile, cork carpet, linoleum, asphalt tile, and concrete do not require
this additional material. This additional weight exists when the structural floor is some form of
concrete slab.
Group 14 Floor And Wall Finishes Construction Technology II SBEC1122
22
2.1.2 CLASSIFICATION OF FLOOR FINISHES
Floor finishes can be classified into several parts by its method of installation, and
materials. There are three groupings; applied floor finishes, in-situ floor finishes and timber
floor finishes.
2.1.2.1 IN-SITU FLOOR FINISHES
2.1.2.1.1 CEMENT SCREED
Figure 9 Cement screed as floor finishes
Cement Screed Flooring refer to a layer of well compacted material, commonly a
mixture of cement and fine aggregate, that is applied to a base at the appropriate thickness and
that has a surface suitable for receiving a floor finish. Usually cement screed floor is made up
by a granolithic concrete material that strengthens and plenty colors cement screeds. It is a
special blend of cement, very hard-wearing aggregates, lime fast pigments and certain additives,
which set rock-hard, have exceptional abrasion resistance and reduces drying shrinkage. Color
Screed comes in a wide range of colors to choose from. These floors are for interior and exterior
use.
Group 14 Floor And Wall Finishes Construction Technology II SBEC1122
23
Figure 10 Dark colour often becoming people’s choice nowadays.
Figure 11 Cement screed can be done into variety different colours
Group 14 Floor And Wall Finishes Construction Technology II SBEC1122
24
i. Factors of Choosing CementScreed:
It can provide a very hard-wearing, attractive coloring system for the surface of cement screeds,
steel floated to a smooth finish or wood floated to create an artistic textured effect.
ii. Types of Cement Screed:
(a) Monolithic screeds and toppings
As defined above, these are screeds and toppings that are applied at the time when
the underlying concrete floor is placed. Screed thickness should be approximately 25 mm but
not less than 15 mm or more than 40 mm. The minimum thickness of a monolithic topping at
any part should be 20 mm. The actual thickness required may depend on structural
requirements. In some circumstances, the design thickness of a topping may have to be
increased to more than 40 mm, but then there will be an increasing risk of loss of adhesion to
the base, due to differential shrinkage stresses. In attempting to achieve good adhesion between
screed/ topping and base concrete, it is important to take cognisance of the phenomenon of
bleeding of fresh concrete. Bleeding causes water to accumulate on the top surface of the fresh
concrete and the presence of this water layer may impair adhesion unless suitably dealt with.
The screed/topping should therefore be laid at one of two stages; either
immediately the concrete has been compacted and levelled off and before bleed water appears
on the surface (“immediate placing”); or after bleeding of the concrete has ceased and bleed
water has evaporated or has been removed completely by mopping up (“delayed placing”).
Immediate placing requires careful timing but has the advantage that no preparation
of the concrete surface is required. Timing of delayed placing is not as critical but the surface
of the concrete does require some preparation: laitance should be loosened by light brushing,
with a wire brush or a brush with stiff bristles, and thoroughly removed by sweeping, or
preferably, by vacuum cleaning. Delayed placing should however be done within an hour or
two after the end of the bleeding period.
Group 14 Floor And Wall Finishes Construction Technology II SBEC1122
25
(b) Bonded screeds & toppings
As defined, bonded screeds and toppings are applied to hardened concrete. The
hardened concrete is also known as the base concrete. Screed thickness should be not less than
25 mm or more than 50 mm. The minimum thickness of a bonded topping at any part should
be 35 mm. The actual thickness required may depend on structural requirements. In some
circumstances, the design thickness of a topping may have to be increased to more than 60 mm,
but then there will be an increasing risk of loss of adhesion to the base, due to differential
shrinkage stresses. In these circumstances, the use of a reinforcing mesh as close to the upper
surface as is permissible will assist in restraining differential shrinkage and in controlling
cracking.
(c) Un-bonded screeds and Toppings
Screeds: Where screeds are, or have to be laid on a damp-proofing membrane or
separating layer, the minimum thickness of the screed should be at least 50 mm. Where they
are laid on a compressible layer, such as insulation boards, the minimum thickness should be
at least 70 mm.
Topping: Where a concrete topping is required over a damp-proof membrane, an
un-bonded overlay of minimum thickness 100 mm should be used in order to minimize the risk
of curling. The grade of concrete for a direct-finished overlay should be in accordance with
Table 3. A similar un-bonded overlay should be used where a base has become contaminated
(e.g. with oil), and bonding is not possible.
iii. Advantages of Cement Screed:
 Shorter waiting times when installing flooring sensitive to humidity (wood, resilients) and
epoxy floor coverings
 Lower risk of detachment of parquet or blistering of rubber, linoleum and PVC flooring
 Less hygrometric shrinkage due to less mixing water and the amount of shrinkage is
controlled, therefore lower risk of crack formation and, as a result, lower risk of breakage
or detachment of ceramic or stone flooring after installation
Group 14 Floor And Wall Finishes Construction Technology II SBEC1122
26
 Because these products have controlled shrinkage, the frequency and, therefore, the
number of control joints may be reduced by increasing the pitch areas the screed is divided
into
 Lower risk of cracking
 Higher resistance to abrasion
 Lower risk of collapse or breakage under concentrated loads
 Better guarantee when laying screeds in environments subject to intense loads
iv. Installation Methods of Cement Screed:
Steps Description Pictures
1
The levelling strips must be made from the
same binder as for the screed. Also, when the
mortar to make the screeds is laid and
levelled off, the levelling strips must not have
hardened.
Figure 12 Forming levelling
strips
Group 14 Floor And Wall Finishes Construction Technology II SBEC1122
27
2
When fresh mortar has to be “welded” to a
set surface (for example, when screed laying
is interrupted for more than an hour or if the
levelling strips have hardened), cold joints
must be made by applying bonding slurry,
made from PLANICRETE, water and binder,
or EPORIP on the hardened part of the screed
(cut cleanly and perpendicularly to the
substrate) (Figure 13) Figure 13 A screed cut
perpendicularly at the point
where laying has been interrupted
3
When filling a chase in a screed that has
already been laid (Figure 14) the same type
of bonding slurry must also be applied on the
contact surfaces between the existing screed
and the filler material.
Figure 14 Sealing a chase in
existing flooring by applying
bonding slurry on the contact
surfaces between the existing and
repaired surfaces
Group 14 Floor And Wall Finishes Construction Technology II SBEC1122
28
4
If there is pipe-work in the screed, make sure
there is a layer of mortar at least 2.5 cm thick
above it. We also recommend reinforcing
this thinner section to prevent the formation
of cracks by bridging metallic reinforcement
mesh made from 2 mm diameter wire over
the pipework (Figure 15). Figure 15 Reinforcing a screed by
bridging fine mesh over pipe-
work
5
To improve the screeds resistance to
cracking, for example when there is
compressible material under the screed,
position zinc plated metallic reinforcement
mesh at the mid-point of the screed (Figure
16). The mesh limits the amount shrinkage
cracks and cracks in correspondence with
check joints open up. In so doing, cohesion
between the grains of inert is maintained,
which is indispensable to transfer loads
correctly between the two edges of the
cracked joint.
Figure 16 Placing zinc-plated
metallic mesh at the mid-point of
the screed
Group 14 Floor And Wall Finishes Construction Technology II SBEC1122
29
6
Finish off the surface of the screed by hand
with a float (Figure 17), with a power float
or by helicopter (Figure 18). Particularly
when TOPCEM, TOPCEM PRONTO,
MAPECEM or MAPECEM binders and
special mortars have been used, take care not
to wet the surface too much or to smooth over
the same point for too much time, otherwise
water from the mix will collect on the surface
and cause bleeding, which will then cause a
reduction in surface porosity and longer
drying times.
Figure 17 Float-finishing the
surface of a screed
Figure 18 Finishing the surface of
a screed with a power float
Group 14 Floor And Wall Finishes Construction Technology II SBEC1122
30
7
While the screed is still wet, as soon as it is
consistent enough to be cut without
breaching the inserts, form a series of check
joints (Figure 19). They must be made in
correspondence with sills, between pillars
and every 20-25 m2 on internal screeds and
every 16 m2 on external substrates. Cut the
screed to a depth of one third its thickness,
taking care not to cut through any electro-
welded mesh present. If the screed is made
from TOPCEM, TOPCEM PRONTO,
MAPECEM or MAPECEM PRONTO
special binder or mortar, the pitch of the
joints may be increased. If a bonded screed is
laid, the position of the joints must match
those in the bonded substrate.
Figure 19 Forming check joints in
a screed
Table 1 Installation methods of cement screed
Once the curing cycle is complete (especially when installing floor coverings
sensitive to humidity, such as wood, resilient and epoxy paints), check the residual moisture
in the screed with a suitable instrument, such as a carbide or electric hygrometer. Any cracks
which form in the screed after completing the curing cycle must be monolithically sealed with
EPORIP before installing the flooring.
In most cases, the surface of screeds finished by float, power-float or helicopter are
suitable for installing ceramic or stone flooring. If the surface is not smooth or flat enough for
tiles, or when the installation surface is too low compared with the final height required, a
smoothing layer must be applied. Also, when installing resilient flooring (linoleum, PVC,
rubber, etc.), the installation surfaces always have to be finished off with a finishing layer,
which must have mechanical strength characteristics compatible with the final use of the floor
and the strength of the substrate.
Group 14 Floor And Wall Finishes Construction Technology II SBEC1122
31
To finish and smooth off installation surfaces for ceramic, stone and resilient
flooring, MAPEI has a wide range of thixotropic and self-levelling skimming compounds
available. For example, the following products are recommended;
No. MAPEI Products Descriptions
1 ULTRAPLAN
Self-levelling, ultra-rapid-hardening smoothing
compound for thicknesses from 1 to 10 mm.
2 ULTRAPLAN MAXI
Self-levelling, ultra-rapid-hardening smoothing
compound for thicknesses from 3 to 30 mm.
3 PLANIPATCH
Fine-grained, ultra-rapid-drying, thixotropic
cementitious skimming compound for thicknesses
from 0 to 10 mm.
4 NIVORAPID
Ultra-rapid-drying, thixotropic cementitious
skimming compound for thicknesses from 3 to 20
mm. These smoothing compounds are also suitable
for use when installing wooden floors as long as they
are applied in layers at least 3 mm thick.
Table 2 Types of thixotropic and self-levelling compounds
v. Application of Cement Screed:
A cement screed of ± 30 – 40 mm thick with levels according to requirements is
cast on concrete. Thereafter the colors is floated onto the wet screed, creating a luxurious
mottled look and providing a very hard and durable floor. Color Screed cannot be cast over
tiles or any other floor covering. Tiles, wooden flooring or carpets will need to be removed
first.
Floor and Wall Finishes Case Study, Educity Sports Complex (Running Track and Swimming Pool)

More Related Content

What's hot

Terrazzo flooring and PCC flooring
Terrazzo flooring and PCC flooringTerrazzo flooring and PCC flooring
Terrazzo flooring and PCC flooringShubhamRai1305
 
Acp and glazing
Acp and glazingAcp and glazing
Acp and glazingaduiti
 
Doors and windows
Doors and windowsDoors and windows
Doors and windowsanimesh91
 
Flat Grid / Waffle Slab
Flat Grid / Waffle SlabFlat Grid / Waffle Slab
Flat Grid / Waffle SlabAkshay Gawade
 
auditorium sightline
auditorium sightlineauditorium sightline
auditorium sightlineSougata De
 
Terrace waterproofing
Terrace waterproofingTerrace waterproofing
Terrace waterproofingRaja n Raja
 
Wooden partition & wall paneling
Wooden partition & wall paneling Wooden partition & wall paneling
Wooden partition & wall paneling vaibhav ghodke
 
Architectural case study of Apartments
Architectural case study of ApartmentsArchitectural case study of Apartments
Architectural case study of ApartmentsTanzil Faraz
 
Some Acoustics Material
Some Acoustics MaterialSome Acoustics Material
Some Acoustics MaterialMayur Waghulde
 
Timber flooring
Timber flooringTimber flooring
Timber flooringkaiwan1996
 
Aluminum partition wall
Aluminum partition wallAluminum partition wall
Aluminum partition wallZuber Memon
 
GREEN BUILDINGS OF Ken yeang
GREEN BUILDINGS OF Ken yeangGREEN BUILDINGS OF Ken yeang
GREEN BUILDINGS OF Ken yeangyaswanth reddy
 
Low cost construction
Low cost construction Low cost construction
Low cost construction Brijesh Alig
 
Project 1: Industrialised Building System [ IBS ]
Project 1: Industrialised Building System [ IBS ]Project 1: Industrialised Building System [ IBS ]
Project 1: Industrialised Building System [ IBS ]JerotichMaswan
 
PREFABRICATED CONSTRUCTION CASE STUDY: THE HEMISPHERE
PREFABRICATED CONSTRUCTION CASE STUDY: THE HEMISPHEREPREFABRICATED CONSTRUCTION CASE STUDY: THE HEMISPHERE
PREFABRICATED CONSTRUCTION CASE STUDY: THE HEMISPHEREShivangi Saini
 
Architecture case study presentation
Architecture case study presentationArchitecture case study presentation
Architecture case study presentationWriters Per Hour
 
Tile Roofing- Materials and Techniques
Tile Roofing- Materials and TechniquesTile Roofing- Materials and Techniques
Tile Roofing- Materials and TechniquesPrasad Thanthratey
 

What's hot (20)

Terrazzo flooring and PCC flooring
Terrazzo flooring and PCC flooringTerrazzo flooring and PCC flooring
Terrazzo flooring and PCC flooring
 
False ceiling
False ceilingFalse ceiling
False ceiling
 
Acp and glazing
Acp and glazingAcp and glazing
Acp and glazing
 
Doors and windows
Doors and windowsDoors and windows
Doors and windows
 
Ferrocement roof
Ferrocement roofFerrocement roof
Ferrocement roof
 
Flat Grid / Waffle Slab
Flat Grid / Waffle SlabFlat Grid / Waffle Slab
Flat Grid / Waffle Slab
 
auditorium sightline
auditorium sightlineauditorium sightline
auditorium sightline
 
Terrace waterproofing
Terrace waterproofingTerrace waterproofing
Terrace waterproofing
 
Partition walls
Partition wallsPartition walls
Partition walls
 
Wooden partition & wall paneling
Wooden partition & wall paneling Wooden partition & wall paneling
Wooden partition & wall paneling
 
Architectural case study of Apartments
Architectural case study of ApartmentsArchitectural case study of Apartments
Architectural case study of Apartments
 
Some Acoustics Material
Some Acoustics MaterialSome Acoustics Material
Some Acoustics Material
 
Timber flooring
Timber flooringTimber flooring
Timber flooring
 
Aluminum partition wall
Aluminum partition wallAluminum partition wall
Aluminum partition wall
 
GREEN BUILDINGS OF Ken yeang
GREEN BUILDINGS OF Ken yeangGREEN BUILDINGS OF Ken yeang
GREEN BUILDINGS OF Ken yeang
 
Low cost construction
Low cost construction Low cost construction
Low cost construction
 
Project 1: Industrialised Building System [ IBS ]
Project 1: Industrialised Building System [ IBS ]Project 1: Industrialised Building System [ IBS ]
Project 1: Industrialised Building System [ IBS ]
 
PREFABRICATED CONSTRUCTION CASE STUDY: THE HEMISPHERE
PREFABRICATED CONSTRUCTION CASE STUDY: THE HEMISPHEREPREFABRICATED CONSTRUCTION CASE STUDY: THE HEMISPHERE
PREFABRICATED CONSTRUCTION CASE STUDY: THE HEMISPHERE
 
Architecture case study presentation
Architecture case study presentationArchitecture case study presentation
Architecture case study presentation
 
Tile Roofing- Materials and Techniques
Tile Roofing- Materials and TechniquesTile Roofing- Materials and Techniques
Tile Roofing- Materials and Techniques
 

Viewers also liked

Floor finishes
Floor finishes Floor finishes
Floor finishes Rita Mitra
 
GROUP PROJECT: PROPOSAL FOR THE FINISHED/ EXISTING BUILDING CONSTRUCTION (CAS...
GROUP PROJECT: PROPOSAL FOR THE FINISHED/ EXISTING BUILDING CONSTRUCTION (CAS...GROUP PROJECT: PROPOSAL FOR THE FINISHED/ EXISTING BUILDING CONSTRUCTION (CAS...
GROUP PROJECT: PROPOSAL FOR THE FINISHED/ EXISTING BUILDING CONSTRUCTION (CAS...Firdaurs Abdullah
 
Lift form slab construction
Lift form slab constructionLift form slab construction
Lift form slab constructiontivar rose
 
Arihant.ppt [autosaved]
Arihant.ppt [autosaved]Arihant.ppt [autosaved]
Arihant.ppt [autosaved]aaru994
 
Construction process''column,beam,slab''
Construction process''column,beam,slab''Construction process''column,beam,slab''
Construction process''column,beam,slab''Nabeel Rajpoot
 
Building methods and construction technology 1
Building methods and construction technology 1Building methods and construction technology 1
Building methods and construction technology 1hpinn
 
Presentation on Slab, Beam & Column
Presentation on Slab, Beam & ColumnPresentation on Slab, Beam & Column
Presentation on Slab, Beam & Columnমু সা
 
Formwork construction in structures
Formwork construction in structuresFormwork construction in structures
Formwork construction in structuresRithika Ravishankar
 

Viewers also liked (14)

Chapter 13
Chapter 13Chapter 13
Chapter 13
 
Floor finishes
Floor finishes Floor finishes
Floor finishes
 
5.2 (2)
5.2 (2)5.2 (2)
5.2 (2)
 
GROUP PROJECT: PROPOSAL FOR THE FINISHED/ EXISTING BUILDING CONSTRUCTION (CAS...
GROUP PROJECT: PROPOSAL FOR THE FINISHED/ EXISTING BUILDING CONSTRUCTION (CAS...GROUP PROJECT: PROPOSAL FOR THE FINISHED/ EXISTING BUILDING CONSTRUCTION (CAS...
GROUP PROJECT: PROPOSAL FOR THE FINISHED/ EXISTING BUILDING CONSTRUCTION (CAS...
 
Lift form slab construction
Lift form slab constructionLift form slab construction
Lift form slab construction
 
Ground floor
Ground floorGround floor
Ground floor
 
Arihant.ppt [autosaved]
Arihant.ppt [autosaved]Arihant.ppt [autosaved]
Arihant.ppt [autosaved]
 
Construction process''column,beam,slab''
Construction process''column,beam,slab''Construction process''column,beam,slab''
Construction process''column,beam,slab''
 
Finishing
FinishingFinishing
Finishing
 
Shopping mall.
Shopping mall.Shopping mall.
Shopping mall.
 
Flooring
FlooringFlooring
Flooring
 
Building methods and construction technology 1
Building methods and construction technology 1Building methods and construction technology 1
Building methods and construction technology 1
 
Presentation on Slab, Beam & Column
Presentation on Slab, Beam & ColumnPresentation on Slab, Beam & Column
Presentation on Slab, Beam & Column
 
Formwork construction in structures
Formwork construction in structuresFormwork construction in structures
Formwork construction in structures
 

Similar to Floor and Wall Finishes Case Study, Educity Sports Complex (Running Track and Swimming Pool)

Site visit report
Site visit reportSite visit report
Site visit reportEyelynLee
 
Pfm site report in morib
Pfm site report in moribPfm site report in morib
Pfm site report in moribRyan Yong
 
Arc2625 report file nik afiq amadi 0317749 final.pdf
Arc2625 report file nik afiq amadi 0317749 final.pdfArc2625 report file nik afiq amadi 0317749 final.pdf
Arc2625 report file nik afiq amadi 0317749 final.pdfAfiq Knick
 
Internship training report
Internship training reportInternship training report
Internship training reportAfiq Knick
 
INDUSTRIAL ATTACHMENT REPORT By Innocent Nsengimana
INDUSTRIAL ATTACHMENT REPORT By Innocent NsengimanaINDUSTRIAL ATTACHMENT REPORT By Innocent Nsengimana
INDUSTRIAL ATTACHMENT REPORT By Innocent NsengimanaInnocent Nsengimana
 
final year civil engineering training report
final year civil engineering training report final year civil engineering training report
final year civil engineering training report Poojan Patel
 
Vm report-most-updated-2
Vm report-most-updated-2Vm report-most-updated-2
Vm report-most-updated-2Syafiq Zariful
 
FINAL_FINAL_PROJECT_COMBINED[1]
FINAL_FINAL_PROJECT_COMBINED[1]FINAL_FINAL_PROJECT_COMBINED[1]
FINAL_FINAL_PROJECT_COMBINED[1]Ali Abdul Fatawu
 
internship report on architecture
internship report on architectureinternship report on architecture
internship report on architecturebiruktigistu1
 
Internship Report Semester 2 Civil Engineering.
Internship Report Semester 2 Civil Engineering.Internship Report Semester 2 Civil Engineering.
Internship Report Semester 2 Civil Engineering.Siana Ann Sebastian
 
Final Internship Report
Final Internship ReportFinal Internship Report
Final Internship ReportMinhas Kamal
 

Similar to Floor and Wall Finishes Case Study, Educity Sports Complex (Running Track and Swimming Pool) (20)

Site visit report
Site visit reportSite visit report
Site visit report
 
Pfm site report in morib
Pfm site report in moribPfm site report in morib
Pfm site report in morib
 
Internship report
Internship reportInternship report
Internship report
 
SOKONI MOBILE APPLICATION FINAL REPORT
SOKONI MOBILE APPLICATION FINAL REPORTSOKONI MOBILE APPLICATION FINAL REPORT
SOKONI MOBILE APPLICATION FINAL REPORT
 
Sadab AHMAD
Sadab AHMADSadab AHMAD
Sadab AHMAD
 
building presentation
building presentation building presentation
building presentation
 
building presentation
building presentationbuilding presentation
building presentation
 
Final Year Project
Final Year ProjectFinal Year Project
Final Year Project
 
Arc2625 report file nik afiq amadi 0317749 final.pdf
Arc2625 report file nik afiq amadi 0317749 final.pdfArc2625 report file nik afiq amadi 0317749 final.pdf
Arc2625 report file nik afiq amadi 0317749 final.pdf
 
Internship training report
Internship training reportInternship training report
Internship training report
 
INDUSTRIAL ATTACHMENT REPORT By Innocent Nsengimana
INDUSTRIAL ATTACHMENT REPORT By Innocent NsengimanaINDUSTRIAL ATTACHMENT REPORT By Innocent Nsengimana
INDUSTRIAL ATTACHMENT REPORT By Innocent Nsengimana
 
final year civil engineering training report
final year civil engineering training report final year civil engineering training report
final year civil engineering training report
 
Vm report-most-updated-2
Vm report-most-updated-2Vm report-most-updated-2
Vm report-most-updated-2
 
FINAL_FINAL_PROJECT_COMBINED[1]
FINAL_FINAL_PROJECT_COMBINED[1]FINAL_FINAL_PROJECT_COMBINED[1]
FINAL_FINAL_PROJECT_COMBINED[1]
 
Report technology-in-costruction-site-the-élysée-from-mam-to-itc
Report technology-in-costruction-site-the-élysée-from-mam-to-itcReport technology-in-costruction-site-the-élysée-from-mam-to-itc
Report technology-in-costruction-site-the-élysée-from-mam-to-itc
 
internship report on architecture
internship report on architectureinternship report on architecture
internship report on architecture
 
Internship Report Semester 2 Civil Engineering.
Internship Report Semester 2 Civil Engineering.Internship Report Semester 2 Civil Engineering.
Internship Report Semester 2 Civil Engineering.
 
Final Internship Report
Final Internship ReportFinal Internship Report
Final Internship Report
 
Final Project
Final ProjectFinal Project
Final Project
 
Front page
Front pageFront page
Front page
 

Recently uploaded

Science&tech:THE INFORMATION AGE STS.pdf
Science&tech:THE INFORMATION AGE STS.pdfScience&tech:THE INFORMATION AGE STS.pdf
Science&tech:THE INFORMATION AGE STS.pdfjimielynbastida
 
Key Features Of Token Development (1).pptx
Key  Features Of Token  Development (1).pptxKey  Features Of Token  Development (1).pptx
Key Features Of Token Development (1).pptxLBM Solutions
 
#StandardsGoals for 2024: What’s new for BISAC - Tech Forum 2024
#StandardsGoals for 2024: What’s new for BISAC - Tech Forum 2024#StandardsGoals for 2024: What’s new for BISAC - Tech Forum 2024
#StandardsGoals for 2024: What’s new for BISAC - Tech Forum 2024BookNet Canada
 
Are Multi-Cloud and Serverless Good or Bad?
Are Multi-Cloud and Serverless Good or Bad?Are Multi-Cloud and Serverless Good or Bad?
Are Multi-Cloud and Serverless Good or Bad?Mattias Andersson
 
Benefits Of Flutter Compared To Other Frameworks
Benefits Of Flutter Compared To Other FrameworksBenefits Of Flutter Compared To Other Frameworks
Benefits Of Flutter Compared To Other FrameworksSoftradix Technologies
 
New from BookNet Canada for 2024: BNC BiblioShare - Tech Forum 2024
New from BookNet Canada for 2024: BNC BiblioShare - Tech Forum 2024New from BookNet Canada for 2024: BNC BiblioShare - Tech Forum 2024
New from BookNet Canada for 2024: BNC BiblioShare - Tech Forum 2024BookNet Canada
 
APIForce Zurich 5 April Automation LPDG
APIForce Zurich 5 April  Automation LPDGAPIForce Zurich 5 April  Automation LPDG
APIForce Zurich 5 April Automation LPDGMarianaLemus7
 
Transcript: New from BookNet Canada for 2024: BNC BiblioShare - Tech Forum 2024
Transcript: New from BookNet Canada for 2024: BNC BiblioShare - Tech Forum 2024Transcript: New from BookNet Canada for 2024: BNC BiblioShare - Tech Forum 2024
Transcript: New from BookNet Canada for 2024: BNC BiblioShare - Tech Forum 2024BookNet Canada
 
SQL Database Design For Developers at php[tek] 2024
SQL Database Design For Developers at php[tek] 2024SQL Database Design For Developers at php[tek] 2024
SQL Database Design For Developers at php[tek] 2024Scott Keck-Warren
 
Snow Chain-Integrated Tire for a Safe Drive on Winter Roads
Snow Chain-Integrated Tire for a Safe Drive on Winter RoadsSnow Chain-Integrated Tire for a Safe Drive on Winter Roads
Snow Chain-Integrated Tire for a Safe Drive on Winter RoadsHyundai Motor Group
 
CloudStudio User manual (basic edition):
CloudStudio User manual (basic edition):CloudStudio User manual (basic edition):
CloudStudio User manual (basic edition):comworks
 
Unblocking The Main Thread Solving ANRs and Frozen Frames
Unblocking The Main Thread Solving ANRs and Frozen FramesUnblocking The Main Thread Solving ANRs and Frozen Frames
Unblocking The Main Thread Solving ANRs and Frozen FramesSinan KOZAK
 
Automating Business Process via MuleSoft Composer | Bangalore MuleSoft Meetup...
Automating Business Process via MuleSoft Composer | Bangalore MuleSoft Meetup...Automating Business Process via MuleSoft Composer | Bangalore MuleSoft Meetup...
Automating Business Process via MuleSoft Composer | Bangalore MuleSoft Meetup...shyamraj55
 
Install Stable Diffusion in windows machine
Install Stable Diffusion in windows machineInstall Stable Diffusion in windows machine
Install Stable Diffusion in windows machinePadma Pradeep
 
Tech-Forward - Achieving Business Readiness For Copilot in Microsoft 365
Tech-Forward - Achieving Business Readiness For Copilot in Microsoft 365Tech-Forward - Achieving Business Readiness For Copilot in Microsoft 365
Tech-Forward - Achieving Business Readiness For Copilot in Microsoft 3652toLead Limited
 
Making_way_through_DLL_hollowing_inspite_of_CFG_by_Debjeet Banerjee.pptx
Making_way_through_DLL_hollowing_inspite_of_CFG_by_Debjeet Banerjee.pptxMaking_way_through_DLL_hollowing_inspite_of_CFG_by_Debjeet Banerjee.pptx
Making_way_through_DLL_hollowing_inspite_of_CFG_by_Debjeet Banerjee.pptxnull - The Open Security Community
 
Streamlining Python Development: A Guide to a Modern Project Setup
Streamlining Python Development: A Guide to a Modern Project SetupStreamlining Python Development: A Guide to a Modern Project Setup
Streamlining Python Development: A Guide to a Modern Project SetupFlorian Wilhelm
 
Bun (KitWorks Team Study 노별마루 발표 2024.4.22)
Bun (KitWorks Team Study 노별마루 발표 2024.4.22)Bun (KitWorks Team Study 노별마루 발표 2024.4.22)
Bun (KitWorks Team Study 노별마루 발표 2024.4.22)Wonjun Hwang
 
Swan(sea) Song – personal research during my six years at Swansea ... and bey...
Swan(sea) Song – personal research during my six years at Swansea ... and bey...Swan(sea) Song – personal research during my six years at Swansea ... and bey...
Swan(sea) Song – personal research during my six years at Swansea ... and bey...Alan Dix
 
Build your next Gen AI Breakthrough - April 2024
Build your next Gen AI Breakthrough - April 2024Build your next Gen AI Breakthrough - April 2024
Build your next Gen AI Breakthrough - April 2024Neo4j
 

Recently uploaded (20)

Science&tech:THE INFORMATION AGE STS.pdf
Science&tech:THE INFORMATION AGE STS.pdfScience&tech:THE INFORMATION AGE STS.pdf
Science&tech:THE INFORMATION AGE STS.pdf
 
Key Features Of Token Development (1).pptx
Key  Features Of Token  Development (1).pptxKey  Features Of Token  Development (1).pptx
Key Features Of Token Development (1).pptx
 
#StandardsGoals for 2024: What’s new for BISAC - Tech Forum 2024
#StandardsGoals for 2024: What’s new for BISAC - Tech Forum 2024#StandardsGoals for 2024: What’s new for BISAC - Tech Forum 2024
#StandardsGoals for 2024: What’s new for BISAC - Tech Forum 2024
 
Are Multi-Cloud and Serverless Good or Bad?
Are Multi-Cloud and Serverless Good or Bad?Are Multi-Cloud and Serverless Good or Bad?
Are Multi-Cloud and Serverless Good or Bad?
 
Benefits Of Flutter Compared To Other Frameworks
Benefits Of Flutter Compared To Other FrameworksBenefits Of Flutter Compared To Other Frameworks
Benefits Of Flutter Compared To Other Frameworks
 
New from BookNet Canada for 2024: BNC BiblioShare - Tech Forum 2024
New from BookNet Canada for 2024: BNC BiblioShare - Tech Forum 2024New from BookNet Canada for 2024: BNC BiblioShare - Tech Forum 2024
New from BookNet Canada for 2024: BNC BiblioShare - Tech Forum 2024
 
APIForce Zurich 5 April Automation LPDG
APIForce Zurich 5 April  Automation LPDGAPIForce Zurich 5 April  Automation LPDG
APIForce Zurich 5 April Automation LPDG
 
Transcript: New from BookNet Canada for 2024: BNC BiblioShare - Tech Forum 2024
Transcript: New from BookNet Canada for 2024: BNC BiblioShare - Tech Forum 2024Transcript: New from BookNet Canada for 2024: BNC BiblioShare - Tech Forum 2024
Transcript: New from BookNet Canada for 2024: BNC BiblioShare - Tech Forum 2024
 
SQL Database Design For Developers at php[tek] 2024
SQL Database Design For Developers at php[tek] 2024SQL Database Design For Developers at php[tek] 2024
SQL Database Design For Developers at php[tek] 2024
 
Snow Chain-Integrated Tire for a Safe Drive on Winter Roads
Snow Chain-Integrated Tire for a Safe Drive on Winter RoadsSnow Chain-Integrated Tire for a Safe Drive on Winter Roads
Snow Chain-Integrated Tire for a Safe Drive on Winter Roads
 
CloudStudio User manual (basic edition):
CloudStudio User manual (basic edition):CloudStudio User manual (basic edition):
CloudStudio User manual (basic edition):
 
Unblocking The Main Thread Solving ANRs and Frozen Frames
Unblocking The Main Thread Solving ANRs and Frozen FramesUnblocking The Main Thread Solving ANRs and Frozen Frames
Unblocking The Main Thread Solving ANRs and Frozen Frames
 
Automating Business Process via MuleSoft Composer | Bangalore MuleSoft Meetup...
Automating Business Process via MuleSoft Composer | Bangalore MuleSoft Meetup...Automating Business Process via MuleSoft Composer | Bangalore MuleSoft Meetup...
Automating Business Process via MuleSoft Composer | Bangalore MuleSoft Meetup...
 
Install Stable Diffusion in windows machine
Install Stable Diffusion in windows machineInstall Stable Diffusion in windows machine
Install Stable Diffusion in windows machine
 
Tech-Forward - Achieving Business Readiness For Copilot in Microsoft 365
Tech-Forward - Achieving Business Readiness For Copilot in Microsoft 365Tech-Forward - Achieving Business Readiness For Copilot in Microsoft 365
Tech-Forward - Achieving Business Readiness For Copilot in Microsoft 365
 
Making_way_through_DLL_hollowing_inspite_of_CFG_by_Debjeet Banerjee.pptx
Making_way_through_DLL_hollowing_inspite_of_CFG_by_Debjeet Banerjee.pptxMaking_way_through_DLL_hollowing_inspite_of_CFG_by_Debjeet Banerjee.pptx
Making_way_through_DLL_hollowing_inspite_of_CFG_by_Debjeet Banerjee.pptx
 
Streamlining Python Development: A Guide to a Modern Project Setup
Streamlining Python Development: A Guide to a Modern Project SetupStreamlining Python Development: A Guide to a Modern Project Setup
Streamlining Python Development: A Guide to a Modern Project Setup
 
Bun (KitWorks Team Study 노별마루 발표 2024.4.22)
Bun (KitWorks Team Study 노별마루 발표 2024.4.22)Bun (KitWorks Team Study 노별마루 발표 2024.4.22)
Bun (KitWorks Team Study 노별마루 발표 2024.4.22)
 
Swan(sea) Song – personal research during my six years at Swansea ... and bey...
Swan(sea) Song – personal research during my six years at Swansea ... and bey...Swan(sea) Song – personal research during my six years at Swansea ... and bey...
Swan(sea) Song – personal research during my six years at Swansea ... and bey...
 
Build your next Gen AI Breakthrough - April 2024
Build your next Gen AI Breakthrough - April 2024Build your next Gen AI Breakthrough - April 2024
Build your next Gen AI Breakthrough - April 2024
 

Floor and Wall Finishes Case Study, Educity Sports Complex (Running Track and Swimming Pool)

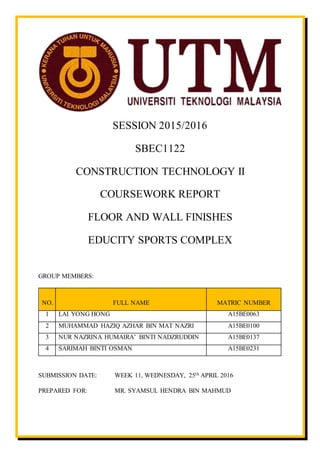
  • 1. SESSION 2015/2016 SBEC1122 CONSTRUCTION TECHNOLOGY II COURSEWORK REPORT FLOOR AND WALL FINISHES EDUCITY SPORTS COMPLEX GROUP MEMBERS: NO. FULL NAME MATRIC NUMBER 1 LAI YONG HONG A15BE0063 2 MUHAMMAD HAZIQ AZHAR BIN MAT NAZRI A15BE0100 3 NUR NAZRINA HUMAIRA’ BINTI NADZRUDDIN A15BE0137 4 SARIMAH BINTI OSMAN A15BE0231 SUBMISSION DATE: WEEK 11, WEDNESDAY, 25th APRIL 2016 PREPARED FOR: MR. SYAMSUL HENDRA BIN MAHMUD
  • 2. Department of Quantity Surveying, Faculty of Built Environment, University Technology of Malaysia. Group 14 Floor And Wall Finishes Construction Technology II SBEC1122 . i ACKNOWLEDGEMENT lmost two months, we tried our best to keep progressing this course work report although it is not good enough to compare to the other academic reports in construction area. Despite having a lot of obstacles, and stressful feelings, we barely managed to keep our pedal on to complete this report, thankfully to ‘those’ who always stand by our side and available for lending their hand to us. Therefore, we would like to take this chance to express our greatest gratitude towards Allah (God) who gave us life and breath every seconds no matter where we are and always gave us guide and strength to do our responsibility, to dealt with difficulties and also to do our job as his servant and of course as a student in here. Secondly, we would like to give a huge appreciation to our parents who gave us a non-stop advices to make us always remember, keen to study and finish our assignment, and also very supportive in terms of money to buy stationaries, food and so on. Their helps and assistances always will be kept in our hearts and will never be erased. Thirdly, we would like to deeply express our gratefulness to Mr. Syamsul Hendra Bin Mahmud, our lecturer and advisor of this report, who continuously giving us support in writing this information without coercion and help us to find new project site after we lost our hope in the previous site, Teega Puteri Harbour. His help are unrequited and very beneficial for us. Hence, we are very grateful to have his help. Following, we would like to give a big thanks to our advisor, K.A.S Juruukur Bahan Sdn. Bhd. team, who provide us explanation and countless information about our project site such as Bill of quantities (BQ), drawings, and program details. We also would like to give appreciation towards Educity Sports Complex management team that allow us to visit the site and make some academic research and also scarification in time to brief us about the site. Afterwards, we want to thanks our dear friends and course mates that always have our thoughts and listen to our words, and also giving us a good response when we appointing question, and also giving us advices in completing the task. Not to forget, to the ‘two groups’ A
  • 3. Department of Quantity Surveying, Faculty of Built Environment, University Technology of Malaysia. Group 14 Floor And Wall Finishes Construction Technology II SBEC1122 . ii who are also helps us in identifying new site, helping to photocopy the drawings, lending hands in managing appointment with the site manager, and many more. Last but not least, we would like to send our thanks to ourselves, starting from Lai Yong Hong, who drove us to the site, and helping us in initial travelling expenses. Next, Nazrina who always give quick response in giving opinion and Sarimah, who help a lot in finding information and Haziq, who leading us towards this end. We hope that our course work report are enough and sit well with the requirements need in this task. We also hope that we will succeed in this report.
  • 4. Department of Quantity Surveying, Faculty of Built Environment, University Technology of Malaysia. Group 14 Floor And Wall Finishes Construction Technology II SBEC1122 . iii TABLE OF CONTENT ACKNOWLEDGEMENT....................................................................................................... I TABLE OF CONTENT........................................................................................................ III LIST OF FIGURES ...............................................................................................................VI LIST OF TABLES ..............................................................................................................XIV 1.0 INTRODUCTION.......................................................................................................1 1.1 BUILDING FINISHES ...........................................................................................1 1.2 INTERNAL AND EXTERNAL FINISHES ...........................................................7 1.3 INTERIOR AND EXTERIOR OF FLOOR FINISHES .........................................7 1.4 INTERIOR AND EXTERIOR OF WALL FINISHES ...........................................8 1.5 HISTORY OF FINISHES .......................................................................................8 1.5.1 THE WOOD FLOORING AS FINISHES ..........................................................8 1.5.2 THE WAXING FLOOR AS FINISHES .............................................................9 1.5.3 THE CONCRETE FLOORING AS FINISHES ................................................11 1.5.4 THE TILES FLOORING AS FINISHES ..........................................................12 1.5.5 THE NATURAL STONE FLOORING AS FINISHES ....................................15 2.0 THEORETICAL STUDY .........................................................................................17 2.1 FLOOR FINISHES ........................................................................................17 2.1.1 GENERAL FACTORS OF FLOOR FINISHES SELECTION .................18 2.1.2 CLASSIFICATION OF FLOOR FINISHES .............................................22 2.1.2.1 IN-SITU FLOOR FINISHES ................................................................22 2.1.2.1.1CEMENT SCREED.........................................................................22 2.1.2.1.2TERRAZZO.....................................................................................42 2.1.2.1.3FLOOR PAINT................................................................................52 2.1.2.2 APPLIED FLOOR FINISHES ..............................................................63 2.1.2.2.1PLASTIC BASED........................................................................63 2.1.2.2.2NATURAL STONES...................................................................73 2.1.2.2.3CERAMIC....................................................................................94 2.1.2.3 TIMBER FLOOR FINISHES ..............................................................101
  • 5. Department of Quantity Surveying, Faculty of Built Environment, University Technology of Malaysia. Group 14 Floor And Wall Finishes Construction Technology II SBEC1122 . iv 2.2 WALL FINISHES........................................................................................111 2.2.1 WALLPAPER ..........................................................................................111 2.2.2 TILE..........................................................................................................116 2.2.3 PLASTER .................................................................................................123 2.2.4 CERAMICS..............................................................................................129 2.2.5 PAINT.......................................................................................................134 3.0 CASESTUDY.........................................................................................................139 3.1 FOCUS OF THE CASE STUDY.................................................................139 3.2 PROJECT PROFILE....................................................................................140 3.3 PROPOSED DRAWINGS AND BILL OF QUANTITIES ........................149 3.4 SYNTHETIC RUNNING TRACK CONSTRUCTION..............................155 3.4.1 TYPES ......................................................................................................155 3.4.2 DESIGN BENEFITS ................................................................................157 3.4.3 COMPONENT .........................................................................................159 3.4.4 CONSTRUCTION METHODS ...............................................................164 3.4.5 MATERIALS AND COST.......................................................................173 3.4.6 SPECIFICATIONS...................................................................................177 3.5 SWIMMING POOL CONSTRUCTION.....................................................179 3.5.1 TYPES ......................................................................................................179 3.5.2 DESIGN BENEFITS................................................................................182 3.5.3 COMPONENTS .......................................................................................183 3.5.4 CONSTRUCTION METHODS ...............................................................190 3.5.5 MATERIALS AND COST.......................................................................196 3.5.6 SPECIFICATIONS...................................................................................199 3.5.7 METHOD STATEMENT ........................................................................200 3.6 PLANTS AND EQUIPMENT.....................................................................205 3.7 COST............................................................................................................217 3.8 LABOUR AND COST.................................................................................221 3.9 CONSTRUCTION SAFETY.......................................................................225 4.0 SUITABILITY STUDIES.......................................................................................227 5.0 BUDGET AND EXPENSES...................................................................................229 6.0 CONCLUSION .......................................................................................................232
  • 6. Department of Quantity Surveying, Faculty of Built Environment, University Technology of Malaysia. Group 14 Floor And Wall Finishes Construction Technology II SBEC1122 . v 7.0 REFERENCES.....................................................ERROR! BOOKMARK NOT DEFINED. 8.0 APPENDIX .............................................................................................................238
  • 7. Department of Quantity Surveying, Faculty of Built Environment, University Technology of Malaysia. Group 14 Floor And Wall Finishes Construction Technology II SBEC1122 . vi LIST OF FIGURES Figure 1 Residential building.....................................................................................................3 Figure 2 High rise building in a city ..........................................................................................4 Figure 3 Example of machinery building ..................................................................................6 Figure 4 Wood flooring as finishes............................................................................................9 Figure 5 Waxing as floor finishes makes floor look shiny and clean......................................10 Figure 6 Concrete flooring as the easiest finishes to install for floor finishing .......................11 Figure 7 Tiling can be match from variety of types, colour and patterns. ...............................13 Figure 8 Stones are famous with its durability against distortion............................................15 Figure 9 Cement screed as floor finishes.................................................................................22 Figure 10 Dark colour often becoming people’s choice nowadays. ........................................23 Figure 11 Cement screed can be done into variety different colours ......................................23 Figure 12 Forming levelling strips...........................................................................................26 Figure 13 A screed cut perpendicularly at the point where laying has been interrupted .........27 Figure 14 Sealing a chase in existing flooring by applying bonding slurry on the contact surfaces between the existing and repaired surfaces................................................................27 Figure 15 Reinforcing a screed by bridging fine mesh over pipe-work ..................................28 Figure 16 Placing zinc-plated metallic mesh at the mid-point of the screed ...........................28 Figure 17 Float-finishing the surface of a screed.....................................................................29 Figure 18 Finishing the surface of a screed with a power float ...............................................29 Figure 19 Forming check joints in a screed .............................................................................30 Figure 20 Cracked screed.........................................................................................................32 Figure 21 Opening cracks in a screed with an angle grinder...................................................32 Figure 22 Sealing fractures with EPORIP ...............................................................................33 Figure 23 Sprinkling sand on the surface of fresh EPORIP ....................................................33 Figure 24 A depression in an underfloor screed in correspondence with pipe-work ..............34 Figure 25 The thickness of the screed over pipe-work is insufficient (<2.5 cm) ....................34 Figure 26 Applying bonding slurry made from epoxy resin (PRIMER MF) ..........................35 Figure 27 Filling fractures with MAPEFLOOR EP19 ............................................................35 Figure 28 Sectional view of a screed with surface bleeding....................................................36
  • 8. Department of Quantity Surveying, Faculty of Built Environment, University Technology of Malaysia. Group 14 Floor And Wall Finishes Construction Technology II SBEC1122 . vii Figure 29 ULTRAPLAN detached from a screed with surface bleeding ................................36 Figure 30 Applying PRIMER MF on the surface of a screed..................................................38 Figure 31 Dusting the surface of a screed with sand after applying a coat of PRIMER MF ..38 Figure 32 Applying PRIMER MF on the surface of a screed..................................................40 Figure 33 Dusting the surface of a screed with sand after applying a coat of PRIMER MF ..40 Figure 34 Brush-applying PRIMER G diluted with water on the surface of a screed.............41 Figure 35 Creating a flat surface on a screed by applying a layer of ULTRAPLAN ..............41 Figure 36 Terrazzo finishes brings luxurious look in a home .................................................42 Figure 37 Terrazzo uses in late 90’s ........................................................................................42 Figure 38 Uses of Epoxy Terrazzo ..........................................................................................44 Figure 39 Cement Terrazzo as finishes....................................................................................45 Figure 40 Rustic Terrazzo found in hotel areas .......................................................................45 Figure 41 Sand cushion Terrazzo looks very elegant in corporate area ..................................46 Figure 42 Determining the tile measurement for the outside edge ..........................................48 Figure 43 Cutting the edge tiles ...............................................................................................48 Figure 44 Spreading the adhesive ............................................................................................49 Figure 45 Securing the tile with floor roller ............................................................................49 Figure 46 Floor paint gives a shiny look with reflected light ..................................................52 Figure 47 Acrylic resin as a binding agent ..............................................................................53 Figure 48 Differences in look of water-based and oil-based paint ..........................................54 Figure 49 Shellac, natural product as floor finishes ................................................................54 Figure 50 Preparing the base....................................................................................................55 Figure 51 Painting the base coat ..............................................................................................56 Figure 52 Measuring and marking the pattern.........................................................................56 Figure 53 Making the first square............................................................................................57 Figure 54 Completing the pattern ............................................................................................57 Figure 55 Masking the squares ................................................................................................57 Figure 56 Cutting tape with putty knife...................................................................................58 Figure 57 Completing the tape outline.....................................................................................58 Figure 58 Painting the pattern..................................................................................................58 Figure 59 Removing the tape...................................................................................................59 Figure 60 Finishing the coat floor............................................................................................59
  • 9. Department of Quantity Surveying, Faculty of Built Environment, University Technology of Malaysia. Group 14 Floor And Wall Finishes Construction Technology II SBEC1122 . viii Figure 61 Tile as floor finishes ................................................................................................63 Figure 62 Vinyl Composition Tiles as floor finishes...............................................................64 Figure 63 Vinyl Asbestos tile as floor finishes........................................................................65 Figure 64 Sheet Vinyl as floor finishes....................................................................................66 Figure 65 Linoleum as floor finishes .......................................................................................66 Figure 66 Putting down underlayment.....................................................................................68 Figure 67 Trimming the door and casing.................................................................................68 Figure 68 Laying out the room in quadrants............................................................................69 Figure 69 Tiling starts at the centre .........................................................................................69 Figure 70 Scribing tiles to fit along walls................................................................................70 Figure 71 Cutting tiles to size ..................................................................................................70 Figure 72 Trimming tiles around heat registers.......................................................................70 Figure 73 Installing shoe molding ...........................................................................................71 Figure 74 Natural stones as floor finishes................................................................................73 Figure 75 Natural cleft .............................................................................................................73 Figure 76 Polishing look on crystalized stones........................................................................74 Figure 77 Low maintenance, smooth honed stones .................................................................75 Figure 78 Flamed finish...........................................................................................................76 Figure 79 Sandblasted finish....................................................................................................76 Figure 80 Leather Finish..........................................................................................................77 Figure 81 Split face finish........................................................................................................77 Figure 82 Veneer stones finish ................................................................................................78 Figure 83 Antiqued finish........................................................................................................78 Figure 84 Bush hammered finish.............................................................................................79 Figure 85 Tumbled finish.........................................................................................................79 Figure 86 Fleuri Cut.................................................................................................................80 Figure 87 Gauged looks ...........................................................................................................80 Figure 88 Chiseled stone as finishes........................................................................................81 Figure 89 Granite .....................................................................................................................82 Figure 90 Marble......................................................................................................................83 Figure 91 Limestone ................................................................................................................83 Figure 92 Travertine.................................................................................................................84
  • 10. Department of Quantity Surveying, Faculty of Built Environment, University Technology of Malaysia. Group 14 Floor And Wall Finishes Construction Technology II SBEC1122 . ix Figure 93 Soapstone.................................................................................................................84 Figure 94 Onyx ........................................................................................................................85 Figure 95 Removing old tiles...................................................................................................86 Figure 96 Removing old thinset...............................................................................................87 Figure 97 Cleaning the area .....................................................................................................87 Figure 98 Measuring the area...................................................................................................87 Figure 99 Mixing thinset..........................................................................................................88 Figure 100 Setting cut tiles ......................................................................................................88 Figure 101 Spreading the thinset .............................................................................................88 Figure 102 Setting and spacing the tiles ..................................................................................89 Figure 103 Creating the pattern ...............................................................................................89 Figure 104 Cutting old tiles .....................................................................................................89 Figure 105 Applying the thinset and setting the tiles ..............................................................90 Figure 106 Applying the sealer................................................................................................90 Figure 107 Applying the grout.................................................................................................90 Figure 108 Cleaning the grout .................................................................................................91 Figure 109 Ceramic as floor finishes .......................................................................................94 Figure 110 Unglazed ceramic tiles...........................................................................................96 Figure 111 Glazed ceramic tiles...............................................................................................96 Figure 112 Porcelain ceramic tiles...........................................................................................97 Figure 113 Timber floor finishes ...........................................................................................101 Figure 114 Hardwood flooring ..............................................................................................102 Figure 115 Solid wood flooring.............................................................................................103 Figure 116 Rotary-peel ..........................................................................................................104 Figure 117 Sliced-peel...........................................................................................................104 Figure 118 Dry solid-sawn.....................................................................................................105 Figure 119 Engineered wood floors.......................................................................................105 Figure 120 Parquet floor ........................................................................................................106 Figure 121 Floor board ..........................................................................................................106 Figure 122 Timber board .......................................................................................................107 Figure 123 Educity Sports Complex front view ....................................................................142 Figure 124 Educity Sports Complex side view......................................................................143
  • 11. Department of Quantity Surveying, Faculty of Built Environment, University Technology of Malaysia. Group 14 Floor And Wall Finishes Construction Technology II SBEC1122 . x Figure 125 Educity Sports Complex site location .................................................................143 Figure 126 Educity Sports Complex construction timeframe................................................145 Figure 127 Educity Sports Complex in construction on 2011 ...............................................146 Figure 128 Educity Sports Complex in construction on 2011 ...............................................146 Figure 129 The construction phase of Educity Sports Complex in 2010 ..............................147 Figure 130 Educity Sports Complex completely done on 2013 ............................................147 Figure 131 Designated Model of Educity Sports Complex ...................................................148 Figure 132 Bill of Quantities .................................................................................................149 Figure 133 Contract document front page example...............................................................150 Figure 134 Some of the first element content of a contract document ..................................151 Figure 135 Front page of bill of quantities ............................................................................152 Figure 136 Elements in bill of quantities...............................................................................153 Figure 137 Bill of quantities descriptions..............................................................................154 Figure 138 Running track in Educity Sports Complex..........................................................155 Figure 139 EPDM rubber granules for running tracks surfaces ............................................156 Figure 140 EPDM granules ...................................................................................................156 Figure 141 Damage on running track surfaces ......................................................................158 Figure 142 Running in running track .....................................................................................159 Figure 143 Drainage...............................................................................................................159 Figure 144 Curbing................................................................................................................160 Figure 145 Paving..................................................................................................................160 Figure 146 Event areas...........................................................................................................161 Figure 147 In-ground equipment ...........................................................................................162 Figure 148 Surfacing..............................................................................................................162 Figure 149 Professional stripping ..........................................................................................163 Figure 150 Custom graphics ..................................................................................................163 Figure 151 Site inspection .....................................................................................................164 Figure 152 Certified CAD designated ...................................................................................164 Figure 153 Clearing the site...................................................................................................164 Figure 154 Site balancing ......................................................................................................165 Figure 155 Curbing and drainage ..........................................................................................165 Figure 156 Track paving........................................................................................................165
  • 12. Department of Quantity Surveying, Faculty of Built Environment, University Technology of Malaysia. Group 14 Floor And Wall Finishes Construction Technology II SBEC1122 . xi Figure 157 Constructing first layer ........................................................................................166 Figure 158 Polyurethane set...................................................................................................166 Figure 159 Polyurethane mixing............................................................................................166 Figure 160 Pouring polyurethane...........................................................................................167 Figure 161 Levelling..............................................................................................................167 Figure 162 Levelling..............................................................................................................167 Figure 163 Constructing second layer ...................................................................................168 Figure 164 Preparing EPDM .................................................................................................168 Figure 165 Sprinkling EPDM granules..................................................................................169 Figure 166 Levelling..............................................................................................................169 Figure 167 Track cleaning .....................................................................................................170 Figure 168 Track cleaning .....................................................................................................170 Figure 169 Adjusting track ....................................................................................................170 Figure 170 Paint mixing.........................................................................................................171 Figure 171 Line marking........................................................................................................171 Figure 172 Line marking........................................................................................................172 Figure 173 Crusher.................................................................................................................173 Figure 174 Bituminous prime coat ........................................................................................173 Figure 175 Asphalt.................................................................................................................173 Figure 176 Bituminous tack coat ...........................................................................................174 Figure 177 Polyurethane ........................................................................................................174 Figure 178 EPDM granules ...................................................................................................174 Figure 179 synthetic black rubber..........................................................................................175 Figure 180 Precast half round glaze ware drain.....................................................................175 Figure 181 Precast concrete kerbing......................................................................................175 Figure 182 Polyurethane paint ...............................................................................................176 Figure 183 Anodised aluminium kerbing ..............................................................................176 Figure 184 Specifications of synthetic running track ............................................................177 Figure 185 Specifications of synthetic running track ............................................................178 Figure 186 Olympic swimming pool in Educity Sports Complex.........................................179 Figure 187 Installing finishes in swimming pool ..................................................................180 Figure 188 Terracotta tiles has been used in Educity Sports Complex .................................180
  • 13. Department of Quantity Surveying, Faculty of Built Environment, University Technology of Malaysia. Group 14 Floor And Wall Finishes Construction Technology II SBEC1122 . xii Figure 189 Components in swimming pool...........................................................................183 Figure 190 Pool plant and filtration .......................................................................................184 Figure 191 Ladders ................................................................................................................185 Figure 192 Exits.....................................................................................................................185 Figure 193 Handrails..............................................................................................................186 Figure 194 Hydraulic lifts......................................................................................................186 Figure 195 Lifeguard chair ....................................................................................................187 Figure 196 Starting block.......................................................................................................187 Figure 197 Float lines ............................................................................................................188 Figure 198 Main drain............................................................................................................188 Figure 199 Skimmers.............................................................................................................189 Figure 200 Overflow grating..................................................................................................189 Figure 201 LED Pool lights ...................................................................................................190 Figure 202 Laying the tiles ....................................................................................................190 Figure 203 Sealing the joints .................................................................................................192 Figure 204 Washing...............................................................................................................193 Figure 205 Finishing..............................................................................................................194 Figure 206 Hard dry broken bricks........................................................................................196 Figure 207 Concrete grade 15 blinding .................................................................................197 Figure 208 High tensile reinforcement ..................................................................................197 Figure 209 Mild steel reinforcement......................................................................................197 Figure 210 Polythene sheet moisture.....................................................................................198 Figure 211Specifications of swimming pool .........................................................................199 Figure 212 Plant and equipment of Educity Sports Complex 1.............................................205 Figure 213 Plant and equipment of Educity Sports Complex 2.............................................206 Figure 214 Plant and equipment of Educity Sports Complex 3.............................................207 Figure 215 Plant and equipment of Educity Sports Complex...............................................208 Figure 216 Bulldozer .............................................................................................................209 Figure 217 Blade....................................................................................................................210 Figure 218 Ripper ..................................................................................................................210 Figure 219 Grader ..................................................................................................................210 Figure 220 Bucket..................................................................................................................211
  • 14. Department of Quantity Surveying, Faculty of Built Environment, University Technology of Malaysia. Group 14 Floor And Wall Finishes Construction Technology II SBEC1122 . xiii Figure 221 Paver ....................................................................................................................212 Figure 222 Dump truck..........................................................................................................212 Figure 223 Mobile crane........................................................................................................212 Figure 224 Road roller ...........................................................................................................213 Figure 225 Dragline excavator...............................................................................................214 Figure 226 Rock breaker........................................................................................................214 Figure 227 Excavator.............................................................................................................215 Figure 228 Wheeled Loader...................................................................................................215 Figure 229 Backhoe ...............................................................................................................216 Figure 230 Prime cost ............................................................................................................217 Figure 231 Prime cost detail ..................................................................................................218 Figure 232 Provisional sum ...................................................................................................219 Figure 233 Provisional sum detail .........................................................................................220 Figure 234 Day work rates of labour .....................................................................................221 Figure 235 Day work rates of labour .....................................................................................222 Figure 236 Johor payment of labour ranges ..........................................................................224 Figure 237 Gloves..................................................................................................................225 Figure 238 Safety googles .....................................................................................................226 Figure 239 Sandwich track system ........................................................................................227
  • 15. Department of Quantity Surveying, Faculty of Built Environment, University Technology of Malaysia. Group 14 Floor And Wall Finishes Construction Technology II SBEC1122 . xiv LIST OF TABLES Table 1 Installation methods of cement screed ........................................................................30 Table 2 Types of thixotropic and self-levelling compounds ...................................................31 Table 3 Maintenance of cement screed 1.................................................................................33 Table 4 Maintenance of cement screed 2.................................................................................35 Table 5 Maintenance of cement screed 3.................................................................................36 Table 6 Maintenance of cement screed 4.................................................................................37 Table 7 Maintenance of cement screed 5.................................................................................38 Table 8 Maintenance of cement screed 6.................................................................................39 Table 9 Maintenance of cement screed 7.................................................................................40 Table 10 Maintenance of cement screed 8...............................................................................40 Table 11 Maintenance of cement screed 9...............................................................................41 Table 12 Installation methods of Terrazzo ..............................................................................50 Table 13 Installation method of floor paint .............................................................................60 Table 14 Applications of floor paint........................................................................................62 Table 15 Installation method of plastic tiles ............................................................................71 Table 16 Advantages and disadvantages of natural stones ......................................................86 Table 17 Installation methods of natural stones ......................................................................91 Table 18 the do’s and don’ts in maintenance of natural stones ...............................................93 Table 19 Advantages and disadvantages of ceramic tiles........................................................98 Table 20 Maintenance of ceramic tiles ....................................................................................99 Table 21 Installation methods of timber floor .......................................................................109 Table 22 Project profile of Educity Sports Complex.............................................................142 Table 23 Installation methods of Educity Sports Complex running track .............................172 Table 24 Materials and cost of running track ........................................................................176 Table 25 Components in swimming pool ..............................................................................183 Table 26 Materials and cost of swimming pool of Educity Sports Complex ........................198 Table 27 Method statement of surface preparation................................................................200 Table 28 Method statement of steel mesh application...........................................................200 Table 29 Method statement of guniting works ......................................................................201
  • 16. Department of Quantity Surveying, Faculty of Built Environment, University Technology of Malaysia. Group 14 Floor And Wall Finishes Construction Technology II SBEC1122 . xv Table 30 Briefing about all plant and equipment...................................................................216 Table 31 Common labour based on CIDB.............................................................................223 Table 32 Labour involved in finishes ....................................................................................223 Table 33 Budget.....................................................................................................................229 Table 34 Stationaries expenses ..............................................................................................230 Table 35 Telephone bills expenses ........................................................................................230 Table 36 Travelling expenses ................................................................................................230 Table 37 Balance....................................................................................................................231
  • 17. Group 14 Floor And Wall Finishes Construction Technology II SBEC1122 1 INTRODUCTION 1.1 BUILDING FINISHES uilding Finishes is comprise those non-structural parts of the building. The finish is divided into exterior finish (located principally on the outside of the structure) and interior finish (located inside). The work involved in the installation of non-structural members on the structure is called finish carp entry. In construction, a group of construction operations relating to the exterior and exterior finishing of building and structures to enhance their service and aesthetic qualities. Finishing work is the concluding stage of construction; in many cases, the overall quality of a building or structure being put into service depends on the quality of its execution. The main types off finishing work include facing, plastering, flooring, (and parquetry), painting, wallpapering, and glazing. Finishing works is a fine job in building construction process where it forms the beauty of a building. Several types of finishes can be used based on the materials used, environmental conditions and costs. Finishing of a building can be divided into several sections; Floor finishing, Wall finishing and Ceiling finishing. In modern construction practise for residential, public, and industrial buildings, the technology of finishing work has changed substantially. Increasingly widespread use is being made of large prefabricated units, structures, and parts that are delivered to the construction site in final finishes form (for example, wall panels and roof slabs, sanitary facilities, and window and door units). This substantially reduces the post assembly finishing work. Industry has mastered production of a number of effective finishing materials that make it possible to eliminate the most laborious and time-consuming processes (the ‘wet’ process) and to improve the quality of the finish (sheets of thistle board, facing slabs, plastic shingles, and water-resistant wallpaper). Finishing work is carried out at construction sites by means of various types of mechanized equipment (movable plastering and panting equipment, units for installing floors made of polymeric materials, puttying apparatus, polishing machines, smoothing machines, paint sprayers, and vibration pumps) that substantially facilitate and accelerate the processes of finishing buildings and reduce the number of operations. B
  • 18. Group 14 Floor And Wall Finishes Construction Technology II SBEC1122 2 However, finishing work is still very labour-intensive, and for residential construction it accounts for up to35 percent of all labour expenditures in construction and assembly operations. Among the most labour-intensive types of finishing work are facing operations, for the purpose of covering the front surfaces of structures with in laid products made of natural or artificial materials. All facing products are usually delivered to a construction site in ready to use form, in predetermined sizes, colouring, and textures. Facing operations may be the exterior or interior type, depending on the kind of products being used and the means of attaching them to the surfaces. Exterior facing operations consist mainly in finishing the fronts of buildings and structures with slabs and parts made of natural stone, facing brick, or ceramic blocks; they are usually done with interior scaffolding at the same times as the walls are being laid. The space between the wall and the facing is filled with cement mortar. Stone facing is sometimes applied to finished walls; in this case exterior scaffolding is used. The facing is attached to the wall by means of fasteners, which are embedded in holes drilled in the wall, and by filling the recesses with mortar. Facings are also attached by means of steel bars or rods. Facing must be constructed to avoid the possibility of penetration of moisture through seams and joints of the facing products. In modern mass construction, an assortment of materials and products are used for interior facing work, which is mainly the facing of walls, floors, and ceilings. Such products make it possible to vary and improve the interior finishing of buildings; they include ceramic and plastic tiles, chipboard, fibreboard, asbestos-cement boards (including those with enamelled surfaces), decorative plywood, paper-laminated plastic, and decorative acoustic panels. The finishing operations inside a building are usually done after the general construction work has been completed. Before the facing work is begun, all buried wiring must be laid; the installation of the risers, water pipes, and drain pipes must be completed; the surfaces to be faced must be even and dry; the products must be sorted according to shape, size, and colour and if necessary, the edges must be ground in and holes must be drilled. The facing articles are attached by means of mortars, mastics, shaped framing moldings, and drift bolts. In machine building, the group of final operations on metals that result in high accuracy of the dimensions and shape of parts and improve the surface quality. The processes used in finishing a surface may be mechanical (machining and pressure working),
  • 19. Group 14 Floor And Wall Finishes Construction Technology II SBEC1122 3 electrochemical, or electro physical. Machining operations that remove a small chip are the most common finishing methods; they include fine turning, reaming, milling, shaving, grinding, lapping, polishing, honing, and superfinishing. Surface finishing methods that do not remove a chip include drawing and stamping, which are performed in a cold state by pressure, without disrupting the continuity of the material. Also used are such methods of finishing as rolling, precision forging, burnishing with rollers and balls, and shot-blasting, which harden the surface as a result of plastic deformation and reduce its surface roughness. Electro physical and electrochemical treatments, which are often called dimensional machining, are used mostly for finishing materials that are not amenable to machining, as well as for the production of complex contours. The main process involved in this type of finishing are electro machining, spark machining, and electric-pulse machining. Finishing work is a fine job in building construction process were it forms the beauty of a building. Several types of finishes can be used based on the materials used, environmental conditions and costs. Finishing of a building can be divided into several conditions which is floor finishing, wall finishing, and ceiling finishing. Common buildings (residential & high rise building) Figure 1 Residential building
  • 20. Group 14 Floor And Wall Finishes Construction Technology II SBEC1122 4 Figure 2 High rise building in a city High Rise Buildings In construction field, finishes refer to a group of construction operations relating to the exterior and interior finishing of buildings and structures to enhance their service and aesthetic qualities. Finishing work is the concluding stage of construction; in many cases, the overall quality of a building or structure being put into service depends on the quality of its execution. The main types of finishing work include facing, plastering, flooring (and parquetry), painting, wallpapering, and glazing. Nowadays modern construction practice for residential, public, and industrial buildings, the technology of finishing work has changed substantially. Increasingly widespread use is being made of large prefabricated units, structures, and parts that are delivered to the construction site in final finished form (for example, wall panels and roof slabs, sanitary facilities, and window and door units). This substantially reduces the finishing work. Industry has mastered production of a number of effective finishing materials that make it possible to eliminate the most laborious and time-consuming processes (the “wet” processes) and to improve the quality of the finish (sheets of thistle board, facing slabs, plastic shingles, and water-resistant wallpaper). Finishing work is carried out at construction sites by means of various types of mechanized equipment (movable plastering and painting equipment, units for installing floors
  • 21. Group 14 Floor And Wall Finishes Construction Technology II SBEC1122 5 made of polymeric materials, puttying apparatus, polishing machines, smoothing machines, paint sprayers, and vibration pumps) that substantially facilitate and accelerate the processes of finishing buildings and reduce the number of operations. However, finishing work is still very labour intensive, and for residential construction it accounts for up to 35 percent of all labour expenditures in construction and assembly operations. Among the most labour intensive types of finishing work are facing operations, for the purpose of covering the front surfaces of structures with inlaid products made of natural or artificial materials. All facing products are usually delivered to a construction site in ready-to- use form, in predetermined sizes, colouring, and textures. Facing operations may be of the exterior or interior type, depending on the kind of products being used and the means of attaching them to the surfaces. Exterior facing operations consist mainly in finishing the fronts of buildings and structures with slabs and parts made of natural stone, facing brick, or ceramic blocks; they are usually done with interior scaffolding at the same time as the walls are being laid. The space between the wall and the facing is filled with cement mortar. Stone facing is sometimes applied to finished walls; in this case exterior scaffolding is used. The facing is attached to the wall by means of fasteners, which are embedded in holes drilled in the wall, and by filling the recesses with mortar. Facings are also attached by means of steel bars or rods. Facing must be constructed to avoid the possibility of penetration of moisture through seams and joints of the facing products. In modern mass construction, an assortment of materials and products are used for interior facing work, which is mainly the facing of walls, floors, and ceilings. Such products make it possible to vary and improve the interior finishing of buildings; they include ceramic and plastic tiles, chipboard, fibre board, asbestos-cement boards (including those with enamel surfaces), decorative plywood, paper-laminated plastic, and decorative acoustic panels. The finishing operations inside a building are usually done after the general construction work has been completed. Before the facing work is begun, all buried wiring must be laid; the installation of the risers, water pipes, and drain pipes must be completed; the surfaces to be faced must be even and dry; the products must be sorted according to shape, size, and colour; and, if necessary, the edges must be ground in and holes must be drilled. The facing articles are attached by means of mortars, mastics, shaped framing mouldings, and drift bolts.
  • 22. Group 14 Floor And Wall Finishes Construction Technology II SBEC1122 6 Machine building (specify uses) Figure 3 Example of machinery building While this type of building refer to the group of final operations on metals that result in high accuracy of the dimensions and shape of parts and improve the surface quality. The processes used in finishing a surface may be mechanical (machining and pressure working), electro chemical, or electro physical. Machining operations that remove a small chip are the most common finishing methods; they include fine turning, reaming, milling, shaving, grinding, lapping, polishing, honing, and superfinishing. Surface finishing methods that do not remove a chip include drawing and stamping, which are performed in a cold state by pressure, without disrupting the continuity of the material. Such methods of finishing as rolling, precision forging, burnishing with rollers and balls, and shot-blasting, which harden the surface as a result of plastic deformation and reduce its surface roughness. Electro physical and electro chemical treatments, which are often called dimensional machining, are used mostly for finishing materials that ’are not amenable to machining, as well as for the production of complex contours. The main processes involved in this type of finishing are electro machining, spark machining, and electric-pulse machining.
  • 23. Group 14 Floor And Wall Finishes Construction Technology II SBEC1122 7 1.2 INTERNAL AND EXTERNAL FINISHES nternal finishes are important in creating a sense of place and in helping to ensure a healthy indoor environment. The quality of the internal environment is particularly important in ensuring a sense of wellbeing and enjoyment. Materials will be touched, experienced visually and will give off scent, which combined with furnishings and appliances will influence our perception of the space in which we live or work. The functional requirements are aesthetics, durability and flexible ability to with stand thermal and moisture movement, ease of maintenance and cleaning, strong mechanical or chemical bond to structural substrate and expel water from the surface that forms as condensation (particularly in kitchens and bathrooms). External finishes are important in determining the aesthetic appeal of the building. The external finishes will also, in conjunction with the detailing, determine how the building will weather over time. The quality of the materials used for external finishes and the manner in which they are applied will determine the durability of the building fabric. The functional requirements are aesthetic appeal, durability, strong mechanical or chemical bond to structural substrate, flexibility, the ability to withstand thermal and moisture movement (via control joints) and health and safety considerations. 1.3 INTERIOR AND EXTERIOR OF FLOOR FINISHES he type of floor finishes that will be used are depending on several factors. Such as type of base, room/space usage, degree of comfort required, maintenance problems, cost, appearance, safety and individual preferences. Floor finishes can be classified under three headings. Firstly in-situ floor finishes, mixed on site, laid in a fluid state, allowed to dry, and set to form a hard joint less surface. For the example cement screed, terrazzo and floor paint. Second applied floor finishes, supplied in tile or sheet form and are laid onto a suitably prepared based. For the example ceramic likes homogeneous (homogeneous tile) and non-homogeneous (mosaic, ceramic). Natural stones likes marble, granite, quartz and slates. Cement based, likes terrazzo and concrete tiles. Plastic based likes linoleum, carpet, PVC tile and vinyl tile. Lastly timber floor finishes, it is boards, sheets and blocks or timber laid on or attached to a suitable structural frame or base. For the example, parquet, floor board and timber board. I T
  • 24. Group 14 Floor And Wall Finishes Construction Technology II SBEC1122 8 1.4 INTERIOR AND EXTERIOR OF WALL FINISHES he type of wall finishes that will be used are depending on several factors. Such as type of base, room/space usage, degree of comfort required, maintenance problems, cost, appearance and individual preferences. External brickwork with an exposed face of facing bricks is a self-finish and requires no further treatment. External walls of common bricks or blocks can be treated to give an acceptable appearance by the application of paint or an applied wall finish such as rendering, or can be clad with boards or tiles. Internal walls or partitions can be built with a fair face of natural materials such as bricks or stone but much cheaper by using plaster or glazed tiles. Types of wall finishes is wallpaper, ceramic wall tiles, cement screed, and painting. 1.5 HISTORY OF FINISHES 1.5.1 THE WOOD FLOORING AS FINISHES Before looking at the products on the market, is useful to understand what finishes might have been on your floors in the past. The earliest wood floors usually softwoods such as pine were often never finished. In the North, tight-grained, old-growth Eastern white pine is still going strong in many homes. Often referred to as pumpkin pine because it has aged to a warm, amber colour, this wide-board, flat-sawn flooring was left natural and maintained by regular washing with water and homemade lye. Later on, these floors may have been finished with linseed oil or hand-rubbed with wax for colour and protection. In the South, flooring was often made from dense, resinous heart pine and left equally bare. Whatever the species, lesser grade wood was commonly used on floors in less important rooms, particularly above the first floor, and usually painted. From the colonial to the early Victorian era, homeowners also enjoyed decorative floors produced by stencilling borders or painting faux mosaics and rugs. T
  • 25. Group 14 Floor And Wall Finishes Construction Technology II SBEC1122 9 Figure 4 Wood flooring as finishes As manufacturing and railroads made paints and coatings more available after 1860, varnish, shellac, and other clear, hard finishes became popular for woodwork. Homeowners enjoyed both the shiny presentation of varnish and the protection it offered for the increasingly popular hardwood floors particularly oak, which develops a deep, blue stain upon contact with water. Varnish was a product of natural oils and resins until the 1910s when the first man-made resins appeared. The 1960s brought a new generation of tough, synthetic resins and the first wave of exceptionally strong (albeit then plastic-looking) polyurethane varnishes and Swedish finishes. 1.5.2 THE WAXING FLOOR AS FINISHES Much of the terminology and the traditional procedures in floor care come from the early history of floor finishes. So it is important to understand their history and the evolution of modern technology used today. This technology is a combination of floor finish evolution and floor machine advances that have increased the speed for buffing resulting in a higher shine in less time. The advances in floor care technology we enjoy today are due to progressive manufacturers competing to provide a product and process superior to their peers. The building service industry and end users are the beneficiaries of these advances.
  • 26. Group 14 Floor And Wall Finishes Construction Technology II SBEC1122 10 Figure 5 Waxing as floor finishes makes floor look shiny and clean Today many people still talk about “waxing” the floor, even though it has been 50 years since natural waxes were widely used as a floor finish. The first floor finishes were carnauba waxes, made from the leaves of a tropical plant. Carnauba is a natural wax emulsion blend combined with a resin. Carnauba waxes were buff able and gave a great shine. They dried to a slight haze and left deep, rich swirls on the floor when buffed. They were extremely abrasive resistant but, because carnauba wax was very expensive and difficult to obtain, manufacturers began using other natural materials that were less costly, like beeswax, shellac and paraffin. Although some natural wax finishes are still used today, synthetic materials have largely replaced them in floor maintenance. Synthetic wax or polymer finishes followed carnauba wax. In the late 1940s, a synthetic floor finish using a water-based and a plastic called polystyrene was developed. The first polystyrene finishes were colourless and had a very high gloss. But, they were also very brittle and tended to turn yellow after a period of time. When the wax-like plastic polyethylene was mixed with the polystyrene, however, a very durable, buff able, non-brittle floor finish was created. Today, synthetic materials are much more commonly used in floor finishes than natural waxes. Synthetic water-based finishes are collectively called polymer finishes. The improved result was a dry, bright finish. The "buffability" of the finish depended on the type
  • 27. Group 14 Floor And Wall Finishes Construction Technology II SBEC1122 11 of synthetic wax and polymers that were put into them. Synthetic wax or polymer finishes in liquid form are a milky white colour. 1.5.3 THE CONCRETEFLOORING AS FINISHES The word concrete refers to a construction material which is made by mixing cement, an adhesive which is able to harden and set over time, with dense chemically inert aggregate particles, usually comprised of sand or gravel. This is then churned with water in order to create a substance which is extremely hard, easy to mold, and useful for a variety of building applications, including flooring. Figure 6 Concrete flooring as the easiest finishes to install for floor finishing The oldest evidence we have of the use of concrete comes from the remains of what is believed to be a concrete mix found in Syria, dating back to 6500 BC. Archaeologists have also found evidence for the ancient use of concrete in sites up and down the Danube River in Yugoslavia dating around 5000 BC. The oldest, and some of the arguably most impressive remains of concrete construction can be found in Egypt. There, at around 3000 BC they began using a primitive form of concrete that consisted of straw mixed with mud, to create dried bricks for monuments, tombs, and even the iconic pyramids of Giza. They also pioneered the use of lime and gypsum as binding agents.
  • 28. Group 14 Floor And Wall Finishes Construction Technology II SBEC1122 12 By 1000 BC the Greeks were setting colourful pebbles and later, bits of flat pottery and stone into concrete floors before they set, to create the first mosaic surfaces. These efforts would grow more elaborate and detailed with time. The use of concrete in flooring and construction reached its pinnacle during the late Roman Republic and throughout the span of the Roman Empire. During this time engineers were able to concoct a concrete mix that used lime, sand, and volcanic ash, along with milk and animal fat, to create a material that is estimated to be as hard as modern, un-reinforced Portland concrete. This allowed the construction of massive architectural achievements such as the Parthenon. While concrete construction continued to be used in various forms throughout the Eastern and Middle Eastern World, it was largely lost to Europe after the fall of the Roman Empire. During the Dark Ages and the middle Ages, European peasants reverted to making primitive mud mixes that produced walls and floors which were not nearly as strong as their Roman predecessors. The modern age of concrete dawned at the beginning of the industrial revolution with a series of innovations. First, in 1756 a British engineer named John Smeaton added pebbles and powdered brick to the concrete mix as coarse aggregate, in order to make the first hydraulic cement. Then in 1824 another Englishman named Joseph Aspdin found that burning limestone and clay together changed their chemical properties and resulted in a much stronger material which he named Portland cement. This is still the dominant cement used in the manufacture of concrete flooring and building materials. 1.5.4 THE TILES FLOORING AS FINISHES Historically, the use of ceramic floor tiles goes back to the fourth millennium B.C. in the near and Far East. The Romans introduced tile-making in Western Europe as they occupied territories. However, that art was eventually forgotten in Europe for centuries until the 12th century when Cistercian monks developed a method of making encaustic floor tiles with inlaid patterns for cathedral and church floors. But, this skill was again lost in the 16th century following the Reformation. Except for finely decorated wall tiles made in Turkey and the Middle East, and Delft tiles made in Holland in the 17th century, ceramic floor tiles were not made again in Europe until almost the mid-19th century.
  • 29. Group 14 Floor And Wall Finishes Construction Technology II SBEC1122 13 Figure 7 Tiling can be match from variety of types, colour and patterns. The modern tile industry was advanced by Herbert Minton in 1843 when he revived the lost art of encaustic tile-making in England. The industry was further revolutionized in the 1840s by the "dust-pressing" method which consisted of compressing nearly dry clay between two metal dies. Dust-pressing replaced tile-making by hand with wet clay, and facilitated mechanization of the tile-making industry. Throughout the rest of the 19th century, dust-pressing enabled faster and cheaper production of better quality floor tiles in a greater range of colours and designs. In the 1850s encaustic tiles were selected for such important structures as the new Palace at Westminster in London, and Queen Victoria's Royal Residence on the Isle of Wight. By the latter part of the 19th century, despite the fact that encaustic tiles were still quite expensive, they had become a common flooring material in many kinds of buildings. The majority of ceramic floor tile made in the U.S. before 1890 was encaustic, but various factories gradually began to develop and produce other kinds of tiles. The Trent Tile Company, among others, started to manufacture both white and coloured ceramic mosaic tiles by the mid-1890s. White vitreous wall tile became available, as well as more decorative tiles with coloured glazes, such as the variegated faience glazes intended to give a more hand-crafted appearance that were originated by the Grueby Faience and Tile Company in 1894, and soon adopted by other potteries.
  • 30. Group 14 Floor And Wall Finishes Construction Technology II SBEC1122 14 In the 19th and early-20th century, many ceramic tile firms had their own engraving departments, while some used commercial designs supplied by professional printers. Well- known designers were often commissioned to work on specific product lines for a particular firm. These designers worked for one firm after another which resulted in similar designs being produced by different companies. (Historic ceramic floor tiles were usually identified by a manufacturer's or designer's mark on the back, if they were marked at all.) By the latter part of the 19th century ready-mixed glazes and colours were also available. During the 20th century, the floor tile industry continued to evolve as much as it had in the previous century. Modern methods of production employed sophisticated machinery, new materials and decorating techniques. In the years following World War II, there were many advances in the industry. Commercially manufactured dust-pressed tiles, which had previously required more than 70 hours just in the kiln, could be made in less than two hours from the raw material stage to finished tiles, boxed and ready to ship. Dried, unglazed tiles were sprayed with coloured glaze evenly and automatically as conveyors carried the tiles into the tunnel kilns, and the extrusion process ensured that the tiles were cut to a uniform thickness and size. The changes and developments in the production of floor tile brought forth a wide range of shapes and sizes, along with new colours, glazes and decorating techniques. After the turn of the century, fewer encaustic floor tiles were used, particularly in residential architecture. The introduction of ceramic mosaic floor tiles was a factor in their decline. The development of rubber interlocking floor tiles in 1894, along with other, more resilient, flooring materials, was instrumental in the decreased popularity not only of encaustic tiles, but also other ceramic tile flooring. These new materials were not only cheaper, they were not as fragile; they were also lighter and thinner, and easier to install. Ceramic mosaic tiles remained in common use through the 1930s in part because an innovative development had made laying such small tiles easier. The tiles were pre-mounted in decorative patterns on 12" x 12" sheets of paper, and sold ready to lay in cement. This greatly simplified the tile setter's work, and no doubt was a significant factor in the increased popularity of ceramic mosaic tiles. Sophisticated mosaic floor designs became common in entrance foyers of public and private buildings. Small, white, unglazed tiles in round, square, octagonal or hexagonal shapes were promoted for their sanitary qualities, particularly for bathroom floors, while larger, rectangular, white, glazed tiles were used for bathroom walls or wains cotting.
  • 31. Group 14 Floor And Wall Finishes Construction Technology II SBEC1122 15 Coloured tiles were also popular, especially for bathrooms, and even kitchens. Quarry tile, which was larger and thicker than other ceramic floor tile of this period, was often used in public buildings, as well as for entrance halls, small studies, libraries, dining rooms and even living rooms in private homes. But, by the 1930s, the fashion for art tile had diminished to the point where floor tiles were, for the most part, generally regarded as primarily utilitarian, as opposed to important decorative elements. 1.5.5 THE NATURAL STONE FLOORING AS FINISHES Any solid stone flooring ever stepped on came into existence millions of years ago. Stone comes from the earth, where it forms deep beneath the surface under intense heat and pressure. This heat and pressure created massive blocks of natural stones like marble, granite, limestone, slate, and travertine, used then and now as stone flooring. These stone blocks have been mined as building material from quarries since the dawn of civilization. Many surviving stone buildings and floors are thousands of years old. The Greek and Roman temples or the pyramids of Egypt are the evidence of stone's longevity. Enormous blocks of limestone and granite were used to construct Djoser's Step Pyramid in Egypt, the oldest remaining structure created entirely out of natural stone. Figure 8 Stones are famous with its durability against distortion
  • 32. Group 14 Floor And Wall Finishes Construction Technology II SBEC1122 16 Ancient European floors have been found with pebble mosaics, a trend that started with the Greeks and spread over the rest of Europe. Engineers during the Roman Empire enhanced the usage of stone flooring even further. They developed a floor heating system to heat stone floors from beneath using controlled fire and vents, creating a warm stone surface to walk on. Stone flooring has been consistently popular since. While the extreme class divide of centuries past made stone floors too expensive for common use, these days there is no such problem. Stone is abundant in quarries all over the world. Modern developments like diamond studded cutting tools have made the quarrying process much easier, further lowering the price point. For the modern consumer, a beautiful stone floor is a worthwhile investment that will last the lifetime. In fact, it may last several lifetimes.
  • 33. Group 14 Floor And Wall Finishes Construction Technology II SBEC1122 17 THEORETICAL STUDY heories are formulated to explain, predict, and understand phenomena and, in many cases, to challenge and extend existing knowledge within the limits of critical bounding assumptions. The theoretical framework is the structure that can hold and support a theory of a research study. The theoretical framework introduces and describes the theory that explains why the research problem under study exists. (Swason, 2013) In this theoretical study, we make a research about Floor and Wall finishes based on books, articles, journals and some other sources from the internet. We try to find some information from various sources, and classify it into some parts based on their characteristics and compare it with the application that has been made in construction site. This outcome information on site is called case study. The case study is an application based on the theory. Hence, part of the theory displays or visualises the actual condition. Therefore, in this theoretical study, it is divided into two main parts: i. Floor finishes and; ii. Wall finishes. 2.1 FLOOR FINISHES Flooring is the general term for a permanent covering of a floor, or for the work of installing such a floor covering. Floor covering is the term to describe any finish material applied over a floor structure to provide a walking surface. Type of base, room usage, degree of comfort required, maintenance problems, cost, appearance, safety and individual appearance are among of selection factors in applying floor finishes. Whereas the sub floor must be finished with can make it usable without any extra work, some types of flooring must not installed at below grade (lower than ground level), and laminate or hardwood should be avoided where there will be moisture and condensation. T
  • 34. Group 14 Floor And Wall Finishes Construction Technology II SBEC1122 18 However, floor finishes can be considered by three main groupings; in-situ floor finishes, applied floor finishes, and timber floor finishes. In terms of flooring materials, it can be classified to several headings; soft coverings, wood flooring, hard flooring, resilient flooring, and seamless chemical flooring. 2.1.1 GENERAL FACTORS OF FLOOR FINISHES SELECTION a) Appearance Attractiveness of the material, colour range, texture and its decorative values in an architectural sense are considered as appearance. There are many floor surfaces which are attractive when suitably used, such as hardwood when properly finished, terrazzo, ceramic tile, marble, and, to a somewhat less degree, vinyl plastic, rubber tile, cork tile, linoleum tile, asphalt tile, linoleum, cork carpet, sheet rubber, slate, and magnesite composition. Concrete without special treatment and industrial wood blocks are not suitable for use where appearance is a factor. Concrete floors may be painted or waxed and are not unattractive as long as the surface is maintained, but this is difficult to do where the traffic is at all heavy. b) Initial Cost One of the first factors in selecting a floor surface is the initial cost, but even the most expensive materials do not possess all the desirable features. Flooring materials may be roughly divided into classes according their cost in place. In the following list, the most expensive materials are given first; i. Ceramic tile, marble, vinyl tile and rubber tile. ii. Terrazzo, magnesite composition, cork tile, and hardwood. iii. Cork carpet, linoleum, and asphalt tile. iv. Concrete. This list assumes that a concrete base is available to receive the wearing surface. Brick and wood block floors are not included in these lists, for they are used for a different class of traffic from that to which the materials included, except concrete, are subjected, and a comparison would be of no value.
  • 35. Group 14 Floor And Wall Finishes Construction Technology II SBEC1122 19 c) Degree of Comfort Comfort under foot is determined by the shock-absorbing quality, sure-footedness, evenness of surface, and conductivity. A good floor which is a good heat conductor will always feel cold. The most comfortable floors to work on are cork tile, cork carpet, and rubber. Wood, linoleum, vinyl plastic, magnesite composition, and asphalt tile, are very satisfactory but concrete, terrazzo, ceramic tile, marble, slate and brick are tiresome and cold. d) Noiselessness Cork tile, cork carpet, and rubber are practically noiseless, while wood, linoleum, vinyl plastic, magnesite composition, and asphalt tile are slightly less satisfactory but still very good; but concrete, ceramic tile, marble, slate and brick are the noisiest of flooring materials. e) Fire Resistance Materials may be non-combustible but still suffer severely in case of fire. Concrete, ceramic tile, and brick are probably the most fire-resistance floor surfaces, but terrazzo, marble and slate are very satisfactory. Magnesite composition, or asphalt tile, will not burn but may suffer seriously in fire. Linoleum, cork carpet, rubber, vinyl plastic, and wood are combustible but if laid it on fire-resistant base, they are not considered a serious defect in a fire resistance building. f) Sanitation To be sanitary, a floor surface must be non-absorbent and easily cleaned. Joints which are not watertight are unsanitary feature. The most sanitary feature are terrazzo, ceramic tile, marble and slate. Magnesite composition, asphalt tile, rubber, vinyl plastic and linoleum are quite satisfactory. Cork carpet is unsatisfactory because of its porosity, concrete because of the difficulty in cleaning, and wood because of its porosity and the presence of open joints. g) Acid and Alkali Resistance The factors that should be considered are immunity from damage by occasional spilling of strong acid solutions and resistance to the continuous use of soap, lye, cleaning and scouring compounds, and disinfectants. Ceramic tile is the most satisfactory floor surface in this respect; asphalt tile and vinyl plastic are quite resistant; rubber, terrazzo, marble, concrete, and magnesite composition are sufficiently resistant for ordinary purposes; but linoleum, cork carpet, and cork tile should not be subjected to the action of acids and alkalises.
  • 36. Group 14 Floor And Wall Finishes Construction Technology II SBEC1122 20 h) Grease and Oil Resistance Grease and oil are not absorbed by ceramic tile and by vinyl coverings and do not affect these materials. They are absorbed by wood, brick, concrete, terrazzo, linoleum, cork carpet, and cork tile and therefore detract from their appearance, but they do not seriously affect their durability. Asphalt and rubber floors, except greaseproof asphalt tile, are seriously affected by grease, oil, and gasoline. i) Dampness Ceramic tile, brick, concrete, terrazzo, and asphalt tile are not affected by dampness and are suitable for use on floors located on the ground such as basement floors but wood, rubber, linoleum, cork carpet and cork tile are not suitable for use in such locations. j) Indentation The hard flooring materials, such as ceramic tiles, concrete terrazzo, and brick, do not suffer indentation from chair legs, heels of shoes, and other objects which rest on them or strike them. Maple and oak flooring yield very little and not retain imprints. Other materials such as linoleum and rubber yield considerably under such loads but recover quite well when the load is removed. Asphalt and vinyl asbestos tile may become permanently intended. k) Trucking Three factors are pertinent when considering the suitability of a floor for trucking. It must stand the abrasive action of the truck wheels, the tractive effort required to pull the truck must not be excessive, and the flooring must have structural resistance sufficient to carry the load transmitted to it by the truck wheels. Concrete, heavy maple flooring and industrial wood blocks are satisfactory in all three respects if the materials are of high quality and if the trucking parallel to the length of the maple flooring rather than crosswise. The maple flooring must be heavy enough so that the weight of the trucks will not break the tongued-and-grooved joint. The aggregate in the concrete may have to be specially selected so as to have a high resistance to abrasion. Rubber-tired wheels are much easier on all types of flooring than wheels which are steel-tired.
  • 37. Group 14 Floor And Wall Finishes Construction Technology II SBEC1122 21 l) Maintenance Maintenance means the ease of which floor can be cleaned, needs for the floor to surface treatment and care, such as waxing and painting, needs for the floor to be repaired and the cost of the operations. Ceramic tile, marble, terrazzo, slate, vinyl plastic, and rubber tile floors are easily cleaned and require very little care. Linoleum, asphalt tile, and magnesite composition are easily cleaned but should receive surface treatment occasionally. Cork carpet is not easy to clean and requires surface treatment. Hardwood floors are fairly easy to clean if in good condition, but require frequent surface treatment. Concrete is not as easy to clean as ceramic tile, linoleum if it is not painted or waxed. Painting makes cleaning better but requires frequent renewal. The monolithic floors such as terrazzo, magnesite composition, and concrete are difficult to repair satisfactorily. Floors composed of separate units of tile, slate, or marble are more easily repaired, but require skilled mechanics. Linoleum, cork tile, and cork carpet may be easily repaired by replacing the damaged parts. The maintenance costs of wood block, heavy asphalt mastic, brick, and concrete are relatively low except under extremely severe traffic. With the exception of concrete, these materials are easily repaired. They receive no further treatment. m) Weight More heavily the floor surfaces, more cost it needs to add to because of requiring stronger floor constructions, beams, girders, columns, and foundations. Ceramic tile, marble, and slate are bedded on ½ in. or more cement mortar which has no structural value; terrazzo requires 1 ¼ in. of material which is simply a dead weight; and hard-wood flooring usually requires about 2 in. of filling between the nailing strips if placed over concrete. Rubber tile, magnesite composition, cork tile, cork carpet, linoleum, asphalt tile, and concrete do not require this additional material. This additional weight exists when the structural floor is some form of concrete slab.
  • 38. Group 14 Floor And Wall Finishes Construction Technology II SBEC1122 22 2.1.2 CLASSIFICATION OF FLOOR FINISHES Floor finishes can be classified into several parts by its method of installation, and materials. There are three groupings; applied floor finishes, in-situ floor finishes and timber floor finishes. 2.1.2.1 IN-SITU FLOOR FINISHES 2.1.2.1.1 CEMENT SCREED Figure 9 Cement screed as floor finishes Cement Screed Flooring refer to a layer of well compacted material, commonly a mixture of cement and fine aggregate, that is applied to a base at the appropriate thickness and that has a surface suitable for receiving a floor finish. Usually cement screed floor is made up by a granolithic concrete material that strengthens and plenty colors cement screeds. It is a special blend of cement, very hard-wearing aggregates, lime fast pigments and certain additives, which set rock-hard, have exceptional abrasion resistance and reduces drying shrinkage. Color Screed comes in a wide range of colors to choose from. These floors are for interior and exterior use.
  • 39. Group 14 Floor And Wall Finishes Construction Technology II SBEC1122 23 Figure 10 Dark colour often becoming people’s choice nowadays. Figure 11 Cement screed can be done into variety different colours
  • 40. Group 14 Floor And Wall Finishes Construction Technology II SBEC1122 24 i. Factors of Choosing CementScreed: It can provide a very hard-wearing, attractive coloring system for the surface of cement screeds, steel floated to a smooth finish or wood floated to create an artistic textured effect. ii. Types of Cement Screed: (a) Monolithic screeds and toppings As defined above, these are screeds and toppings that are applied at the time when the underlying concrete floor is placed. Screed thickness should be approximately 25 mm but not less than 15 mm or more than 40 mm. The minimum thickness of a monolithic topping at any part should be 20 mm. The actual thickness required may depend on structural requirements. In some circumstances, the design thickness of a topping may have to be increased to more than 40 mm, but then there will be an increasing risk of loss of adhesion to the base, due to differential shrinkage stresses. In attempting to achieve good adhesion between screed/ topping and base concrete, it is important to take cognisance of the phenomenon of bleeding of fresh concrete. Bleeding causes water to accumulate on the top surface of the fresh concrete and the presence of this water layer may impair adhesion unless suitably dealt with. The screed/topping should therefore be laid at one of two stages; either immediately the concrete has been compacted and levelled off and before bleed water appears on the surface (“immediate placing”); or after bleeding of the concrete has ceased and bleed water has evaporated or has been removed completely by mopping up (“delayed placing”). Immediate placing requires careful timing but has the advantage that no preparation of the concrete surface is required. Timing of delayed placing is not as critical but the surface of the concrete does require some preparation: laitance should be loosened by light brushing, with a wire brush or a brush with stiff bristles, and thoroughly removed by sweeping, or preferably, by vacuum cleaning. Delayed placing should however be done within an hour or two after the end of the bleeding period.
  • 41. Group 14 Floor And Wall Finishes Construction Technology II SBEC1122 25 (b) Bonded screeds & toppings As defined, bonded screeds and toppings are applied to hardened concrete. The hardened concrete is also known as the base concrete. Screed thickness should be not less than 25 mm or more than 50 mm. The minimum thickness of a bonded topping at any part should be 35 mm. The actual thickness required may depend on structural requirements. In some circumstances, the design thickness of a topping may have to be increased to more than 60 mm, but then there will be an increasing risk of loss of adhesion to the base, due to differential shrinkage stresses. In these circumstances, the use of a reinforcing mesh as close to the upper surface as is permissible will assist in restraining differential shrinkage and in controlling cracking. (c) Un-bonded screeds and Toppings Screeds: Where screeds are, or have to be laid on a damp-proofing membrane or separating layer, the minimum thickness of the screed should be at least 50 mm. Where they are laid on a compressible layer, such as insulation boards, the minimum thickness should be at least 70 mm. Topping: Where a concrete topping is required over a damp-proof membrane, an un-bonded overlay of minimum thickness 100 mm should be used in order to minimize the risk of curling. The grade of concrete for a direct-finished overlay should be in accordance with Table 3. A similar un-bonded overlay should be used where a base has become contaminated (e.g. with oil), and bonding is not possible. iii. Advantages of Cement Screed:  Shorter waiting times when installing flooring sensitive to humidity (wood, resilients) and epoxy floor coverings  Lower risk of detachment of parquet or blistering of rubber, linoleum and PVC flooring  Less hygrometric shrinkage due to less mixing water and the amount of shrinkage is controlled, therefore lower risk of crack formation and, as a result, lower risk of breakage or detachment of ceramic or stone flooring after installation
  • 42. Group 14 Floor And Wall Finishes Construction Technology II SBEC1122 26  Because these products have controlled shrinkage, the frequency and, therefore, the number of control joints may be reduced by increasing the pitch areas the screed is divided into  Lower risk of cracking  Higher resistance to abrasion  Lower risk of collapse or breakage under concentrated loads  Better guarantee when laying screeds in environments subject to intense loads iv. Installation Methods of Cement Screed: Steps Description Pictures 1 The levelling strips must be made from the same binder as for the screed. Also, when the mortar to make the screeds is laid and levelled off, the levelling strips must not have hardened. Figure 12 Forming levelling strips
  • 43. Group 14 Floor And Wall Finishes Construction Technology II SBEC1122 27 2 When fresh mortar has to be “welded” to a set surface (for example, when screed laying is interrupted for more than an hour or if the levelling strips have hardened), cold joints must be made by applying bonding slurry, made from PLANICRETE, water and binder, or EPORIP on the hardened part of the screed (cut cleanly and perpendicularly to the substrate) (Figure 13) Figure 13 A screed cut perpendicularly at the point where laying has been interrupted 3 When filling a chase in a screed that has already been laid (Figure 14) the same type of bonding slurry must also be applied on the contact surfaces between the existing screed and the filler material. Figure 14 Sealing a chase in existing flooring by applying bonding slurry on the contact surfaces between the existing and repaired surfaces
  • 44. Group 14 Floor And Wall Finishes Construction Technology II SBEC1122 28 4 If there is pipe-work in the screed, make sure there is a layer of mortar at least 2.5 cm thick above it. We also recommend reinforcing this thinner section to prevent the formation of cracks by bridging metallic reinforcement mesh made from 2 mm diameter wire over the pipework (Figure 15). Figure 15 Reinforcing a screed by bridging fine mesh over pipe- work 5 To improve the screeds resistance to cracking, for example when there is compressible material under the screed, position zinc plated metallic reinforcement mesh at the mid-point of the screed (Figure 16). The mesh limits the amount shrinkage cracks and cracks in correspondence with check joints open up. In so doing, cohesion between the grains of inert is maintained, which is indispensable to transfer loads correctly between the two edges of the cracked joint. Figure 16 Placing zinc-plated metallic mesh at the mid-point of the screed
  • 45. Group 14 Floor And Wall Finishes Construction Technology II SBEC1122 29 6 Finish off the surface of the screed by hand with a float (Figure 17), with a power float or by helicopter (Figure 18). Particularly when TOPCEM, TOPCEM PRONTO, MAPECEM or MAPECEM binders and special mortars have been used, take care not to wet the surface too much or to smooth over the same point for too much time, otherwise water from the mix will collect on the surface and cause bleeding, which will then cause a reduction in surface porosity and longer drying times. Figure 17 Float-finishing the surface of a screed Figure 18 Finishing the surface of a screed with a power float
  • 46. Group 14 Floor And Wall Finishes Construction Technology II SBEC1122 30 7 While the screed is still wet, as soon as it is consistent enough to be cut without breaching the inserts, form a series of check joints (Figure 19). They must be made in correspondence with sills, between pillars and every 20-25 m2 on internal screeds and every 16 m2 on external substrates. Cut the screed to a depth of one third its thickness, taking care not to cut through any electro- welded mesh present. If the screed is made from TOPCEM, TOPCEM PRONTO, MAPECEM or MAPECEM PRONTO special binder or mortar, the pitch of the joints may be increased. If a bonded screed is laid, the position of the joints must match those in the bonded substrate. Figure 19 Forming check joints in a screed Table 1 Installation methods of cement screed Once the curing cycle is complete (especially when installing floor coverings sensitive to humidity, such as wood, resilient and epoxy paints), check the residual moisture in the screed with a suitable instrument, such as a carbide or electric hygrometer. Any cracks which form in the screed after completing the curing cycle must be monolithically sealed with EPORIP before installing the flooring. In most cases, the surface of screeds finished by float, power-float or helicopter are suitable for installing ceramic or stone flooring. If the surface is not smooth or flat enough for tiles, or when the installation surface is too low compared with the final height required, a smoothing layer must be applied. Also, when installing resilient flooring (linoleum, PVC, rubber, etc.), the installation surfaces always have to be finished off with a finishing layer, which must have mechanical strength characteristics compatible with the final use of the floor and the strength of the substrate.
  • 47. Group 14 Floor And Wall Finishes Construction Technology II SBEC1122 31 To finish and smooth off installation surfaces for ceramic, stone and resilient flooring, MAPEI has a wide range of thixotropic and self-levelling skimming compounds available. For example, the following products are recommended; No. MAPEI Products Descriptions 1 ULTRAPLAN Self-levelling, ultra-rapid-hardening smoothing compound for thicknesses from 1 to 10 mm. 2 ULTRAPLAN MAXI Self-levelling, ultra-rapid-hardening smoothing compound for thicknesses from 3 to 30 mm. 3 PLANIPATCH Fine-grained, ultra-rapid-drying, thixotropic cementitious skimming compound for thicknesses from 0 to 10 mm. 4 NIVORAPID Ultra-rapid-drying, thixotropic cementitious skimming compound for thicknesses from 3 to 20 mm. These smoothing compounds are also suitable for use when installing wooden floors as long as they are applied in layers at least 3 mm thick. Table 2 Types of thixotropic and self-levelling compounds v. Application of Cement Screed: A cement screed of ± 30 – 40 mm thick with levels according to requirements is cast on concrete. Thereafter the colors is floated onto the wet screed, creating a luxurious mottled look and providing a very hard and durable floor. Color Screed cannot be cast over tiles or any other floor covering. Tiles, wooden flooring or carpets will need to be removed first.