Change Shirt Tie
•
0 likes•1,169 views
A quick way to change the color of any object while preserving its original texture. In this tutorial I use a tie and dress shirt as the examples.

Recommended
More Related Content
What's hot
What's hot (19)
Viewers also liked
Similar to Change Shirt Tie
Similar to Change Shirt Tie (20)
More from Michael e. Stern Photography
More from Michael e. Stern Photography (18)
Recently uploaded
Recently uploaded (20)
Change Shirt Tie
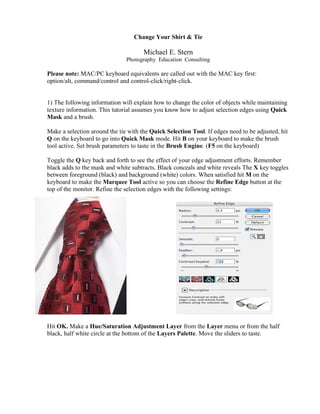
- 1. Change Your Shirt & Tie Michael E. Stern Photography Education Consulting Please note: MAC/PC keyboard equivalents are called out with the MAC key first: option/alt, command/control and control-click/right-click. 1) The following information will explain how to change the color of objects while maintaining texture information. This tutorial assumes you know how to adjust selection edges using Quick Mask and a brush. Make a selection around the tie with the Quick Selection Tool. If edges need to be adjusted, hit Q on the keyboard to go into Quick Mask mode. Hit B on your keyboard to make the brush tool active. Set brush parameters to taste in the Brush Engine. (F5 on the keyboard) Toggle the Q key back and forth to see the effect of your edge adjustment efforts. Remember black adds to the mask and white subtracts. Black conceals and white reveals The X key toggles between foreground (black) and background (white) colors. When satisfied hit M on the keyboard to make the Marquee Tool active so you can choose the Refine Edge button at the top of the monitor. Refine the selection edges with the following settings: Hit OK. Make a Hue/Saturation Adjustment Layer from the Layer menu or from the half black, half white circle at the bottom of the Layers Palette. Move the sliders to taste.
- 2. After Hue change. Hard Light Blend Mode and 50% Opacity. Shirt Change Make a selection around the shirt and refine the edge just like before. Due to its’ brightness values, for this shirt coloring technique to work effectively, we have to put this selection of shirt pixels onto its’ own layer and paint it black and change the Blend Mode and Opacity values. After selecting the shirt pixels, make the Background active before jumping the selected pixels to its’ own layer command/control + J copies an active selection to its own layer. Or use this menu command: Name the layer Shirt. Lock the layer so only the shirt pixels get painted in the next step: Go to Edit – Fill, choose black as the color. Click OK.
- 3. Command/control-click on the shirt layer thumbnail icon to load it as a selection. With the selection active again, make a new Hue & Saturation Adjustment Layer and set the option: Colorize. Move the sliders to taste. Click OK. Set the Blend Mode of the Hue & Saturation Adjustment Layer to Color and the Blend Mode of the Shirt layer to Luminosity and the Opacity to 55%. The idea of Blend Modes and Layer Opacity settings is to let textures of the underlying shirt blend with the new color. End use and/or client demands will drive these choices. Experiment now and play, this is not the time to be timid grasshoppers. Adobe® Photoshop® used with permission of Adobe Systems Incorporated. This is a registered trademark in the US and/or other countries.