1. P a g e | 1
Selecting Images for Same Size Prints
Color correction can be done several ways. One is by using the tools in the Image tab in
Photoshop and working right on the background layer. This corrects the pixel information in the
image layer itself, and when you have saved and closed the file it cannot be undone.
The second way is to create layers that adjust the image layer. You can think of these as plastic
overlays on a photograph. They change the color, but you can adjust them or delete them and the
original photo information is unchanged.
Both ways to color correct the image use the same tools (brightness/contrast, hue/saturation, etc.)
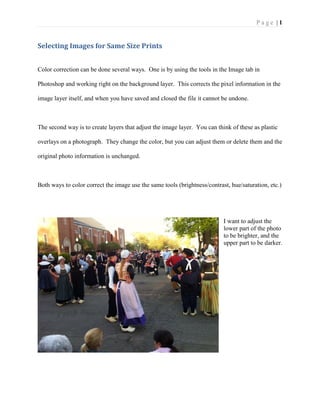
I want to adjust the
lower part of the photo
to be brighter, and the
upper part to be darker.
2. P a g e | 2
Image Color Corrections Tools
To make color corrections
directly to the background
layer choose
Image>Adjustments, and the
type of color correction you
want to make.
To create an adjustment
layer select Image>New
Adjustment Layer, and then
the type of color adjustment
you wish to perform.
Here are the directions for making a color correction to photograph using adjustment layers.
3. P a g e | 3
Using an Adjustment Layer
Select the portion of the
photograph you want to
adjust by using one of the
selection tools.
Feather the edge of the
selection so there will not
be a sharp line at its edge.
The Feather tool is located directly on the Select menu in earlier versions of Photoshop.
4. P a g e | 4
Choose the number or
pixels you want the feather
to affect. The Feathering
affect extends on both sides
of the selection line.
Create a New Adjustment
Layer. Here I am creating
and adjustment layer for
Brightness/Contrast.
A mask is created for the adjustment layer using the area you have selected on the image.
5. P a g e | 5
The dialogue box that
appears lets you name the
layer and select options.
This dialogue box looks
different in earlier versions
of Photoshop.
The adjustment layer is
created and here you can
see the sliders for adjusting
brightness and contrast.
After I adjust the brightness
the lower part of this image
is lighter and clearer.
Older versions of Photoshop have the adjustment sliders in their own dialogue box, which can be
re-opened by clicking on the circle icon in the layers palette.
Now I am going to adjust the upper part of the image that is over exposed.
6. P a g e | 6
I select the upper part of the
image and feather is as I
did the last time. Then I
create a second adjustment
layer that is named
Brightness/Contrast 2.
A layer mask is created in
the new
Brightness/Contrast layer to
adjust the upper part of the
image.
There is not much color
information in this part of
the image to adjust, and I
cannot get the definition I
would like, but the
adjustment does pull up
some of the color in the
trees.
Use this procedure to create the color correction you want in your images. After you have saved
the Photoshop files, you can always go back and adjust the image color again through the
adjustment layers.