SlideShare a Scribd company logo
1 of 59
BIG IDEA artists grow by exploring new
media, techniques, and ideas
LEARNING OUTCOME
I can identify the parts of the enlarger.
I can print a contact sheet.
CRITERIA FOR SUCCESS
● Correctly label each part of the
enlarger on the enlarger worksheet
● Print a test strip
● Read a test strip
● Print a contact sheet
GRAN IDEA Los artistas crecen explorando
nuevos medios, técnicas e ideas.
RESULTADO DE APRENDIZAJE
Puedo identificar las partes de la ampliadora.
Puedo imprimir una contacto imprimir.
CRITERIOS PARA EL ÉXITO
● Etiquete correctamente cada parte de la
ampliadora en la hoja de trabajo
ampliada
● Imprimir una tira reactiva
● leer una tira reactiva
● Imprimir una contacto imprimir
What You Need
Que necesitas :
Negative Sleeve
Páginas Negativas
Printing Easel
Caballete de cuarto oscuro
Enlarger
Ampliadora
Negative Carrier
Portanegativos
Negative Sleeve
protects your negatives from
dust and scratches
Páginas Negativas
protege sus película del polvo
y los arañazos
Negative Carrier
holds your negative in place
in the enlarger for printing
Portanegativos
Mantiene la película en su
lugar en la ampliadora para
imprimir.
Printing Easel
holds your paper in place
when making a final print
Caballete de
impresión
Mantiene el papel en su
lugar al realizar una
impresión final.
Enlarger
projects light through the
negative to cast a shadow of
the image onto photographic
paper
Ampliadora
proyecta luz a través del
negativo para proyectar una
sombra de la imagen sobre
papel fotográfico
Lamp House
(where the light bulb lives)
Casa de la lámpara
(donde vive la bombilla)
Filter Drawer
(where you put contrast filters)
Gaveta de filtro
(donde pones los filtros de
contraste)
Film Stage
(where the negative carrier
goes)
Escenario de película
(donde va la portadora negativa)
Height Control
(moves the enlarger up or down to
make the image projection bigger or
smaller)
Control de altura
(mueve la ampliadora hacia arriba o
hacia abajo para agrandar o reducir la
proyección de la imagen)
Focus Control
(makes the picture sharp / in focus)
Control de enfoque
(hace que la imagen sea
nítida/enfocada)
Lens
(controls how much light is going to
hit your paper)
Lente
(controla la cantidad de luz que llegará
al papel)
Baseboard
(where your image projects onto &
where you place your easel)
Zócalo
(donde se proyecta su imagen y donde
coloca su caballete)
Review!
What is this? ¿Qué es esto?
A Negative Carrier Porta Negativos
B Printing Easel Caballete de
impresión
C Negative Sleeve Páginas Negativas
What is this? ¿Qué es esto?
A Negative Carrier Porta Negativos
B Printing Easel Caballete de impresión
C Negative Sleeve Páginas Negativas
What is this? ¿Qué es esto?
A Negative Carrier Porta Negativos
B Printing Easel Caballete de impresión
C Negative Sleeve Páginas Negativas
What is this? ¿Qué es esto?
A Negative Carrier Porta Negativos
B Printing Easel Caballete de impresión
C Negative Sleeve Páginas Negativas
D Enlarger Ampliadora
What is this? ¿Qué es esto?
A Filter Drawer Gaveta de filtro
B Lamp House Casa de la lámpara
C Film Stage Escenario de película
D Height Control Control de altura
E Lens Lente
F Focus Control Control de enfoque
What is this? ¿Qué es esto?
A Filter Drawer Gaveta de filtro
B Lamp House Casa de la lámpara
C Film Stage Escenario de película
D Height Control Control de altura
E Lens Lente
F Focus Control Control de enfoque
What is this? ¿Qué es esto?
A Filter Drawer Gaveta de filtro
B Lamp House Casa de la lámpara
C Film Stage Escenario de película
D Height Control Control de altura
E Lens Lente
F Focus Control Control de enfoque
What is this? ¿Qué es esto?
A Filter Drawer Gaveta de filtro
B Lamp House Casa de la lámpara
C Film Stage Escenario de película
D Height Control Control de altura
E Lens Lente
F Focus Control Control de enfoque
What is this? ¿Qué es esto?
A Filter Drawer Gaveta de filtro
B Lamp House Casa de la lámpara
C Film Stage Escenario de película
D Height Control Control de altura
E Lens Lente
F Focus Control Control de enfoque
What is this? ¿Qué es esto?
A Filter Drawer Gaveta de filtro
B Lamp House Casa de la lámpara
C Film Stage Escenario de película
D Height Control Control de altura
E Lens Lente
F Focus Control Control de enfoque
15 1.5
“SECS” vs “1/10” Time Range Buttons
CONTACT SHEETS
WHY?
To SEE what your photographs
actually look like (in the
positive)!
This will allow you to choose
the photographs that you will
print enlarged, through
assessing their success
(lighting, focus, composition).
How do you think contact
sheets are made?
Let’s set up your film so that you are
ready to make a contact sheet.
1. Cut negatives into strips of 5.
2. Place in Negative Sleeve.
3. Write your name, period, and photoshoot on the top
white area with sharpie.
Listen Up!
How to create a Contact Sheet
IN THE DARKROOM
1. Take negative sleeve into the darkroom.
2. Pick an enlarger station.
3. Check the elevation of the enlarger by turning on the timer. Make
sure it floods over the contact easel.
4. Turn OFF light.
5. Get photo paper from safe.
6. Open glass. Lay paper in contact easel, shiny side up.
7. Lay negatives on the photo paper neatly.
8. Close glass.
9. Expose for 5.0 seconds.
10.Open glass, remove paper and develop as usual; 1, 30 sec, 4, 10.
11. Collect negatives and take them out of the darkroom. Place them
into your folder / binder.
Contact Sheets (10 points)
CRITERIA
2=Satisfactory
1=Needs Improvement
0=Incomplete/Insufficient
Content/Concepts - All negatives frames are clear enough
to select printed images. Exposure is good- not too dark or
too light.
Composition Negatives are aligned, no overlapping.
Proper size paper is used for number of frames.
Creativity - Images in negative are aligned with the
photoshoot assignment.
Craftsmanship - Overall contact print is neat, clean,
blemish (scratches and smudges) free, and well aligned.
Studio Habits - Safe and proper use of enlarger. Safe and
proper use of print chemicals.
BIG IDEA artists grow by exploring new media,
techniques, and ideas
LEARNING OUTCOME
● I can create a contact sheet
● I can determine which of my photos were
successfully focused, composed, and
metered.
CRITERIA FOR SUCCESS
● Contact sheet is properly exposed,
aligned, and appropriate size for number
of frames
● Contact sheet is annotated / assessed to
select first photo to be enlarged
Get out your
negatives!
GRAN IDEA Los artistas crecen explorando
nuevos medios, técnicas e ideas.
RESULTADO DE APRENDIZAJE
● Puedo crear una hoja de contacto
● Puedo determinar cuáles de mis
fotografías fueron enfocadas,
compuestas y medidas con éxito.
CRITERIOS PARA EL ÉXITO
● La hoja de contacto está
correctamente expuesta, alineada y
tiene el tamaño adecuado para la
cantidad de marcos.
● Se anota/evalúa la hoja de contacto
para seleccionar la primera foto que
se ampliará
Which photo is overexposed? How do you know?
¿Qué foto está sobreexpuesta? ¿Cómo lo sabes?
1 2 3 4 5
Which photo is out of focus? How do you know?
¿Qué foto está desenfocada? ¿Cómo lo sabes?
1 2 3 4 5
Which photo is composed the best? Why?
¿Qué foto está mejor compuesta? ¿Por qué?
1 2 3
Which photo would you develop? What factors lead to your decision?
¿Qué foto revelarías? ¿Qué factores llevaron a su decisión?
1
2
3
4
BIG IDEA artists refine their craft through practice
and perseverance
LEARNING OUTCOME
● I can analyze a test strip to determine the
best exposure time.
● I can print two photos
● I can crop a photo using the enlarger
CRITERIA FOR SUCCESS
● Contact sheet is properly exposed, aligned,
and appropriate size for number of frames
● Prints are of the same photo, with one
cropped
● Paper is cut to 5” x 7”
● Prints demonstrate a full tonal range
● Enlarger settings are recorded on the back
of each print.
GRAN IDEA Los artistas refinan su oficio a través de
la práctica y la perseverancia.
RESULTADO DE APRENDIZAJE
● Puedo analizar una tira reactiva para
determinar el mejor tiempo de exposición.
● Puedo imprimir dos fotos
● Puedo recortar una foto usando la
ampliadora.
CRITERIOS PARA EL ÉXITO
● La hoja de contacto está correctamente
expuesta, alineada y tiene el tamaño
adecuado para la cantidad de marcos.
● Las impresiones son de la misma foto, con
una recortada.
● El papel se corta a 5” x 7”
● Las impresiones demuestran una gama
tonal completa.
● Los ajustes de ampliación se registran en la
parte posterior de cada impresión.
REVIEW
Darkroom photo paper has a chemical coating called an EMULSION.
This paper is sensitive to light. Which color light is it NOT sensitive to?
El papel fotográfico de cuarto oscuro tiene un recubrimiento químico
llamado EMULSIÓN.
Este papel es sensible a la luz. ¿A qué color de luz NO es sensible?
REVIEW
Why do we make TEST STRIPS?
¿Por qué hacemos TIRAS DE PRUEBA?
REVIEW
● What is the first chemical we put our paper in? For how long?
● What is the second chemical we put our paper in? For how
long?
● What is the third chemical we put our paper in? For how long?
● ¿Cuál es el primer químico en el que ponemos nuestro papel?
○ ¿Por cuánto tiempo?
● ¿Cuál es el segundo químico en el que ponemos nuestro papel?
○ ¿Por cuánto tiempo?
● ¿Cuál es el tercer químico en el que ponemos nuestro papel?
○ ¿Por cuánto tiempo?
To-Do
1. Read through the Test Strip
CFU assignment on Canvas
a. Answer the 3 Questions
2. Cut an 8x10 piece of paper to
5x7 with Ms. S
3. Print one image uncropped
4. Cut 3 paper snowflakes
(google directions if needed)
5. Complete Sketchbook Letter D
1. Lea la tarea CFU de la tira reactiva
en Canvas
a. Responde las 3 preguntas
2. Corte una hoja de papel de 8x10 a
5x7 con la Sra. S.
3. Imprimir una imagen sin recortar
4. Corta 3 copos de nieve de papel
(direcciones de Google si es
necesario)
5. Cuaderno de bocetos completo
Letra D
Step 1: Cut Your Paper in the DARK ROOM
Watch this video before cutting your 8”x10” paper into two 5”x7” prints and a test strip. After cutting your
paper, put it in a black plastic bag sealed with masking tape to keep light out.
Mire este video antes de cortar su papel de 8”x10” en dos impresiones de 5”x7” y una tira reactiva. Después de
cortar el papel, colóquelo en una bolsa de plástico negra sellada con cinta adhesiva para evitar la entrada de luz.
8” x 10”
5” x 7”
5” x 7”
+ =
Step 2: Prepare Your Film
a) AFTER choosing which negative you want to print from, remove
the negative from the negative sleeve. Wipe off the negative with
an antistatic cloth to remove any dirt or dust.
b) Remove the negative carrier from the enlarger and place your
negative dull side down in the carrier. Carefully line up the
negative in the carrier.
c) Re-place the negative carrier into the enlarger.
1. 2. 3.
Step 3: Height & Size
Turn on the enlarger to “Focus” mode so that your negative image is
projected down onto the printing easel.
Adjust the height of the enlarger so that your image fills the size of
your enlargement (5” x 7”) on the blank printing easel. (DON’T PUT
THE PAPER THERE YET!)
Step 4: Focus
Turn the aperture / lens on the enlarger to shine the brightest
image (all the way to the left), and focus your image with the focus
knob.
Now turn the aperture / lens to shine the dimmest image.
Step 5: Test Strip
Turn off the light. Place a test strip on the easel in a diagonal across
the easel. Set your timer to 3 second intervals and make a test strip
of your print including at least 5 different increments.
Step 6: Analyze
Develop your test strip. Examine the strip and choose an exposure
time with true blacks and highlights.
If the entire test strip is too dark, re-set the lens opening to a
dimmer setting (turn to the right)
If the entire test strip is too light, re-set the lens opening to a
brighter setting, at least one click to the left.
When returning to your enlarger, check that the image is still in
focus, refocusing if necessary. Check also that your image still fills
the appropriate spot on your easel.
Step 7: Paper!
Carefully open the easel without moving
it and slide a piece of photographic
paper against the metal stops on the
easel. Close the easel SLOWLY without
moving the paper.
Before exposing your paper, write your initials, the f-stop, and the
number of seconds for your exposure on the back of your paper.
Step 8: Exposure
Set the timer for the desired time determined by viewing the test
strip and expose the paper.
These exposure settings, including the lens opening AND timer
settings apply ONLY to this enlarger height. If the size of the
print is changed, a new test strip is necessary.
Step 9: Studio Habits
When finished, pick up all of your materials and leave the work area
ready for the next user.
DONE!
How and why might artists tell the story of their creative
process?
How can refinement and craftsmanship enrich a narrative?
Why might some narrative works be shared, and how do we
choose which artwork to share?
How might an artist decide when artwork is complete?

More Related Content

Similar to Parts of the Enlarger & How to Print a Contact Sheet.pptx

Joiner Eveluation
Joiner EveluationJoiner Eveluation
Joiner EveluationMel Storey
 
Sustainability, modelling and pewter2
Sustainability, modelling and pewter2Sustainability, modelling and pewter2
Sustainability, modelling and pewter2NeilOw87
 
Final-MentorBrochure-AmelieAllain1
Final-MentorBrochure-AmelieAllain1Final-MentorBrochure-AmelieAllain1
Final-MentorBrochure-AmelieAllain1Amélie Allain
 
Lesson plan version 2
Lesson plan version 2Lesson plan version 2
Lesson plan version 2asmedia14b
 
Lesson plan version 2
Lesson plan version 2Lesson plan version 2
Lesson plan version 2asmedia14b
 
Webquest Measurement
Webquest MeasurementWebquest Measurement
Webquest MeasurementKaryn Bower
 
Webquest keynote
Webquest keynoteWebquest keynote
Webquest keynoteKaryn Bower
 
Myp 3 signage saskia
Myp 3 signage saskiaMyp 3 signage saskia
Myp 3 signage saskiaSaskia1234
 
Evaluation Question 3
Evaluation Question 3Evaluation Question 3
Evaluation Question 3Beckm94
 
Instantly Transform Into a Master Communicator Using 21 Secrets of Effective ...
Instantly Transform Into a Master Communicator Using 21 Secrets of Effective ...Instantly Transform Into a Master Communicator Using 21 Secrets of Effective ...
Instantly Transform Into a Master Communicator Using 21 Secrets of Effective ...Ateneo Graduate School of Business
 
Ararte 2015 daryl bates copy
Ararte 2015 daryl bates copyArarte 2015 daryl bates copy
Ararte 2015 daryl bates copydarylstar1
 
Photographing Your Art
Photographing Your ArtPhotographing Your Art
Photographing Your ArtLeah Murray
 
Critique and The Design Process: Facilitating Better Feedback
Critique and The Design Process: Facilitating Better FeedbackCritique and The Design Process: Facilitating Better Feedback
Critique and The Design Process: Facilitating Better FeedbackAaron Irizarry
 
Ideation at Sprint Pace
Ideation at Sprint PaceIdeation at Sprint Pace
Ideation at Sprint PaceAtlassian
 
A2 media section 1a
A2 media section 1aA2 media section 1a
A2 media section 1aCat Davies
 
Ollie long unit 30 lo3
Ollie long unit 30   lo3Ollie long unit 30   lo3
Ollie long unit 30 lo3olong17
 

Similar to Parts of the Enlarger & How to Print a Contact Sheet.pptx (20)

Joiner Eveluation
Joiner EveluationJoiner Eveluation
Joiner Eveluation
 
Sustainability, modelling and pewter2
Sustainability, modelling and pewter2Sustainability, modelling and pewter2
Sustainability, modelling and pewter2
 
Final-MentorBrochure-AmelieAllain1
Final-MentorBrochure-AmelieAllain1Final-MentorBrochure-AmelieAllain1
Final-MentorBrochure-AmelieAllain1
 
Design Sprint Workshop
Design Sprint WorkshopDesign Sprint Workshop
Design Sprint Workshop
 
Fmp proposal 2020
Fmp proposal 2020Fmp proposal 2020
Fmp proposal 2020
 
Lesson plan version 2
Lesson plan version 2Lesson plan version 2
Lesson plan version 2
 
Lesson plan version 2
Lesson plan version 2Lesson plan version 2
Lesson plan version 2
 
Webquest Measurement
Webquest MeasurementWebquest Measurement
Webquest Measurement
 
Webquest keynote
Webquest keynoteWebquest keynote
Webquest keynote
 
Myp 3 signage saskia
Myp 3 signage saskiaMyp 3 signage saskia
Myp 3 signage saskia
 
Evaluation Question 3
Evaluation Question 3Evaluation Question 3
Evaluation Question 3
 
Instantly Transform Into a Master Communicator Using 21 Secrets of Effective ...
Instantly Transform Into a Master Communicator Using 21 Secrets of Effective ...Instantly Transform Into a Master Communicator Using 21 Secrets of Effective ...
Instantly Transform Into a Master Communicator Using 21 Secrets of Effective ...
 
Ararte 2015 daryl bates copy
Ararte 2015 daryl bates copyArarte 2015 daryl bates copy
Ararte 2015 daryl bates copy
 
Photographing Your Art
Photographing Your ArtPhotographing Your Art
Photographing Your Art
 
Critique and The Design Process: Facilitating Better Feedback
Critique and The Design Process: Facilitating Better FeedbackCritique and The Design Process: Facilitating Better Feedback
Critique and The Design Process: Facilitating Better Feedback
 
Ideation at Sprint Pace
Ideation at Sprint PaceIdeation at Sprint Pace
Ideation at Sprint Pace
 
AS Media Booklet
AS Media BookletAS Media Booklet
AS Media Booklet
 
Proposal (Improved)
Proposal (Improved)Proposal (Improved)
Proposal (Improved)
 
A2 media section 1a
A2 media section 1aA2 media section 1a
A2 media section 1a
 
Ollie long unit 30 lo3
Ollie long unit 30   lo3Ollie long unit 30   lo3
Ollie long unit 30 lo3
 

Recently uploaded

Software Engineering Methodologies (overview)
Software Engineering Methodologies (overview)Software Engineering Methodologies (overview)
Software Engineering Methodologies (overview)eniolaolutunde
 
Sanyam Choudhary Chemistry practical.pdf
Sanyam Choudhary Chemistry practical.pdfSanyam Choudhary Chemistry practical.pdf
Sanyam Choudhary Chemistry practical.pdfsanyamsingh5019
 
Separation of Lanthanides/ Lanthanides and Actinides
Separation of Lanthanides/ Lanthanides and ActinidesSeparation of Lanthanides/ Lanthanides and Actinides
Separation of Lanthanides/ Lanthanides and ActinidesFatimaKhan178732
 
Presentation by Andreas Schleicher Tackling the School Absenteeism Crisis 30 ...
Presentation by Andreas Schleicher Tackling the School Absenteeism Crisis 30 ...Presentation by Andreas Schleicher Tackling the School Absenteeism Crisis 30 ...
Presentation by Andreas Schleicher Tackling the School Absenteeism Crisis 30 ...EduSkills OECD
 
MENTAL STATUS EXAMINATION format.docx
MENTAL     STATUS EXAMINATION format.docxMENTAL     STATUS EXAMINATION format.docx
MENTAL STATUS EXAMINATION format.docxPoojaSen20
 
Introduction to ArtificiaI Intelligence in Higher Education
Introduction to ArtificiaI Intelligence in Higher EducationIntroduction to ArtificiaI Intelligence in Higher Education
Introduction to ArtificiaI Intelligence in Higher Educationpboyjonauth
 
mini mental status format.docx
mini    mental       status     format.docxmini    mental       status     format.docx
mini mental status format.docxPoojaSen20
 
Arihant handbook biology for class 11 .pdf
Arihant handbook biology for class 11 .pdfArihant handbook biology for class 11 .pdf
Arihant handbook biology for class 11 .pdfchloefrazer622
 
Micromeritics - Fundamental and Derived Properties of Powders
Micromeritics - Fundamental and Derived Properties of PowdersMicromeritics - Fundamental and Derived Properties of Powders
Micromeritics - Fundamental and Derived Properties of PowdersChitralekhaTherkar
 
A Critique of the Proposed National Education Policy Reform
A Critique of the Proposed National Education Policy ReformA Critique of the Proposed National Education Policy Reform
A Critique of the Proposed National Education Policy ReformChameera Dedduwage
 
Concept of Vouching. B.Com(Hons) /B.Compdf
Concept of Vouching. B.Com(Hons) /B.CompdfConcept of Vouching. B.Com(Hons) /B.Compdf
Concept of Vouching. B.Com(Hons) /B.CompdfUmakantAnnand
 
Contemporary philippine arts from the regions_PPT_Module_12 [Autosaved] (1).pptx
Contemporary philippine arts from the regions_PPT_Module_12 [Autosaved] (1).pptxContemporary philippine arts from the regions_PPT_Module_12 [Autosaved] (1).pptx
Contemporary philippine arts from the regions_PPT_Module_12 [Autosaved] (1).pptxRoyAbrique
 
APM Welcome, APM North West Network Conference, Synergies Across Sectors
APM Welcome, APM North West Network Conference, Synergies Across SectorsAPM Welcome, APM North West Network Conference, Synergies Across Sectors
APM Welcome, APM North West Network Conference, Synergies Across SectorsAssociation for Project Management
 
PSYCHIATRIC History collection FORMAT.pptx
PSYCHIATRIC   History collection FORMAT.pptxPSYCHIATRIC   History collection FORMAT.pptx
PSYCHIATRIC History collection FORMAT.pptxPoojaSen20
 
Hybridoma Technology ( Production , Purification , and Application )
Hybridoma Technology  ( Production , Purification , and Application  ) Hybridoma Technology  ( Production , Purification , and Application  )
Hybridoma Technology ( Production , Purification , and Application ) Sakshi Ghasle
 
The Most Excellent Way | 1 Corinthians 13
The Most Excellent Way | 1 Corinthians 13The Most Excellent Way | 1 Corinthians 13
The Most Excellent Way | 1 Corinthians 13Steve Thomason
 
Organic Name Reactions for the students and aspirants of Chemistry12th.pptx
Organic Name Reactions  for the students and aspirants of Chemistry12th.pptxOrganic Name Reactions  for the students and aspirants of Chemistry12th.pptx
Organic Name Reactions for the students and aspirants of Chemistry12th.pptxVS Mahajan Coaching Centre
 
18-04-UA_REPORT_MEDIALITERAСY_INDEX-DM_23-1-final-eng.pdf
18-04-UA_REPORT_MEDIALITERAСY_INDEX-DM_23-1-final-eng.pdf18-04-UA_REPORT_MEDIALITERAСY_INDEX-DM_23-1-final-eng.pdf
18-04-UA_REPORT_MEDIALITERAСY_INDEX-DM_23-1-final-eng.pdfssuser54595a
 

Recently uploaded (20)

Software Engineering Methodologies (overview)
Software Engineering Methodologies (overview)Software Engineering Methodologies (overview)
Software Engineering Methodologies (overview)
 
Sanyam Choudhary Chemistry practical.pdf
Sanyam Choudhary Chemistry practical.pdfSanyam Choudhary Chemistry practical.pdf
Sanyam Choudhary Chemistry practical.pdf
 
Separation of Lanthanides/ Lanthanides and Actinides
Separation of Lanthanides/ Lanthanides and ActinidesSeparation of Lanthanides/ Lanthanides and Actinides
Separation of Lanthanides/ Lanthanides and Actinides
 
Presentation by Andreas Schleicher Tackling the School Absenteeism Crisis 30 ...
Presentation by Andreas Schleicher Tackling the School Absenteeism Crisis 30 ...Presentation by Andreas Schleicher Tackling the School Absenteeism Crisis 30 ...
Presentation by Andreas Schleicher Tackling the School Absenteeism Crisis 30 ...
 
MENTAL STATUS EXAMINATION format.docx
MENTAL     STATUS EXAMINATION format.docxMENTAL     STATUS EXAMINATION format.docx
MENTAL STATUS EXAMINATION format.docx
 
Introduction to ArtificiaI Intelligence in Higher Education
Introduction to ArtificiaI Intelligence in Higher EducationIntroduction to ArtificiaI Intelligence in Higher Education
Introduction to ArtificiaI Intelligence in Higher Education
 
mini mental status format.docx
mini    mental       status     format.docxmini    mental       status     format.docx
mini mental status format.docx
 
Arihant handbook biology for class 11 .pdf
Arihant handbook biology for class 11 .pdfArihant handbook biology for class 11 .pdf
Arihant handbook biology for class 11 .pdf
 
Micromeritics - Fundamental and Derived Properties of Powders
Micromeritics - Fundamental and Derived Properties of PowdersMicromeritics - Fundamental and Derived Properties of Powders
Micromeritics - Fundamental and Derived Properties of Powders
 
A Critique of the Proposed National Education Policy Reform
A Critique of the Proposed National Education Policy ReformA Critique of the Proposed National Education Policy Reform
A Critique of the Proposed National Education Policy Reform
 
Model Call Girl in Bikash Puri Delhi reach out to us at 🔝9953056974🔝
Model Call Girl in Bikash Puri  Delhi reach out to us at 🔝9953056974🔝Model Call Girl in Bikash Puri  Delhi reach out to us at 🔝9953056974🔝
Model Call Girl in Bikash Puri Delhi reach out to us at 🔝9953056974🔝
 
Concept of Vouching. B.Com(Hons) /B.Compdf
Concept of Vouching. B.Com(Hons) /B.CompdfConcept of Vouching. B.Com(Hons) /B.Compdf
Concept of Vouching. B.Com(Hons) /B.Compdf
 
Contemporary philippine arts from the regions_PPT_Module_12 [Autosaved] (1).pptx
Contemporary philippine arts from the regions_PPT_Module_12 [Autosaved] (1).pptxContemporary philippine arts from the regions_PPT_Module_12 [Autosaved] (1).pptx
Contemporary philippine arts from the regions_PPT_Module_12 [Autosaved] (1).pptx
 
APM Welcome, APM North West Network Conference, Synergies Across Sectors
APM Welcome, APM North West Network Conference, Synergies Across SectorsAPM Welcome, APM North West Network Conference, Synergies Across Sectors
APM Welcome, APM North West Network Conference, Synergies Across Sectors
 
PSYCHIATRIC History collection FORMAT.pptx
PSYCHIATRIC   History collection FORMAT.pptxPSYCHIATRIC   History collection FORMAT.pptx
PSYCHIATRIC History collection FORMAT.pptx
 
TataKelola dan KamSiber Kecerdasan Buatan v022.pdf
TataKelola dan KamSiber Kecerdasan Buatan v022.pdfTataKelola dan KamSiber Kecerdasan Buatan v022.pdf
TataKelola dan KamSiber Kecerdasan Buatan v022.pdf
 
Hybridoma Technology ( Production , Purification , and Application )
Hybridoma Technology  ( Production , Purification , and Application  ) Hybridoma Technology  ( Production , Purification , and Application  )
Hybridoma Technology ( Production , Purification , and Application )
 
The Most Excellent Way | 1 Corinthians 13
The Most Excellent Way | 1 Corinthians 13The Most Excellent Way | 1 Corinthians 13
The Most Excellent Way | 1 Corinthians 13
 
Organic Name Reactions for the students and aspirants of Chemistry12th.pptx
Organic Name Reactions  for the students and aspirants of Chemistry12th.pptxOrganic Name Reactions  for the students and aspirants of Chemistry12th.pptx
Organic Name Reactions for the students and aspirants of Chemistry12th.pptx
 
18-04-UA_REPORT_MEDIALITERAСY_INDEX-DM_23-1-final-eng.pdf
18-04-UA_REPORT_MEDIALITERAСY_INDEX-DM_23-1-final-eng.pdf18-04-UA_REPORT_MEDIALITERAСY_INDEX-DM_23-1-final-eng.pdf
18-04-UA_REPORT_MEDIALITERAСY_INDEX-DM_23-1-final-eng.pdf
 

Parts of the Enlarger & How to Print a Contact Sheet.pptx

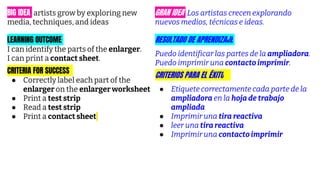
  • 1. BIG IDEA artists grow by exploring new media, techniques, and ideas LEARNING OUTCOME I can identify the parts of the enlarger. I can print a contact sheet. CRITERIA FOR SUCCESS ● Correctly label each part of the enlarger on the enlarger worksheet ● Print a test strip ● Read a test strip ● Print a contact sheet GRAN IDEA Los artistas crecen explorando nuevos medios, técnicas e ideas. RESULTADO DE APRENDIZAJE Puedo identificar las partes de la ampliadora. Puedo imprimir una contacto imprimir. CRITERIOS PARA EL ÉXITO ● Etiquete correctamente cada parte de la ampliadora en la hoja de trabajo ampliada ● Imprimir una tira reactiva ● leer una tira reactiva ● Imprimir una contacto imprimir
  • 2. What You Need Que necesitas : Negative Sleeve Páginas Negativas Printing Easel Caballete de cuarto oscuro Enlarger Ampliadora Negative Carrier Portanegativos
  • 3. Negative Sleeve protects your negatives from dust and scratches Páginas Negativas protege sus película del polvo y los arañazos
  • 4. Negative Carrier holds your negative in place in the enlarger for printing Portanegativos Mantiene la película en su lugar en la ampliadora para imprimir.
  • 5. Printing Easel holds your paper in place when making a final print Caballete de impresión Mantiene el papel en su lugar al realizar una impresión final.
  • 6. Enlarger projects light through the negative to cast a shadow of the image onto photographic paper Ampliadora proyecta luz a través del negativo para proyectar una sombra de la imagen sobre papel fotográfico
  • 7. Lamp House (where the light bulb lives) Casa de la lámpara (donde vive la bombilla)
  • 8. Filter Drawer (where you put contrast filters) Gaveta de filtro (donde pones los filtros de contraste)
  • 9. Film Stage (where the negative carrier goes) Escenario de película (donde va la portadora negativa)
  • 10. Height Control (moves the enlarger up or down to make the image projection bigger or smaller) Control de altura (mueve la ampliadora hacia arriba o hacia abajo para agrandar o reducir la proyección de la imagen)
  • 11. Focus Control (makes the picture sharp / in focus) Control de enfoque (hace que la imagen sea nítida/enfocada)
  • 12. Lens (controls how much light is going to hit your paper) Lente (controla la cantidad de luz que llegará al papel)
  • 13. Baseboard (where your image projects onto & where you place your easel) Zócalo (donde se proyecta su imagen y donde coloca su caballete)
  • 15. What is this? ¿Qué es esto? A Negative Carrier Porta Negativos B Printing Easel Caballete de impresión C Negative Sleeve Páginas Negativas
  • 16. What is this? ¿Qué es esto? A Negative Carrier Porta Negativos B Printing Easel Caballete de impresión C Negative Sleeve Páginas Negativas
  • 17. What is this? ¿Qué es esto? A Negative Carrier Porta Negativos B Printing Easel Caballete de impresión C Negative Sleeve Páginas Negativas
  • 18. What is this? ¿Qué es esto? A Negative Carrier Porta Negativos B Printing Easel Caballete de impresión C Negative Sleeve Páginas Negativas D Enlarger Ampliadora
  • 19. What is this? ¿Qué es esto? A Filter Drawer Gaveta de filtro B Lamp House Casa de la lámpara C Film Stage Escenario de película D Height Control Control de altura E Lens Lente F Focus Control Control de enfoque
  • 20. What is this? ¿Qué es esto? A Filter Drawer Gaveta de filtro B Lamp House Casa de la lámpara C Film Stage Escenario de película D Height Control Control de altura E Lens Lente F Focus Control Control de enfoque
  • 21. What is this? ¿Qué es esto? A Filter Drawer Gaveta de filtro B Lamp House Casa de la lámpara C Film Stage Escenario de película D Height Control Control de altura E Lens Lente F Focus Control Control de enfoque
  • 22. What is this? ¿Qué es esto? A Filter Drawer Gaveta de filtro B Lamp House Casa de la lámpara C Film Stage Escenario de película D Height Control Control de altura E Lens Lente F Focus Control Control de enfoque
  • 23. What is this? ¿Qué es esto? A Filter Drawer Gaveta de filtro B Lamp House Casa de la lámpara C Film Stage Escenario de película D Height Control Control de altura E Lens Lente F Focus Control Control de enfoque
  • 24. What is this? ¿Qué es esto? A Filter Drawer Gaveta de filtro B Lamp House Casa de la lámpara C Film Stage Escenario de película D Height Control Control de altura E Lens Lente F Focus Control Control de enfoque
  • 25. 15 1.5 “SECS” vs “1/10” Time Range Buttons
  • 26. CONTACT SHEETS WHY? To SEE what your photographs actually look like (in the positive)! This will allow you to choose the photographs that you will print enlarged, through assessing their success (lighting, focus, composition).
  • 27. How do you think contact sheets are made?
  • 28.
  • 29.
  • 30.
  • 31. Let’s set up your film so that you are ready to make a contact sheet. 1. Cut negatives into strips of 5. 2. Place in Negative Sleeve. 3. Write your name, period, and photoshoot on the top white area with sharpie.
  • 32. Listen Up! How to create a Contact Sheet
  • 33. IN THE DARKROOM 1. Take negative sleeve into the darkroom. 2. Pick an enlarger station. 3. Check the elevation of the enlarger by turning on the timer. Make sure it floods over the contact easel. 4. Turn OFF light. 5. Get photo paper from safe. 6. Open glass. Lay paper in contact easel, shiny side up. 7. Lay negatives on the photo paper neatly. 8. Close glass. 9. Expose for 5.0 seconds. 10.Open glass, remove paper and develop as usual; 1, 30 sec, 4, 10. 11. Collect negatives and take them out of the darkroom. Place them into your folder / binder.
  • 34. Contact Sheets (10 points) CRITERIA 2=Satisfactory 1=Needs Improvement 0=Incomplete/Insufficient Content/Concepts - All negatives frames are clear enough to select printed images. Exposure is good- not too dark or too light. Composition Negatives are aligned, no overlapping. Proper size paper is used for number of frames. Creativity - Images in negative are aligned with the photoshoot assignment. Craftsmanship - Overall contact print is neat, clean, blemish (scratches and smudges) free, and well aligned. Studio Habits - Safe and proper use of enlarger. Safe and proper use of print chemicals.
  • 35. BIG IDEA artists grow by exploring new media, techniques, and ideas LEARNING OUTCOME ● I can create a contact sheet ● I can determine which of my photos were successfully focused, composed, and metered. CRITERIA FOR SUCCESS ● Contact sheet is properly exposed, aligned, and appropriate size for number of frames ● Contact sheet is annotated / assessed to select first photo to be enlarged Get out your negatives! GRAN IDEA Los artistas crecen explorando nuevos medios, técnicas e ideas. RESULTADO DE APRENDIZAJE ● Puedo crear una hoja de contacto ● Puedo determinar cuáles de mis fotografías fueron enfocadas, compuestas y medidas con éxito. CRITERIOS PARA EL ÉXITO ● La hoja de contacto está correctamente expuesta, alineada y tiene el tamaño adecuado para la cantidad de marcos. ● Se anota/evalúa la hoja de contacto para seleccionar la primera foto que se ampliará
  • 36. Which photo is overexposed? How do you know? ¿Qué foto está sobreexpuesta? ¿Cómo lo sabes? 1 2 3 4 5
  • 37. Which photo is out of focus? How do you know? ¿Qué foto está desenfocada? ¿Cómo lo sabes? 1 2 3 4 5
  • 38. Which photo is composed the best? Why? ¿Qué foto está mejor compuesta? ¿Por qué? 1 2 3
  • 39. Which photo would you develop? What factors lead to your decision? ¿Qué foto revelarías? ¿Qué factores llevaron a su decisión? 1 2 3 4
  • 40.
  • 41. BIG IDEA artists refine their craft through practice and perseverance LEARNING OUTCOME ● I can analyze a test strip to determine the best exposure time. ● I can print two photos ● I can crop a photo using the enlarger CRITERIA FOR SUCCESS ● Contact sheet is properly exposed, aligned, and appropriate size for number of frames ● Prints are of the same photo, with one cropped ● Paper is cut to 5” x 7” ● Prints demonstrate a full tonal range ● Enlarger settings are recorded on the back of each print. GRAN IDEA Los artistas refinan su oficio a través de la práctica y la perseverancia. RESULTADO DE APRENDIZAJE ● Puedo analizar una tira reactiva para determinar el mejor tiempo de exposición. ● Puedo imprimir dos fotos ● Puedo recortar una foto usando la ampliadora. CRITERIOS PARA EL ÉXITO ● La hoja de contacto está correctamente expuesta, alineada y tiene el tamaño adecuado para la cantidad de marcos. ● Las impresiones son de la misma foto, con una recortada. ● El papel se corta a 5” x 7” ● Las impresiones demuestran una gama tonal completa. ● Los ajustes de ampliación se registran en la parte posterior de cada impresión.
  • 42. REVIEW Darkroom photo paper has a chemical coating called an EMULSION. This paper is sensitive to light. Which color light is it NOT sensitive to? El papel fotográfico de cuarto oscuro tiene un recubrimiento químico llamado EMULSIÓN. Este papel es sensible a la luz. ¿A qué color de luz NO es sensible?
  • 43. REVIEW Why do we make TEST STRIPS? ¿Por qué hacemos TIRAS DE PRUEBA?
  • 44. REVIEW ● What is the first chemical we put our paper in? For how long? ● What is the second chemical we put our paper in? For how long? ● What is the third chemical we put our paper in? For how long? ● ¿Cuál es el primer químico en el que ponemos nuestro papel? ○ ¿Por cuánto tiempo? ● ¿Cuál es el segundo químico en el que ponemos nuestro papel? ○ ¿Por cuánto tiempo? ● ¿Cuál es el tercer químico en el que ponemos nuestro papel? ○ ¿Por cuánto tiempo?
  • 45. To-Do 1. Read through the Test Strip CFU assignment on Canvas a. Answer the 3 Questions 2. Cut an 8x10 piece of paper to 5x7 with Ms. S 3. Print one image uncropped 4. Cut 3 paper snowflakes (google directions if needed) 5. Complete Sketchbook Letter D 1. Lea la tarea CFU de la tira reactiva en Canvas a. Responde las 3 preguntas 2. Corte una hoja de papel de 8x10 a 5x7 con la Sra. S. 3. Imprimir una imagen sin recortar 4. Corta 3 copos de nieve de papel (direcciones de Google si es necesario) 5. Cuaderno de bocetos completo Letra D
  • 46. Step 1: Cut Your Paper in the DARK ROOM Watch this video before cutting your 8”x10” paper into two 5”x7” prints and a test strip. After cutting your paper, put it in a black plastic bag sealed with masking tape to keep light out. Mire este video antes de cortar su papel de 8”x10” en dos impresiones de 5”x7” y una tira reactiva. Después de cortar el papel, colóquelo en una bolsa de plástico negra sellada con cinta adhesiva para evitar la entrada de luz. 8” x 10” 5” x 7” 5” x 7” + =
  • 47. Step 2: Prepare Your Film a) AFTER choosing which negative you want to print from, remove the negative from the negative sleeve. Wipe off the negative with an antistatic cloth to remove any dirt or dust. b) Remove the negative carrier from the enlarger and place your negative dull side down in the carrier. Carefully line up the negative in the carrier. c) Re-place the negative carrier into the enlarger.
  • 49. Step 3: Height & Size Turn on the enlarger to “Focus” mode so that your negative image is projected down onto the printing easel. Adjust the height of the enlarger so that your image fills the size of your enlargement (5” x 7”) on the blank printing easel. (DON’T PUT THE PAPER THERE YET!)
  • 50. Step 4: Focus Turn the aperture / lens on the enlarger to shine the brightest image (all the way to the left), and focus your image with the focus knob. Now turn the aperture / lens to shine the dimmest image.
  • 51. Step 5: Test Strip Turn off the light. Place a test strip on the easel in a diagonal across the easel. Set your timer to 3 second intervals and make a test strip of your print including at least 5 different increments.
  • 52. Step 6: Analyze Develop your test strip. Examine the strip and choose an exposure time with true blacks and highlights.
  • 53. If the entire test strip is too dark, re-set the lens opening to a dimmer setting (turn to the right) If the entire test strip is too light, re-set the lens opening to a brighter setting, at least one click to the left.
  • 54. When returning to your enlarger, check that the image is still in focus, refocusing if necessary. Check also that your image still fills the appropriate spot on your easel.
  • 55. Step 7: Paper! Carefully open the easel without moving it and slide a piece of photographic paper against the metal stops on the easel. Close the easel SLOWLY without moving the paper. Before exposing your paper, write your initials, the f-stop, and the number of seconds for your exposure on the back of your paper.
  • 56. Step 8: Exposure Set the timer for the desired time determined by viewing the test strip and expose the paper. These exposure settings, including the lens opening AND timer settings apply ONLY to this enlarger height. If the size of the print is changed, a new test strip is necessary.
  • 57. Step 9: Studio Habits When finished, pick up all of your materials and leave the work area ready for the next user.
  • 58. DONE!
  • 59. How and why might artists tell the story of their creative process? How can refinement and craftsmanship enrich a narrative? Why might some narrative works be shared, and how do we choose which artwork to share? How might an artist decide when artwork is complete?

Editor's Notes

  1. https://aboutphotography.blog/blog/2020/3/27/v-j-day-in-times-square-by-alfred-eisenstaedt-story-behind-the-photograph
  2. uses paper that has a chemical coating – (this is called emulsion and is usually made up of silver salts) coated on one side that is sensitive to light, but not red light.
  3. uses paper that has a chemical coating – (this is called emulsion and is usually made up of silver salts) coated on one side that is sensitive to light, but not red light.