

Recommended
More Related Content
What's hot
What's hot (20)
Similar to Air content test for fresh concrete
Similar to Air content test for fresh concrete (20)
More from Ayaz khan
More from Ayaz khan (18)
Recently uploaded
Recently uploaded (20)
Air content test for fresh concrete
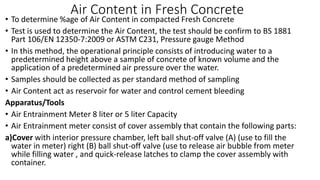
- 1. Air Content in Fresh Concrete • To determine %age of Air Content in compacted Fresh Concrete • Test is used to determine the Air Content, the test should be confirm to BS 1881 Part 106/EN 12350-7:2009 or ASTM C231, Pressure gauge Method • In this method, the operational principle consists of introducing water to a predetermined height above a sample of concrete of known volume and the application of a predetermined air pressure over the water. • Samples should be collected as per standard method of sampling • Air Content act as reservoir for water and control cement bleeding Apparatus/Tools • Air Entrainment Meter 8 liter or 5 liter Capacity • Air Entrainment meter consist of cover assembly that contain the following parts: a)Cover with interior pressure chamber, left ball shut-off valve (A) (use to fill the water in meter) right (B) ball shut-off valve (use to release air bubble from meter while filling water , and quick-release latches to clamp the cover assembly with container.
- 2. b.) Cap with pressure-gauge (use to check pressure and %age air content in concrete), Switch panel with integrated hand pump that have screw at top to be locked while transporting ( use to apply air pressure), • TEST valve (green color), correction valve (black color) • A flanged type cylinder vessel 5 liter or 8 liter capacity, ratio of diameter to height not less than 0.75 nor more than 1.25 & be suitable for 100 KN/m2 • Tamping bar made of hard wood having squire section side of 46+-1 mm and length 200 mm and further 120 mm to 150 mm shall be turned to a circular shape • scoop, about 100 mm • Sampling tray 900x900x50mm • Squire type shovel
- 4. Procedure • Fill concrete sample in test container in three layers with compaction to each layer to minimize maximum air voids in concrete. • Wipe off extra material from the top and level the surface of container. • Thoroughly clean the flanges of container, specially the ceiling edge. • Place the cover assembly on container and line up the red dots of cover assembly and container and then close the clamps/quick release latches. • beat slightly out side of the container with rubber hammer to release any trapped air • Open valves A & B, tilt the machine toward valve A, inject the water by squeeze bottle in valve A • Complete this operation until the water is free of air bubble • Close both the valves A & B • Using the hand pump rise the air pressure in pressure chamber until the needle of pressure gauge stop behind the last Red Mark
- 5. • Wait few seconds so that air pressure will reach to ambient temperature • slightly press the Black Correction button on machine so that the needle rest on first Red line • Tape slightly the pressure gauge with fingers and press the green button to release the air pressure until the need is stable • Strike slightly sides of cover assembly to release any trapped air and press the green button • Note the air content of compacted fresh concrete in percentage. • After completing test open valve A & B • open the quick release latches and remove the cover assembly from container • Press the green test button to release all air pressure until the needle reach to initial position i.e. beyond 100%
- 6. Needle Position on pumping Air Pressure Needle Position after pressing Black Correction Button
- 7. Calibration of Air Entrainment Meter • Take off the cover assembly from the container • Fix the 8 mm supply hose under the valve A in cover assembly • Fill up the container with water and close it with cover assembly • Open both valve A & B tilt the machine toward valve A and fill the water with squeeze bottle until the water is free of air bubble • Close both the valves A & B • Using the hand pump rise the p air pressure in pressure chamber until the needle of pressure gauge stop behind the last Red Mark • Wait few seconds so that air pressure will reach to ambient temperature
- 8. • slightly press the Black Correction button on machine as the needle rest on first Red line • Tape slightly the pressure gauge with fingers to and press the green button to release the air pressure until the need is stable • If the needle rest on “0” means the machine is ok, if not the pressure gauge cover should be open to adjust the scale with “0” reading • Repeat the test to check if the correction are successful i.e. the pressure needle stand on 0% • If the initial pressure correct then start calibration of Air Content of Machine by screwing 4 mm tube out side of valve A
- 9. • Keep the graduated cylinder on balance and make the weight of cylinder as “0” • Hold the tube in graduated cylinder of 500 ml capacity • Open valve A and press green button to flow the water in cylinder as mentioned below • If 1 liter test container used remove 100 g (10%) of water from container, while total amount of water required to fill the container is 1000 gm • If 5 liter test container used remove 250 g (5%) of water from container, while total amount of water required to fill the container is 5000 gm • If 8 liter test container used remove 400 g (5%) of water from container, while total amount of water required to fill the container is 8000 gm • Close the valve A
- 10. • Using the hand pump rise the p air pressure in pressure chamber until the needle of pressure gauge stop behind the last Red Mark • Wait few seconds so that air pressure will reach to ambient temperature • slightly press the Black Correction button on machine as the needle rest on first Red line • Tape slightly the pressure gauge with fingers and press the green button to release the air pressure until the need is stable • Check the corresponding air pressure, if 1 liter container used it should be 10% • Check the corresponding air pressure, if 5 liter container used it should be 5% • Check the corresponding air pressure, if 8 liter container used it should be 5% • Calibration is completed
- 11. 8 mm supply hose position of red dots while closing cover assembly on container position of machine while filling water 4 mm tube with valve A
- 12. Filling of water in cylinder