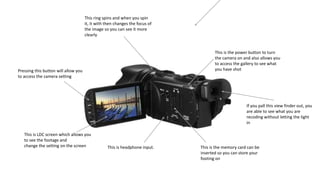
1. This is the power button to turn
the camera on and also allows you
to access the gallery to see what
you have shot
This is the memory card can be
inserted so you can store your
footing on
This ring spins and when you spin
it, it with then changes the focus of
the image so you can see it more
clearly
Pressing this button will allow you
to access the camera setting
If you pall this view finder out, you
are able to see what you are
recoding without letting the light
in
This is LDC screen which allows you
to see the footage and
change the setting on the screen This is headphone input.
2. The record button
Extra zoom
This is a zoom which allows you to
zoom in on an object and also
zoom out
This is where a built-in mic is, you
use this if you don’t have a boom
mic
3. This is where you can press and
access the menu
This is where you can change the
setting depending on the light
outside or inside
The manual setting changes the
exposer
The USB in put will allows you to
export to any other device
The HDMI port allows you to
export to an external monitor
The remote input is a way for the
camera to be attached and have an
external remote control