
Recommended
More Related Content
What's hot
What's hot (20)
Viewers also liked
Viewers also liked (17)
Similar to Antenna
Similar to Antenna (20)
Antenna
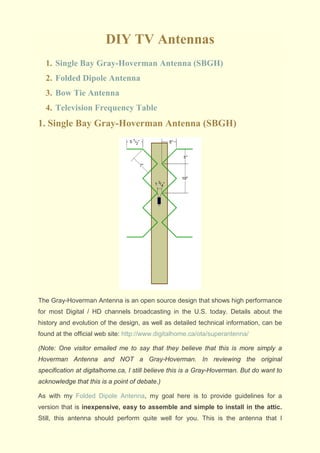
- 1. DIY TV Antennas 1. Single Bay Gray-Hoverman Antenna (SBGH) 2. Folded Dipole Antenna 3. Bow Tie Antenna 4. Television Frequency Table 1. Single Bay Gray-Hoverman Antenna (SBGH) The Gray-Hoverman Antenna is an open source design that shows high performance for most Digital / HD channels broadcasting in the U.S. today. Details about the history and evolution of the design, as well as detailed technical information, can be found at the official web site: http://www.digitalhome.ca/ota/superantenna/ (Note: One visitor emailed me to say that they believe that this is more simply a Hoverman Antenna and NOT a Gray-Hoverman. In reviewing the original specification at digitalhome.ca, I still believe this is a Gray-Hoverman. But do want to acknowledge that this is a point of debate.) As with my Folded Dipole Antenna, my goal here is to provide guidelines for a version that is inexpensive, easy to assemble and simple to install in the attic. Still, this antenna should perform quite well for you. This is the antenna that I
- 2. currently use in my attic and I get 22 channels. Most of these are broadcasting from 45 or even 50+ miles away. (See the broadcast tower information for my area at TV Fool.) Parts List: • 2 - 4 foot 1x4 pine boards • 6 - 3/4" Screws • 6 - Finish Washers • 10 - 2" Wood Screws • 2 - 5' lengths of 14 gauge wire • 1 - Balun - This transformer is needed to adapt the antenna's signal to your T.V.'s coax input. It is available from many sources. I got mine at my local Walmart for less than $5. See pictures below. • 1 - 2 foot by 4 foot THIN plywood or masonite board • about 8 feet of 12" wide aluminum foil. • clear packing tape Assembly: Mark one of the 1x4 boards as shown. The first line should be 7" from the end of the board. The second should be 10" from the first. The third 10" from the second.
- 3. Mark one each of these three lines with two marks as show. The marks should be 5/8" in from the edges of the board. For the actual antenna elements, I used 14 gauge wire that I got at my local home improvement store. It came in a 100' roll costing less than $7. For this project, I used two 5 foot lengths. Cut these lengths from the roll and try to straighten them out. They will probably still be a bit wavy at this point, but that is okay.
- 4. Now bend the wires to the shape described in the diagram. I marked my wires with a permanent marker at 5 1/2" and then every 7" to know where to bend.
- 5. Using a pair of pliers to hold the wire as you bend it will help you get sharper angles. When you are done with all of your bends, you will probably have about 7" extra wire to snip off. Trim this down to 5 1/2" AFTER you have made all of your bends. This leaves room to correct errors you might make during bending. To attach the antenna elements to the board, I used some short screws and finish washers. I like the way these washers "grab" the antenna elements better than plain flat washers. Put a screw and washer at each of the six marks on your board. Do not screw them in all of the way yet so that you have room to put in the antenna elements. Put the inner bends of the antenna elements under the washers. The bend in the wire should go inside the screw. Tighten down the end screws, but leave a little room in the center screws to attach the balun.
- 6. Place the spades of the balun around the center screws and under the antenna elements. The ends of the balun should be in direct contact with the antenna elements. Tighten down the center screws. The main assembly of your antenna is now complete. Depending on your needs you may or may not want to add a reflector to your antenna. A reflector will help give stronger reception for weak stations in the direction that the antenna is pointing. But on the down side, it will block the signal of stations behind the antenna. Without a reflector, I was able to get 26 channels with this antenna. But I added the reflector to
- 7. increase the signal on a particular station that I wanted to get from over 50 miles away. After adding the reflector, I am only getting 22 stations. Skip down to see a simple base that you can stand up this antenna with. I built my reflector from a thin piece of masonite measuring 24" by 33". To begin, draw two lines down the center of the board running length wise. The lines should be 1" apart. Tape aluminum foil to the front of the reflector. Use the lines to keep a space between the foil on the left and the foil on the right.
- 8. Make two spacers to support the reflector from 1x4 pine. Cut these spacers to 3 1/4" long. Screw the spacers to the top and bottom of the reflector as shown. I did the final assembly of my antenna in the attic because it was easier to get the pieces up there that way. To attach the reflector, screw through the front of the antenna into the spacers on the reflector. The aluminum foil on the reflector should be centered behind the reflector elements.
- 9. Attach the cable to your television to the balun on the antenna. The cable should go down between the antenna elements and not in front of them. I used some zip ties to hold the cable in place. The base of the antenna was made by attaching the remaining piece of 1x4 to the bottom of the antenna. For stability, you could screw this to a rafter or two. Mine is just balanced there since wind is not a concern in my attic. PVC SBGH With Reflector This is the first Gray-Hoverman Antenna that I built. The frame is 1/2" PVC fitted together without glue. The antenna elements are secured to the frame using zip ties. The reflector is made from poster board and aluminum foil.
- 10. 2. Folded Dipole Antenna This is the third antenna that I built but it is also the simplest, both in terms of design and construction. It is also the design that impressed me the most. A folded dipole is a very basic antenna design. Often, it is combined with other elements such as reflectors to produce more powerful antennas. But I wanted to see how it would perform in its most basic form since that would be easy for anyone to build. This antenna took me less than 10 minutes to build and I was surprised to find that after placing this in my attic, I was able to bring in 13 digital channels. This included the four major network channels (ABC, CBS, NBC and FOX), some independents and a few news and weather channels. The nearest tower is 8.8 miles from my house and the furthest is 51.6 miles away! (See the broadcast tower information for my area at TV Fool.) While this did not perform as well as my Gray- Hoverman Antenna, I would recommend it as a first build. If it gets all of the channels that you want, you won't need to take the time to build something more complex unless you want to. Parts List: • 1 Metal Coat Hanger • 2 Screws • 1 Balun - This transformer is needed to adapt the antenna's signal to your T.V.'s coax input. It is available from many sources. I got mine at my local Walmart for less than $5. See pictures below. • 1 Wood Board - For this build I used a pine 1x2 that I had laying around my garage. • 1 Bracket - This is used to mount and pivot the antenna. Again, I used one that I had laying around.
- 11. Assembly Photos
- 14. Homemade DTV Antenna In June of 2009 the government-mandated switch to digital television (DTV) went into effect in the United States. With this change comes more channels along with DVD- quality picture and sound. To enjoy these benefits of DTV, all you need is a converter box (or a TV with a built-in ATSC tuner) and a decent antenna. This page explains how you can build a great little antenna for not a lot of money and start enjoying over- the-air digital. My Digital Conversion Experience When I first found out about over-the-air digital TV I was pretty excited. I had heard that DTV broadcasts were in the UHF band and UHF channels had always been among the best analog reception for me. So I went out and bought a converter box and hooked it up to a cheap UHF loop antenna. Amazingly enough I got many channels with good clarity. I had a few had dropouts here and there, but overall the
- 15. picture quality was better than cable. Then I noticed a couple channels were missing. After visiting antennaweb.org, I found out why. It turns out that not all digital TV is broadcast in the UHF band. In fact, in Chicago there are two stations (CBS2 and ABC7) that still broadcast over VHF. Since a VHF antenna was required, I resorted to adding a pair of rabbit ears to my UHF loop. So now I've got free over-the-air digital TV, but at the expense of a really hokey-looking antenna atop my entertainment center. I started searching the Internet for a better solution. There are several space-age looking "HDTV-ready" antennas out there, but surprisingly many of them were only designed for the UHF band. I managed to find a few that advertised VHF and UHF coverage, but upon closer inspection the VHF band was pulled in by a set of rabbit ears. Building My Own I have a pretty solid background in electronics, so I decided to try my hand at building an antenna from scratch. I figured that with a little research, I could make one that's better performing and less obtrusive than what's commercially available. I started by researching some basic designs and finally settled on the half-wave folded dipole. I chose this antenna design for several reasons. • Easy to understand, well documented antenna design. • Can be built with readily-available 14 gauge copper wire. (The same stuff used deliver electricity to household outlets.) • Good bandwidth covering a full octave. • 300 Ohm impedance connects to commonly available matching transformers. Design Criteria Digital TV is broadcast in two bands, VHF High (RF channels 7-13) and a portion of UHF (RF channels 14 - 51). According to information at cgsnetwork.com, these channels correspond to frequencies 174 - 216 MHz and 470 - 698 MHz respectively. Looking at the DTV broadcast frequencies, I determined that it's just not possible to build a single folded dipole that performs well over the entire range. This did not surprise me however, since analog TV always required using two different antennas, one for VHF and another for UHF. So I decided to build two antennas and use an old-fashioned VHF/UHF combiner to bring the signals together.
- 16. The UHF Antenna I started with the UHF antenna. I figured that being smaller it would be easier to construct and I wouldn't waste much wire if it took me a couple tries to get it right. The first thing to do is calculate the measurements of the folded dipole. I chose the center of the UHF band for my target frequency of 584 MHz. The formula to calculate the length of a folded dipole is taken from the ARRL Handbook For Radio Communications that I checked out from my local library. l = 468 / f where l is length in feet and f is frequency in Hertz or l = 5616 / f where l is length in inches and f is frequency in Hertz Using the formula, I found that the length of antenna required for my UHF target frequency is 5616 / 584 or 9.616 inches. Since measuring tapes have fractions and not decimals, I rounded to 9 5/8 inches. The distance separating the wires in a folded dipole design (s), although not extremely critical, should be small compared to it's length. I decided to wrap the wire around a screwdriver handle to form the curves, so s is about 3/4 inch. So now the trick is to take all of the measurements and build an actual antenna. I start by cutting a 20 1/4 inch (2l plus an extra inch) length of 14 gauge wire and marking the center of it. The extra inch is so I can make curves on the end and still end up with the correct width. From the center marking I measure out 5 1/16 inches in either direction, a quarter of the length of wire, and mark these distances as well. These last two marks show me roughly where the ends of my dipole will be. The VHF Antenna Designing the VHF antenna is the same process as the UHF antenna except that the center frequency is 195 MHz. This translates to a length (l) of about 24 3/4 inches. I'll
- 17. be using the same screwdriver handle to form curves on the ends of the dipole so again I added an extra inch to the length of wire to compensate. That makes the total length of wire 25 1/4 inches with a center mark at 12 7/8 inches and quarter-length marks at 6 7/16 inches from the ends. Putting It All Together To form the folded dipole elements, I take my straight piece of wire and place one of the quarter-length marks on top of my screwdriver handle. I then gently bend the wire around the screwdriver handle, lining up the end of the wire with the center marking. I repeat the process with the other side making sure the two ends have a gap of about 1/8 inch between them. After a little adjustment, I've got two nice-looking folded dipoles ready for mounting. Since I have two antenna elements, I need to combine the signals. I also need to convert the 300 Ohm antenna elements to the 75 Ohm input of my DTV converter box. I can accomplish both of these tasks with a relatively inexpensive UHF/VHF 300 Ohm combiner from Radio Shack. I can simply cram the ends of my folded dipoles under the screw terminals of the combiner and tighten them down so that the UHF element is stacked on top of the VHF element. If I want to get a little fancier, I could solder on some fork terminals first. The only thing left to tackle is hooking it up to the converter. It's not very practical to attach the 75 Ohm output of the UHF/VHF combiner directly onto the converter box. That leaves me a couple options. I can get a cable to attach it, but it will need a male F-connector on one end and a female F connector on the other end. That's not a real common item as most cables are male on both ends. My other option is to rig something up with a gender changer. I can plug one end into the UHF/VHF combiner and attach any standard coax cable to the other end. Enjoying Over-The-Air Digital Now that the antenna is done, I simply place it on top of my entertainment center, cable it to my converter box and point it toward the broadcast towers in my area. Most of the channels come in very well, but I do live 30 miles from the towers and occasionally there is some break-up in the picture of weaker stations. Fortunately, I was able to boost my signal strength with an inexpensive 12dB RF amplifier from a local home improvement store.
- 18. All-in-all I am very happy with my antenna design. It has several advantages: • Good performance • Fairly inexpensive • Relatively easy to build • Much less obtrusive than rabbit ears Best of all, I learned a lot while building it, plus I get bragging rights for doing it myself. 3. Bow Tie Antenna The Bow Tie Antenna is a simple design that can be found in many variations on the web. It can be made with a 2x4, some coat hangers, aluminum foil and a few other common parts. While very inexpensive to build, this design is able to pull in stations from 45 and 50 miles away. (See the broadcast tower information for my area at TV Fool.)
- 20. I had originally intended to include some detailed build instructions here. But since building my Folded Dipole Antenna, I have decided that I would not be recommending this design. Not that it is a bad design, but I feel that the Folded Dipole or my Gray-Hoverman are better DIY projects for someone not wanting to make a hobby of antenna building. Check out the pages for those antennas for the pros and cons of each design. If you really want to build a bow tie antenna, a quick web search will find MANY interesting designs. Here is a diagram and a photo of the Bow Tie that I built. In the third photo, you can see that I added a reflector to mine. This is just a thin piece of scrap plywood wrapped in aluminum foil mounted four inches behind the bow tie elements. 4. Television Frequency Table This table is the frequency chart for the US designated Television Channels. There are both VHF and UHF channels listed. This is listed as a matter of information only and is part of the public domain information of the government. GENERAL TELEVISION FREQUENCIES Sub CATV Band - T7 - T13 7 - 48 MHz VHF Band - Ch. 2 - 13 54 - 216 MHz Low Band - VHF Ch. 2 - 6 59 - 88 MHz Mid Band - UHF Ch. 14 – 22 121 - 174 MHz - UHF Ch. 95 - 99 91 - 120 MHz High Band - VHF Ch. 7 - 13 175 - 216 MHz Super Band - CATV Ch. 23 - 36 216 - 300 MHz Hyper Band - CATV Ch. 37 - 62 300 - 456 MHz Ultra Band - CATV Ch. 63 - 158 457 - 1002 MHz UHF Band Ch.14 - 83 - CATV Ch. 63 - 158 70 - 1002 MHz
- 21. VHF TELEVISION FREQUENCIES BAND CH # FREQUENCY BAND CH # FREQUENCY VHF LOW 2 54-60 MHz VHF HIGH 7 174-180 MHz VHF LOW 3 60-66 MHz VHF HIGH 8 180-186 MHz VHF LOW 4 66-72 MHz VHF HIGH 9 186-192 MHz VHF LOW 5 76-82 MHz VHF HIGH 10 192-198 MHz VHF LOW 6 82-88 MHz VHF HIGH 11 198-204 MHz VHF HIGH 12 204-210 MHz VHF HIGH 13 210-216 MHz UHF TELEVISION FREQUENCIES CH # FREQUENCY CH # FREQUENCY CH # FREQUENCY 14 470-476 MHz 38 614-620 MHz 62 758-764 MHz 15 476-482 MHz 39 620-626 MHz 63 764-770 MHz 16 482-488 MHz 40 626-632 MHz 64 770-776 MHz 17 488-494 MHz 41 632-638 MHz 65 776-782 MHz 18 494-500 MHz 42 638-644 MHz 66 782-788 MHz 19 500-506 MHz 43 644-650 MHz 67 788-794 MHz 20 506-512 MHz 44 650-656 MHz 68 794-800 MHz 21 512-518 MHz 45 656-662 MHz 69 800-806 MHz 22 518-524 MHz 46 662-668 MHz 70 806-812 MHz 23 524-530 MHz 47 668-674 MHz 71 812-818 MHz 24 530-536 MHz 48 674-680 MHz 72 818-824 MHz 25 536-542 MHz 49 680-686 MHz 73 824-830 MHz 26 542-548 MHz 50 686-692 MHz 74 830-836 MHz 27 548-554 MHz 51 692-698 MHz 75 836-842 MHz 28 554-560 MHz 52 698-704 MHz 76 842-848 MHz
- 22. CH # FREQUENCY CH # FREQUENCY CH # FREQUENCY 29 560-566 MHz 53 704-710 MHz 77 848-854 MHz 30 566-572 MHz 54 710-716 MHz 78 854-860 MHz 31 572-578 MHz 55 716-722 MHz 79 860-866 MHz 32 578-584 MHz 56 722-728 MHz 80 866-872 MHz 33 584-590 MHz 57 728-734 MHz 81 872-878 MHz 34 590-596 MHz 58 734-740 MHz 82 878-884 MHz 35 596-602 MHz 59 740-746 MHz 83 884-890 MHz 36 602-608 MHz 60 746-752 MHz 37 608-614 MHz 61 752-758 MHz CATV CHANNELS CATV Video Sound Channel Frequency Frequency SUB-Band CATV Channels T7 7.0000 11.5000 T8 13.0000 17.5000 T9 19.0000 23.5000 T10 25.0000 29.5000 T11 31.0000 35.5000 T12 37.0000 41.5000 T13 43.0000 47.5000 LOW BAND 2 55.2500 59.7500 3 61.2500 65.7500 4 67.2500 71.7500 5 77.2500 81.7500 6 83.2500 87.7500
- 23. CATV Video Sound Channel Frequency Frequency MID BAND 95 91.2500 95.7500 96 97.2500 101.7500 97 103.2500 107.7500 98 109.2750 113.7750 99 115.2750 119.7750 14 121.2625 125.7625 15 127.2625 131.7625 16 133.2625 137.7625 17 139.2500 143.7500 18 145.2500 149.7500 19 151.2500 155.7500 20 157.2500 161.7500 21 163.2500 167.7500 22 169.2500 173.7500 HIGH BAND 7 175.2500 179.7500 8 181.2500 185.7500 9 187.2500 191.7500 10 193.2500 197.7500 11 199.2500 203.7500 12 205.2500 209.7500 13 211.2500 215.7500 SUPER BAND 23 217.2500 221.7500 24 223.2500 227.7500 25 229.2625 233.7625 26 235.2625 239.7625
- 24. CATV Video Sound Channel Frequency Frequency 27 241.2625 245.7625 28 247.2625 251.7625 29 253.2625 257.7625 30 259.2625 263.7625 31 265.2625 269.7625 32 271.2625 275.7625 33 277.2625 281.7625 34 283.2625 287.7625 35 289.2625 293.7625 36 295.2625 299.7625 HYPER BAND 37 301.2625 305.7625 38 307.2625 311.7625 39 313.2625 317.7625 40 319.2625 323.7625 41 325.2625 329.7625 42 331.2750 335.7750 43 337.2625 341.7625 44 343.2625 347.7625 45 349.2625 353.7625 46 355.2625 359.7625 47 361.2625 365.7625 48 367.2625 371.7625 49 373.2625 377.7625 50 379.2625 383.7625 51 385.2625 389.7625 52 391.2625 395.7625 53 397.2625 401.7625
- 25. CATV Video Sound Channel Frequency Frequency 54 403.2500 407.7500 55 409.2500 413.7500 56 415.2500 419.7500 57 421.2500 425.7500 58 427.2500 431.7500 59 433.2500 437.7500 60 439.2500 443.7500 61 445.2500 449.7500 62 451.2500 455.7500 ULTRA BAND 63 457.2500 461.7500 64 463.2500 467.7500 65 469.2500 473.7500 66 475.2500 479.7500 67 481.2500 485.7500 68 487.2500 491.7500 69 493.2500 497.7500 70 499.2500 503.7500 71 505.2500 509.7500 72 511.2500 515.7500 73 517.2500 521.7500 74 523.2500 527.7500 75 529.2500 533.7500 76 535.2500 539.7500 77 541.2500 545.7500 78 547.2500 551.7500 79 553.2500 557.7500 80 559.2500 563.7500
- 26. CATV Video Sound Channel Frequency Frequency 81 565.2500 569.7500 82 571.2500 575.7500 83 577.2500 581.7500 84 583.2500 587.7500 85 589.2500 593.7500 86 595.2500 599.7500 87 601.2500 605.7500 88 607.2500 611.7500 89 613.2500 617.7500 90 619.2500 623.7500 91 625.2500 629.7500 92 631.2500 635.7500 93 637.2500 641.7500 94 643.2500 647.7500 100 649.2500 653.7500 101 655.2500 659.7500 102 661.2500 665.7500 103 667.2500 671.7500 104 673.2500 677.7500 105 679.2500 683.7500 106 685.2500 689.7500 107 691.2500 695.7500 108 697.2500 701.7500 109 703.2500 707.7500 110 709.2500 713.7500 111 715.2500 719.7500 112 721.2500 725.7500 113 727.2500 731.7500
- 27. CATV Video Sound Channel Frequency Frequency 114 733.2500 737.7500 115 739.2500 743.7500 116 745.2500 749.7500 117 751.2500 755.7500 118 757.2500 761.7500 119 763.2500 767.7500 120 769.2500 773.7500 121 775.2500 779.7500 122 781.2500 785.7500 123 787.2500 791.7500 124 793.2500 797.7500 125 799.2500 803.7500 126 805.2500 809.7500 127 811.2500 815.7500 128 817.2500 821.7500 129 823.2500 827.7500 130 829.2500 833.7500 131 835.2500 839.7500 132 841.2500 845.7500 133 847.2500 851.7500 134 853.2500 857.7500 135 859.2500 863.7500 136 865.2500 869.7500 137 871.2500 875.7500 138 877.2500 881.7500 139 883.2500 887.7500 140 889.2500 893.7500 141 895.2500 899.7500
- 28. CATV Video Sound Channel Frequency Frequency 142 901.2500 905.7500 143 907.2500 911.7500 144 913.2500 917.7500 145 919.2500 923.7500 146 925.2500 929.7500 147 931.2500 935.7500 148 937.2500 941.7500 149 943.2500 947.7500 150 949.2500 953.7500 151 955.2500 959.7500 152 961.2500 965.7500 153 967.2500 971.7500 154 973.2500 977.7500 155 979.2500 983.7500 156 985.2500 989.7500 157 991.2500 995.7500 158 997.2500 1001.7500 Frequencies Used by Wireless Cable Channel Frequency Number of Type of Channel Bandwidth Range Channels Service Groups (MHz) 2,150 - 2,162 MHz 2 MDS 1,2,2(A) 6 2,305 - 2,320 MHz 2 WCS 5 & 10 2,345 - 2,360 MHz 2 WCS 5 & 10 2,500 - 2,596 MHz 16 ITFS ABC&D 6 2.596 - 2,644 MHz 8 MMDS E&F 6 2,644 - 2,686 MHz 4 ITFS G 6
- 29. 2,644 - 2,686 MHz 3 MMDS H 6 2,686 - 2,689.875 MHz 31* MMDS Response Channels 0.125 * Each channel's bandwidth is 125 KHz, and does not carry video. NTSC CONTOURS Grade B Grade A City Grade Channels Service Contour Service Contour Service Contour Channels 2 through 6 47 dBu 68 dBu 74 dBu Channels 7 through 13 56 dBu 71 dBu 77 dBu Channels 14 through 69 64 dBu 74 dBu 80 dBu DIGITAL TV CONTOURS Grade B Grade A City Grade Channels Service Contour Service Contour Service Contour Channels 2 through 6 - dBu - dBu 35 dBu Channels 7 through 13 - dBu - dBu 43 dBu Channels 14 through 69 - dBu - dBu 48 dBu