
Recommended
More Related Content
What's hot
What's hot (20)
Similar to Parabolic Dish Installation Guide
Similar to Parabolic Dish Installation Guide (20)
Recently uploaded
Recently uploaded (20)
Parabolic Dish Installation Guide
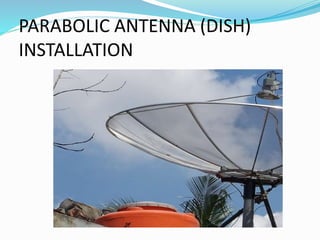
- 2. PARABOLIC ANTENNA (DISH) INSTALLATION A parabolic antenna is an antenna that uses a parabolic reflector, a curved surface with the cross-sectional shape of a parabola, to direct the radio waves. The most common form is shaped like a dish and is popularly called a dish antenna or parabolic dish.
- 4. Cont…..
- 6. Cont……..
- 7. Installing the wall mount First of all, you have to find an appropriate location. Take into account these two requirements: The location must allow the correct orientation of the dish to the satellite. Use the compass. There can not be any obstacles between the dish and the satellite.
- 8. Cont……. Take the "L" wall mount, and attach it to the wall manually. Mark the positions of the future holes on the wall. Now, drill the four holes. Be careful choosing a appropriate diameter. The ideal depth for the holes is about 0,5 cm + wall plug length.
- 9. Cont……. Put the four fixings in their holes, and use the hammer and the chisel to fix them.
- 10. Cont…….. Now take the "L" wall mount, and screw it to the fixings. Don't forget the washers.
- 11. Installing the dish The installation process will vary depending on the brand and model of the dish. Mount it all, including the LNB, and screw it on tightly, except the screws that are marked in red. You will need to turn and move the dish to orientate it correctly.
- 12. Pointing the dish to a satellite Which satellite should you point the dish to? It depends. You should visit Lyngsat website to find out what satellite is the most interesting for you. Also you can use SATELLITE FINDER APP, for Android in order to search for an appropriate satellite . Then interface it with your decoder.
- 13. Wiring Cut the cable insulation as described in the following figure
- 14. lastly Connect two "F" connectors, on both ends of the cable. Connect one end to the LNB of the dish and the other one to the receiver. Now it is time for the fine-tuning. Turn on the digital satellite receiver, choose the name of the satellite and look for the option that tells you the signal strength and quality. Then, move the dish slightly until you get the best signal quality and strength.
- 15. Cont………..
- 16. PROBLEMS FACING SAHARA MEDIA GROUP AND POSSIBLE SOLUTIONS PROBLEMS Lack of technicians who are needed to repair and remove faults in electronic devices such as decoder, transmitter and receiver. SOLUTIONS • A company should employ number of technicians who will solve all technical problems.