Vitorsworkshop
•
0 likes•224 views

The document describes a low-cost and inconspicuous method for receiving signals from multiple satellites using a small antenna array. It involves using a foldable table base turned on its side as improvised antenna poles. Four small prime focus flat antennas are mounted on the poles to receive signals from four satellite positions. The entire setup takes up little space, is lower than the balcony wall and hidden from view. It provides reception of over 2200 TV and 440 radio channels without a permanent installation and avoids issues with landlords.

Recommended
More Related Content
Similar to Vitorsworkshop
Similar to Vitorsworkshop (20)
More from TELE-audiovision eng
Vitorsworkshop
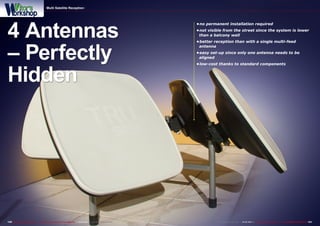
- 1. Multi Satellite Reception 4 Antennas – Perfectly Hidden 130 TELE-audiovision International — The World‘s Largest Digital TV Trade Magazine — 01-02/2014 — www.TELE-audiovision.com • permanent installation required no • not visible from the street since the system is lower than a balcony wall • better reception than with a single multi-feed antenna • easy set-up since only one antenna needs to be aligned • low-cost thanks to standard components www.TELE-audiovision.com — 01-02/2014 — TELE-audiovision International — 全球发行量最大的数字电视杂志 131
- 2. Multi Satellite Reception Antenna array on the balcony – without your neighbour or landlord having a clue Vitor Martins Augusto If you live in a rented apartment or in a condo the following might ring bell: You prefer the endless possibilities of satellite reception over cable or terrestrial channels, but you’re not allowed to install a satellite antenna on your balcony, let alone on the building’s facade. If you believe you’ll be stuck with that situation forever, we have news for you. We’ve come up with a real treat that should even impress the odd satellite DXer. But let’s not get over-excited and rather start right from the beginning. When I strolled through my local DIY centre recently I also walked through the satellite section, as I always do, only to find out that stand-alone antenna poles are way too expensive. 49 euros for a small piece of galvanized steel? Come on! Actually, I have one of those at home already, and it does a brilliant job for use on a balcony without having to drill a whole into the existing 1 building structure. But let’s be honest, multi-feed reception with a 60cm offset antenna is not exactly the perfect solution and – come to think of it – I originally wanted to receive a total of four positions anyway: 28.2E, 19.2E, 13.0E and 30.0W. This requires at least two antennas, and this was also why I was on the lookout for a second pole in the first place. One that I could use without permanent installation. Because my landlord would never allow that. Period. Disappointedly, I trotted away, passing a display of workbenches along my way when all of a sudden my eyes wandered towards this foldable base which was meant to support a heightadjustable table. This would do nicely for hanging wallpaper, but in actual fact my thoughts had long gone from home improvement to something entirely different: What if I turned that foldable base by 90 degrees and used it as perfectly suitable antenna poles for four individual antennas? A quick look at the attached price tag meant that it could be mine for 23 euros, and so a decision was taken on the spot. Minutes later, I carried home an inconspicuous foldable base that would be turned into excellent stand-alone antenna poles. The base looked a bit low, though, and frankly I had some doubts as to whether 60cm antennas could be mounted on them at all. And whether those antennas would actually allow decent reception in the end. As it turned out, it was a very tight job with only a couple of centimetres clearance between antenna and balcony floor. Nonetheless, I had a signal coming in, which proved that recep- 4 1. Existing stand-alone antenna pole. Cost: around 40 to 50 euros. 2. Foldable base for DIY table. Cost in the DIY centre: around 25 euros. 3. Create an improvised antenna pole by turning the foldable base by 90 degrees. 4. Comparison of height and space requirements of both solutions. 5. 60cm offset antenna: Barely fits into available space. 2 3 132 TELE-audiovision International — The World‘s Largest Digital TV Trade Magazine — 01-02/2014 — www.TELE-audiovision.com 5 www.TELE-audiovision.com — 01-02/2014 — TELE-audiovision International — 全球发行量最大的数字电视杂志 133
- 3. 6 6. Inside the flat antenna: It’s more like a prime focus antenna with reflector. The LNB is mounted behind. 7. Size comparison between a 60cm offset antenna and a 60cm prime focus flat antenna. 7 tion was possible. On the down side, I found that a maximum of three offset antennas could be mounted, since the space required by the feed arms and the LNBs did not allow for a fourth antenna. Still, at this point I simply refused to give up and thought long and hard about how I could accomplish a small and – almost – invisible antenna farm on my balcony after all. I decided to get four flat antennas. The models I chose were not flat antennas in the true sense of the word, but rather prime focus antennas that feature a metal dish behind the plastic covering on the front, which means that the LNB is actually positioned behind the antenna. This a very smart design that allows for virtually flat antennas which still achieve a good signal gain that is in line with most conventional 60cm antennas. Genuine flat antennas, on the other hand, use a multitude of small patches that are connected to each other. Signal gain with such a construction can only grow logarithmically with regard to the number of patches that are used, which means that those antennas are usually only available in small sizes (comparable to 60cm antennas) and are more expensive – one of the reasons why I did not opt for genuine flat antennas. When I tested only one antenna for the first time the results I obtained were truly promising. I was able to receive a perfect signal right on my balcony, behind the balcony wall. Next, I had to mount the remaining 134 TELE-audiovision International — The World‘s Largest Digital TV Trade Magazine — 01-02/2014 — www.TELE-audiovision.com
- 4. three antennas. Taking into account the extremely low clearance between the individual antennas I had to figure out the best possible arrangement. For position 1 I chose ASTRA2 (28.2E), followed by ASTRA1 (19.2E) for position 2, HOTBIRD (13.0E) for position 3 and finally HISPASAT (30.0W) for position 4. This way no single antenna was blocked by another one and – equally important – antennas in the front were not in the way of the two antennas behind. What’s more, this set-up seemed to be a logical choice to begin with. With the help of professional signal meter SPAUN SPAROS 609 precise alignment turned out to be child’s play and did not take more than 15 minutes for all four satellites. Once I had completed that job I went about laying out and tailoring the required coax cables. The four cables from the antennas 8 9 were first fed to a 4/1 DiSEqC switch and from there to our AZBox ME test receiver (see test report in TELE-satellite 02+03/2012). The moment of truth came when I initiated a channel search on all four positions, which yielded a total of 2230 TV channels and 442 radio stations. Unfortunately, the BBC transponder on ASTRA2 did not come in strong enough due to the small size of the prime focus flat antenna. While this did not come as a real surprise I should mention at this point that the position is very worthwhile nonetheless, with channels such as Channel4 HD, among others. The entire set-up is lower than my balcony wall and the adjusted 4-pole base is extremely robust. When a major thunderstorm moved through the area the antennas did not even move a single millimetre. 12 12. The SPAUN SPAROS 609 signal meter was used to individually align each antenna. This job did not take longer than 15 minutes, since the first aligned antenna can be used as a point of reference for the additional antennas. 10 11 8. Antenna pole base with a single prime focus flat antenna: Due to uneven weight distribution the set-up is still slightly shaky. 9. Adding the second antenna: To make sure the pole base does not tip over I continued with position 3 rather than position 2. 10. Once the second antenna was installed the base has become sure-footed and could not fall over any longer. At this stage it did not make much of a difference whether antenna 2 or 4 would be next. 11. Finished. With each of the four antennas taking its space the overall situation is quite tight, but each antenna has an unobstructed line of sight. 136 TELE-audiovision International — The World‘s Largest Digital TV Trade Magazine — 01-02/2014 — www.TELE-audiovision.com www.TELE-audiovision.com — 01-02/2014 — TELE-audiovision International — 全球发行量最大的数字电视杂志 137
- 5. 13 One of the huge benefits of the construction is that the antenna array is freely positioned on the floor without any screws or additional fixtures. A surface area of approximately 1.4 by 1.4 meters is occupied and total height does not exceed 80 centimetres. With a distance of 1.2 meters 14 from the balcony wall I was able to achieve perfect reception quality, provided the view towards south is unobstructed – but this is a general rule for all antenna installations in the northern hemisphere. In order to fully check out the entire antenna array I also moved it to a 13. Fully cabled set-up: Doesn’t take up much space and is lower than the balcony wall. 14. Shown for comparison: An offset antenna requires an extra 50 centimetres for its feed arm. 15. Antenna array on a small balcony: Even with restricted space available it was possible to receive signals from all four positions. 15 138 TELE-audiovision International — The World‘s Largest Digital TV Trade Magazine — 01-02/2014 — www.TELE-audiovision.com
- 6. 16 17 much smaller second balcony. Thanks to its southern exposure, it was once again possible to catch signals with all four antennas. And what’s more, since the height of the balcony wall is 30 centimetres higher than that of the antenna construction, the array is completely hidden from outside view. There are other advantages as well: Two persons can easily carry the completed structure and if you turn it by 90 degrees it even fits through a standard balcony door. This means the antenna array can be stored away when not in use to free up balcony space. Thanks to all four antennas being tightly attached to the base you can also just move the whole thing in any direction without having to worry that the four antennas might need realignment afterwards. In actual fact, not even a signal meter will be required: Simply move the array until you have reception with one antenna. The remaining three antennas will then automatically be aligned as well, since their positions towards each other have not changed. I don’t know about you, but to me that’s really clever… As you can gather, I am totally over the moon with this set-up. Obviously, you could also go for two 60cm multi-feed offset antennas (antenna 1: 28.2E, 19.2E and 13.0E; antenna 2: 30.0W), but due to the ‘cross-eyed’ LNBs which would have to be used the actual signal gain would be inferior to this array. 16. A bird’s eye view reveals just how little space is required for the antenna array. 17. A total of five antennas are positioned on the small balcony – completely hidden behind the balcony wall, yet perfectly suited for state-of-the-art satellite reception and without causing hassles with neighbours or landlords. 140 TELE-audiovision International — The World‘s Largest Digital TV Trade Magazine — 01-02/2014 — www.TELE-audiovision.com