
Recommended
More Related Content
What's hot
What's hot (15)
Similar to Tutorial 3 accessing the database
Similar to Tutorial 3 accessing the database (20)
Recently uploaded
Recently uploaded (20)
Tutorial 3 accessing the database
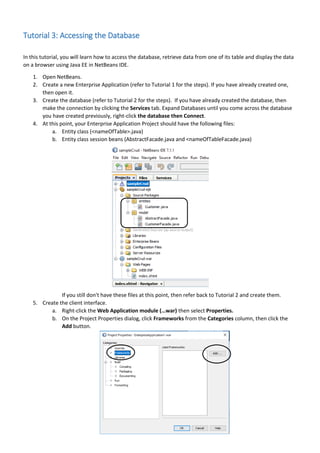
- 1. Tutorial 3: Accessing the Database In this tutorial, you will learn how to access the database, retrieve data from one of its table and display the data on a browser using Java EE in NetBeans IDE. 1. Open NetBeans. 2. Create a new Enterprise Application (refer to Tutorial 1 for the steps). If you have already created one, then open it. 3. Create the database (refer to Tutorial 2 for the steps). If you have already created the database, then make the connection by clicking the Services tab. Expand Databases until you come across the database you have created previously, right-click the database then Connect. 4. At this point, your Enterprise Application Project should have the following files: a. Entity class (<nameOfTable>.java) b. Entity class session beans (AbstractFacade.java and <nameOfTableFacade.java) If you still don't have these files at this point, then refer back to Tutorial 2 and create them. 5. Create the client interface. a. Right-click the Web Application module (…war) then select Properties. b. On the Project Properties dialog, click Frameworks from the Categories column, then click the Add button.
- 2. c. In the Add a Framework dialog, select JavaServer Faces then click OK. d. In the application's Web Application module, expand Web Pages directory and delete index.html or index.jsp. Make sure that only index.xhtml is left. 6. Create the controller object. a. In the application's Web Application module, right-click Source Packages -> New -> Java Package. Type controller as package name then click Finish. b. Right-click the controller package then select New -> JSF Managed Bean (if you don't find this, click Other -> JavaServer Faces -> JSF Managed Bean. c. Type the name of the JSF managed bean, then change the Scope value to Session then click Finish
- 3. At the point, your enterprise application should have the following files in its directory: 7. Clean and build the application by right-clicking the project then select Clean and Build from the pop up menu. You should see a green message that says that clean and build is successful. If the message is in red, then it means that there are errors in the application and you should correct these. 8. Once the build is successful, click the Run button from the standard toolbar to test the application.
- 4. You should read something about Facelets on the browser of your desktop, like as follows: 9. Retrieve data from the table and display the data on the browser. a. Place a form on your JSF (index.xhtml). b. From the JSF Palette, drag a JSF Data Table From Entity object. If the Palette window is not displayed, Click Window -> Palette from the menu bar or Window -> IDE Tools -> Palette. This Palette should be displayed on the right side of the IDE screen. c. You should see some JSF tags embedded in the body section of your index.xhtml file. These tags would read as follows: Drag this object towards index.xhtml body section.
- 5. 10. Add a new method in your controller that would display all records from the table. a. Right-click the body of the controller class and select Insert Code -> Call Enterprise Bean. b. Expand your ejb directory and select the appropriate …Façade file. c. Add the method that would call the findAll() method from the session bean. Your controller code should look like as follows: Add this table attribute if you want your table to have borders.
- 6. d. Correct any errors (if there are any) by importing the necessary packages to gain access to the library files you need – java.util.List and your entities package that contains your entity class. e. Clean and Build, then run your program. You should see the following output on your browser. Add this method to the controller code. Make sure you use the correct entity name (the one you have in your entities package – in the ejb). Your Project Directory should have the following files in it.