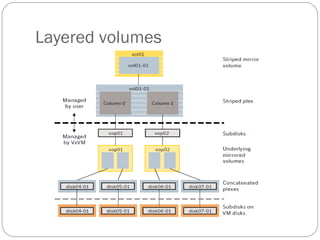
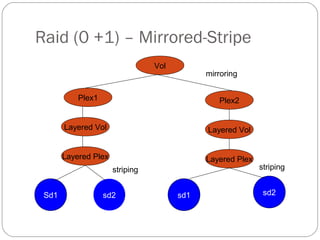
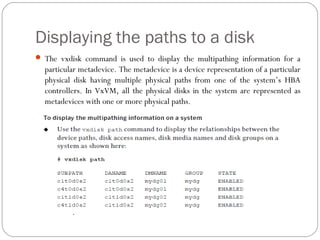
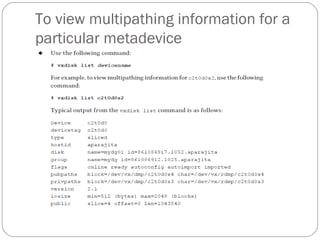
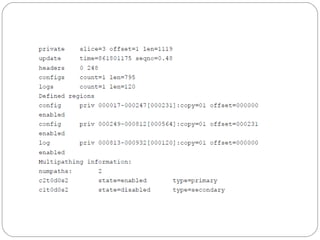
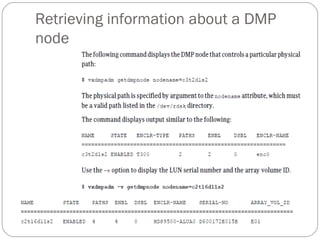
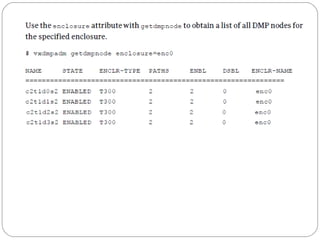
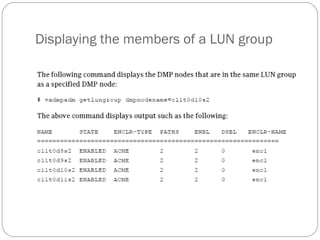
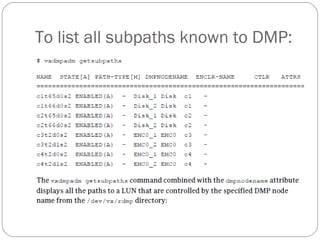
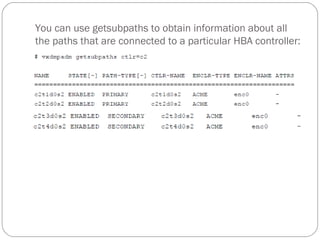
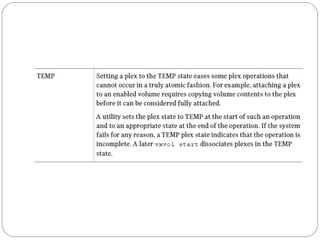
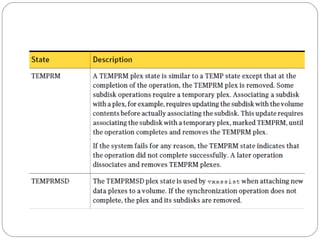
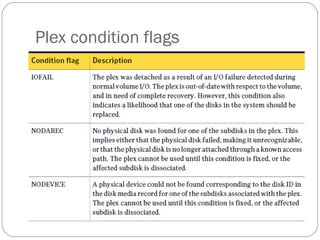
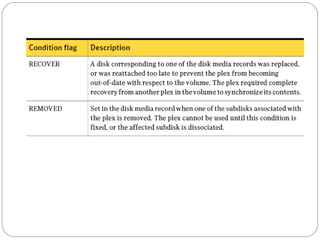
This document discusses layered volumes in VxVM. Layered volumes tolerate failure better and have greater redundancy than standard volumes. For example, a mirrored-striped layered volume has quicker recovery than a standard mirrored volume since each mirror covers less storage space. The document also discusses different types of layered volumes like mirror-striped and stripe-mirrored, how they provide redundancy and performance advantages over standard volumes, and some of their limitations.

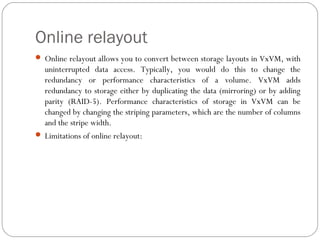
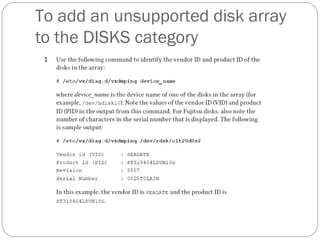
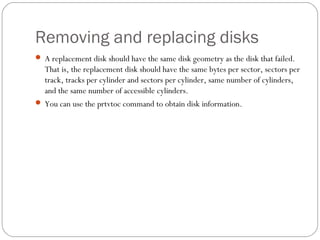
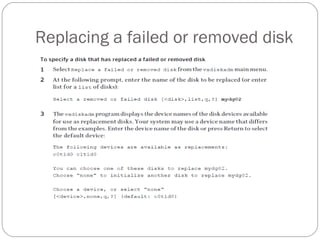
![Performing online relayout
# vxassist [-b] [-g diskgroup] relayout volume [layout=layout] [relayout_options]
If specified, the -b option makes relayout of the volume a background task.
The following destination layout configurations are supported.
concat-mirror concatenated-mirror
concat concatenated
nomirror concatenated
Administering volumes 363
Performing online relayout
nostripe concatenated
raid5 RAID-5 (not supported for shared disk groups)
span concatenated
stripe striped](https://image.slidesharecdn.com/vxvm-151106143300-lva1-app6891/85/Vx-vm-12-320.jpg)
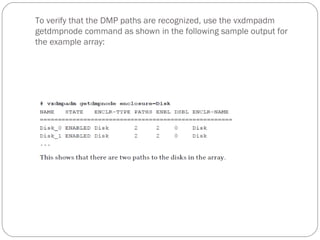
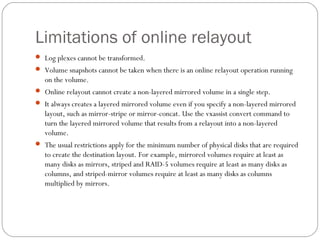
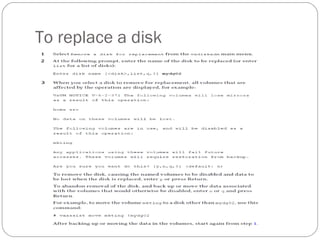
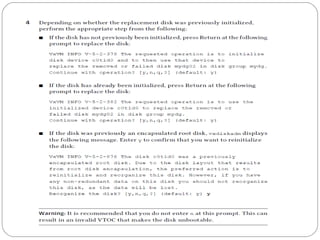
![To change the disk-naming scheme
Select Change the disk naming scheme from the vxdiskadm main menu to change the
disk-naming scheme that you wantVxVMto use.Whenprompted, enter y to change the
naming scheme. This restarts the vxconfigd daemon to bring the new disk naming
scheme into effect. Alternatively, you can change the naming scheme from the
command line.
Use the following command to select enclosure-based naming:
# vxddladm set namingscheme=ebn [persistence={yes|no}]
[use_avid=yes|no] [lowercase=yes|no]
Use the following command to select operating system-based naming:
# vxddladm set namingscheme=osn [persistence={yes|no}]
[lowercase=yes|no]](https://image.slidesharecdn.com/vxvm-151106143300-lva1-app6891/85/Vx-vm-20-320.jpg)
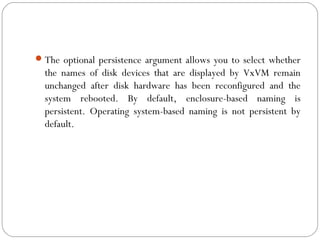
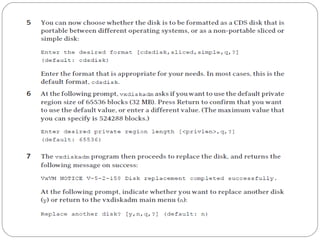
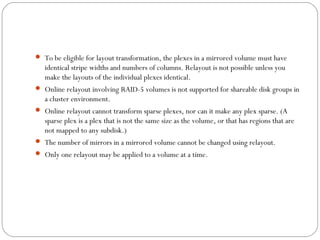
![Displaying plex information
Listing plexes helps identify free plexes for building volumes.
Use the plex (–p) option to the vxprint command to list
information about all plexes. To display detailed information
about all plexes in the system, use the following command:
# vxprint -lp
To display detailed information about a specific plex, use the
following command:
# vxprint [-g diskgroup] -l plex
The -t option prints a single line of information about the
plex. To list free plexes, use the following command:
# vxprint -pt](https://image.slidesharecdn.com/vxvm-151106143300-lva1-app6891/85/Vx-vm-52-320.jpg)
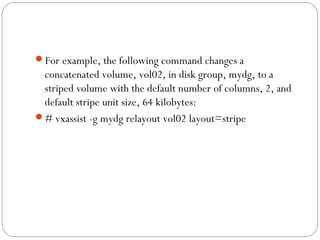
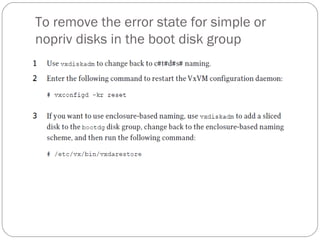
![Attaching and associating plexes
A plex becomes a participating plex for a volume by
attaching it to a volume. (Attaching a plex associates it with
the volume and enables the plex for use.) To attach a plex to
an existing volume, use the following command:
# vxplex [-g diskgroup] att volume plex
Example:
# vxplex -g mydg att vol01 vol01-02](https://image.slidesharecdn.com/vxvm-151106143300-lva1-app6891/85/Vx-vm-61-320.jpg)
![If the volume does not already exist, a plex (or multiple
plexes) can be associated with the volume when it is created
using the following command:
# vxmake [-g diskgroup] -U usetype vol volume plex=plex1[,plex2...]
For example, to create a mirrored, fsgen-type volume
named home, and to associate two existing plexes named
home-1 and home-2 with home, use the following
command:
# vxmake -g mydg -U fsgen vol home plex=home-1,home-2](https://image.slidesharecdn.com/vxvm-151106143300-lva1-app6891/85/Vx-vm-62-320.jpg)
![Taking plexes offline
To take a plex OFFLINE so that repair or maintenance can be
performed on the physical disk containing subdisks of that plex, use the
following command:
# vxmend [-g diskgroup] off plex
If a disk has a head crash, put all plexes that have associated subdisks on
the affected disk OFFLINE. For example, if plexes vol01-02 and vol02-
02 in the disk group, mydg, had subdisks on a drive to be repaired, use
the following command to take these plexes offline:
# vxmend -g mydg off vol01-02 vol02-02
This command places vol01-02 and vol02-02 in the OFFLINE state, and
they remain in that state until it is changed. The plexes are not
automatically recovered on rebooting the system.](https://image.slidesharecdn.com/vxvm-151106143300-lva1-app6891/85/Vx-vm-63-320.jpg)
![Detaching plexes
To temporarily detach one data plex in a mirrored volume,
use the following command:
# vxplex [-g diskgroup] det plex
For example, to temporarily detach a plex named vol01-02
in the disk group, mydg, and place it in maintenance mode,
use the following command:
# vxplex -g mydg det vol01-02](https://image.slidesharecdn.com/vxvm-151106143300-lva1-app6891/85/Vx-vm-64-320.jpg)
![Reattaching plexes
When a disk has been repaired or replaced and is again ready for use, the plexes
must be put back online (plex state set to ACTIVE). To set the plexes to
ACTIVE, use one of the following procedures depending on the state of the
volume.
■ If the volume is currently ENABLED, use the following command to reattach
the plex:
# vxplex [-g diskgroup] att volume plex ...
For example, for a plex named vol01-02 on a volume named vol01 in the disk
group, mydg, use the following command:
# vxplex -g mydg att vol01 vol01-02
As when returning an OFFLINE plex to ACTIVE, this command starts to
recover the contents of the plex and, after the revive is complete, sets the plex
utility state to ACTIVE.](https://image.slidesharecdn.com/vxvm-151106143300-lva1-app6891/85/Vx-vm-65-320.jpg)
![If the volume is not in use (not ENABLED), use the
following command to re-enable the plex for use:
# vxmend [-g diskgroup] on plex
For example, to re-enable a plex named vol01-02 in the disk
group, mydg, enter:
# vxmend -g mydg on vol01-02](https://image.slidesharecdn.com/vxvm-151106143300-lva1-app6891/85/Vx-vm-66-320.jpg)
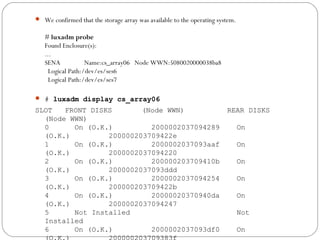
![How to recover and start a Veritas Volume
Manager logical volume where the volume is
DISABLED ACTIVE and has a plex that is
DISABLED RECOVER
# vxprint -ht -g testdg
DG NAME NCONFIG NLOG MINORS GROUP-ID
DM NAME DEVICE TYPE PRIVLEN PUBLEN STATE
RV NAME RLINK_CNT KSTATE STATE PRIMARY DATAVOLS SRL
RL NAME RVG KSTATE STATE REM_HOST REM_DG REM_RLNK
V NAME RVG KSTATE STATE LENGTH USETYPE PREFPLEX RDPOL
PL NAME VOLUME KSTATE STATE LENGTH LAYOUT NCOL/WID MODE
SD NAME PLEX DISK DISKOFFS LENGTH [COL/]OFF DEVICE MODE
SV NAME PLEX VOLNAME NVOLLAYR LENGTH [COL/]OFF AM/NM MODE
dg testdg default default 84000 970356463.1203.alu
dm testdg01 c1t4d0s2 sliced 2179 8920560 -
dm testdg02 c1t6d0s2 sliced 2179 8920560 -
v test - DISABLED ACTIVE 17840128 fsgen - SELECT
pl test-01 test DISABLED RECOVER 17841120 CONCAT - RW
sd testdg01-01 test-01 testdg01 0 8920560 0 c1t4d0 ENA
sd testdg02-01 test-01 testdg02 0 8920560 8920560 c1t6d0 ENA](https://image.slidesharecdn.com/vxvm-151106143300-lva1-app6891/85/Vx-vm-68-320.jpg)
![ # vxprint -ht -g testdg
DG NAME NCONFIG NLOG MINORS GROUP-ID
DM NAME DEVICE TYPE PRIVLEN PUBLEN STATE
RV NAME RLINK_CNT KSTATE STATE PRIMARY DATAVOLS SRL
RL NAME RVG KSTATE STATE REM_HOST REM_DG REM_RLNK
V NAME RVG KSTATE STATE LENGTH USETYPE PREFPLEX RDPOL
PL NAME VOLUME KSTATE STATE LENGTH LAYOUT NCOL/WID MODE
SD NAME PLEX DISK DISKOFFS LENGTH [COL/]OFF DEVICE MODE
SV NAME PLEX VOLNAME NVOLLAYR LENGTH [COL/]OFF AM/NM MODE
dg testdg default default 84000 970356463.1203.alu
dm testdg01 c1t4d0s2 sliced 2179 8920560 -
dm testdg02 c1t6d0s2 sliced 2179 8920560 -
v test - DISABLED ACTIVE 17840128 fsgen - SELECT
pl test-01 test DISABLED STALE 17841120 CONCAT - RW
sd testdg01-01 test-01 testdg01 0 8920560 0 c1t4d0 ENA
sd testdg02-01 test-01 testdg02 0 8920560 8920560 c1t6d0 ENA](https://image.slidesharecdn.com/vxvm-151106143300-lva1-app6891/85/Vx-vm-70-320.jpg)
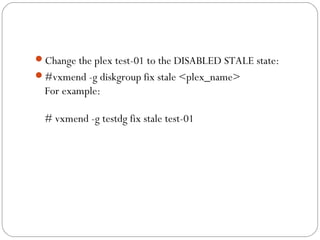
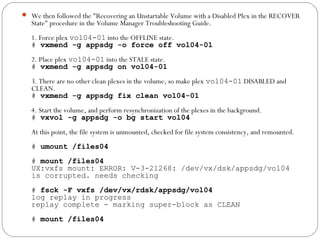
![Change the plex test-01 to the
DISABLED CLEAN state:
vxmend -g diskgroup fix clean <plex_name>
For example:
# vxmend -g testdg fix clean test-01
# vxprint -ht -g testdg
DG NAME NCONFIG NLOG MINORS GROUP-ID
DM NAME DEVICE TYPE PRIVLEN PUBLEN STATE
RV NAME RLINK_CNT KSTATE STATE PRIMARY DATAVOLS SRL
RL NAME RVG KSTATE STATE REM_HOST REM_DG REM_RLNK
V NAME RVG KSTATE STATE LENGTH USETYPE PREFPLEX RDPOL
PL NAME VOLUME KSTATE STATE LENGTH LAYOUT NCOL/WID MODE
SD NAME PLEX DISK DISKOFFS LENGTH [COL/]OFF DEVICE MODE
SV NAME PLEX VOLNAME NVOLLAYR LENGTH [COL/]OFF AM/NM MODE
dg testdg default default 84000 970356463.1203.alu
dm testdg01 c1t4d0s2 sliced 2179 8920560 -
dm testdg02 c1t6d0s2 sliced 2179 8920560 -
v test - DISABLED ACTIVE 17840128 fsgen - SELECT
pl test-01 test DISABLED CLEAN 17841120 CONCAT - RW
sd testdg01-01 test-01 testdg01 0 8920560 0 c1t4d0 ENA
sd testdg02-01 test-01 testdg02 0 8920560 8920560 c1t6d0 ENA](https://image.slidesharecdn.com/vxvm-151106143300-lva1-app6891/85/Vx-vm-71-320.jpg)
![Start the volume test:
vxvol -g diskgroup start <volume>
For example:
# vxvol -g diskgroup start test
# vxprint -ht -g testdg
DG NAME NCONFIG NLOG MINORS GROUP-ID
DM NAME DEVICE TYPE PRIVLEN PUBLEN STATE
RV NAME RLINK_CNT KSTATE STATE PRIMARY DATAVOLS SRL
RL NAME RVG KSTATE STATE REM_HOST REM_DG REM_RLNK
V NAME RVG KSTATE STATE LENGTH USETYPE PREFPLEX RDPOL
PL NAME VOLUME KSTATE STATE LENGTH LAYOUT NCOL/WID MODE
SD NAME PLEX DISK DISKOFFS LENGTH [COL/]OFF DEVICE MODE
SV NAME PLEX VOLNAME NVOLLAYR LENGTH [COL/]OFF AM/NM MODE
dg testdg default default 84000 970356463.1203.alu
dm testdg01 c1t4d0s2 sliced 2179 8920560 -
dm testdg02 c1t6d0s2 sliced 2179 8920560 -
v test - ENABLED ACTIVE 17840128 fsgen - SELECT
pl test-01 test ENABLED ACTIVE 17841120 CONCAT - RW
sd testdg01-01 test-01 testdg01 0 8920560 0 c1t4d0 ENA
sd testdg02-01 test-01 testdg02 0 8920560 8920560 c1t6d0 ENA](https://image.slidesharecdn.com/vxvm-151106143300-lva1-app6891/85/Vx-vm-72-320.jpg)
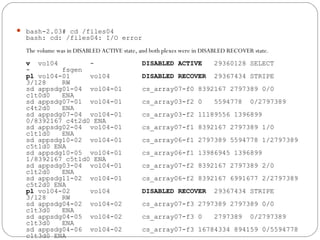
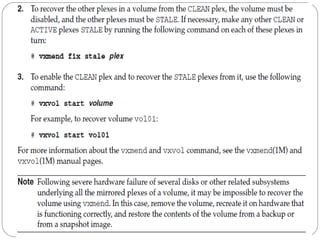
![Recovering an unstartable
volume with a disabled plex in
the RECOVER state
To recover an unstartable volume with a disabled plex in the RECOVER state
Use the following command to force the plex into the OFFLINE state:
# vxmend [-g diskgroup] -o force off plex
Place the plex into the STALE state using this command:
# vxmend [-g diskgroup] on plex
If there are other ACTIVE or CLEAN plexes in the volume, use the following
command to reattach the plex to the volume:
# vxplex [-g diskgroup] att plex volume
If the volume is already enabled, resynchronization of the plex is started
immediately.
If there are no other clean plexes in the volume, use this command to make the
plex DISABLED and CLEAN:
# vxmend [-g diskgroup] fix clean plex
If the volume is not already enabled, use the following command to start it, and
preform any resynchronization of the plexes in the background:
# vxvol [-g diskgroup] -o bg start volume
If the data in the plex was corrupted, and the volume has no ACTIVE or CLEAN
redundant plexes from which its contents can be resynchronized, it must be
restored from a backup or from a snapshot image.](https://image.slidesharecdn.com/vxvm-151106143300-lva1-app6891/85/Vx-vm-73-320.jpg)


![Restoring a Disk Group
Configuration
The following command performs a precommit analysis of
the state of the disk group configuration, and reinstalls the
disk headers where these have become corrupted:
# /etc/vx/bin/vxconfigrestore -p [-l directory]
{diskgroup | dgid}
The disk group can be specified either by name or by ID.](https://image.slidesharecdn.com/vxvm-151106143300-lva1-app6891/85/Vx-vm-86-320.jpg)


![谷歌留痕技术教程[ 𝙩𝙤𝙥 𝟮𝟯𝟯. 𝙘 𝙤𝙢 ]](https://cdn.slidesharecdn.com/ss_thumbnails/top233-260130173900-2eb784f9-thumbnail.jpg?width=640&height=640&fit=bounds)


![20260201 [FOSDEM] gomodjail - library sandboxing for Go modules.pdf](https://cdn.slidesharecdn.com/ss_thumbnails/20260201fosdemgomodjail-librarysandboxingforgomodules-260201225659-76609ec4-thumbnail.jpg?width=640&height=640&fit=bounds)


