

Recommended
More Related Content
What's hot
What's hot (20)
Viewers also liked
Viewers also liked (14)
Similar to Vlsi lab manual_new
Similar to Vlsi lab manual_new (20)
Recently uploaded
Recently uploaded (20)
Vlsi lab manual_new
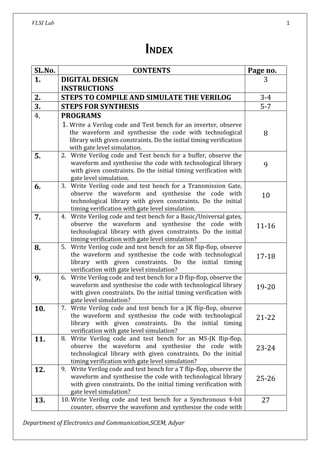
- 1. 1 VLSI Lab INDEX SL.No. CONTENTS Page no. 1. DIGITAL DESIGN 3 INSTRUCTIONS 2. STEPS TO COMPILE AND SIMULATE THE VERILOG 3-4 3. STEPS FOR SYNTHESIS 5-7 4. PROGRAMS 1. Write a Verilog code and Test bench for an inverter, observe the waveform and synthesise the code with technological 8 5. 6. 7. 8. 9. 10. 11. 12. 13. library with given constraints. Do the initial timing verification with gate level simulation. 2. Write Verilog code and Test bench for a buffer, observe the waveform and synthesise the code with technological library with given constraints. Do the initial timing verification with gate level simulation. 3. Write Verilog code and test bench for a Transmission Gate, observe the waveform and synthesise the code with technological library with given constraints. Do the initial timing verification with gate level simulation. 4. Write Verilog code and test bench for a Basic/Universal gates, observe the waveform and synthesise the code with technological library with given constraints. Do the initial timing verification with gate level simulation? 5. Write Verilog code and test bench for an SR flip-flop, observe the waveform and synthesise the code with technological library with given constraints. Do the initial timing verification with gate level simulation? 6. Write Verilog code and test bench for a D flip-flop, observe the waveform and synthesise the code with technological library with given constraints. Do the initial timing verification with gate level simulation? 7. Write Verilog code and test bench for a JK flip-flop, observe the waveform and synthesise the code with technological library with given constraints. Do the initial timing verification with gate level simulation? 8. Write Verilog code and test bench for an MS-JK flip-flop, observe the waveform and synthesise the code with technological library with given constraints. Do the initial timing verification with gate level simulation? 9. Write Verilog code and test bench for a T flip-flop, observe the waveform and synthesise the code with technological library with given constraints. Do the initial timing verification with gate level simulation? 10. Write Verilog code and test bench for a Synchronous 4-bit counter, observe the waveform and synthesise the code with Department of Electronics and Communication,SCEM, Adyar 9 10 11-16 17-18 19-20 21-22 23-24 25-26 27
- 2. 2 VLSI Lab 14. 15. 16. 17. 18. 19. 20. 21. 22. technological library with given constraints. Do the initial timing verification with gate level simulation? 11. Write Verilog code and test bench for a 4 bit Carry Adder, observe the waveform and synthesise the code with technological library with given constraints. Do the initial timing verification with gate level simulation. 12. Write Verilog code and test bench for a Asynchronous 4-bit counter, observe the waveform and synthesise the code with technological library with given constraints. Do the initial timing verification with gate level simulation? ANALOG DESIGN STEPS FOR THE ANALOG LAB BUILDING THE TEST DESIGN FOR THE CELL STEP TO SIMULATE STEPS FOR LAYOUT 1.Design an Inverter with given specifications, completing the design flow mentioned below: a. Draw the schematic and verify the following i. DC Analysis ii. Transient Analysis b. Draw the Layout and verify the DRC, ERC c. Check for LVS d. Extract RC and back annotate the same and verify the Design e. Verify & Optimise for Time, Power and Area to the given constraint. 2.Design the following circuits with given specifications, completing the design flow mentioned below: a. Draw the schematic and verify the following i. DC Analysis ii. Transient Analysis b. Draw the Layout and verify the DRC, ERC c. Check for LVS d. Extract RC and back annotate the same and verify the Design i. A Single Stage differential amplifier ii. Common source and Common Drain amplifier 3. Design an op-amp with given specifications, using given differential amplifier Common source and Common Drain amplifier in library and completing the design flow mentioned below: a. Draw the schematic and verify the following i. DC Analysis ii. Transient Analysis b. Draw the Layout and verify the DRC, ERC c. Check for LVS d. Extract RC and back annotate the same and verify the Design. Department of Electronics and Communication,SCEM, Adyar 28 29-30 31-34 35 36-38 39-43 44-46 47-55 56-58
- 3. 3 VLSI Lab DIGITAL DESIGN ASIC-DIGITAL DESIGN FLOW: INSTRUCTIONS Login with the respective login name as provided in the lab Right click on the screen and select Open Terminal to open the command prompt To enter into csh shell type csh in the command line To source the cadence tools type sourcecshrcin the command line Get into the mkdir lab directory by typing cd lab in the command line STEPS TO COMPILE AND SIMULATE THE VERILOG CODES The verilog code should be written inside the rtl directory and test bench code in the test_bench directory and simulation to be done in the simulation directory. To write the verilog code open the editor by typing gedit<filename.extension> Eg: geditinverter.v Department of Electronics and Communication,SCEM, Adyar
- 4. VLSI Lab 4 To type the code in the vi editor press I, which will get into the insert mode. After writing the code press esc to exit from the insert mode o To save the file type :w o To exit the editor type :q! o Or to save and exit type :wq To exit from the current directory type cd ../in the command line. Enter into the test_bench directory to write the test bench code by typing cd test_bench in command line To write the verilog code open the editor by typing gedit<filename.extension> Eg: getitinverter_test.v To type the code in the vi editor press i, which will get into the insert mode. After writing the code press esc to exit from the insert mode o To save the file type :w Department of Electronics and Communication,SCEM, Adyar
- 5. VLSI Lab 5 o To exit the editor type :q! o Or to save and exit type :wq To exit from the current directory type cd ../in the command line. To simulate the program enter into the simulation directory by typing cd simulation in command line To verify and run the verilog code in the cadence tool type irun<path of verilog code><path of test bench code> -access +rwc-mess–gui eg: iruninv.vinv_test –access +rwc –mess -gui Department of Electronics and Communication,SCEM, Adyar
- 6. VLSI Lab 6 Now the tool will verify the codes one by one and open a simulation window if there is no error. Here you can check your respective waveforms. Department of Electronics and Communication,SCEM, Adyar
- 7. 7 VLSI Lab Now press the play button to get the waveform. Department of Electronics and Communication,SCEM, Adyar
- 8. 8 VLSI Lab PROGRAMS 1. Write a Verilog code and Test bench for an inverter, observe the waveform and synthesise the code with technological library with given constraints. Do the initial timing verification with gate level simulation. Verilog Program module inverter(out,in); output out; input in; supply1 pwr; supply0 gnd; pmos (out,pwr,in); nmos (out,gnd,in); end module Verilog Test bench module inverter_test; wire out; reg in; inveter i1(out,in); task display; begin $display("time=%0d",$time,"ns", "input=",in,"output=",out); end endtask initial begin in=1'b0; #10;display; in=1'b1; #10;display; in=1'bx; #10;display; in=1'bz; #10;display; end endmodule WAVEFORMS: RESULT: Source description is compiled, test bench is simulated and waveform is verified for the design mentioned above. Department of Electronics and Communication,SCEM, Adyar
- 9. 9 VLSI Lab 2. Write Verilog code and Test bench for a buffer, observe the waveform and synthesise the code with technological library with given constraints. Do the initial timing verification with gate level simulation. Verilog Program module buffer(y,a); output y; input a; wire out; supply1 pwr ; supply0 gnd; pmos (out,pwr,a); nmos (out,gnd,a); pmos (y,pwr,out); nmos (y,gnd,out); endmodule Verilog Testbench module buf_test; wire out; reg in; buffer b1(out,in); task display; begin $display("time=%0d",$time,"ns", "input=",in,"output=",out); end endtask initial begin in=1'b0;#10;display; in=1'b1;#10;display; in=1'bx;#10;display; in=1'bz;#10;display; end endmodule WAVEFORMS: RESULT:Source description is compiled, test bench is simulated and waveform is verified for the design mentioned above. Department of Electronics and Communication,SCEM, Adyar
- 10. 10 VLSI Lab 3. Write Verilog code and test bench for a Transmission Gate, observe the waveform and synthesise the code with technological library with given constraints. Do the initial timing verification with gate level simulation. Verilog Program module trangate(out,in,cntrl1,cntrl2); output out; input in; input cntrl1,cntrl2; pmos(out,in,cntrl1); nmos(out,in,cntrl2); endmodule Verilog Testbench module trangate_test; wire out; reg in; reg cntrl1,cntrl2; trangate t1(out,in,cntrl1,cntrl2); task display; begin $display("time=%0d",$time,"ns", "input=",in,"output=",out," control1=",cntrl1,"control2=",cntrl2 ); end endtask initial begin in=1'b0;cntrl1=1'b0;cntrl2=1'b1;#10;display; in=1'b0;cntrl1=1'b1;cntrl2=1'b0;#10;display; in=1'b1;cntrl1=1'b0;cntrl2=1'b1;#10;display; in=1'b1;cntrl1=1'b1;cntrl2=1'b0;#10;display; end endmodule WAVEFORMS: RESULT:Source description is compiled, test bench is simulated and waveform is verified for the design mentioned above. Department of Electronics and Communication,SCEM, Adyar
- 11. 11 VLSI Lab 4. Write Verilog code and test bench for a Basic/Universal gates, observe the waveform and synthesise the code with technological library with given constraints. Do the initial timing verification with gate level simulation? I. AND Verilog Program module andgate(in1,in2,out); output out; input in1,in2; supply1 pwr; supply0 gnd; wire contact; wire nout; pmos(nout,pwr,in1); pmos(nout,pwr,in2); nmos(nout,contact,in1); nmos(contact,pgnd,in2); pmos(out,pwr,nout); nmos(out,gnd,nout); endmodule Verilog Testbench module and_test; wire out; reg in1,in2; andgate a1(in1,in2,out); task display; begin $display("time=%0d",$time,"ns", "input1=",in1,"input2=",in2,"output=",out); end endtask initial begin in1=1'b0; in2=1'b0;#10;display; in1=1'b0; in2=1'b1;#10;display; in1=1'b1; in2=1'b0;#10;display; in1=1'b1; in2=1'b1;#10;display; end endmodule WAVEFORMS: RESULT:Source description is compiled, test bench is simulated and waveform is verified for the design mentioned above. Department of Electronics and Communication,SCEM, Adyar
- 12. 12 VLSI Lab II. NAND Verilog Program module nandgate(out,A,B); output out; input A,B; supply1 pwr; supply0 gnd; wire y; pmos(out,pwr,A); nmos(out,y,A); pmos(out,pwr,B); nmos(y,gnd,B); endmodule Verilog Testbench module nandgate_test; wire out; reg A,B; nandgate a1(out,A, B); task display; begin $display("time=%0d",$time,"ns", "input1=",A,"input2=",B,"output=",out); end endtask initial begin A=1'b0;B=1'b0;#10;display; A=1'b0;B=1'b1;#10;display; A=1'b1;B=1'b0;#10;display; A=1'b1;B=1'b1;#10;display; end endmodule WAVEFORM: RESULT:Source description is compiled, test bench is simulated and waveform is verified for the design mentioned above. Department of Electronics and Communication,SCEM, Adyar
- 13. 13 VLSI Lab III. OR Verilog Program module orgate(out,A,B); output out; input A,B; supply1 pwr; supply0 gnd; wire y; wire contact; pmos(contact,pwr,A); pmos(y,contact,B); nmos(y,gnd,A); nmos(y,gnd,B); pmos(out,pwr,y); nmos(out,gnd,y); endmodule Verilog Testbench module orgate_test; wire out; reg A,B; orgate a1(out,A,B); task display; begin $display("time=%0d",$time,"ns","input1=",A, "input2=",B,"output=",out); end endtask initial begin A=1'b0;B=1'b0;#10;display; A=1'b0;B=1'b1;#10;display; A=1'b1;B=1'b0;#10;display; A=1'b1;B=1'b1;#10;display; end endmodule WAVEFORM: RESULT:Source description is compiled, test bench is simulated and waveform is verified for the design mentioned above. Department of Electronics and Communication,SCEM, Adyar
- 14. 14 VLSI Lab IV. NOR Verilog Program module norgate(out,A,B); output out; input A,B; supply1 pwr; supply0 gnd; wire y; pmos(y,pwr,A); pmos(out,y,B); nmos(out,gnd,A); nmos(out,gnd,B); endmodule Verilog Testbench module norgate_test; wire out; reg A,B; norgate a1(out,A,B); task display; begin $display("time=%0d",$time,"ns", "input1=",A,"input2=",B,"output=",out); end endtask initial begin A=1'b0;B=1'b0;#10;display; A=1'b0;B=1'b1;#10;display; A=1'b1;B=1'b0;#10;display; A=1'b1;B=1'b1;#10;display; end endmodule WAVEFORM: RESULT:Source description is compiled, test bench is simulated and waveform is verified for the design mentioned above. Department of Electronics and Communication,SCEM, Adyar
- 15. 15 VLSI Lab V. XOR Verilog Program module xnorgate(out,a,b); output out; input a,b; wire abar,bbar; wire p,q,r,s; supply1 pwr; supply0 gnd; assign abar=~a; assign bbar=~b; pmos(p,pwr,a); nmos(s,r,a); pmos(s,p,bbar); nmos(s,r,bbar); pmos(q,pwr,abar); nmos(r,gnd,abar); pmos(s,q,b); nmos(r,gnd,b); pmos(out,pwr,s); nmos(out,gnd,s); endmodule Verilog Testbench module xor1_test; wire out; rega,b; xorgate a1(out,a,b); task display; begin $display("time=%0d",$time,"ns", "a=",a,"b=",b,"output=",out); end endtask initial begin a=1'b0;b=1'b0;#10;display; a=1'b0;b=1'b1;#10;display; a=1'b1;b=1'b0;#10;display; a=1'b1;b=1'b1;#10;display; end endmodule WAVEFORM: RESULT:Source description is compiled, test bench is simulated and waveform is verified for the design mentioned above. Department of Electronics and Communication,SCEM, Adyar
- 16. 16 VLSI Lab VI. XNOR Verilog Program module xorgate(out,a,b); output out; input a,b; wire abar,bbar; wire p,q,r; supply1 pwr; supply0 gnd; assign abar=~a; assign bbar=~b; pmos(p,pwr,a); nmos(out,r,a); pmos(out,p,bbar); nmos(out,r,bbar); pmos(q,pwr,abar); nmos(r,gnd,abar); pmos(out,q,b); nmos(r,gnd,b); endmodule Verilog Testbench module xnor1_test; wire out; rega,b; xnorgate a1(out,a,b); task display; begin $display("time=%0d",$time,"ns","a=",a, "b=",b,"output=",out); end endtask initial begin a=1'b0;b=1'b0;#10;display; a=1'b0;b=1'b1;#10;display; a=1'b1;b=1'b0;#10;display; a=1'b1;b=1'b1;#10;display; end endmodule WAVEFORM : RESULT: Source description is compiled, test bench is simulated and waveform is verified for the design mentioned above. Department of Electronics and Communication,SCEM, Adyar
- 17. 17 VLSI Lab 5. Write Verilog code and test bench for an SR flip-flop, observe the waveform and synthesise the code with technological library with given constraints. Do the initial timing verification with gate level simulation. Verilog Program module sr_ff(q,q_bar,clk,s,r); output q,q_bar; input clk,s,r; regtq; always @(clk or tq) begin if (s==1'b0 && r==1'b0) tq<=tq; else if (s==1'b0 && r==1'b1) tq<=1'b0; else if (s==1'b1 && r==1'b0) tq<=1'b1; else if (s==1'b1 && r==1'b1) tq<=1’bx; end begin q<=tq; q_bar<=~tq; end endmodule Verilog Testbench module sr_ff_test; regclk,s,r; wire q,q_bar; wire clk2,s2,r2; ms_jkffinst(q,q_bar,clk,s,r); assign s2=s; assign r2=r; assign clk2=clk; initial clk=1'b0; always #10 clk=~clk; initial begin s=1'b0;r=1'b0; #30 s=1'b0; r=1'b1; #9s=1'b0; s=1'b0; #10 s=1'b1; s=1'b1; #40 r=1'b1; r=1'b0; #5 s=1'b0; r=1’b0; #200 r=1'b1; #10; end always #5 $display($time,"clk=%b j=%b k=%b",clk,s,r); initial #500 $finish; Specify $setup(s2,posedge clk2,2); $setup(r2,posedge clk2,2); $hold(posedge clk2,s2,2); $hold(posedge clk2,r2,2); endspecify endmodule Department of Electronics and Communication,SCEM, Adyar
- 18. VLSI Lab 18 WAVEFORMS: RESULT:Source description is compiled, test bench is simulated and waveform is verified for the design mentioned above. Department of Electronics and Communication,SCEM, Adyar
- 19. 19 VLSI Lab 6. Write Verilog code and test bench for a D flip-flop, observe the waveform and synthesise the code with technological library with given constraints. Do the initial timing verification with gate level simulation. Verilog Program module d_ff(q,clk,rst,din); output q; input clk,din,rst; reg q; always@(posedgeclk or negedgerst) begin if(!rst) q<=1'b0; else q<=din; end endmodule Verilog Testbench module d_ff_test; regclk,din,rst; wire q,d1,clk1; d_ff df1(q,clk,rst,din); assign d1=din; assign clk1=clk; initial clk=1'b0; always #10 clk=~clk; initial begin din=1'b0; rst=1'b1; #20 rst=1'b0; #10 din=1'b1; #20 rst=1'b1; #18 din=1'b1; #20 din=1'b0; #10; end always #5 $display($time,"clk=%b din=%b q=%b",clk,din,q); initial #100 $finish; specify $setup(d1,posedge clk1,2); $hold(posedge clk1,d1,2); $width(negedge d1,2); endspecify endmodule Department of Electronics and Communication,SCEM, Adyar
- 20. VLSI Lab 20 WAVEFORMS: RESULT:Source description is compiled, test bench is simulated and waveform is verified for the design mentioned above. Department of Electronics and Communication,SCEM, Adyar
- 21. 21 VLSI Lab 7. Write Verilog code and test bench for a JK flip-flop, observe the waveform and synthesise the code with technological library with given constraints. Do the initial timing verification with gate level simulation. Verilog Program module jk_ff(q,qbar,clk,rst,j,k); input clk,rst,j,k; output q,qbar; regq,tq; always @(posedgeclk or negedgerst) begin if(!rst) begin q<=1'b0; tq<=1'b0; end else begin if(j==1'b1 && k==1'b0) q<=j; else if (j==1'b0 &&k==1'b1) q<=1'b0; else if(j==1'b1 &&k==1'b1) begin tq<=~tq; q<=tq; end end end assign qbar=~q; endmodule Verilog Testbench module jk_ff_test; regclk,rst,j,k; wire q,qbar; wire clk1,j1,k1; jk_ffinst(q,qbar,clk,rst,j,k); assign clk1=clk; assign j1=j; assign k1=k; initial clk=1'b0; always #10 clk=~clk; initial begin j=1'b0;k=1'b0;rst=1'b0; #30 rst=1'b1; #60j=1'b0;k=1'b1; #29 j=1'b1;k=1'b0; #1 j=1'b0;k=1'b1; #20 j=1'b1;k=1'b1; #40j=1'b1;k=1'b0; #5j=1'b0;#20j=1'b1; #50 rst=1'b0; #10; end always #5 $display($time,"clk=%b j=%b k=%b",clk,j,k); initial #300 $finish; specify $setup(j1,posedge clk1,2); $setup(k1,posedge clk1,2); $hold(posedge clk1,j1,2); $hold(posedge clk1,k1,2); endspecify endmodule Department of Electronics and Communication,SCEM, Adyar
- 22. VLSI Lab 22 WAVEFORMS: RESULT:Source description is compiled, test bench is simulated and waveform is verified for all the designs mentioned above. Department of Electronics and Communication,SCEM, Adyar
- 23. 23 VLSI Lab 8. Write Verilog code and test bench for an MS-JK flip-flop, observe the waveform and synthesise the code with technological library with given constraints. Do the initial timing verification with gate level simulation? Verilog Program module ms_jkff(q,qbar,clk,j,k); output q,qbar; input clk,j,k; regtq,q,qbar; always@(clk) begin if(!clk) begin if(j==1'b0 && k==1'b1) tq<=1'b0; else if(j==1'b1 && k==1'b0) tq<=1'b1; else if(j==1'b1 && k==1'b1) tq<=~tq; end if(clk) begin q<=tq; qbar<=~tq; end end endmodule Verilog Testbench module tb_ms_jkff; regclk,j,k; wire q,qbar; wire clk2,j2,k2; ms_jkffinst(q,qbar,clk,j,k); assign j2=j; assign k2=k; initial clk=1'b0; always #10 clk=~clk; initial begin j=1'b0; k=1'b0; #50 j=1'b0; k=1'b1; #40 j=1'b1; k=1'b0; #20 j=1'b1;k=1'b1; #40 j=1'b1; k=1'b0; #5 j=1'b0; #20 j=1'b1; #10; end always #5 $display($time,"clk=%b j=%b k=%b",clk,j,k); initial #200 $finish; specify $setup(j2,posedge clk2,2); $setup(k2,posedge clk2,2); $hold(posedge clk2,j2,2); $hold(posedge clk2,k2,2); endspecify endmodule Department of Electronics and Communication,SCEM, Adyar
- 24. VLSI Lab 24 WAVEFORMS: RESULT:Source description is compiled, test bench is simulated and waveform is verified for all the designs mentioned above. Department of Electronics and Communication,SCEM, Adyar
- 25. 25 VLSI Lab 9. Write Verilog code and test bench for a T flip-flop, observe the waveform and synthesise the code with technological library with given constraints. Do the initial timing verification with gate level simulation? Verilog Program module t_ff(q,qbar,clk,rst,tin); input tin,clk,rst; output q,qbar; regtq; always @(posedgeclk or negedgerst) begin if(!rst) tq=1'b0; else begin if(tin) tq<=~tq; end end assign q=tq; assign qbar=~q; endmodule Verilog Testbench module t_ff_test; regclk,tin,rst; wire q,qbar; t_ff t1(q,qbar,clk,tin,rst); initial clk=1'b0; always #10clk=~clk; initial begin rst=1'b0;tin=1'b0; #30 rst=1'b1; #10 tin=1'b1; #205 tin=1'b0; #300 tin=1'b1; #175 tin=1'b0; #280 rst=1'b0; #20 rst=1'b1; #280 tin=1'b1; #10; end initial #2000 $finish; endmodule WAVEFORMS: RESULT:Source description is compiled, test bench is simulated and waveform is verified for a design mentioned above. Department of Electronics and Communication,SCEM, Adyar
- 26. 26 VLSI Lab 10. Write Verilog code and test bench for a Synchronous 4-bit counter, observe the waveform and synthesise the code with technological library with given constraints. Do the initial timing verification with gate level simulation. Verilog Program module counter_behav(count,reset,clk); input wire reset,clk; output reg [3:0] count; always @(posedgeclk) if(reset) count<=4'b0000; else count<=count+4'b0001; endmodule Verilog Testbench module mycounter_test; wire [3:0]count; regreset,clk; initial clk=1'b0; always #5 clk=~clk; counter_behav m1(count,reset,clk); initial begin reset=1'b0; #15 reset=1'b1; #30 reset=1'b0; #300 $finish; end initial $monitor($time,"output count=%d",count); endmodule WAVEFORMS: RESULT:Source description is compiled, test bench is simulated and waveform is verified for the design mentioned above. Department of Electronics and Communication,SCEM, Adyar
- 27. 27 VLSI Lab 11. Write Verilog code and test bench for a 4 bit Carry Adder, observe the waveform and synthesise the code with technological library with given constraints. Do the initial timing verification with gate level simulation. Verilog Program module fulladd(carryin,x,y,s,carryout); input carryin,x,y; output s,carryout; assign s=x^y^carryin; assign carryout=(x & y)|(x &carryin)|(y &carryin); endmodule module adder4(carryin,x,y,sum,carryout); input carryin; input[3:0] x,y; output[3:0]sum; output carryout; wire c1,c2,c3; fulladd stage0 (carryin,x[0],y[0],sum[0],c1); fulladd stage1 (c1,x[1],y[1],sum[1],c2); fulladd stage2 (c2,x[2],y[2],sum[2],c3); fulladd stage3 (c3,x[3],y[3],sum[3],carryout); endmodule Verilog Testbench module adder4_test; reg[3:0]x,y; regcarryin; wire[3:0] sum; wire carryout; adder4 a1(carryin,x,y,sum,carryout); initial begin #5$display($time,"SUM=%d",sum); x=4'b0001;y=4'b0010;carryin=1'b0; #20x=4'b0111;y=4'b1010; #40x=4'b1011;y=4'b0110; #40x=4'b1001;y=4'b0101; #50 $finish; end endmodule WAVEFORMS: RESULT:Source description is compiled, test bench is simulated and waveform is verified for the design mentioned above. Department of Electronics and Communication,SCEM, Adyar
- 28. 28 VLSI Lab 12. Write Verilog code and test bench for anAsynchronous 4-bit counter, observe the waveform and synthesise the code with technological library with given constraints. Do the initial timing verification with gate level simulation? Verilog Program module ripple_counter(clock,toggle,reset,count); input clock,toggle,reset; output [3:0] count; reg [3:0] count; wire c0,c1,c2; assign c0 = count[0],c1 = count[1],c2 = count[2]; always @ (posedge reset or posedge clock) if (reset==1'b1) count[0]<=1'b0; else if(toggle == 1'b1) count[0] <= ~count[0]; always @ (posedge reset or negedge c0) if (reset == 1'b1) count[1] <= 1'b0; else if(toggle == 1'b1) count[1] <= ~count[1]; always @ (posedge reset or negedge c1) if (reset == 1'b1) count[2] <= 1'b0; else if(toggle == 1'b1) count[2] <= ~count[2]; always @ (posedge reset or negedge c2) if(reset == 1'b1)count[3] <= 1'b0; else if(toggle == 1'b1) count[3] <=~ count[3]; endmodule Verilog Testbench module ripple_counter_test; regclock,toggle,reset; wire[3:0] count; ripple_counter r1(clock,toggle,reset,count); initial clock=1'b0; always #5 clock=~clock; initial begin reset=1'b0;toggle=1'b0; #10 reset=1'b1; toggle=1'b1; #10 reset=1'b0; #190 reset=1'b1; #20 reset=1'b0; #100 reset=1'b1; #40 reset=1'b0; #250 $finish; end initial $monitor($time,"output q=%d",count); endmodule Department of Electronics and Communication,SCEM, Adyar
- 29. VLSI Lab 29 WAVEFORMS: RESULT:Source description is compiled, test bench is simulated and waveform is verified for the design mentioned above. Department of Electronics and Communication,SCEM, Adyar
- 30. 30 VLSI Lab ANALOG DESIGN ANALOG DESIGN FLOW: Commands STEPS FOR THE ANALOG LAB Creating The Library Go to cd VLSI_LAB/cadence_analog_lab. Go to csh mode. Source the tool source ~/cshrc.main. Type `virtuoso &’ and press enter, it will open a virtuoso tool. Go to the tool tab and select Library manager. Department of Electronics and Communication,SCEM, Adyar
- 31. VLSI Lab Create a new library by going to the link File →New→ Library. Give the library name as SCEM, and click ok. Select attach to anexisting technology library and click ok. Select gpdk180 and click ok Department of Electronics and Communication,SCEM, Adyar 31
- 32. VLSI Lab SCHEMATIC AND SYMBOL CREATION In the library manager select scem library In Library manager select File →New→ Cell view. Give the cell name as inverter. Virtuoso Schematic Editor will open. Select create → instance, and select the required components (pmos&nmos symbols) Select create → pins, and place the ports (vin, vdd, gnd, vout) on the editor. Department of Electronics and Communication,SCEM, Adyar 32
- 33. 33 VLSI Lab Make the complete connection by using wires by selecting create → wire (narrow). After complete of the schematic, save the file by file → check & save SYMBOLE To create symbol Create → Cell view →From cell view. Department of Electronics and Communication,SCEM, Adyar .
- 34. VLSI Lab 34 Virtuoso symbol editor opens. Create shape of the cell using option in Create → Shapes. Make a boundary by Create → Selection box. And click automatic. BUILDING THE TEST DESIGN FOR THE CELL In the library manager select scem library In Library manager select File →New→ Cell view. Give the cell name as inverter_test. Virtuoso Schematic Editor will open. Select create → instance, and select the design to test (inverter from cmrit library). To apply inputs, create → instance. In the library select analogLib and select appropriate inputs (vpulse, vdc, gnd). For vpulse V1 = 0v, V2 = 1.8v, period = 20n, pulse width = 10n, rise time = fall time = 1n. For vdc, dc voltage = 1.8v Department of Electronics and Communication,SCEM, Adyar
- 35. VLSI Lab 35 Put an output pin. Connect the circuit completely using wires, and check & save STEP TO SIMULATE In the Virtuoso Schematic Editor after completing the test circuit design, launch→ADE L. Virtuoso Analog Design Environment window opens. GotoAnalyses → choose, select tran for transient analysis ( stop time = 200n, accuracy default → moderate) and apply, now select dc for DC analysis ( select → save dc operating point, component parameter and double click select component and select input source ‘vpulse’ in schematic editor, and dc, sweep range is 0 to 1.8v). Department of Electronics and Communication,SCEM, Adyar
- 36. VLSI Lab Department of Electronics and Communication,SCEM, Adyar 36
- 37. VLSI Lab Gotooutputs → to be plotted → select on schematic( input and output wires). Gotosimulation →netlist and run. Department of Electronics and Communication,SCEM, Adyar 37
- 38. 38 VLSI Lab STEPS FOR LAYOUT 1. Open the Library Manager in Virtuoso, select SCEM and double click inverter, then gotoFile New Cellview. 2. In the Schematic Editor Window, Go to Launch Layout XL. 3. In the Layout Window Go to Connectivity Generate All from source. 4. Select the PR boundary and delete it. 5. In the layout window Press CNTRL A to select all components. 6. After that go to Connectivity Nets show/hide Incomplete.nets. 7. In the layout window press shift F to view the layers for the transistor. 8. Move each component to the I quadrant and place Vdd, Vss, Vin, Vout in the appropriate position. 9. To draw the rectangle of layers for ex:-Metal1, Choose Metal1 dra in LSW(Layout Selection Window) & press R or (create shape rectangle) & give the connections to Vdd, Vout, Vss. 10. To connect the input Vin to Gate(Polysilicon) place M1 (Poly1) contact from create via M1-poly1. 11. Place the substrate contacts Vdd&Vssi.e, M1 n-well for Vdd&M1 P-sub for Vss. 12. Draw the n-well layer to cover the Vdd&pmos transistor. 13. Check and save the layout. Department of Electronics and Communication,SCEM, Adyar
- 39. 39 VLSI Lab 14. In the same window gotoASSURArun DRC. 15. GotoASSURA run LVS click OK. 16. In LVS debug Window, check for errors in summary and rectify if required. 17. After layout and schematic matches, go to ASSURA Run RCX click ok. 18. Av_extracted (in view) is created in your library. 19. Open then av_extracted view and press shift F& verify the resistance and capacitance value. Physical Verification Assura DRC Running a DRC 1. Open the Differential_Amplifier layout form the CIW or library manger if you have closed that.Pressshift – fin the layout window to display all the levels. 2. Select Assura - Run DRCfrom layout window. The DRC form appears. The Library and Cellname are taken from the current design window, but rule file may be missing. Select the Technology as gpdk180. This automatically loads the rule file. Department of Electronics and Communication,SCEM, Adyar
- 40. VLSI Lab 40 3. Click OKto start DRC. 4. A Progress form will appears. You can click on the watch log file to see the log file. 5. When DRC finishes, a dialog box appears asking you if you want to view your DRC results, and then click Yesto view the results of this run. 6. If there any DRC error exists in the design View Layer Window (VLW) and Error Layer Window (ELW) appears. Also the errors highlight in the design itself. 7. Click View – Summaryin the ELW to find the details of errors. 8. You can refer to rule file also for more information, correct all the DRC errors and Re – run the DRC. 9. If there are no errors in the layout then a dialog box appears with No DRC errors found written in it, click on close to terminate the DRC run. ASSURA LVS In this section we will perform the LVS check that will compare the schematic netlist and the layout netlist. Running LVS 1. Select Assura – Run LVS from the layout window. The Assura Run LVS form appears. The layout name is already in the form. Assura fills in the layout name from the cellview in the layout window. 2. Verify the following in the Run Assura LVS form. Department of Electronics and Communication,SCEM, Adyar
- 41. VLSI Lab 41 3. The LVS begins and a Progress form appears. 4. If the schematic and layout matches completely, you will get the form displaying Schematic and Layout Match. 5. If the schematic and layout do not matches, a form informs that the LVS completed successfully and asks if you want to see the results of this run. Department of Electronics and Communication,SCEM, Adyar
- 42. VLSI Lab 6. Click Yesin the form.LVS debug form appears, and you are directed into LVS debug environment. 7. In the LVS debug form you can find the details of mismatches and you need to correct all those mismatches and Re – run the LVS till you will be able to match the schematic with layout. Department of Electronics and Communication,SCEM, Adyar 42
- 43. 43 VLSI Lab INVERTER 1.Design an Inverter with given specifications, completing the design flow mentioned below: a. Draw the schematic and verify the following iii. DC Analysis iv. Transient Analysis b. Draw the Layout and verify the DRC, ERC c. Check for LVS d. Extract RC and back annotate the same and verify the Design e. Verify & Optimise for Time, Power and Area to the given constraint. SPECIFICATIONS: Library Name Gpdk180 Gpdk180 Cell Name Pmos Nmos Pin Name Vin Vout Vdd, Vss Properties Model name=pmos1; w=2u; l=180n Model name=nmos1; w=2u; l=180n Direction Input Output Input Library Name SCEM Analoglib Cell Name Inverter Vpulse Analoglib Vdd, gnd SCHEMATIC: Department of Electronics and Communication,SCEM, Adyar Properties Symbol Define pulse specification as Voltage1 = 0,Voltage2 =1.8v, pulse width=10ns, rise &fall time= 1ns. Vdd(Vdc)=1.8v,
- 44. VLSI Lab TEST SCHEMATIC: LAYOUT: Department of Electronics and Communication,SCEM, Adyar 44
- 45. VLSI Lab WAVEFORM: Department of Electronics and Communication,SCEM, Adyar 45
- 46. 46 VLSI Lab 2.Design the following circuits with given specifications, completing the design flow mentioned below: a. Draw the schematic and verify the following iii. DC Analysis iv. Transient Analysis b. Draw the Layout and verify the DRC, ERC c. Check for LVS d. Extract RC and back annotate the same and verify the Design iii. A Single Stage differential amplifier iv. Common source and Common Drain amplifier I. DIFFERENTIAL AMPLIFIER SPECIFICATIONS: Library Name Gpdk180 Gpdk180 Cell Name Pmos Nmos Pin Name Idc, V1,V2 Vout Vdd, Vss Properties Model name=pmo,pm1; w=15u; l=1u Model name=nmo,nm1; w=3u; l=1u Model name=nm2,nm3; w=4.5u; l=1u Direction Input Output Input Library Name SCEM Analoglib Cell Name Diff_amplifier Vsin Analoglib Vdd, Vss Analoglib Idc Department of Electronics and Communication,SCEM, Adyar Properties Symbol Define pulse specification as AC magnitude = 1; Amplitude = 5m; Frequency = 1k Vdd(Vdc)=2.5v, Vss=(Vdc)=-2.5v DC current = 30u
- 47. VLSI Lab SCHEMATIC: TEST SCHEMATIC: Department of Electronics and Communication,SCEM, Adyar 47
- 48. VLSI Lab LAYOUT: WAVEFORM: Department of Electronics and Communication,SCEM, Adyar 48
- 49. 49 VLSI Lab II. COMMON SOURCE AMPLIFIER SPECIFICATIONS: Library Name Gpdk180 Gpdk180 Cell Name Pmos Nmos Pin Name Vin, Vbias Vout Vdd, Vss Properties Model name=pmos1; w=50u; l=1u Model name=nmos1; w=10u; l=1u Direction Input Output Input Library Name SCEM Analoglib Cell Name cs_amplifier Vsin Analoglib Vdd, Vss,Vbias SCHEMATIC: Department of Electronics and Communication,SCEM, Adyar Properties Symbol Define pulse specification as AC magnitude = 1; DC voltage=0; Amplitude = 5m; Frequency = 1k Vdd(Vdc)=2.5v, Vss=(Vdc)=2.5
- 50. VLSI Lab TEST SCHEMATIC: LAYOUT: Department of Electronics and Communication,SCEM, Adyar 50
- 51. VLSI Lab WAVEFORM: Department of Electronics and Communication,SCEM, Adyar 51
- 52. 52 VLSI Lab III. COMMON DRAIN AMPIFIER SPECIFICATIONS: Library Name Gpdk180 Gpdk180 Cell Name nmos nmos Pin Name Idc, V1,V2 Vout Vdd, Vss Properties Model name=nm0 ; w=50u; l=1u Model name=nm1 ; w=10u; l=1u Direction Input Output Input Library Name SCEM Analoglib Cell Name cd_amplifier Vsin Analoglib Vdd, Vss SCHEMATIC: Department of Electronics and Communication,SCEM, Adyar Properties Symbol Define pulse specification as AC magnitude = 1; DC voltage=0; Amplitude = 5m; Frequency = 1k Vdd(Vdc)=2.5v, Vss=(Vdc)=2.5
- 53. VLSI Lab TEST SCHEMATIC: LAYOUT: Department of Electronics and Communication,SCEM, Adyar 53
- 54. VLSI Lab WAVEFORM: Department of Electronics and Communication,SCEM, Adyar 54
- 55. 55 VLSI Lab 3. Design an op-amp with given specifications, using given differential amplifier Common source and Common Drain amplifier in library and completing the design flow mentioned below: a. Draw the schematic and verify the following iii. DC Analysis iv. Transient Analysis b. Draw the Layout and verify the DRC, ERC c. Check for LVS d. Extract RC and back annotate the same and verify the Design. SPECIFICATIONS: Library Name Gpdk180 Gpdk180 Cell Name Diff_amplifier Cs_amplifier Pin Name Idc, Vin,Vnoninv Vout Vdd, Vss Properties Symbol Symbol Direction Input Output Input Library Name SCEM Analoglib Cell Name op_amplifier Vsin Analoglib Vdd, Vss Analoglib Idc SCHEMATIC: Department of Electronics and Communication,SCEM, Adyar Properties Symbol Define pulse specification as AC magnitude = 1; Amplitude = 5m; Frequency = 1k Vdd(Vdc)=2.5v, Vss=(Vdc)=2.5 DC current = 30u
- 56. VLSI Lab TEST SCHEMATIC: LAYOUT: Department of Electronics and Communication,SCEM, Adyar 56
- 57. VLSI Lab WAVEFORM: Department of Electronics and Communication,SCEM, Adyar 57