This document provides instructions for upgrading ArcSight Express from version 3.0 to 4.0. It describes downloading the upgrade file, verifying the file, and running the upgrade process. Post-upgrade steps include configuring connectors and verifying content. A trial version of Reputation Security Monitor is included in version 4.0.
The upgrade process begins by stopping all services, extracting the upgrade files, and opening required TCP ports. The user then runs the upgrade binary file and confirms the upgrade. The upgrade performs pre-checks and upgrades components in the following order - Logger, Manager, Web, and Services. Finally, post-upgrade tasks include upgrading connectors and checking customized content. Any issues encountered should be addressed by reviewing upgrade logs and contacting HP support.
This document provides instructions for upgrading the ArcSight database components from version 5.0 SP1 or SP2 to version 5.2. It describes preparing the Oracle database software, verifying the readiness of the existing database, and running the database installer to upgrade the database schema and partition archiver service. Post-upgrade steps include transferring partition archiver settings and completing additional tasks on AIX platforms.
Upgrading from ESM 5.0 SP2 or 5.2 to ESM 5.5Protect724
This document provides instructions for upgrading the ArcSight database components from version 5.0 SP2 or 5.2 to version 5.5. It includes steps for upgrading the Oracle software to version 11.2.0.3, preparing the ArcSight database, and upgrading the database software and partition archiver. It also describes how to transfer partition archiver settings during the upgrade process.
This document provides instructions for upgrading HP ArcSight ESM, ArcSight Express, or ESM Express to version 6.9.1c. It includes prerequisites like verifying proper operation, preparing resources for backup, validating resources, and opening a support ticket. The upgrade process involves running the upgrade utilities package and confirming the upgrade succeeded. Post-upgrade tasks include restoring backups and verifying configurations. Instructions are also provided for upgrading the ArcSight console and connectors.
This document provides release notes for HPE Security ArcSight ESM version 6.8c Patch 4. It includes instructions for installing the patch for the ESM main components and ArcSight Console. Issues fixed in this patch include critical issues in ESM 6.8c as well as security and language updates. Documentation changes and workarounds for certain issues are also described.
The document provides instructions for upgrading ESM from version 6.5c to 6.5c SP1. It discusses supported upgrade paths, important log files to reference in case of issues, planning steps like verifying the current ESM installation and opening a support ticket. The main steps include stopping services, running the upgrade installer, and post-upgrade tasks like upgrading connectors and checking existing content.
This document provides an installation and configuration guide for HP ArcSight ESM version 6.8c. It describes the ESM components, including the ArcSight Manager, CORR-Engine, ArcSight Command Center, ArcSight Console, and SmartConnectors. It covers installing and configuring ESM, installing the ArcSight Console, and includes appendices on troubleshooting, customizing ESM, and using public key cryptography.
Installing Cognos 10: Tips and Tricks from the Trenches – Questions & Answers Senturus
Senturus experts answer nearly 100 questions raised by participants during the Installing Cognos 10: Tips and Tricks from the Trenches webinar. View the video recording and download this deck: http://www.senturus.com/resources/installing-cognos-10-2-1-tips-tricks-trenches/.
Topics include:
• Commonly encountered installation issues and how-to advice on streamlining a Cognos 10 upgrade
• Cognos 10 BI server core components
• Cognos 10 search index required post-install
• Navigating the maze of 32-bit and 64-bit
Senturus, a business analytics consulting firm, has a resource library with hundreds of free recorded webinars, trainings, demos and unbiased product reviews. Take a look and share them with your colleagues and friends: http://www.senturus.com/resources/.
The document provides instructions for deploying Requirements Quality Analyzer (RQA), a server/client application that relies on DOORS to store and manage requirements. It describes installing the RQA server, which requires a supported database management system like SQL Server, as well as the RQA client. The server is configured to connect to the DOORS database and manage quality tasks, while clients allow accessing these tasks from different workstations.
The document provides instructions for migrating ESM resources from Oracle databases used in ESM 5.0 SP2, ESM 5.2, or earlier versions to the CORR-Engine database used in ESM 6.0c. It describes running a migration tool that transfers schema and data from the Oracle database to CORR-Engine. Several requirements and limitations of the migration process are outlined, such as event data not being migrated and domain fields having limited functionality after migration.
This document provides instructions for installing and configuring the TeamLab portal on a local server or intranet. It describes compiling the source code, system requirements, deploying the portal in the default configuration using an embedded web server and SQLite database, configuring the portal as a Windows service, and basic portal configuration steps. It also provides warnings and additional steps for deploying the portal on the internet using IIS and migrating from SQLite to MySQL.
The Apache HTTP Server is open source web server software that played a key role in the early growth of the World Wide Web. It became a viable alternative to other web servers and is now one of the most widely used, running on Unix-like operating systems. Apache is developed by an open community under the Apache Software Foundation and is available for many platforms.
Establishing Environment Best Practices T12 Brendan LawFlamer
This document provides guidance on establishing environmental best practices for SharePoint, including:
1. Setting up appropriate Active Directory structures and service accounts.
2. Configuring dedicated SQL servers or instances with sufficient resources for databases.
3. Partitioning Windows and SQL servers appropriately and keeping systems patched.
4. Planning database and farm topologies suited to requirements like internal use, extranets, or publishing to consider performance, availability, and disaster recovery.
IBM released the newest version of their flagship business intelligence software, IBM Cognos Analytics, at the end of 2015. The redesigned Cognos BI has since gotten a lot of buzz, but not all press has been good press. Rumored upgrade challenges have left many current Cognos customers skeptical of the benefits to upgrading to the latest software. In this webinar, Norm Goddard put these rumors to the test by identifying key differences and demonstrating live upgrade examples. Learn about installation and configuration differences between Cognos BI v10 and Cognos Analytics and discover some of the benefits or challenges that will affect your upgrade decisions.
ESM High Availability Module User's Guide v6.9.1Protect724tk
The document discusses requirements for setting up an HP ArcSight ESM High Availability cluster using the ESM High Availability Module. It describes needing two identical systems connected by an Ethernet cable that meet ESM hardware requirements. The systems each need individual host IP addresses and a shared Service IP address is used to identify the cluster. Software installation and initial disk synchronization takes place on the primary system only, while selected disk writes are mirrored to the secondary for failover capabilities.
The document discusses preparing for and performing an upgrade from Microsoft SharePoint Portal Server 2003 or Windows SharePoint Services 2.0 to Microsoft Office SharePoint Server 2007. It covers running prescan to identify issues, various upgrade methods like in-place, gradual, and content database migration. Post-upgrade considerations include customizations and configurations that need to be reapplied. Tools from partners can help with tasks like migrating customizations.
Install and config steps on the server side of Cognos Analytics 11. View the webinar video recording and download this deck: http://www.senturus.com/resources/installing-cognos-analytics-v11/.
Topics covered include: new installation options, new configuration options, gateway, changes to server side file locations, a new fix pack methodology. Our Cognos installation and upgrade expert, Todd Schuman, describes the installation and configuration steps on the server side of CA11. Among the highlights: 1) New installation options, 2) New configuration options, 3) Optional Gateway (not really optional), 4) Changes to server side file locations and 5) New fix pack methodology.
Senturus, a business analytics consulting firm, has a resource library with hundreds of free recorded webinars, trainings, demos and unbiased product reviews. Take a look and share them with your colleagues and friends: http://www.senturus.com/resources/.
Hyper v replication on windows server 2016 step by stepAhmed Abdelwahed
This lab provides basic information about Install and configure Hyper-V 2016 Server role, Install Windows Server 2016 Core VM on Hyper-V, Enable and configure Hyper-V 2016 Replica Server and Replicate Windows Server Core 2016 VM from Hyper-V server to another through Hyper-V
This technical note provides instructions for backing up and restoring the ArcSight Express 4.0 CORR-Engine and data. The backup process involves shutting down services, backing up files, exporting database tables and trends data, and backing up archive data. The restore process involves importing database tables and trends data, restoring files and configuration data, and restoring archive data before restarting services.
Installing and configuring a dhcp on windows server 2016 step by stepAhmed Abdelwahed
This lab provides the required knowledge to install and manage the DHCP on Windows Server 2016:
Contents
Lab Objective.
Install DHCP role.
DHCP Post Installation Configuration.
DHCP Authorization.
Configuring DHCP.
Create and configure new scope.
Test DHCP functionality from Windows Client (Windows 10).
How DHCP client obtain automatic IP address (DORA).
DHCP Scope Options.
Address leases.
DHCP Exclusion.
DHCP Reservation.
DHCP Filter.
Scope and Server options.
DHCP Classes.
Testing DHCP Class.
DHCP Statistics.
DHCP Advanced Options.
Integration with DNS.
Conflict detection.
DHCP Maintenance.
The document outlines the installation steps and notes for IBM Cognos Analytics (Cognos 11). It describes the three installation types - Ready to Run, Expand, and Custom. Ready to Run provides a full pre-configured version for quick setup while Custom allows flexibility to choose components. It also notes post-installation configuration tips like changing the JDBC driver location and data file path.
This document provides release notes for version 6.1 GA of the ArcSight Connector Appliance. Key information includes:
- New features in v6.1 GA such as a FlexConnector development wizard and additional backup/restore options.
- Instructions for upgrading the Connector Appliance to v6.1 GA from v6.0 Patch 2.
- Notes on port changes, supported connector types, and issues resolved in this release.
Ose -monitoring_the_paas_infrastructure_0Tommy Lee
This document describes how to monitor an OpenShift Enterprise infrastructure using Zabbix. It discusses monitoring brokers, nodes, and broker support nodes. Specific items like CPU, memory, and OpenShift-related metrics are monitored. The architecture uses Zabbix to deploy agents, configure templates and items, create triggers and actions, and confirm email notifications. This allows for monitoring of key metrics and alerting on issues for the OpenShift Enterprise environment.
SAP SQL Anywhere High Availability Tutorial for Business ObjectsSitesh Patel
1. The document describes how to implement database mirroring for the CMS and Audit databases in SAP BusinessObjects to achieve high availability. It involves setting up a primary database server, mirror database server, and arbiter database server that will communicate to ensure the databases remain active if the primary fails.
2. The steps include defining the database servers as mirror partners, setting the primary and mirror servers, configuring the arbiter server, backing up the databases to the mirror server, and starting all the database servers. The ODBC connections also need to be changed to point to the logical primary server name.
3. Additional configuration in Sybase Central is described to set up the database servers as Windows services
This document provides an overview of Muhammad Zeshan Afghan's job responsibilities as a System Administrator/DBA. It includes technical services provided, daily tasks, systems monitored, projects completed, port requests, systems patched, and other responsibilities. The document is formatted with headings and bullet points to organize the various areas of work.
Parnassus data recovery manager for oracle database user guide v0.3maclean liu
ParnassusData Recovery Manager (PRM) is an enterprise Oracle database recovery tool, which can extract database datafile from Oracle 9i, 10g, 11g, 12c directly without any SQL execution on database. ParnassusData Recovery Manager was developed by Java, which can be used cross platforms. It can be run without any installation. Download it, and click to run
PRM has full rich GUI for any command. It is not necessary to learn script or master any skill in Oracle data structure. Recovery Wizard is integrated in the tool.
This document provides an installation and configuration guide for TekSIP Route Server version 1.2. It describes the system requirements, installation process, configuration settings and tabs, routing rules, application logging, starting the service, using SQL mode, and number portability application functionality. Troubleshooting tips are also provided.
The document provides instructions for upgrading from ESM version 5.5 to 5.6. It outlines the following high-level steps:
1. Preparing existing content and downloading necessary installation files and scripts.
2. Upgrading the ArcSight database components and Oracle database software.
3. Upgrading the ArcSight Manager, Console, and Web applications.
4. Checking the state of existing content and upgrading SmartConnectors after the upgrade is complete.
It also provides guidance for upgrading hierarchical or multi-manager ESM installations.
The document provides instructions for installing the ArcSight Express 4.0 virtual appliance, which includes downloading the OVA file, deploying it in VMware ESXi, and installing a license file. It is supported on VMware ESXi 5.5 and requires 12 CPU cores, 36GB of RAM, and 1.8TB of available disk space. The operating system is CentOS 6.2 with various security patches applied. Supported browsers for connecting to the appliance are Internet Explorer 9-10 and Firefox 24.
The document provides instructions for upgrading an HP ArcSight ESM installation from version 6.0c or 6.5c SP1 to version 6.8c. It outlines important prerequisites like backing up data and freeing up disk space. The upgrade process involves untarring the installation file, stopping ArcSight services, running the upgrade script, and completing post-upgrade tasks like upgrading connectors and checking existing content. The document provides detailed steps and cautions at each phase of the upgrade process.
ArcSight Express Release Notes Version 3.0 featuring ESM + CORR-EngineProtect724
This document provides release notes for ArcSight Express v3.0, including:
- It features ESM with CORR-Engine for increased performance and more compact data storage.
- It includes ESM 5.1.0.1281.3, CORR-Engine BL1093, and Process Management 1.0-1117.
- Installation and configuration instructions are provided for the ESM Console, Forwarding Connector, and First Boot Wizard.
Release Notes for ArcSight Express v4.0Protect724v2
ArcSight Express 4.0 release notes provide information about new features and enhancements in the latest version, including:
- Improved content organization around key use cases and new content for NetFlow monitoring, Microsoft Windows monitoring, and Cisco monitoring.
- Two pre-configured connectors (Syslog Daemon and Windows Unified Event Log) and the ability to install additional connectors.
- Enhancements to the management console including connector management capabilities and localization support for additional languages.
- Environment updates such as expanded geographical data and vulnerability information.
Migrating ESM Resources From Oracle to CORR-Engine for ESM 6.5c SP1Protect724mouni
The document provides instructions for migrating ESM resources from an Oracle database in ESM 5.5 to the CORR-Engine database in ESM 6.5c SP1. It outlines what is and is not migrated, how to configure exclusions, steps to prepare the source and destination environments, running the migration tool, and troubleshooting post-migration issues.
This document provides release notes for version 6.4 of the ArcSight Connector Appliance. New features in this version include enhanced system health events, allowing local user passwords to never expire, support for FTPS and passive mode FTP, and a warning for exceeding managed connectors. Instructions are provided for upgrading the appliance and software versions from 6.3 to 6.4. Information on licensing, supported browsers, upgrade files, and issues is also included.
Migrating a CX400 model running RHEL 5.5 to ArcSight Management Center requires:
1. Downloading upgrade files and applying a hotfix
2. Uploading all upgrade files segments
3. Configuring the IP and default gateway after migration
4. Restoring the backup configuration after migration is complete
This document provides release notes for ArcSight Express 4.0 Patch 1. The patch addresses critical issues, provides updates for geographical data and vulnerabilities, upgrades dependencies, and adds support for new operating system versions. Instructions are included for verifying files and installing the patch for the main suite, ArcSight Console, and individual components. Issues fixed and known issues remaining in the patch are also summarized.
Backup Navigator install and configuration guideAndrey Karpov
HP Backup Navigator is one of three products that support HP’s Adaptive Backup and Recovery solution. Adaptive Backup and Recovery is an innovative approach to data protection based on the use of operational analytics targeting the day-to-day use of the backup infrastructure. More importantly this approach adds trending capabilities and predictive algorithms enabling IT teams to make decisions about the backup and recovery process before problems surface. As a core component of the Adaptive Backup and Recovery solution, HP Backup Navigator delivers an interactive web-based reporting and analytics tool that correlates related, but often disparate, pools of information presenting the content graphically in the form of customizable dashboards, graphs, charts, summaries, trending views and detailed information concerning the backup performance, capacity utilization and daily operational details.
The release notes summarize new features for HP ArcSight ESM version 6.9.1c, including:
- Enhancements to the ArcSight Command Center including new tool commands and improvements to active channels.
- New features for the ArcSight Console including improved field set editing and active list options.
- Correlation improvements including a new rule resilience feature.
- Additional type conversion functions and enhancements to lists, security use cases, and package imports.
- A new ESM service layer API method and event data transfer tool to export events to HDFS.
- A new zoneUpdate command to automate updating zones from subscription packages.
ArcSight Management Center 2.2 Release Notes.pdfProtect724mouni
ArcSight Management Center 2.2 release notes provide information about new features, requirements, upgrading, and fixed issues for the software. Key points include:
- New features include logger event archive management, data migration support, pre-set breach rules, and improved user interface.
- Minimum system requirements are listed for the ArcMC server and client systems.
- Upgrading is supported from version 2.1 and instructions are provided.
- Fixed issues and open issues are outlined. Support contact information is also included.
The document provides release notes for version 5.6 of ArcSight Interactive Discovery. It includes instructions for extracting the installation zip file, system requirements for running the software, a brief overview of new features, and steps for installing ArcSight Interactive Discovery. A known issue is also mentioned regarding commas and double quotes sometimes not being handled properly when data is exported from ArcSight ESM to CSV files.
The document provides release notes for version 5.6 of ArcSight Interactive Discovery. It includes instructions for extracting the zip archive, system requirements, what's new in this version, how to install ArcSight Interactive Discovery, and notes a known issue with commas and double quotes in CSV data exported from ArcSight ESM potentially causing incorrect display in ArcSight Interactive Discovery.
ESM Asset Model FlexConnector Developer's Guide for ESM 6.8cProtect724v3
The document provides instructions on installing and configuring the Asset Model Import FlexConnector to import asset model data from CSV files into the ArcSight ESM network model. It describes prerequisites, supported platforms, installing the connector, configuring it with CSV file locations and parsers, and setting the model import user. An example CSV format and default parser template are also provided.
This document provides release notes for HPE ArcSight Management Center version 2.5.1. It includes sections on new features, technical requirements, installer files, prerequisites for upgrading, fixed issues, and open issues. Key information includes new RHEL and OpenSSL upgrades to address security vulnerabilities, a bulk license installer tool, and support for upgrading ArcMC and managed nodes from version 2.5 to 2.5.1.
The release notes summarize key information about version 6.2 Patch 1 of the ArcSight Connector Appliance software, including:
- New features that resolve known issues from the previous version
- Instructions for upgrading both local and remotely managed appliances to the latest patch
- Details on preserving the remote management configuration during upgrade
- Information on supported SmartConnectors and any limitations
This document provides release notes for HPE ArcSight Management Center version 2.6. Key information includes:
- What's new in this release, such as Event Broker management, improved node management interface, and license consumption reporting.
- Technical requirements for ArcSight Management Center and managed products.
- Installer file names and locations.
- Instructions for upgrading ArcSight Management Center software and appliances to this version.
- A list of fixed issues in this release.
This document provides instructions for installing and configuring the Asset Model Import FlexConnector in ArcSight ESM. It discusses prerequisites, supported platforms, and the installation process. It also covers configuring the FlexConnector, including running SmartConnectors, setting the model import user, CSV file format and parsing examples, and reloading asset model data. The goal is to enable importing asset model data from files into the ESM network model and keeping the data synchronized.
This document provides instructions for installing and configuring the Asset Model Import FlexConnector in ArcSight ESM. It assumes familiarity with writing FlexConnectors. The FlexConnector imports asset data from CSV files into the ESM network model based on a configured parser. It supports initial import and ongoing detection of updates. The document describes prerequisites, supported platforms, installation steps, configuration options and reloading of asset data.
Similar to Upgrading ArcSight Express 3.0 to ArcSight Express 4.0 (20)
ArcSight Web User's Guide for ArcSight Express v4.0Protect724v2
This document is the user's guide for ArcSight Web, which provides a summary of key capabilities and information about navigating the user interface. It includes sections on accessing the application, using the home page and dashboards to monitor events, viewing and filtering events in active channels, and descriptions of common event attributes and audit event types. The guide provides information to help users understand and make effective use of ArcSight Web's event monitoring and analysis features.
This document provides a support matrix for ArcSight ESM and its components, including supported operating systems and end of support dates. It lists supported operating systems and browsers for the ESM Manager, Console, and Express. Products at end of support include ESM versions 5.0.x and earlier as well as appliance models E7400 and E7200. Supported operating systems include recent versions of RHEL, CentOS, Windows Server and Mac OS X. The document defines key terms and provides detailed version and patch level information.
This document provides instructions for implementing zone updates using the ArcSight Zone Update Subscription package. It describes running the zoneUpdate command to update IPv4 address allocations and dark space information. The zoneUpdate command updates zones in the global network and performs actions like removing old zones, installing and updating zones, and auto-zoning assets. The document also provides best practices, recommendations, examples, and troubleshooting steps for running zoneUpdates.
Configuration Guide for ArcSight Express v4.0Protect724v2
This document provides instructions for configuring ArcSight Express 4.0, including:
- Configuring the ArcSight Express appliance through the first boot wizard.
- Setting up client-side authentication on smart connectors.
- Running the ArcSight Manager configuration wizard.
- Installing and configuring the ArcSight Console.
- Installing and configuring ArcSight smart connectors.
This document provides an overview and introduction to HP ArcSight ESM software. It describes ESM's capabilities for security event monitoring, network intelligence, correlation, anomaly detection, and automated remediation. It also outlines the key components of ESM including the CORR-Engine for high-speed event storage and retrieval, and introduces the various tools and user roles within ESM. The document is intended to provide readers with a basic understanding of how ESM works and how its different functions are used throughout the lifecycle of analyzing and responding to security events.
This document provides an API reference for core client services in ESM with the following key details:
- It describes classes for exceptions like AuthenticationException and AuthorizationException.
- It outlines classes for requests and responses related to authentication like LoginServiceAuthenticate and LoginServiceAuthenticateResponse.
- It covers classes for getting user and version information like LoginServiceGetCurrentUser and LoginServiceGetServiceMajorVersion.
Management Console User's Guide for ArcSight Express v4.0Protect724v2
This document provides a user's guide for the ArcSight Express 4.0 Management Console. It describes how to navigate the console and use its various modules to perform administrative tasks like managing users and groups, monitoring events through dashboards, configuring connectors, and customizing preferences. The guide also explains how to use the CORR-Engine for streamlined event archiving and real-time correlation and analytics.
This document provides guidance for developers on creating REST clients to interact with HP ArcSight ESM services. It outlines the required documentation, describes the available ESM services, and provides examples for sending HTTP requests to access services for tasks like login, managing cases, and retrieving reports. Developers need the ArcSight Manager certificate and Javadocs to get started developing REST clients for ESM.
Admin and System/Core Standard Content Guide for ArcSight Express v4.0Protect724v2
The document provides installation and configuration instructions for ArcSight System and ArcSight Administration content. It describes modeling the network, categorizing assets, configuring active lists, filters, rules, notification destinations, and notifications. It also covers scheduling reports, configuring trends, and viewing use case resources. Basic configuration of these elements is recommended to tailor the content to the user's environment.
The document provides guidance on configuring the standard content installed with ArcSight ESM. Key configuration tasks include modeling the network, categorizing assets, configuring active lists with environment-specific data, enabling rules, configuring notifications and cases, and scheduling reports. Proper configuration activates the standard content to provide comprehensive monitoring, reporting, alerting and case management tailored to the organization.
The document provides instructions for customizing the user interface of the HP ArcSight ESM Cases Editor. It describes how to:
1. Switch between the extended and simple views of the Cases Editor.
2. Change tab and header labels by modifying the label_strings.properties file.
3. Customize field labels, add or remove tabs, set fields as mandatory, and map case details to audit events by modifying configuration files and properties.
Connector Management User's Guide for ArcSight Express v4.0Protect724v2
This document provides a user guide for managing connectors using the Connector Management module in ArcSight Express. It describes how to navigate the user interface to manage locations, hosts, containers, and connectors in a hierarchical structure. It provides instructions for common management tasks like adding, editing, deleting, moving, and upgrading different components of the connector architecture. Special configurations for certain connector types are also covered.
The document provides release notes for HP Reputation Security Monitor version 1.01. It includes information on how RepSM works using reputation data to detect malware and attacks. Requirements include the Model Import Connector and supported versions of ArcSight Express and ESM. The release includes RepSM solution content and documentation. Performance impacts of additional load on the ArcSight Manager are noted. An open issue with restarting the connector is also documented.
Reputation Security Monitor (RepSM) v1.01 Solution Guide for ArcSight Express...Protect724v2
The document provides installation and configuration instructions for the HP Reputation Security Monitor (RepSM) solution on ArcSight ESM or ArcSight Express. Key steps include verifying the environment, increasing ESM's active list capacity, installing the RepSM content package and model import connector, and configuring the RepSM content which includes deploying rules to ensure the use cases produce results. The solution uses reputation data from the HP RepSM service to detect malware infection, zero day attacks, and dangerous browsing on the network.
Forwarding Connector v5.2.7.6582.0 User's Guide for ArcSight Express v4.0Protect724v2
The document is a configuration guide for the ArcSight Forwarding Connector version 5.2.7.6582.0. It discusses installing and configuring the connector to forward events from an ArcSight source manager to various destination types, including ArcSight managers, Logger, CSV files, and HP OM/OMi. The guide covers installation procedures, configuration for different destinations, and using the connector with FIPS.
This document provides instructions for installing and configuring the HP ArcSight Forwarding Connector software. It describes how the connector can forward events from an ArcSight ESM source installation to various destination locations, including another ArcSight Manager, ArcSight Logger, or non-ESM systems. The document covers verifying the ESM installation, creating a user account to access correlation events, and configuring the connector to automatically or on-demand forward correlated events. It also provides guidance on installing the connector software and upgrading or uninstalling the connector.
This document is the user's guide for HP ArcSight ESM Command Center version 6.9.0c. It provides information on using the Command Center interface to view system information, monitor events through active channels, search for events, use reports and cases, and configure administrative settings. The guide covers topics such as dashboards, event channels, search queries, content management, storage configuration, and authentication settings. It also includes appendices with details on search operators and using the rex search operator.
RepSM Model Import Connector v5.2.7.6581.0 Configuration Guide for ArcSight E...Protect724v2
The document provides installation and configuration instructions for the Model Import Connector for RepSM 1.01. It describes downloading and running the installation wizard for the core connector software. Additional steps are then required to complete the RepSM connector installation, such as entering the service activation key and configuring the destination ArcSight Manager. The document also provides an overview of the connector's features for retrieving reputation data from the RepSM threat intelligence service and forwarding it to ArcSight ESM.
This document provides guidance on basic administration tasks for HP ArcSight ESM, including:
- Starting and stopping the ArcSight Manager, Console, Command Center, and SmartConnectors.
- Configuring properties, logging, passwords, authentication, SSL certificates, asset aging, and more.
- Troubleshooting performance issues and providing logs and diagnostics to HP support.
- Customizing email notifications and the Manager configuration wizard.
- Securing communications using FIPS-compliant encryption and certificates.
The document contains details on tasks administrators can perform to effectively manage, configure, and maintain ESM components like the Manager, Console, and SmartConnectors. It provides instructions for
The document provides installation instructions for HP ArcSight ESM Express. It describes the components of ESM Express including the ArcSight Manager, CORR-Engine, ArcSight Command Center, ArcSight Console, and SmartConnectors. It then discusses starting the ESM Express appliance for the first time which involves using the configuration wizard to set passwords, hostname, and network configuration. The document also covers post-installation considerations like localizing reports and installing the ArcSight Console.
Takashi Kobayashi and Hironori Washizaki, "SWEBOK Guide and Future of SE Education," First International Symposium on the Future of Software Engineering (FUSE), June 3-6, 2024, Okinawa, Japan
Top Features to Include in Your Winzo Clone App for Business Growth (4).pptxrickgrimesss22
Discover the essential features to incorporate in your Winzo clone app to boost business growth, enhance user engagement, and drive revenue. Learn how to create a compelling gaming experience that stands out in the competitive market.
OpenMetadata Community Meeting - 5th June 2024OpenMetadata
The OpenMetadata Community Meeting was held on June 5th, 2024. In this meeting, we discussed about the data quality capabilities that are integrated with the Incident Manager, providing a complete solution to handle your data observability needs. Watch the end-to-end demo of the data quality features.
* How to run your own data quality framework
* What is the performance impact of running data quality frameworks
* How to run the test cases in your own ETL pipelines
* How the Incident Manager is integrated
* Get notified with alerts when test cases fail
Watch the meeting recording here - https://www.youtube.com/watch?v=UbNOje0kf6E
Transform Your Communication with Cloud-Based IVR SolutionsTheSMSPoint
Discover the power of Cloud-Based IVR Solutions to streamline communication processes. Embrace scalability and cost-efficiency while enhancing customer experiences with features like automated call routing and voice recognition. Accessible from anywhere, these solutions integrate seamlessly with existing systems, providing real-time analytics for continuous improvement. Revolutionize your communication strategy today with Cloud-Based IVR Solutions. Learn more at: https://thesmspoint.com/channel/cloud-telephony
Do you want Software for your Business? Visit Deuglo
Deuglo has top Software Developers in India. They are experts in software development and help design and create custom Software solutions.
Deuglo follows seven steps methods for delivering their services to their customers. They called it the Software development life cycle process (SDLC).
Requirement — Collecting the Requirements is the first Phase in the SSLC process.
Feasibility Study — after completing the requirement process they move to the design phase.
Design — in this phase, they start designing the software.
Coding — when designing is completed, the developers start coding for the software.
Testing — in this phase when the coding of the software is done the testing team will start testing.
Installation — after completion of testing, the application opens to the live server and launches!
Maintenance — after completing the software development, customers start using the software.
AI Fusion Buddy Review: Brand New, Groundbreaking Gemini-Powered AI AppGoogle
AI Fusion Buddy Review: Brand New, Groundbreaking Gemini-Powered AI App
👉👉 Click Here To Get More Info 👇👇
https://sumonreview.com/ai-fusion-buddy-review
AI Fusion Buddy Review: Key Features
✅Create Stunning AI App Suite Fully Powered By Google's Latest AI technology, Gemini
✅Use Gemini to Build high-converting Converting Sales Video Scripts, ad copies, Trending Articles, blogs, etc.100% unique!
✅Create Ultra-HD graphics with a single keyword or phrase that commands 10x eyeballs!
✅Fully automated AI articles bulk generation!
✅Auto-post or schedule stunning AI content across all your accounts at once—WordPress, Facebook, LinkedIn, Blogger, and more.
✅With one keyword or URL, generate complete websites, landing pages, and more…
✅Automatically create & sell AI content, graphics, websites, landing pages, & all that gets you paid non-stop 24*7.
✅Pre-built High-Converting 100+ website Templates and 2000+ graphic templates logos, banners, and thumbnail images in Trending Niches.
✅Say goodbye to wasting time logging into multiple Chat GPT & AI Apps once & for all!
✅Save over $5000 per year and kick out dependency on third parties completely!
✅Brand New App: Not available anywhere else!
✅ Beginner-friendly!
✅ZERO upfront cost or any extra expenses
✅Risk-Free: 30-Day Money-Back Guarantee!
✅Commercial License included!
See My Other Reviews Article:
(1) AI Genie Review: https://sumonreview.com/ai-genie-review
(2) SocioWave Review: https://sumonreview.com/sociowave-review
(3) AI Partner & Profit Review: https://sumonreview.com/ai-partner-profit-review
(4) AI Ebook Suite Review: https://sumonreview.com/ai-ebook-suite-review
#AIFusionBuddyReview,
#AIFusionBuddyFeatures,
#AIFusionBuddyPricing,
#AIFusionBuddyProsandCons,
#AIFusionBuddyTutorial,
#AIFusionBuddyUserExperience
#AIFusionBuddyforBeginners,
#AIFusionBuddyBenefits,
#AIFusionBuddyComparison,
#AIFusionBuddyInstallation,
#AIFusionBuddyRefundPolicy,
#AIFusionBuddyDemo,
#AIFusionBuddyMaintenanceFees,
#AIFusionBuddyNewbieFriendly,
#WhatIsAIFusionBuddy?,
#HowDoesAIFusionBuddyWorks
Flutter is a popular open source, cross-platform framework developed by Google. In this webinar we'll explore Flutter and its architecture, delve into the Flutter Embedder and Flutter’s Dart language, discover how to leverage Flutter for embedded device development, learn about Automotive Grade Linux (AGL) and its consortium and understand the rationale behind AGL's choice of Flutter for next-gen IVI systems. Don’t miss this opportunity to discover whether Flutter is right for your project.
Mobile App Development Company In Noida | Drona InfotechDrona Infotech
Looking for a reliable mobile app development company in Noida? Look no further than Drona Infotech. We specialize in creating customized apps for your business needs.
Visit Us For : https://www.dronainfotech.com/mobile-application-development/
Zoom is a comprehensive platform designed to connect individuals and teams efficiently. With its user-friendly interface and powerful features, Zoom has become a go-to solution for virtual communication and collaboration. It offers a range of tools, including virtual meetings, team chat, VoIP phone systems, online whiteboards, and AI companions, to streamline workflows and enhance productivity.
Hand Rolled Applicative User ValidationCode KataPhilip Schwarz
Could you use a simple piece of Scala validation code (granted, a very simplistic one too!) that you can rewrite, now and again, to refresh your basic understanding of Applicative operators <*>, <*, *>?
The goal is not to write perfect code showcasing validation, but rather, to provide a small, rough-and ready exercise to reinforce your muscle-memory.
Despite its grandiose-sounding title, this deck consists of just three slides showing the Scala 3 code to be rewritten whenever the details of the operators begin to fade away.
The code is my rough and ready translation of a Haskell user-validation program found in a book called Finding Success (and Failure) in Haskell - Fall in love with applicative functors.
Neo4j - Product Vision and Knowledge Graphs - GraphSummit ParisNeo4j
Dr. Jesús Barrasa, Head of Solutions Architecture for EMEA, Neo4j
Découvrez les dernières innovations de Neo4j, et notamment les dernières intégrations cloud et les améliorations produits qui font de Neo4j un choix essentiel pour les développeurs qui créent des applications avec des données interconnectées et de l’IA générative.
Enterprise Resource Planning System includes various modules that reduce any business's workload. Additionally, it organizes the workflows, which drives towards enhancing productivity. Here are a detailed explanation of the ERP modules. Going through the points will help you understand how the software is changing the work dynamics.
To know more details here: https://blogs.nyggs.com/nyggs/enterprise-resource-planning-erp-system-modules/
Atelier - Innover avec l’IA Générative et les graphes de connaissancesNeo4j
Atelier - Innover avec l’IA Générative et les graphes de connaissances
Allez au-delà du battage médiatique autour de l’IA et découvrez des techniques pratiques pour utiliser l’IA de manière responsable à travers les données de votre organisation. Explorez comment utiliser les graphes de connaissances pour augmenter la précision, la transparence et la capacité d’explication dans les systèmes d’IA générative. Vous partirez avec une expérience pratique combinant les relations entre les données et les LLM pour apporter du contexte spécifique à votre domaine et améliorer votre raisonnement.
Amenez votre ordinateur portable et nous vous guiderons sur la mise en place de votre propre pile d’IA générative, en vous fournissant des exemples pratiques et codés pour démarrer en quelques minutes.
Essentials of Automations: The Art of Triggers and Actions in FMESafe Software
In this second installment of our Essentials of Automations webinar series, we’ll explore the landscape of triggers and actions, guiding you through the nuances of authoring and adapting workspaces for seamless automations. Gain an understanding of the full spectrum of triggers and actions available in FME, empowering you to enhance your workspaces for efficient automation.
We’ll kick things off by showcasing the most commonly used event-based triggers, introducing you to various automation workflows like manual triggers, schedules, directory watchers, and more. Plus, see how these elements play out in real scenarios.
Whether you’re tweaking your current setup or building from the ground up, this session will arm you with the tools and insights needed to transform your FME usage into a powerhouse of productivity. Join us to discover effective strategies that simplify complex processes, enhancing your productivity and transforming your data management practices with FME. Let’s turn complexity into clarity and make your workspaces work wonders!
5. Confidential ArcSight Express Upgrade Guide 5
Chapter 1
Upgrading ArcSight Express
3.0 to 4.0
The following topics are covered in this chapter:
Document Status
The information in this document applies to the ArcSight Express appliance 3.0 which
needs to be upgraded to 4.0.
Summary
This document describes the steps required to upgrade the software components on the
ArcSight Express appliance from 3.0 to 4.0. If you run into any issues during upgrade,
contact the HP ArcSight Customer Support for help.
Be sure to have the following files available while calling Support for help:
All the log files in /opt/updates/ directory (excluding the binary files)
The system tables
(/opt/arcsight/manager/tmp/arcsight_dump_system_tables.sql.
<timestamp>).
Before You Upgrade
Before you begin upgrading your appliance, we recommend that you open a ticket with HP
ArcSight Customer Support to test the upgrade with your system tables and to determine if
any special steps are necessary for your configuration. Be sure to run the resource
validator (resvalidate) before you provide Customer Support with your system tables. See
the Caution below for details on running resvalidate. Be sure to fix all the invalid
resources found by the resource validator before sending the system tables to Support.
“Document Status” on page 5
“Summary” on page 5
“Before You Upgrade” on page 5
“Upgrading ArcSight Express 3.0 to 4.0” on page 7
“Post-Upgrade Tasks” on page 9
6. 1 Upgrading ArcSight Express 3.0 to 4.0
6 ArcSight Express Upgrade Guide Confidential
Allow two weeks for results when planning your deployment. Having HP ArcSight Customer
Support test your upgrade will greatly help make your upgrade run smoother.
Once you are ready to upgrade, you will need to:
Important! Before you upgrade, verify that your ArcSight Express 3.0 is fully
functional and its archives intact. If there is any issue with your ArcSight Express 3.0
system, contact HP ArcSight Customer Support before upgrading.
Download the upgrade file, arcsight-express-4.0.0.xxxx.0.pl from the HP
SSO download web site. The xxxx in the file name stands for the build number. When
you click on the .pl file to download it, its checksum appears at the bottom of the
page. After downloading the .pl file, calculate the checksum on your downloaded .pl
file and make sure it matches with the checksum provided on the download page.
If you downloaded the files to a system other than the ArcSight Express 4.0 appliance,
make sure to copy it over to the ArcSight Express 4.0 appliance. If using an external
application (such as WinSCP) to transfer the files, make sure to use the binary mode of
transfer to transfer the files.
Make sure that you have a total of 15 GB free disk space in your /opt directory.
Make sure that you have at least 3 GB free disk space in your /tmp directory.
If you plan to use the Syslog Daemon and the Microsoft Windows Event Log - Unified
connector after you upgrade to ArcSight Express 4.0, you will need to open the
appropriate ports on the appliance. Refer to the respective SmartConnector
configuration guide for more information about the ports that need to be open.
If the ArcSight Express 3.0 appliance has updated tzdata or Russian DST Hotfix
RDST20141026 installed, then the upgrade to 4.0 will fail because the upgrade script
requires the 2010e OS TZDATA RPM. Contact Customer Support for the hotfix that
reverts the OS TZDATA RPM to 2010e.
• Back up your existing resources before you begin your upgrade. Refer to
“Backing Up Existing Resources Before Upgrade” on page 16 for more
details on how to do this.
• Run the resource validator (resvalidate) located on the ArcSight Manager
in /opt/arcsight/manager/bin/scripts directory to check that the
resources are working correctly before the upgrade. This prevents you from
attributing broken resources with the upgrade. Run the resource validation
script as follows:
First run:
arcsight resvalidate
Then run:
arcsight resvalidate -persist false
7. 1 Upgrading ArcSight Express 3.0 to 4.0
Confidential ArcSight Express Upgrade Guide 7
Upgrading ArcSight Express 3.0 to 4.0
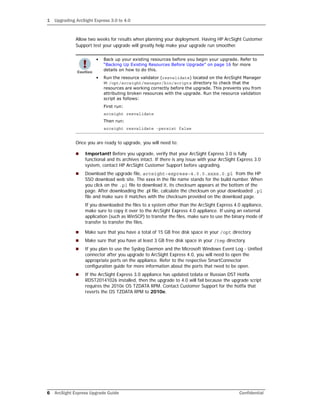
To upgrade the components on your ArcSight Express Appliance:
1 Log in to the ArcSight Express appliance as a superuser (root).
2 If you downloaded the ArcSight Express license file and the
arcsight-express-4.0.0.xxxx.0.pl file to a system other than the ArcSight
Express appliance that you want to upgrade, move the file(s) over to the ArcSight
Express appliance using the scp command. For example, from your local machine
where the file(s) are located, run:
scp arcsight-express-4.0.0.xxxx.0.pl
root@<hostname>.<domain>:/root
3 You can perform the rest of the steps either directly on the ArcSight Express machine
or remotely using ssh. To use ssh, open a shell window by running:
ssh root@<hostname>.<domain>
4 Verify the integrity of the update file you have downloaded just to make sure that it
was not truncated or corrupted during the download. Run:
md5sum -c arcsight-express-4.0.0.xxxx.0.pl.md5
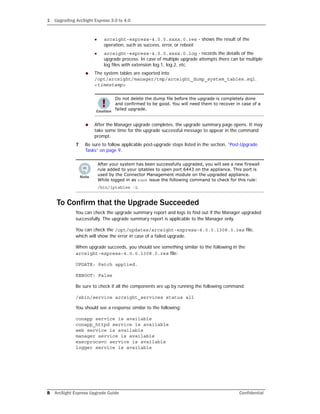
5 Run the upgrade file with the following command:
perl arcsight-express-4.0.0.xxxx.0.pl
6 Enter Y at the following prompt:
Note: You are about to run this product updater.
Processed [y/N]?
The upgrade is done in silent mode and transfers configurations, upgrades the
schema, upgrades the content, and generates upgrade report for the Manager and
CORRE upgrade. It also installs the Connector Management module.
Before the upgrade process begins, the existing software components will be
backed up into the following location:
/opt/arcsight/manager.preUpgradeBackup
/opt/arcsight/web.preUpgradeBackup
/opt/arcsight/logger/BL1093
The arcsight-express-4.0.0.xxxx.0.pl file extracts itself into a
subdirectory within /opt/updates directory and automatically upgrades the
existing RPMs.
The following log files for the upgrade are placed in the /opt/updates/
directory:
If you run the upgrade from a remote system connected to the appliance, you
will need to have X-Windows running on your remote system and use ssh -X to
run the upgrade.
Do not modify any environment variables. Particularly, if logger environment
variables such as ARCSIGHT_LOGGER_BASE, UPGRADE and ARCSIGHT_BASE
are altered, upgrade may fail.
8. 1 Upgrading ArcSight Express 3.0 to 4.0
8 ArcSight Express Upgrade Guide Confidential
arcsight-express-4.0.0.xxxx.0.res - shows the result of the
operation, such as success, error, or reboot
arcsight-express-4.0.0.xxxx.0.log - records the details of the
upgrade process. In case of multiple upgrade attempts there can be multiple
log files with extension log.1, log.2, etc.
The system tables are exported into
/opt/arcsight/manager/tmp/arcsight_dump_system_tables.sql.
<timestamp>
After the Manager upgrade completes, the upgrade summary page opens. It may
take some time for the upgrade successful message to appear in the command
prompt.
7 Be sure to follow applicable post-upgrade steps listed in the section, “Post-Upgrade
Tasks” on page 9.
To Confirm that the Upgrade Succeeded
You can check the upgrade summary report and logs to find out if the Manager upgraded
successfully. The upgrade summary report is applicable to the Manager only.
You can check the /opt/updates/arcsight-express-4.0.0.1308.0.res file,
which will show the error in case of a failed upgrade.
When upgrade succeeds, you should see something similar to the following in the
arcsight-express-4.0.0.1308.0.res file:
UPDATE: Patch applied.
REBOOT: False
Be sure to check if all the components are up by running the following command:
/sbin/service arcsight_services status all
You should see a response similar to the following:
conapp service is available
conapp_httpd service is available
web service is available
manager service is available
execprocsvc service is available
logger service is available
Do not delete the dump file before the upgrade is completely done
and confirmed to be good. You will need them to recover in case of a
failed upgrade.
After your system has been successfully upgraded, you will see a new firewall
rule added to your iptables to open port 6443 on the appliance. This port is
used by the Connector Management module on the upgraded appliance.
While logged in as root issue the following command to check for this rule:
/bin/iptables -L
9. 1 Upgrading ArcSight Express 3.0 to 4.0
Confidential ArcSight Express Upgrade Guide 9
mysql service is available
postgresql service is available
This command also shows the versions of the components installed which is another good
way to verify a successful upgrade:
Build versions:
conapp:6.4.0.6711.2
connector:connector_1 5.2.7.6583.0
connector:connector_2 5.2.7.6583.0
esm:6.1.0.1389.0(BE1389)
storage:BL1124
process management:4.0-1311
installer:4.0-1311
You have upgraded to ArcSight Express v4.0.
Make sure to upgrade your existing Console. See “Upgrading ArcSight Console” on
page 13.
Post-Upgrade Tasks
After you have confirmed that the upgrade was successful, you can perform the tasks in
this section.
After the upgrade, the Connector Management module (new in ArcSight Express 4.0) gets
installed.
By default, no containers get installed in the module. If you would like to add
connectors to be managed by the Connector Management module, manually add them
through the Connector Management interface. Make sure to open any needed ports
for the containers on the appliance.
If you were using connectors that were remotely installed (installed on systems other
than the appliance itself) with ArcSight Express 3.0 and would like to use them with
your upgraded appliance, manually add them to the Connector Management module
on the upgraded appliance. For details, see the Connector Management User’s Guide.
For a list of connectors that can be installed remotely, refer to the article Supported
Products for Connector Appliance from the ArcSight Knowledge Base.
If you would like to use Microsoft Windows Event Log - Unified connector and Syslog
Daemon connector or another connector, manually add them to container 1 and
container 2 respectively in the Connector Management module of the Management
Console. For details on how to do so, see the Connector Management User’s Guide. Be
sure to open the relevant ports for these connectors. For connectors supported on
ArcSight Express 4.0, refer to the respective connector guide.
If you would like to use the Forwarding Connector and/or the Reputation Security
Monitor Model Import Connector, download the installation files for it and install
manually. Be sure to open the relevant ports for these connectors.
After upgrading to ArcSight Express 4.0, the users defined in the custom ArcSight
Express users group (/All Users/Custom User Groups/ArcSight Express)
An incomplete or aborted upgrade will show some of the packages with the
upgraded version number, but others will have the original (pre-upgrade)
version number-- depending upon which component the upgrade stopped at.
10. 1 Upgrading ArcSight Express 3.0 to 4.0
10 ArcSight Express Upgrade Guide Confidential
will still have access to some ArcSight Foundation resources that were available in
ArcSight Express 3.0 (for example, /All Queries). Due to upgrade process issues
for ACLs in user groups, we recommend that you remove the access permissions to
/All Queries for the users in /All Users/Custom User Groups/ArcSight
Express. Permissions to /All Queries is not necessary, and has been replaced
with permissions to /All Queries/ArcSight Express. Refer to the ArcSight
Express 4.0 Release Notes for further details.
The NetFlow Monitoring content is triggered by NetFlow events from the following
SmartConnectors, which are not currently installed with ArcSight Express 4.0.
ArcSight IP Flow SmartConnector
ArcSight QoSient ARGUS SmartConnector
When upgrading to ArcSight Express 4.0 from ArcSight Express 3.0 if you want to use
the NetFlow Monitoring content, you need to install and configure these
SmartConnectors. For information about how to obtain the SmartConnectors, contact
your HP ArcSight sales representative.
Verify your standard content and restore customized content, if any. See “Checking
and Restoring Content After Upgrade” on page 17.
Reputation Security Monitor
A trial version of the HP Reputation Security Monitor (RepSM) solution is available on
ArcSight Express 4.0. RepSM uses internet threat intelligence to detect malware infection,
zero day attacks, and dangerous browsing on your network. RepSM consists of the
following components:
The HP RepSM service, powered by HP TippingPoint Reputation Digital Vaccine
(RepDV), provides reputation data from the comprehensive RepDV database of
malicious IP addresses, host names, and domain names. RepDV uses IPv4 and
Domain Name System (DNS) security intelligence feeds from multiple sources to
provide a broad set of reputation data.
The HP Model Import Connector for RepSM imports the reputation data at
regular intervals from the RepSM service to ArcSight ESM or ArcSight Express.
The HP RepSM content running on ArcSight ESM or ArcSight Express, correlates the
reputation data and security events to detect and remediate security incidents and
issues that would otherwise be undetectable.
After upgrading ArcSight Express and the ArcSight Console to version 4.0, the RepSM
solution is ready to install. You will need to contact your HP ArcSight sales representative
for an evaluation license. You can install the on-board version of RepSM, or ask your sales
representative if there is a newer version available for evaluation. After you get the license,
install the solution first, and then the Model Import Connector for RepSM, as described
below.
To install the RepSM solution content package:
1 In the ArcSight Console, click the Packages tab in the Navigator panel.
2 Navigate to ArcSight Solutions, right-click the Reputation Security
Monitor 1.0 package, and select Install Package.
3 In the Install Packages dialog, click OK. The Progress tab shows how the installation is
progressing. When the installation is complete, the Results tab displays the Summary
Report.
4 In the Installing Packages dialog, click OK.
11. 1 Upgrading ArcSight Express 3.0 to 4.0
Confidential ArcSight Express Upgrade Guide 11
5 On the Packages tab of the Navigator panel, expand the Reputation Security
Monitor 1.0 group to verify that the installation is successful and that the content
is accessible in the Navigator panel.
6 Follow the configuration instructions in the Reputation Security Monitor 1.01 Solution
Guide.
To install the Model Import Connector for RepSM:
1 On the ArcSight Express appliance, navigate to the installation executable for the
Model Import Connector for RepSM at:
/opt/arcsight/software/connector/repSmConnr/ArcSight-5.2.7.xxxx
.0-RepSMModelConnector-Linux64.bin
2 Start the connector installer by running the executable.
3 Follow the installation instructions in the Model Import Connector for RepSM
Configuration Guide to complete the installation.
13. Confidential ArcSight Express Upgrade Guide 13
Chapter 2
Upgrading ArcSight Console
The ArcSight Console upgrade process should be performed on all ArcSight Console
instances that connect to the Manager running on the upgraded appliance.
1 Stop ArcSight Console if it is running.
2 Download the appropriate installation file for your platform from the HP SSO download
web site. The xxxxx in the filename represents the Console build number:
ArcSight-6.1.0.xxxxx.0-Console-Win.exe
ArcSight-6.1.0.xxxxx.0-Console-Linux.bin
ArcSight-6.1.0.xxxxx.0-Console-MacOSX.zip
3 If you downloaded the v4.0 Console installation file to a different machine, transfer it
to the machine on which you plan to install the Console.
4 Run the installation file appropriate for your platform:
On Windows:
Double-click ArcSight-6.1.0.xxxxx.0-Console-Win.exe
On Macintosh:
Unzip the following file:
ArcSight-6.1.0.xxxxx.0-Console-MacOSX.zip
and run the installer by double-clicking on it.
On Linux:
Run the following command.
./ArcSight-6.1.0.xxxxx.0-Console-Linux.bin
To install in console mode, run the following command from the shell prompt and
then follow the instructions in the window.
./ArcSight-6.1.0.xxxxx.0-Console-Linux.bin -i console
Step through the Installation wizard screens. Specifically, enter values as described
below for the following wizard screens:
Installation Process Check—Click Next.
Introduction—Read the Introduction and click Next.
License Agreement—The “I accept the terms of the License Agreement” radio
button will be disabled until you read and scroll to the bottom of the agreement
14. 2 Upgrading ArcSight Console
14 ArcSight Express Upgrade Guide Confidential
text. After you have read the text, click the “I accept the terms of the License
Agreement” radio button then click Next.
Special Notice—Read the notice and click Next.
Choose Installation Folder—Enter an <ARCSIGHT_HOME> path for v4.0 that is
different from where the existing Console is installed.
Choose Shortcut Folder (on Windows) or Choose Link Folder (on UNIX)—
Specify or select where the ArcSight Console icon will be created; for example, in
an existing Program Files Group or on the Desktop on Windows. Click Next.
Pre-Installation Summary—Review the settings and click Install.
After you have stepped through the Installation Wizard, it automatically starts the
Configuration Wizard.
5 The Console installation program prompts you for a previous installation and provides
you an option to copy your existing settings to the new Console. Settings such as
connection information including the Manager host name or IP address and port
number, and authentication information including authentication type. Select Yes, I
want to transfer the settings and click Next.
6 You will be prompted to enter the location of your previous Console installation.
Click Next.
7 See the ArcSight Express Configuration Guide for details on the remaining screens for
installing a Console using the installation wizard.
8 Start the ArcSight Console.
A What’s new Quick Start screen is displayed automatically. This screen summarizes
the new features in ArcSight Express v4.0.
9 After you have upgraded a Console to v4.0:
a You can view the upgraded standard content
b All your SmartConnectors are connecting to the Manager on the appliance.
c The Manager is receiving events from the SmartConnectors.
If no event viewers appear initially in the Console, select the All Active
Channels/ArcSight System/Core/Live channel to view real-time events.
Do NOT install v4.0 Console in the same location as the existing Console.
Installing in a different location prevents the installation program from
overwriting your existing configuration, thus enabling you to migrate
settings from it.
Be sure to select <ARCSIGHT_HOME>current directory of your previous
installation as shown in the screen image above.
15. Confidential ArcSight Express Upgrade Guide 15
Chapter 3
Upgrading Standard Content
You can only upgrade ArcSight Express 4.0 standard content from ArcSight Express 3.0
with CORR-Engine.
This chapter discusses the following topics.
Preparing Existing Content for Upgrade
The majority of standard content does not need configuration and does not require special
preparation for upgrade. Upgrade preparation is recommended only for content that has
been configured and for which configuration is not preserved after the upgrade.
Configurations Preserved During Upgrade
The following resource configurations are preserved during the upgrade process. No
restoration is required for these resources after the upgrade.
Asset modeling for network assets, including:
Assets, and asset groups and their settings
Asset categories applied to assets and asset groups
Vulnerabilities applied to assets
Custom zones
SmartConnectors
Users and user groups
Report schedules
Notification destinations and priority settings
Microsoft Windows Monitoring content requires the Microsoft Windows
Event Log - Unified SmartConnector with parser version 1. If you are
upgrading content from ArcSight Express 3.0 and you already have the
Microsoft Windows Event Log - Unified SmartConnector installed, make sure
the SmartConnector is using parser version 1. Refer to the SmartConnectors
for Microsoft Windows Event Log – Unified With Parser Version 1 Security
Event Mappings document for more details.
“Preparing Existing Content for Upgrade” on page 15
“Performing the Upgrade” on page 17
“Checking and Restoring Content After Upgrade” on page 17
16. 3 Upgrading Standard Content
16 ArcSight Express Upgrade Guide Confidential
Cases
Configurations that Require Restoration After Upgrade
The following resource configurations require restoration after upgrade.
Any standard content resource that you have modified, including active lists
Any custom content or special modifications not already described in this document
(including customizations performed by Professional Services)
Backing Up Existing Resources Before Upgrade
To help the process of reconfiguring resources that require restoration after upgrade, back
up the resources you identify in “Configurations that Require Restoration After Upgrade” on
page 16 and export them in a package. After upgrade, you can re-import the package and
use the existing resources as a reference for restoring the configurations to the upgraded
environment.
To create a backup of the resources that require restoration after upgrade:
1 For each resource type (filter, rule, active list), create a new group under your personal
group. Provide a name that identifies the contents.
Right-click your group name and select New Group.
2 Copy the resources into the new group. Repeat this process for every resource type
you want to back up.
Select the resources you want to back up and drag them into the backup folder
you created in Step 1. In the Drag & Drop Options dialog box, select Copy.
3 Export the backup groups in a package.
In the Navigator panel Packages tab, right-click your group name and select New
Package. In the Packages editor in the Inspect/Edit panel, name the package to
identify the contents.
Select the group that you created in Step 1, right click and select Add to
Package. Select your new package and click OK.
Only active list attributes, such as the TTL and description are not
preserved during upgrade. Any entries removed from an original active
list are restored during upgrade. Any entries added to an active list are
preserved during upgrade.
Before you back up existing resources, run the resource validator
(resvalidate) located on the ArcSight Manager in
/opt/arcsight/manager/bin/scripts to check that the resources are
working correctly before the upgrade. This prevents you from attributing
broken resources with the upgrade.
During the upgrade process, the content is run through a resource validator
automatically (see “Fixing Invalid Resources” on page 18).
17. 3 Upgrading Standard Content
Confidential ArcSight Express Upgrade Guide 17
Right click your package name and select Export Package to Bundle.
Performing the Upgrade
After exporting a copy of the configured resources in a backup package, you are ready to
perform the upgrade process. Refer to Chapter 1‚ Upgrading ArcSight Express 3.0 to 4.0‚ on
page 5 for upgrade procedures.
Checking and Restoring Content After Upgrade
After the upgrade is complete, perform the following checks to verify that all your content
has been transferred to the new environment successfully.
Verifying and Reapplying Configurations
Verify and restore standard content after the upgrade.
1 Verify that your configured resources listed in the section “Configurations Preserved
During Upgrade” on page 15 retained their configurations as expected.
2 Reconfigure the resources that require restoration.
a Re-import the package you created in “Backing Up Existing Resources Before
Upgrade” on page 16.
b One resource at a time, copy and paste the configurations preserved in the
package of copied resources into the new resources installed with the upgrade.
Copying your configurations one resource at a time instead of overwriting the new
resources with the old ensures that you retain your configurations without
overwriting any improvements provided with the upgraded content.
Verifying Customized Content
It is possible during upgrade that updates to the standard content cause resources you
created to work in a way that is not intended. For example, a rule might trigger too often
or not at all if it uses a filter in which conditions have been changed.
To verify that the resources you rely upon work as expected, check the following:
Trigger events. Send events that you know trigger the content through the system
using the Replay with Rules feature. For more about this feature, refer to the ArcSight
Console User’s Guide.
Check Live Events. Check the Live or All Events active channel to verify that the
correlation event triggered. Check that the data monitors you created are returning
the expected output based on the test events you send through.
Verify notification destinations. Verify that notifications are sent to the recipients
in your notification destinations as expected.
Verify active lists. Check that any active lists you have created to support your
content are gathering the replay with rules data as expected.
Copy and paste configurations from the old resources to the new
Instead of overwriting the new resources with backup copies of the old ones,
copy and paste configurations from the old resources one by one into the new
ones. This procedure ensures that you preserve your configurations without
overwriting any improvements provided in the upgrade.
18. 3 Upgrading Standard Content
18 ArcSight Express Upgrade Guide Confidential
Repair any invalid resources. During the upgrade process, the resource validator
identifies any resources that are rendered invalid (conditions that no longer work)
during the upgrade. Find invalid resources and fix their conditions as appropriate. For
more about invalid resources, see Fixing Invalid Resources, below.
Fixing Invalid Resources
During the upgrade process, the content is run through a resource validator, which
verifies that the values expressed in the resource condition statement still apply to
the resource in its new format, and that any resources upon which it depends are
still present and also valid. The resource validator runs on any resource that contains a
condition statement or populates the asset model, such as:
Active channels
Filters
Data Monitors
Rules
Report queries and schedules
Assets and Asset ranges
Zones
It is possible that during upgrade, the condition statement for a resource you created or
modified becomes invalid. For example, if the schema of an ArcSight-supplied active list
changes from one release to another and a resource you created reads entries from this
list, the condition statement in the created resource no longer matches the schema of the
active list, and the logic is invalid.
When the installer performs the resource validation check and finds an invalid resource, it
identifies why the resource is invalid in the report it generates at the end of the upgrade.
The upgrade installer also lets you choose to save the reason the resource is invalid in the
database (Persist conflicts to the database=TRUE). If you choose this option, the
upgrade installer:
Saves the reason the resource is found to be invalid in the database so you can
generate a list of invalid resources that you can use later to repair the problems
manually.
Disables the resource so it does not try to evaluate live events in its invalid state.
If you choose not to save the reasons the resource is invalid in the database (Persist
conflicts to the database=FALSE), the resources remain enabled, which means they
try to evaluate the event stream in their invalid state.
If you choose not to persist conflicts to the database and disable invalid
resources, the ArcSight Manager might throw exceptions when the invalid
resources try to evaluate live events.
19. Confidential ArcSight Express Upgrade Guide 19
I
invalid resources 18
M
Microsoft Windows Event Log- Unified SmartConnector
15
P
post upgrade
post upgrade tasks 9
Reputation Security Monitor 10
R
Reputation Security Monitor 10
S
SmartConnector
Microsoft Windows Event Log- Unified 15
U
upgrade
before you upgrade 5
confirm upgrade succeeded 8
invalid resources 18
preparing for upgrade 15
restoring content 17
summary 5
verify customer content 17
using X-Windows 7
Index