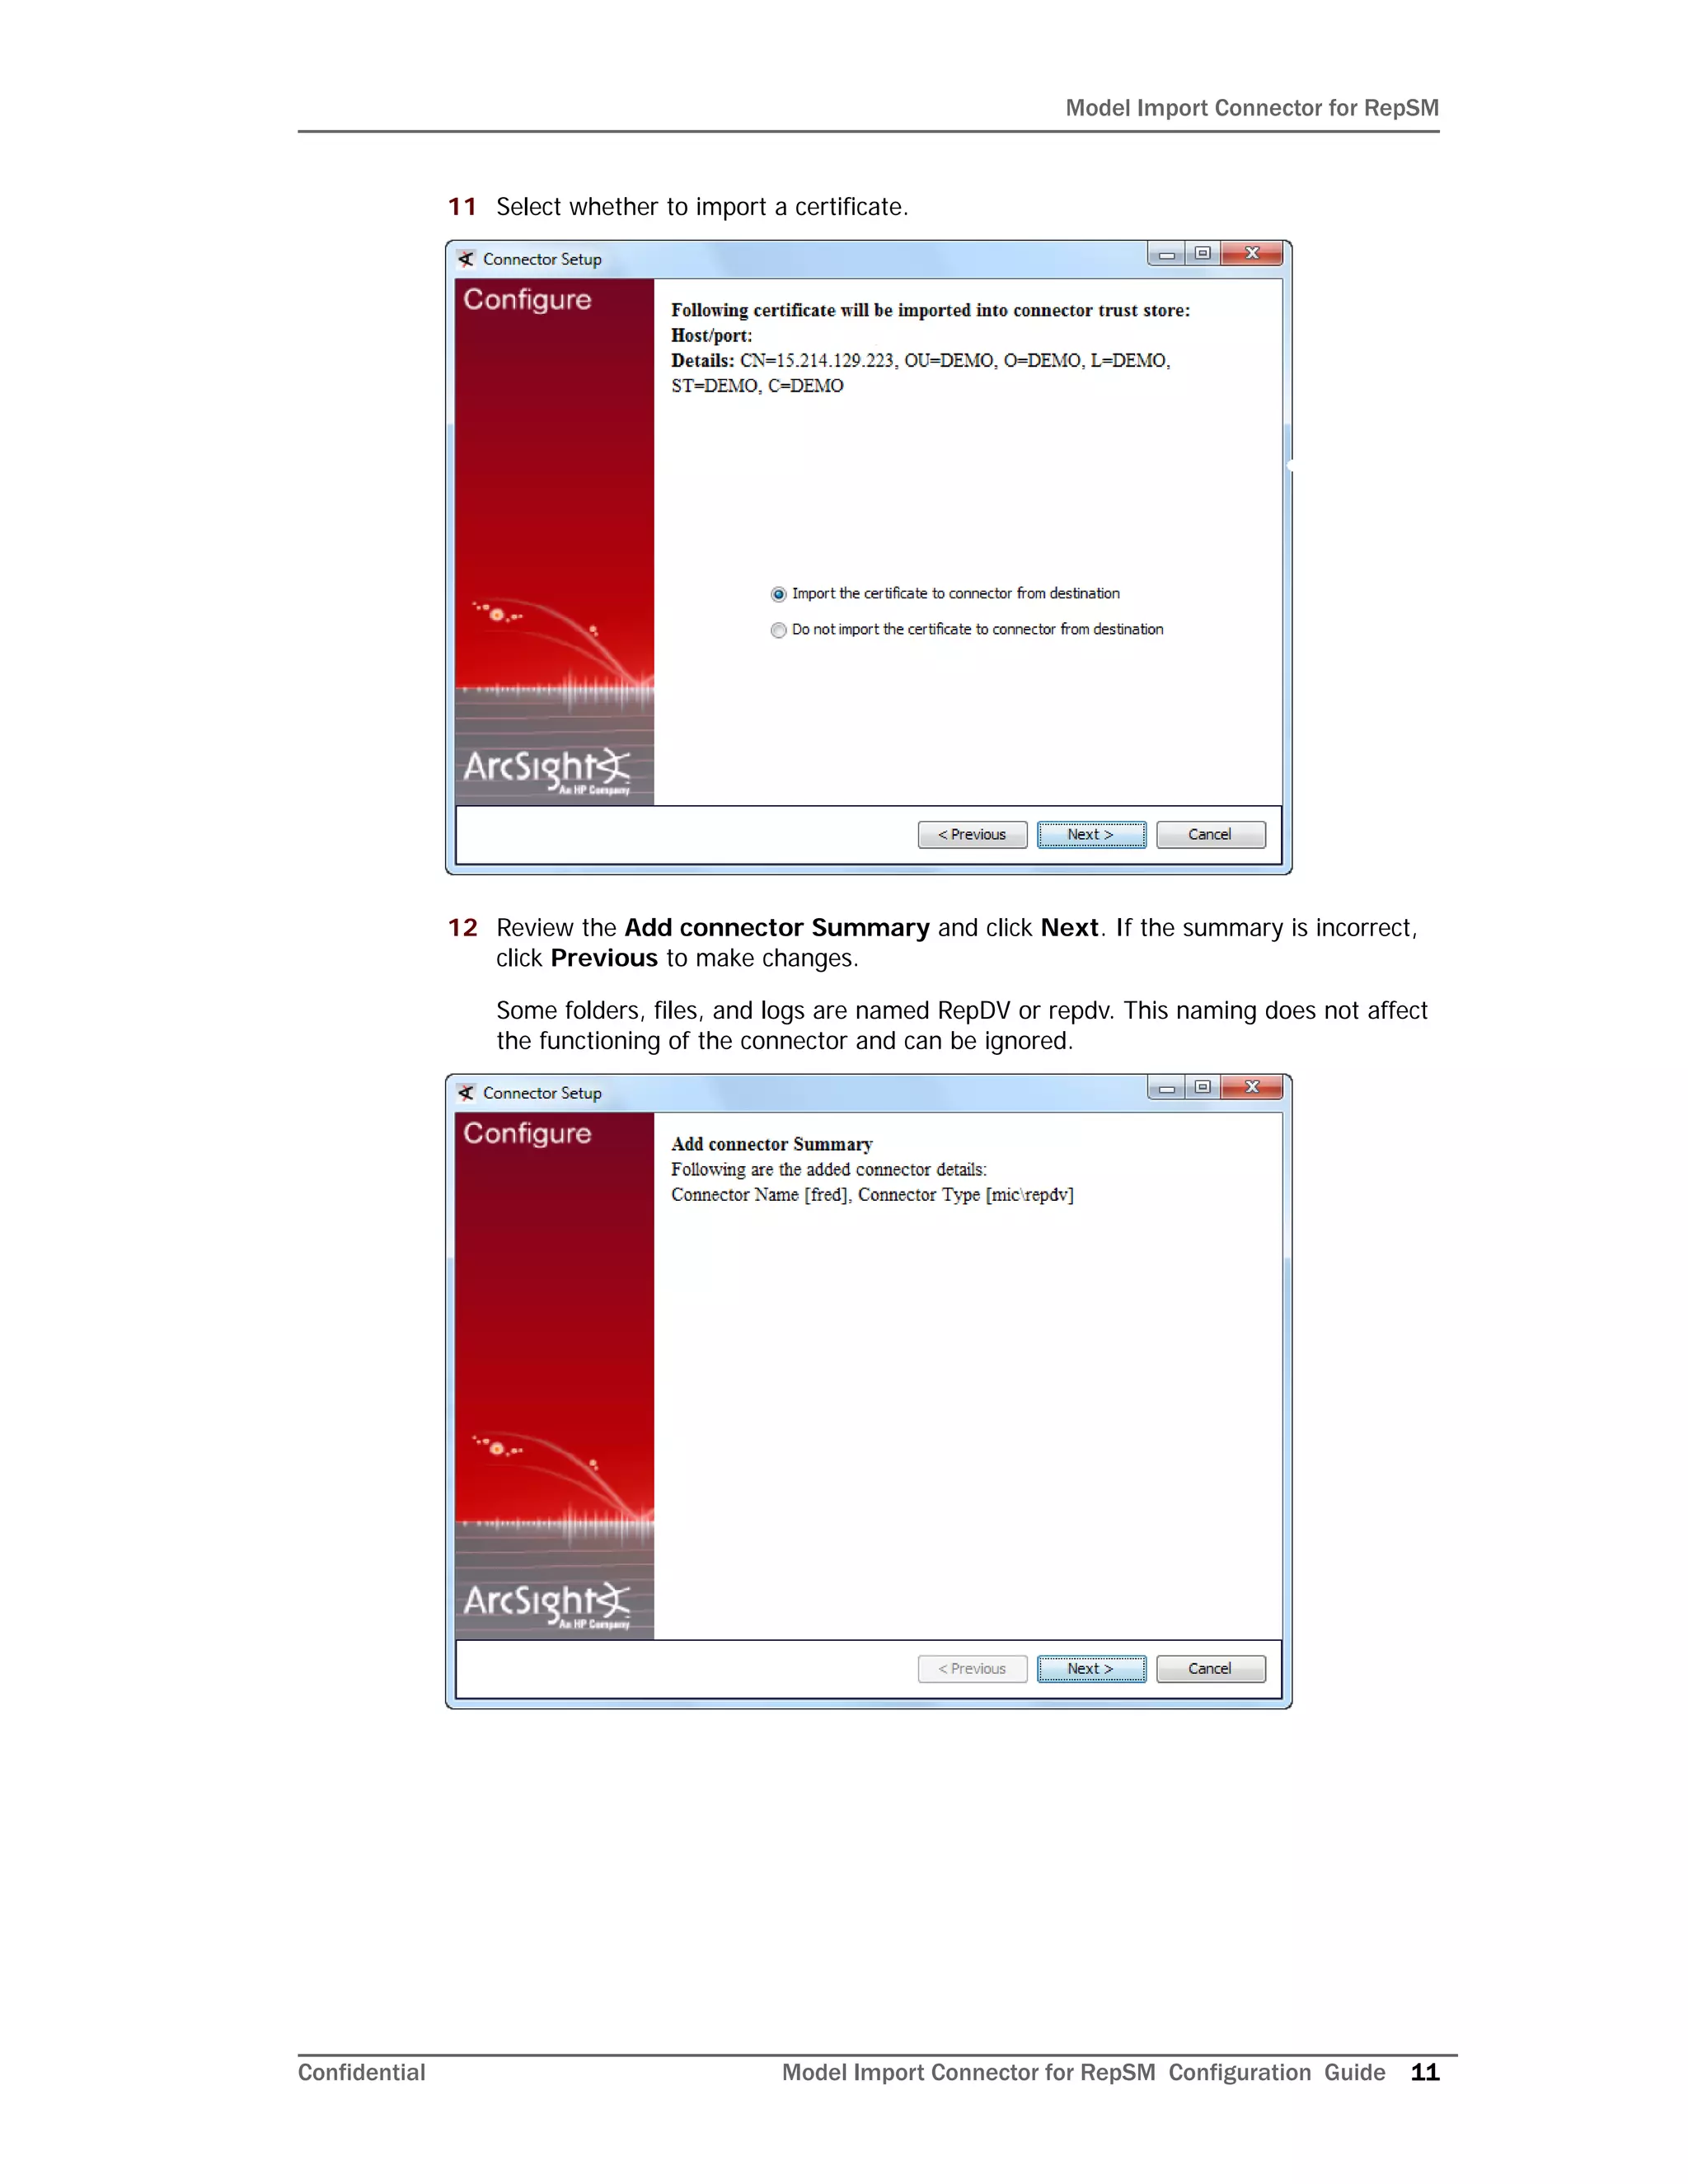
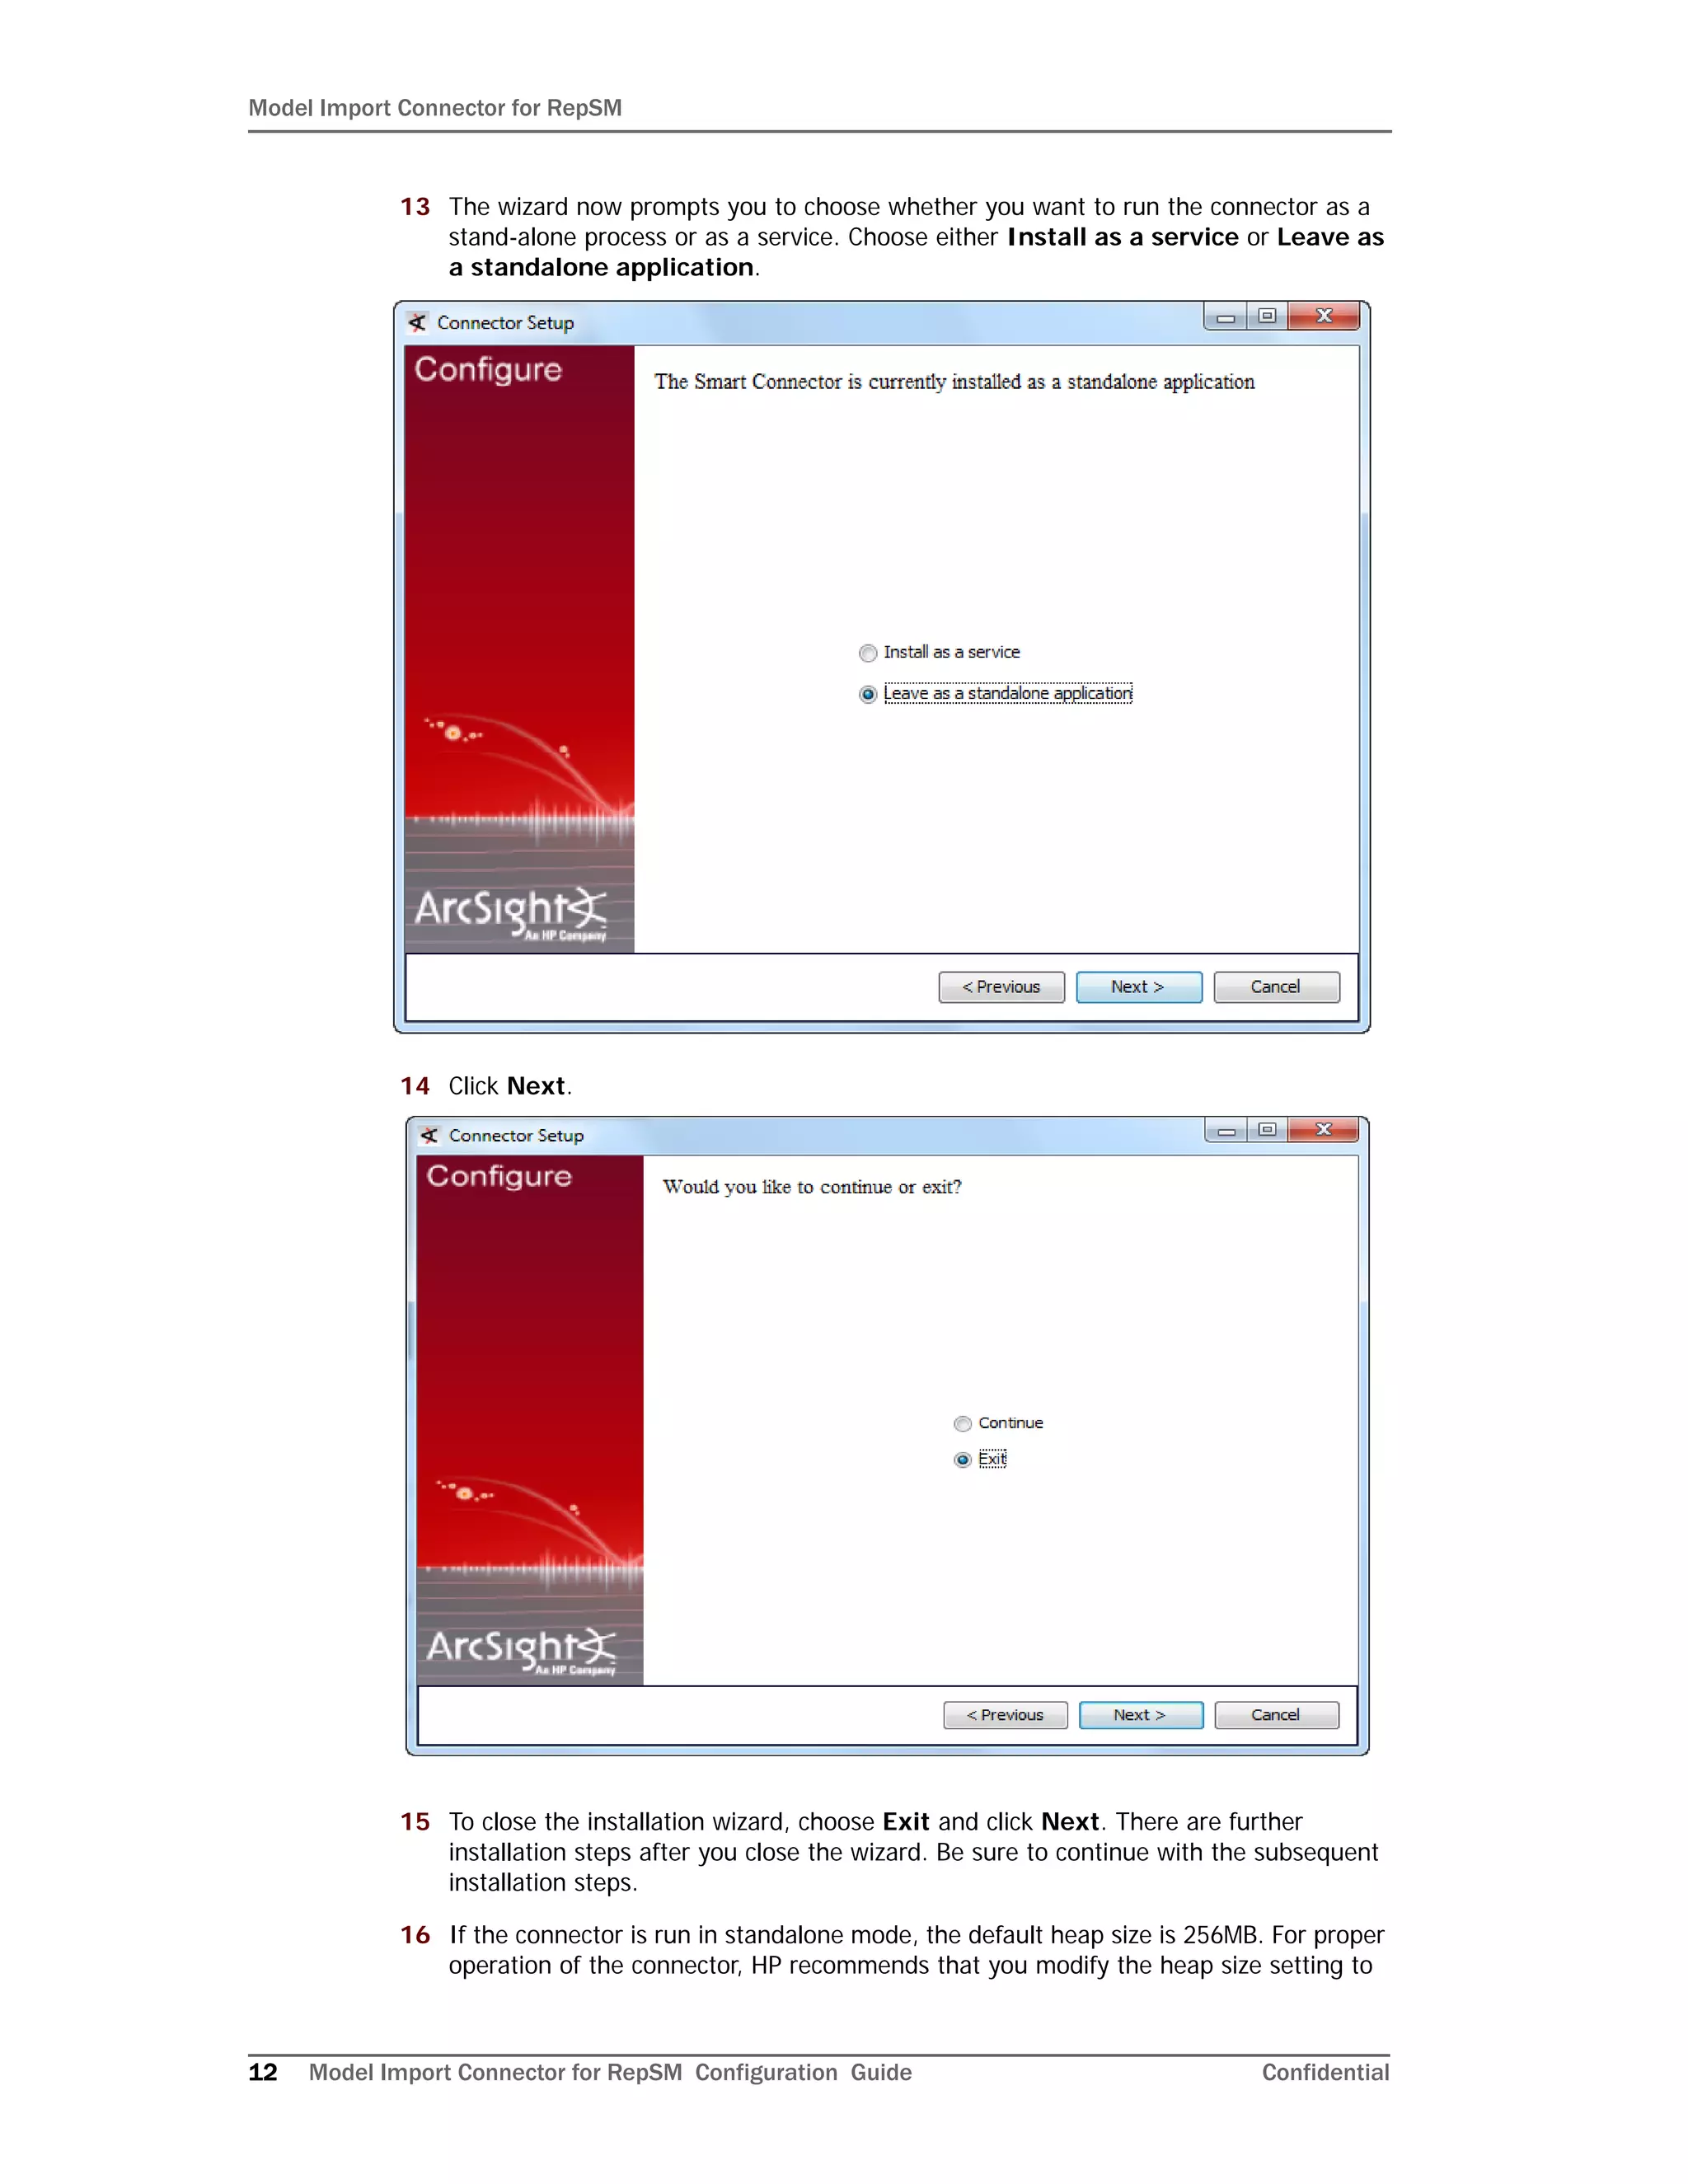
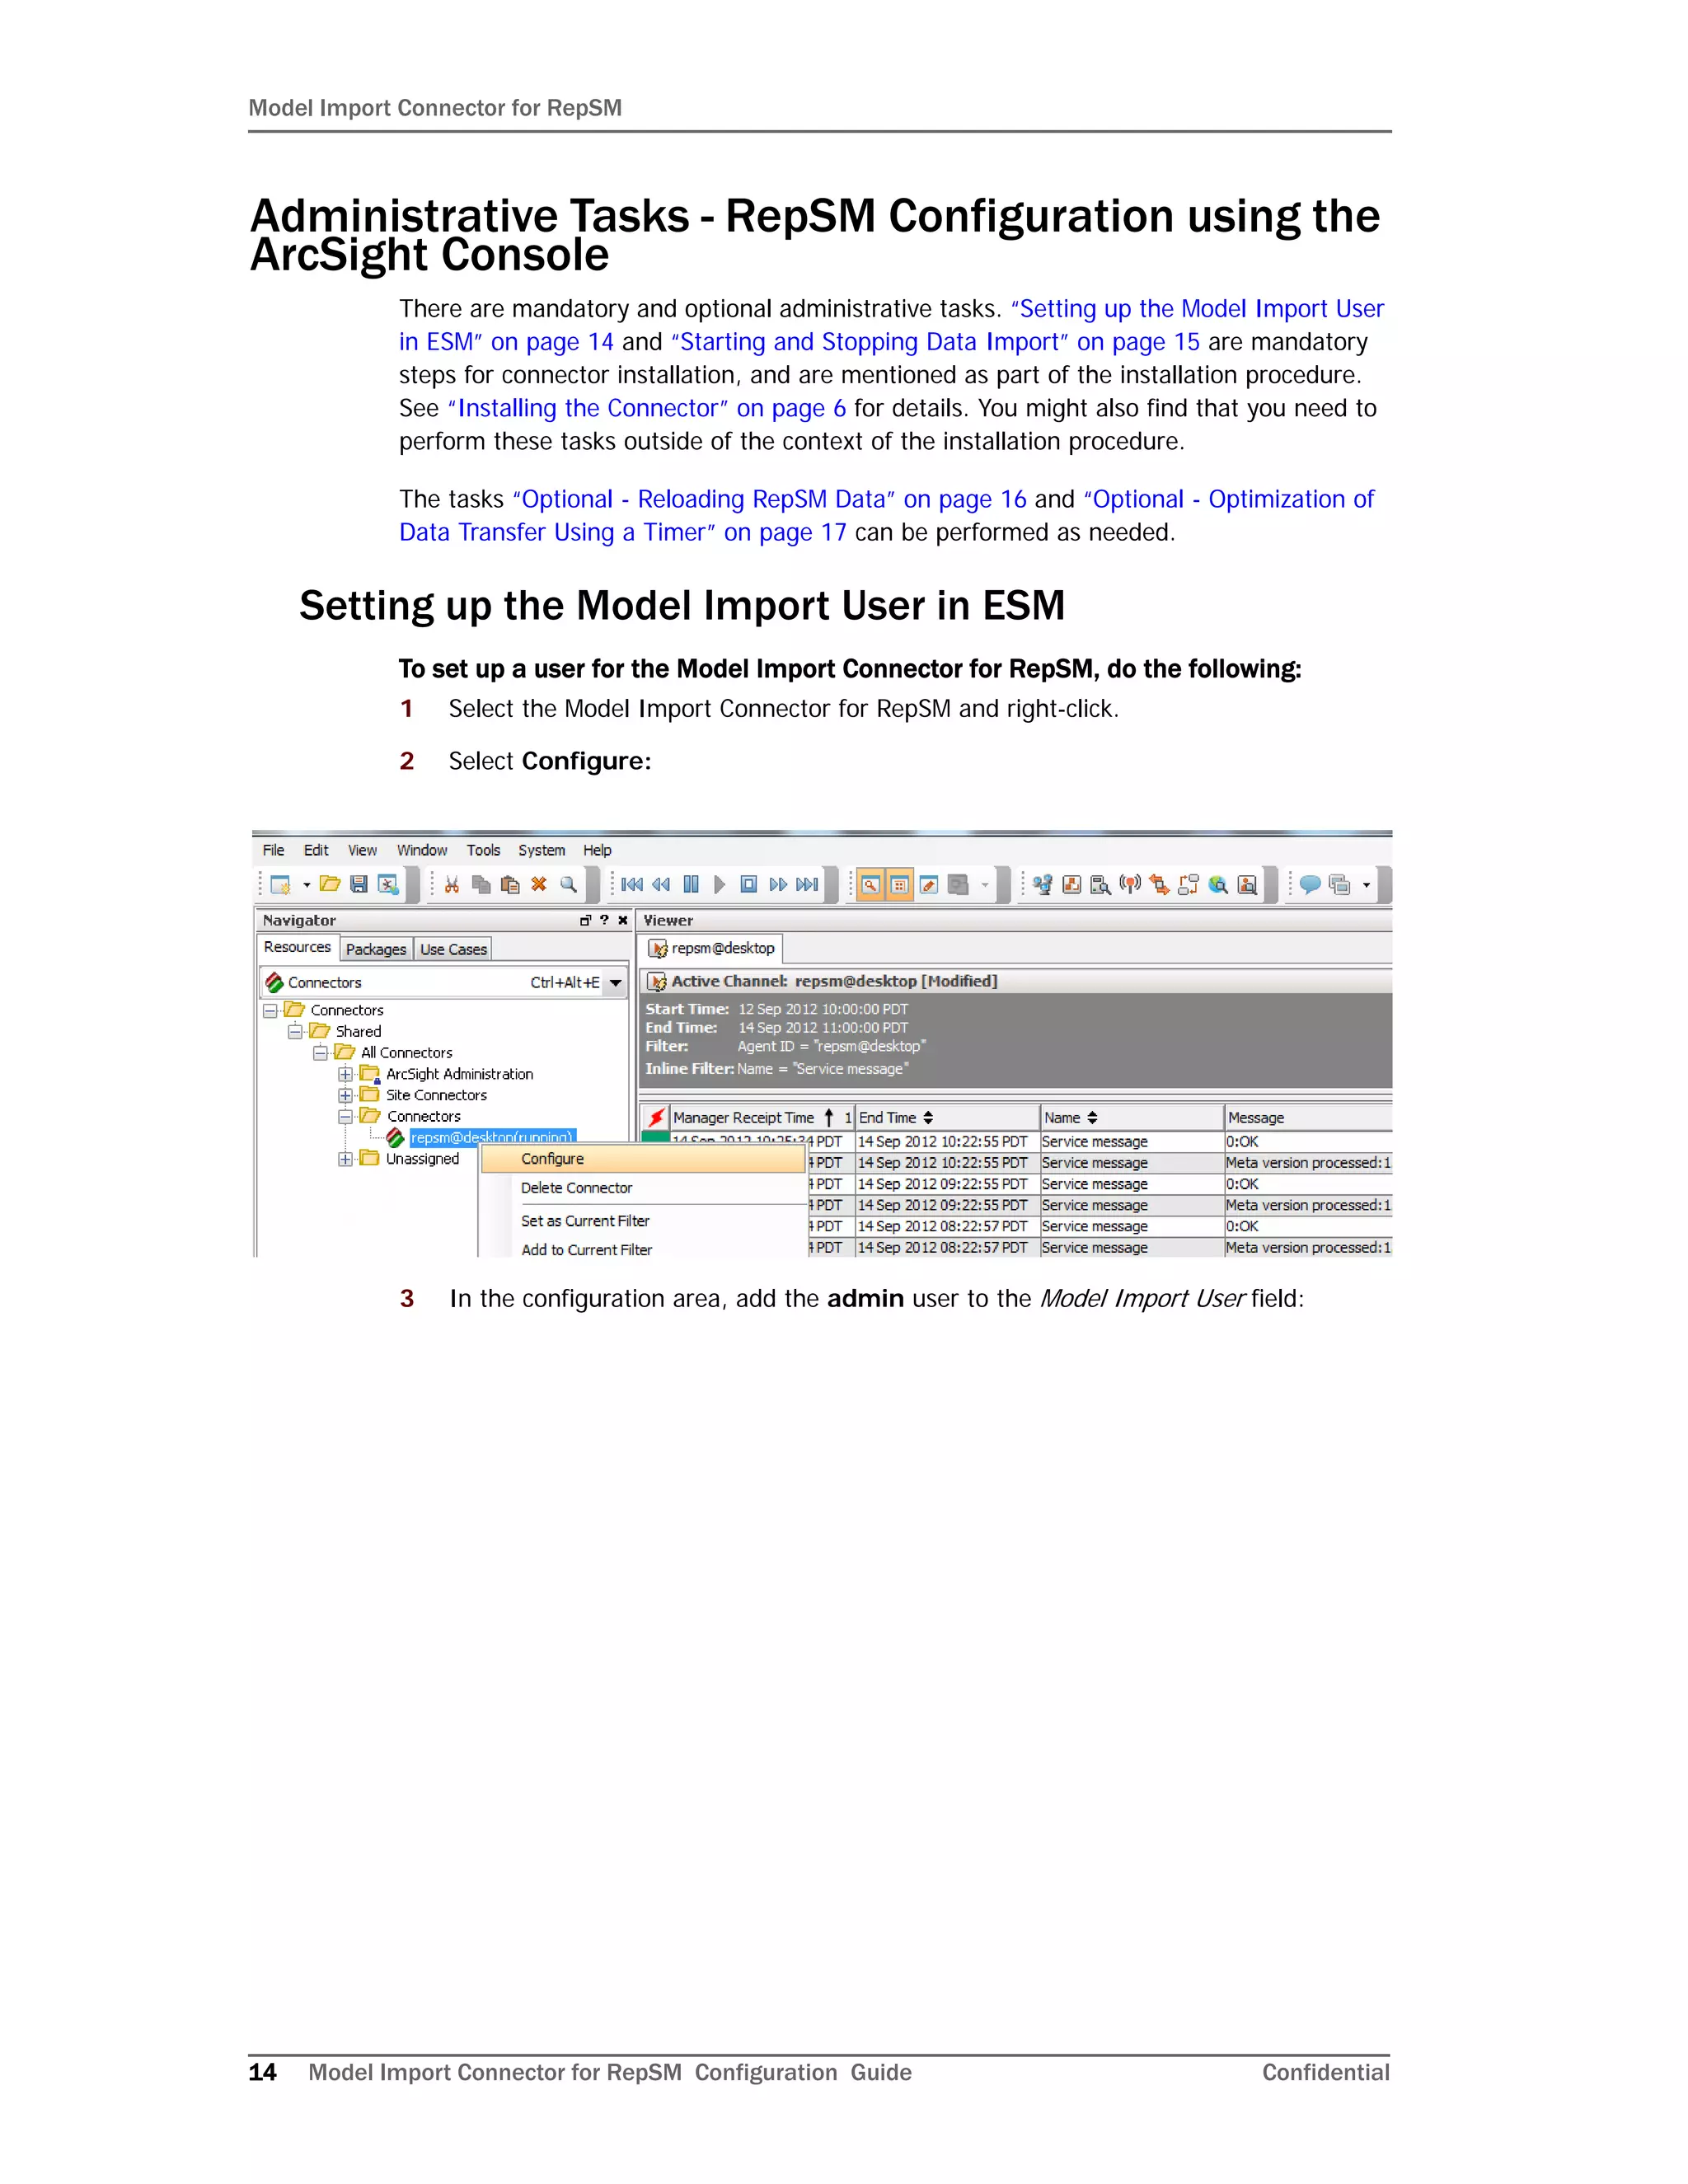
The document provides installation and configuration instructions for the Model Import Connector for RepSM 1.01. It describes downloading and running the installation wizard for the core connector software. Additional steps are then required to complete the RepSM connector installation, such as entering the service activation key and configuring the destination ArcSight Manager. The document also provides an overview of the connector's features for retrieving reputation data from the RepSM threat intelligence service and forwarding it to ArcSight ESM.
Dell EMC PowerEdge iDRAC9 - 14 features for power usersMark Maclean
The integrated Dell Remote Access Controller 9 (iDRAC9) delivers advanced, agent-free local and remote server administration.This slide deck covers some of advanced features of the latest iDRAC9 embedded in Dell EMC PowerEdge 14 generation of servers. .
Oracle database - The most common license compliance issues seenb.lay
The Oracle Database software is one of the most popular Relational Database Management Systems (RDBMS) used by many of the world’s larger enterprises. Although the Oracle Database is one of the major components in the IT landscape, almost every company that uses the software struggles with managing the accompanying licenses in a complete and accurate manner. This can easily result in large operational, financial and/or legal risks. The objective of this presentations is to provide a clear overview of the most common license compliance issues. After this webinar you can assess your organisations own situation and get a grasp of actions to be taken.
Be prepared and read our white paper "Oracle database - The most common license issues" on www.b-lay.com!
Top Features to Include in Your Winzo Clone App for Business Growth (4).pptxrickgrimesss22
Discover the essential features to incorporate in your Winzo clone app to boost business growth, enhance user engagement, and drive revenue. Learn how to create a compelling gaming experience that stands out in the competitive market.
Code reviews are vital for ensuring good code quality. They serve as one of our last lines of defense against bugs and subpar code reaching production.
Yet, they often turn into annoying tasks riddled with frustration, hostility, unclear feedback and lack of standards. How can we improve this crucial process?
In this session we will cover:
- The Art of Effective Code Reviews
- Streamlining the Review Process
- Elevating Reviews with Automated Tools
By the end of this presentation, you'll have the knowledge on how to organize and improve your code review proces
Unleash Unlimited Potential with One-Time Purchase
BoxLang is more than just a language; it's a community. By choosing a Visionary License, you're not just investing in your success, you're actively contributing to the ongoing development and support of BoxLang.
Enhancing Project Management Efficiency_ Leveraging AI Tools like ChatGPT.pdfJay Das
With the advent of artificial intelligence or AI tools, project management processes are undergoing a transformative shift. By using tools like ChatGPT, and Bard organizations can empower their leaders and managers to plan, execute, and monitor projects more effectively.
In software engineering, the right architecture is essential for robust, scalable platforms. Wix has undergone a pivotal shift from event sourcing to a CRUD-based model for its microservices. This talk will chart the course of this pivotal journey.
Event sourcing, which records state changes as immutable events, provided robust auditing and "time travel" debugging for Wix Stores' microservices. Despite its benefits, the complexity it introduced in state management slowed development. Wix responded by adopting a simpler, unified CRUD model. This talk will explore the challenges of event sourcing and the advantages of Wix's new "CRUD on steroids" approach, which streamlines API integration and domain event management while preserving data integrity and system resilience.
Participants will gain valuable insights into Wix's strategies for ensuring atomicity in database updates and event production, as well as caching, materialization, and performance optimization techniques within a distributed system.
Join us to discover how Wix has mastered the art of balancing simplicity and extensibility, and learn how the re-adoption of the modest CRUD has turbocharged their development velocity, resilience, and scalability in a high-growth environment.
Understanding Globus Data Transfers with NetSageGlobus
NetSage is an open privacy-aware network measurement, analysis, and visualization service designed to help end-users visualize and reason about large data transfers. NetSage traditionally has used a combination of passive measurements, including SNMP and flow data, as well as active measurements, mainly perfSONAR, to provide longitudinal network performance data visualization. It has been deployed by dozens of networks world wide, and is supported domestically by the Engagement and Performance Operations Center (EPOC), NSF #2328479. We have recently expanded the NetSage data sources to include logs for Globus data transfers, following the same privacy-preserving approach as for Flow data. Using the logs for the Texas Advanced Computing Center (TACC) as an example, this talk will walk through several different example use cases that NetSage can answer, including: Who is using Globus to share data with my institution, and what kind of performance are they able to achieve? How many transfers has Globus supported for us? Which sites are we sharing the most data with, and how is that changing over time? How is my site using Globus to move data internally, and what kind of performance do we see for those transfers? What percentage of data transfers at my institution used Globus, and how did the overall data transfer performance compare to the Globus users?
SOCRadar Research Team: Latest Activities of IntelBrokerSOCRadar
The European Union Agency for Law Enforcement Cooperation (Europol) has suffered an alleged data breach after a notorious threat actor claimed to have exfiltrated data from its systems. Infamous data leaker IntelBroker posted on the even more infamous BreachForums hacking forum, saying that Europol suffered a data breach this month.
The alleged breach affected Europol agencies CCSE, EC3, Europol Platform for Experts, Law Enforcement Forum, and SIRIUS. Infiltration of these entities can disrupt ongoing investigations and compromise sensitive intelligence shared among international law enforcement agencies.
However, this is neither the first nor the last activity of IntekBroker. We have compiled for you what happened in the last few days. To track such hacker activities on dark web sources like hacker forums, private Telegram channels, and other hidden platforms where cyber threats often originate, you can check SOCRadar’s Dark Web News.
Stay Informed on Threat Actors’ Activity on the Dark Web with SOCRadar!
Into the Box Keynote Day 2: Unveiling amazing updates and announcements for modern CFML developers! Get ready for exciting releases and updates on Ortus tools and products. Stay tuned for cutting-edge innovations designed to boost your productivity.
Developing Distributed High-performance Computing Capabilities of an Open Sci...Globus
COVID-19 had an unprecedented impact on scientific collaboration. The pandemic and its broad response from the scientific community has forged new relationships among public health practitioners, mathematical modelers, and scientific computing specialists, while revealing critical gaps in exploiting advanced computing systems to support urgent decision making. Informed by our team’s work in applying high-performance computing in support of public health decision makers during the COVID-19 pandemic, we present how Globus technologies are enabling the development of an open science platform for robust epidemic analysis, with the goal of collaborative, secure, distributed, on-demand, and fast time-to-solution analyses to support public health.
OpenFOAM solver for Helmholtz equation, helmholtzFoam / helmholtzBubbleFoamtakuyayamamoto1800
In this slide, we show the simulation example and the way to compile this solver.
In this solver, the Helmholtz equation can be solved by helmholtzFoam. Also, the Helmholtz equation with uniformly dispersed bubbles can be simulated by helmholtzBubbleFoam.
Custom Healthcare Software for Managing Chronic Conditions and Remote Patient...Mind IT Systems
Healthcare providers often struggle with the complexities of chronic conditions and remote patient monitoring, as each patient requires personalized care and ongoing monitoring. Off-the-shelf solutions may not meet these diverse needs, leading to inefficiencies and gaps in care. It’s here, custom healthcare software offers a tailored solution, ensuring improved care and effectiveness.
Globus Compute wth IRI Workflows - GlobusWorld 2024Globus
As part of the DOE Integrated Research Infrastructure (IRI) program, NERSC at Lawrence Berkeley National Lab and ALCF at Argonne National Lab are working closely with General Atomics on accelerating the computing requirements of the DIII-D experiment. As part of the work the team is investigating ways to speedup the time to solution for many different parts of the DIII-D workflow including how they run jobs on HPC systems. One of these routes is looking at Globus Compute as a way to replace the current method for managing tasks and we describe a brief proof of concept showing how Globus Compute could help to schedule jobs and be a tool to connect compute at different facilities.
Globus Connect Server Deep Dive - GlobusWorld 2024Globus
We explore the Globus Connect Server (GCS) architecture and experiment with advanced configuration options and use cases. This content is targeted at system administrators who are familiar with GCS and currently operate—or are planning to operate—broader deployments at their institution.
Accelerate Enterprise Software Engineering with PlatformlessWSO2
Key takeaways:
Challenges of building platforms and the benefits of platformless.
Key principles of platformless, including API-first, cloud-native middleware, platform engineering, and developer experience.
How Choreo enables the platformless experience.
How key concepts like application architecture, domain-driven design, zero trust, and cell-based architecture are inherently a part of Choreo.
Demo of an end-to-end app built and deployed on Choreo.
A Comprehensive Look at Generative AI in Retail App Testing.pdfkalichargn70th171
Traditional software testing methods are being challenged in retail, where customer expectations and technological advancements continually shape the landscape. Enter generative AI—a transformative subset of artificial intelligence technologies poised to revolutionize software testing.
First Steps with Globus Compute Multi-User EndpointsGlobus
In this presentation we will share our experiences around getting started with the Globus Compute multi-user endpoint. Working with the Pharmacology group at the University of Auckland, we have previously written an application using Globus Compute that can offload computationally expensive steps in the researcher's workflows, which they wish to manage from their familiar Windows environments, onto the NeSI (New Zealand eScience Infrastructure) cluster. Some of the challenges we have encountered were that each researcher had to set up and manage their own single-user globus compute endpoint and that the workloads had varying resource requirements (CPUs, memory and wall time) between different runs. We hope that the multi-user endpoint will help to address these challenges and share an update on our progress here.
3. Confidential Model Import Connector for RepSM Configuration Guide 3
Contents
Model Import Connector for RepSM ......................................................................................................... 5
Product Overview ............................................................................................................ 5
Features and Functional Summary ............................................................................... 5
Supported Platforms ........................................................................................................ 6
Installing the Connector ................................................................................................... 6
Model Import Connector Installation ............................................................................ 6
Running Connectors ...................................................................................................... 13
Connector Upgrade ................................................................................................. 13
Administrative Tasks - RepSM Configuration using the ArcSight Console ............................... 14
Setting up the Model Import User in ESM ................................................................... 14
Starting and Stopping Data Import ............................................................................ 15
Optional - Reloading RepSM Data .............................................................................. 16
Optional - Optimization of Data Transfer Using a Timer ................................................ 17
5. Confidential Model Import Connector for RepSM Configuration Guide 5
Model Import Connector for RepSM
This guide describes installing the HP Model Import Connector for RepSM and configuring
the device for data collection.
Product Overview
The HP Reputation Security Monitor (RepSM) solution uses internet reputation data to
detect Advance Persistent Threats and zero day attacks as well as provide context to
security events. The Model Import Connector for RepSM is a component of RepSM which
retrieves reputation data from the RepSM threat intelligence service (powered by HP
DVLabs), processes this data, and forwards it to ArcSight ESM or ArcSight Express. This
guide hereafter mentions “ESM” throughout; this refers to both ArcSight ESM and ArcSight
Express, in terms of functionality.
The threat intelligence includes reputation information about internet nodes which are
known to exhibit bad behavior. The ill reputed nodes are identified by their network
address or Domain Name System (DNS) name. This data is used by the accompanying
RepSM content package to detect malware infected machines, zero day attacks, and
dangerous browsing. The user can also use the data to implement custom ESM solutions.
For further details on this solution, see the HP Reputation Security Monitor Solution Guide.
Features and Functional Summary
The Model Import Connector for RepSM retrieves the reputation data and forwards it to
ESM. This connector supports one ESM destination.
Between restarts, the connector retrieves from the reputation service only the delta from
the last retrieved version. If the connector requests only delta information from the threat
intelligence service, and the service cannot provide such a delta, then a full update of data
will be sent to the connector. In this case, the existing entries in the ESM active list will be
dropped, and the list repopulated with new entries from the latest full update.
These entries are:
IPv4 addresses
Host and domain names
For each entry these reputation attributes are retrieved:
Reputation Score
Exploit Type
“Product Overview” on page 5
“Supported Platforms” on page 6
“Installing the Connector” on page 6
“Running Connectors” on page 13
“Administrative Tasks - RepSM Configuration using the ArcSight Console” on page 14
6. Model Import Connector for RepSM
6 Model Import Connector for RepSM Configuration Guide Confidential
The initial load and any manually initiated full update will see a delay of about 5 minutes
from the time the update is initiated. In the subsequent updates following the initial load of
the entries, the connector will process deltas to add, delete, and update the entries which
the RepSM service releases at intervals of every several hours. The connector checks for
updates, by default, every two hours. The connector will read any warning codes or
messages sent by the RepSM service and will send these to ESM as an ArcSight event.
Supported Platforms
For details on ESM version support, see the HP Reputation Security Monitor Solution
Release Notes.
The connector supports the following platforms:
Microsoft Windows Server 2003 R2 (SP2), 64-bit
Microsoft Windows Server 2008 R2, 64-bit
Red Hat Enterprise Linux (RHEL) 5.5, 5.7, 6.1, 64-bit
Installing the Connector
Before installing the connector, verify that ESM (the product with which the connector will
communicate) and ArcSight Console have already been installed correctly. It is
recommended that the connector not be installed on the same machine as ESM. Also, be
sure the following are available:
Additional 2GB memory if the connector is run in standalone mode
Subscription to the Reputation Security Monitor Service (RepSM)
Local administrator access to the machine on which the connector will be installed.
The machine, on which the connector will be installed, has external access over the
Internet to any system over port 443 and connectivity to the ESM machine over port
8443 (default) or the configured port if the default was not used.
ESM IP address, port, administrator user name, and password
Model Import Connector Installation
This section provides instructions on how to install the Model Import Connector for RepSM.
To install the Model Import Connector for RepSM:
1 Obtain the license activation key. You will have received an e-mail containing a link to
the license activation page and an order number. Click the link or copy and paste the
order number, and follow the instructions that you receive from there on.
2 Download the Model Import Connector for RepSM installation executable using the link
provided in the e-mail sent to you by HP.
Due to storage requirements, the RepSM service might not provide
accumulated delta updates if the connector has been down for more than a
week. In this case, a full import will be automatically performed.
7. Model Import Connector for RepSM
Confidential Model Import Connector for RepSM Configuration Guide 7
3 Start the connector installer by running the executable.
Follow the installation wizard through the following folder selection tasks and
installation of the core connector software:
Introduction
Choose Install Folder
Choose Shortcut Folder
Pre-Installation Summary
Installing...
4 When the installation of connector core component software is finished, the following
window is displayed.
The Model Import Connector for RepSM installation requires additional steps
after the installation wizard has finished. See step 16 of this procedure and
subsequent steps for details.
8. Model Import Connector for RepSM
8 Model Import Connector for RepSM Configuration Guide Confidential
5 Select Add a Connector.
6 Model Import Connector for RepSM is already selected. Click Next.
7 Enter the required parameters to configure the connector, then click Next.
Parameter Description
Service Activation Key When you request an activation key, HP will send you a .dat file.
Open the .dat file in a pure ASCII text editor (such as
Notepad++) and copy the entire second line of the file (the
activation key). Paste the activation key into the Service
Activation Key field. This field is required.
9. Model Import Connector for RepSM
Confidential Model Import Connector for RepSM Configuration Guide 9
8 ArcSight Manager (encrypted) is selected. Click Next.
9 Enter the Manager Host Name, Manager Port, and a valid ArcSight User name
and Password. This is the same user name and password you created during the
Update Frequency (hours) Interval at which the connector checks for updates. The default is
2 (two hours). The value must be 1 or larger, and in whole
numbers. Zero (0) is invalid. The default is recommended for
performance reasons. This field is required.
Proxy Host (https) Use this field and the following three fields only if you need the
connector to use a proxy to access the Internet. Enter the proxy
host IP address. This value is required for proxy configuration.
Proxy Port Enter the proxy port. This value is required for proxy
configuration.
Proxy User Name Enter the proxy user name. This value is needed if the proxy
requires authentication. If you specify a proxy user name, you
must also specify a proxy password.
Proxy Password Enter the password for the proxy user specified. This value is
needed if the proxy requires authentication. This field is required
only if you have specified a proxy user name.
Parameter Description
10. Model Import Connector for RepSM
10 Model Import Connector for RepSM Configuration Guide Confidential
ArcSight Manager installation. Leave the values for the next three parameters as
False. Click Next.
10 Enter a Name for the connector and provide other information identifying the
connector's use in your environment. Click Next.
11. Model Import Connector for RepSM
Confidential Model Import Connector for RepSM Configuration Guide 11
11 Select whether to import a certificate.
12 Review the Add connector Summary and click Next. If the summary is incorrect,
click Previous to make changes.
Some folders, files, and logs are named RepDV or repdv. This naming does not affect
the functioning of the connector and can be ignored.
12. Model Import Connector for RepSM
12 Model Import Connector for RepSM Configuration Guide Confidential
13 The wizard now prompts you to choose whether you want to run the connector as a
stand-alone process or as a service. Choose either Install as a service or Leave as
a standalone application.
14 Click Next.
15 To close the installation wizard, choose Exit and click Next. There are further
installation steps after you close the wizard. Be sure to continue with the subsequent
installation steps.
16 If the connector is run in standalone mode, the default heap size is 256MB. For proper
operation of the connector, HP recommends that you modify the heap size setting to
13. Model Import Connector for RepSM
Confidential Model Import Connector for RepSM Configuration Guide 13
2GB. There is no need to modify memory if the connector is run as a service; if the
connector is configured to run as a service, the heap size is set to 2GB by default.
Increase the memory for the connector by doing the following (in the following
example commands, ARCSIGHT_HOME represents the name of the directory where
the connector is installed):
For Linux - create the following shell script and be sure it is executable:
~/ARCSIGHT_HOME/current/user/agent/setmem.sh
with the following content:
ARCSIGHT_MEMORY_OPTIONS=" -Xms1024m -Xmx2048m "
For Windows - create the following batch file:
$ARCSIGHT_HOMEcurrentuseragentsetmem.bat
with the following content:
SET ARCSIGHT_MEMORY_OPTIONS=" -Xms1024m -Xmx2048m "
Be sure to use regular double quote characters in the file content in either the shell
script or the batch file.
17 Verify that the connector is running. You can check the ArcSight Console Navigator in
the Resources tab, under Connectors. If the connector is running, you will see
<connector_name> (running) listed. See “Running Connectors” on page 13.
18 Set up the Model Import user in ESM. See “Setting up the Model Import User in ESM”
on page 14.
19 Start the data import. See “Starting and Stopping Data Import” on page 15.
Running Connectors
Connectors can be installed and run in standalone mode, on Windows platforms as a
Windows service, or on UNIX platforms as a UNIX daemon, depending upon the platform
supported. On Windows platforms, connectors also can be run using shortcuts and optional
Start menu entries.
If installed standalone, the connector must be started manually, and is not automatically
active when a host is restarted. If installed as a service or daemon, the connector runs
automatically when the host is restarted. For information about connectors running as
services or daemons, see the ArcSight SmartConnector User's Guide, Chapter 3, Installing
SmartConnectors, in the section “Running SmartConnectors”.
For connectors installed standalone, to run all installed connectors on a particular host,
open a command window, go to $ARCSIGHT_HOMEcurrentbin and run: arcsight
connectors
To view the connector log, read the file:
For Windows - $ARCSIGHT_HOMEcurrentlogsagent.log
For Linux - ~/ARCSIGHT_HOME/current/logs/agent.log
To stop all connectors, enter Ctrl+C in the command window.
Connector Upgrade
To upgrade the Model Import Connector for RepSM, you must uninstall the current version
of the connector and then install the latest version. For information about uninstallnig
connectors, see the ArcSight SmartConnector User's Guide.
14. Model Import Connector for RepSM
14 Model Import Connector for RepSM Configuration Guide Confidential
Administrative Tasks - RepSM Configuration using the
ArcSight Console
There are mandatory and optional administrative tasks. “Setting up the Model Import User
in ESM” on page 14 and “Starting and Stopping Data Import” on page 15 are mandatory
steps for connector installation, and are mentioned as part of the installation procedure.
See “Installing the Connector” on page 6 for details. You might also find that you need to
perform these tasks outside of the context of the installation procedure.
The tasks “Optional - Reloading RepSM Data” on page 16 and “Optional - Optimization of
Data Transfer Using a Timer” on page 17 can be performed as needed.
Setting up the Model Import User in ESM
To set up a user for the Model Import Connector for RepSM, do the following:
1 Select the Model Import Connector for RepSM and right-click.
2 Select Configure:
3 In the configuration area, add the admin user to the Model Import User field:
15. Model Import Connector for RepSM
Confidential Model Import Connector for RepSM Configuration Guide 15
4 Click OK.
Starting and Stopping Data Import
By default the connector’s data import capability is not started. You must start the import
manually in the ArcSight Console.
To start and stop import for the Model Import Connector for RepSM:
1 Select the Model Import Connector for RepSM and right-click.
2 Select Send Command > Model Import Connector > Start or Stop:
Data import needs to be started only once from the ArcSight Console. Unless
it is stopped from the ArcSight Console, there is no need to restart the data
import.
16. Model Import Connector for RepSM
16 Model Import Connector for RepSM Configuration Guide Confidential
Optional - Reloading RepSM Data
To reload RepSM data:
1 If active, stop the connector.
2 Remove all files at:
Linux - ~/ARCSIGHT_HOME/current/user/agent/agentdata
Windows - $ARCSIGHT_HOMEcurrentuseragentagentdata
3 Remove all folders and XML files (if any) at:
Linux - ~/ARCSIGHT_HOME/current/user/agent/mic/repdv
Windows - $ARCSIGHT_HOMEcurrentuseragentmicrepdv
4 At the ArcSight Console, clear all entries in the Malicious Domains and Malicious IP
Addresses Active Lists. For each Active List:
a Select the Active List and right-click.
b Select Clear Entries.
17. Model Import Connector for RepSM
Confidential Model Import Connector for RepSM Configuration Guide 17
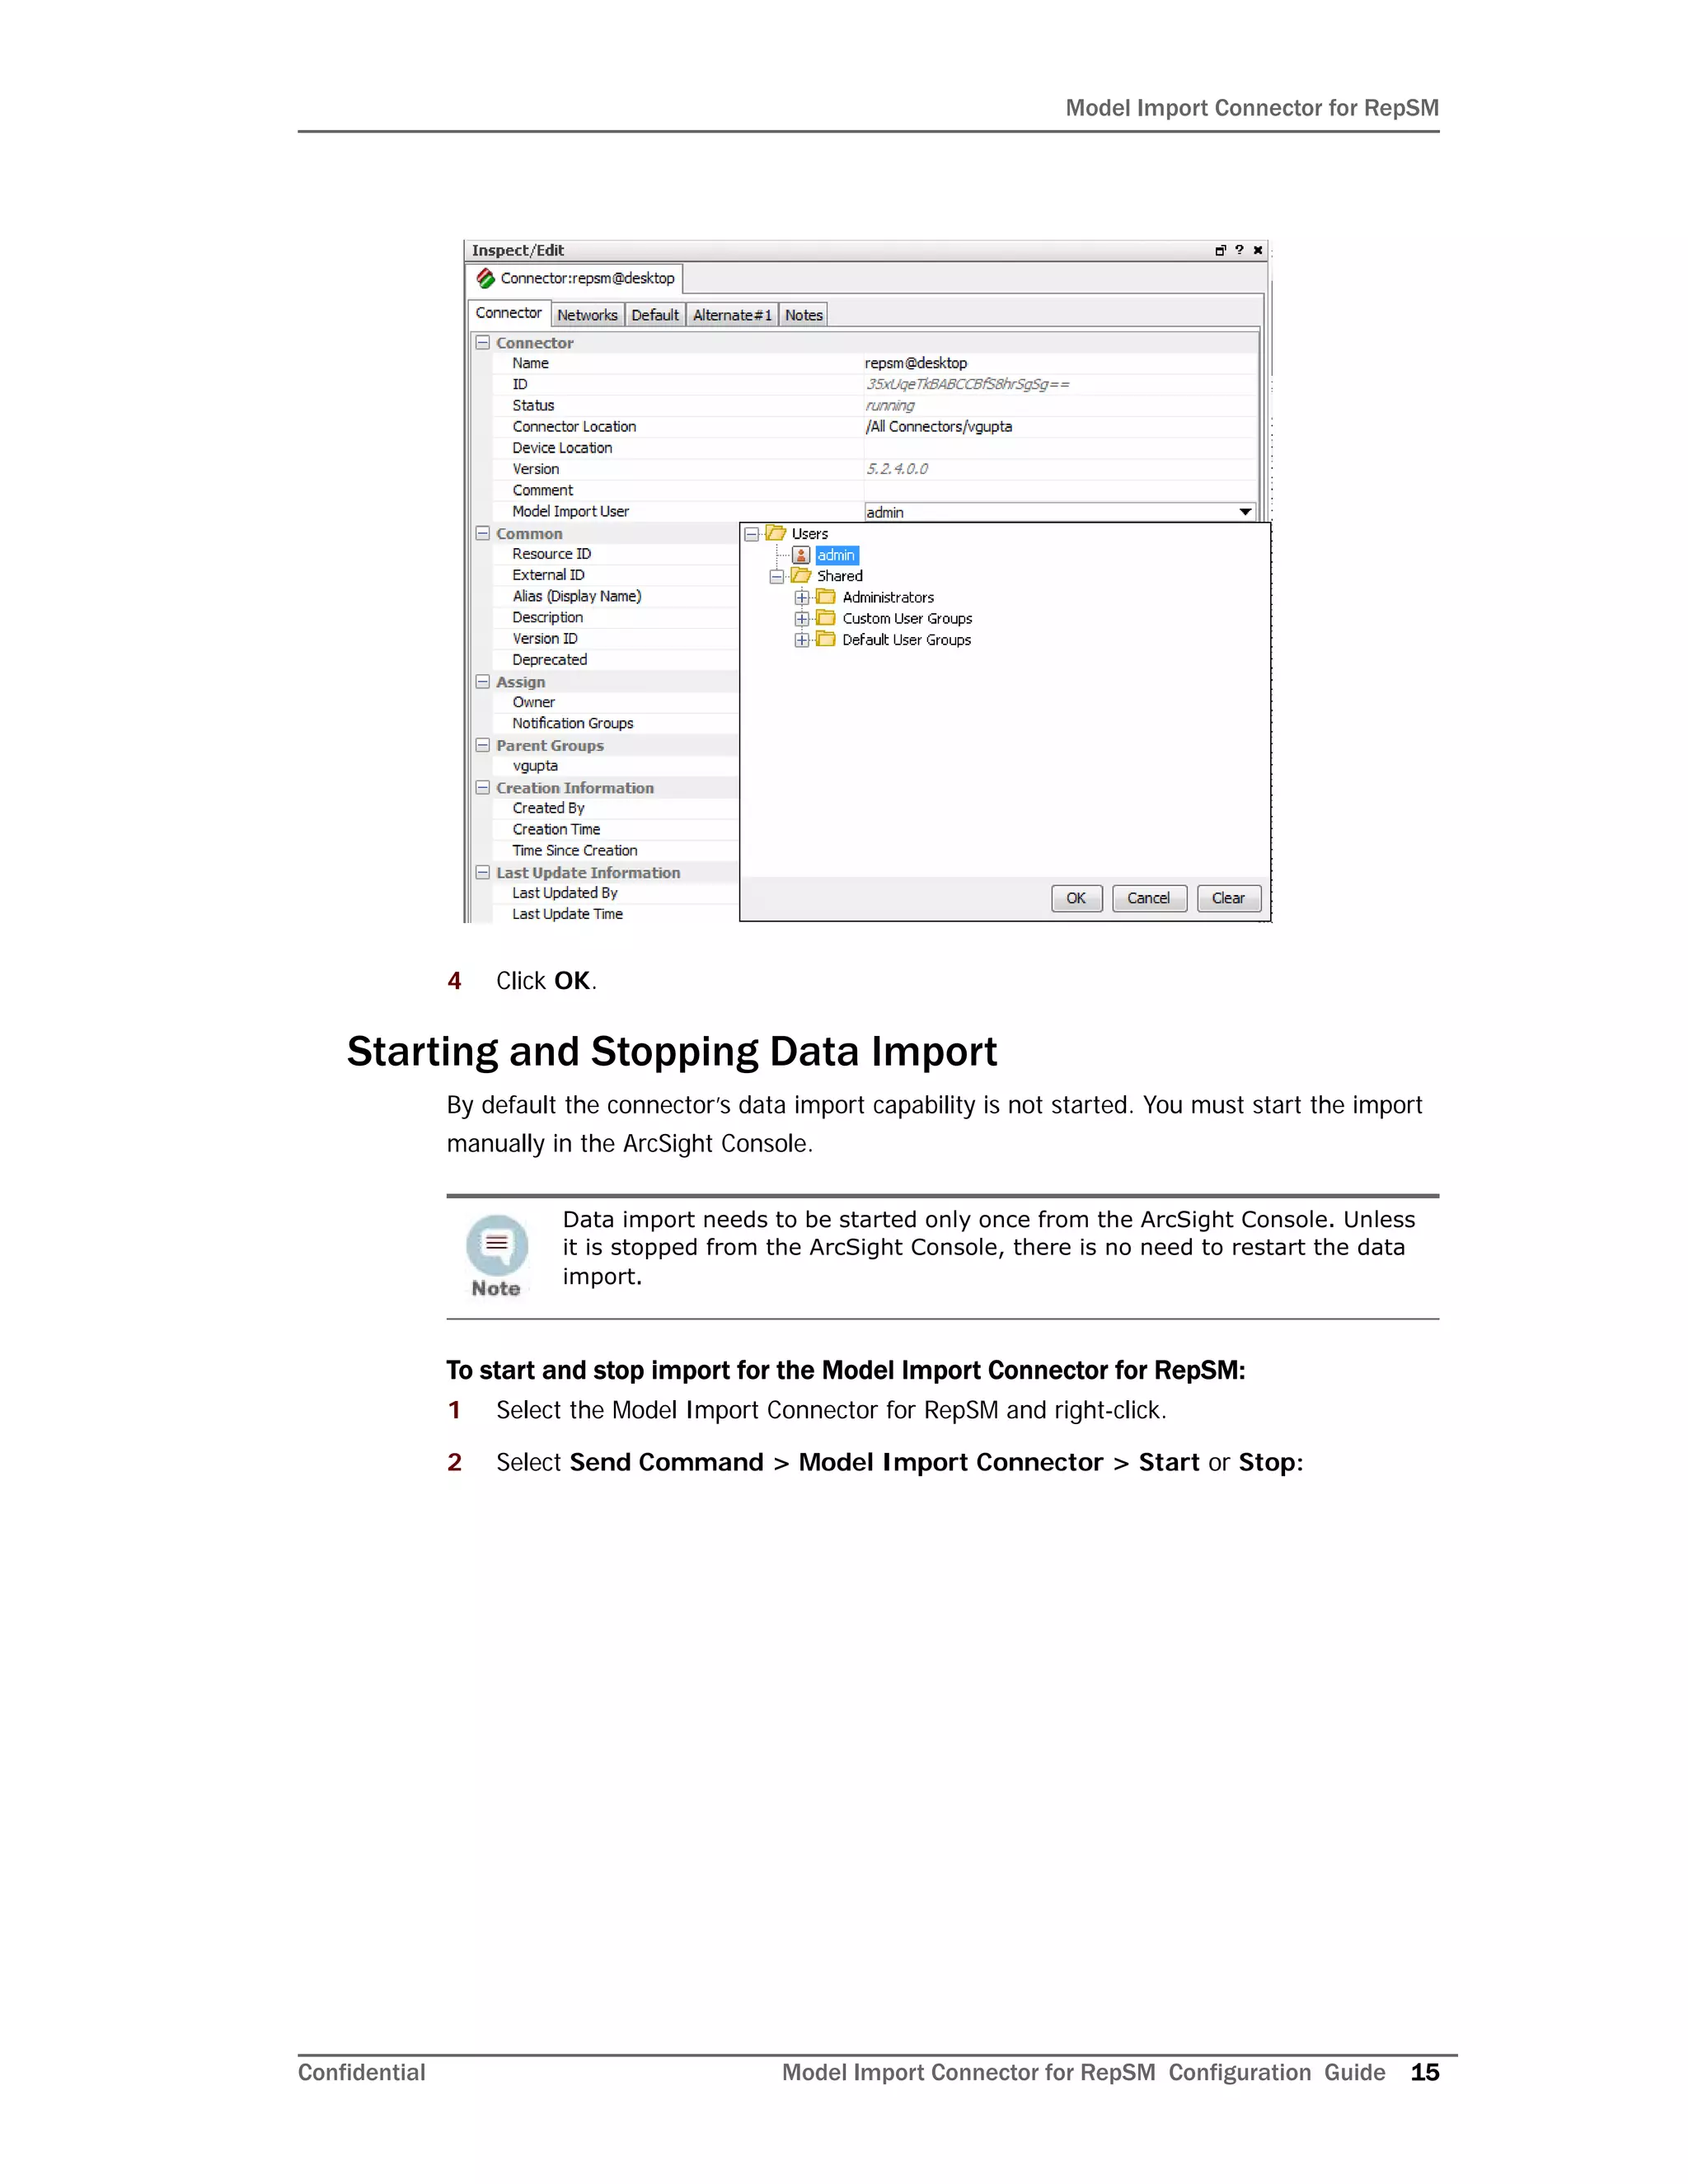
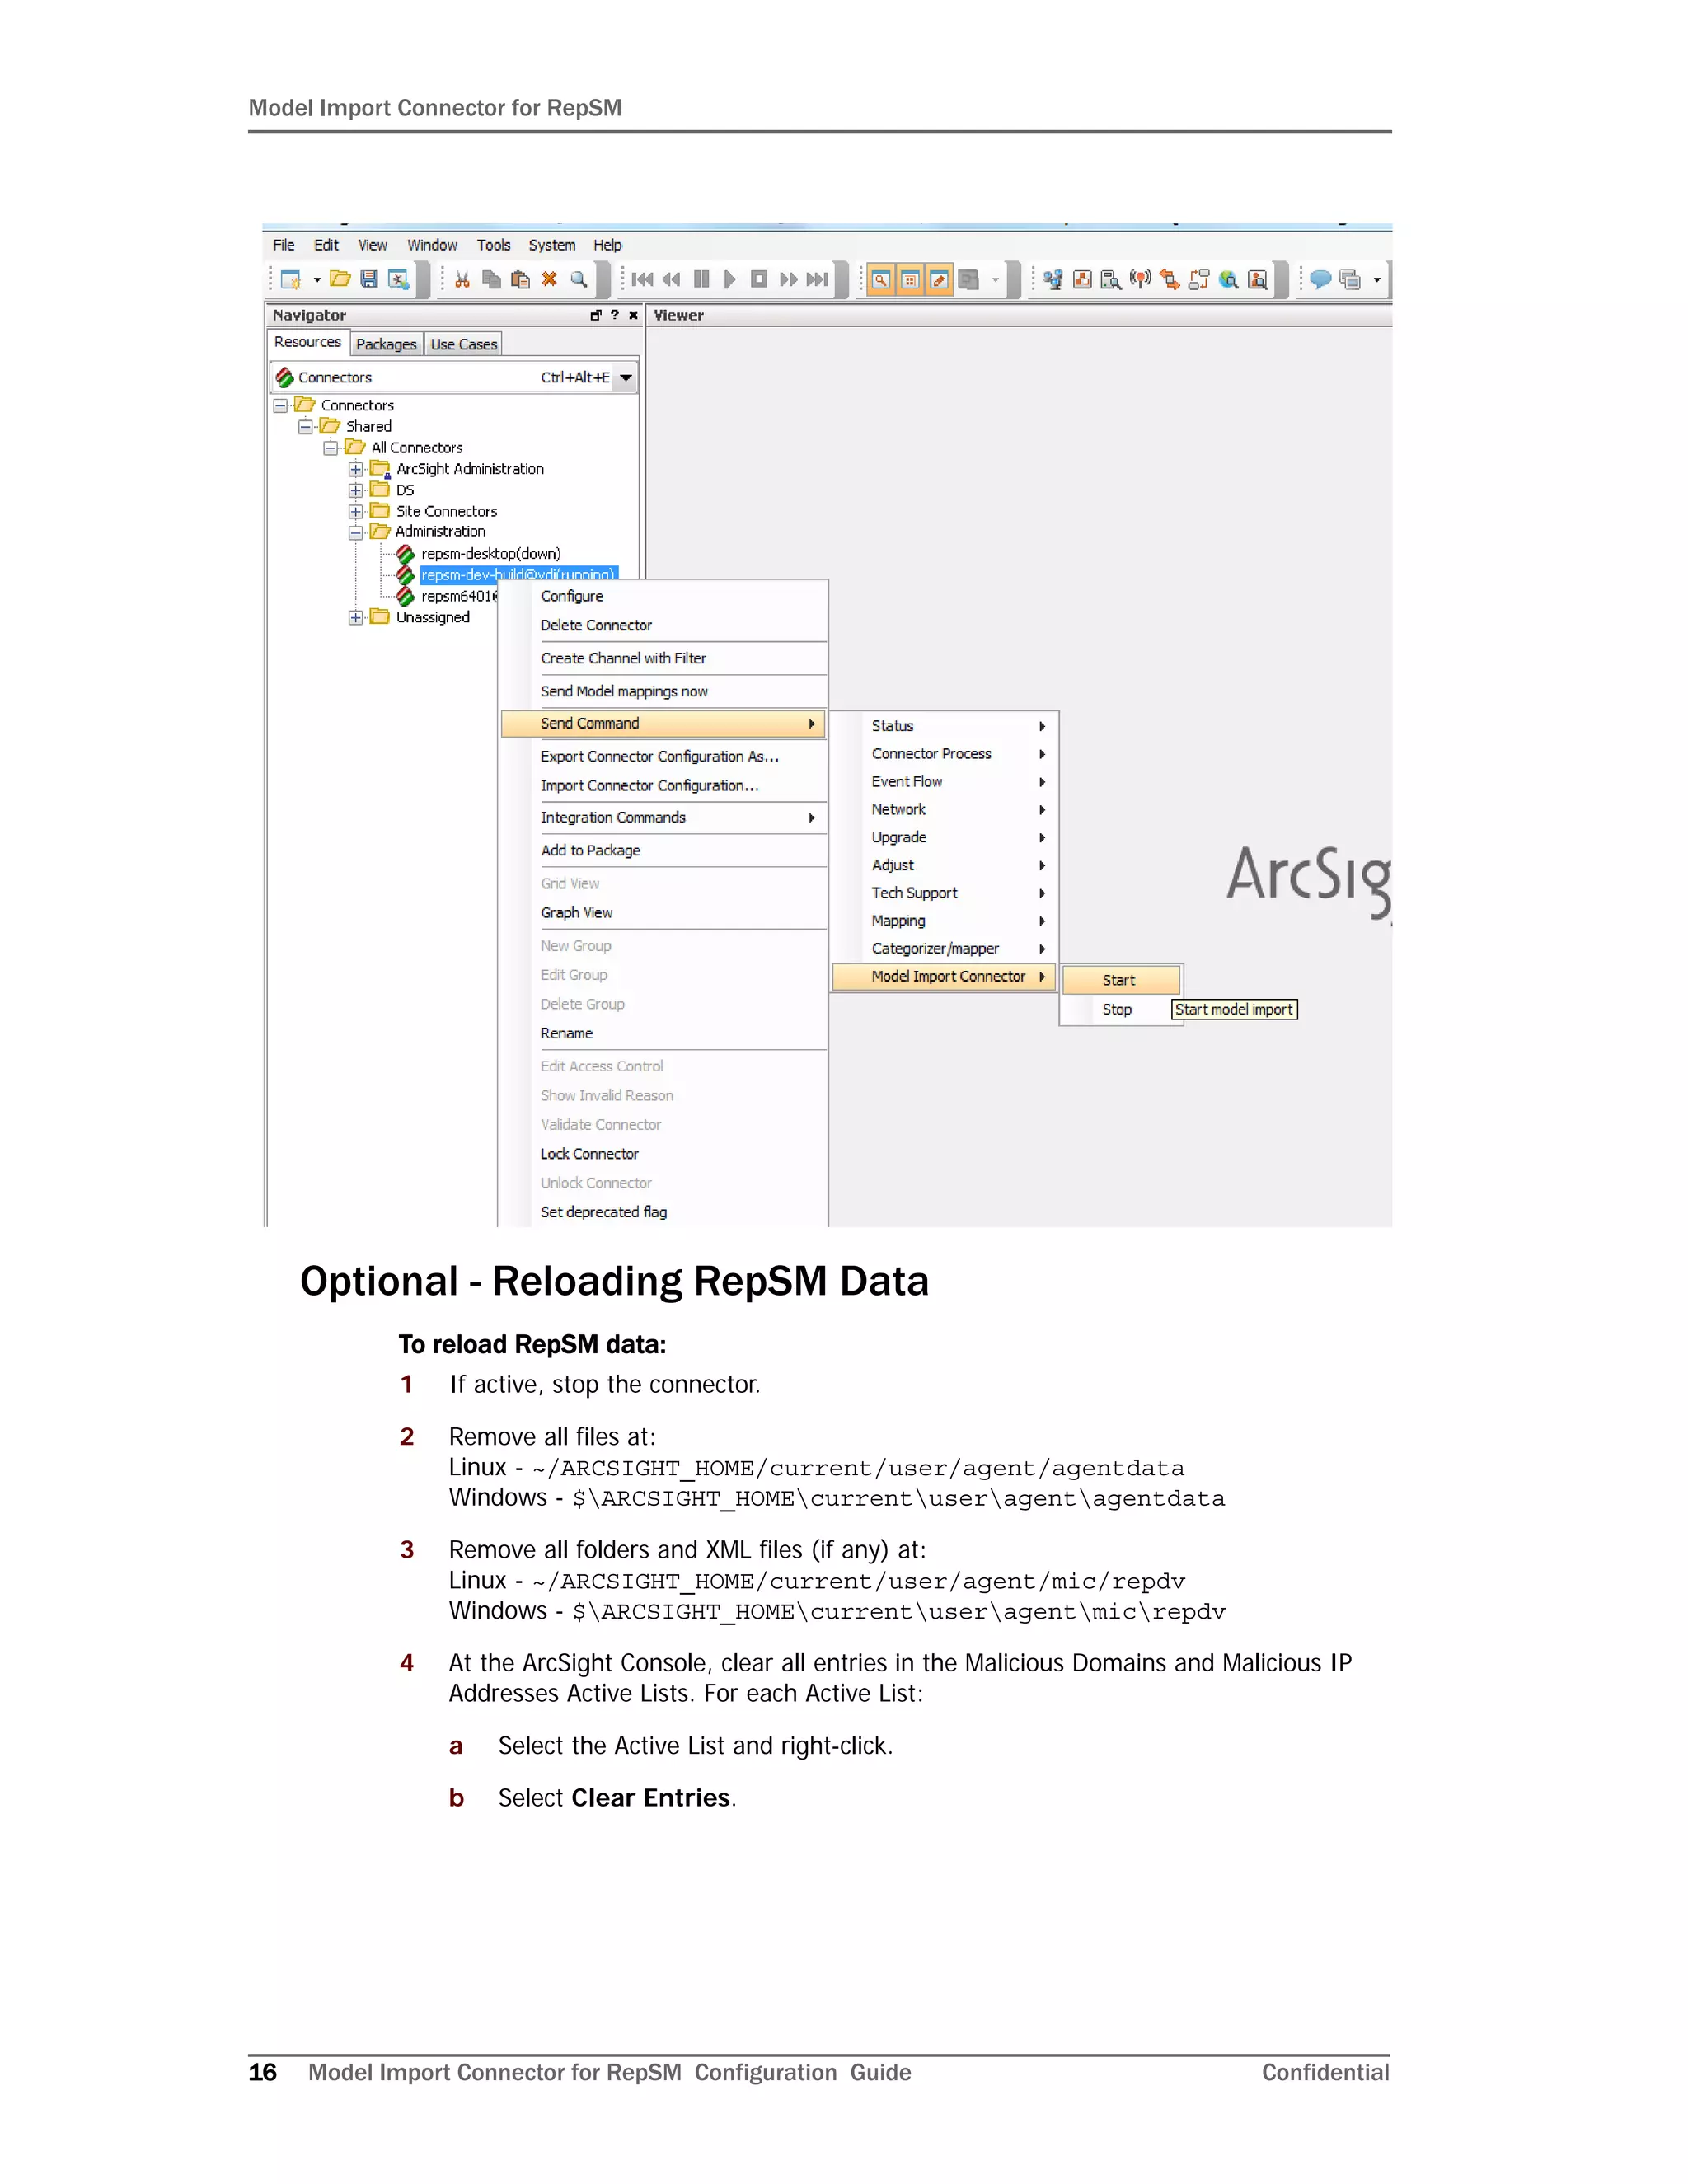
5 Restart the connector.
Optional - Optimization of Data Transfer Using a Timer
The time interval between archives sent by the connector to ESM can be controlled by the
buildmodeldelay property. The default value is 1 minute.
To increase or decrease this time interval, you can add the buildmodeldelay property to
the file agent.properties (located at $ARCSIGHT_HOMEcurrentuseragent).
The property buildmodeldelay is expressed in milliseconds.
For example, the following property sets the time interval to 10 seconds:
agent.component[35].buildmodeldelay=10000
18. Model Import Connector for RepSM
18 Model Import Connector for RepSM Configuration Guide Confidential