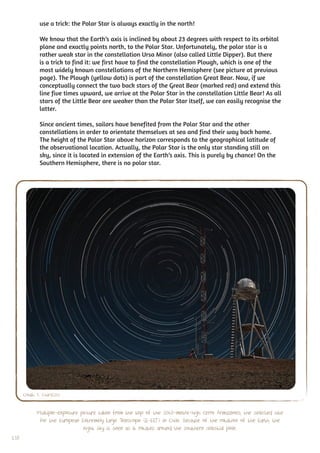
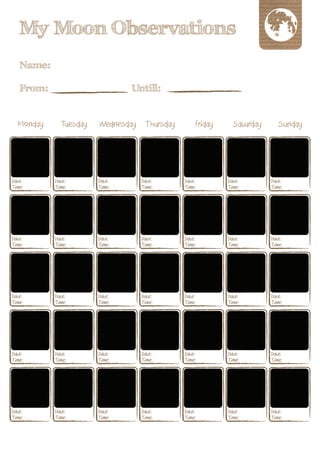
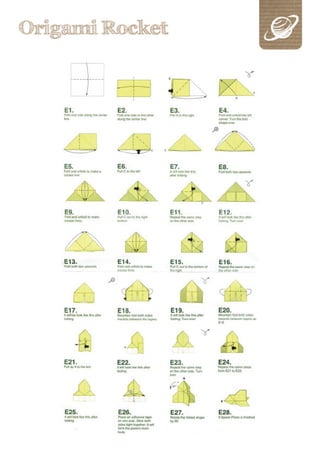
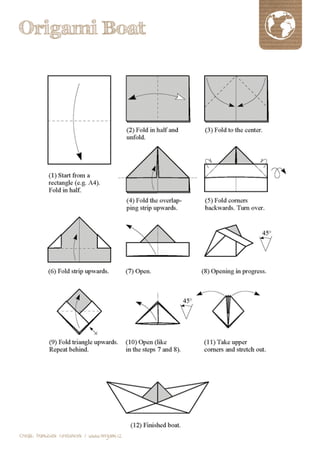
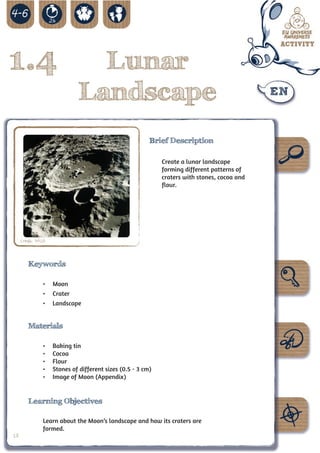
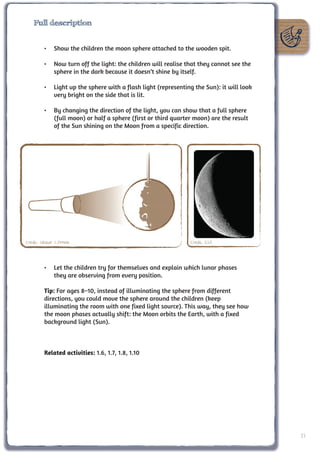
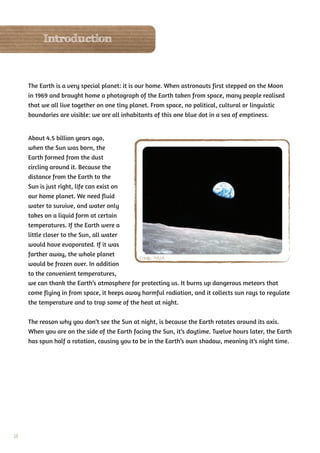
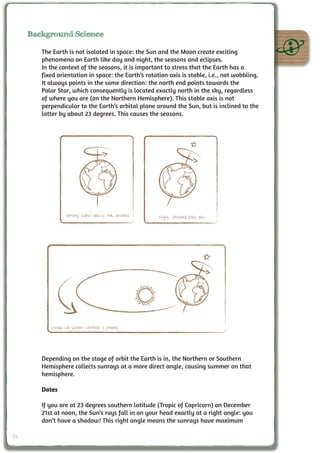
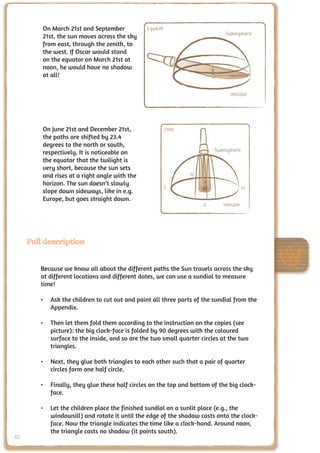
EU-Universe Awareness uses astronomy to encourage children's interest in science and technology and foster global citizenship. Its Universe in a Box program provides hands-on activities and materials to teach difficult astronomy concepts simply to children ages 4-10. The program aims to help children understand their place in the greater universe through activities on the moon, earth, sun, planets, and constellations while promoting respect for other cultures and environmental stewardship. Universe in a Box uses a modular approach with inquiry-based learning to gradually expand children's worldview.


![Background Science
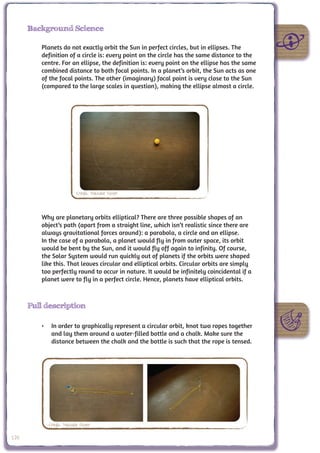
The planets’ distances to the Sun and to each other are huge compared to their
sizes. Thus, one cannot sensibly depict all planets together. Consequently,
composite photographs are used in many textbooks. Still, one should be aware
that this might create the false impression that the distances between all
planets are the same!
To provide a remedy, you can construct a model of the Solar System yourself!
If you want to construct a model of our planetary system, you have to cast a
glimpse of the sizes of the celestial bodies and their distances from the Sun.
Then you will notice that you have to use a different scale for the planet sizes
than for their mutual distances. Otherwise, either the planets’ paths will
become several kilometres long or the planets become so small that it is hard
to notice them.
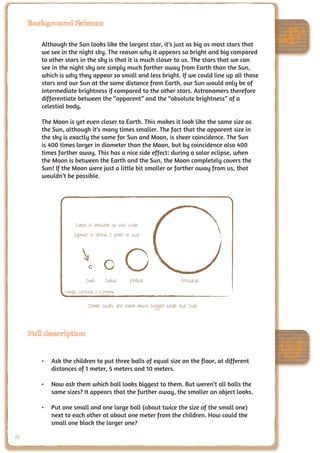
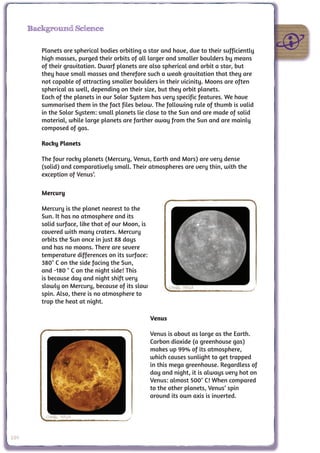
The following table reproduces the distances and sizes of the planets (sources
for columns 1 and 2: dtv-Atlas Astronomie, 2005).
Celestial Diameter Diameter Distance from Distance from
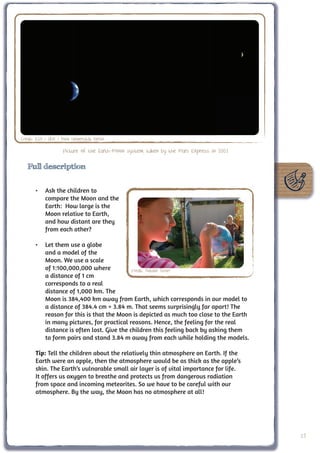
body in reality scale 1:1 Sun in reality Sun scale 1:20
[km] billion [cm] [million km] billion [m]
Sun 1 392 000 139.0 - -
Mercury 4 878 0.5 57.9 2.8
Venus 12 104 1.2 108.2 5.4
Earth 12 756 1.2 149.6 7.5
Mars 6 794 0.7 227.9 11.4
Jupiter 142 984 14.3 778.3 38.9
Saturn 120 536 12.1 1427.0 71.4
Uranus 51 118 5.1 2869.6 143.5
Neptune 49 528 5.0 4496.6 225.0
Pluto 2 246 0.2 5900.0 295.0
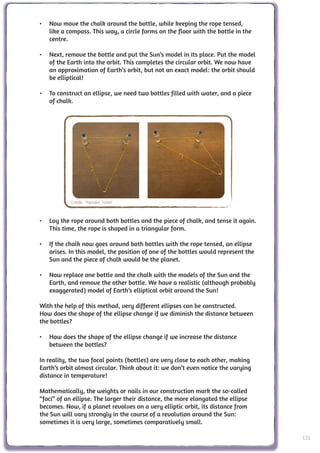
If you prefer to build a small planetary system, you can also interpret the
distance from the Sun column as specifications in cm: the only important
aspect is the ratios between these numbers (Pluto would then be 2.95 m from
the Sun).
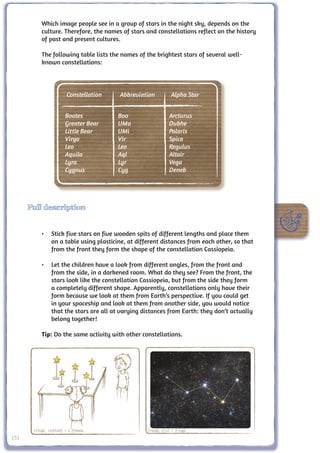
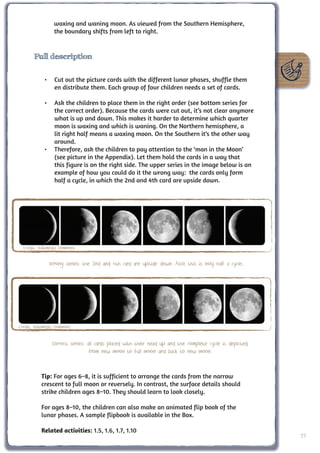
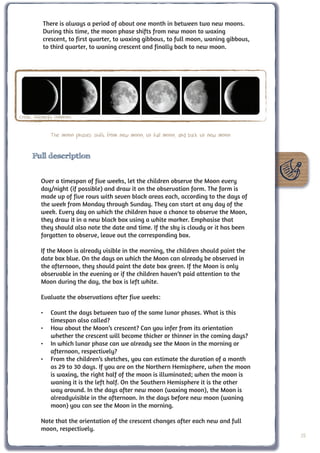
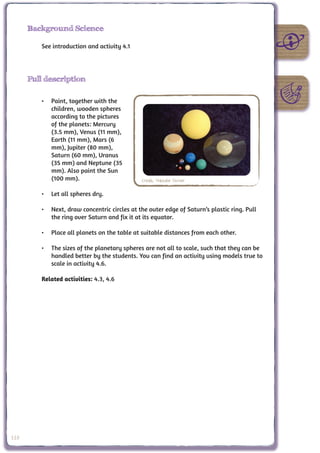
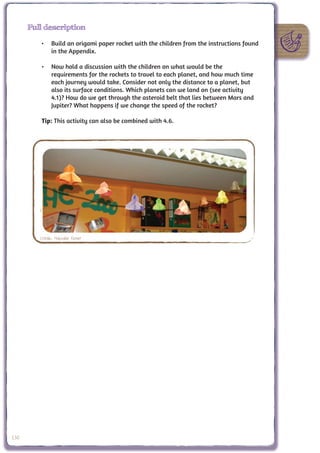
Full description
• Create models of the planets and the Sun by making balls of cotton or
clay, or use appropriate-sized marbles or other spherical shapes objects.
Use the table in ‘background science’ to get the right diameter.
124](https://image.slidesharecdn.com/universeinboxactivitybook-130316173632-phpapp02/85/Uniwerse-in-a-Box-Podrecznik-124-320.jpg)


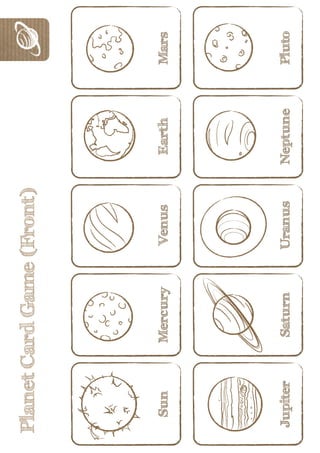
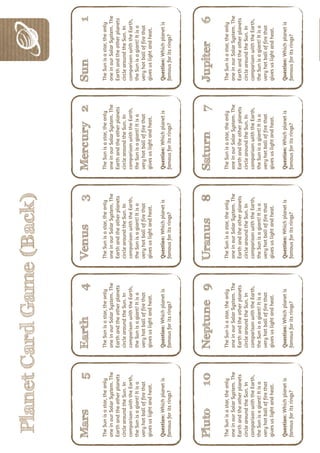
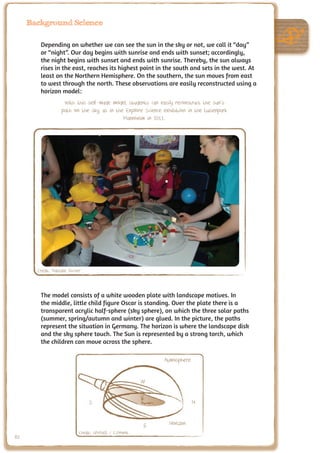
![Background Science
We want to travel to the planets and get to know them more closely. Our
card game and the planets’ paths already told us a lot about the planets. But
we also need suitable rockets and surely have to think about how long our
journey will take.
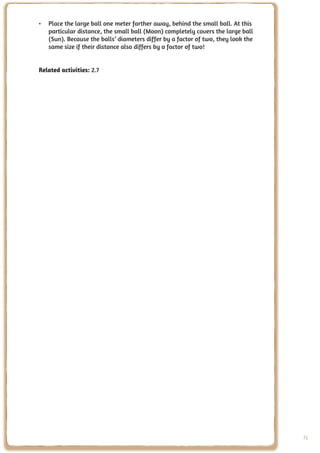
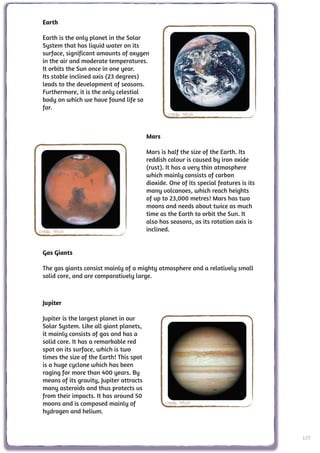
Escape velocity
Celestial
(at the equator)
body
[km/h]
Mercury 15,480
Venus 36,720
Earth 40,320
Mars 18,000
Jupiter 214,560
Credit: NASA
Saturn 127,800
Uranus 76,680
Neptune 83,880
Pluto 3,960
Traveling to other planets takes lots of time. It takes slightly less than one
year to even reach our closest neighbour, Mars. Flying to Pluto would take
almost a lifetime: about 45 years.
To take off, we have to conquer Earth’s gravitational field. To do that, our
rocket needs to reach the so-called escape velocity. If we want to leave the
planet we visited and return home, we need to escape that planet’s gravity
as well. The higher a planet’s gravitational field, the higher the escape
velocity.
For the Earth, this velocity is 40,320 km/h, or 40 times the speed of a
plane! In the table above, you can see the values of all the planets. To leave
Jupiter, for example, would take lots and lots of fuel. However, since Jupiter
is a gas planet, you cannot land on it, so we’ll never encounter this problem.
The four terrestrial planets have comparatively low escape velocities.
The direct flight times to individual planets are in the table below.
128](https://image.slidesharecdn.com/universeinboxactivitybook-130316173632-phpapp02/85/Uniwerse-in-a-Box-Podrecznik-128-320.jpg)
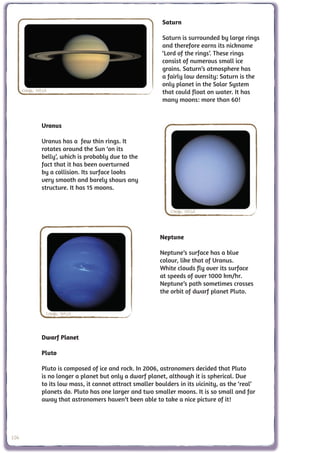
![Destination Distance Diameter Flight time at Flight time at
from Earth scale 1:1 1000 km/h 40,300 km/h
[million km] billion [cm] [years] [years]
Sun 0 149.6 17.08 0.42
Mercury 57.9 91.7 10.47 0.26
Venus 108.2 41.4 4.73 0.12
Earth 149.6 0 0.00 0.00
Mars 227.9 78.3 8.94 0.22
Jupiter 778.3 628.7 71.77 1.78
Saturn 1,427 12,77.4 145.82 3.62
Uranus 2,869.6 2,720 310.50 7.70
Neptune 4,496.6 4,347 496.23 12.31
Pluto 5,900 5,750.4 656.44 16.29
However, things are not that simple in practise. The flight paths to the
planets are much more complicated. Planets, the Earth and the Sun keep
pulling on the spacecraft during the whole journey. The following flight
times are more realistic:
n 6.05 years
Satur
Venus
er 2.73 years
9 years Jupit
0.2 3.5 mon
t
a.
hs)
(c
Mars
months)
Mercury
3.5 years
0.4 years
(ca. 5 months) 0.7 .
1
(ca
rs
1 yea
Uranus 16.
years
30.6
ars
Neptune
ye
.5
45
to
Plu
Credit: UNAWE / C.Provot
129](https://image.slidesharecdn.com/universeinboxactivitybook-130316173632-phpapp02/85/Uniwerse-in-a-Box-Podrecznik-129-320.jpg)
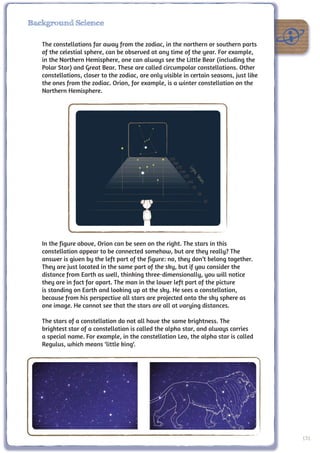
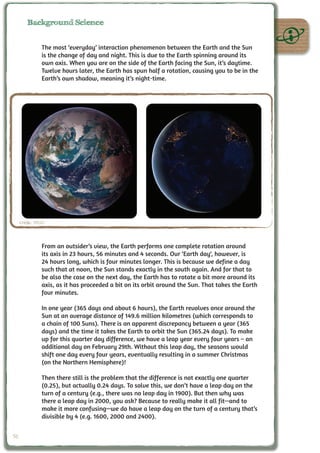
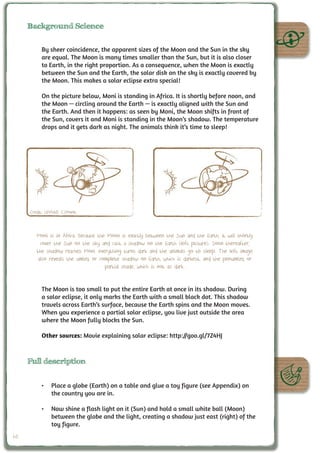
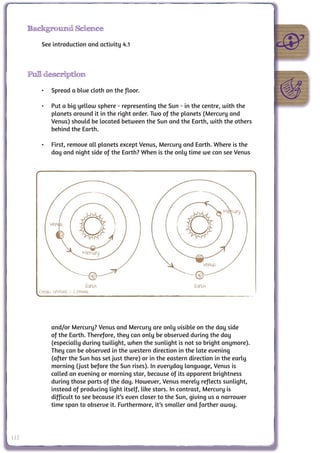
![Background Science
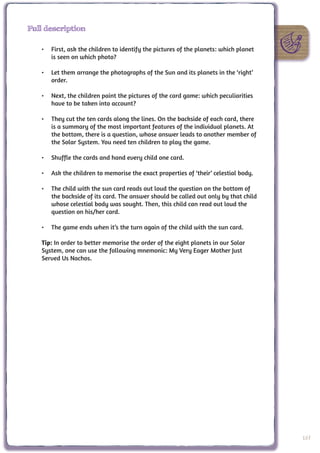
There is one very special experiment that an astronaut carried out during a
moon landing more than 40 years ago. He held a feather in one hand and a
hammer in the other, and then released both objects simultaneously. Which
one reached the ground first? They both hit the floor at the same time! If
there’s no atmosphere, the feather doesn’t experience any air friction, just like
the hammer would barely feel any on earth. In a vacuum, all objects fall at
the same speed, regardless of their mass.
When astronauts landed on the Moon, they had a lot of fun jumping on the
lunar surface. Due to the weak gravitation, they could effortlessly jump very
far and high. They felt extremely light.
How much an object weighs on another celestial body depends on the so-
called gravity acceleration. The higher this value, the stronger the celestial
body attracts this object, i.e. the more it weighs. Note that the ‘mass’ of an
object is always the same anywhere in the universe. One kilogram of sugar
remains one kilogram of sugar. It just appears as if it had less mass on the
Moon, because it weighs less there. The Moon attracts one kilogram of sugar
with less force than the Earth does.
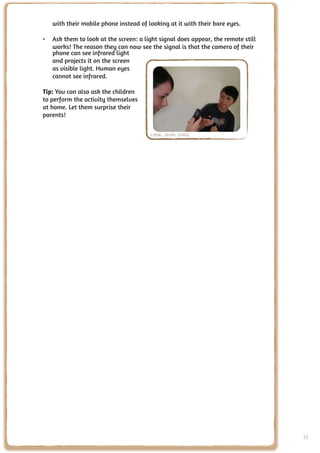
To see how much one kilogram of sugar and a child of 30 kilograms weigh on
the surface of each planet, see the table below.
Gravity Example 1 kg Example 30 kg
Celestial acceleration Multiplier sugar child
body at the equator [apparent kg] [apparent kg]
[m/s2]
Sun 273.7 27.9 27.9 837
Mercury 3.7 0.38 0.38 11.4
Venus 8.87 0.9 0.9 27
Earth 9.81 1 1 30
Moon 1.62 0.17 0.17 5.1
Mars 3.71 0.38 0.38 11.4
Jupiter 24.79 2.53 2.53 75.9
Saturn 10.44 1.06 1.06 31.8
Uranus 8.69 0.89 0.89 26.7
Neptune 11.15 1.14 1.14 34.2
Pluto 0.7 0.07 0.07 2.1
On the Moon, a child with a mass of 30 kg would weigh only 0.17 x 30 kg = 5.1
kg, while on Jupiter it would weigh as much as an adult weighs on Earth: 2.36
x 30 kg = 70.8 kg.
Other sources: An astronaut carries out a famous experiment on the Moon
with a feather and a hammer: http://goo.gl/TIvEI
132](https://image.slidesharecdn.com/universeinboxactivitybook-130316173632-phpapp02/85/Uniwerse-in-a-Box-Podrecznik-132-320.jpg)