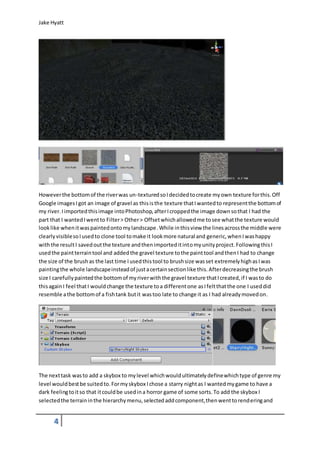
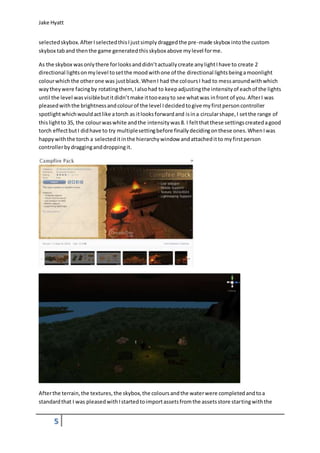
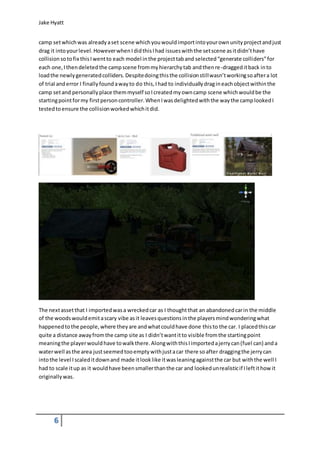
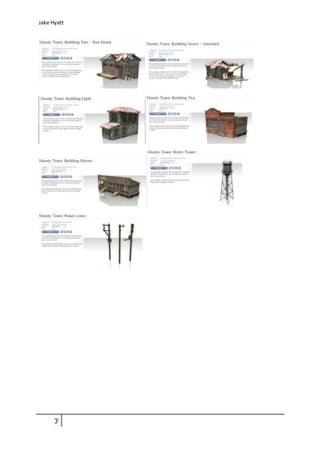
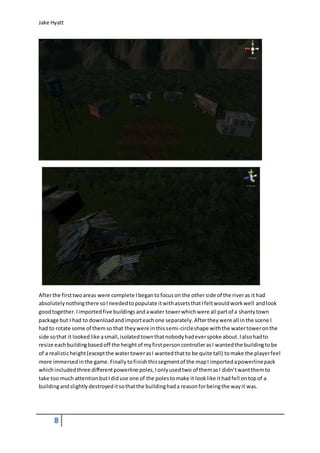
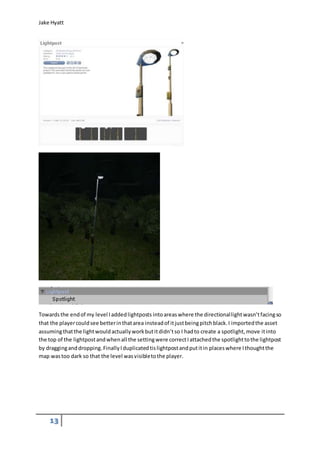
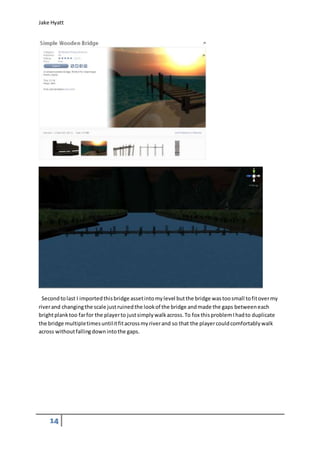
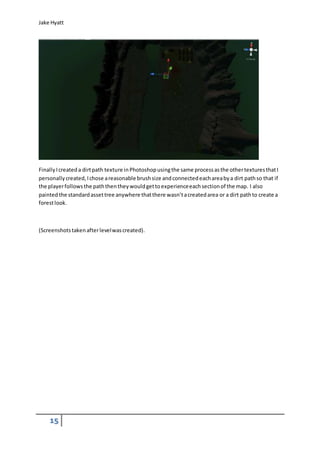
SlideShare a Scribd company logo
Jake Hyatt 
Unity 3D level design workflow 
I have been asked to design and create a level for a 3D game which will be a fist person one. I have 
decided to go for a horror theme for my level as I feel that this type of game is very big at the 
moment and there are also many things that is associated with horror. I will aim to create a map that 
is forest based but have paths and areas which will all the isolated from each other. The map will be 
set in the middle of the night so that you instantly get a bad feeling as games set during this time are 
usually horror based games. I will include a variety of trees, a mansion, a campsite, a wrecked car, an 
outhouse and a bridge that will cross over the river that flows through the middle of the map. 
1
Jake Hyatt 
Firstly I opened up Unity to create this 3D map as this is the best software that I have available to 
me, I then created a new project and started to create the terrain of the map. I decided that the 
player would be completely surrounded on all sides by mountains so that it created a feeling of them 
being trapped so I used the raise/lower terrain tool and started to roughly mould where the 
mountains would be and once I was happy with the positioning I began to raise the mountains to a 
tall height to loom over the player. 
Next I smoothed the mountain tops down by using the smooth height tool because the tops were to 
jagged and rough looking, even though I want my landscape to look frightening I thought that the 
tops looked rushed and unprofessional which is why I decided to smooth them down slightly. After 
this I created smaller mounds in front of the mountains by using the same process to raise them and 
to smooth them down. 
2
Jake Hyatt 
Then I decided that my landscape would have a river running through the middle of it because I 
thought that just mountains would look dull and boring. I used the paint height tool which allows me 
to type in my custom height and once the brush has reached that height it wouldn’t raise the surface 
anymore. I chose to set the height to 30 as I wanted the river to have depth to it; I painted the 
ground until it was all raised to level 30 on the Y axis. However after raising the floor the mountains 
looked miniscule compared to what they were so I had to raise and smooth the mountains again 
until I was happy with their height. 
After I was satisfied with the way which my landscape looked I next was going to paint this 
landscape with different textures depending on the area. For this I used the paint texture tool which 
would allow me to drag in pre-made textures into this tool and then I could paint it wherever I 
wanted (I could also change the size of the brush and the opacity of the brush). When painting the 
big mountains I used a rock texture as it was the most suitable, for the ground I used a grass texture 
as it was the most suitable and for the smaller mountains in-between the ground and the high 
mountains I used a texture that was a mixture of grass and rock blended together to show the 
process of change between the other 2 so that it wasn’t obvious lines where the grass ended and the 
rock began. 
I then added the water to my level by simply dragging the “Nighttime Simple Water” into the scene. 
As it was only a small pool of water when it was spawned into the scene I had to scale this water 
pool by stretching it until it filled the gap that I left for where the river would be and until it created 
like an ocean around the entire map. 
3
Jake Hyatt 
However the bottom of the river was un-textured so I decided to create my own texture for this. Off 
Google images I got an image of gravel as this is the texture that I wanted to represent the bottom of 
my river. I imported this image into Photoshop, after I cropped the image down so that I had the 
part that I wanted I went to Filter > Other > Offset which allowed me to see what the texture would 
look like when it was painted onto my landscape. While in this view the lines across the middle were 
clearly visible so I used to clone tool to make it look more natural and generic, when I was happy 
with the result I saved out the texture and then imported it into my unity project. Following this I 
used the paint terrain tool and added the gravel texture to the paint tool and then I had to change 
the size of the brush as the last time I used this tool to brush size was set extremely high as I was 
painting the whole landscape instead of just a certain section like this. After decreasing the brush 
size I carefully painted the bottom of my river with the gravel texture that I created, if I was to do 
this again I feel that I would change the texture to a different one as I felt that the one I used did 
resemble a the bottom of a fish tank but it was too late to change it as I had already moved on. 
The next task was to add a skybox to my level which would ultimately define which type of genre my 
level would best be suited to. For my skybox I chose a starry night as I wanted my game to have a 
dark feeling to it so that it could be used in a horror game of some sorts. To add the skybox I 
selected the terrain in the hierarchy menu, selected add component, then went to rendering and 
4
Jake Hyatt 
selected skybox. After I selected this I just simply dragged the pre-made skybox into the custom 
skybox tab and then the game generated this skybox above my level for me. 
As the skybox was only there for looks and didn’t actually create any light I have to create 2 
directional lights on my level to set the mood with one of the directional lights being a moonlight 
colour which the other one was just black. When I had the colours I had to mess around with which 
way they were facing by rotating them, I also had to keep adjusting the intensity of each of the lights 
until the level was visible but it didn’t make it too easy to see what was in front of you. After I was 
pleased with the brightness and colour of the level I decided to give my first person controller 
spotlight which would act like a torch as it looks forward and is in a circular shape, I set the range of 
this light to 35, the colour was white and the intensity was 8. I felt that these settings created a good 
torch effect but I did have to try multiple setting before finally deciding on these ones. When I was 
happy with the torch a selected it in the hierarchy window and attached it to my first person 
controller by dragging and dropping it. 
After the terrain, the textures, the skybox, the colours and the water were completed and to a 
standard that I was pleased with I started to import assets from the assets store starting with the 
5
Jake Hyatt 
camp set which was already a set scene which you would import into your own unity project and just 
drag it into your level. However when I did this I had issues with the set scene as it didn’t have 
collision so to fix this I went to each model in the project tab and selected “generate colliders” for 
each one, I then deleted the camp scene from my hierarchy tab and then re-dragged it back in to 
load the newly generated colliders. Despite doing this the collision still wasn’t working so after a lot 
of trial and error I finally found a way to do this, I had to individually drag in each object within the 
camp set and personally place them myself so I created my own camp scene which would be the 
starting point for my first person controller. When I was delighted with the way the camp looked I 
tested to ensure the collision worked which it did. 
The next asset that I imported was a wrecked car as I thought that an abandoned car in the middle 
of the woods would emit a scary vibe as it leaves questions in the players mind wondering what 
happened to the people, where they are and what could have done this to the car. I placed this car 
quite a distance away from the camp site as I didn’t want it to visible from the starting point 
meaning the player would have to walk there. Along with this I imported a jerry can (fuel can) and a 
water well as the area just seemed too empty with just a car there so after dragging the jerry can 
into the level I scaled it down and made it look like it was leaning against the car but with the well I 
had to scale it up as it would have been smaller than the car and looked unrealistic if I left it how it 
originally was. 
6
Jake Hyatt 
7
Jake Hyatt 
After the first two areas were complete I began to focus on the other side of the river as it had 
absolutely nothing there so I needed to populate it with assets that I felt would work well and look 
good together. I imported five buildings and a water tower which were all part of a shanty town 
package but I had to download and import each one separately. After they were all in the scene I 
had to rotate some of them so that they were in this semi-circle shape with the water tower on the 
side so that it looked like a small, isolated town that nobody had ever spoke about. I also had to 
resize each building based off the height of my first person controller as I wanted the building to be 
of a realistic height (except the water tower as I wanted that to be quite tall) to make the player feel 
more immersed in the game. Finally to finish this segment of the map I imported a powerline pack 
which included three different powerline poles, I only used two of them as I didn’t want them to 
take too much attention but I did use one of the poles to make it look like it had fell on top of a 
building and slightly destroyed it so that the building had a reason for being the way it was. 
8
Jake Hyatt 
The next area that I worked on was the corner next to the river and I decided that this area would be 
a logging facility however I couldn’t find a suitable building so I had to settle for just these logging 
machines. I chose to only put two of them in as I didn’t want the area to seem too crowded but 
looking at the final product I feel that I made these machines too large which takes away from the 
game being realistic which isn’t what I wanted to do. 
9
Jake Hyatt 
The next section that I worked on was just to the right of the logging machines and I decided to put 
large oil tanks here so the player could navigate around them to look for an object or for a key (if the 
game was complete). To set this up I imported an asset of an oil tank and dragged it into the scene, 
after this I had to move it into position, scale it and generate colliders so that the player couldn’t just 
walk straight through it. When I was pleased with what the oil tank looked like I just simply 
duplicated it 7 time and moved them into a different position to create this area. The reason I 
duplicated one is because if I tried to perfectly scale each one separately it most likely wouldn’t have 
worked and all the tanks would have been a different size making the level look odd. 
10
Jake Hyatt 
The next thing that I did is that I fenced in the oil tanks as I only wanted there to be one 
entrance/exit in case I wanted an event to occur when the player was in this area. It also just adds 
more detail and aesthetics to the level in general, with these fences I had to use the same process as 
the oil tanks where I brought in one fence, moved it, scaled it and generated colliders. I would then 
duplicate the fence and move it along until it looked natural and when I came to a corner all I had to 
do was rotate the fence 90 degrees and continue, I did this until the fence was complete. 
11
Jake Hyatt 
Next I wanted to add some darkness and mystery to my level so I chose to add this asset (rune 
stone) and made it quite large, the asset also has an engraved symbol on the front which brings 
questions to the players mind. When on the ground you can see that there is something on the floor 
and with a bird’s eye view you can see what it is. I decided to create a blood texture in Photoshop by 
using the same process as the gravel texture. I changed the brush size to the second lowest and 
attempted to paint a pentagram on the floor around the rune stone to add evil to the level . Also 
when playing the level there is smoke around the bottom of the rune stone but for some reason you 
aren’t able to see it when in this view. 
12
Jake Hyatt 
Towards the end of my level I added lightposts into areas where the directional light wasn’t facing so 
that the player could see better in that area instead of it just being pitch black. I imported the asset 
assuming that the light would actually work but it didn’t so I had to create a spotlight, move it into 
the top of the lightpost and when all the setting were correct I attached the spotlight to the lightpost 
by dragging and dropping. Finally I duplicated tis lightpost and put it in places where I thought the 
map was too dark so that the level was visible to the player. 
13
Jake Hyatt 
Second to last I imported this bridge asset into my level but the bridge was too small to fit over my 
river and changing the scale just ruined the look of the bridge and made the gaps between each 
bright plank too far for the player to just simply walk across. To fox this problem I had to duplicate 
the bridge multiple times until it fit across my river and so that the player could comfortably walk 
across without falling down into the gaps. 
14
Jake Hyatt 
Finally I created a dirt path texture in Photoshop using the same process as the other textures that I 
personally created, I chose a reasonable brush size and connected each area by a dirt path so that if 
the player follows the path then they would get to experience each section of the map. I also 
painted the standard asset tree anywhere that there wasn’t a created area or a dirt path to create a 
forest look. 
(Screenshots taken after level was created). 
15

More Related Content

Similar to Unity 3D level design workflow

6. interactive production reflection 2
6. interactive production reflection 26. interactive production reflection 2
6. interactive production reflection 2OliverFrost4
 
Fmp2 production reflection
Fmp2 production reflectionFmp2 production reflection
Fmp2 production reflectionbronparsons
 
Fmp2 production reflectionss
Fmp2 production reflectionssFmp2 production reflectionss
Fmp2 production reflectionssbronparsons
 
Fmp2 production reflection
Fmp2 production reflectionFmp2 production reflection
Fmp2 production reflectionbronparsons
 
Fmp2 production reflection
Fmp2 production reflectionFmp2 production reflection
Fmp2 production reflectionbronparsons
 
Production reflection fmp y1
Production reflection fmp y1Production reflection fmp y1
Production reflection fmp y1GemmaNicholls1
 
Cristian galliano 3D game engine workflow
Cristian galliano 3D game engine workflowCristian galliano 3D game engine workflow
Cristian galliano 3D game engine workflowcrisgalliano
 
3 d game engine workflow
3 d game engine workflow3 d game engine workflow
3 d game engine workflowKeatonBradley
 
P4 - 3. Production Experiments
P4 - 3. Production ExperimentsP4 - 3. Production Experiments
P4 - 3. Production ExperimentsTamzinTwose
 
P4 - 6. Production Reflection (Interactive)
P4 - 6. Production Reflection (Interactive)P4 - 6. Production Reflection (Interactive)
P4 - 6. Production Reflection (Interactive)TamzinTwose
 
Photographic thumbnail
Photographic thumbnail Photographic thumbnail
Photographic thumbnail aaronmc165
 
Post-Production.pptx
Post-Production.pptxPost-Production.pptx
Post-Production.pptxMeganIvy1
 
3D game engine work flow
3D game engine work flow3D game engine work flow
3D game engine work flowsoulsama
 
7. production reflection
7. production reflection7. production reflection
7. production reflectionLuke Ross
 
3. fmp production experiments
3. fmp production experiments3. fmp production experiments
3. fmp production experimentsJamescooperabel1
 
2.2 Production Experiments.pptx
2.2 Production Experiments.pptx2.2 Production Experiments.pptx
2.2 Production Experiments.pptxMatthewEvans7662
 

Similar to Unity 3D level design workflow (20)

6. interactive production reflection 2
6. interactive production reflection 26. interactive production reflection 2
6. interactive production reflection 2
 
Unity workflow
Unity workflow Unity workflow
Unity workflow
 
3 d level workflow
3 d level workflow3 d level workflow
3 d level workflow
 
Fmp2 production reflection
Fmp2 production reflectionFmp2 production reflection
Fmp2 production reflection
 
Fmp2 production reflectionss
Fmp2 production reflectionssFmp2 production reflectionss
Fmp2 production reflectionss
 
Fmp2 production reflection
Fmp2 production reflectionFmp2 production reflection
Fmp2 production reflection
 
Fmp2 production reflection
Fmp2 production reflectionFmp2 production reflection
Fmp2 production reflection
 
Workflow unity
Workflow unityWorkflow unity
Workflow unity
 
Production reflection fmp y1
Production reflection fmp y1Production reflection fmp y1
Production reflection fmp y1
 
Cristian galliano 3D game engine workflow
Cristian galliano 3D game engine workflowCristian galliano 3D game engine workflow
Cristian galliano 3D game engine workflow
 
3 d game engine workflow
3 d game engine workflow3 d game engine workflow
3 d game engine workflow
 
P4 - 3. Production Experiments
P4 - 3. Production ExperimentsP4 - 3. Production Experiments
P4 - 3. Production Experiments
 
P4 - 6. Production Reflection (Interactive)
P4 - 6. Production Reflection (Interactive)P4 - 6. Production Reflection (Interactive)
P4 - 6. Production Reflection (Interactive)
 
Photographic thumbnail
Photographic thumbnail Photographic thumbnail
Photographic thumbnail
 
Post-Production.pptx
Post-Production.pptxPost-Production.pptx
Post-Production.pptx
 
Workflow
WorkflowWorkflow
Workflow
 
3D game engine work flow
3D game engine work flow3D game engine work flow
3D game engine work flow
 
7. production reflection
7. production reflection7. production reflection
7. production reflection
 
3. fmp production experiments
3. fmp production experiments3. fmp production experiments
3. fmp production experiments
 
2.2 Production Experiments.pptx
2.2 Production Experiments.pptx2.2 Production Experiments.pptx
2.2 Production Experiments.pptx
 

More from jakehyatt

7274 submission form
7274 submission form7274 submission form
7274 submission formjakehyatt
 
Sound recording glossary improved
Sound recording glossary improvedSound recording glossary improved
Sound recording glossary improvedjakehyatt
 
Gears of war analysis
Gears of war analysisGears of war analysis
Gears of war analysisjakehyatt
 
Bioshock analysis
Bioshock analysisBioshock analysis
Bioshock analysisjakehyatt
 
Assessment submission declaration
Assessment submission declarationAssessment submission declaration
Assessment submission declarationjakehyatt
 
Assessment submission declaration
Assessment submission declarationAssessment submission declaration
Assessment submission declarationjakehyatt
 
Assessment submission declaration
Assessment submission declarationAssessment submission declaration
Assessment submission declarationjakehyatt
 
Unit 3 - Assignment brief
Unit 3 - Assignment briefUnit 3 - Assignment brief
Unit 3 - Assignment briefjakehyatt
 

More from jakehyatt (9)

7274 submission form
7274 submission form7274 submission form
7274 submission form
 
Production
ProductionProduction
Production
 
Sound recording glossary improved
Sound recording glossary improvedSound recording glossary improved
Sound recording glossary improved
 
Gears of war analysis
Gears of war analysisGears of war analysis
Gears of war analysis
 
Bioshock analysis
Bioshock analysisBioshock analysis
Bioshock analysis
 
Assessment submission declaration
Assessment submission declarationAssessment submission declaration
Assessment submission declaration
 
Assessment submission declaration
Assessment submission declarationAssessment submission declaration
Assessment submission declaration
 
Assessment submission declaration
Assessment submission declarationAssessment submission declaration
Assessment submission declaration
 
Unit 3 - Assignment brief
Unit 3 - Assignment briefUnit 3 - Assignment brief
Unit 3 - Assignment brief
 

Recently uploaded

50 ĐỀ LUYỆN THI IOE LỚP 9 - NĂM HỌC 2022-2023 (CÓ LINK HÌNH, FILE AUDIO VÀ ĐÁ...
50 ĐỀ LUYỆN THI IOE LỚP 9 - NĂM HỌC 2022-2023 (CÓ LINK HÌNH, FILE AUDIO VÀ ĐÁ...50 ĐỀ LUYỆN THI IOE LỚP 9 - NĂM HỌC 2022-2023 (CÓ LINK HÌNH, FILE AUDIO VÀ ĐÁ...
50 ĐỀ LUYỆN THI IOE LỚP 9 - NĂM HỌC 2022-2023 (CÓ LINK HÌNH, FILE AUDIO VÀ ĐÁ...Nguyen Thanh Tu Collection
 
The Art Pastor's Guide to Sabbath | Steve Thomason
The Art Pastor's Guide to Sabbath | Steve ThomasonThe Art Pastor's Guide to Sabbath | Steve Thomason
The Art Pastor's Guide to Sabbath | Steve ThomasonSteve Thomason
 
Phrasal Verbs.XXXXXXXXXXXXXXXXXXXXXXXXXX
Phrasal Verbs.XXXXXXXXXXXXXXXXXXXXXXXXXXPhrasal Verbs.XXXXXXXXXXXXXXXXXXXXXXXXXX
Phrasal Verbs.XXXXXXXXXXXXXXXXXXXXXXXXXXMIRIAMSALINAS13
 
Synthetic Fiber Construction in lab .pptx
Synthetic Fiber Construction in lab .pptxSynthetic Fiber Construction in lab .pptx
Synthetic Fiber Construction in lab .pptxShajedul Islam Pavel
 
INU_CAPSTONEDESIGN_비밀번호486_업로드용 발표자료.pdf
INU_CAPSTONEDESIGN_비밀번호486_업로드용 발표자료.pdfINU_CAPSTONEDESIGN_비밀번호486_업로드용 발표자료.pdf
INU_CAPSTONEDESIGN_비밀번호486_업로드용 발표자료.pdfbu07226
 
Gyanartha SciBizTech Quiz slideshare.pptx
Gyanartha SciBizTech Quiz slideshare.pptxGyanartha SciBizTech Quiz slideshare.pptx
Gyanartha SciBizTech Quiz slideshare.pptxShibin Azad
 
Danh sách HSG Bộ môn cấp trường - Cấp THPT.pdf
Danh sách HSG Bộ môn cấp trường - Cấp THPT.pdfDanh sách HSG Bộ môn cấp trường - Cấp THPT.pdf
Danh sách HSG Bộ môn cấp trường - Cấp THPT.pdfQucHHunhnh
 
Accounting and finance exit exam 2016 E.C.pdf
Accounting and finance exit exam 2016 E.C.pdfAccounting and finance exit exam 2016 E.C.pdf
Accounting and finance exit exam 2016 E.C.pdfYibeltalNibretu
 
UNIT – IV_PCI Complaints: Complaints and evaluation of complaints, Handling o...
UNIT – IV_PCI Complaints: Complaints and evaluation of complaints, Handling o...UNIT – IV_PCI Complaints: Complaints and evaluation of complaints, Handling o...
UNIT – IV_PCI Complaints: Complaints and evaluation of complaints, Handling o...Sayali Powar
 
2024_Student Session 2_ Set Plan Preparation.pptx
2024_Student Session 2_ Set Plan Preparation.pptx2024_Student Session 2_ Set Plan Preparation.pptx
2024_Student Session 2_ Set Plan Preparation.pptxmansk2
 
PART A. Introduction to Costumer Service
PART A. Introduction to Costumer ServicePART A. Introduction to Costumer Service
PART A. Introduction to Costumer ServicePedroFerreira53928
 
Basic phrases for greeting and assisting costumers
Basic phrases for greeting and assisting costumersBasic phrases for greeting and assisting costumers
Basic phrases for greeting and assisting costumersPedroFerreira53928
 
Adversarial Attention Modeling for Multi-dimensional Emotion Regression.pdf
Adversarial Attention Modeling for Multi-dimensional Emotion Regression.pdfAdversarial Attention Modeling for Multi-dimensional Emotion Regression.pdf
Adversarial Attention Modeling for Multi-dimensional Emotion Regression.pdfPo-Chuan Chen
 
aaaaaaaaaaaaaaaaaaaaaaaaaaaaaaaaaaaaaaaaa
aaaaaaaaaaaaaaaaaaaaaaaaaaaaaaaaaaaaaaaaaaaaaaaaaaaaaaaaaaaaaaaaaaaaaaaaaaaaaaaaaa
aaaaaaaaaaaaaaaaaaaaaaaaaaaaaaaaaaaaaaaaasiemaillard
 
Fish and Chips - have they had their chips
Fish and Chips - have they had their chipsFish and Chips - have they had their chips
Fish and Chips - have they had their chipsGeoBlogs
 
Application of Matrices in real life. Presentation on application of matrices
Application of Matrices in real life. Presentation on application of matricesApplication of Matrices in real life. Presentation on application of matrices
Application of Matrices in real life. Presentation on application of matricesRased Khan
 
MARUTI SUZUKI- A Successful Joint Venture in India.pptx
MARUTI SUZUKI- A Successful Joint Venture in India.pptxMARUTI SUZUKI- A Successful Joint Venture in India.pptx
MARUTI SUZUKI- A Successful Joint Venture in India.pptxbennyroshan06
 
Additional Benefits for Employee Website.pdf
Additional Benefits for Employee Website.pdfAdditional Benefits for Employee Website.pdf
Additional Benefits for Employee Website.pdfjoachimlavalley1
 
Forest and Wildlife Resources Class 10 Free Study Material PDF
Forest and Wildlife Resources Class 10 Free Study Material PDFForest and Wildlife Resources Class 10 Free Study Material PDF
Forest and Wildlife Resources Class 10 Free Study Material PDFVivekanand Anglo Vedic Academy
 
Instructions for Submissions thorugh G- Classroom.pptx
Instructions for Submissions thorugh G- Classroom.pptxInstructions for Submissions thorugh G- Classroom.pptx
Instructions for Submissions thorugh G- Classroom.pptxJheel Barad
 

Recently uploaded (20)

50 ĐỀ LUYỆN THI IOE LỚP 9 - NĂM HỌC 2022-2023 (CÓ LINK HÌNH, FILE AUDIO VÀ ĐÁ...
50 ĐỀ LUYỆN THI IOE LỚP 9 - NĂM HỌC 2022-2023 (CÓ LINK HÌNH, FILE AUDIO VÀ ĐÁ...50 ĐỀ LUYỆN THI IOE LỚP 9 - NĂM HỌC 2022-2023 (CÓ LINK HÌNH, FILE AUDIO VÀ ĐÁ...
50 ĐỀ LUYỆN THI IOE LỚP 9 - NĂM HỌC 2022-2023 (CÓ LINK HÌNH, FILE AUDIO VÀ ĐÁ...
 
The Art Pastor's Guide to Sabbath | Steve Thomason
The Art Pastor's Guide to Sabbath | Steve ThomasonThe Art Pastor's Guide to Sabbath | Steve Thomason
The Art Pastor's Guide to Sabbath | Steve Thomason
 
Phrasal Verbs.XXXXXXXXXXXXXXXXXXXXXXXXXX
Phrasal Verbs.XXXXXXXXXXXXXXXXXXXXXXXXXXPhrasal Verbs.XXXXXXXXXXXXXXXXXXXXXXXXXX
Phrasal Verbs.XXXXXXXXXXXXXXXXXXXXXXXXXX
 
Synthetic Fiber Construction in lab .pptx
Synthetic Fiber Construction in lab .pptxSynthetic Fiber Construction in lab .pptx
Synthetic Fiber Construction in lab .pptx
 
INU_CAPSTONEDESIGN_비밀번호486_업로드용 발표자료.pdf
INU_CAPSTONEDESIGN_비밀번호486_업로드용 발표자료.pdfINU_CAPSTONEDESIGN_비밀번호486_업로드용 발표자료.pdf
INU_CAPSTONEDESIGN_비밀번호486_업로드용 발표자료.pdf
 
Gyanartha SciBizTech Quiz slideshare.pptx
Gyanartha SciBizTech Quiz slideshare.pptxGyanartha SciBizTech Quiz slideshare.pptx
Gyanartha SciBizTech Quiz slideshare.pptx
 
Danh sách HSG Bộ môn cấp trường - Cấp THPT.pdf
Danh sách HSG Bộ môn cấp trường - Cấp THPT.pdfDanh sách HSG Bộ môn cấp trường - Cấp THPT.pdf
Danh sách HSG Bộ môn cấp trường - Cấp THPT.pdf
 
Accounting and finance exit exam 2016 E.C.pdf
Accounting and finance exit exam 2016 E.C.pdfAccounting and finance exit exam 2016 E.C.pdf
Accounting and finance exit exam 2016 E.C.pdf
 
UNIT – IV_PCI Complaints: Complaints and evaluation of complaints, Handling o...
UNIT – IV_PCI Complaints: Complaints and evaluation of complaints, Handling o...UNIT – IV_PCI Complaints: Complaints and evaluation of complaints, Handling o...
UNIT – IV_PCI Complaints: Complaints and evaluation of complaints, Handling o...
 
2024_Student Session 2_ Set Plan Preparation.pptx
2024_Student Session 2_ Set Plan Preparation.pptx2024_Student Session 2_ Set Plan Preparation.pptx
2024_Student Session 2_ Set Plan Preparation.pptx
 
PART A. Introduction to Costumer Service
PART A. Introduction to Costumer ServicePART A. Introduction to Costumer Service
PART A. Introduction to Costumer Service
 
Basic phrases for greeting and assisting costumers
Basic phrases for greeting and assisting costumersBasic phrases for greeting and assisting costumers
Basic phrases for greeting and assisting costumers
 
Adversarial Attention Modeling for Multi-dimensional Emotion Regression.pdf
Adversarial Attention Modeling for Multi-dimensional Emotion Regression.pdfAdversarial Attention Modeling for Multi-dimensional Emotion Regression.pdf
Adversarial Attention Modeling for Multi-dimensional Emotion Regression.pdf
 
aaaaaaaaaaaaaaaaaaaaaaaaaaaaaaaaaaaaaaaaa
aaaaaaaaaaaaaaaaaaaaaaaaaaaaaaaaaaaaaaaaaaaaaaaaaaaaaaaaaaaaaaaaaaaaaaaaaaaaaaaaaa
aaaaaaaaaaaaaaaaaaaaaaaaaaaaaaaaaaaaaaaaa
 
Fish and Chips - have they had their chips
Fish and Chips - have they had their chipsFish and Chips - have they had their chips
Fish and Chips - have they had their chips
 
Application of Matrices in real life. Presentation on application of matrices
Application of Matrices in real life. Presentation on application of matricesApplication of Matrices in real life. Presentation on application of matrices
Application of Matrices in real life. Presentation on application of matrices
 
MARUTI SUZUKI- A Successful Joint Venture in India.pptx
MARUTI SUZUKI- A Successful Joint Venture in India.pptxMARUTI SUZUKI- A Successful Joint Venture in India.pptx
MARUTI SUZUKI- A Successful Joint Venture in India.pptx
 
Additional Benefits for Employee Website.pdf
Additional Benefits for Employee Website.pdfAdditional Benefits for Employee Website.pdf
Additional Benefits for Employee Website.pdf
 
Forest and Wildlife Resources Class 10 Free Study Material PDF
Forest and Wildlife Resources Class 10 Free Study Material PDFForest and Wildlife Resources Class 10 Free Study Material PDF
Forest and Wildlife Resources Class 10 Free Study Material PDF
 
Instructions for Submissions thorugh G- Classroom.pptx
Instructions for Submissions thorugh G- Classroom.pptxInstructions for Submissions thorugh G- Classroom.pptx
Instructions for Submissions thorugh G- Classroom.pptx
 

Unity 3D level design workflow

  • 1. Jake Hyatt Unity 3D level design workflow I have been asked to design and create a level for a 3D game which will be a fist person one. I have decided to go for a horror theme for my level as I feel that this type of game is very big at the moment and there are also many things that is associated with horror. I will aim to create a map that is forest based but have paths and areas which will all the isolated from each other. The map will be set in the middle of the night so that you instantly get a bad feeling as games set during this time are usually horror based games. I will include a variety of trees, a mansion, a campsite, a wrecked car, an outhouse and a bridge that will cross over the river that flows through the middle of the map. 1
  • 2. Jake Hyatt Firstly I opened up Unity to create this 3D map as this is the best software that I have available to me, I then created a new project and started to create the terrain of the map. I decided that the player would be completely surrounded on all sides by mountains so that it created a feeling of them being trapped so I used the raise/lower terrain tool and started to roughly mould where the mountains would be and once I was happy with the positioning I began to raise the mountains to a tall height to loom over the player. Next I smoothed the mountain tops down by using the smooth height tool because the tops were to jagged and rough looking, even though I want my landscape to look frightening I thought that the tops looked rushed and unprofessional which is why I decided to smooth them down slightly. After this I created smaller mounds in front of the mountains by using the same process to raise them and to smooth them down. 2
  • 3. Jake Hyatt Then I decided that my landscape would have a river running through the middle of it because I thought that just mountains would look dull and boring. I used the paint height tool which allows me to type in my custom height and once the brush has reached that height it wouldn’t raise the surface anymore. I chose to set the height to 30 as I wanted the river to have depth to it; I painted the ground until it was all raised to level 30 on the Y axis. However after raising the floor the mountains looked miniscule compared to what they were so I had to raise and smooth the mountains again until I was happy with their height. After I was satisfied with the way which my landscape looked I next was going to paint this landscape with different textures depending on the area. For this I used the paint texture tool which would allow me to drag in pre-made textures into this tool and then I could paint it wherever I wanted (I could also change the size of the brush and the opacity of the brush). When painting the big mountains I used a rock texture as it was the most suitable, for the ground I used a grass texture as it was the most suitable and for the smaller mountains in-between the ground and the high mountains I used a texture that was a mixture of grass and rock blended together to show the process of change between the other 2 so that it wasn’t obvious lines where the grass ended and the rock began. I then added the water to my level by simply dragging the “Nighttime Simple Water” into the scene. As it was only a small pool of water when it was spawned into the scene I had to scale this water pool by stretching it until it filled the gap that I left for where the river would be and until it created like an ocean around the entire map. 3
  • 4. Jake Hyatt However the bottom of the river was un-textured so I decided to create my own texture for this. Off Google images I got an image of gravel as this is the texture that I wanted to represent the bottom of my river. I imported this image into Photoshop, after I cropped the image down so that I had the part that I wanted I went to Filter > Other > Offset which allowed me to see what the texture would look like when it was painted onto my landscape. While in this view the lines across the middle were clearly visible so I used to clone tool to make it look more natural and generic, when I was happy with the result I saved out the texture and then imported it into my unity project. Following this I used the paint terrain tool and added the gravel texture to the paint tool and then I had to change the size of the brush as the last time I used this tool to brush size was set extremely high as I was painting the whole landscape instead of just a certain section like this. After decreasing the brush size I carefully painted the bottom of my river with the gravel texture that I created, if I was to do this again I feel that I would change the texture to a different one as I felt that the one I used did resemble a the bottom of a fish tank but it was too late to change it as I had already moved on. The next task was to add a skybox to my level which would ultimately define which type of genre my level would best be suited to. For my skybox I chose a starry night as I wanted my game to have a dark feeling to it so that it could be used in a horror game of some sorts. To add the skybox I selected the terrain in the hierarchy menu, selected add component, then went to rendering and 4
  • 5. Jake Hyatt selected skybox. After I selected this I just simply dragged the pre-made skybox into the custom skybox tab and then the game generated this skybox above my level for me. As the skybox was only there for looks and didn’t actually create any light I have to create 2 directional lights on my level to set the mood with one of the directional lights being a moonlight colour which the other one was just black. When I had the colours I had to mess around with which way they were facing by rotating them, I also had to keep adjusting the intensity of each of the lights until the level was visible but it didn’t make it too easy to see what was in front of you. After I was pleased with the brightness and colour of the level I decided to give my first person controller spotlight which would act like a torch as it looks forward and is in a circular shape, I set the range of this light to 35, the colour was white and the intensity was 8. I felt that these settings created a good torch effect but I did have to try multiple setting before finally deciding on these ones. When I was happy with the torch a selected it in the hierarchy window and attached it to my first person controller by dragging and dropping it. After the terrain, the textures, the skybox, the colours and the water were completed and to a standard that I was pleased with I started to import assets from the assets store starting with the 5
  • 6. Jake Hyatt camp set which was already a set scene which you would import into your own unity project and just drag it into your level. However when I did this I had issues with the set scene as it didn’t have collision so to fix this I went to each model in the project tab and selected “generate colliders” for each one, I then deleted the camp scene from my hierarchy tab and then re-dragged it back in to load the newly generated colliders. Despite doing this the collision still wasn’t working so after a lot of trial and error I finally found a way to do this, I had to individually drag in each object within the camp set and personally place them myself so I created my own camp scene which would be the starting point for my first person controller. When I was delighted with the way the camp looked I tested to ensure the collision worked which it did. The next asset that I imported was a wrecked car as I thought that an abandoned car in the middle of the woods would emit a scary vibe as it leaves questions in the players mind wondering what happened to the people, where they are and what could have done this to the car. I placed this car quite a distance away from the camp site as I didn’t want it to visible from the starting point meaning the player would have to walk there. Along with this I imported a jerry can (fuel can) and a water well as the area just seemed too empty with just a car there so after dragging the jerry can into the level I scaled it down and made it look like it was leaning against the car but with the well I had to scale it up as it would have been smaller than the car and looked unrealistic if I left it how it originally was. 6
  • 8. Jake Hyatt After the first two areas were complete I began to focus on the other side of the river as it had absolutely nothing there so I needed to populate it with assets that I felt would work well and look good together. I imported five buildings and a water tower which were all part of a shanty town package but I had to download and import each one separately. After they were all in the scene I had to rotate some of them so that they were in this semi-circle shape with the water tower on the side so that it looked like a small, isolated town that nobody had ever spoke about. I also had to resize each building based off the height of my first person controller as I wanted the building to be of a realistic height (except the water tower as I wanted that to be quite tall) to make the player feel more immersed in the game. Finally to finish this segment of the map I imported a powerline pack which included three different powerline poles, I only used two of them as I didn’t want them to take too much attention but I did use one of the poles to make it look like it had fell on top of a building and slightly destroyed it so that the building had a reason for being the way it was. 8
  • 9. Jake Hyatt The next area that I worked on was the corner next to the river and I decided that this area would be a logging facility however I couldn’t find a suitable building so I had to settle for just these logging machines. I chose to only put two of them in as I didn’t want the area to seem too crowded but looking at the final product I feel that I made these machines too large which takes away from the game being realistic which isn’t what I wanted to do. 9
  • 10. Jake Hyatt The next section that I worked on was just to the right of the logging machines and I decided to put large oil tanks here so the player could navigate around them to look for an object or for a key (if the game was complete). To set this up I imported an asset of an oil tank and dragged it into the scene, after this I had to move it into position, scale it and generate colliders so that the player couldn’t just walk straight through it. When I was pleased with what the oil tank looked like I just simply duplicated it 7 time and moved them into a different position to create this area. The reason I duplicated one is because if I tried to perfectly scale each one separately it most likely wouldn’t have worked and all the tanks would have been a different size making the level look odd. 10
  • 11. Jake Hyatt The next thing that I did is that I fenced in the oil tanks as I only wanted there to be one entrance/exit in case I wanted an event to occur when the player was in this area. It also just adds more detail and aesthetics to the level in general, with these fences I had to use the same process as the oil tanks where I brought in one fence, moved it, scaled it and generated colliders. I would then duplicate the fence and move it along until it looked natural and when I came to a corner all I had to do was rotate the fence 90 degrees and continue, I did this until the fence was complete. 11
  • 12. Jake Hyatt Next I wanted to add some darkness and mystery to my level so I chose to add this asset (rune stone) and made it quite large, the asset also has an engraved symbol on the front which brings questions to the players mind. When on the ground you can see that there is something on the floor and with a bird’s eye view you can see what it is. I decided to create a blood texture in Photoshop by using the same process as the gravel texture. I changed the brush size to the second lowest and attempted to paint a pentagram on the floor around the rune stone to add evil to the level . Also when playing the level there is smoke around the bottom of the rune stone but for some reason you aren’t able to see it when in this view. 12
  • 13. Jake Hyatt Towards the end of my level I added lightposts into areas where the directional light wasn’t facing so that the player could see better in that area instead of it just being pitch black. I imported the asset assuming that the light would actually work but it didn’t so I had to create a spotlight, move it into the top of the lightpost and when all the setting were correct I attached the spotlight to the lightpost by dragging and dropping. Finally I duplicated tis lightpost and put it in places where I thought the map was too dark so that the level was visible to the player. 13
  • 14. Jake Hyatt Second to last I imported this bridge asset into my level but the bridge was too small to fit over my river and changing the scale just ruined the look of the bridge and made the gaps between each bright plank too far for the player to just simply walk across. To fox this problem I had to duplicate the bridge multiple times until it fit across my river and so that the player could comfortably walk across without falling down into the gaps. 14
  • 15. Jake Hyatt Finally I created a dirt path texture in Photoshop using the same process as the other textures that I personally created, I chose a reasonable brush size and connected each area by a dirt path so that if the player follows the path then they would get to experience each section of the map. I also painted the standard asset tree anywhere that there wasn’t a created area or a dirt path to create a forest look. (Screenshots taken after level was created). 15