Downloaded 28 times


![Program Menu
Note: To save space, only the menu items that are not self-explanatory are described in this documentation.
Volumes -> Auto-Mount All Device-Hosted Volumes
See the section Auto-Mount Devices.
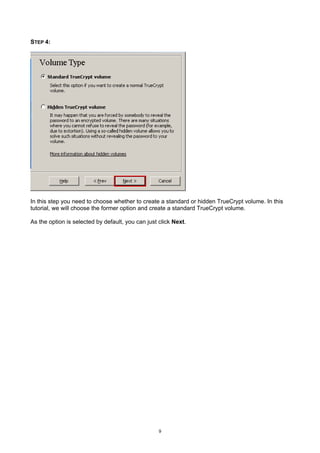
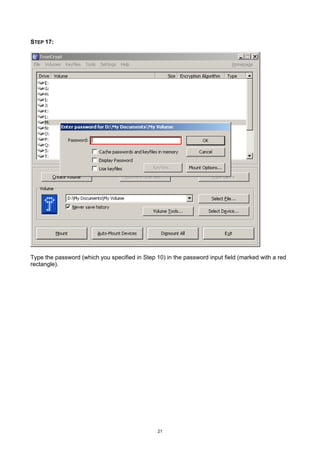
Volumes -> Change Volume Password
Allows changing the password of the currently selected TrueCrypt volume (no matter whether the
volume is hidden or standard). Only the header key and the secondary header key (XTS mode) are
changed – the master key remains unchanged. This function re-encrypts the volume header using
a header encryption key derived from a new password. Note that the volume header contains the
master encryption key with which the volume is encrypted. Therefore, the data stored on the
volume will not be lost after you use this function (password change will only take a few seconds).
To change a TrueCrypt volume password, click on Select File or Select Device, then select the
volume, and from the Volumes menu select Change Volume Password.
Note: For information on how to change a password used for pre-boot authentication, please see
the section System -> Change Password.
See also the chapter Security Requirements and Precautions.
PKCS-5 PRF
In this field you can select the algorithm that will be used in deriving new volume header
keys (for more information, see the section Header Key Derivation, Salt, and Iteration
Count) and in generating the new salt (for more information, see the section Random
Number Generator).
Note: When TrueCrypt re-encrypts a volume header, the original volume header is first
overwritten 256 times with random data to prevent adversaries from using techniques such
as magnetic force microscopy or magnetic force scanning tunneling microscopy [17] to
recover the overwritten header (however, see also the chapter Security Requirements and
Precautions).
Volumes -> Set Header Key Derivation Algorithm
This function allows you to re-encrypt a volume header with a header key derived using a different
PRF function (for example, instead of HMAC-RIPEMD-160 you could use HMAC-Whirlpool). Note
that the volume header contains the master encryption key with which the volume is encrypted.
Therefore, the data stored on the volume will not be lost after you use this function. For more
information, see the section Header Key Derivation, Salt, and Iteration Count.
Note: When TrueCrypt re-encrypts a volume header, the original volume header is first overwritten
256 times with random data to prevent adversaries from using techniques such as magnetic force
microscopy or magnetic force scanning tunneling microscopy [17] to recover the overwritten
57](https://image.slidesharecdn.com/truecryptuserguide-120228140112-phpapp02/85/True-crypt-user-guide-57-320.jpg)
![Hardware Acceleration
Some processors (CPUs) support hardware-accelerated AES encryption, * which is typically 4-8
times faster than encryption performed by the purely software implementation on the same
processors.
By default, TrueCrypt uses hardware-accelerated AES on computers that have a processor where
the Intel AES-NI instructions are available. Specifically, TrueCrypt uses the AES-NI instructions
that perform so-called AES rounds (i.e. the main portions of the AES algorithm). † TrueCrypt does
not use any of the AES-NI instructions that perform key generation.
Note: By default, TrueCrypt uses hardware-accelerated AES also when an encrypted Windows
system is booting or resuming from hibernation (provided that the processor supports the Intel
AES-NI instructions).
To find out whether TrueCrypt can use hardware-accelerated AES on your computer, select
Settings > Performance and check the field labeled ‘Processor (CPU) in this computer can provide
hardware acceleration for AES’.
To find out whether a processor you want to purchase supports the Intel AES-NI instructions (also
called "AES New Instructions"), which TrueCrypt uses for hardware-accelerated AES, please
check the documentation for the processor or contact the vendor/manufacturer.
If you want to disable hardware acceleration of AES (e.g. because you want TrueCrypt to use only
a fully open-source implementation of AES), you can do so by selecting Settings > Performance
and disabling the option ‘Accelerate AES encryption/decryption by using the AES instructions of
the processor’. Note that when this setting is changed, the operating system needs to be restarted
to ensure that all TrueCrypt components internally perform the requested change of mode. Also
note that when you create a TrueCrypt Rescue Disk, the state of this option is written to the
Rescue Disk and used whenever you boot from it (affecting the pre-boot and initial boot phase).
To create a new TrueCrypt Rescue Disk, select System > Create Rescue Disk.
Note: Support for hardware acceleration was introduced in TrueCrypt 7.0.
*
In this chapter, the word 'encryption' also refers to decryption.
†
Those instructions are AESENC, AESENCLAST, AESDEC, and AESDECLAST and they perform the following AES
transformations: ShiftRows, SubBytes, MixColumns, InvShiftRows, InvSubBytes, InvMixColumns, and AddRoundKey (for
more details about these transformations, see [3]).
64](https://image.slidesharecdn.com/truecryptuserguide-120228140112-phpapp02/85/True-crypt-user-guide-64-320.jpg)

![These control elements appear in various dialog windows and always have the same functions.
Check the Use keyfiles option and click Keyfiles. The keyfile dialog window should appear where
you can specify keyfiles (to do so, click Add Files or Add Token Files) or keyfile search paths (click
Add Path).
Security Tokens and Smart Cards
TrueCrypt can directly use keyfiles stored on a security token or smart card that complies with the
PKCS #11 (2.0 or later) standard [23] and that allows the user to store a file (data object) on the
token/card. To use such files as TrueCrypt keyfiles, click Add Token Files (in the keyfile dialog
window).
Access to a keyfile stored on a security token or smart card is typically protected by PIN codes,
which can be entered either using a hardware PIN pad or via the TrueCrypt GUI. It can also be
protected by other means, such as fingerprint readers.
In order to allow TrueCrypt to access a security token or smart card, you need to install a
PKCS #11 (2.0 or later) software library for the token or smart card first. Such a library may be
supplied with the device or it may be available for download from the website of the vendor or other
third parties.
If your security token or smart card does not contain any file (data object) that you could use as a
TrueCrypt keyfile, you can use TrueCrypt to import any file to the token or smart card (if it is
supported by the device). To do so, follow these steps:
1. In the keyfile dialog window, click Add Token Files.
2. If the token or smart card is protected by a PIN, password, or other means (such as a
fingerprint reader), authenticate yourself (for example, by entering the PIN using a
hardware PIN pad).
3. The ‘Security Token Keyfile’ dialog window should appear. In it, click Import Keyfile to
Token and then select the file you want to import to the token or smart card.
Note that you can import for example 512-bit keyfiles with random content generated by TrueCrypt
(see Tools -> Keyfile Generator below).
To close all opened security token sessions, either select Tools > Close All Security Token
Sessions or define and use a hotkey combination (Settings > Hot Keys > Close All Security Token
Sessions).
67](https://image.slidesharecdn.com/truecryptuserguide-120228140112-phpapp02/85/True-crypt-user-guide-67-320.jpg)
![Volumes -> Add/Remove Keyfiles to/from Volume
This function allows you to re-encrypt a volume header with a header encryption key derived from
any number of keyfiles (with or without a password), or no keyfiles at all. Thus, a volume which is
possible to mount using only a password can be converted to a volume that require keyfiles (in
addition to the password) in order to be possible to mount. Note that the volume header contains
the master encryption key with which the volume is encrypted. Therefore, the data stored on the
volume will not be lost after you use this function.
This function can also be used to change/set volume keyfiles (i.e., to remove some or all keyfiles,
and to apply new ones).
Remark: This function is internally equal to the Password Change function.
When TrueCrypt re-encrypts a volume header, the original volume header is first overwritten 256
times with random data to prevent adversaries from using techniques such as magnetic force
microscopy or magnetic force scanning tunneling microscopy [17] to recover the overwritten
header (however, see also the chapter Security Requirements and Precautions).
Volumes -> Remove All Keyfiles from Volume
This function allows you to re-encrypt a volume header with a header encryption key derived from
a password and no keyfiles (so that it can be mounted using only a password, without any
keyfiles). Note that the volume header contains the master encryption key with which the volume is
encrypted. Therefore, the data stored on the volume will not be lost after you use this function.
Remark: This function is internally equal to the Password Change function.
When TrueCrypt re-encrypts a volume header, the original volume header is first overwritten 256
times with random data to prevent adversaries from using techniques such as magnetic force
microscopy or magnetic force scanning tunneling microscopy [17] to recover the overwritten
header (however, see also the chapter Security Requirements and Precautions).
Tools -> Keyfile Generator
You can use this function to generate a file with random content, which you can use as a keyfile
(recommended). This function uses the TrueCrypt Random Number Generator. Note that the
resulting file size is always 64 bytes (i.e., 512 bits), which is also the maximum possible TrueCrypt
password length.
Settings -> Default Keyfiles
Use this function to set default keyfiles and/or default keyfile search paths. This function is
particularly useful if you, for example, store keyfiles on a USB memory stick that you carry with
you. You can add its drive letter to the default keyfile configuration. To do so, click Add Path,
browse to the drive letter assigned to the USB memory stick, and click OK. Now each time you
mount a volume (and if Use keyfiles is checked in the password dialog), TrueCrypt will scan the
path and use all files that it finds there as keyfiles.
69](https://image.slidesharecdn.com/truecryptuserguide-120228140112-phpapp02/85/True-crypt-user-guide-69-320.jpg)

![Security Tokens & Smart Cards
TrueCrypt supports security (or cryptographic) tokens and smart cards (smart card readers) that
can be accessed using the PKCS #11 (2.0 or later) protocol [23]. For more information, please see
the section Security Tokens and Smart Cards in the chapter Keyfiles.
71](https://image.slidesharecdn.com/truecryptuserguide-120228140112-phpapp02/85/True-crypt-user-guide-71-320.jpg)
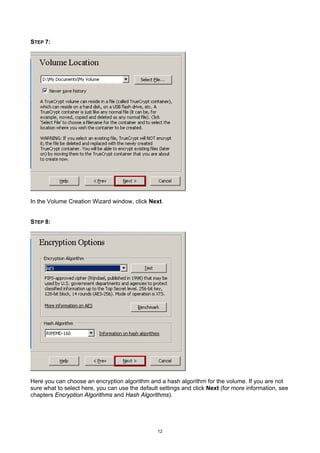
![Encryption Algorithms
TrueCrypt volumes can be encrypted using the following algorithms:
Block Size Mode of
Algorithm Designer(s) Key Size (Bits)
(Bits) Operation
AES J. Daemen, V. Rijmen 256 128 XTS
Serpent R. Anderson, E. Biham, L. Knudsen 256 128 XTS
B. Schneier, J. Kelsey, D. Whiting,
Twofish 256 128 XTS
D. Wagner, C. Hall, N. Ferguson
AES-Twofish 256; 256 128 XTS
AES-Twofish-Serpent 256; 256; 256 128 XTS
Serpent-AES 256; 256 128 XTS
Serpent-Twofish-AES 256; 256; 256 128 XTS
Twofish-Serpent 256; 256 128 XTS
For information about XTS mode, please see the section Modes of Operation.
AES
The Advanced Encryption Standard (AES) specifies a FIPS-approved cryptographic algorithm
(Rijndael, designed by Joan Daemen and Vincent Rijmen, published in 1998) that may be used by
US federal departments and agencies to cryptographically protect sensitive information [3].
TrueCrypt uses AES with 14 rounds and a 256-bit key (i.e., AES-256, published in 2001) operating
in XTS mode (see the section Modes of Operation).
In June 2003, after the NSA (US National Security Agency) conducted a review and analysis of
AES, the U.S. CNSS (Committee on National Security Systems) announced in [1] that the design
and strength of AES-256 (and AES-192) are sufficient to protect classified information up to the
Top Secret level. This is applicable to all U.S. Government Departments or Agencies that are
considering the acquisition or use of products incorporating the Advanced Encryption Standard
(AES) to satisfy Information Assurance requirements associated with the protection of national
security systems and/or national security information [1].
75](https://image.slidesharecdn.com/truecryptuserguide-120228140112-phpapp02/85/True-crypt-user-guide-75-320.jpg)
![Serpent
Designed by Ross Anderson, Eli Biham, and Lars Knudsen; published in 1998. It uses a 256-bit
key, 128-bit block, and operates in XTS mode (see the section Modes of Operation). Serpent was
one of the AES finalists. It was not selected as the proposed AES algorithm even though it
appeared to have a higher security margin than the winning Rijndael [4]. More concretely, Serpent
appeared to have a high security margin, while Rijndael appeared to have only an adequate
security margin [4]. Rijndael has also received some criticism suggesting that its mathematical
structure might lead to attacks in the future [4].
In [5], the Twofish team presents a table of safety factors for the AES finalists. Safety factor is
defined as: number of rounds of the full cipher divided by the largest number of rounds that has
been broken. Hence, a broken cipher has the lowest safety factor 1. Serpent had the highest safety
factor of the AES finalists: 3.56 (for all supported key sizes). Rijndael-256 had a safety factor of
1.56.
In spite of these facts, Rijndael was considered an appropriate selection for the AES for its
combination of security, performance, efficiency, implementability, and flexibility [4]. At the last AES
Candidate Conference, Rijndael got 86 votes, Serpent got 59 votes, Twofish got 31 votes, RC6 got
23 votes, and MARS got 13 votes [18, 19].*
Twofish
Designed by Bruce Schneier, John Kelsey, Doug Whiting, David Wagner, Chris Hall, and Niels
Ferguson; published in 1998. It uses a 256-bit key and 128-bit block and operates in XTS mode
(see the section Modes of Operation). Twofish was one of the AES finalists. This cipher uses key-
dependent S-boxes. Twofish may be viewed as a collection of 2128 different cryptosystems, where
128 bits derived from a 256-bit key control the selection of the cryptosystem [4]. In [13], the
Twofish team asserts that key-dependent S-boxes constitute a form of security margin against
unknown attacks [4].
AES-Twofish
Two ciphers in a cascade [15, 16] operating in XTS mode (see the section Modes of Operation).
Each 128-bit block is first encrypted with Twofish (256-bit key) in XTS mode and then with AES
(256-bit key) in XTS mode. Each of the cascaded ciphers uses its own key. All encryption keys are
mutually independent (note that header keys are independent too, even though they are derived
from a single password – see Header Key Derivation, Salt, and Iteration Count). See above for
information on the individual cascaded ciphers.
AES-Twofish-Serpent
Three ciphers in a cascade [15, 16] operating in XTS mode (see the section Modes of Operation).
Each 128-bit block is first encrypted with Serpent (256-bit key) in XTS mode, then with Twofish
(256-bit key) in XTS mode, and finally with AES (256-bit key) in XTS mode. Each of the cascaded
ciphers uses its own key. All encryption keys are mutually independent (note that header keys are
independent too, even though they are derived from a single password – see the section Header
Key Derivation, Salt, and Iteration Count). See above for information on the individual cascaded
ciphers.
* These are positive votes. If negative votes are subtracted from the positive votes, the following results are obtained:
Rijndael: 76 votes, Serpent: 52 votes, Twofish: 10 votes, RC6: -14 votes, MARS: -70 votes [19].
76](https://image.slidesharecdn.com/truecryptuserguide-120228140112-phpapp02/85/True-crypt-user-guide-76-320.jpg)
![Serpent-AES
Two ciphers in a cascade [15, 16] operating in XTS mode (see the section Modes of Operation).
Each 128-bit block is first encrypted with AES (256-bit key) in XTS mode and then with Serpent
(256-bit key) in XTS mode. Each of the cascaded ciphers uses its own key. All encryption keys are
mutually independent (note that header keys are independent too, even though they are derived
from a single password – see the section Header Key Derivation, Salt, and Iteration Count). See
above for information on the individual cascaded ciphers.
Serpent-Twofish-AES
Three ciphers in a cascade [15, 16] operating in XTS mode (see the section Modes of Operation).
Each 128-bit block is first encrypted with AES (256-bit key) in XTS mode, then with Twofish (256-
bit key) in XTS mode, and finally with Serpent (256-bit key) in XTS mode. Each of the cascaded
ciphers uses its own key. All encryption keys are mutually independent (note that header keys are
independent too, even though they are derived from a single password – see the section Header
Key Derivation, Salt, and Iteration Count). See above for information on the individual cascaded
ciphers.
Twofish-Serpent
Two ciphers in a cascade [15, 16] operating in XTS mode (see the section Modes of Operation).
Each 128-bit block is first encrypted with Serpent (256-bit key) in XTS mode and then with Twofish
(256-bit key) in XTS mode. Each of the cascaded ciphers uses its own key. All encryption keys are
mutually independent (note that header keys are independent too, even though they are derived
from a single password – see the section Header Key Derivation, Salt, and Iteration Count). See
above for information on the individual cascaded ciphers.
77](https://image.slidesharecdn.com/truecryptuserguide-120228140112-phpapp02/85/True-crypt-user-guide-77-320.jpg)
![Hash Algorithms
In the Volume Creation Wizard, in the password change dialog window, and in the Keyfile
Generator dialog window, you can select a hash algorithm. A user-selected hash algorithm is used
by the TrueCrypt Random Number Generator as a pseudorandom “mixing” function, and by the
header key derivation function (HMAC based on a hash function, as specified in PKCS #5 v2.0) as
a pseudorandom function. When creating a new volume, the Random Number Generator
generates the master key, secondary key (XTS mode), and salt. For more information, please see
the section Random Number Generator and section Header Key Derivation, Salt, and Iteration
Count.
RIPEMD-160
RIPEMD-160, published in 1996, is a hash algorithm designed by Hans Dobbertin, Antoon
Bosselaers, and Bart Preneel in an open academic community. The size of the output of RIPEMD-
160 is 160 bits. RIPEMD-160 is a strengthened version of the RIPEMD hash algorithm that was
developed in the framework of the European Union’s project RIPE (RACE Integrity Primitives
Evaluation), 1988-1992. RIPEMD-160 was adopted by the International Organization for
Standardization (ISO) and the IEC in the ISO/IEC 10118-3:2004 international standard [21].
SHA-512
SHA-512 is a hash algorithm designed by the NSA and published by NIST in FIPS PUB 180-2 [14]
in 2002 (the first draft was published in 2001). The size of the output of this algorithm is 512 bits.
Whirlpool
The Whirlpool hash algorithm was designed by Vincent Rijmen (co-designer of the AES encryption
algorithm) and Paulo S. L. M. Barreto. The size of the output of this algorithm is 512 bits. The first
version of Whirlpool, now called Whirlpool-0, was published in November 2000. The second
version, now called Whirlpool-T, was selected for the NESSIE (New European Schemes for
Signatures, Integrity and Encryption) portfolio of cryptographic primitives (a project organized by
the European Union, similar to the AES competition). TrueCrypt uses the third (final) version of
Whirlpool, which was adopted by the International Organization for Standardization (ISO) and the
IEC in the ISO/IEC 10118-3:2004 international standard [21].
78](https://image.slidesharecdn.com/truecryptuserguide-120228140112-phpapp02/85/True-crypt-user-guide-78-320.jpg)
![created TrueCrypt Rescue Disk. Note that every time you encrypt a system
partition/drive, you must create a new TrueCrypt Rescue Disk even if you
use the same password. A previously created TrueCrypt Rescue Disk
cannot be reused as it was created for a different master key.
Syntax
TrueCrypt.exe [/a [devices|favorites]] [/b] [/c [y|n]] [/d [drive letter]] [/e] [/f]
[/h [y|n]] [/k keyfile or search path] [/l drive letter] [/m {bk|rm|recovery|ro|sm|ts}] [/p
password] [/q [background|preferences]] [/s] [/tokenlib path] [/v volume] [/w]
"TrueCrypt Format.exe" [/n]
Note that the order in which options are specified does not matter.
Examples
Mount the volume d:myvolume as the first free drive letter, using the password prompt (the main
program window will not be displayed):
truecrypt /q /v d:myvolume
Dismount a volume mounted as the drive letter X (the main program window will not be displayed):
truecrypt /q /dx
Mount a volume called myvolume.tc using the password MyPassword, as the drive letter X.
TrueCrypt will open an explorer window and beep; mounting will be automatic:
truecrypt /v myvolume.tc /lx /a /p MyPassword /e /b
82](https://image.slidesharecdn.com/truecryptuserguide-120228140112-phpapp02/85/True-crypt-user-guide-82-320.jpg)


![Known Issues & Limitations
It is strongly recommended that you read also the latest online version of this chapter at:
http://www.truecrypt.org/docs/?s=issues-and-limitations
Known Issues
· (There were no confirmed issues when this document was created.)
Limitations
· [Note: This limitation does not apply to users of Windows Vista and later versions of Windows.]
On Windows XP/2003, TrueCrypt does not support encrypting an entire system drive that
contains extended (logical) partitions. You can encrypt an entire system drive provided that it
contains only primary partitions. Extended (logical) partitions must not be created on any
system drive that is partially or fully encrypted (only primary partitions may be created on it).
Note: If you need to encrypt an entire drive containing extended partitions, you can encrypt the
system partition and, in addition, create partition-hosted TrueCrypt volumes within any non-
system partitions on the drive. Alternatively, you may want to consider upgrading to Windows
Vista or a later version of Windows.
· TrueCrypt currently does not support encrypting a system drive that has been converted to a
dynamic disk.
· TrueCrypt does not support pre-boot authentication for operating systems installed within VHD
files.
· TrueCrypt volume passwords must consist only of printable ASCII characters. Non-ASCII
characters in passwords are not supported and may cause various problems (e.g., inability to
mount a volume).
· To work around a Windows XP issue, the TrueCrypt boot loader is always automatically
configured for the version of the operating system under which it is installed. When the version
of the system changes (for example, the TrueCrypt boot loader is installed when Windows
Vista is running but it is later used to boot Windows XP) you may encounter various known and
unknown issues (for example, on some notebooks, Windows XP may fail to display the log-on
screen). Note that this affects multi-boot configurations, TrueCrypt Rescue Disks, and
decoy/hidden operating systems (therefore, if the hidden system is e.g. Windows XP, the
decoy system should be Windows XP too).
· The ability to mount a partition that is within the key scope of system encryption without pre-
boot authentication (for example, a partition located on the encrypted system drive of another
operating system that is not running), which can be done e.g. by selecting System > Mount
Without Pre-Boot Authentication, is limited to primary partitions (extended/logical partitions
cannot be mounted this way).
118](https://image.slidesharecdn.com/truecryptuserguide-120228140112-phpapp02/85/True-crypt-user-guide-118-320.jpg)
![The only thing that TPM is almost guaranteed to provide is a false sense of security (even the
name itself, “Trusted Platform Module”, is misleading and creates a false sense of security). As for
real security, TPM is actually redundant (and implementing redundant features is usually a way to
create so-called bloatware). Features like this are sometimes referred to as ‘security theater’ [6].
For more information, please see the sections Physical Security and Malware.
Why does Windows Vista (and later versions of Windows) ask me for permission to run
TrueCrypt every time I run it in ‘portable’ mode?
When you run TrueCrypt in portable mode, TrueCrypt needs to load and start the TrueCrypt device
driver. TrueCrypt needs a device driver to provide transparent on-the-fly encryption/decryption, and
users without administrator privileges cannot start device drivers in Windows. Therefore, Windows
Vista and later versions of Windows ask you for permission to run TrueCrypt with administrator
privileges.
Note that if you install TrueCrypt on the system (as opposed to running TrueCrypt in portable
mode), you will not be asked for permission every time you run it.
Do I have to dismount TrueCrypt volumes before shutting down or restarting Windows?
No. TrueCrypt automatically dismounts all mounted TrueCrypt volumes on system
shutdown/restart.
Which type of TrueCrypt volume is better – partition or file container?
File containers are normal files so you can work with them as with any normal files (file containers
can be, for example, moved, renamed, and deleted the same way as normal files). Partitions/drives
may be better as regards performance. Note that reading and writing to/from a file container may
take significantly longer when the container is heavily fragmented. To solve this problem,
defragment the file system in which the container is stored (when the TrueCrypt volume is
dismounted).
What’s the recommended way to back up a TrueCrypt volume?
See the chapter How to Back Up Securely.
What will happen if I format a TrueCrypt partition?
See the question “Is it possible to change the file system of an encrypted volume?” in this FAQ.
Is it possible to change the file system of an encrypted volume?
Yes, when mounted, TrueCrypt volumes can be formatted as FAT12, FAT16, FAT32, NTFS, or
any other file system. TrueCrypt volumes behave as standard disk devices so you can right-click
the device icon (for example in the ‘Computer’ or ‘My Computer’ list) and select ‘Format’. The
actual volume contents will be lost. However, the whole volume will remain encrypted. If you format
129](https://image.slidesharecdn.com/truecryptuserguide-120228140112-phpapp02/85/True-crypt-user-guide-129-320.jpg)

![Modes of Operation
The mode of operation used by TrueCrypt for encrypted partitions, drives, and virtual volumes is
XTS.
XTS mode is in fact XEX mode [12], which was designed by Phillip Rogaway in 2003, with a
minor modification (XEX mode uses a single key for two different purposes, whereas XTS mode
uses two independent keys).
In 2010, XTS mode was approved by NIST for protecting the confidentiality of data on storage
devices [24]. In 2007, it was also approved by the IEEE for cryptographic protection of data on
block-oriented storage devices (IEEE 1619).
Description of XTS mode:
Ci = EK1 (Pi ^ (EK2 (n) Ä αi)) ^ (EK2 (n) Ä αi)
Where:
Ä denotes multiplication of two polynomials over the binary field GF(2) modulo x128+x7+x2+x+1
K1 is the encryption key (256-bit for each supported cipher; i.e., AES, Serpent, and Twofish)
K2 is the secondary key (256-bit for each supported cipher; i.e., AES, Serpent, and Twofish)
i is the cipher block index within a data unit; for the first cipher block within a data unit, i = 0
n is the data unit index within the scope of K1; for the first data unit, n = 0
α is a primitive element of Galois Field (2128) that corresponds to polynomial x (i.e., 2)
The size of each data unit is always 512 bytes (regardless of the sector size).
For further information pertaining to XTS mode, see e.g. [12] and [24].
137](https://image.slidesharecdn.com/truecryptuserguide-120228140112-phpapp02/85/True-crypt-user-guide-137-320.jpg)
![Header Key Derivation, Salt, and Iteration Count
Header key is used to encrypt and decrypt the encrypted area of the TrueCrypt volume header (for
system encryption, of the key data area), which contains the master key and other data (see the
sections Encryption Scheme and TrueCrypt Volume Format Specification). In volumes created by
TrueCrypt 5.0 or later (and for system encryption), the area is encrypted in XTS mode (see the
section Modes of Operation). The method that TrueCrypt uses to generate the header key and the
secondary header key (XTS mode) is PBKDF2, specified in PKCS #5 v2.0; see [7].
512-bit salt is used, which means there are 2512 keys for each password. This significantly decreases
vulnerability to ‘off-line’ dictionary/’rainbow table’ attacks (pre-computing all the keys for a
dictionary of passwords is very difficult when a salt is used) [7]. The salt consists of random values
generated by the TrueCrypt random number generator during the volume creation process. The
header key derivation function is based on HMAC-SHA-512, HMAC-RIPEMD-160, or HMAC-
Whirlpool (see [8, 9, 20, 22]) – the user selects which. The length of the derived key does not
depend on the size of the output of the underlying hash function. For example, a header key for the
AES-256 cipher is always 256 bits long even if HMAC-RIPEMD-160 is used (in XTS mode, an
additional 256-bit secondary header key is used; hence, two 256-bit keys are used for AES-256 in
total). For more information, refer to [7]. 1000 iterations (or 2000 iterations when HMAC-
RIPEMD-160 is used as the underlying hash function) of the key derivation function have to be
performed to derive a header key, which increases the time necessary to perform an exhaustive
search for passwords (i.e., brute force attack) [7].
Header keys used by ciphers in a cascade are mutually independent, even though they are derived
from a single password (to which keyfiles may have been applied). For example, for the AES-
Twofish-Serpent cascade, the header key derivation function is instructed to derive a 768-bit
encryption key from a given password (and, for XTS mode, in addition, a 768-bit secondary header
key from the given password). The generated 768-bit header key is then split into three 256-bit keys
(for XTS mode, the secondary header key is split into three 256-bit keys too, so the cascade actually
uses six 256-bit keys in total), out of which the first key is used by Serpent, the second key is used
by Twofish, and the third by AES (in addition, for XTS mode, the first secondary key is used by
Serpent, the second secondary key is used by Twofish, and the third secondary key by AES).
Hence, even when an adversary has one of the keys, he cannot use it to derive the other keys, as
there is no feasible method to determine the password from which the key was derived (except for
brute force attack mounted on a weak password).
138](https://image.slidesharecdn.com/truecryptuserguide-120228140112-phpapp02/85/True-crypt-user-guide-138-320.jpg)
![Random Number Generator
The TrueCrypt random number generator (RNG) is used to generate the master encryption key, the
secondary key (XTS mode), salt, and keyfiles. It creates a pool of random values in RAM
(memory). The pool, which is 320 bytes long, is filled with data from the following sources:
· Mouse movements
· Keystrokes
· Mac OS X and Linux: Values generated by the built-in RNG (both /dev/random and
/dev/urandom)
· MS Windows only: MS Windows CryptoAPI (collected regularly at 500-ms interval)
· MS Windows only: Network interface statistics (NETAPI32)
· MS Windows only: Various Win32 handles, time variables, and counters (collected regularly
at 500-ms interval)
Before a value obtained from any of the above-mentioned sources is written to the pool, it is divided
into individual bytes (e.g., a 32-bit number is divided into four bytes). These bytes are then
individually written to the pool with the modulo 28 addition operation (not by replacing the old
values in the pool) at the position of the pool cursor. After a byte is written, the pool cursor position
is advanced by one byte. When the cursor reaches the end of the pool, its position is set to the
beginning of the pool. After every 16th byte written to the pool, the pool mixing function is
automatically applied to the entire pool (see below).
Pool Mixing Function
The purpose of this function is to perform diffusion [2]. Diffusion spreads the influence of
individual “raw” input bits over as much of the pool state as possible, which also hides statistical
relationships. After every 16th byte written to the pool, this function is applied to the entire pool.
Description of the pool mixing function:
1. Let R be the randomness pool.
2. Let H be the hash function selected by the user (SHA-512, RIPEMD-160, or Whirlpool).
3. l = byte size of the output of the hash function H (i.e., if H is RIPEMD-160, then l = 20;
if H is SHA-512, l = 64)
4. z = byte size of the randomness pool R (320 bytes)
5. q = z / l – 1 (e.g., if H is Whirlpool, then q = 4)
6. R is divided into l-byte blocks B0...Bq.
For 0 £ i £ q (i.e., for each block B) the following steps are performed:
a. M = H (B0 || B1 || ... || Bq) [i.e., the randomness pool is hashed using the hash function H,
which produces a hash M]
b. Bi = Bi ^ M
7. R = B0 || B1 || ... || Bq
For example, if q = 1, the randomness pool would be mixed as follows:
1. (B0 || B1) = R
2. B0 = B0 ^ H(B0 || B1)
3. B1 = B1 ^ H(B0 || B1)
4. R = B0 || B1
139](https://image.slidesharecdn.com/truecryptuserguide-120228140112-phpapp02/85/True-crypt-user-guide-139-320.jpg)
![Generated Values
The content of the RNG pool is never directly exported (even when TrueCrypt instructs the RNG to
generate and export a value). Thus, even if the attacker obtains a value generated by the RNG, it is
infeasible for him to determine or predict (using the obtained value) any other values generated by
the RNG during the session (it is infeasible to determine the content of the pool from a value
generated by the RNG).
The RNG ensures this by performing the following steps whenever TrueCrypt instructs it to
generate and export a value:
1. Data obtained from the sources listed above is added to the pool as described above.
2. The requested number of bytes is copied from the pool to the output buffer (the copying
starts from the position of the pool cursor; when the end of the pool is reached, the copying
continues from the beginning of the pool; if the requested number of bytes is greater than the
size of the pool, no value is generated and an error is returned).
3. The state of each bit in the pool is inverted (i.e., 0 is changed to 1, and 1 is changed to 0).
4. Data obtained from some of the sources listed above is added to the pool as described above.
5. The content of the pool is transformed using the pool mixing function. Note: The function
uses a cryptographically secure one-way hash function selected by the user (for more
information, see the section Pool Mixing Function above).
6. The transformed content of the pool is XORed into the output buffer as follows:
a. The output buffer write cursor is set to 0 (the first byte of the buffer).
b. The byte at the position of the pool cursor is read from the pool and XORed into the
byte in the output buffer at the position of the output buffer write cursor.
c. The pool cursor position is advanced by one byte. If the end of the pool is reached,
the cursor position is set to 0 (the first byte of the pool).
d. The position of the output buffer write cursor is advanced by one byte.
e. Steps b–d are repeated for each remaining byte of the output buffer (whose length is
equal to the requested number of bytes).
7. The content of the output buffer, which is the final value generated by the RNG, is exported.
Design Origins
The design and implementation of the random number generator are based on the following works:
· Software Generation of Practically Strong Random Numbers by Peter Gutmann [10]
· Cryptographic Random Numbers by Carl Ellison [11]
140](https://image.slidesharecdn.com/truecryptuserguide-120228140112-phpapp02/85/True-crypt-user-guide-140-320.jpg)
![Keyfiles
TrueCrypt keyfile is a file whose content is combined with a password. The user can use any kind
of file as a TrueCrypt keyfile. The user can also generate a keyfile using the built-in keyfile
generator, which utilizes the TrueCrypt RNG to generate a file with random content (for more
information, see the section Random Number Generator).
The maximum size of a keyfile is not limited; however, only its first 1,048,576 bytes (1 MB) are
processed (all remaining bytes are ignored due to performance issues connected with processing
extremely large files). The user can supply one or more keyfiles (the number of keyfiles is not
limited).
Keyfiles can be stored on PKCS-11-compliant [23] security tokens and smart cards protected by
multiple PIN codes (which can be entered either using a hardware PIN pad or via the TrueCrypt
GUI).
Keyfiles are processed and applied to a password using the following method:
1. Let P be a TrueCrypt volume password supplied by user (may be empty)
2. Let KP be the keyfile pool
3. Let kpl be the size of the keyfile pool KP, in bytes (64, i.e., 512 bits);
kpl must be a multiple of the output size of a hash function H
4. Let pl be the length of the password P, in bytes (in the current version: 0 £ pl £ 64)
5. if kpl > pl, append (kpl – pl) zero bytes to the password P (thus pl = kpl)
6. Fill the keyfile pool KP with kpl zero bytes.
7. For each keyfile perform the following steps:
a. Set the position of the keyfile pool cursor to the beginning of the pool
b. Initialize the hash function H
c. Load all bytes of the keyfile one by one, and for each loaded byte perform the
following steps:
i. Hash the loaded byte using the hash function H without initializing the hash,
to obtain an intermediate hash (state) M. Do not finalize the hash (the state is
retained for next round).
ii. Divide the state M into individual bytes.
For example, if the hash output size is 4 bytes, (T0 || T1 || T2 || T3) = M
iii. Write these bytes (obtained in step 7.c.ii) individually to the keyfile pool with
the modulo 28 addition operation (not by replacing the old values in the pool)
at the position of the pool cursor. After a byte is written, the pool cursor
position is advanced by one byte. When the cursor reaches the end of the
pool, its position is set to the beginning of the pool.
8. Apply the content of the keyfile pool to the password P using the following method:
a. Divide the password P into individual bytes B0...Bpl-1.
Note that if the password was shorter than the keyfile pool, then the password was padded with zero
bytes to the length of the pool in Step 5 (hence, at this point the length of the password is always
greater than or equal to the length of the keyfile pool).
b. Divide the keyfile pool KP into individual bytes G0...Gkpl-1
c. For 0 £ i < kpl perform: Bi = Bi Å Gi
d. P = B0 || B1 || ... || Bpl-2 || Bpl-1
141](https://image.slidesharecdn.com/truecryptuserguide-120228140112-phpapp02/85/True-crypt-user-guide-141-320.jpg)
![9. The password P (after the keyfile pool content has been applied to it) is now passed to the
header key derivation function PBKDF2 (PKCS #5 v2), which processes it (along with salt
and other data) using a cryptographically secure hash algorithm selected by the user (e.g.,
SHA-512). See the section Header Key Derivation, Salt, and Iteration Count for more
information.
The role of the hash function H is merely to perform diffusion [2]. CRC-32 is used as the hash
function H. Note that the output of CRC-32 is subsequently processed using a cryptographically
secure hash algorithm: The keyfile pool content (in addition to being hashed using CRC-32) is
applied to the password, which is then passed to the header key derivation function PBKDF2
(PKCS #5 v2), which processes it (along with salt and other data) using a cryptographically
secure hash algorithm selected by the user (e.g., SHA-512). The resultant values are used to
form the header key and the secondary header key (XTS mode).
142](https://image.slidesharecdn.com/truecryptuserguide-120228140112-phpapp02/85/True-crypt-user-guide-142-320.jpg)
![TrueCrypt Volume Format Specification
Offset Size Encryption
(bytes) (bytes) Status * Description
0 64 Unencrypted ‡ Salt
64 4 Encrypted ASCII string “TRUE”
68 2 Encrypted Volume header format version (5)
70 2 Encrypted Minimum program version required to open the volume
72 4 Encrypted CRC-32 checksum of the (decrypted) bytes 256–511
76 16 Encrypted Reserved (must contain zeroes)
92 8 Encrypted Size of hidden volume (set to zero in non-hidden volumes)
100 8 Encrypted Size of volume
108 8 Encrypted Byte offset of the start of the master key scope
116 8 Encrypted Size of the encrypted area within the master key scope
124 4 Encrypted Flag bits (bit 0 set: system encryption; bit 1 set: non-system
in-place-encrypted volume; bits 2-31 are reserved)
128 4 Encrypted Sector size (in bytes)
132 120 Encrypted Reserved (must contain zeroes)
252 4 Encrypted CRC-32 checksum of the (decrypted) bytes 64–251
256 Var. Encrypted Concatenated primary and secondary master keys §
512 65024 Encrypted Reserved (for system encryption, this item is omitted††)
65536 65536 Encrypted / Area for hidden volume header (if there is no hidden volume
Unencrypted‡ within the volume, this area contains random data **). For
system encryption, this item is omitted. †† See bytes 0–65535.
131072 Var. Encrypted Data area (master key scope). For system encryption, offset
may be different (depending on offset of system partition).
S–131072 † 65536 Encrypted / Backup header (encrypted with a different header key derived
Unencrypted‡ using a different salt). For system encryption, this item is
omitted. †† See bytes 0–65535.
S–65536 65536 Encrypted / Backup header for hidden volume (encrypted with a different
Unencrypted‡ header key derived using a different salt). If there is no hidden
volume within the volume, this area contains random data.** For
system encryption, this item is omitted. †† See bytes 0–65535.
*
The encrypted areas of the volume header are encrypted in XTS mode using the primary and secondary header keys. For more
information, see the section Encryption Scheme and the section Header Key Derivation, Salt, and Iteration Count.
†
S denotes the size of the volume host (in bytes).
‡
Note that the salt does not need to be encrypted, as it does not have to be kept secret [7] (salt is a sequence of random values).
§
Multiple concatenated master keys are stored here when the volume is encrypted using a cascade of ciphers (secondary master keys
are used for XTS mode).
**
See below in this section for information on the method used to fill free volume space with random data when the volume is
created.
††
Here, the meaning of "system encryption" does not include a hidden volume containing a hidden operating system.
143](https://image.slidesharecdn.com/truecryptuserguide-120228140112-phpapp02/85/True-crypt-user-guide-143-320.jpg)
![Compliance with Standards and Specifications
To our best knowledge, TrueCrypt complies with the following standards, specifications, and
recommendations:
· ISO/IEC 10118-3:2004 [21]
· FIPS 197 [3]
· FIPS 198 [22]
· FIPS 180-2 [14]
· NIST SP 800-3E [24]
· PKCS #5 v2.0 [7]
· PKCS #11 v2.20 [23]
The correctness of the implementations of the encryption algorithms can be verified using test
vectors (select Tools > Test Vectors) or by examining the source code of TrueCrypt.
Source Code
TrueCrypt is open-source and free software. The complete source code of TrueCrypt (written in C,
C++, and assembly) is freely available for peer review at:
http://www.truecrypt.org/
145](https://image.slidesharecdn.com/truecryptuserguide-120228140112-phpapp02/85/True-crypt-user-guide-145-320.jpg)
![References
[1] U.S. Committee on National Security Systems (CNSS), National Policy on the Use of the
Advanced Encryption Standard (AES) to Protect National Security Systems and National
Security Information, CNSS Policy No. 15, Fact Sheet No. 1, June 2003, available at
http://csrc.nist.gov/groups/STM/cmvp/documents/CNSS15FS.pdf.
[2] C. E. Shannon, Communication Theory of Secrecy Systems, Bell System Technical Journal,
v. 28, n. 4, 1949
[3] NIST, Advanced Encryption Standard (AES), Federal Information Processing Standards
Publication 197, November 26, 2001, available at
http://csrc.nist.gov/publications/fips/fips197/fips-197.pdf.
[4] J. Nechvatal, E. Barker, L. Bassham, W. Burr, M. Dworkin, J. Foti, E. Roback, NIST,
Report on the Development of the Advanced Encryption Standard (AES), October 2, 2000,
Journal of Research of the National Institute of Standards and Technology, Vol. 106, No. 3,
May-June 2001, available at http://nvl.nist.gov/pub/nistpubs/jres/106/3/j63nec.pdf.
[5] B. Schneier, J. Kelsey, D. Whiting, D. Wagner, C. Hall, N. Ferguson, T. Kohno, M. Stay,
The Twofish Team’s Final Comments on AES Selection, May 15, 2000, available at
http://csrc.nist.gov/archive/aes/round2/comments/20000515-bschneier.pdf.
[6] Bruce Schneier, Beyond Fear: Thinking Sensibly About Security in an Uncertain World,
Springer, 2003
[7] RSA Laboratories, PKCS #5 v2.0: Password-Based Cryptography Standard, RSA Data
Security, Inc. Public-Key Cryptography Standards (PKCS), March 25, 1999, available at
ftp://ftp.rsasecurity.com/pub/pkcs/pkcs-5v2/pkcs5v2-0.pdf.
[8] H. Krawczyk, M. Bellare, R. Canetti, HMAC: Keyed-Hashing for Message Authentication,
RFC 2104, February 1997, available at http://www.ietf.org/rfc/rfc2104.txt.
[9] M. Nystrom, RSA Security, Identifiers and Test Vectors for HMAC-SHA-224, HMAC-SHA-
256, HMAC-SHA-384, and HMAC-SHA-512, RFC 4231, December 2005, available at
http://www.ietf.org/rfc/rfc4231.txt.
[10] Peter Gutmann, Software Generation of Practically Strong Random Numbers, presented at
the 1998 Usenix Security Symposium, available at
http://www.cs.auckland.ac.nz/~pgut001/pubs/usenix98.pdf.
[11] Carl Ellison, Cryptographic Random Numbers, originally an appendix to the P1363
standard, available at http://world.std.com/~cme/P1363/ranno.html.
149](https://image.slidesharecdn.com/truecryptuserguide-120228140112-phpapp02/85/True-crypt-user-guide-149-320.jpg)
![[12] P. Rogaway, Efficient Instantiations of Tweakable Blockciphers and Refinements to Modes
OCB and PMAC, Asiacrypt 2004. LNCS vol. 3329. Springer, 2004. Also available at:
http://www.cs.ucdavis.edu/~rogaway/papers/offsets.pdf.
[13] J. Kelsey, Twofish Technical Report #7: Key Separation in Twofish, AES Round 2 public
comment, April 7, 2000
[14] NIST, Secure Hash Standard, FIPS 180-2, August 1, 2002, available at
http://csrc.nist.gov/publications/fips/fips180-2/fips180-2.pdf.
[15] U. Maurer, J. Massey, Cascade Ciphers: The Importance of Being First, Journal of
Cryptology, v. 6, n. 1, 1993
[16] Bruce Schneier, Applied Cryptography, Second Edition, John Wiley & Sons, 1996
[17] Peter Gutmann, Secure Deletion of Data from Magnetic and Solid-State Memory, first
published in the Sixth USENIX Security Symposium Proceedings, San Jose, California,
July 22-25, 1996, available at http://www.cs.auckland.ac.nz/~pgut001/pubs/secure_del.html
[18] Serpent home page: http://www.cl.cam.ac.uk/~rja14/serpent.html.
[19] M. E. Smid, AES Issues, AES Round 2 Comments, May 22, 2000, available at
http://csrc.nist.gov/archive/aes/round2/comments/20000523-msmid-2.pdf.
[20] A. Menezes, P. van Oorschot, S. Vanstone, Handbook of Applied Cryptography, CRC
Press, October 1996
[21] International Organization for Standardization (ISO), Information technology – Security
techniques – Hash-functions – Part 3: Dedicated hash-functions, ISO/IEC 10118-3:2004,
February 24, 2004
[22] NIST, The Keyed-Hash Message Authentication Code (HMAC), Federal Information
Processing Standards Publication 198, March 6, 2002, available at
http://csrc.nist.gov/publications/fips/fips198/fips-198a.pdf.
[23] RSA Laboratories, PKCS #11 v2.20: Cryptographic Token Interface Standard, RSA
Security, Inc. Public-Key Cryptography Standards (PKCS), June 28, 2004, available at
ftp://ftp.rsasecurity.com/pub/pkcs/pkcs-11/v2-20/pkcs-11v2-20.pdf.
[24] Morris Dworkin, Recommendation for Block Cipher Modes of Operation: The XTS-AES
Mode for Confidentiality on Storage Devices, NIST Special Publication 800-3E, January
2010, available at http://csrc.nist.gov/publications/nistpubs/800-38E/nist-sp-800-38E.pdf.
150](https://image.slidesharecdn.com/truecryptuserguide-120228140112-phpapp02/85/True-crypt-user-guide-150-320.jpg)

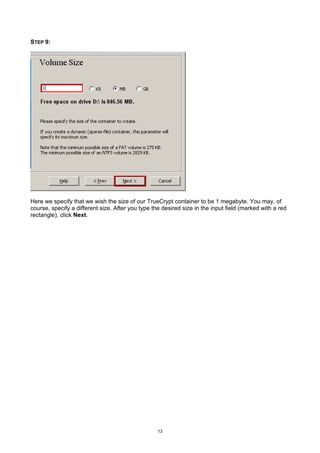
Here are a few notes on choosing a container size: - The size you specify here is the maximum size the container will ever grow to be. It does not mean the container will use this much space on your disk immediately. - The container will only use space on your disk as you add data to it. So starting with a larger size does not negatively impact performance. - You can expand the size later if needed, but you cannot shrink it. So it's better to overestimate than underestimate at creation time. - For this tutorial, 1 MB is sufficient as we won't be storing significant amounts of data. In practice, choose a size suitable for your needs. With that in mind,


![V sphere 5-upgrade-best-practices-guide[1]](https://cdn.slidesharecdn.com/ss_thumbnails/vsphere-5-upgrade-best-practices-guide1-131003071356-phpapp01-thumbnail.jpg?width=640&height=640&fit=bounds)