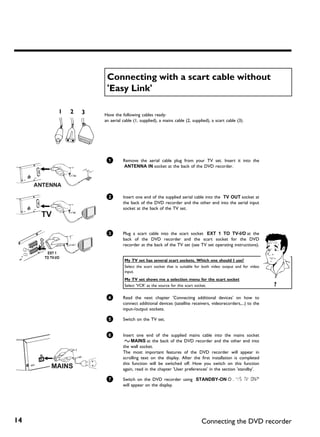
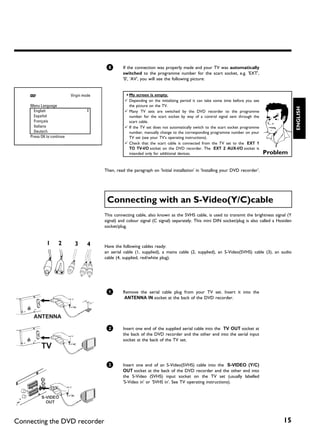
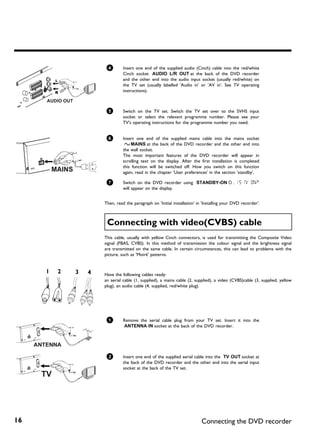
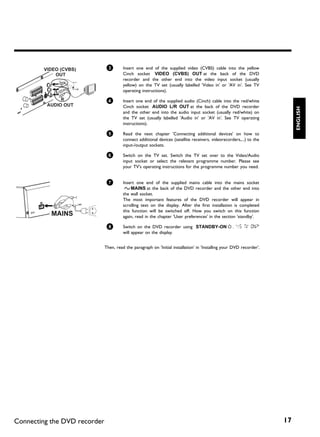
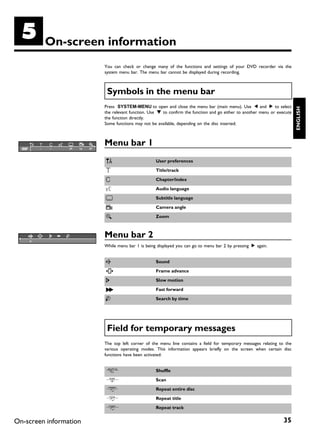
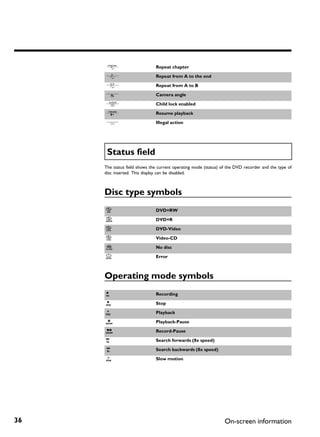
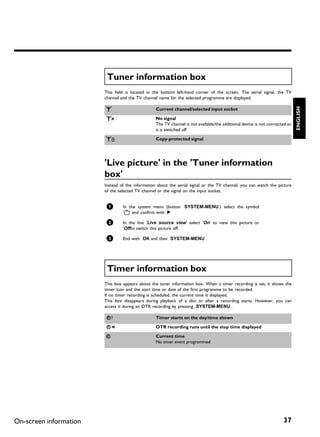
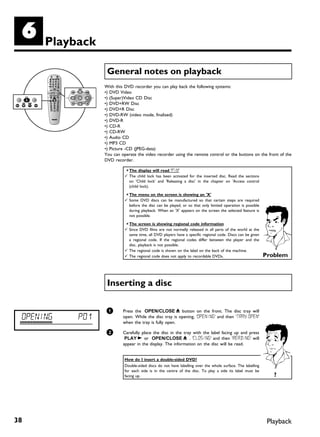
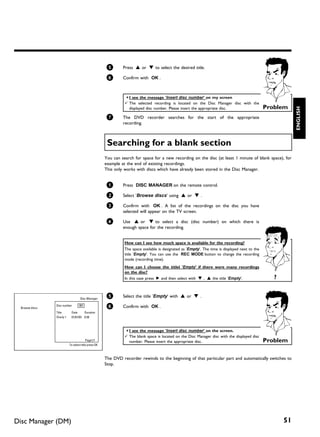
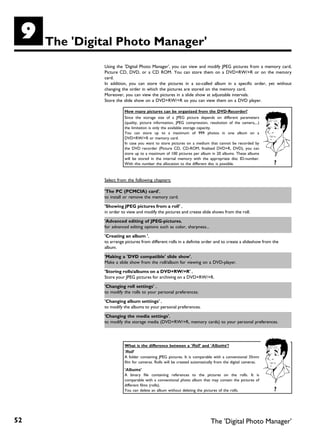
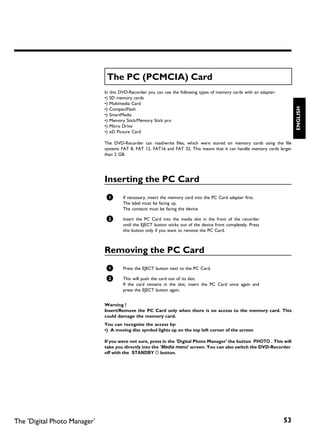
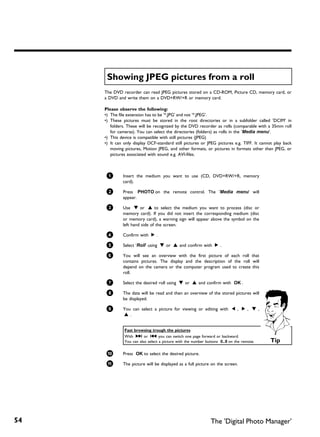
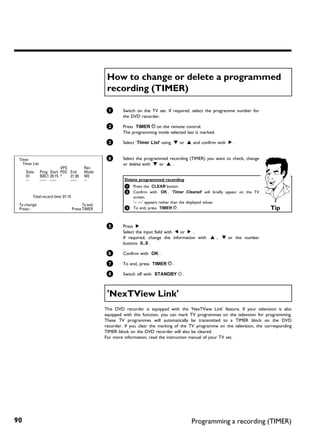
Table of contents

AIntroduction ....................................                                                                      3    FPlayback ........................................                                                                   38
Dear Philips customer, ....................................................................................             3    General notes on playback ...........................................................................                    38
Regional code ....................................................................................................      6    Inserting a disc ................................................................................................        38
Technical data ...................................................................................................      6    Playing a DVD video disc ..............................................................................                  39
Accessories ........................................................................................................    6    Playing a DVD+RW/ +R disc .......................................................................                        40
Important ...........................................................................................................   7    Playing an audio CD .......................................................................................              40
Cleaning the discs .............................................................................................        8    Playing an MP3 CD .........................................................................................              41
Special functions of your DVD recorder ....................................................                             9    Playing a (Super) Video CD .........................................................................                     42


BConnecting the DVD recorder ...                                                                                    11       GAdditonal playback features ........                                                                                43
Preparing the remote control for operation ...........................................                                  11   Changing to another title/chapter ..............................................................                         43
Connecting your DVD recorder to the TV set ......................................                                       11   Searching a disc ...............................................................................................         43
Connecting with a scart cable and 'Easy Link' ..........................................                                12   Still picture .......................................................................................................    44
Connecting with a scart cable without 'Easy Link' ..................................                                    14   Slow motion ....................................................................................................         44
Connecting with an S-Video(Y/C)cable .....................................................                              15   Search by time .................................................................................................         45
Connecting with video(CVBS) cable ..........................................................                            16   Repeat/Shuffle play .........................................................................................            45
                                                                                                                             Repeating a passage (A-B) ............................................................................                   46

CConnecting additional devices ....
                                                                                                                             Scan feature .....................................................................................................       46
                                                                                                                    18       Camera angle ...................................................................................................         46
                                                                                                                             Zoom feature ..................................................................................................          47
Connecting additional devices to the second scart socket ...................                                            18   Select the audio language ..............................................................................                 47
Connecting a video recorder, DVD player. .............................................                                  18   Subtitles ............................................................................................................   47
Connecting an external receiver (satellite receiver, set-top box,


                                                                                                                             HDisc Manager (DM) ......................
cable TV box,...) ..............................................................................................        19
Connecting additional devices only via aerial cable ................................                                    19
Connect camcorder to the front sockets ................................................                                 20
                                                                                                                                                                                                                                                  48
Connecting audio devices to the analogue audio sockets ....................                                             20   General information ......................................................................................               48
Connecting audio devices to the digital audio sockets ..........................                                        21   Adding a disc to the Disc Manager .............................................................                          48
                                                                                                                             Removing discs from the Disc Manager ....................................................                                49

DInstalling your DVD recorder ......
                                                                                                                             Searching for a title in the Disc Manager ..................................................                             50
                                                                                                                    22       Searching discs ................................................................................................         50
                                                                                                                             Searching for a blank section .......................................................................                    51
Initial installation .............................................................................................      22


                                                                                                                             IThe 'Digital Photo Manager' .......
Using a satellite receiver ...............................................................................              24
Allocating a decoder ......................................................................................             25
Connection using a component video (Y Pb Pr/YUV) cable ................                                                 26
                                                                                                                                                                                                                                                  52
Manual TV channel search ............................................................................                   27   The PC (PCMCIA) Card ...............................................................................                     53
Sorting TV channels automatically (Follow TV) ......................................                                    29   Inserting the PC Card ...................................................................................                53
Automatic TV channel search .....................................................................                       30   Removing the PC Card .................................................................................                   53
Sorting and deleting TV channels manually ..............................................                                31   Showing JPEG pictures from a roll .............................................................                          54
Setting the language/country ........................................................................                   32   Editing JPEG pictures .....................................................................................              55
'Recording audio' switching over (2-channel sound) ..............................                                       33   Slide show ........................................................................................................      55
Setting the time and date ..............................................................................                34   Advanced editing of the JPEG pictures ......................................................                             56
                                                                                                                             Creating an album ..........................................................................................             58

EOn screen information ................
                                                                                                                             Adding pictures to an album ........................................................................                     58
                                                                                                                    35       Changing the picture order within an album ...........................................                                   59
                                                                                                                             Editing pictures in an album .........................................................................                   59
Symbols in the menu bar ..............................................................................                  35   Making a 'DVD compatible' slide show .....................................................                               60
Menu bar 1 .......................................................................................................      35   Making a slide show from an album ...........................................................                            60
Menu bar 2 .......................................................................................................      35   Making a slide show from a roll ..................................................................                       60
Field for temporary messages .....................................................................                      35   Storing rolls/albums on a DVD+RW/+R ..................................................                                   61
Status field ........................................................................................................   36   Preparing a DVD+RW/+R ...........................................................................                        61
Disc type symbols ..........................................................................................            36   Transfer the photos to a DVD+RW/+R ...................................................                                   62
Operating mode symbols .............................................................................                    36   Changing roll settings ....................................................................................              63
Tuner information box .................................................................................                 37   Changing the rolls name ...............................................................................                  63
'Live picture' in the 'Tuner information box' ...........................................                               37   Changing the rolls date .................................................................................                63
Timer information box .................................................................................                 37   Calling roll overview directly .......................................................................                   63
                                                                                                                             Deleting a roll ..................................................................................................       64


Table of contents
Changing album settings ...............................................................................                 64   Changing the disc name ................................................................................                 84
Changing the cover picture ..........................................................................                   64   Finishing editing ...............................................................................................       84
Changing the album name ............................................................................                    64   Finalising DVD+R discs .................................................................................                85
Changing the album date ..............................................................................                  65   Erase DVD+RW disks ...................................................................................                  85
Calling the album overview directly ...........................................................                         65

                                                                                                                             LProgramming a recording
Copying an album ...........................................................................................            65
Erasing an album .............................................................................................          66
Changing the media settings ........................................................................                    66
Problem solving for 'Digital Photo Manager' ............................................                                67   (TIMER) .............................................. 86
                                                                                                                             General .............................................................................................................   86

JManual recording ..........................                                                                        68
                                                                                                                             Programming recordings with the ShowView® System .........................
                                                                                                                             Programming recordings without the ShowView® System ...................
                                                                                                                             How to change or delete a programmed recording (TIMER) .............
                                                                                                                                                                                                                                                     87
                                                                                                                                                                                                                                                     89
                                                                                                                                                                                                                                                     90
General .............................................................................................................   68
                                                                                                                             'NexTView Link' .............................................................................................           90
Recording without automatic switch-off ...................................................                              69
                                                                                                                             Problem solving for programmed recordings ..........................................                                    91
Interrupt recording (Pause) .........................................................................                   70
Recording with automatic switch-off (OTR one-touch-recording) ....                                                      71
Preventing accidental erasing of discs ........................................................
Lining up recordings within a title (assemble cut) ..................................
                                                                                                                        71
                                                                                                                        72   MUser preferences ..........................                                                                        92
Selecting the recording type (picture quality) ..........................................                               73   Picture settings ................................................................................................       92
Automatic recording from a satellite receiver (Sat recording) ............                                              74   Sound settings .................................................................................................        94
Direct Record .................................................................................................         75   Language settings ............................................................................................          95
Switching 'Direct Record' on or off ...........................................................                         76   Additional settings ..........................................................................................          95
                                                                                                                             Remote Control settings ..............................................................................                  96

KManaging the disc contents .........                                                                               77
                                                                                                                             Disk feature menu ..........................................................................................            97


General .............................................................................................................
Favorite Scene Selection ...............................................................................
                                                                                                                        77
                                                                                                                        78   NAccess control (Child Lock) ........                                                                               98
Insert chapter markers .................................................................................                78   Child lock (DVD and VCD) ......................................................................... 98
Hiding chapters ...............................................................................................         78   Activating/deactivating child lock ................................................................ 98
Deleting chapter markers .............................................................................                  80   Authorising a disc ........................................................................................... 99
Changing the index picture ..........................................................................                   80   Locking unlocked discs .................................................................................. 99
Changing the menu background .................................................................                          81   Parental level control (DVD video only) .................................................. 99
Dividing titles ...................................................................................................     81   Activating/deactivating parental level control .......................................... 99
Editing recording titles (name) ....................................................................                    82   Changing the country .................................................................................. 100
Playing the entire title ...................................................................................            82   Changing the PIN code ............................................................................... 101
Erasing recordings/titles ................................................................................              83
Disc settings ....................................................................................................      83
                                                                                                                             OBefore you call an engineer .......                                                                            102


                                                                                                                                                                                                           Table of contents
The remote control

REC/OTR n      Record: Record the current TV channel


                                                                                          ENGLISH
STANDBY m      Switch on or off: To switch set on or off, interrupt menu function,
               interrupt a programmed recording (TIMER)

TIMER s        TIMER: To make a TIMER programming with/without ShowView® or
               to alter or clear a programmed TIMER

REC MODE       Record type (Picture quality): To select the maximum possible
               record time

PLAY MODE      Playback type: Choose between repeat, shuffle play and intro-scan

TV/DVD         TV/DVD switch: Switches the scart socket EXT 2 AUX-I/O of the
               DVD recorder directly to the TV set. This lets you watch the picture
               from any unit connected to this scart socket (set-top box', video
               recorder or satellite receiver) and at the same time record from
               another source.
               If you have not connected a device to the EXT 2 AUX-I/O socket or
               the device is switched off, you can use this button to switch between
               TV reception and the signal of the DVD recorder.
               But this only works if you use a scart cable to connect the TV set to
               your DVD recorder ( EXT 1 TO TV-I/O socket) and your TV set
               responds to this switch-over.

MONITOR        Monitor: This button lets you switch between disc playback or the
               picture of the internal tuner (TV channel).

DIM            Dimmer: This button lets you change the brightness of the display to
               one of two levels or switch it off.

RETURN         Back: Return to previous menu on a video CD (VCD). This also works
               with some DVDs.

T/C            Title/Chapter: Choose the 'B'(Title)/'C'(Chapter) directly from the
               menu bar using B , A .
               If 'INFO' appears in the display, the index menu from a recorded disc or
               an introductory film will be shown. In this case, this function is not
               available.

SUBTITLE       Subtitle : Select the subtitle language

AUDIO          Audio: Selecting the audio language. For recording or during playback
               using the internal tuner ( MONITOR key), select language 1 or 2.

ANGLE          Angle: Select the camera angle

ZOOM           Zoom: Enlarge the picture

DISC MANAGER   Disc Manager: Call up or cancel the Disc Manager

EDIT           EDIT: For displaying the edit menu for DVD+RW/+R discs, for setting
               chapter markers, for editing the photos in the 'Digital Photo Manager'

SELECT         Select: Select function/value/photos

PHOTO          Digital Photo Manager: Open the 'Digital Photo Manager'

DISC-MENU      Disc menu: To show the DVD menu or the index screen, to leave the
               'Digital Photo Mamger'
SYSTEM-MENU              System menu: Call up/cancel the main menu (menu bar at the top of
                          the screen)

 D C A B                  Cursor keys : Cursor left, right, up, down

 CHANNEL q                Plus : Next programme number

 CHANNEL r                Minus : Previous programme number

 OK                       Store/confirm: To store or confirm entry

 PLAY G                   Playback: To play a recorded disc.

 N                        Select previous title/search backwards :
                          Briefly press the button during playback: Previous chapter/film or
                          previous title
                          Hold down the button: Search backwards
                          Hold down button during still picture, slow motion backwards

 STOP h                   Stop: Stop playback/recording, except with programmed recordings
                          (TIMER)
                          Hold down button, opens and closes the disc tray.
 PAUSE 9                  Pause (still picture):
                          If this button is pressed during playback, the DVD recorder switches to
                          pause. You will see a still picture.
                          If this button is pressed during recording, the DVD recorder will also
                          switch to pause.

 O                        Select next title/search forwards :
                          Briefly press the button during playback: Next chapter/film or next title
                          Hold down the button: Search forwards
                          Hold down button during still picture, slow motion forwards

 0..9                     Number /Letter buttons: To enter numbers or letters in appropriate
                          entry fields

 CLEAR                    Delete: To delete last entry or clear programmed recording (TIMER)


Additional TV functions
This will only work with TV sets with the same remote control code *RC5) (e.g. Philips TV sets)

 TV VOLUME q              TV volume: Increase TV volume

 TV VOLUME r              TV volume: Reduce TV volume

 MUTE y                   TV sound off: Switch TV sound on/off


For the following functions you need to hold down the button at the left side • TV and then
select the function you need with the appropriate button.


 STANDBY m                Switching the TV off

 0..9                     Number buttons: 0 - 9

 CHANNEL q                TV programme number: To select a higher programme number

 CHANNEL r                TV programme number: To select a lower programme number
Front of the device


                                                                                                   ENGLISH
 STANDBY-ON m           Switch on or off: To switch off or on, interrupt a function, interrupt a
                        programmed recording (TIMER)

 OPEN/CLOSE J           Open/close disc tray: Open/close disc tray

 MEDIA SLOT             Media Slot for PC (PCMCIA) cards (adapters)

 EJECT                  Eject PC (PCMCIA) card:
 RECORD                 Record: Record the current TV channel

 G                      Playback: To play a recorded disc

 N                      Select previous title/search backwards

 O                      Select next title/search forwards

 h                      Stop: Interrupt playback/recording


Behind the flap at the right hand corner on
the front
Switching between the S-VIDEO and VIDEO sockets takes place automatically. If a signal is
available at both sockets at the same time, the signal at the S-VIDEO socket has priority.

 S-VIDEO                S Video socket: Connection of SVHS/Hi8 camcorders or SVHS/Hi8
                        video recorders (programme number 'CAM1')

Yellow socket           Video input socket: Connection of camcorders or video recorders
VIDEO                   (programme number 'CAM1')

White/red socket        Audio input socket left/right : Connection of camcorders or video
left AUDIO right        recorders (programme number 'CAM1')

 DV IN                  i Link/DV socket (digital video input, IEEE 1394, FireWire):
                        Connecting a digital camcorder or other suitable device (programme
                        number 'CAM2').
Back of the device


4MAINS              Mains socket: Connection to the mains supply (230V/50Hz)

ANTENNA IN          Aerial input: Connection of the aerial

TV OUT              Aerial output: Connection of the TV set

EXT 2 AUX-I/O       Scart socket 2: Connection of an additional device (satellite receiver,
                    set-top box, video recorder, camcorder, etc.). RGB input

EXT 1 TO TV-I/O     Scart socket 1: Connection of a TV set. RGB output


Output sockets (AUDIO/VIDEO OUT)
S-VIDEO (Y/C) OUT   S Video output: Connection of an S-Video-compatible TV set

VIDEO (CVBS)        Video output (yellow socket): Connecting a TV set with a video
OUT                 input (CVBS, Composite Video)

AUDIO L/R OUT       Analogue audio output (white/red socket): Connection of a TV
                    set with audio input sockets or connection of an additional device

COMPONENT           Component Video output (red/blue/green socket): Connection
VIDEO OUT           of an additional device with Component Video input


Output sockets (DIGITAL AUDIO OUT)
COAX OUT            Coaxial digital audio output


OPTICAL AUDIO       Optical digital audio output
OUT
The symbols on your DVD recorder
 display


                                                                                                     ENGLISH
These symbols can light up on your DVD recorder display:

                         Multi-function display/text line
                         •) Clock
                         •) Disc/title playing time
                         •) OTR switch-off time
                         •) Title name
                         •) Display of the programme number of the TV channel/playing
                         time/channel name/function.
                         •) Display of information and alerts

 IIIIIIIIIIIIIII         Disc bar: Displays the current position on the disc (disc pointer).
                         Play/Record: Single flashing segment at the current position.
                         Pause: Flashing segment on both sides of the current position.
                         Stop: Illuminated segment at the current position.

 SAT                     An automatic recording from a satellite receiver (SAT recording) has
                         been programmed.

 TIMER                   A recording (timer) has been programmed

 o(((                    A remote control signal has been received

 VPS/PDC                 Video programming system / programme delivery control: A VPS or
                         PDC code will be transmitted for the selected TV program

 LANG II                 During playback a 2-channel tone was detected or a 2-channel tone was
                         received. 'I' or 'II' lights up depending on which sound channel has been
                         selected (button AUDIO )
Messages in the DVD recorder display


READING   The following messages may appear in your DVD recorder display

           IS TV ON?               The DVD recorder is in initial installation mode. Switch the TV on, then
                                   read the paragraph on 'Initial installation' in 'Installing your DVD
                                   recorder'.

           NO SIGNAL               No input signal available (signal inadequate or unstable)

           MENU                    The menu on the screen is active

           OPENING                 Disc tray opening

           TRAY OPEN               Disc tray open
           CLOSING                 Disc tray closing

           READING                 Disc being read

           MENU UPDT               Once recording has been successfully completed the table of contents is
                                   created.

           INIT MENU               The menu structure is created after the first recording has been made
                                   on a new disc

           COPY PROT               You received a copy-protected signal. This may come from a
                                   copy-protected DVD/videotape of a DVD/video player or from a TV
                                   channel.

           WAIT                    Please wait until this message disappears. The DVD recorder is busy
                                   performing a task.

           NO DISC                 A disc has not been inserted for recording. If a disc has been inserted, it
                                   cannot be read.

           INFO                    Information about the inserted DVD is displayed on the screen

           BUSY                    The DVD recorder is processing the changes to make them DVD
                                   compatible

           ERASING                 The entire disc is erased

           EMPTYDISC               The disc inserted is either new or has been completely erased (no
                                   recordings).

           PROTECTED               The disc is protected against recording.

           MAX TITLE               The maximum number of titles per disc has been reached. The
                                   maximum number of titles on a disc is 48.

           MAX CHAP                The maximum number of chapters within a title/or the disc has been
                                   reached. The maximum number of chapters within a title is 99, on a disc
                                   124.

           DISC FULL               The disc is full. There is no space for new recordings

           PAL DISC                A disc with PAL recordings has been inserted. The machine is trying to
                                   record an NTSC signal. Insert a new disc or one that contains NTSC
                                   recordings.
NTSC DISC     A disc with NTSC recordings has been inserted. The machine is trying
              to record a PAL signal. Insert a new disc or one that contains PAL
              recordings.

RECORDING     An illegal action (e.g. OPEN/CLOSE J button) was attempted during
              recording.

FREETITLE     Playback was started for an empty title or the following title is empty.


                                                                                         ENGLISH
DISC LOCK     An attempt has been made to record during playback of a protected
              disc. This message appears if an attempt is made to insert a chapter
              marker ( EDIT button).

DISC ERR      An error occurred when writing the title. If this error keeps occurring,
              please clean the disc or use a new one.
              For instructions on how to clean a disc see the section on 'Cleaning the
              discs' in the next chapter.

DISC WARN     An error occurred when writing the title. Recording was continued; the
              error was skipped

SETUP         After the automatic search the menu for setting the date/time will
              appear on the screen.

WAIT 01       During the automatic channel search the TV channels found will be
              counted.

BLOCKED       The disc tray cannot be closed/opened.

SAFE REC      The new recording will be added at the end of all the other recordings
              (SAFE RECORD).

EASYLINK      Data transfer 'EasyLink' from the TV is in progress

POST-FORMAT   After the creation of the menu structure the disc is prepared

PHILIPS       The DVD-Recorder has been switched on

STANDBY       The DVD-Recorder has been switched off

PHOTO         The 'Digital Photo Manager' is switched on

VIDEO         The 'Digital Photo Manager' will be switched off

SAVING        Data will be written on the inserted memory card or on a
              DVD+RW/+R
A         Introduction

                    Dear Philips customer,
                   Instruction manuals are usually very dry since they are technically-oriented and often poorly
                   translated. I have therefore been employed by Philips to help you.


                                                                                                                       ENGLISH
                   Allow me to introduce myself.
                   My name is Phil. I will be guiding you through the instruction manual and helping you get to
                   know your new DVD recorder. At appropriate points along the way, I will be providing you with
                   the following information:


                   Question: (?)                   Tip                             Problem
                   Here I will be explaining       Here I will be giving you       Here I'll help you identify
                   seemingly unimportant           instructions on functions       the cause of a problem and
                   things.                         that will make it easier for    find a solution.
                                                   you to use your DVD
                                                   recorder.


                   I hope you have lots of fun.

                                                  Phil
                   P.S. If you have any problems operating the machine, please read the section entitled 'Before you
                   call an engineer'. If this doesn't help you to resolve the problem, please call the customer
                   support service for your country.
                   The telephone numbers and e-mail addresses can be found on the last page of this instruction
                   manual.
                   You can also visit the website 'http://www.p4c.philips.com' .


Introduction                                                                                                     3
Welcome to the growing family of owners of PHILIPS equipment.

    Thank you for buying a DVDR 77/00-02 .
    Please take the time to read this operating manual before using your DVD recorder. It contains
    important information on how to set up and operate the machine.
    The DVD recorder should not be turned on immediately after transportation from a
    cold to a hot area or vice versa, or in conditions of extreme humidity.
    Wait at least three hours after transporting the machine. The DVD recorder needs this time
    to acclimatise to its new environment (temperature, relative humidity, etc.).

                                   Your Philips team hopes your
                                   new DVD recorder will bring you
                                   many years of enjoyment.


              What is a DVD?
              DVD (Digital Versatile Disc) is a storage medium that combines the
              convenience of the compact disc with the latest digital video technology. DVD
              video uses modern MPEG2 data compression technology that enables an
              entire feature film to be stored on a single five inch disc.
              How good is the resolution of DVD compared with VHS?
              The razor-sharp digital images have a resolution of more than 500 lines of 720
              pixels per line. This is more than twice as high as VHS and is even better than
              the laser disc. Its picture quality is easily comparable to the digital masters
              produced in recording studios.
              What can DVD+RW do?
              DVD+ReWritable uses phase change media, the same technology on which
              rewritable CDs are based. A high-performance laser is used to change the
              reflective properties of the recording layer; this process can be repeated more
              than a thousand times.
              What can the DVD+R do?
              DVD+R (write-once DVD). Unlike a DVD+RW disc, this disc can only be
              written to once. If it is not finalised after a recording, further recordings can
              be added to it. Old recordings can be deleted but can no longer be
              overwritten. The deleted titles are marked 'Deleted title'.
              Before this disc can be played in a DVD player, it must be finalised in the
              DVD recorder. Once this process is complete, no further recordings can be
              added.
              What can my DVD recorder do?
              Your Philips DVD recorder is a machine for recording and playing back digital
              video discs with "two-way" compatibility with the universal DVD video
              standard. This means:
              •) existing DVD video discs can be played on the recorder.
              •) Recordings made on your DVD recorder can be played on other DVD
              video players and DVD ROM drives.                                                   ?


4                                                                                           Introduction
Discs you can use
               The following discs can be used in your DVD recorder for playback and recording:


                                                                                                                ENGLISH
               Playback and recording

               DVD+RW (Digital Versatile Disc + rewritable)


               DVD+R (Digital Versatile Disc + Recordable)


               Playback only:

               DVD Video (Digital Versatile Disc)


               DVD-R (DVD-Recordable). These discs can only be played back if the recording was made in video
               mode and the recording was finalised.


               DVD-RW (DVD-Rewritable) These discs can only be played back if the recording was made in
               video mode and the recording was finalised.


               Audio CD (Compact Disc Digital Audio)


               Super Audio CD (Only plays the CD layer of a hybrid SACD disc)


               Video CD (Format 1.0, 1.1, 2.0)


               Super Video CD


               CD-R (CD-Recordable) Audio/MP3 content


               CD-RW (CD-Rewritable) Audio/MP3 content


               Picture CD, CD-R/RW with JPEG content


Introduction                                                                                               5
Regional code
    Since DVD films are not normally released in all parts of the world at the same time, all DVD
    players have a specific regional code. Discs can be given a regional code. If the regional codes
    differ between the player and the disc, playback is not possible.

    DVDs must be marked 'ALL' for all regions or '2' for region 2 to work in this machine. If the
    DVD is marked with a different region, it cannot be played in this DVD recorder.
    The number within the globe represents the region.
    Regional code 2 represents:
    Europe, Japan, South Africa, Middle East (incl. Egypt).


     Technical data
    Voltage: 220-240V/50Hz
    Power consumption: 30W
    Power consumption (standby): less than 3W (clock display off)
    Measurements in cm (W/H/D): 43.5/7.6/33.5 (Disc tray closed), 47.2 (disc tray open)
    Weight without packaging approx.: 4.0kg
    Power outage/no power: Channel and timer information remain saved for up to 1 year, the
                           time is saved for up to 12 hours.

    Operating position: maximum 10 degree inclination in all directions
    Ambient temperature: 15 C - 35 C
    Humidity: 25% - 75%


     Accessories
    Operating instructions
    Guarantee booklet
    Quick install guide
    Remote control and batteries
    Aerial cable
    Mains cable
    Scart cable (AV-Euro cable)


6                                                                                Introduction
Important

               Caution:


                                                                                                                       ENGLISH
               Visible and invisible laser radiation. If the cover is open, do not look at the beam.

               Because of the risk of eye injuries, only qualified service engineers should open the machine and
               carry out maintenance or repair work.
               LASER
               Type: Semiconductor lasers InGaAlP (DVD), AlGaAs(CD)
               Wavelength: 660nm (DVD), 780nm (CD)
               Output power (outside the lens): 20mW (DVD+RW write), 0.8mW (DVD read), 0.3mW (CD
               read).
               Beam divergence: 82 degrees (DVD), 54 degrees (CD)


               Danger. High voltage! Do not open.
               You run the risk of getting an electric shock.

               The machine does not contain any user-serviceable parts. Please leave all maintenance work to
               qualified personnel.

               There are some components in the DVD recorder that keep running as long as the recorder is
               connected to the power supply. To switch off the DVD recorder completely you must unplug it
               from the power supply.

               If you disconnect the DVD recorder from the mains, make sure to take the plug out of the wall
               socket and not just remove the connector from the 4MAINS socket at the back of the unit.
               Children could seriously injure themselves at the free, live end of the cable.


               These operating instructions have been printed on non-polluting paper.

               Please dispose of old batteries safely.

               Please take the packaging to your local recycling centre.

               This electronic equipment contains a large number of materials that can be recycled. If you are
               disposing of an old machine, please take it to a recycling centre.


Introduction                                                                                                       7
When installing the recorder in a cupboard ensure there is a gap of approximately 2.5 cm (1
    inch) around the recorder to enable air to circulate freely and prevent overheating.

    Make sure that air can circulate freely through the ventilation slots on the machine. The machine
    should be placed on a firm surface.

    Make sure that no objects or liquids enter the video recorder. Do not place vases or similar on
    the DVD recorder. If you spill liquid in the recorder, immediately disconnect it from the power
    supply and call after-sales service for advice.

    Keep the DVD recorder away from radiators and other heat sources and protect from direct
    sunlight.

    Do not place any combustible objects on the device (candles, etc.).

    Make sure that children do not place any foreign objects in any of the openings.


     Cleaning the discs
    Some malfunctions (frozen or distorted picture and broken sound for example) are due to dirt
    on the disc. To avoid such problems you should clean your discs regularly.


     1       Dirty discs should be cleaned with a soft cloth. Always wipe from the
             middle to the edge.

     2       Do not use any solvents such as benzine, thinners, commercially
             available cleaning agents or antistatic sprays designed for vinyl records.


              Can I use a CD lens cleaner in the DVD recorder?
              This optical unit (laser) of the DVD recorder operates at a higher power level
              than the ones in normal DVDs and CD players so CD lens cleaner discs may
              actually damage it.
              CD lens cleaner discs should therefore not be used.                              ?


8                                                                                        Introduction
Special functions of your DVD recorder
               Your PhilipsDVD recorder has a number of special functions to make it easier to use and to
               enhance your enjoyment.


                                                                                                                      ENGLISH
               Philips provides the best possible connection between your DVD recorder and other home
               cinema equipment.

               Using the 'Digital Photo Manager', you can view and modify JPEG pictures from a memory card,
               Picture CD, DVD, or a CD ROM. You can store them on a DVD+RW/+R or on the memory card.
               You can create slide shows and play them on a DVD player.

               The Type-2 PC Card slot (media slot) allows you to use an ATA Flash Card or other memory
               cards using a PC Card adapter.

               The DVD recorder is controlled by external devices (receivers, TV sets and so on) via Cinema Link
               and is automatically set to the right system settings.

               This function automatically transfers all the television channel settings onto your DVD recorder
               via the scart cable ( EXT 1 TO TV-I/O socket).

               Recordings made on your DVD recorder can be controlled from an external satellite receiver.


               At the touch of a button your DVD recorder, even though it is switched off, will check which
               channel is currently playing on your television and record it.

               This connector is also known as a 'FireWire' or 'IEEE 1394'. This connector is used to transmit
               wide digital broadband signals that are used for digital video camcorders. Audio and video signals
               are transmitted using a cable. In addition to DV and Hi8 camcorders, PCs with digital video output
               can also be connected to the digital input.

               This screen tells you what's on the disc. Each index screen represents a recording. On the right
               hand side of the screen you can also see a disc indicator that shows the position and length of
               the current recording on the disc in a graphic format.

               This function enables you to simply delete commercials or other scenes. The relevant scenes are
               marked and skipped as required. This information is stored on the DVD in such a way that other
               DVD players will skip the scenes.

               MP3 files are highly compressed music files. The data is compressed to 1/10 of the volume of the
               original audio material using a special process. This means that 10 hours of music can be stored
               on a single CD.
               These music CDs can be played on this machine.

               Normally a recording is made at the current disc position. This is the same as for a video cassette,
               in the middle of the tape for example. By holding down the REC/OTR n button, the recording
               will be made at the end of all the other recordings to avoid overwriting previous recordings.
               New recordings on DVD+R discs are always added after all existing recordings.

               Using your DVD recorder you can record from an RGB source such as a satellite receiver using
               a SCART input ( EXT 2 AUX-I/O socket). Video signals for the colours R(Red), G(Green) and
               B(Blue) are transmitted via separate channels. This reduces the interference that occurs with
               standard video cables.


Introduction                                                                                                      9
The Philips DVD recorder can play back pre-recorded DVDs and CDs. DVDs recorded using this
     DVD recorder can be played back on current and future DVD players.

     Dolby Digital is a standard developed by Dolby Laboratories for transmitting from 1 to 5
     full-range channels as well as a low frequency (.1) channel for a total of 5.1 discrete channels.
     The loudspeakers are arranged front left, front middle, front right, rear left and rear right. This
     system is currently the most common system and is used in cinemas.
     With this DVD recorder each soundtrack in 2-channel Dolby Digital is recorded onto a
     DVD+RW/+R.


     Manufactured under license from Dolby Laboratories. Dolby and the double-D symbol are
     trademarks of Dolby Laboratories.

     Transmission standard for 5.1 channels from Digital Theatre Systems Inc. This is the second most
     wide-spread system after Dolby Digital.

     This product contains copy protection technology, which is protected by US Patent Nos.
     4631603, 4577216, 4819098 and 4907.093 and other intellectual property rights. Use of this
     copy protection technology from Macrovision Corporation requires the approval of Macrovision.
     It is intended exclusively for home use and other limited pay-per-view applications, unless
     Macrovision approves some other use in writing. Modifications to the equipment, removal of
     components and reverse engineering are prohibited.

     Simple programming system for DVD recorders. Simply enter the programming number associated
     with your television programme. You will find this number in your favourite listings magazine.

     ShowView is a registered trademark of Gemstar Development Corporation. ShowView is
     manufactured under licence from Gemstar Development Corporation.


     Enter the serial number here. You will need it for service queries or if your machine is stolen.
     The serial number (PROD. NO.) is printed on the type plate at the back.


      MODEL NO.                 DVDR 77/00-02

      PROD. NO.                 ..................


     This product complies with the requirements of the following directives and guidelines:
     73/23/EEC + 89/336/EEC + 93/68 EEC.


10                                                                                   Introduction
B        Connecting the DVD recorder

                               Preparing the remote control for
                               operation


                                                                                                                                      ENGLISH
                              The remote control and its batteries are packed separately in the original DVD recorder
                              packaging. You must install the batteries in the remote control before use - described in the
                              following section.


                               1       Take the remote control and the enclosed batteries (2 batteries).

                               2       Open the battery compartment, insert the batteries as shown and
                                       then close the battery compartment.


                              The remote control is now ready to use.
                              Its range is approximately 5 to 10 meters.


                                        'Aim' correctly
                                        In the following sections, you will need the remote control for the first time.
                                        Aim the remote control at the DVD recorder and not at the TV set.                  Tip


                               Connecting your DVD recorder to the TV
                               set
                              The necessary cable connections must be made before you can record or playback TV
                              programmes using your DVD recorder.

                              Connect the DVD recorder directly to your TV set. If there is a video recorder in between
                              the picture quality may be poor.
                              We recommend that you use a scart cable to connect your TV set and DVD recorder.


                                        What is a scart cable?
                                        The scart or Euro AV cable serves as the universal connector for picture,
                                        sound and control signals. With this type of connection, there is practically no
                                        loss of quality in picture or sound transmission.                                   ?


Connecting the DVD recorder                                                                                                      11
When you install your DVD recorder for the first time, select one of the following options:

     'Connecting with a scart cable and Easy Link'
     If your TV set is equipped with 'Easy Link, Cinema Link, NexTView Link, Q-Link, Smart Link,
     Megalogic, Datalogic, ...' and you wish to use a scart cable.

     'Connecting with a scart cable without Easy Link'
     If your TV set is not equipped with 'Easy Link, Cinema Link, NexTView Link, Q-Link, Smart Link,
     Megalogic, Datalogic, ...' and you wish to use a scart cable.

     'Connecting with an S Video(Y/C)cable'
     If your TV set is equipped with an S-Video(SVHS) socket.

     'Connecting with video(CVBS) cable'
     If your TV set is equipped only with an video(CVBS) socket.


      Connecting with a scart cable and 'Easy
      Link'

     Your DVD recorder can exchange information with your TV set using 'Easy Link'. Your TV
     channels can also be transferred in the same order from your TV set to your DVD recorder
     using 'Easy Link'.
     Please see your TV's operating instructions.


     Have the following cables ready:
     an aerial cable (1, supplied), a mains cable (2, supplied), a special scart cable (3, suitable for
     Easylink).


      1       Switch off your TV set.

      2       Remove the aerial cable plug from your TV set. Insert it into the
              ANTENNA IN socket at the back of the DVD recorder.


      3       Insert one end of the supplied aerial cable into the TV OUT socket at
              the back of the DVD recorder and the other end into the aerial input
              socket at the back of the TV set.


      4       Plug in a full-pin scart cable (all 21 contacts wired) into the scart
              socket EXT 1 TO TV-I/O at the back of the DVD recorder and the
              corresponding scart socket - suitable for Easylink - at the back of the
              TV set (see TV set operating instructions).

      5       Read the next chapter 'Connecting additional devices' on how to
              connect additional devices (satellite receivers, videorecorders,...) to the
              input-/output sockets.


12                                                       Connecting the DVD recorder
6        Switch on the TV set.


                                          7        Use the supplied mains cable to connect the mains socket
                                                    4MAINS at the back of the DVD recorder with the wall outlet.
                                                   The most important features of the DVD recorder will appear in
                                                   scrolling text on the display. After the first installation is completed
                                                   this function will be switched off. How you switch on this function


                                                                                                                                                ENGLISH
                                                   again, read in the chapter 'User preferences' in the section 'standby'.


                                          8        Switch on the DVD recorder using STANDBY-ON m .
                                                   A message appears on the screen announcing that the transfer has
                                                   started. 'EASYLINK' appears on the display during transfer.
         EasyLink                                  The TV set transfers all saved TV channels, in the same order, to the
         loading data from TV;                     DVD recorder
         please wait
                                                   This may take several minutes.


                                                     a 'Time', 'Year', 'Month', 'Date' appears on the TV screen
                                                    1 Check if the time in 'Time' is correct.
                                                    2 If required, change the time with the number buttons   0..9 on your
                                                      remote control.
                                                    3 Select the next line with A or B .
                                                    4 Check if the displayed settings for 'Year', 'Month' and 'Date' are
                                                      correct.
                                                    5 When all information is correct, save by pressing OK .                          Problem


                           Virgin mode               a I can see more installation menus on my TV set
                                                       Not all the necessary data has been transferred. Please enter the settings
    Audio Language                                     by hand as follows. For more information on the various functions see
      English                                          'Initial installation' in 'Installing your DVD recorder'.
      Español
      Français                                      1 Select the desired audio language using B or A and confirm with OK .
      Português                                     2 Select the desired subtitle language with B or A and confirm with
      Italiano                                           OK .
    Press OK to continue                            3 Select the desired screen format position using B or A .

                                                         '4:3 letterbox' For a 4:3 TV set; cinema format (black bars above and
                                                                         below the picture)
                                                          '4:3 panscan' For a 4:3 TV set; full height format with the sides cut off
                                                          '16:9' For a 16:9 TV set
                                                    4 Confirm with OK .
                                                    5 Select the country of your residence with B or A .
                                                         If your country does not appear, select 'Other'.
                                                    6 Confirm with OK .                                                               Problem

                                         Initial installation is now complete.


Connecting the DVD recorder                                                                                                                13
Connecting with a scart cable without
      'Easy Link'

     Have the following cables ready:
     an aerial cable (1, supplied), a mains cable (2, supplied), a scart cable (3).


      1        Remove the aerial cable plug from your TV set. Insert it into the
               ANTENNA IN socket at the back of the DVD recorder.


      2        Insert one end of the supplied aerial cable into the TV OUT socket at
               the back of the DVD recorder and the other end into the aerial input
               socket at the back of the TV set.


      3        Plug a scart cable into the scart socket EXT 1 TO TV-I/O at the
               back of the DVD recorder and the scart socket for the DVD
               recorder at the back of the TV set (see TV set operating instructions).


                My TV set has several scart sockets. Which one should I use?
                Select the scart socket that is suitable for both video output and for video
                input.
                My TV set shows me a selection menu for the scart socket
                Select 'VCR' as the source for this scart socket.                              ?

      4        Read the next chapter 'Connecting additional devices' on how to
               connect additional devices (satellite receivers, videorecorders,...) to the
               input-/output sockets.

      5        Switch on the TV set.


      6        Insert one end of the supplied mains cable into the mains socket
                4MAINS at the back of the DVD recorder and the other end into
               the wall socket.
               The most important features of the DVD recorder will appear in
               scrolling text on the display. After the first installation is completed
               this function will be switched off. How you switch on this function
               again, read in the chapter 'User preferences' in the section 'standby'.

      7        Switch on the DVD recorder using STANDBY-ON m . 'IS TV ON?'
               will appear on the display.


14                                                         Connecting the DVD recorder
8        If the connection was properly made and your TV was automatically
                                                   switched to the programme number for the scart socket, e.g. 'EXT',
                                                   '0', 'AV', you will see the following picture:


                           Virgin mode             a My screen is empty.
                                                   b Depending on the initializing period it can take some time before you see
    Menu Language                                    the picture on the TV.


                                                                                                                                               ENGLISH
      English                                      b Many TV sets are switched by the DVD recorder to the programme
      Español                                        number for the scart socket by way of a control signal sent through the
      Français                                       scart cable.
      Italiano                                     b If the TV set does not automatically switch to the scart socket programme
      Deutsch                                        number, manually change to the corresponding programme number on your
    Press OK to continue                             TV set (see your TV's operating instructions).
                                                   b Check that the scart cable is connected from the TV set to the EXT 1
                                                     TO TV-I/O socket on the DVD recorder. The EXT 2 AUX-I/O socket is
                                                     intended only for additional devices.                                       Problem

                                         Then, read the paragraph on 'Initial installation' in 'Installing your DVD recorder'.


                                          Connecting with an S Video(Y/C)cable
                                         This connecting cable, also known as the SVHS cable, is used to transmit the brightness signal (Y
                                         signal) and colour signal (C signal) separately. This mini DIN socket/plug is also called a Hosiden
                                         socket/plug.


                                         Have the following cables ready:
                                         an aerial cable (1, supplied), a mains cable (2, supplied), an S-Video(SVHS) cable (3), an audio
                                         cable (4, supplied, red/white plug).


                                          1        Remove the aerial cable plug from your TV set. Insert it into the
                                                   ANTENNA IN socket at the back of the DVD recorder.


                                          2        Insert one end of the supplied aerial cable into the TV OUT socket at
                                                   the back of the DVD recorder and the other end into the aerial input
                                                   socket at the back of the TV set.


                                          3        Insert one end of an S-Video(SVHS) cable into the S-VIDEO (Y/C)
                                                   OUT socket at the back of the DVD recorder and the other end into
                                                   the S-Video (SVHS) input socket on the TV set (usually labelled
                                                   'S-Video in' or 'SVHS in'. See TV operating instructions).


Connecting the DVD recorder                                                                                                            15
4        Insert one end of the supplied audio (Cinch) cable into the red/white
               Cinch socket AUDIO L/R OUT at the back of the DVD recorder
               and the other end into the audio input socket (usually red/white) on
               the TV set (usually labelled 'Audio in' or 'AV in'. See TV operating
               instructions).


      5        Switch on the TV set. Switch the TV set over to the SVHS input
               socket or select the relevant programme number. Please see your
               TV's operating instructions for the programme number you need.


      6        Insert one end of the supplied mains cable into the mains socket
                4MAINS at the back of the DVD recorder and the other end into
               the wall socket.
               The most important features of the DVD recorder will appear in
               scrolling text on the display. After the first installation is completed
               this function will be switched off. How you switch on this function
               again, read in the chapter 'User preferences' in the section 'standby'.

      7        Switch on the DVD recorder using STANDBY-ON m . IS TV ON?'
               will appear on the display.


     Then, read the paragraph on 'Initial installation' in 'Installing your DVD recorder'.


      Connecting with video(CVBS) cable
     This cable, usually with yellow Cinch connectors, is used for transmitting the Composite Video
     signal (FBAS, CVBS). In this method of transmission the colour signal and the brightness signal
     are transmitted on the same cable. In certain circumstances, this can lead to problems with the
     picture, such as 'Moiré' patterns.


     Have the following cables ready:
     an aerial cable (1, supplied), a mains cable (2, supplied), a video (CVBS)cable (3, supplied, yellow
     plug), an audio cable (4, supplied, red/white plug).


      1        Remove the aerial cable plug from your TV set. Insert it into the
               ANTENNA IN socket at the back of the DVD recorder.


      2        Insert one end of the supplied aerial cable into the TV OUT socket at
               the back of the DVD recorder and the other end into the aerial input
               socket at the back of the TV set.


16                                                        Connecting the DVD recorder
3        Insert one end of the supplied video (CVBS) cable into the yellow
                                        Cinch socket VIDEO (CVBS) OUT at the back of the DVD
                                        recorder and the other end into the video input socket (usually
                                        yellow) on the TV set (usually labelled 'Video in' or 'AV in'. See TV
                                        operating instructions).

                               4        Insert one end of the supplied audio (Cinch) cable into the red/white
                                        Cinch socket AUDIO L/R OUT at the back of the DVD recorder


                                                                                                                           ENGLISH
                                        and the other end into the audio input socket (usually red/white) on
                                        the TV set (usually labelled 'Audio in' or 'AV in'. See TV operating
                                        instructions).

                               5        Read the next chapter 'Connecting additional devices' on how to
                                        connect additional devices (satellite receivers, videorecorders,...) to the
                                        input-/output sockets.

                               6        Switch on the TV set. Switch the TV set over to the Video/Audio
                                        input socket or select the relevant programme number. Please see
                                        your TV's operating instructions for the programme number you need.


                               7        Insert one end of the supplied mains cable into the mains socket
                                         4MAINS at the back of the DVD recorder and the other end into
                                        the wall socket.
                                        The most important features of the DVD recorder will appear in
                                        scrolling text on the display. After the first installation is completed
                                        this function will be switched off. How you switch on this function
                                        again, read in the chapter 'User preferences' in the section 'standby'.

                               8        Switch on the DVD recorder using STANDBY-ON m . 'IS TV ON?'
                                        will appear on the display.


                              Then, read the paragraph on 'Initial installation' in 'Installing your DVD recorder'.


Connecting the DVD recorder                                                                                           17
C    Connecting additional devices

                Connecting additional devices to the
                second scart socket
               You can connect additional devices such as decoders, satellite receivers, camcorders, etc. to the
                EXT 2 AUX-I/O socket. When playback is started on this additional device the DVD recorder
               automatically connects the EXT 2 AUX-I/O scart socket with the EXT 1 TO TV-I/O scart
               socket. You will then see the picture from the additional device on your TV set, even if the
               DVD recorder is switched off.
               The TV/DVD button on the remote control allows you to switch between playback through the
                EXT 2 AUX-I/O scart socket and playback from the DVD recorder.

               The DVD recorder must be connected directly to the TV set ( EXT 1 TO TV-I/O socket
               directly to the TV set). If there is a video recorder in between the picture quality may be poor
               because of the copy protection system built into the DVD recorder.


               Connecting a video recorder, DVD player.
               You can connect a video recorder or a DVD player to the EXT 2 AUX-I/O input socket. If you
               already have an external receiver (satellite receiver, set-top box, cable TV box) connected to this
               socket, you can connect the video recorder to the 'VCR', 'TO VCR', ...socket of the external
               receiver.
               You can also use the front sockets S-VIDEO , VIDEO and the left AUDIO right audio
               sockets.

               Please note:
               Most prerecorded video cassettes and DVDs are copy-protected. If you try to copy them you
               will see the message 'COPY PROT' on the DVD recorder's display.

                         a When copying video cassettes the display on the DVD recorder
                           shows 'NO SIGNAL'
                         b Check that the cable is plugged in firmly.
                         b If a recording is made from a video recorder, change the tracking on the
                           video recorder.
                         b The DVD recorder may not be able to recognise the video input signal if
                           this signal is poor or does not comply with relevant standards.

                         a When I copy DVD video discs or prerecorded video cassettes the
                           picture is fuzzy and the brightness varies
                         b This happens if you try to copy DVDs or video cassettes that have been
                           copy-protected. Even though the picture on the TV is fine the recording on
                           a DVD+RW/+R is faulty. This interference is unavoidable with
                           copy-protected DVDs or video cassettes.                                      Problem


18                                                                    Connecting additional devices
Connecting an external receiver (satellite
                                receiver, set top box, cable TV box,...)
                                You can connect external receivers to the EXT 2 AUX-I/O socket.
                                For additional receivers, you can also use the EXT 1 TO TV-I/O socket (if the TV set is


                                                                                                                                          ENGLISH
                                connected to the COMPONENT VIDEO OUT sockets), and VIDEO , S-VIDEO sockets at
                                the front. Please observe that you also have to connect an audio cable to the IN AUDIO
                                L/R or left AUDIO right socket.


                                 1        Connect the scart socket of the receiver (satellite receiver) provided
                                          for the TV set (usually labelled 'TV', 'TO TV'), with the EXT 2
                                          AUX-I/O socket of the DVD recorder.

                                           Why can't I use the 'VCR', 'TO VCR',... socket?
                                           In order to achieve the best possible picture quality, you must use the RGB
                                           (red-green-blue) signal of the receiver. As a rule, this signal is available at the
                                           'TV', 'TO TV',... socket. The DVD recorder transfers the signal to the EXT 1
                                           TO TV-I/O socket.
                                           Some receivers only provide a 'Video (CVBS/FBAS)' signal at the 'VCR', 'TO
                                           VCR'...socket. Read the instruction manual of the receiver on the signals
                                           available at the sockets.
                                           If you are satisfied with the picture quality of the 'VCR', 'TO VCR',... socket,
                                           you can also use this socket.                                                         ?

                                 2        If your external receiver offers several options for the signal available
                                          at the 'TV', 'TO TV',... socket, choose the 'RGB' setting.


                                 Connecting additional devices only via
                                 aerial cable
                                If you want to connect additional devices (e.g. satellite receiver...) only via aerial cable, please
                                observe the following:

                                 The DVD-Recorder must be connected directly to the TV set. If there is a video recorder or an
                                 additional device in between, the picture quality may be poor because of the copy protection
                                 system built into the DVD-Recorder.
                                 The additional device (satellite receiver) must be connected before the DVD recorder (additional
                                 device - DVD recorder - TV set). Only the TV set must be connected to the TV OUT socket.
                                •) If there is interference in the picture when the additional device is switched on, a TV
                                   broadcaster may be transmitting on the same channel or a channel very close to that of the
                                   additional device. (e.g.: TV broadcaster on channel 45, additional device (satellite receiver) also
                                   on channel 45). In this case, change the channel of the additional device (satellite receiver).
                                   Consult the instruction manual of the additional device.
                                   You must also store this channel on the DVD recorder to be able to record TV programmes
                                   from the additional device (satellite receiver).
                                •) Switch on the additional device during the installation of the DVD recorder. During the
                                   automatic channel search, the channel on which the additional device is transmitting will be
                                   stored as a TV channel.


Connecting additional devices                                                                                                        19
Connect camcorder to the front sockets
     To copy camcorder recordings, you can use the front sockets. These sockets are located behind
     the flap on the right hand side.


     Best picture quality
     If you have a DV or Digital 8 camcorder, connect the DV IN input of the DVD recorder to the
     appropriate DV output on the camcorder.
     When films are transferred the original recording date and time are stored as DVD subtitles.
     On playback, this data can be displayed on the TV screen by using the 'E' function (Subtitle).
     Choose 'CAM2' as a programme number for this input.


     Very good picture quality
     If you have a Hi8 or S-VHS(C) camcorder, connect the S-VIDEO input of the DVD recorder to
     the appropriate S-VHS output on the camcorder.
     You must also connect the audio input left AUDIO right on the DVD recorder to the audio
     output on the camcorder.
     Choose 'CAM1' as a programme number for this input.


     Good picture quality
     If you have a camcorder that only has a single video output (Composite Video, CVBS), connect
     the VIDEO input on the DVD recorder to the appropriate output on the camcorder.
     You must also connect the audio input left AUDIO right on the DVD recorder to the audio
     output on the camcorder.
     Choose 'CAM1' as a programme number for this input.


      Connecting audio devices to the analogue
      audio sockets

     Two audio output sockets AUDIO L/R OUT are located on the back of the DVD recorder
     (audio signal output left/right)

     These can be used to connect the following:
     •) a receiver with Dolby Surround Pro Logic
     •) a receiver with two channel analogue stereo


               Can I use the 'Phono' input on my amplifier?
               This socket (input) on the amplifier is designed only for record players
               without preamplifiers. Do not use this input for connecting the DVD
               recorder.
               The DVD recorder or the amplifier may be damaged as a result.              ?


20                                                        Connecting additional devices
Connecting audio devices to the digital
                                 audio sockets


                                                                                                                                    ENGLISH
                                At the back of the DVD recorder there are two digital audio output sockets OPTICAL
                                AUDIO OUT for an optical cable and COAX OUT for a coaxial cable (Cinch cable).

                                These can be used to connect the following:
                                •) an A/V receiver or an A/V amplifier with a digital multi channel sound decoder
                                •) a receiver with two channel digital stereo (PCM)


                                         Digital multi channel sound
                                         Digital multi-channel sound offers the best possible sound quality. You will
                                         need a multi-channel A/V receiver or amplifier that supports at least one of
                                         the audio formats of the DVD recorder (MPEG2, Dolby Digital and DTS).
                                         Consult the operating instructions for your receiver to find out which audio
                                         formats it supports.                                                              ?


                                         a All I can hear from my loudspeakers is a loud distorted noise
                                         b The receiver is not compatible with the digital audio format of the DVD
                                           recorder. The audio format of the DVD disc is displayed in the status
                                           window when you switch to another language. Playback in six-channel
                                           digital surround sound is only possible if the receiver has a digital
                                           multi-channel sound decoder.                                                 Problem


Connecting additional devices                                                                                                  21
D            Installing your DVD recorder

                                           Initial installation
                                          After successfully connecting your DVD recorder to the TV set and other additional devices as
                                          described in the previous chapters, this chapter will show you how to start the initial installation.
                                          The DVD recorder automatically seeks out and stores all available TV channels.

                                                    Connecting additional devices
                                                    If you have connected additional devices such as a satellite receiver to the
                                                    aerial cable, switch them on. The automatic channel search will recognise it
                                                    and save it. Please observe that you must switch on a "test signal" for some
                                                    additional devices.
                                                    No aerial connected
                                                    Even if you only want to use the DVD recorder to play back or have only
                                                    connected a satellite receiver, you must still complete the initial installation.
                                                    This is necessary so that the basic settings are stored correctly. Once initial
                                                    installation is complete you can use the DVD recorder as normal.                       Tip


                                           1       Select the desired language for the on-screen menu by pressing B or
                            Virgin mode             A.

     Menu Language
       English                                      What is an on screen menu?
       Español                                      The multi-language on-screen menu takes the mystery out of using your new
       Français                                     DVD recorder. All settings and/or functions are displayed on your TV screen
       Italiano                                     in the relevant language.                                                               ?
       Deutsch
     Press OK to continue
                                           2       Confirm with OK .


                                           3       Select the desired audio language using B or A .
                            Virgin mode

     Audio Language                                 What is an audio language?
       English                                      The DVD will play the sound in             the language you select, provided this
       Español                                      language is available on the disc. If      it is not available on the disc the first
       Français                                     language on the DVD will be used           instead. The DVD Video Disc menu, if
       Português                                    available, will also be displayed in the   language you select.                         ?
       Italiano
     Press OK to continue
                                           4       Confirm with OK .


                                           5       Select the desired language for the subtitles by pressing B or A .
                            Virgin mode

     Subtitle Language                              What is the subtitle language?
       English                                      The subtitles will be displayed in the language you select, provided this
       Español                                      language is available on the disc. If it is not available on the disc the fist
       Français                                     language on the DVD will be used instead.                                               ?
       Português
       Italiano
     Press OK to continue                  6       Confirm with OK .


22                                                                                                      Installing your DVD recorder
7   Select the desired screen format position using B or A . These
                            Virgin mode       settings will only be used if you insert a DVD that contains this
                                              information.
     TV Shape
       4:3 letterbox
       4:3 panscan                            Which screen formats can I select?
       16:9


                                                                                                                                                ENGLISH
                                              '4:3 letterbox' for a 'wide-screen' (cinema format) picture with black bars at
                                                              the top and bottom.
     Press OK to continue                     '4:3 panscan' for a full-height picture with the sides trimmed.
                                              '16:9' for a wide-screen TV set (screen edge ratio 16:9)                                 ?

                                          8   Confirm with OK .


                                          9   Select the country of your residence with B or A .
                            Virgin mode       If your country does not appear, select 'Other'.

     Country
       Austria                                Why do I have to select a country?
       Belgium                                To call up the specific settings for the respective country, you must first install
       Denmark                                the country.                                                                             ?
       Finland
       France
     Press OK to continue                 0   Confirm with OK .


                                          A   After you connect the aerial (or cable TV, satellite receiver, etc.) to
                                              the DVD recorder, press OK .
                                              The automatic TV channel search starts. 'WAIT' will appear on the
                                              display.

     Installation
       Autom. search                          a The DVD recorder cannot find any TV stations
                                              b Select channel 1 on the TV set. Can you see the stored TV channel on the
        Searching for TV channels               TV set?
        00 Channels found                       If not, check the cable connection from the aerial (aerial socket) to the
                                                DVD recorder and to the TV set.
                                              b Please have patience.
      Please wait                               The DVD recorder searches the entire frequency range in order to find
                                                and save the largest possible number of TV channels.
                                              b If you have not connected an aerial, go through all the basic settings right
                                                to the end and then, if you wish, start the automatic search (see 'Automatic
                                                TV station search').                                                                Problem

                                          B   When the automatic TV channel search is complete, 'Autom. search
                                              complete' will appear on the TV screen.
                                              'Time', 'Year', 'Month', 'Date' will then appear on the TV screen.


     Autom. search                        C   Check if the time in 'Time' is correct.

                                          À   If required, change the time with the number buttons 0..9 on your
        Autom. search complete
        00 Channels found                     remote control.

        Time                  20:01       Á   Select the next line with A or B .
        Year                  2003
        Month                 01
        Date                  01          Â   Check if the displayed settings for 'Year', 'Month' and 'Date' are
                                              correct.
                       To continue
                       Press OK           Ã   When all information is correct, save by pressing OK .


Installing your DVD recorder                                                                                                               23
The initial installation is now complete.


                Satellite receiver
                If you are connecting a satellite receiver, please read the section on 'Using a
                satellite receiver'.
                Decoder
                If you are connecting a decoder, you must install it as described in the next
                section.                                                                            Tip


                a Sound may be distorted on some TV channels.
                b If the sound is distorted on any of the stored TV channels or if there is no
                  sound at all, the wrong TV system may have been stored for the TV
                  channel. Read 'Manual TV channel search' for information on how to
                  change the TV system.                                                           Problem


      Using a satellite receiver
     TV channels from a satellite receiver (connected to scart socket EXT 2 AUX-I/O ) are received
     on the DVD recorder on programme number 'EXT2'

     If necessary, use the MONITOR button to switch to the internal tuner.
     Select programme number 'EXT1' with 0 on the remote control and then select programme
     number 'EXT2' with CHANNEL r .
     You should select the TV channels to be received by the satellite receiver directly on the
     receiver itself.


24                                                             Installing your DVD recorder
Allocating a decoder
                                          Some TV channels send coded TV signals that can only be viewed properly with a purchased or
                                          rented decoder. You can connect such a decoder (descrambler) to your DVD recorder. The
                                          following function automatically activates the connected decoder for the TV channel you want to


                                                                                                                                             ENGLISH
                                          watch.


                                                    How do I allocate the decoder for Easy Link?
                                                    If your TV set supports 'Easy Link' the decoder must be assigned to the
                                                    relevant TV channel on the TV set (see the operating instructions for your TV
                                                    set). Settings cannot then be made in this menu.                                ?


                                           1       Switch on the TV set. If required, select the programme number for
                                                   the DVD recorder.

                                           2       Switch on the DVD recorder using STANDBY-ON m .

                                           3       Use the CHANNEL q and CHANNEL r buttons or the number
                                                   buttons 0..9 on the remote control to select the TV channel for
                                                   which you want to use the decoder. If necessary, use the
                                                    MONITOR button to switch to the internal tuner.

                                           4       Press the SYSTEM-MENU button on the remote control. The menu
                                                   bar appears.

                                           5       Select 'A' symbol with D or C .

                                           6       Select 'Installation' using B or A and confirm with C .

                                           7       Select 'Manual search' using B or A and confirm with C .

     Installation                          8       Select 'Decoder' using B or A .
       Manual search
                                           9       Select 'On' with D or C .
        Channel/freq.      CH
        Entry/search       01
        Programme number   01
        TV channel name    BBC1                     How do I switch the decoder off again?
        Decoder            Off                                                                                                      ?
                                                    Use C to select 'Off' in the 'Decoder' line on the screen (Decoder off).
        TV system          PAL-BG
        NICAM              On
        Fine tuning        0
                               To store    0       Confirm with OK .
                              Press OK
                                           A       To end, press SYSTEM-MENU .


                                          Your decoder has now been allocated to this TV channel.


Installing your DVD recorder                                                                                                            25
Connection using a component video
                                             (Y Pb Pr/YUV) cable
                                            Component video (Y Pb Pr) is the highest quality picture transmission option. This is achieved by
                                            dividing the video signal into a luminance signal (Y) and two colour difference signals - red minus
                                            luminance (V) and blue minus luminance (U). As a rule, "Cr" or "R-Y" is used to describe the red
                                            difference signal and "Cb" or "B-Y" the blue difference signal.
                                            These signals are transmitted through separate lines. The connectors of this cable and the
                                            corresponding sockets are usually green (luminance), blue (Pb, Cb, B-Y), and red (Pr, Cr, R-Y).

                                            If you choose this type of connection, the DVD recorder must already be connected and
                                            completely installed (initial installation complete).
                                            Switching of the signal to the COMPONENT VIDEO OUT sockets is carried out in a menu
                                            that is not yet available during the initial installation.


                                             1       Switch on the TV set. If required, select the programme number for
                                                     the DVD recorder.

                                             2       Switch on the DVD recorder using STANDBY-ON m .

                                             3       Press the SYSTEM-MENU button on the remote control. The menu
                                                     bar appears.

                                             4       Select 'A' using D oder C and confirm with B .

                                             5       Select the 't' symbol using B or A and confirm with C .


                                             6       Select the line 'Video output' using A or B and confirm with C .

                                             7       Select your setting with B or A .
                                  Picture
     TV shape            16:9                         Which setting should I choose?
     Black level shift   Off                          Since YPbPr (YUV) signals are not transmitted simultaneously with
     Video shift                ï                     S-video(Y/C) and video (FBAS/CVBS) signals, you can choose between the two
     RGB attenuation      ï                           types. The 'RGB' signal is switched off.
     Video output        RGB + CVBS
                                                      'S-video + YPbPr' Component Video (YUV) and S-Video(Y/C).
                                                      'CVBS + YPbPr'Component Video (YUV) and Video (FBAS/CVBS).
                                                      With all other settings, the signal is switched off at the COMPONENT
                                                      VIDEO OUT sockets. This will also be displayed as information on the screen.
                                                      For more information on the other settings, read section 'Picture settings'
                                                      ('Video output') in chapter 'User preferences'.                                ?

                                             8       Confirm with OK .


26                                                                                                 Installing your DVD recorder
9       Use a component video (Y Pb Pr) cable, connect the three cinch
                                        sockets (red, blue, green) COMPONENT VIDEO OUT at the back
                                        of the DVD recorder with the corresponding three component video
                                        input sockets of your TV set, usually labelled 'Component Video
                                        Input', 'YUV Input', 'YPbPr', 'YCbCr' or simply 'YUV'.

                                        Warning!


                                                                                                                                      ENGLISH
                                        Do not confuse these sockets with the five-component RGB sockets
                                        (if available) or the yellow video (CVBS/FBAS) socket and the two
                                        audio sockets (red/white). The five-component RGB sockets are only
                                        provided for the R-G-B-H-V signals (red, green, blue with horizontal
                                        and vertical synchronisation impulse).


                                         Please observe the colour sequence
                                         The colours of the sockets at the DVD recorder and the connectors must
                                         match     those     of    the     socket    colours     at    the    TV     set
                                         (red-red/blue-blue/green-green). If they don't, the colours of the picture may
                                         get mixed up or the picture may not be visible.                                   Tip


                                0       Use an audio (cinch) cable, connect the red/white cinch socket
                                         AUDIO L/R OUT at the back of the DVD recorder with the mostly
                                        red/white audio input socket of your TV set (usually labelled 'Audio in'
                                        or 'AV in'. See the instruction manual of your TV set.)

                                A       If necessary, switch your TV set to the component video input socket.
                                        Also consult the instruction manual of your TV set.

                                B       The menu of the DVD recorder should now appear on the TV
                                        screen. If not, check the cable connections and the settings on your
                                        TV set.


                                Manual TV channel search
                               In some cases, not all of the available TV channels may have been found and stored during initial
                               installation. In this case, you will need to search for and store the missing or coded TV channels
                               manually.


                                         Manual search with EasyLink
                                         With 'Easy Link', the DVD recorder will automatically download the TV
                                         channels stored on the TV set. This is why some lines have no function. To
                                         store new TV channels, they must first be stored on the TV set. The
                                         information will then be transferred to the DVD recorder automatically.           Tip


                                1       Switch on the TV set. If required, select the programme number for
                                        the DVD recorder.

                                2       Switch on the DVD recorder using STANDBY-ON m .


Installing your DVD recorder                                                                                                     27
3   Press SYSTEM-MENU on the remote control. The menu bar
                                              appears.

                                          4   Select 'A' symbol with D or C .

                                          5   Select 'Installation' using B or A and confirm with C .

                                          6   Select 'Manual search' using B or A and confirm with C .


     Installation                         7   In 'Channel/freq.', select the desired display using C .
       Manual search                          'Freq.'(Frequency), 'CH'(Channel), 'S-CH'(Special/hyperband channel)
        Channel/freq.      CH
        Entry/search       01             8   In 'Entry/search', enter the frequency or channel of the TV station
        Programme number   01                 using the number buttons 0..9 .
        TV channel name    BBC1
        Decoder            Off
        TV system          PAL-BG
        NICAM              On                 a I don't know the channel for my TV station
        Fine tuning        0                  b In this case, press C to start the automatic search. A changing channel
                               To store         number/frequency number will appear on the TV screen.
                              Press OK          Continue the automatic search until you have found the TV channel you
                                                are looking for.                                                           Problem

                                          9   Using D or C in 'Programme number', select the programme
                                              number you want to use for the TV channel, e.g. '01'.


                                              How can I change the namel of a TV channel?
                                              1 In 'TV channel name', press C .
                                              2 Select the desired character position using D or C .
                                              3 Change the character at the desired position with B or A .
                                              4 Select the next character position in the same way.
                                              5 Confirm with OK .                                                            Tip

                                              How can I change the TV system of the TV channel?
                                              In 'TV system', use D or C to select the TV system that produces the
                                              least distortion of picture and sound.
                                              What is NICAM?
                                              NICAM is a digital sound transmission system. Using NICAM, you can
                                              transmit either 1 stereo channel or 2 separate mono channels. However, if
                                              reception is poor and the sound distorted you can turn off NICAM.
                                              In 'NICAM', select 'Off' using D or C .
                                              How can I improve the automatic process for storing channels?
                                              To change the automatic process for storing channels (fine tuning), select
                                              'Fine tuning'.
                                              Using D or C you can try to fine-tune the TV channelmanually.                  Tip

                                          0   Press OK to store the TV channel.

                                          A   To search for other TV channels, begin again at 8 .

                                          B   To end, press SYSTEM-MENU .


28                                                                                        Installing your DVD recorder
Sorting TV channels automatically
                                (Follow TV)
                               When the automatic channel search function is activated, the TV channels are stored in a specific


                                                                                                                                         ENGLISH
                               order. This may differ from the order in which the TV channels appear on your TV set.
                               This function changes the order of the TV channels stored in your DVD recorder to match the
                               order on the TV set.
                               This only works if the DVD recorder ( EXT 1 TO TV-I/O socket) and the TV set are
                               connected with a scart cable.


                                         My TV set has Easylink
                                         If your TV set supports 'Easylink,..', TV channels will be stored during initial
                                         installation in the same order as they appear on the TV set. To store the TV
                                         channels in a different order, you'll need to change the order on the TV set.
                                         When you start the Follow TV function the information is transferred again
                                         from the TV set.                                                                     Tip


                                1       Switch on the TV set. If required, select the programme number for
                                        the DVD recorder.

                                2       Switch on the DVD recorder using STANDBY-ON m .

                                3       Press the SYSTEM-MENU button on the remote control. The menu
                                        bar appears.

                                4       Select 'A' symbol with D or C .

                                5       Select 'Installation' using B or A and confirm with C .

                                6       Select line 'Follow TV' with B or A . and confirm with the
                                         C button.

                                7       Confirm the message on the screen with OK . 'TV 01' will appear in
                                        the DVD recorder display.


                                8       Select programme number '1' on the TV set.
     TV 01
                                         a I cannot switch my TV set to programme number '1'
                                         b If you have connected additional devices to the EXT 2 AUX-I/O socket,
                                           please disconnect these devices. Other connected devices may have
                                           switched the TV set to the programme number of the scart socket.                 Problem

                                9       Confirm with OK on the DVD recorder remote control.
                                        'WAIT' will appear in the display. The DVD recorder compares the TV
                                        channels on the TV set and the DVD recorder.
                                        If the DVD recorder finds the same TV channel as on the TV set it
                                        stores it at 'P01'.


Installing your DVD recorder                                                                                                        29
a 'NOTV' will appear in the display. The DVD recorder is not
                         receiving a video signal from the TV set.
                       b Chech the connectors at both ends of the scart cable.
                       b Check your TV's operating instructions to see which scart socket is used
                         for video signals.
                       b If the problem persists, you won't be able to use this feature.
                         Please read 'Sorting and deleting TV channels manually'.                    Problem

              0       Wait until for example 'TV 02' appears in the display.


              A       Select the next programme number on the TV set, e.g. '2'.
     TV 02    B       Confirm with OK on the DVD recorder remote control.


                       Deleting sorting
                       You can delete incorrect TV channel sorting by pressing D .                     Tip

              C       Repeat steps 0 to B until you have assigned all the TV channels
                      from your TV set.

              À       To end, press SYSTEM-MENU .


              Automatic TV channel search
             During installation, all available TV channels are searched for and stored. If the channel
             assignments of your cable or satellite TV provider change or if you are reinstalling the DVD
             recorder, e.g. after moving house, you can start this procedure again. This will replace the stored
             TV channels with the new ones.


                       My TV set has Easylink
                       With Easylink, you can search for and store TV channels only on the TV set.
                       These settings are accepted by the DVD recorder. Use this function to start
                       the transfer of TV channels from the TV set.                                    Tip


              1       Switch on the TV set. If required, select the programme number for
                      the DVD recorder.

              2       Switch on the DVD recorder using STANDBY-ON m .

              3       Press SYSTEM-MENU on the remote control. The menu bar
                      appears.

              4       Select 'A' symbol with D or C .

              5       Select 'Installation' using B or A and confirm with C .

              6       Select 'Autom. search' using B or A .


30                                                                   Installing your DVD recorder
7       Press C .


     Installation                       8       The automatic TV channel search starts. This allows the DVD
       Autom. search                            recorder to save all available TV channels. This procedure may take
         Searching for TV channels
                                                several minutes.

         00 Channels found              9       When all the TV channels have been found, 'Autom. search


                                                                                                                                          ENGLISH
                                                complete' will appear on the TV screen.

       Please wait                      0       To end, press SYSTEM-MENU .


                                       You can read about how to search for a TV channel manually in 'Manual TV channel search'.


                                        Sorting and deleting TV channels manually
                                       After you have performed the automatic channel search you may not agree with the sequence in
                                       which the individual TV channels have been allocated to the programme positions (programme
                                       numbers). You can use this function to rearrange the TV channels already stored or to delete
                                       TV channels you don't want or those with poor reception.


                                                 EasyLink
                                                 With Easylink, you can search for and store TV channels only on the TV set.
                                                 These settings are then transferred to the DVD recorder.
                                                 That is why you cannot select this function manually.                         Tip
                                        1       Switch on the TV set. If required, select the programme number for
                                                the DVD recorder.

                                        2       Switch on the DVD recorder. Press the SYSTEM-MENU button on
                                                the remote control. The menu bar appears.

                                        3       Select 'A' symbol with D or C .

                                        4       Select 'Installation' using B or A and confirm with C .

                                        5       Select 'Sort TV channels' using B or A and confirm with C .


     Installation                       6       Using B or A select the TV channel that you want to delete or
       Sort TV channels                         whose order you want to change.
         ...
     • P01 BBC1
         P02 BBC2                       7       Confirm with C .
         P03 ITV
         P04
         P05                                     Deleting TV channels
         P06
         ...                                     Unwanted channels or those with poor reception can be deleted using
                                                 CLEAR . Proceed at step 6 .                                                   Tip
     To sort           To exit press
     Press ›           SYSTEM MENU


Installing your DVD recorder                                                                                                         31
8       Using B or A , shift the TV channel to the desired position and
                                                   press the D button. The DVD recorder will insert the TV channel.

                                           9       Repeat steps 6 to 8 until you have resorted/deleted all the TV
                                                   channels you want.

                                           0       To store, press OK .

                                           A       To end, press SYSTEM-MENU .


                                           Setting the language/country
                                          You can select the country and, for the basic setting of DVD playback, the language for the
                                          subtitles and the audio language. Please note that with some DVDs the audio language and/or
                                          subtitle language can be changed only via the DVD menu.
                                          For bilingual shows, you can also select the sound channel of the TV station via the internal
                                          tuner ( MONITOR button) for recording or playback.
                                          You also have the option of setting one of the displayed languages for the on-screen menu
                                          (OSD). However, the DVD recorder display will only display English text regardless of this
                                          setting.


                                           1       Switch on the TV set. If required, select the programme number for
                                                   the DVD recorder.

                                           2       Switch on the DVD recorder using STANDBY-ON m .

                                           3       Press SYSTEM-MENU on the remote control. The menu bar
                                                   appears.

                                           4       Select 'A' symbol with D or C .

                                           5       Select line 'Language' with          B or     A and confirm with the
                                                    C button.


                                           6       Select the appropriate line and confirm with C .


                               Language            Which settings can I choose?
     Audio Language    English                     'Audio Language' : The DVD will play back in the language you have chosen.
     Recording audio   Language 1                  'Recording audio': In the case of bilingual programmes, you can choose either
     Subtitle          English                                             'Language 1' or 'Language 2' as the default setting
     Menu              English                     'Subtitle': Subtitle language
     Country           Other
                                                   'Menu': Language of the OSD menu
                                                   'Country' : Location                                                            Tip

                                           7       Select the appropriate setting using B or A and confirm with OK .

                                           8       To end, press SYSTEM-MENU .


32                                                                                               Installing your DVD recorder
'Recording audio' switching over
                                            (2 channel sound)
                                            Some TV programmes transmit an extra audio signal in stereo in addition to the normal audio
                                            signal (2-channel sound). In most cases this means that an additional language is available. If a TV


                                                                                                                                                   ENGLISH
                                            programme is available in, say, English and German, German may be available as the second
                                            language.
                                            To record TV programmes in 2-channel sound, you can select the language you want as the
                                            default setting. This setting does not become active until the sound of a TV programme is
                                            transmitted in 2-channel sound.
                                            When you play back the recording you can play back the sound only in the language you used
                                            for the recording.


                                             1       Switch on the TV set. If required, select the programme number for
                                                     the DVD recorder.

                                             2       Switch on the DVD recorder using STANDBY-ON m .

                                             3       Press SYSTEM-MENU on the remote control. The menu bar
                                                     appears.

                                             4       Select 'A' symbol with D or C .


                                             5       Select line 'Language' with        B or    A . and confirm with the
                                                      C button.

                                 Language    6       Select line 'Recording audio' and confirm with C .
       Audio Language    English
       Recording audio   Language 1          7       Select 'Language 1' or 'Language 2' with B or A and confirm
       Subtitle          English                     with OK .
       Menu              English
       Country           Other
                                             8       To end, press SYSTEM-MENU .


Installing your DVD recorder                                                                                                               33
Setting the time and date
                                        If the display shows an incorrect time or '--:--', the time and date must be reset manually.

                                        'SMART CLOCK' automatically sets the time and date using the information transmitted by the
                                        TV channel. Normally the TV channel stored at programme number 'P01' is used. In the 'Clock
                                        preset' line you can select the programme number (channel name) whose TV channel transmits
                                        this information.
                                        If the time/date is not displayed correctly you need to choose the 'Off' setting in the 'Clock
                                        preset' line and set the date and time manually.


                                         1       Press SYSTEM-MENU on the remote control. The menu bar
                                                 appears.

                                         2       Select 'A' symbol with D or C .

                                         3       Select 'Installation' using B or A and confirm with C .

                                         4       Select 'Time/Date' using B or A and confirm with C .


     Installation                        5       Check if the time in 'Time' is correct. If required, change the time
       Time/Date                                 with the number buttons 0..9 on your remote control.
         Time                 20:00
         Year                 2003       6       Check 'Year', 'Month' and 'Date' in the same way. To move between
         Month                01                 the fields, use B or A .
         Date                 01
         Clock preset         01
                                                  a Time/date is displayed incorrectly despite manual setting
                                                  b With 'SMART CLOCK', time/date is transferred from the TV channel saved
                        To exit press               on 'P01' and automatically corrected.
                        SYSTEM MENU                 You can either enter another TV channel for transferring the data or
                                                    disable the function.
                                                    In the line 'Clock preset' select the relevant TV channel with D or C .
                                                    To disable, select 'Off'.                                                 Problem

                                         7       Check the displayed settings and confirm with OK .
                                                 'Stored' will appear briefly on the screen.

                                         8       To end, press SYSTEM-MENU .


34                                                                                            Installing your DVD recorder
E        On screen information
                        You can check or change many of the functions and settings of your DVD recorder via the
                        system menu bar. The menu bar cannot be displayed during recording.


                         Symbols in the menu bar
                        Press SYSTEM-MENU to open and close the menu bar (main menu). Use D and C to select


                                                                                                                        ENGLISH
                        the relevant function. Use B to confirm the function and go either to another menu or execute
                        the function directly.
                        Some functions may not be available, depending on the disc inserted.


                        Menu bar 1
                        A                        User preferences

                        B                        Title/track

                        C                        Chapter/index

                        D                        Audio language

                        E                        Subtitle language

                        F                        Camera angle

                        G                        Zoom


                        Menu bar 2
                        While menu bar 1 is being displayed you can go to menu bar 2 by pressing C again.


                        H                        Sound

                        I                        Frame advance

                        J                        Slow motion

                        K                        Fast forward

                        L                        Search by time


                         Field for temporary messages
                        The top left corner of the menu line contains a field for temporary messages relating to the
                        various operating modes. This information appears briefly on the screen when certain disc
                        functions have been activated:


                        /                        Shuffle

                        6                        Scan

                        5                        Repeat entire disc

                        3                        Repeat title

                        4                        Repeat track


On-screen information                                                                                            35
2                        Repeat chapter

     0                        Repeat from A to the end

     1                        Repeat from A to B

     7                        Camera angle

     l                        Child lock enabled

     8                        Resume playback

     9                        Illegal action


      Status field
     The status field shows the current operating mode (status) of the DVD recorder and the type of
     disc inserted. This display can be disabled.


     Disc type symbols
     M                        DVD+RW

     W                        DVD+R

     N                        DVD Video

     O                        Video CD

     P                        No disc

     Q                        Error


     Operating mode symbols
     R                        Recording

     S                        Stop

     T                        Playback

     U                        Playback Pause

     V                        Record Pause

     X                        Search forwards (8x speed)

     Y                        Search backwards (8x speed)

     Z                        Slow motion


36                                                               On-screen information
Tuner information box
                        This field is located in the bottom left-hand corner of the screen. The aerial signal, the TV
                        channel and the TV channel name for the selected programme are displayed.


                                                                                                                              ENGLISH
                        a                         Current channel/selected input socket

                        b                         No signal
                                                  The TV channel is not available/the additional device is not connected or
                                                  it is switched off

                        c                         Copy protected signal


                        'Live picture' in the 'Tuner information
                        box'
                        Instead of the information about the aerial signal or the TV channel, you can watch the picture
                        of the selected TV channel or the signal on the input socket.


                         1       In the system menu (button SYSTEM-MENU ) select the symbol
                                 'w' and confirm with C

                         2       In the line 'Live source view' select 'On' to view this picture or
                                 'Offto switch this picture off.

                         3       End with OK and then SYSTEM-MENU .


                         Timer information box
                        This box appears above the tuner information box. When a timer recording is set, it shows the
                        timer icon and the start time or date of the first programme to be recorded.
                        If no timer recording is scheduled, the current time is displayed.
                        This box disappears during playback of a disc or after a recording starts. However, you can
                        access it during an OTR recording by pressing SYSTEM-MENU .

                        f                         Timer starts on the day/time shown

                        g                         OTR recording runs until the stop time displayed

                        h                         Current time
                                                  No timer event programmed


On-screen information                                                                                                 37
F     Playback

                  General notes on playback
                 With this DVD recorder you can play back the following systems:
                 •) DVD Video
                 •) (Super)Video CD Disc
                 •) DVD+RW Disc
                 •) DVD+R Disc
                 •) DVD-RW (video mode, finalised)
                 •) DVD-R
                 •) CD-R
                 •) CD-RW
                 •) Audio CD
                 •) MP3 CD
                 •) Picture -CD (JPEG-data)
                 You can operate the video recorder using the remote control or the buttons on the front of the
                 DVD recorder.

                           a The display will read 'PIN'
                           b The child lock has been activated for the inserted disc. Read the sections
                             on 'Child lock' and 'Releasing a disc' in the chapter on 'Access control
                             (child lock).

                           a The menu on the screen is showing an 'X'
                           b Some DVD discs can be manufactured so that certain steps are required
                             before the disc can be played, or so that only limited operation is possible
                             during playback. When an 'X' appears on the screen the selected feature is
                             not possible.

                           a The screen is showing regional code information
                           b Since DVD films are not normally released in all parts of the world at the
                             same time, all DVD players have a specific regional code. Discs can be given
                             a regional code. If the regional codes differ between the player and the
                             disc, playback is not possible.
                           b The regional code is shown on the label on the back of the machine.
                           b The regional code does not apply to recordable DVDs.                           Problem


                  Inserting a disc

                  1       Press the OPEN/CLOSE J button on the front. The disc tray will
 OPENING   P01            open. While the disc tray is opening, 'OPENING' and then 'TRAY OPEN'
                          when the tray is fully open.

                  2       Carefully place the disc in the tray with the label facing up and press
                           PLAY G or OPEN/CLOSE J . 'CLOSING' and then 'READING' will
                          appear in the display. The information on the disc will be read.


                           How do I insert a double sided DVD?
                           Double-sided discs do not have labelling over the whole surface. The labelling
                           for each side is in the centre of the disc. To play a side its label must be
                           facing up.                                                                          ?


38                                                                                                           Playback
Opening/closing the tray using the remote control
                            You can open and close the disc tray using the remote control.
                            Press and hold the STOP h button on the remote control until the dialog
                            box shows 'OPENING' or 'CLOSING'.                                            Tip


                                                                                                                      ENGLISH
                   3       Playback starts automatically.


                  A menu may appear when a DVD is played back. If the titles and chapters are numbered, press a
                  number button on the remote control. You can also use the D , C , A , B buttons or
                  number buttons 0..9 to select a menu item and confirm with OK .
                  You can also access the menu using DISC-MENU on the remote control.
                  For further information see 'Playing a DVD video disc'.


                  When a DVD+RW is played back the index overview appears. Using B , A , N , O select
                  the title you want to play back.
                  Confirm with OK .
                  For further information see 'Playing back a DVD+RW/+R Disc'.


                  If playback does not start automatically, press PLAY G .
                  For further information see 'Playing an audio CD'.


                  If the 'h' symbol appears on the screen, start playback by pressing PLAY G .
                  If a menu appears on the screen, use the remote control buttons indicated on the screen to select
                  the menu option you want (PREV= N , NEXT= O ) or with the number buttons 0..9 .
                  For further information see ' Playing a (Super) Video CD'.


                   Playing a DVD video disc

                   1       If playback does not start automatically, press PLAY G .
  C01      2:04            This will appear on the display:
                           title/chapter number, elapsed time.

                   2       To stop playback, press STOP h on the remote control or h on
                           the DVD recorder.

                   3       To eject the disc, press OPEN/CLOSE J on the front of the DVD
                           recorder.


Playback                                                                                                        39
Playing a DVD+RW/ +R disc

                  1       If the disc is write-protected or a finalised DVD+R disc, playback
                          starts automatically.


                  2       If playback does not start automatically, use the B or A button to
 C01 ANNA   P01           select the title you want to play on the index screen.
                          You can also use the N or O button on the front.

                  3       Press the PLAY G button.
                          This will appear on the display:
                          title/chapter number, elapsed time.


                           a I can see the message 'EMPTYDISC'
                           b The disc does not contain any recordings.                                      Problem

                  4       To stop playback, press STOP h on the remote control or h on
                          the DVD recorder.

                  5       To eject the disc, press OPEN/CLOSE J on the front of the DVD
                          recorder.


                           What should I note when playing back different recording types
                           (qualities)?
                           The correct recording quality 'M1, M2, M2x, M3, M4, M6',M8' will
                           automatically be selected during playback.
                           For more information see the section on 'Selecting the recording type (picture
                           quality)' in the chapter on 'Manual recording'.                                     ?


                   Playing an audio CD
                  You can also use the DVD recorder to play audio CDs


                  1       Insert an audio CD. Playback starts automatically.


                           Audio CD display'
                           If the TV is on, the audio CD screen appears automatically.
                           During playback, the current track number and its elapsed playing time will
                           show on the TV screen and on the recorder display.                                 Tip

                  2       Stop playback using STOP h . The number of tracks and the total
                          time are displayed.


40                                                                                                           Playback
Playing an MP3 CD
           MP3 (MPEG1 Audio Layer-3) files are highly compressed music files. Using this technology the
           data volume can be compressed by a factor of 10. This means it is possible to record 10 hours
           of music in CD quality on a single CD-ROM.


                                                                                                               ENGLISH
           When creating MP3 CDs please note the following:
           File system: ISO9660
           Directory structure: maximum of 8 levels
           Formats: *.mp3
           Filenames: maximum of 12 characters (8+3)
           Maximum of 32 albums, 999 titles
           Supported sampling frequencies: 32, 44.1, 48 (kHz). Music with sampling frequencies other than
           these will be skipped.
           Supported bit rates: 32, 64, 96, 128, 192, 256 (kbit/s)
           ID3 Tag: Version 1, 1.1. In later versions the directory name is displayed as the album and the
           filename as the title.

           Important notes for playback:
           Only the first session of a multi-session CD will play back.


            1       Insert an MP3 CD. Playback starts automatically.


                     MP3 CD display
                     If the TV is on, the MP3 CD screen appears automatically.
                     During playback, the current track number and its elapsed playing time will
                     show on the TV screen and on the recorder display.
                     During stopped playback ( STOP h button) the numbers of the albums will
                     show on the TV screen and on the display.
                     Further information on the album, track and artist will also be displayed if
                     included in the ID tag.                                                        Tip

            2       Stop playback using STOP h . The number of albums is displayed in
                    the display.


                     Additional playback features
                     Using N or O select the next or previous title.
                     You can also use the T/C button to select titles and albums.
                     1 Press the T/C button and use the C or D button to select the 'T'
                         symbol for title or 'C' for chapter.
                     2 Use the B or A buttons or the number buttons 0..9 on the remote
                         control to select the number of the title/chapter.

                     You can also use the repeat functions ( PLAY MODE button).                     Tip


Playback                                                                                                  41
Playing a (Super) Video CD
     (Super) Video CDs may be equipped with PBC (Play Back Control). This means that special
     playback functions (menus) can be directly selected. The video CD must be PBC compatible (see
     CD case).
     'PBC' is active in the default settings.


      1       Insert a (Super) Video CD.
              If the 'h' symbol appears in the display, start playback by pressing
               PLAY G .

      2       If a menu appears on the screen, use the remote control buttons
              indicated on the screen to select the menu option you want
              (PREV= N , NEXT= O ) or with the number buttons 0..9 .
              If a PBC menu consists of a list of titles, you can select a title directly.

      3       Use RETURN to go back to the previous menu

      4       Stop playback using STOP h .


42                                                                                           Playback
G         Additonal playback features

                               Changing to another title/chapter
                              If there is more than one title or chapter on a disc you can change to another title or chapter
                              as follows. However if there are several chapters within a title, these will be selected. The title
                              can then still be selected via the menu bar.


                                                                                                                                    ENGLISH
                               1       During playback, press O to go to the next title/chapter. Press
                                       N to return to the start of the current title/chapter. Press
                                       N twice to return to the start of the previous title/chapter.


                                        Use the T/C (title/chapter) button
                                        1 Press    T/C (title/chapter) and then use A or B to select the
                                          appropriate title.
                                          Make sure the symbol 'T' (title) is selected in the menu bar.
                                        2 Use T/C to select chapters within a title. Press T/C and use C to
                                          select the 'C' symbol (chapter).
                                          Now select the appropriate chapter with A or B .                           Tip


                               Searching a disc
                              You can search the disc for a recording at 4x, 8x or 32x playback speed. Other speeds can only
                              be selected via the menu bar ('K').


                               1       During playback, press and hold N (reverse) or O (forwards) to
                                       switch to the search feature. You can switch between the playback
                                       speeds using N / O .

                               2       To continue playback, press PLAY G at your chosen location.


                                        a No sound
                                        b The sound is switched off in search mode. This is not a fault in your
                                          machine.                                                                Problem


                                        Search feature via menu bar
                                        1 During playback press SYSTEM-MENU on the remote control. The
                                          menu bar will appear at the top of the screen.
                                        2 Select the ' K   ' symbol using C or D and confirm with B .
                                        3 You can now use the D or C button to select different forward and
                                          backward search speeds.
                                        4 If necessary, switch the menu bar off with the SYSTEM-MENU button.
                                        5 To continue playback, press PLAY G .                                       Tip


Additonal playback features                                                                                                 43
Still picture

              1   During playback, press PAUSE 9 to stop playback and display a still
 C01   2:04       picture.


                  Frame advance via menu bar
                  1 During a still picture press SYSTEM-MENU on the remote control.
                    The menu bar will appear at the top of the screen.
                  2 Select the 'I   ' symbol using C or D and confirm with B .
                  3 You can now use the D or C button to go forwards or backwards one
                    frame at a time.
                  4 If necessary, switch the menu bar off with the SYSTEM-MENU button.   Tip

              2   To continue playback, press PLAY G .


              Slow motion

              1   During playback press PAUSE 9 on the remote control. Now hold
                  down N or O to switch to slow motion.

              2   You can switch between different speeds using N or O .


                  Slow motion via menu bar
                  1 During playback press PAUSE 9 and then          SYSTEM-MENU on the
                    remote control. The menu bar will appear at the top of the screen.
                  2 Select the ' ' symbol using C or D and confirm with B .
                                J
                  3 You can now use the D or C button to select different forward and
                    backward slow motion speeds.
                  4 If necessary, switch the menu bar off with the SYSTEM-MENU button.   Tip

              3   To continue playback, press PLAY G twice.


44                                                            Additonal playback features
Search by time
                              Using this feature you can select where playback should start (select elapsed time).


                               1


                                                                                                                               ENGLISH
                                       During playback press SYSTEM-MENU on the remote control. The
                                       menu bar will appear at the top of the screen.

                               2       Select the 'L' symbol using C or D and confirm with B . Playback
                                       is stopped and a box appears on the screen showing the elapsed time.

                               3       Enter the start time with the digit keys 0..9 from where playback
                                       should start.

                               4       Confirm with OK .


                                        a The time entered will flash on the screen
                                        b The selected title is shorter than the time entered. Enter a new time or
                                          cancel the function by pressing SYSTEM-MENU .                              Problem

                               5       Playback starts at the time you entered.


                               Repeat/Shuffle play
                              You can mark entire sections or the whole disc for endless playback. Depending on the type of
                              disc (DVD video, DVD+RW, video CD) you can select a chapter, title or the entire disc.


                               1       Select the desired chapter, title or the entire disc and start playback.

                               2       During playback, press PLAY MODE . By pressing                      PLAY
                                       MODE again you can chose from the following options:
                                       •) '2': repeat chapter (DVD only)
                                        •) '3': repeat track/title
                                        •) '5': repeat entire disc (Video CD, Audio CD only)
                                        •) '/': Shuffle
                                        •) Display disappears: no repeat

                               3       To end the repeat, press the STOP h button.
                                       You can also keep pressing the PLAY MODE button until the
                                       displays disappear.


Additonal playback features                                                                                               45
Repeating a passage (A B)
     You can repeat a particular passage within a title/chapter. You need to indicate the start and end
     of the passage.


      1       During playback press PAUSE 9 at the start point.
              You will see a still picture.

      2       Keep pressing PLAY MODE until '0' appears on the screen.
              The start point is now saved.
              Press PLAY G to start playback.

      3       When the end point is reached press OK . '1' appears on the
              TV screen. Playback now takes place within these points.

      4       To end the repeat, press the STOP h button.
              You can also keep pressing the PLAY MODE button until the
              displays disappear.


      Scan feature
     This feature plays back the first 10 seconds of each chapter (DVD) or track (CD).


      1       During playback, press PLAY MODE . Select '6' using PLAY
              MODE .

      2       After 10 seconds the DVD recorder switches to the next
              chapter/index. To start playback at the relevant chapter/index press
               STOP h and then PLAY G .


      Camera angle
     If a DVD contains scenes that have been shot from different camera angles you can select these
     camera angles for playback.


      1       During playback, press PAUSE 9 . You will see a still picture.

      2       Press SYSTEM-MENU and select the 'F' icon using C .


               a The ' F   ' symbol will be hidden
               b The selected scene has been shot from only one camera angle. This feature
                 is therefore not available. For more information please read the cover of
                 your DVD disc.                                                              Problem

      3       Select the required camera angle with B or A . You can also
              directly enter the number with the number buttons 0..9 .

      4       After a short time, playback will resume from the new camera angle.
              The 'F' symbol will remain visible until a scene starts for which
              there is only one camera angle.


46                                                             Additonal playback features
Zoom feature
                              The Zoom feature allows you to enlarge the video image and pan through the enlarged image.


                               1


                                                                                                                               ENGLISH
                                       During playback, press ZOOM . The DVD recorder switches to
                                       'PAUSE'. You will see a still picture.

                               2       Select the required zoom factor using B or A .

                               3       When 'press OK to pan' appears on the screen, the zoom process
                                       is complete.

                               4       Press OK . Using A , B , C , D select the part of the image you
                                       wish to view.

                               5       Confirm with OK .

                               6       To stop the feature, press PLAY G and then SYSTEM-MENU .


                               Select the audio language
                              Many pre-recorded DVD discs have more than one audio language. The language initially selected
                              for playback will be the one you selected when you first set up the DVD recorder. However
                              you can change the audio language of the inserted disc at any time.
                              You can change the audio language either using the menu of the inserted disc
                              ( DISC-MENU button) or the AUDIO button. The audio languages for DVD playback in the
                              two menus may be different. Please note that with some DVDs the audio language and/or
                              subtitle language can be changed only via the DVD menu.


                               1       During playback press AUDIO .

                               2       Select the required audio language using B or A . You can also
                                       enter the number directly using the number buttons 0..9 .

                               3       Play continues in the new audio language.


                               Subtitles
                              Many pre-recorded DVD discs have more than one subtitle language. The language initially
                              selected for playback will be the one you selected when you first set up the DVD recorder.
                              However you can change the subtitle language of the inserted disc at any time.
                              You can change the subtitle language either using the menu of the inserted disc
                              ( DISC-MENU button) or the SUBTITLE button. The subtitle languages in the menus may
                              differ.


                               1       During playback press SUBTITLE .
                                       Select the required subtitle language using B or A . You can also
                                       enter the number directly using the number buttons 0..9 .
                                       You can switch off subtitles again with 0 or by pressing 'off'.

                               2       Playback continues in the new subtitle language.


Additonal playback features                                                                                            47
H    Disc Manager (DM)

               General information
              The 'Disc Manager' is an integrated database in the DVD recorder that remembers all recordings
              made by this DVD recorder. This gives you a complete overview of your entire video collection
              at the touch of a button. The Disc Manager gives you quick and easy access to every recording
              made with this DVD recorder. The Disc Manager also tells you which film was recorded on
              which disc and how many unrecorded minutes remain on the discs.
              And: You can go automatically to the beginning of the selected recording and start playback.


                        How many discs can I save in the Disc Manager?
                        You can store up to 999 discs on this DVD recorder. The maximum number
                        of titles is more than 9,000. The maximum number of titles per disc is 49.         ?


                        Caution when recording with other DVD recorders
                        Don't use a disc stored in the Disc Manager for recording on other DVD
                        recorders. If you use a disc to record on another DVD recorder, then this
                        disc will no longer be recognised by the Disc Manager. In this case, delete the
                        disc from the Disc Manager's memory and then add it after it has been
                        recorded.
                        Adding 'child proof discs'
                        If you want to add child-proof discs you need to enter the PIN code.              Tip


               Adding a disc to the Disc Manager
              You can only add DVD+RW or DVD+R discs to the Disc Manager since other discs do not hold
              any information on the titles or lengths of the recordings. These discs have to be at least once
              recorded in the DVD-Recorder. A table of content have to be available.
              DVD+R discs can also be finalised. Other discs cannot be added to the Disc Manager.


                        Recordings are saved automatically
                        On a disc that has been added to the Disc Manager, you can make new
                        recordings as often as you like using this DVD recorder. The titles of these
                        recordings will be stored in the Disc Manager automatically.                      Tip


               1       Switch on the TV set. If required, select the programme number for
                       the DVD recorder.


48                                                                                      Disc Manager (DM)
2       Insert a DVD+RW/+R disc in the DVD recorder.


                                        Disc Manager
 Find title         C04
                                                                 a When I insert a disc I see a number on the screen in the index
 Browse discs       Disc number001
 Remove a disc      Disc number001                                 picture screen in the top left hand corner
 Add current disc   Next free disc number= 001                   b You have inserted a disc that has already been registered by the Disc
                                                                                                                                              Problem


                                                                                                                                                              ENGLISH
                                                                   Manager.


                                                        3       Press the DISC MANAGER button on the remote control.
                                    To exit press DM
                                                        4       Select 'Add current disc' using A or B and confirm with C .

                                                        5       Confirm with OK .
                                                                The disc number will be added to the Disc Manager.

                                                        6       The disc number is then displayed and the disc tray opens
                                                                automatically.

                                                        7       The disc is now stored in the Disc Manager under the displayed disc
                                                                number.
                                                                Please write this number on the disc and on the cover.


                                                                 Why do I need to label the discs?
                                                                 When searching for unrecorded free space or available recordings, you will
                                                                 asked to insert the appropriate discs (disc numbers).                           ?

                                                        8       To end, press DISC MANAGER .


                                                       The DVD recorder will immediately recognise that this disc is saved in the Disc Manager. When
                                                       this disc is inserted the disc number will appear in the title overview in the top left-hand corner.


                                                        Removing discs from the Disc Manager
                                                       Every DVD+RW/+R is stored with a number in the Disc Manager (DM). You can remove this
                                                       disc number from the Disc Manager to use the Disc Manager's memory for new discs or to
                                                       remove damaged discs from memory.


                                                        1       Press DISC MANAGER on the remote control.

                                                        2       Select 'Remove a disc' using A or B and confirm with C .


                                        Disc Manager
                                                        3       Select the disc number with A or B and confirm with OK .
 Find title         C04
 Browse discs       Disc number001
 Remove a disc      Disc number001                               Disc contents are not deleted.
 Add current disc   Next free disc number= 001                   The disc is only removed from the Disc Manager's memory. Its contents
                                                                 remain unchanged.                                                              Tip

                                                        4       To end, press DISC MANAGER .
                                    To exit press DM


Disc Manager (DM)                                                                                                                                     49
Searching for a title in the Disc Manager
                                                      This function can be used to quickly and easily find and play back a recording saved in the Disc
                                                      Manager.


                                                       1       Press DISC MANAGER on the remote control.

                                                       2       Select 'Find title' using B or A and confirm with C .


                                   Disc Manager
                                                       3       A list of the titles of all recordings stored in the Disc Manager (DM)
 Find title     Title       Date      Duration                 will appear on the TV screen.
                Charly 1    01/01/03 0:28


                                                                What do the displays on the screen mean?
                                                                'Title' = Title
                                                                'Date' = Date of the recording
                                                                'Duration' = Length of the recording
                                          Page1/1                                                                                               Tip
                           To select title press OK

                                                       4       Select the title that you want to play back with B or A .

                                                       5       Confirm with OK . The DVD recorder will jump to the start of the
                                                               selected recording.


                                                                a I see the message 'Insert disc number' on my screen
                                                                b The selected recording is located on the Disc Manager disc with the
                                                                  displayed disc number. Please insert the appropriate disc. After a brief
                                                                  check, the DVD recorder will jump to the start of the selected recording.   Problem


                                                       Searching discs
                                                      You can easily search for the title of a recording stored in the Disc Manager. To do this, the
                                                      appropriate disc does not have to be in the DVD recorder.


                                                       1       Press DISC MANAGER on the remote control.

                                                       2       Select 'Browse discs' using B or A .

                                                       3       Confirm with C . The screen will show the contents of the last Disc
                                                               Manager disc used.


                                    Disc Manager
                                                       4       Use A or B to select a different disc number if necessary and
                                                               confirm with C .
                Disc number        001
 Browse discs
                Title       Date     Duration
                Charly 1    01/01/03 0:28                       What do the displays on the screen mean?
                                                                'Title' = Title
                                                                'Date' = Date of the recording
                                                                'Duration' = Length of the recording                                             ?
                                          Page1/1
                           To select title press OK


50                                                                                                                           Disc Manager (DM)
5       Press A or B to select the desired title.

                                                       6       Confirm with OK .


                                                                a I see the message 'Insert disc number' on my screen
                                                                b The selected recording is located on the Disc Manager disc with the
                                                                                                                                                  Problem


                                                                                                                                                              ENGLISH
                                                                  displayed disc number. Please insert the appropriate disc.

                                                       7       The DVD recorder searches for the start of the appropriate
                                                               recording.


                                                       Searching for a blank section
                                                      You can search for space for a new recording on the disc (at least 1 minute of blank space), for
                                                      example at the end of existing recordings.
                                                      This only works with discs which have already been stored in the Disc Manager.


                                                       1       Press DISC MANAGER on the remote control.

                                                       2       Select 'Browse discs' using A or B .

                                                       3       Confirm with OK . A list of the recordings on the disc you have
                                                               selected will appear on the TV screen.

                                                       4       Use A or B to select a disc (disc number) on which there is
                                                               enough space for the recording.


                                                                How can I see how much space is available for the recording?
                                                                The space available is designated as 'Empty'. The time is displayed next to the
                                                                title 'Empty'. You can use the REC MODE button to change the recording
                                                                mode (recording time).
                                                                How can I choose the titlel 'Empty' if there were many recordings
                                                                on the disc?
                                                                In this case press C and then select with B , A the title 'Empty'.                   ?


                                    Disc Manager
                                                       5       Select the title 'Empty' with A or B .

 Browse discs
                Disc number        001                 6       Confirm with OK .
                Title       Date     Duration
                Charly 1    01/01/03 0:28


                                                                a I see the message 'Insert disc number' on the screen.
                                                                b The blank space is located on the Disc Manager disc with the displayed disc
                                          Page1/1                 number. Please insert the appropriate disc.                                     Problem
                           To select title press OK


                                                      The DVD recorder rewinds to the beginning of that particular part and automatically switches to
                                                      Stop.


Disc Manager (DM)                                                                                                                                        51
I    The 'Digital Photo Manager'
              Using the 'Digital Photo Manager', you can view and modify JPEG pictures from a memory card,
              Picture CD, DVD, or a CD ROM. You can store them on a DVD+RW/+R or on the memory
              card.
              In addition, you can store the pictures in a so-called album in a specific order, yet without
              changing the order in which the pictures are stored on the memory card.
              Moreover, you can view the pictures in a slide show at adjustable intervals.
              Store the slide show on a DVD+RW/+R so you can view them on a DVD player.

                        How many pictures can be organized from the DVD Recorder?
                        Since the storage size of a JPEG picture depends on different parameters
                        (quality, picture information, JPEG compression, resolution of the camera,...)
                        the limitation is only the available storage capacity.
                        You can store up to a maximum of 999 photos in one album on a
                        DVD+RW/+R or memory card.
                        In case you want to store pictures on a medium that cannot be recorded by
                        the DVD recorder (Picture CD, CD-ROM, finalised DVD+R, DVD), you can
                        store up to a maximum of 100 pictures per album in 20 albums. These albums
                        will be stored in the internal memory with the appropriate disc ID-number.
                        With this number the allocation to the different disc is possible.                ?

              Select from the following chapters:

              'The PC (PCMCIA) card',
              to install or remove the memory card.

              'Showing JPEG pictures from a roll' ,
              in order to view and modify the pictures and create slide shows from the roll.

              'Advanced editing of JPEG pictures,
              for advanced editing options such as color, sharpness...

              'Creating an album ',
              to arrange pictures from different rolls in a definite order and to create a slideshow from the
              album.

              'Making a 'DVD compatible' slide show',
              Make a slide show from the roll/album for viewing on a DVD-player.

              'Storing rolls/albums on a DVD+RW/+R' ,
              Store your JPEG pictures for archiving on a DVD+RW/+R.

              'Changing roll settings' ,
              to modify the rolls to your personal preferences.

              'Changing album settings' ,
              to modify the albums to your personal preferences.

              'Changing the media settings',
              to modify the storage media (DVD+RW/+R, memory cards) to your personal preferences.


                        What is the difference between a 'Roll' and 'Albums'?
                        'Roll'
                        A folder containing JPEG pictures. It is comparable with a conventional 35mm
                        film for cameras. Rolls will be created automatically from the digital cameras.
                        'Albums'
                        A binary file containing references to the pictures on the rolls. It is
                        comparable with a conventional photo album that may contain the pictures of
                        different films (rolls).
                        You can delete an album without deleting the pictures of the rolls.               ?


52                                                                        The 'Digital Photo Manager'
The PC (PCMCIA) Card
                              In this DVD-Recorder you can use the following types of memory cards with an adapter:
                              •) SD memory cards
                              •) Multimedia Card


                                                                                                                           ENGLISH
                              •) CompactFlash
                              •) SmartMedia
                              •) Memory Stick/Memory Stick pro
                              •) Micro Drive
                              •) xD Picture Card

                              The DVD-Recorder can read/write files, which were stored on memory cards using the file
                              systems FAT 8, FAT 12, FAT16 and FAT 32. This means that it can handle memory cards larger
                              than 2 GB.


                              Inserting the PC Card
                               1       If necessary, insert the memory card into the PC Card adapter first.
                                       The label must be facing up.
                                       The contacts must be facing the device.

                               2       Insert the PC Card into the media slot in the front of the recorder
                                       until the EJECT button sticks out of the device front completely. Press
                                       this button only if you want to remove the PC Card.


                              Removing the PC Card
                               1       Press the EJECT button next to the PC Card.

                               2       This will push the card out of its slot.
                                       If the card remains in the slot, insert the PC Card once again and
                                       press the EJECT button again.


                              Warning !
                              Insert/Remove the PC Card only when there is no access to the memory card. This
                              could damage the memory card.
                              You can recognise the access by:
                              •) A moving disc symbol lights up on the top left corner of the screen

                              If you were not sure, press in the 'Digital Photo Manager' the button PHOTO . This will
                              take you directly into the 'Media menu' screen. You can also switch the DVD Recorder
                              off with the STANDBY m button.


The 'Digital Photo Manager'                                                                                           53
Showing JPEG pictures from a roll
     The DVD recorder can read JPEG pictures stored on a CD-ROM, Picture CD, memory card, or
     a DVD and write them on a DVD+RW/+R or memory card.

     Please observe the following:
     •) The file extension has to be '*.JPG' and not '*.JPEG'.
     •) These pictures must be stored in the root directories or in a subfolder called 'DCIM' in
        folders. These will be recognized by the DVD recorder as rolls (comparable with a 35mm roll
        for cameras). You can select the directories (folders) as rolls in the 'Media menu'.
     •) This device is compatible with still pictures (JPEG)
     •) It can only display DCF-standard still pictures or JPEG pictures e.g. TIFF. It cannot play back
        moving pictures, Motion JPEG, and other formats, or pictures in formats other than JPEG, or
        pictures associated with sound e.g. AVI-files.


      1       Insert the medium you want to use (CD, DVD+RW/+R, memory
              card).

      2       Press PHOTO on the remote control. The 'Media menu' will
              appear.

      3       Use B or A to select the medium you want to process (disc or
              memory card). If you did not insert the corresponding medium (disc
              or memory card), a warning sign will appear above the symbol on the
              left hand side of the screen.

      4       Confirm with C .

      5       Select 'Roll' using B or A and confirm with C .

      6       You will see an overview with the first picture of each roll that
              contains pictures. The display and the description of the roll will
              depend on the camera or the computer program used to create this
              roll.

      7       Select the desired roll using B or A and confirm with OK .

      8       The data will be read and then an overview of the stored pictures will
              be displayed.

      9       You can select a picture for viewing or editing with D , C , B ,
              A.


               Fast browsing trough the pictures
               With O or N you can switch one page forward or backward.
               You can also select a picture with the number buttons 0..9 on the remote.   Tip

      0       Press OK to select the desired picture.

      A       The picture will be displayed as a full picture on the screen.


54                                                             The 'Digital Photo Manager'
Editing JPEG pictures
                               1       On the corresponding pictures press SELECT to select them for
                                       editing.
                                       The picture frame appears in a different color.


                                                                                                                                   ENGLISH
                                       If you want to deselect the pictures, press SELECT on the selected
                                       pictures again.

                               2       Keep pressing A until the menu bar is selected. Select one of the
                                       displayed functions with the C or D button.


                                        Which options are available?
                                        'Menu': leave the menu
                                        'Play': Starts the slide show
                                        'Erase': Erases the selected pictures
                                        'Rotate': Rotates the selected pictures by 90°
                                        'Copy': Copies the selected pictures on the other loaded media (from memory
                                                 card to DVD+RW/+R or vice versa)
                                        'Select all': Selects all pictures
                                        'Cancel': Cancels the changes
                                        Using the buttons on the remote
                                        'Play': Button PLAY G
                                        'Erase': Button CLEAR and then OK
                                        'Rotate': Button ANGLE                                                        Tip


                              Slide show
                              You can display JPEG pictures in the selected roll automatically one after the other at adjustable
                              intervals.


                              Starting the slide show

                               1       Press PLAY G to start the slide show.


                              Interrupting the slide show

                               1       Press PAUSE 9 . This will stop the automatic display of the pictures.

                               2       Press PLAY G to resume the slide show.


                              Closing the slide show

                               1       Press STOP h . The picture overview will appear.


The 'Digital Photo Manager'                                                                                                 55
Changing the slide show settings

      1       Press SYSTEM-MENU during playback of the slide show.

      2       Select one of the displayed functions with the D or C button.

               Which options are available?
               'Overview': Returns to the picture overview. Has the same function as
                             STOP h
               'Play': Resumes the slide show. Has the same function as PLAY G
               'Timer': Select one of various speeds by pressing B
                        Confirm with C .
                        Start the slide show with PLAY G .
               'Repeat': Switches repeat playback of the slide show on and off
               Using the buttons on the remote
               Repeat playback: Button PLAY MODE
               Enlarge pictures: Button ZOOM
               Edit pictures: Button EDIT                                              Tip


      Advanced editing of the JPEG pictures
     You can edit the pictures in the DVD recorder and then store them back on the memory card
     or a DVD+RW/+R. The original picture remains unchanged, and the modified one is additionally
     stored on the medium.
     Please make sure the memory card or DVD+RW/+R is not write-protected and has enough
     storage space.


      1       Press at the required picture the button EDIT .

      2       Select one of the displayed functions with the D or C button.


               Using the buttons on the remote
               ANGLE : Rotates the picture
               ZOOM : Enlarge the picture
               STOP h : Returns to the picture overview
               CLEAR : Discard the changes. The picture will be reloaded.              Tip

     'Overview'
     Returns to the picture overview.


     'Rotate'
     Rotates the picture by 90° each time you press OK .


     'Flip'
     Mirrors the picture along its vertical axis when you press OK .


56                                                              The 'Digital Photo Manager'
'Zoom'
                              Using this function, you can enlarge the picture and pan through the enlarged picture.


                               1       Press OK to activate the zoom function.

                               2       Select the area to be enlarged with D , C , B , A .


                                                                                                                                  ENGLISH
                               3       You can press ZOOM to enlarge the selected area at several steps.

                               4       Press OK to return to the normal picture size.


                              'Filters'
                              Using this function, you can modify the picture properties.


                               1       Press B and select one of the displayed functions using B or A .
                                       Confirm with C .


                                        Which options are available?
                                        'Sepia: Displays the entire picture in brown colors. It gives the picture an
                                                'antique' appearance.
                                        'Negative': Converts the picture into a black-and-white negative.
                                        'Colour negative': Converts the picture into a color negative. Comparable to
                                                             a color negative film.
                                        'Black & white': Converts the picture into a black-and-white picture.
                                        'Soften': Use this function to reduce picture sharpness in three steps, from
                                                  edge blurring to a visible blur.                                     Tip

                               2       Keep pressing A until the menu bar is selected.


                              'Colour'
                              Using this function, you can change the red, green, and blue color components of the picture.


                               1       Press B .

                               2       Use B or A to select the corresponding color control.

                               3       Change the color using D or C .

                               4       Keep pressing A until the menu bar is selected.


                              'Reset'
                              This setting will appear only if changes have already been made to the picture. If you want to
                              discard the changes, confirm with OK .


                              'Save'
                              This setting will appear only if changes have already been made to the picture. If you want to
                              save the changes, confirm with OK .


The 'Digital Photo Manager'                                                                                                  57
Creating an album
     You can store pictures contained in a memory card or DVD+RW/+R in a so-called 'Albums' in
     a different order. Albums are binary files containing information on the orientation and storage
     location of the pictures.
     Albums from a medium that cannot be recorded by the DVD recorder (Picture CD, CD-ROM,
     finalised DVD+R), will be stored in the internal memory of the DVD recorder. You can store up
     to a maximum of 100 pictures per album in 20 albums.


     Adding pictures to an album
      1       Select 'Albums' in the 'Media menu' using B or A and confirm
              with C .
      2       An overview of the albums you already created will appear. Select
              'New album' with B to create a new album.
      3       Press C . The menu 'Album Settings' will appear.
              In a new album, the line 'Add photos' is already highlighted.
      4       Confirm with OK .
      5       The roll overview will appear.
      6       Use B or A to select the roll from which you want to add pictures
              to the album.
      7       Confirm with C .
              The picture overview will appear.
      8       Use D , C , B , A to select the pictures you want to add to the
              album.
      9       Confirm each selected picture with SELECT . Do not pay attention
              to the order of the pictures. You can change it later in the album.


               Select all pictures
               If you want to store many pictures in the album, select 'Select all'.
               Then use SELECT to select the pictures you don't want to add to the
               album.
               These pictures will be deselected.                                         Tip
      0       Keep pressing A until the menu bar is highlighted.
      A       Select 'Done' with D or C to add all selected pictures to the album.
      B       Confirm with OK .
              The album will be created. 'SAVING' will appear in the display while
              the album is created.
              Do not remove the medium from the device!
      C       The menu 'Album Settings' will then automatically appear.
      À       To add additional pictures, use B to select 'Add photos' and
              confirm with OK .
      Á       Repeat steps 5 to À until the album contains all the desired
              pictures.


58                                                         The 'Digital Photo Manager'
Changing the picture order within an
                              album
                              You can change the order of the pictures within an album as you wish. The order of the
                              pictures of the rolls remains unchanged.


                                                                                                                               ENGLISH
                               1       Select 'Albums' in the 'Media menu' using B or A and confirm
                                       with C .
                                       An overview of the albums you already created will appear.
                               2       Press C to select the desired album. The 'Album Settings' menu
                                       will appear.
                               3       Select 'Overview' by pressing B . The 'Overview' option can be
                                       found on the second menu page
                               4       Confirm with OK .
                               5       Use B , A , D , C to select the picture you want to move to a
                                       different position.
                               6       Press SELECT . The picture frame appears in a different color.
                               7       Keep pressing A until the menu bar is highlighted.
                               8       Select 'Move' using D or C and confirm with OK .
                               9       Use B , A , D , C to select the position before which the
                                       desired picture is to be moved.
                               0       Confirm with OK . The picture will be inserted.


                              Editing pictures in an album
                              You can also erase, rotate, or hide pictures in an album. These changes will only affect the
                              album. The pictures on the disc or the memory card will remain unchanged.


                               1       Select the pictures you want to change in the 'Album overview'
                                       using SELECT .
                               2       Keep pressing A until the menu bar is highlighted.
                               3       Select one of the displayed functions with the D or C button.

                                       What do the individual functions mean?
                                       'Menu': Closes the current menu
                                       'Play': Starts the slide show of the album
                                       'Move': Changes the order of pictures within an album.
                                       'Erase': Erases the pictures from an album. The picture on the media remains
                                                 unchanged.
                                       'Rotate: Rotates pictures by 90°
                                       'Hide': Hides pictures for the slide show
                                       'Select all': Selects all pictures
                                       'Cancel': Discards all changes
                                       Using of the buttons on the remote
                                       'Play': Button PLAY MODE
                                       'Erase': Button CLEAR
                                       'Rotate': Button ANGLE                                                         ?


The 'Digital Photo Manager'                                                                                               59
Making a 'DVD compatible' slide show
     Using this function, you can record the pictures in such a way, that you can view the slide show
     from a roll or an album on a DVD player.
     The slide show will be stored on the DVD+RW/+R as a video title. If you want to store the
     photos in the JPEG format in addition to the video title, you must prepare the DVD+RW so
     that you can store both pictures and videos. See section 'Preparing a DVD+RW/+R'.
     On a DVD+R you can only store either photos or videos. A combination of JPEG photos and
     video is not possible.


     Making a slide show from an album
      1       Select the disc (top symbol) in the 'Media menu' and confirm with
               C.
      2       Add pictures to the album as described in chapter 'Adding pictures to
              the album'.
      3       You can change the order of the pictures, erase unwanted pictures,
              enter a new name for an album, or change the cover picture of the
              album, until the album corresponds to your personal preferences.
      4       Select 'Make video title' in the menu 'Album Settings' using B ,
               A.
      5       Confirm with OK . 'SAVING' will appear in the display and the screen
              will show the time left until completion.
              The new album will be stored on the DVD+RW/+R as a video title
              (movie). It will appear in the index picture screen as a separate title.

              This video title will be recorded automatically after the last recording.
              No existing titles will be overwritten.
              Ensure that there is enough space on the disc.
      6       To end, press DISC-MENU .


     Making a slide show from a roll
     Each roll will be stored as one video title on the DVD+RW/+R.
     If you want to make a video title from different rolls, you have to create an album first. Then
     you can store the album as a video title on the DVD+RW/+R.


      1       In the 'Media menu' screen select the memory card (symbol in the
              middle) and confirm with C .
      2       Select the line 'Rolls' and confirm with C .
      3       Select with B , A , the roll from which you want to make a video
              title.
      4       Press C the 'Roll Settings' menu will appear.


60                                                           The 'Digital Photo Manager'
5       Select the line 'Make video title' using B , A an confirm with
                                       OK .
                                      'SAVING' will appear in the display and the screen will show the time
                                      left until completion.
                                      The new roll will be stored on the DVD+RW/+R as a video title
                                      (movie). It will appear in the index picture screen as a separate title.

                                      This video title will be recorded automatically after the last recording.


                                                                                                                              ENGLISH
                                      No existing titles will be overwritten.
                                      Ensure that there is enough space on the disc.
                              6       To end, press DISC-MENU .


                               Storing rolls/albums on a DVD+RW/+R
                              If you want to store the JPEG pictures from the rolls/albums on a DVD+RW/+R, you must first
                              prepare the disc.


                              Preparing a DVD+RW/+R
                              1       Press PHOTO on the remote control. The media menu will appear.
                              2       Use B or A to select the disc alone as a medium. If you did not
                                      insert a disc, a warning sign will appear above the symbol on the left
                                      hand side of the screen.
                              3       Press C .
                               4      Select 'Media settings' using B and confirm with OK .
                              5       Use B or A to select whether you want to store 'Photo only'or
                                      'Video & photo' together on this disc.
                                      Please note, that DVD+R's or memory cards can only be prepared for
                                      'Photo only'.

                                       What is the difference?
                                       'Photo only'
                                       The DVD+RW/+R will be prepared so that only pictures can be stored on
                                       the entire disc (4,4 GB).
                                       'Video & photo'
                                       On the DVD+RW/+R a space (650 MB) will be reserved for storing pictures
                                       additionally to movies. So you can store the appropriate photos after the
                                       movie.
                                       A DVD+R can not be prepared for 'Video & photo'
                                       How long does this process last?
                                       To prepare a disc for 'Video & photo', a new DVD+RW has to be formattet
                                       first. This can take up to 25 minutes. You can speed up the process, if you
                                       use a prerecorded disc.                                                       ?
                              6       Confirm with OK .
                              7       WARNING!
                                      All data on the disc will be erased.
                                      If you want to continue, press OK .
                                      To cancel the process, press B or A .


The 'Digital Photo Manager'                                                                                              61
8       'PREPARING' will appear in the display until the preparation is
             complete.
     9       If the disc has been successfully prepared, the 'Media settings' menu
             will appear, indicating the available storage space. (4.4 GB for 'Photo
             only'/650MB for 'Video & photo')


     Transfer the photos to a DVD+RW/+R
     Using this function, you can store the pictures on the DVD+RW/+R in the same format as on a
     memory card. You can handle these pictures as if they were stored on a memory card.
     If you want to play this DVD on a computer drive, ensure that the operating system of your
     computer can handle the file system UDF 1.5 (Universal Disc Format).
     If you want to play back a DVD+RW/+R on a DVD player, read section ' Making a 'DVD
     compatible' slide show '.


     1       Press PHOTO on the remote control. The 'Media menu' will
             appear.
     2       Use B or A to select the disc with the memory card (last symbol).
             If you did not insert a disc, a warning sign will appear above the
             symbol on the left hand side of the screen.
     3       Press C .
      4      Use B or A to select whether you want to copy the complete
             memory card into a roll or to create additionally to the roll an album
             that contains the same pictures as the roll. The creation of the album
             makes edits easier.
             Attention!
             Ensure that the data of the memory card fits on the available space on
             the DVD+RW/+R. (4,4GB photo only/650MB photo and video).
             Storing the album will also store the corresponding pictures.
      5      Confirm with OK . 'SAVING' will appear on the display.
             A bar with a time display will appear on the screen until the process
             has been completed.


62                                                        The 'Digital Photo Manager'
Changing roll settings
                              You can adjust various roll settings to your individual needs. You can change the name and date
                              of a roll.


                                                                                                                                ENGLISH
                              Changing the rolls name
                              You can re-enter or change the name of an existing roll.
                              The name on the storage media will not be changed. The new name will be stored additionally.


                               1       Select 'Roll name' in the menu 'Roll Settings' using B , A and
                                       confirm with C .
                               2       Type the new roll name using the 0..9 buttons like you would do on
                                       a cellular phone. You can also move to the position where you want
                                       to enter or change a character using D , C .
                               3       Enter the new name with the buttons B , A .


                                        Enter the characters with the buttons 0..9
                                        Press a number button as often as the required character or the number
                                        appears. You can enter language dependent characters with the buttons
                                         N or O on the corresponding character e.g.: 'ä', button 2 for 'a' and
                                        then with O as often as 'ä' appears.
                                        For special characters press the button 1 repeatedly.
                                        The position for the following character will be selected automatically.
                                        To enter a space press the button 1 .
                                        To switch over to upper case characters press SELECT .
                                        To erase a character press CLEAR .                                         Tip
                               4       To end, press OK .


                              Changing the rolls date
                               1       Select 'Date' in the menu 'Roll Settings' using B , A and confirm
                                       with C .
                               2       Select the field you want to change using D , C .
                               3       Change the date using B , A or use the 0..9 buttons to enter the
                                       numbers.
                               4       Confirm the changes with OK .


                              Calling roll overview directly
                               1       Select 'Overview' in the 'Roll Settings' using B , A , and confirm
                                       with OK .
                               2       This will take you directly into the roll overview where you can make
                                       changes.


The 'Digital Photo Manager'                                                                                              63
Deleting a roll
     WARNING!
     This procedure cannot be reversed, since the rolls will also be erased from the corresponding
     media. Deleting a roll will also affect any album that uses pictures contained in this roll.
     Therefore, apply this function with particular care.


      1       Select 'Erase roll' in the menu 'Roll Settings' using B , A , and
              confirm with OK .
      2       If you really want to delete the roll, press OK to confirm, otherwise
              cancel the function using A .
      3       The overview of all rolls will then be displayed.


      Changing album settings
     You can adjust various album settings to your individual needs. You can change the name and
     date of an album. Moreover, you can copy or delete the album.


     Changing the cover picture
     You can change the picture used to represent a certain album in the 'Album overview'. As a
     rule, the first picture of an album is used as the cover picture. However, you can use any picture
     in the album as a 'cover picture'.


      1       Select 'New cover photo' in the 'Album Settings' using
               B , A and confirm with OK .
              The album will be read and a picture overview of the album will
              appear.
      2       Use B , A , D , C to select the picture you want to use as the
              'cover picture'.
      3       Confirm with OK .
              The new 'cover picture' appears in the bottom left corner of the
              'Album Settings'.


     Changing the album name
     You can re-enter or change the name of an existing album.


      1       Select the 'Album name' in the 'Album Settings' using B ,
               A and confirm with C .
      2       Type the new album name using the 0..9 buttons like you would do
              on a cellular phone. You can also move to the position where you
              want to enter or change a character using D , C . Change the
              characters with B , A .


64                                                           The 'Digital Photo Manager'
How can I enter the characters with the buttons 0..9 ?
                                       Press a number button as often as the required character or the number
                                       appears. You can enter language dependent characters with the buttons
                                        N or O on the corresponding character e.g.: 'ä', button 2 for 'a' and
                                       then with O as often as 'ä' appears.
                                       For special characters press the button 1 repeatedly.


                                                                                                                                ENGLISH
                                       The position for the following character will be selected automatically.
                                       To enter a space press the button 1 once.
                                       To switch over to upper case characters press SELECT .
                                       To erase a character press CLEAR .                                              ?
                              3       To end, press OK .


                              Changing the album date
                              1       Select 'Date' in the 'Album Settings' using B , A and confirm
                                      with C .
                              2       Select the field you want to change using D , C .
                              3       Change the date using B , A or use the 0..9 buttons to enter the
                                      numbers.
                              4       Confirm the changes with OK .


                              Calling the album overview directly
                              1       Select 'Overview' (second page) in the 'Album Settings' using B ,
                                       A and confirm with OK .
                              2       This will take you directly into the album overview where you can
                                      make changes.


                              Copying an album
                              Using this function, you can:
                              •) Copy albums created on a memory card to a DVD+RW/+R
                              •) Copy albums created on a DVD or a CD-ROM to a memory card.
                              This will also store the pictures used for the album.


                              1       Select 'Copy album' (second page) in the menu 'Album Settings'
                                      using B , A and confirm with OK .


                                       a It is not possible to select 'Copy album'
                                       b There is no media in the DVD-Recorder to store an album/'Roll'. Insert a
                                         DVD+RW/+R disc or insert a memory card.                                    Problem


The 'Digital Photo Manager'                                                                                                65
Erasing an album
     It is also possible to erase an album. The pictures within an album will not be deleted and shall
     remain on the storage medium (disc or memory card) unchanged.


      1       Select 'Remove album' (second page) in the 'Album Settings'
              using B , A and confirm with OK .
      2       If you really want to erase the album, press OK to confirm, otherwise
              cancel the function using A .
      3       The overview of all albums will then be displayed.


      Changing the media settings
     You can adjust various settings for a DVD+RW/+R or a memory card. If a CD-R/RW is loaded
     no changes can be made, because this media cannot be recorded by the DVD recorder


      1       Press PHOTO on the remote control. The 'Media menu' screen will
              appear.
      2       Use B or A to select the medium you want to process (disc or
              memory card). If you did not insert the corresponding medium (disc
              or memory card), a warning sign will appear above the symbol on the
              left hand side of the screen.
      3       Press C .
      4       Select the line 'Media settings' and confirm with OK .

     'Media name'
     The name of the media will be created by the digital camera.


     'Protection'
     The write protection of the media can be switched on or off.
     You can use this function only if the write protection can be switched off by a software. You can
     not select this line if your memory card was equipped with a mechanically switch.


     'Prepare media'
     The DVD+RW/+R will be prepared for the data transfer. Read further information in the section
     'Preparing a DVD+RW/+R'.


     'Finalise disc'
     You can select this line only if a 'not finalised' DVD+R is loaded.
     If you store pictures on a DVD+R, you have to finalise the disc to play it on a DVD-player.
     Once this process is complete, no further changes can be made.


     'Erase media'
     With these setting all data (rolls and albums) can be erased on a recordable media (DVD+RW
     or memory card). This procedure cannot be reversed


66                                                          The 'Digital Photo Manager'
Problem solving for 'Digital Photo
                                   Manager'


                                                                                                                               ENGLISH
  PROBLEM                     SOLUTION
                          b'Thumbnail not available'
                           The photo does not have a associated thumbnail. In this case, the photo but not the thumbnail is
                           viewable.
                          b'Too large to display'
                           The image is too large to be viewed in its thumbnail format.
 Messages instead of      b'Hidden photo'
 the thumbnails:           The corresponding (hidden) photo will not be shown during the slide show. You can unhide this
                           photo in the album overview again.
                          b'Photo not found'
                           In the album overview a photo entry is found that no longer exists on the referenced source
                           media.

                          bOn the inserted media (disc or memory card) no photo can be found.
                          bThe file extension has to be *.JPG and not *.JPEG.
 Error message 'Media     bThe storage media should contain a subfolder 'DCIM'. Under that there should be folders so
 does not contain             called 'Rolls'. Only pictures in these folders can be recognised
 photos':                 bPictures can also be stored in the root directory.
                          bBefore you make changes to the storage media check the content of the media in a computer or
                              in a digital camera.

                          bCheck that your DVD drive on the computer can read DVD+RW/+R discs.
 My computer can not      bCheck that your operating system of your computer support the file system UDF (Universal Disc
 read the DVD+RW/+R:          Format). Install if necessary the required driver. The DVD+RW/+Rs were recorded in the format
                              UDF 1.02 ('Video & photo') and UDF 1.50('Photo only').

                          bThe file extension has to be *.JPG and not *.JPEG.
                          bThe disc should contain a subfolder 'DCIM'. Under that there should be folders so called 'Rolls'.
 The disc (CD ROM,            Only pictures in these folders can be recognised.
 DVD) can not be read     bPictures can also be stored in the root directory.
 by the DVD Recorder,     bIf you create a CD-ROM, you have to store the photos in the same directory structure as on a
                              DVD+RW/+R
 no pictures available:
                              If you use a CD-ROM from a photo shop or something similar, the whole disc will be searched
                              for the photos on the basis of the disc format.

 The memory card can      bThe memory card should contain a subfolder 'DCIM'. Under that there should be folders so called
 not be read by the           'Rolls'. Only pictures in these folders can be recognised.
 DVD Recorder, no         bPictures can also be stored in the root directory.
                          bThe file extension has to be *.JPG and not *.JPEG.
 pictures available:


The 'Digital Photo Manager'                                                                                               67
J    Manual recording

               General

                        Which discs can I use for recording?
                        With this DVD recorder, you can record on two types of DVD:
                        DVD+RW
                        This disc can be written to and then the contents deleted.
                        DVD+R
                        This type of disc can only be recorded once.
                        If you want to play this DVD in a DVD player it must be finalised using the
                        'Finalise disc' function. It is not possible to make further recordings using
                        this disc.
                        If this disc is to be played in a DVD recorder it must not be finalised.
                        Recordings can be added and deleted. The disc space (playback time) from the
                        deleted recording cannot be recovered for further recordings                      ?

              Use the 'Manual recording' function to spontaneously start recording (e.g. to record a TV show
              already in progress).
              In the 'index display' select the title to be overwritten or 'Empty title' with B , A .
              If you insert recordings between existing recordings, check the lengths of the old and new
              recordings. If the new recording is too long the subsequent recording (title/chapter) will be
              overwritten.


                        Insert new recordings at the end of all existing recordings (Safe
                        Record)
                        To add a new recording at the end of the last recording on the disc, hold
                        down the REC/OTR n button until the message 'SAFE REC' appears on the
                        display.
                        For DVD+R discs each new recording is always added at the end of all
                        previous recordings as existing recordings cannot be overwritten.
                        End of disc is reached
                        If the end of a disc is reached during recording, recording will stop and the
                        Recorder will turn itself off automatically.                                    Tip

              Please refer to section 'Recording without automatic switch off', if you want to manually
              start and stop your own recording.

              If you want to start a recording manually but have it stopped automatically, read the section
              'Recording with automatic switch off'. (e.g. not to record to the end of the disc)

              Read the section 'Automatic recording from a satellite receiver', if you want a recording
              to be controlled automatically by a satellite receiver.

              Read the section 'Direct record' if you want to record a programme currently being shown.


68                                                                                        Manual recording
Recording without automatic switch off

                    1   Switch on the TV set and select the programme number for the DVD
                        recorder.


                                                                                                                          ENGLISH
                    2   Insert a disc on which the recording is to be made. This disc is then
                        checked for content and system. READING' will appear on the display.

                        a Index display
                        b A DVD+RW disc has been inserted that already contains recordings. Use
                          the A or B button to select the point where the recording is to start.

                        a The message 'EMPTYDISC' appears in the display
                        b The disc inserted is a blank DVD disc.

                        a A dialog box appears asking you whether you want to delete the
                          contents or eject the disc
                        b The disc inserted is a DVD+RW but its contents are not DVD
                          video-compatible (e.g. a data disc). Recordings on this disc can only be
                          made if the entire disc is first deleted with the REC/OTR n button.

                        a The message 'Title limit' appears on the screen if a recording is to
                          be made
                        b A disc may contain a maximum of 48 titles (including blank titles). Delete
                          titles or change the disc.                                                         Problem

                    3   If necessary, use the MONITOR button on the remote control to
                        switch to the internal tuner in the DVD recorder.

                    4   Use CHANNEL q or CHANNEL r to select the programme
                        number (station name) you want to record. This will appear on the
                        display:


  1 FREETITLE P01       Programme numbers of the external inputs:
                        'EXT1' Scart socket at the back EXT 1 TO TV-I/O
                        'EXT2'   Scart socket at the back EXT 2 AUX-I/O
                        'CAM1'   Front SVHS/audio sockets S-VIDEO / left AUDIO right
                        'CAM1'   Front video/audio sockets A/V S-VIDEO / left AUDIO right
                                 Switching between the S-VIDEO and VIDEO sockets takes place
                                 automatically. If a signal is available at both sockets at the same time,
                                 the signal at the S-VIDEO socket has priority.
                        'CAM2'   Digital Video (i Link) front socket DV IN                                     Tip

                    5   To start recording, press REC/OTR n on the remote control or
                        RECORD on the DVD recorder.

                        If you want to start the recording at the end of the existing
                        recordings, hold down the REC/OTR n button until the message
                        'SAFE REC' appears on the display.
                        For DVD+R discs each new recording is always added at the end of
                        all previous recordings as existing recordings cannot be overwritten.
                        This will, for example, appear in the display:


Manual recording                                                                                                     69
C01   1:16:51   P01       Insert chapter markers
                           During recording you can mark scenes so you can find them or hide them
                           later.
                           During recording, press EDIT at the start point. 'Inserting marker' appears
                           on the TV screen. In the display, the number of the 'CHAPTER' increases by
                           one.
                           For further information on titles and chapters, see the section on 'Changing to
                           another title/chapter' in 'Playback'.                                                Tip

                       6   Use the STOP h button on the remote control or h on the
                           machine to stop the recording. 'MENU UPDT' will appear on the display.
                           The DVD recorder is writing the list of contents. Wait until the
                           message disappears from the display. The recording is then complete.


                           a The display will read 'DISC ERR'
                           b Recording could not be completed correctly because of a disc error. Check
                             the disc and clean it if necessary.                                              Problem


                           Making recordings on DVD+R discs compatible
                           If you want to play back the recording on a DVD player, you need to finalise
                           the disc in the DVD recorder. You can prepare your DVD for use in a DVD
                           player using the 'Finalising' feature. See 'Finalising DVD+R discs' in 'Managing
                           the disc contents'.                                                                  Tip


                       Interrupt recording (Pause)

                       1   During recording press PAUSE 9 , for example to avoid recording
                           the commercials.

                       2   To continue recording, press REC/OTR n .


                           End recording
                           To end the recording, press the STOP h button. Wait until 'MENU UPDT'
                           disappears from the display.                                                         Tip


70                                                                                              Manual recording
Recording with automatic switch off
                    (OTR one touch recording)


                                                                                                                  ENGLISH
                    1       Insert a disc.

                    2       If necessary, use the MONITOR button on the remote control to
                            switch to the internal tuner in the DVD recorder.

                    3       Use CHANNEL q or CHANNEL r to select the programme
                            number (channel name) you want to record.

                    4       Press REC/OTR n on the remote control.

                    5       Each time you press REC/OTR n you will add 30 minutes to the
                            recording time.


                            How can I cancel the recording time I have just entered?
                            To delete an entry, press CLEAR while the display shows the recording
                            time.
                            How can I check the remaining recording time?
                            Press SYSTEM-MENU while an OTR is in progress. The time at which the
                            recording will end will appear on the TV screen in the timer info box.    ?


                    Preventing accidental erasing of discs
                   To ensure you don't accidentally delete a recording you can protect the entire disc. You can
                   only ever protect the entire disc. You cannot protect individual recordings.


                            What happens with DVD+R discs?
                            As long as these discs are not finalised, they can be protected against
                            accidental erasure in the same way as DVD+RW discs.                       ?
                    1       Insert the disc to be protected.

                    2       While the index screen is displayed press STOP h on the remote
                            control. The first title is highlighted.

                    3       Press A . This takes you to the disc info screen.

                    4       Press the C button.
                            Select the 'Protection' line.
                            Confirm with C .

                    5       Select 'Protected' with the B button and confirm with OK .


Manual recording                                                                                           71
6        Press D and then DISC-MENU to terminate.

               The entire disc is now protected.
               If an attempt is made to record on a protected disc, 'DISC LOCK' will
               appear on the display and 'Disc locked' will appear on the screen.


               If you later decide to record on the disc, follow these steps but select
               'Unprotected' at step 5 .                                                      Tip


      Lining up recordings within a title
      (assemble cut)
     On a recorded DVD+RW disc you can add another recording to an existing title. This recording
     is added to the title as a 'chapter'. The existing information will be overwritten starting from this
     point. Titles will also be overwritten that follow the current title depending on the length of the
     new recording. The recording type (Quality) will be taken from the current title.
     To play back this recording, press SYSTEM-MENU and use the C button to select the 'C'
     (Chapter) symbol. You can also use the T/C key.

     For further information, see 'Changing to another title/chapter' in 'Playback'.


               What happens with DVD+R discs?
               New recordings on 'DVD+R' discs can only be added after existing recordings.
               It is not possible to overwrite existing recordings on 'DVD+R' discs.            ?


      1        In the index display, find the title to which the new recording is to be
               added.

      2        Look at the last minute of the old recording (playback)

      3        Press PAUSE 9 on the remote control at the position where the
               new recording is to go. '9' will appear on the screen.

      4        To monitor the recording you can press MONITOR to switch to the
               internal tuner.

      5        Now start recording as usual by pressing            REC/OTR n on the
               remote control.
               The new recording will be inserted.

      6        Stop recording with STOP h .


72                                                                              Manual recording
Selecting the recording type (picture
                    quality)
                   You can select the picture quality of the recording using the recording quality feature and hence


                                                                                                                         ENGLISH
                   the maximum recording time per disc.
                   To check the quality of a recording mode you can make a 'test recording' with the desired
                   recording mode. Check during playback the quality of this 'test recording'.
                   During playback, the correct picture quality will automatically be selected.


                    1       Switch on the TV set. If required, select the programme number for
                            the DVD recorder.

                            Select the record mode with the button REC MODE on the remote
                            control.


                             Which recording types can I choose?
                             Please observe, that you can not switch the recording type during
                             recording. You have to interrupt the recording with the
                              STOP h button.
                             'M1': High Quality offers the best picture quality and a recording time of 1
                             hour.
                             'M2': Standard Play (pre-recorded DVD quality) offers standard picture quality
                             and a recording time of 2 hours.
                             'M2x': Standard Play plus (better than S-VHS quality) offers standard picture
                             quality and a recording time of 2.5 hours.
                             'M3': Long Play (S-VHS picture quality). Recording time of 3 hours.
                             'M4': Extended Play (better than VHS picture quality). Recording time of 4
                             hours.
                             'M6': Super Long Play (VHS picture quality). Recording time of 6 hours.
                             'M8': Super Extended Play (VHS picture quality). Recording time of 8 hours.
                             Can I select the recording type via a menu as well?
                             1 Press the SYSTEM-MENU button.
                             2 Select '  A' symbol with    D or C .
                             3 Select 'Record settings' using B or A and confirm with C .
                             4 In the line 'Record mode' select the recording type with D or C .
                             5 Confirm using OK and SYSTEM-MENU .
                             6 If you have selected the recording mode 'M3', 'M4', 'M6' or 'M8', you
                                  can select the 'Stndrd' (Standard) or 'Sport' setting (for rapid
                                  movements) in the 'Filter mode' line.                                       Tip


Manual recording                                                                                                    73
Automatic recording from a satellite
      receiver (Sat recording)
     You can use this function if your own a satellite receiver that can control other devices via a
     scart cable and a programming function (timer). For more information, please see the operating
     instructions for the satellite receiver.


      1       Switch on the TV set. If required, select the programme number for
              the DVD recorder.

      2       Press SYSTEM-MENU on the remote control. The menu bar
              appears.

      3       Select 'A' symbol with D or C .


      4       Select 'Record settings' using B or A and confirm with C .

      5       Select 'Sat record' using B or A .

      6       Select 'EXT2' with D or C .


               Switching off 'Sat Recording'
               To switch off the function, select 'Off' using C or D .                   Tip
      7       Confirm with OK .

      8       Use a scart cable to connect scart socket EXT 2 AUX-I/O on the
              DVD recorder to the corresponding scart socket on the satellite
              receiver.

      9       To end, press SYSTEM-MENU .

      0       Insert a disc you want to use for recording.

      A       Programme the satellite receiver with the required information
              (programme number of the TV channel, start time, finish time).
              If necessary, please see the operating instructions for your satellite
              receiver.

      B       Switch off the DVD recorder using STANDBY m . 'SAT' also
              appears in the display to indicate that the function is active.


     The DVD recorder is now ready to record. The start and end of the recording is controlled via
     scart cable EXT 2 AUX-I/O .


74                                                                        Manual recording
Direct Record
                   Can you record the right TV channel in seconds when the DVD recorder is switched off? No
                   problem. If recording is started manually, the switched off DVD recorder takes the current TV
                   channel from the TV set via the scart cable.


                                                                                                                      ENGLISH
                   You will find more information on how to switch 'Direct record' on or off in the next section
                   'Direct record'.


                            How does Direct Record work?
                            The DVD recorder compares the TV channel selected on the TV set with its
                            stored TV channels via the scart cable. If the same TV channel is found, it
                            switches the DVD recorder to the corresponding programme number and
                            starts recording.
                            Please do not change channel on the TV during the search. This could affect
                            the tuning of the DVD recorder.                                                  ?
                    1       On the TV set, select the programme number you want make the
                            recording from.

                    2       Press REC/OTR n with the DVD recorder switched off.


                            a The display will read 'WAIT'
                            b The DVD recorder is comparing its saved TV channels with those of the
                              TV set. Please do not change the TV channel on the TV set while 'WAIT' is
                              shown in the display.

                            a 'NOTV' appears in the display
                            b This TV channel could not be found in the DVD recorder's memory.
                              Check that all TV channels saved on the TV set are available on the DVD
                              recorder. If required, save any missing channels. Please read 'Manual TV
                              channel search' in 'Installing your DVD recorder'.
                            b Check the connectors at both ends of the scart cable.
                            b Check your TV's operating instructions to see which scart socket is used
                              for video signals.
                            b If the problem persists, you won't be able to use this feature.             Problem
                    3       Stop recording with STOP h .


Manual recording                                                                                                 75
Switching 'Direct Record' on or off
     1   Switch on the TV set. If required, select the programme number for
         the DVD recorder.

     2   Press SYSTEM-MENU on the remote control. The menu bar
         appears.

     3   Select 'A' symbol with D or C .

     4   Select 'Record settings' using B or A and confirm with C .

     5   Select 'Direct Record' using B or A .

     6   Select 'On' (Direct Record on) or 'Off' (Direct Record off) using
          D or C .

     7   Confirm with OK .

     8   To end, press SYSTEM-MENU .

     9   Switch off with STANDBY m .


76                                                                Manual recording
K         Managing the disc contents

                                 General
                Charly 1
                00:29:59 • M1
                Fri15/02/2003   When a recording is made to disc, the following additional information is also stored at the
                                beginning of the recording:
                Empty title
                                •) Name of the recording
                01:30:01
                                If the TV station does not transmit a name, only the


                                                                                                                                    ENGLISH
                                channel number and time will be stored as the name
                                •) Length of the recording
                                •) Record type (Quality)
                                •) Date of the recording
                                •) Index picture of the recording

                                A marker will be set every 5-6 minutes if the 'Auto chapters' function is activated in the
                                'Record settings' menu. This marker is known as a 'chapter'.
                                These markers can be changed when the recording has finished.


                                          Can markers be set on a DVD+R disc?
                                          Markers can be set on these discs if they have not been finalised.             ?

                                It is also possible to add 'chapters' later. This means that scenes you do not want to see during
                                playback, such as commercials, can be hidden or skipped. During playback you can watch your
                                recording as a continuous sequence without the hidden chapters.


                                Select from the following chapters:

                                'Favorite Scene Selection',
                                to divide the title into chapters or to manage the chapters.

                                'Editing recording titles (name)',
                                to change the recording names.

                                'Play complete title',
                                to play the entire title including the hidden chapters.

                                'Delete recording/title'to delete the relevant title and therefore also the recording.

                                'Disc settings'to change the general settings of the disc.


Managing the disc contents                                                                                                   77
Favorite Scene Selection
                                                      In this menu you can adapt a title to suit your particular needs.
                                                      You can insert/delete chapter markers, hide chapters, select a new index, or split up a title.
                                                      Press EDIT on the remote control during recording to open this menu.


                                                      Insert chapter markers
                                                      During recording, you can set or delete chapter markers within a title.
                                                      The maximum number of chapters per disc is 124 and 99 per title. If one of these limits is
                                                      reached the following message will appear on the screen: 'Chapter limit'. You need to delete
                                                      some markers before you can insert new ones or make recordings.


                                                       1       During playback, press EDIT on the remote control at the
                                                               appropriate point. The 'Favorite Scene Selection' menu appears on
                                                               the TV screen.


                                                       2       Confirm 'Insert marker' by pressing          OK . 'Inserting marker'
                                                               appears on the TV screen.
                          Favorite Scene Selection

     Insert marker         Press OK
     Delete marker
     Delete all markers
                                                                'X' will appear on the screen:
     Current chapter       visible                              This DVD is write-protected or the disc is a finalised DVD-R. Subsequent
                                                                changes cannot be made.                                                       Tip
                                 Press EDIT to exit    3       To stop this function, press EDIT .


                                                      Hiding chapters
                                                      Initially, all the chapters are visible. You can hide chapters for playback (e.g. advertisements) or
                                                      make them visible again. In editing mode, hidden chapters are shown darker.
                                                      A chapter always consists of a start marker and an end marker.
                                                      To hide a certain scene, proceed as follows:


                                                       1       Search the beginning of the scene you want to hide. Press
                                                                PAUSE 9 .


                                                       2       Press EDIT on the remote control to call the 'Favorite Scene
                                                               Selection' editing menu.
                          Favorite Scene Selection
                                                       3       Set the start marker using OK .
     Insert marker         Press OK
     Delete marker
                                                               The number of chapters ('C') in the menu line will increase by one.
     Delete all markers
     Current chapter       visible                     4       Search for the end of the scene. You can also use O or N to
                                                               search faster for the end of the scene.
                                                               Make sure that you do not jump into the next title (title number 'T'
                                 Press EDIT to exit
                                                               must not change). Only chapters within a title can be hidden.

                                                       5       Press PAUSE 9 at the corresponding position.


78                                                                                                              Managing the disc contents
6       Set the end marker with OK . This will also be the start marker of
                                      the next chapter.
                                      The number of chapters ('C') in the menu line increases by one.

                                       a The number of chapters ('C') has increased by two or more
                                         numbers
                                       b This is the case when you want to hide a chapter that, due to automatic
                                         chapter numbering (if switched on), stretches over two or more chapters.


                                                                                                                                 ENGLISH
                                         In this case, you must delete the start of the automatically generated
                                         chapter:
                                       1 Press T/C twice while the editing menu is displayed to change the
                                           chapter number.
                                       2 Select the chapter between the new markers using B or A . Press
                                            PAUSE 9 .
                                       3 Select 'Delete marker' with B to delete the current chapter marker.
                                           Confirm with OK . The current chapter number decreases by one.           Problem

                              7       Press T/C twice to change the chapter number 'C'.

                              8       Select the previous chapter with B , since you are already in the
                                      next chapter (end of the chapter is also the beginning of the next
                                      chapter).

                              9       Wait until the chapter has been played and press PAUSE 9 to stop
                                      playback.

                              0       Select 'Current chapter' using B or A .

                              A       Using C select 'hidden'. The picture is shown darker.


                                       Switching quickly
                                       You can switch between show chapters ('visible') and hide chapters
                                       ('hidden') quickly and easily using SELECT .
                                       This function is independent from the selected line.                           Tip

                              B       To end, press EDIT .


                             During playback this chapter will be skipped.
                             If the chapter is not visible, select 'visible' in step 3 with C .


Managing the disc contents                                                                                                  79
Deleting chapter markers
                                                      Within a title you can delete either all markers or individual markers.


                                                       1       While the relevant chapter is playing, press EDIT on the remote
                                                               control. The 'Favorite Scene Selection' menu appears on the TV
                          Favorite Scene Selection             screen.
     Insert marker         Press OK
     Delete marker
     Delete all markers
     Current chapter       visible                              How can I select different chapters?
                                                                1 Press the T/C button on the remote control. Titles and chapters are
                                                                     displayed at the top of the screen.
                                 Press EDIT to exit
                                                                2 Select title (T) or chapter (C) with C or D .
                                                                3 Use A or B to select the title/chapter channel you want to edit.      Tip

                                                       2       Use B to select either 'Delete marker' for this chapter or 'Delete
                                                               all markers' for all chapters within the selected title.

                                                       3       Confirm with OK . (You will be prompted to press OK again to
                                                               make sure you really want to delete all markers. If you do not want
                                                               to, press the D button.)

                                                       4       To end, press EDIT .


                                                      Changing the index picture
                                                      Normally the picture from the begin of a recording is used as the index picture. You can
                                                      however choose any picture from the recording as the index picture.


                                                       1       During playback, search for location of the new index picture. Press
                                                               the PAUSE 9 button.


                                                       2       Press the EDIT button. The 'Favorite Scene Selection' menu
                                                               appears on the TV screen.
                          Favorite Scene Selection
                                                       3       Select line 'New index picture' and confirm with OK .
     New index picture     Press OK
     New background
     Divide title
                                                       4       Start the change with OK . 'Updating menu' appears on the TV
                                                               screen.


                                 Press EDIT to exit   Once the revision has been completed successfully the DVD recorder reverts to the index
                                                      overview.


80                                                                                                                Managing the disc contents
Changing the menu background
                                                     You can choose any frame from the recording as the menu background. This setting is stored on
                                                     the inserted DVD. Please note that after the modification the 'original background' will be lost.
                                                     If you erase the complete disc (close the disc tray with CLEAR and make a recording) the
                                                     'original background' will be restored.


                                                                                                                                                             ENGLISH
                                                      1       During playback, search for the location that is to be used as the new
                                                              menu background. Press the PAUSE 9 button.


                                                      2       Press the EDIT button. The 'Favorite Scene Selection' menu
                                                              appears on the TV screen.
                         Favorite Scene Selection
                                                      3       Select line 'New background' and confirm with OK .
     New index picture    Press OK
     New background
     Divide title
                                                      4       Start the change with OK . 'Updating menu' appears on the TV
                                                              screen.


                                Press EDIT to exit   Once the revision has been completed successfully the DVD recorder reverts to the index
                                                     overview.


                                                     Dividing titles
                                                     You can divide a title into several sections (titles) of any size. Each of these sections (titles) is
                                                     identified by its own index.
                                                     Note: This division cannot be undone.


                                                               Can I divide titles on DVD+R discs?
                                                               As recordings on DVD+R discs cannot be overwritten, it is not possible to
                                                               divide titles on DVD+R discs.                                                    ?

                                                      1       While the relevant title is playing, press EDIT on the remote control.
                                                              The 'Favorite Scene Selection' menu appears on the TV screen.
                         Favorite Scene Selection
                                                      2       Select 'Divide title' and confirm with the OK button.
     New index picture    Press OK
     New background
     Divide title
                                                      3       If you are sure, press OK to start the process. 'Dividing title'
                                                              appears on the TV screen.

                                                      4       Wait until the new title is displayed with an index picture in the index
                                Press EDIT to exit            picture overview.


                                                     The process of splitting the title is now complete.


Managing the disc contents                                                                                                                           81
Editing recording titles (name)
                                              Some TV stations transmit the title (name) of a programme. In this case, the name will be
                                              included automatically (e.g. 'ROCKY'). Otherwise, the only the programme number (programme
                                              name) and the time are stored as the name of the recording. The name of the recording can
                                              only be changed after the recording has been completed.


                                               1        If required, press the STOP h button to interrupt playback.

                                               2        Using A or B select the title whose name you want to edit and
     Settings for title Charly 1                        confirm with C . The menu for editing names appears.
     Name                          Charly 1
     Play full title                           3        Select 'Name' using A or B and confirm with C .
     Erase this title
                                               4        Using C or D select the position where the letter/number/icon is to
                                                        be changed/re-entered.

                                               5        Change the icon using A or B . You can switch between upper and
                                                        lowercase using SELECT . You can delete the character using
                                                         CLEAR .


                                                         How can I enter the characters with the buttons 0..9 ?
                                                         Press a number button as often as the required character or the number
                                                         appears. You can enter language dependent characters with the buttons
                                                          N or O on the corresponding character e.g.: ä, button 2 for 'a' and then
                                                         with O as often as 'ä' appears.
                                                         For special characters press the button 1 repeatedly.
                                                         The position for the following character will be selected automatically.
                                                         To enter a space press the button 1 .
                                                         To switch over to upper case characters press SELECT .
                                                         To erase a character press CLEAR .                                                ?

                                               6        Repeat 4 and 5 until you have made the changes you want.

                                               7        Save the new name with OK . 'Storing name' appears on the TV
                                                        screen for confirmation.

                                               8        To end, press D .


                                               Playing the entire title
                                              If you have hidden certain sections (chapters) of a title, this setting lets you watch the entire title
                                              including the hidden sections. To do this, proceed as follows:


                                               1        Press the STOP h button or during playback press DISC-MENU .

                                               2        Using A or B select the title you want to play all of and confirm
     Settings for title Charly 1                        with C . The title editing menu will appear.
     Name                          Charly 1
     Play full title               Press OK    3        Select 'Play full title' using A or B and confirm with OK .
     Erase this title
                                               4        Playback starts automatically. The title is played in its entirety -
                                                        including the hidden chapters.


82                                                                                                       Managing the disc contents
Erasing recordings/titles
                                                    You can erase specific recordings from a disc. To do this, proceed as follows:


                                                     1       Press the STOP h button or during playback press DISC-MENU .


                                                                                                                                                          ENGLISH
                                                     2       Using A or B select the title you want to delete and confirm with
      Settings for title Charly 1                            C . The title editing menu will appear.
      Name                           Charly 1
      Play full title                                3       Select 'Erase this title' using A or B and confirm with OK .
      Erase this title               Press OK                'This will completely erase this title' appears on the TV screen.
                                                              'Press OK to confirm'.

                                                     4       If you want to delete this title, press OK to confirm. Otherwise press
                                                              D.

                                                     5       'Erasing title' appears on the TV screen.

                                                     6       At this point 'Empty title' appears in the 'index picture display'. A
                                                             new recording can now be made here.
                                                             If the deleted title was very short (less than 1 minute) 'Empty title'
                                                             will not appear at this point.


                                                              Can titles be deleted from a DVD+R disc?
                                                              Titles on DVD+R discs are only marked as deleted. 'Deleted title' will appear
                                                              in the display instead of 'Empty title'. During playback the 'deleted' title is
                                                              skipped. The space used for this title cannot be used again as the title has not
                                                              been physically deleted. Once the disc has been finalised no further changes
                                                              can be made.                                                                       ?

                                                     Disc settings

                                    Philips1        This screen appears beforethe first title and contains general information about the current disc.
                                    00:35:59 used
                                    Fri15/02/2003   You can:
       PAL
                                                    •) change the name of the disc
                                                    •) activate or deactivate write protection on the disc
       DVD playback                                 •) Finish editing (make the disc DVD compatible)
                                                    •) finalise a DVD+R
                                                    •) delete a DVD+RW


                                                    To get to this display, proceed as follows:


                                                     1       Press the STOP h button or during playback press DISC-MENU .

                                                     2       Select the first title with A or press STOP h .

                                                     3       Press the A button. The disc info display will appear.


Managing the disc contents                                                                                                                           83
Changing the disc name
                                            1       In the 'Disc info display' press C . The 'Settings for' menu appears
                                                    on the TV screen.


                                            2       Select 'Disc name' using A or B and confirm with C .
     Settings for Philips1

     Disc name               Philips1       3       Using C or D select the position where the letter/number/icon is to
     Protection              Unprotected            be changed/re-entered.
     Erase disc
                                            4       Change the icon using A or B . You can switch between upper and
                                                    lowercase using SELECT . You can delete the character using
                                                     CLEAR .

                                            5       Repeat 3 and 4 until you have made the changes you want.

                                            6       Save the new title with OK . 'Storing name' appears on the TV
                                                    screen for confirmation.

                                            7       To end, press D .


                                           Finishing editing
                                           If one or more titles have been edited a DVD player may still display the original titles. You can
                                           prepare your DVD+RW disc in such a way that a DVD player will be able to play the edited
                                           version.


                                            1       In the 'Disc info display' press C . The 'Settings for' menu appears
                                                    on the TV screen.

                                            2       Select 'Make edits compatible' using A or B and confirm with
                                                     OK .


                                                     a 'Make edits compatible' does not appear
                                                     b Your disc is already compatible. There is no need for conversion.
                                                       To end, press SYSTEM-MENU .                                           Problem
                                            3       The screen displays 'This will take' to show how long the process
                                                    will last.

                                            4       To confirm press OK . 'Working' appears on the TV screen. A bar
                                                    will move from left to right indicating progress.


84                                                                                                      Managing the disc contents
Finalising DVD+R discs
                                            This feature is required to play back a DVD+R disc in a DVD player. Once the disc has been
                                            finalised no further recordings or changes can be made.


                                                                                                                                               ENGLISH
                                            1       In the 'Disc info display' press C . The 'Settings for' menu appears
                                                    on the TV screen.

                                            2       Select 'Finalise disc' using A or B and confirm with OK .


                                                     a 'Finalise disc' does not appear
                                                     b Either there is no DVD+R disc inserted or the disc is already finalised.
                                                       To end, press SYSTEM-MENU .

                                                     a The 'Settings for' menu does not appear
                                                     b The menu may not appear if the disc has been recorded on another DVD
                                                       recorder. In this case, use the 'Finalise disc' feature in the '  A
                                                                                                                        ' menu,
                                                       under 'Features'.                                                          Problem
                                            3       The screen displays 'This will take...' to show how long the process
                                                    will take.

                                            4       To confirm press OK . 'Working' appears on the TV screen. A bar
                                                    will move from left to right indicating progress.


                                            Erase DVD+RW disks
                                            1       In the 'Disc info display' press C . The 'Settings for' menu appears
                                                    on the TV screen.


                                            2       Select 'Erase disc' using A or B and confirm with OK . 'This
      Settings for Philips1                         will erase all titles' appears on the TV screen. Press OK to
      Disc name               Philips1              confirm'.
      Protection              Unprotected
      Erase disc              Press OK      3       If you want to delete all the titles, press OK to confirm. Otherwise
                                                    press D .

                                            4       'Erasing disc' appears on the TV screen.

                                            5       After deletion, the index picture display shows the free space on the
                                                    disc.


                                                     If the disc is empty already, you cannot select 'Erase disc'.                  Tip


Managing the disc contents                                                                                                                85
L    Programming a recording (TIMER)

               General
              Use 'Programming a recording (TIMER)', to automatically start and stop a recording at a later
              date.

              The DVD recorder will switch to the right programme number and begin recording at the
              correct time.
              With this DVD recorder, you can pre-programme up to six recordings within a period of one
              month.

              To make a programmed recording, your DVD recorder needs to know:
              * the date you want to make the recording
              * the programme number of the TV channel
              * the start and stop time of the recording
              * VPS or PDC on or off
              * the recording mode (picture quality) ('M1/M2/M2x/M3/M4/M6/M8')


                        Fit to space Recording
                        You can select also the recording mode 'FR' .
                        With these setting the recording mode (bit rate) will be automatically
                        calculated to use the complete empty space (title 'Empty').
                        If the empty space is too small the recording will be stopped to prevent the
                        following titles from being overwritten.                                             Tip

              This information is saved in a 'TIMER block'.
              Before you begin, make sure the clock is set. If the clock is not set, the 'Time/Date' menu will
              appear when you press the TIMER s button.


                        What is 'VPS/PDC'?
                        'VPS' (Video Programming System)/'PDC' (Programme Delivery Control) are
                        used to control the start and duration of TV channel recordings. If a TV
                        programme starts earlier or ends later than was scheduled, the DVD recorder
                        will then turn on and off at the correct time.
                        What do I need to know about 'VPS/PDC'?
                        • Usually the start time is the same as the VPS or PDC time. If a different
                          'VPS/PDC time' is indicated, e.g.: '20.15 (VPS/PDC 20.14)', the VPS/PDC time
                          '20.14' must be entered exactly to the minute during programming.
                          If you want to programme a time that is different from the VPS or PDC time,
                          you must switch off VPS or PDC.
                        • Only one TV program of a TV channel can be controlled using 'VPS/PDC' at a
                          time. If you want to record two or more TV programmes on a TV channel
                          using 'VPS/PDC', you will need to programme these as two separate
                          recordings.
                        • Since the DVD recorder requires a certain lead time (for getting the disc up to
                          speed and positioning the laser) before recording can start, it is possible that
                          the recorder will miss the first few seconds of a TV show recorded with
                          VPS/PDC.
                          In this case, disable VPS/PDC and enter a start time one minute earlier.            ?


86                                                               Programming a recording (TIMER)
Programming recordings with the
                                   ShowView® System


                                                                                                                                 ENGLISH
                                  Thanks to this programming system, you no longer need to tediously enter the date, programme
                                  number, start and finish times. All the information needed by the DVD recorder for
                                  programming is contained in the ShowView® programming number. This 9-digit ShowView®
                                  number is found in most TV listings magazine.

                                   1       Switch on the TV set. If required, select the programme number for
                                           the DVD recorder.

                                   2       Press TIMER s on the remote control.
                                           The programming method selected last is marked.

                                   3       Select 'ShowView system' using B or A and confirm with C .


                                   4       Enter the entire ShowView number. This number is up to 9 digits long
                                           and can be found next to the start time of the TV programme in your
                                           TV listings magazine.
                                           e.g.: 5-312-4 or 5,312 4
                                           Enter 53124 for the ShowView-number.
                                           If you make a mistake, you can clear your instructions with CLEAR .


 Timer
   ShowView system
                                           Selecting daily/weekly recordings
    ShowView number                        Using SELECT , select from the following options:
      ---------                            'Mo-Fr': Repeated daily recordings (Monday to Friday).
                                           'Weekly': Repeated weekly recordings (every week on the same day).      Tip


 Mo-Fr/Weekly          To store
 Press SELECT         Press OK


                                   5       Confirm with OK .


Programming a recording (TIMER)                                                                                           87
a The following message appears on the screen: 'Please enter
                                                        programme number'
                                                      b The programme number of the TV channel has not yet been assigned to
                                                        the ShowView number. Use C , D or the number buttons 0..9 on the
                                                        remote control to select the appropriate programme number (name) of the
                                                        TV channel and confirm with OK .

                                                      a The following message appears on the screen: 'ShowView number
                                                        wrong'
                                                      b The entered ShowView number is incorrect. Correct your entry or cancel
                                                        using the SYSTEM-MENU button.
                                                      b Check the time/date (see 'Setting the time & date' in 'Installing your DVD
                                                        recorder').

                                                      a The following message appears on the screen: 'Weekend
                                                        programming not possible'
                                                      b A daily recording was entered for the wrong day. Daily programming can
                                                        only be used for recordings to be made from Monday to Friday.                  Problem

 Timer                                       6       The decoded data appears after confirmation. You can go back and
   ShowView system                                   change the data. Select the appropriate input field with C or D . If
                        VPS         Rec              required, make changes using A , B or the number buttons 0..9 .
     Date   Prog. Start PDC End     Mode
     01     BBC1 20:15      21:30   M2
                                                      'Switching on 'VPS/PDC' in the 'Start' input field
                                                      Select the 'Start' input field using C . Using SELECT switch on 'VPS/PDC'
                                                      ('*' lights up). If you press SELECT again, you will switch 'VPS/PDC' off ('*'
                                                      goes out).
 Mo-Fr/Weekly                    To store             Changing the recording mode in input field 'End'
 Press SELECT                   Press OK              Select the 'End' input field using C .
                                                      Use REC MODE to select the recording mode 'M1, M2, M2x, M3, M4, M6,
                                                      M8'.
                                                      Fit to space Recording
                                                      You can select also the recording mode 'FR' .
                                                      With these setting the recording mode (bit rate) will be automatically
                                                      calculated to use the complete empty space (title 'Empty').
                                                      If the empty space is too small the recording will be stopped to prevent the
                                                      following titles from being overwritten.
                                                      Do not use this function under the following conditions:
                                                      •) more then one programmed recording
                                                      •) daily/weekly repeated recordings
                                                      •) recordings with VPS/PDC
                                                      May be the calculation of the recording mode can not function properly.            Tip

                                             7       If all information is correct, press the OK button. The programming
                                                     information is stored in a TIMER block.

                                             8       To end, press TIMER s .

                                             9       Insert a recordable disc (one without write protection).
                                                     The inserted disk is checked.

                                             0       Search the position on the disc where the recording should begin.
                                                     Press STOP h .

                                             A       Switch the DVD recorder off with STANDBY m .
                                                     The programmed recording will only function properly if the DVD
                                                     recorder has been switched off using the STANDBY m button.


                                            If any of the TIMER blocks are in use, 'TIMER' will light up on the recorder display.


88                                                                                          Programming a recording (TIMER)
Programming recordings without the
                                            ShowView® System


                                                                                                                                              ENGLISH
                                            1       Switch on the TV set. If required, select the programme number for
                                                    the DVD recorder.

                                            2       Press TIMER s on the remote control.
                                                    The programming method selected last is marked.


 Timer                                      3       Select line 'Timer programming' with B or A . and confirm with
   Timer programming                                the C button.
                       VPS         Rec              The information will appear on the screen.
    Date   Prog. Start PDC End     Mode
    01     BBC1 20:15      21:30   M1
                                            4       Select the input field with D or C .

                                            5       Enter information with B or A or with the number buttons 0..9 .

                                                     Selecting daily/weekly recordings
 Mo-Fr/Weekly                   To store
 Press SELECT                  Press OK              In 'Date' use SELECT to select from the following options:
                                                     'Mo-Fr': Repeated daily recordings from Monday to Friday
                                                     'Mon': Repeated weekly recordings (every week on the same day, e.g.
                                                     Monday).
                                                     Programme numbers of the 'EXT1' and 'EXT2'scart socket
                                                     You can also programme recordings from external sources via scart socket
                                                     EXT 1 TO TV-I/O ('EXT1') or EXT 2 AUX-I/O ('EXT2').
                                                     'Switching on 'VPS/PDC' in the 'Start' input field
                                                     Select the 'Start' input field using TIMER s . Using SELECT switch on
                                                     'VPS/PDC' ('*' lights up). If you press SELECT again, you will switch
                                                     'VPS/PDC' off ('*' goes out).
                                                     Changing the recording quality in input field 'End'
                                                     Select the 'End' input field using C .
                                                     Use SELECT to select the recording mode.                                      Tip

                                            6       If all information is correct, press the OK button. The programming
                                                    information is stored in a TIMER block.

                                            7       To end, press TIMER s .

                                                    The disc you have inserted will be checked.

                                            8       Search the position on the disc where the recording should begin.

                                            9       Switch off with STANDBY m .
                                                    The programmed recording will only function properly if the DVD
                                                    recorder has been switched off using the STANDBY m button.


                                           If any of the TIMER blocks are in use, 'TIMER' will light up on the recorder display.


Programming a recording (TIMER)                                                                                                          89
How to change or delete a programmed
                                                     recording (TIMER)

                                                    1       Switch on the TV set. If required, select the programme number for
                                                            the DVD recorder.

                                                    2       Press TIMER s on the remote control.
                                                            The programming mode selected last is marked.

                                                    3       Select 'Timer List' using B or A and confirm with C .


 Timer                                              4       Select the programmed recording (TIMER) you want to check, change
   Timer List                                               or delete with B or A .
                            VPS            Rec
     Date       Prog. Start PDC End        Mode
     01         BBC1 20:15 *    21:30      M2
     --         ----- --:--     --:--      --                Delete programmed recording
                                                             1 Press the CLEAR button.
                                                             2 Confirm with      OK . 'Timer Cleared' will briefly appear on the TV
         Total record time: 01:15                              screen.
                                                               '-- ---' appears rather than the displayed values
 To change                                To exit
 Press ›                            Press TIMER              3 To end, press TIMER s .                                                Tip

                                                    5       Press C .
                                                            Select the input field with D or C .
                                                            If required, change the information with A , B or the number
                                                            buttons 0..9 .

                                                    6       Confirm with OK .

                                                    7       To end, press TIMER s .

                                                    8       Switch off with STANDBY m .


                                                     'NexTView Link'
                                                    This DVD recorder is equipped with the 'NexTView Link' feature. If your television is also
                                                    equipped with this function, you can mark TV programmes on the television for programming.
                                                    These TV programmes will automatically be transmitted to a TIMER block on the DVD
                                                    recorder. If you clear the marking of the TV programme on the television, the corresponding
                                                    TIMER block on the DVD recorder will also be cleared.
                                                    For more information, read the instruction manual of your TV set.


90                                                                                             Programming a recording (TIMER)
Problem solving for programmed
                               recordings


                                                                                                                               ENGLISH
 PROBLEM                  SOLUTION
The DVD recorder is      bWhile a programmed recording is being made, you cannot operate your DVD recorder manually.
not responding            If you want to cancel the programmed recording, press STANDBY m .

'Switch off, timer       bThe DVD recorder was switched on a few minutes before the start of a programmed recording.
recording' flashes on     Switch off the DVD recorder using STANDBY m . A programmed recording (timer) will only
the TV screen.            function if the DVD recorder is switched off ( STANDBY m button).

                         bEither a disc has not been inserted or the disc cannot be used for recording. Insert a disc on
Error message: 'Insert    which recordings can be made.
recordable disc'          Search the position on the disc where you want the recording to begin.
                          Switch off the DVD recorder using STANDBY m .

The error message
                         bA write-protected disc has been inserted. Undo the write protection (see 'Preventing accidental
'Disc locked' appears     erasing of discs' in 'Manual recording') or insert a different disc.
briefly on the screen.
                         bIf this error message appears after pressing TIMER s , then all TIMER blocks are already
Error message:            programmed. No more recordings can be programmed. Press the C button. If you want to clear
'Memory full'             or check a programmed recording (TIMER block), select it with A or B .

The 'Data error'
                         bThe data for the recording could not be transferred. Please check date, start time and finish time
message appears on        of the programmed recording.
the screen.
                         bTwo programmed recordings overlap.
The 'Collision'          bIf you ignore this error message the show with the earlier start time will be recorded first. The
message appears on        start of the second show will not be recorded.
                         bChange the setting for either of the two recordings.
the screen.
                         bClear either of the two recordings


Programming a recording (TIMER)                                                                                           91
M           User preferences
                                            In this section you will learn how to set your user preferences on the DVD recorder. The
                                            symbols have the following meanings:


                                            t                         Picture setting

                                            v                         Sound setting

                                            u                         Language setting

                                            w                         Additional settings

                                            x                         Remote control settings
                                                                      Control the DVD recorder using the remote control of your Philips TV
                                                                      set

                                            s                         Disc settings

                                            z                         Recording settings

                                            y                         Installation


                                             1       Switch on the TV set. If required, select the programme number for
                                                     the DVD recorder.

                                             2       Press SYSTEM-MENU on the remote control. The menu bar
                                                     appears.

                                             3       Select 'A' using D or C and confirm with B .

                                             4       Select the appropriate function with B or A and confirm with C .

                                             5       Select the appropriate line using B or A and confirm with C .

                                             6       Select the appropriate function using B or A or the setting with
                                                      D or C .

                                             7       Confirm the new setting by pressing OK .

                                             8       To close the menu item, press D .


                                             Picture settings
                                            You can choose the following features in this menu:


                                            'TV shape'
                                            The picture signal from your DVD Recorder can be set to match your TV screen.
                                  Picture
     TV shape            16:9
     Black level shift   Off
                                            '4:3 letterbox': for a 'wide-screen' picture with black bars at the top and bottom
     Video shift                ï           '4:3 panscan': for a full-height picture with the sides trimmed.
     RGB attenuation      ï                 '16:9' : for a wide-screen TV set (screen edge ratio 16:9)
     Video output        RGB + CVBS


                                            'Black level shift'
                                            Adapts the colour dynamics for NTSC playback when switched to 'On'


92                                                                                                                 User preferences
'Video shift'
                   Use this feature to adjust the position of the picture on your TV left or right using D , C to
                   suit your TV set.


                   'RGB attenuation'


                                                                                                                          ENGLISH
                   With the buttons D , C you can attenuate or amplify the RGB-signal on the input socket EXT
                   2 AUX-I/O These setting concerns only the input signal. The RGB output signal on the socket
                   EXT 1 TO TV-I/O leaves unchanged.


                   'Video output'
                   Since RGB and S-Video signals sometimes use the same connections on a scart cable, the two
                   signals cannot be transmitted simultaneously. With these settings, you can decide whether RGB
                   or S-Video signals should be transmitted. This setting affects only the scart sockets of the DVD
                   recorder ( EXT 1 TO TV-I/O output socket and EXT 2 AUX-I/O input socket).
                   Please also observe which signals are available at which scart socket of the TV set or how the
                   scart sockets need to be switched.
                   If necessary, consult the instruction manual of your TV set.

                             Which settings can I select?
                             'RGB + CVBS' Depending on the TV set you are using, switching between the
                                           'RGB' and the 'Video(CVBS/FBAS)' signal is done automatically.
                                           If the picture scrolls to the side or the colour quality is poor
                                           on some TV sets when the setting is 'RGB + CVBS', you
                                           must select 'CVBS only'.
                             'S-video only' Both scart sockets ( EXT 1 TO TV-I/O output socket and
                                             EXT 2 AUX-I/O input socket) process only the S-Video signal.
                                            In case the scart socket of the TV set is not suitable for S-Video
                                            (Y/C) signals, you will only see a black-and-white picture,
                                            although the recording will be made in colour.
                                            Moreover, only the video (CVBS, FBAS) signal will be used for
                                            recordings via the EXT 1 TO TV-I/O scart socket.
                                            Please observe that when making recordings from a video
                                            recorder that transmits only video (CVBS/FBAS) signals through
                                            the scart cable, recordings via scart socket EXT 2
                                            AUX-I/O may be made in black and white.
                                            Therefore, use this setting with caution.
                             'CVBS only' Only the video (CVBS/FBAS) signal is transmitted regardless of
                                         the video signals (RGB, Y/C) on the scart sockets. This setting is
                                         selected automatically when no 'RGB' or 'S-VIDEO' signal is
                                         detected at the scart socket.
                             When selecting the settings 'S-video only' or 'CVBS only', the RGB signal
                             is switched off.                                                                    ?


User preferences                                                                                                     93
Sound settings
                                        Depending on which audio outputs are used, you can select the settings in this menu.
                                        If you only use the analogue audio output ( AUDIO L/R OUT ), select the settings 'Off' in the
                                        'Digital output' menu.


                                        'Digital output'
                                        You can select one of the following settings for devices that are connected to the COAX
                                Sound
     Digital output    All
                                        OUT or OPTICAL AUDIO OUT sockets:
     Analogue output   Stereo
     Night mode        Off              'All': Dolby Digital and DTS signals are fed unaltered to the digital output. MPEG-2 multi-channel
                                               signals are converted to PCM (Pulse Code Modulation).
                                               For receivers/amplifiers with digital multi channel sound decoders.
                                        'PCM only: Dolby Digital and MPEG-2 multi-channel signals are converted to PCM (Pulse Code
                                                       Modulation).
                                                       For receivers/amplifiers without digital multi channel sound decoders.
                                        'Off: Digital output switched off.
                                               For devices with analogue audio input.


                                        'Analogue output'
                                        For devices connected to the analogue audio output ( AUDIO L/R OUT ), you can select from
                                        the following settings.

                                        'Stereo': For devices without DolbySurround or TruSurround. Use this setting if the DVD
                                                  recorder is only connected to a stereo TV set.

                                        'Surround: Dolby Digital and MPEG-2 multi-channel are mixed down to a DOLBY
                                                   surround-compatible two-channel output signal.
                                                   For devices with Dolby Surround Pro Logic decoder .


                                        'Night mode'
                                        Night mode optimises the sound for playback at low volume. You are therefore less likely to
                                        disturb your neighbours. This only works for Dolby Digital audio on DVD video discs.


94                                                                                                              User preferences
Language settings
                                              You can choose the following settings in this menu:


                                                                                                                                                     ENGLISH
                                              'Audio Language'
                                              Playback audio language
                                  Language
       Audio Language     English
       Recording audio
       Subtitle
                          Language 1
                          English
                                              'Recording audio'
       Menu               English
       Country            Other
                                              Selection of audio recording for bilingual programmes


                                              'Subtitle'
                                              Subtitle language


                                              'Menu'
                                              Screen menu language


                                              'Country'
                                              Select the country you currently live from the list


                                               Additional settings
                                              You can select the following functions in this menu:


                                              'Status box'
                                              Along with the on screen menu, the OSD (On Screen Display) also displays information on the
                                   Features
       Status box         On
                                              current operating status (counter, playback, recording, TV channel, etc.) on the TV screen.
       Live source view   On                  You can switch off the information about the operating status so that the on screen display
       Auto standby       On                  (OSD) is not recorded during copying.
       Standby            Normal
       Display            Bright              'On': The OSD information appears in every selected mode for a few seconds and disappears
                                                    again.

                                              'Off': The OSD information is switched off. It is no longer displayed on the screen.


                                              'Live source view'
                                              With this function you can switch between the live picture or the information of the selected TV
                                              channel/input socket in the 'Tuner information box' (left-hand corner of the screen).

                                              'On': The live picture of the selected TV channel or signal on the input sockets is visible.

                                              'Off': The information about the selected TV channel or signal on the input sockets is visible.


User preferences                                                                                                                                95
'Auto standby'
     If you haven't used the DVD-recorder for a few minutes in certain modes (e.g.: STOP), it will
     switch to standby automatically. You can cancel this function to use the DVD-recorder as a
     television receiver.

     'On': The DVD-Recorder leave switched on.

     'Off': The DVD-Recorder will be switched to standby.


     'Standby'
     To save power, you can switch off the clock display on the DVD recorder. Programmed
     (TIMER) recordings will still take place.
     In addition, you can present the most important features of the DVD recorder in scrolling text
     in the display (demo).

     'Low power': If the DVD-Recorder is switched off (button STANDBY m ), the clock display is
                  also switched off.

     'Normal': If the DVD-Recorder is switched off (button STANDBY m ), the clock display is
               visible.

     'Demo mode': If the DVD recorder is switched off with the STANDBY m button, a list of the
                  most important features is shown in the display.


     'Display'
     You can change the brightness of the display on the DVD recorder. This setting only affects the
     DVD recorder when it is switched on.
     You can also adjust this setting with the DIM button on the remote control.

     'Bright': The display appears with normal brightness.

     'Dimmed': The display appears less bright.

     'Off': The display is switched off.


      Remote Control settings
     In this menu you can set the remote control type to which your DVD recorder should respond.

     'DVD player': The DVD recorder responds to the supplied remote control and the remote
                   control of a DVD player (remote control code RC-6).
                   Choose this setting if your Philips TV remote supports DVD functions.
     'DVD recorder': The DVD recorder only responds to the supplied remote control.


96                                                                        User preferences
Disk feature menu
                                              In this menu you can make the changes that relate to the disc:


                                                                                                                                                       ENGLISH
                                              'Access control'
                                              Please read the next chapter on 'Access control (child lock)'.
                              Disc features
       Access control   Enter code…
       Auto resume      On
                                              'Auto resume'
                                              If playback of a pre-recorded DVD video disc or video CD is interrupted (button STOP h or
                                               OPEN/CLOSE J ) when the disc is reloaded (disc is started) playback starts at the precise
                                              location where it stopped. This applies not only to the current disc but to the last 20 discs
                                              played.

                                              This feature can be switched off if not required.


                                              'PBC'
                                              This line appears only if a VCD is loaded.
                                              This function lets you activate or deactivate the PBC menu (Playback Control) for video CDs.
                                              See 'Playing a (Super) Video CD'.


                                              'Finalise disc'
                                              This feature allows you to finalise DVD+R discs. If the disc has already been finalised this line will
                                              appear darker.


                                              'Adapt disc format'
                                              If a DVD+RW has been recorded in a computer drive or in another DVD recorder the index
                                              screen may not be displayed correctly.
                                              This feature allows you to change the format of the disc.
                                              It is therefore only visible if the disc format is different.


User preferences                                                                                                                               97
N          Access control (Child Lock)

                                             Child lock (DVD and VCD)
                                            This feature enables discs to be locked for children.
                                            When Child Lock is on, a 4-digit code (PIN) needs to be entered before a disc can be played.
                                            You can also decide whether the inserted disc should always be played or should be played only
                                            once, despite the child lock

                                            •)'Play always':
                                            This disc is stored in a memory with space for 50 child-safe discs. If more than 50 discs are
                                            stored, the last disc in the list is removed and the new disc is added. The screen shows 'Child
                                            safe' at the start of playback.

                                            •)'Play once':
                                            This disc is only authorised for single playback. If the recorder is switched off, the PIN code
                                            must be re-entered.


                                            Activating/deactivating child lock
                                             1       Switch on the TV set. If required, select the programme number for
                                                     the DVD recorder.

                                             2       Switch on the DVD recorder using STANDBY-ON m .

                                             3       Press SYSTEM-MENU . The menu bar appears

                                             4       Select the 'A' icon using D or C .

                                             5       Select 's(Disc features)' using B or A and confirm with C .


                                             6       Confirm 'Access control' using C .

                                             7       Enter a 4-digit code of your choice. If the code is new, you may have
                            Disc features            to enter the code a second time as confirmation.
     Access control   Enter code…
     Auto resume      On                     8       Select 'Child lock' using A or B and confirm with C .

                                             9       Select the 'i' icon using B or A .

                                             0       Confirm with OK .

                                             A       Quit the feature using D and SYSTEM-MENU .


                                            Unauthorised discs can only be played by entering the four-digit PIN code.
                                            To deactivate the child lock, select the 'n' icon in 9 .


98                                                                                                Access control (Child Lock)
Authorising a disc
                               1       Insert a disc. The access control box will appear after a short delay.

                               2       Using A or B select 'Play once' or 'Play always'.


                                                                                                                                    ENGLISH
                               3       Enter your PIN code using the number buttons 0..9 .


                              Double-sided DVDs may have a different ID for each side. For these discs, each side must be
                              authorised. Video CDs may have a different ID for each disc. For these CDs, each disc must be
                              authorised.


                              Locking unlocked discs
                              To lock a disc that was formerly authorised follow the instructions below


                               1       Insert a disc. Playback starts automatically. If the playback does not
                                       start automatically, press PLAY G .

                               2       Press the STOP h button while the 'm' icon is visible. The icon
                                       changes to 'l'. The disc is now locked.


                               Parental level control (DVD video only)
                              Films on pre-recorded DVD discs may contain scenes not suitable for children. Therefore, some
                              discs may contain 'Parental Control' rating information that applies to the entire disc or to
                              certain scenes on the disc.
                              The appropriate scenes have filter values that reach from 1-8. If such a scene is detected during
                              playback, the filter value set on the DVD recorder is compared to the scene. If the filter value is
                              higher than the setting, an alternative scene will be played (if available).
                              Most DVDs apply the rating to an entire DVD. Therefore, if certain scenes exceed the rating
                              you select, the entire disc will be blocked from viewing.


                              Activating/deactivating parental level
                              control
                               1       Switch on the TV set. If required, select the programme number for
                                       the DVD recorder.

                               2       Switch on the DVD recorder using STANDBY-ON m .

                               3       Press SYSTEM-MENU . The menu bar appears

                               4       Select the 'A' icon using D or C .


Access control (Child Lock)                                                                                                 99
5       Select 's(Disc features)' using B or A and confirm with C .


                                              6       Confirm 'Access control' using C .

                                              7       Enter a 4-digit code of your choice. If the code is new, you may have
                             Disc features            to enter the code a second time as confirmation.
      Access control   Enter code…
      Auto resume      On                     8       Select the 'Parental level' using A or B and confirm with C . A
                                                      bar appears to select the parental level.

                                              9       Select the appropriate rating using B , A or the number buttons
                                                       0..9 .


                                                       What do the ratings mean?
                                                       Rating 0 (displayed as '--') parental control not active.
                                                       Rating 1 (suitable for children)
                                                       Rating 8 (only suitable for adults)
                                                       What happens if a DVD scene contains a higher level than the rating
                                                       set?
                                                       If the recorder does not find a suitable alternative, playback will stop and you
                                                       must enter the four-digit code.                                                    Tip

                                              0       Confirm with OK . Quit using D and SYSTEM-MENU .


                                             Changing the country
                                             The set filter values depend on the respective country. It is therefore necessary to enter the
                                             country to which these filter values apply.


                                              1       Switch on the TV set. If required, select the programme number for
                                                      the DVD recorder.

                                              2       Switch on the DVD recorder using STANDBY-ON m .

                                              3       Press SYSTEM-MENU . The menu bar appears

                                              4       Select the 'A' icon using D or C .

                                              5       Select line 's(Disc features)' using B or A and confirm with C .


                                              6       Confirm the line 'Access control' using C .

                                              7       Enter your four-digit code. If the code is new, you may have to enter
                             Disc features            the code a second time as confirmation.
      Access control   Enter code…
      Auto resume      On                     8       Select 'Change country' using B or A and confirm with C .

                                              9       Select the corresponding country using A or B and confirm with
                                                       OK .

                                              0       To end, press D and then SYSTEM-MENU .


100                                                                                                         Access control (Child Lock)
Changing the PIN code

                                              1   Switch on the TV set. If required, select the programme number for
                                                  the DVD recorder.


                                                                                                                                 ENGLISH
                                              2   Switch on the DVD recorder using STANDBY-ON m .

                                              3   Press SYSTEM-MENU . The menu bar appears

                                              4   Select the 'A' icon using D or C .

                                              5   Select 's(Disc features)' using B or A and confirm with C .


                                              6   Confirm 'Access control' using C .

                                              7   Enter your four-digit PIN code. If the code is new, you may have to
                              Disc features       enter the code a second time as confirmation.
       Access control   Enter code…
       Auto resume      On                    8   Select 'Change code' using A or B and confirm with C .

                                              9   Enter the new code using the number buttons 0..9 . Enter the same
                                                  code again as confirmation.

                                              0   Quit using D and SYSTEM-MENU .


                                                  I have forgotten my code
                                                  Press STOP h four times (step 7 ), then press OK . Access control is
                                                  now switched off. You can now enter a new code as described above.     Tip


Access control (Child Lock)                                                                                                101
O        Before you call an engineer
                              If you have any problems using this DVD recorder, the reason may be one of the following. You
                              can also call the customer service centre in your country.
                              The telephone numbers can be found on the back of this instruction manual.
                              You can also visit our web page 'http://www.p4c.philips.com' .
                              Have the model number (MODEL NO) and the production number (PROD.NO) of your
                              recorder ready.
                              The production number (PROD. NO.) is printed on the type plate at the back.


 PROBLEM                  SOLUTION
Your recorder does
not respond to any       bRecorder in initial installation mode: Switch on the TV, switch over to the DVD recorder socket.
button being pressed      Now the menu for language selection should appear. Please read paragraph 'Initial Installation' in
                          the chapter 'Installing your DVD Recorder'.
and the display shows
'IS TV ON?':
                         b'Dealer-Mode' is switched on: All buttons on the front of the set are locked.
                          Switch off the function:
The device does not
                          1 Pull out the mains plug from the wall outlet.
react when you press a    2 Press and hold down h and OPEN/CLOSE J and put back the mains plug into the wall
button, although the          outlet.
remote control works:     3 As soon as the time or '--:--' appears in the display (ca. 6 - 10 seconds), release h and
                               OPEN/CLOSE J .


Your DVD recorder        bThere is no power supply: check the power supply
                         bA programmed recording (Timer) is currently being made: If desired, cancel the programmed
does not respond to
                          recording (Timer) with STANDBY m .
any button being         bThere is a technical problem: disconnect from the mains power supply for 30 seconds, then
pressed:                  connect again.
                          If this doesn't help, you can reset your DVD recorder to the default factory settings.

                         bImportant:
                          All the information stored (TV channels, time and date, TIMER) will be lost.
                          1 Disconnect from the mains power supply.
Resetting the machine
                          2 Press and hold down the STANDBY-ON m button on the device and reconnect to the
to the default factory         mains power supply.
settings                  3 Release the STANDBY-ON m button when 'IS TV ON?' appears on the display. All the
                               information stored (TV channels, time and date, TIMER) will be lost.
                          Please read paragraph 'Initial Installation' in the chapter 'Installing your DVD Recorder'.

                         bRemote control not pointed toward the DVD recorder: Point the remote control at the machine.
                          See if the 'o(((' appears on the display briefly each time you press a remote control button. If it
Remote control does       does, the Recorder is receiving information from the remote correctly.
not work:                bThere is a technical problem: Take out the batteries, wait for 10 seconds and put them in again.
                         bBatteries are flat: Change the batteries.


102                                                                                     Before you call an engineer
PROBLEM                      SOLUTION
                              bData transfer is controlled via pin nr. 10 of the scart cable. It is possible that the connection to
                               this pin is interrupted or that the signal is distorted by an additional device connected to the
                                EXT 2 AUX-I/O socket.
                              bRemove any scart switch boxes, mixing consoles, signal amplifiers, ... connected between the DVD
 Data transfer from TV         recorder and the TV set. Connect the DVD recorder directly to the TV set.


                                                                                                                                      ENGLISH
                              bRemove any additional devices from the EXT 2 AUX-I/O socket.
 set via 'EASYLINK'           bTry using another scart cable (all pins wired).
 does not work:               bPlease observe the installation order:
                               1) Switch on the TV set
                               2) Connect the DVD recorder to the mains
                               3) Switch on the DVD recorder using STANDBY m
                               4) The data transfer should now work.

                              bThere is no recording on the disc: Change disc.
                              bYou inserted the wrong disc type: Your recorder can play back the following disc types: DVD
                               Video, (Super)Video CD, DVD+R(W), Audio CD, , MP3-CD's
                              bYou inserted the disc the wrong way: Insert the disc with the label facing upwards
 No playback on DVD           bDisc is dirty: Clean the disc
 recorder:                    bWrong region code: The region code of the DVD and the DVD recorder must match.
                              bParental control is on: Read chapter 'Access control (child lock)'
                              bYou have selected the wrong programme number for the DVD recorder on the TV: on the TV,
                               select the correct programme number for the DVD recorder.
                              bThe cable connecting the TV set and the DVD recorder has come loose: check the cable.

                              bIt is possible that this (Super) Video CD contains a menu and the 'PBC' is switched off. You can
                               see this in status field 'PBC OFF'. To activate this function, proceed as follows:
                               1 Press SYSTEM-MENU while the (Super) Video-CD is inserted .
 I cannot playback             2 Select 'A' using D or C .
 (Super) Video CDs             3 Select line 'Features' using B or A and confirm with C .
                               4 Select 'On' in line 'PBC' using B or A .
                               5 Confirm with OK and end with SYSTEM-MENU .


 Poor playback on DVD
                              bYour TV set is not properly adjusted.
 recorder: (distorted         bDisc is dirty: Clean the disc
 picture/distorted            bSometimes the picture may be temporarily distorted. This is not a defect of your DVD recorder.
 sound)
                              bThe TV channel you want to record is not stored or you selected the wrong programme number:
                               Check TV channels stored.
 No recording possible:       bDisc write-protected (recording protected): Remove write-protection or change the disc. For
                               more information, please see 'Preventing accidental erasing of discs' in chapter 'Manual Recording'.
                              bAn already finalised DVD+R has been inserted: Change disc.

                              bYou have programmed the wrong time or date: Check time/date.
                              bIf the time and date are wrong despite setting them by hand, you can switch 'SMART CLOCK'
 Programmed                    (Clock preset) off. See 'Setting the time/date' in 'Installing your DVD recorder'.
                              bYou have not set the TIMER properly: Check the programmed recordings (TIMER block).
 recording does not           bLocked disc inserted: Remove disc lock.
 work:                        bAn already finalised DVD+R has been inserted: Change disc.
                              b'VPS/PDC' switched on but 'VPS/PDCtime' wrong: 'Enter 'VPS/PDCtime exactly to the minute.
                               Check the aerial.


Before you call an engineer                                                                                                     103
PROBLEM                  SOLUTION
The wrong TV channel
                          1    Enter the ShowView programming number of the TV channel you want.
was decoded
                          2    Confirm with OK .
(recorded) after you      3    Check the programme number/channel name in the 'Prog.' input field.
programmed a              4    If this does not correspond to the desired TV channel, select the input field and change the
recording using                programme number/channel name.
ShowView System.          5    Confirm with OK .

                         bBefore recording, select the recording mode as described in chapter 'Manual Recording', section
There is picture or       'Selecting the recording mode (quality)'.
sound interference on    bHave your aerial checked.
                         bYou will find information on how to change the TV system in 'Manual TV channel search' in
TV reception:
                          'Installing your DVD recorder'.

Distorted sound
coming from a            bThe DVD recorder is connected to the 'Phono-input' of your amplifier: This socket is provided
connected hi fi           only for record players without a preamplifier. Select a different audio input.
amplifier
The picture is           bThe TV system of the disc does not match that of your TV set (PAL/NTSC).
distorted or             bThe recording can be made in colour only when the TV channels or the connected additional
black and white during    device send a colour signal. Black-and-white signals containing no color information (colour
                          subcarriers) cannot be recorded.
playback
No sound signal at the   bCheck whether the sound settings match the selected inputs and connected additional devices.
digital output            For more information, see section 'Sound setting' in chapter 'User preferences'.

                         bIf a recording is too short, it is possible that a DVD player cannot detect it: Please observe the
                          following 'Minimum recording times':
                          Recording mode 'M1': 5 minutes, 'M2': 10 minutes, 'M2x': 13 minutes, 'M3': 15 minutes, 'M4': 20
                          minutes, 'M6': 30 minutes, 'M8': 30minutes,
                         bSome DVD players cannot play back DVD+RW recordings. You can solve this problem by using a
                          special function:
A DVD+RW disc             1 Open the disc tray with OPEN/CLOSE J . Insert the disc but do not close the tray.
                          2 Hold down the number button 2 on the remote control until the tray closes. The disc is
cannot be played on
                               modified.
certain DVD players       3 If this fails to produce the desired result, repeat the procedure using the number button
                                3 on the remote control.
                          4 You can restore the disc to its original condition by pressing 1 .

                          Warning!
                          There is a risk that you can no longer play the disc on other DVD players after this procedure.
                          Therefore, apply this function with particular care.


104
PROBLEM                    SOLUTION
                           bIf it is impossible to play back a disc, you can try and repair it for new recordings using the
                            following function. This will only prepare the disc for erasing. It will not be erased, however, until
                            the recording has been completed.
Other disc errors           1 Clean the disc
                            2 Open the disc tray with OPEN/CLOSE J . Insert the disc but do not close the tray.
(DVD+RW)


                                                                                                                                     ENGLISH
                            3 Hold down CLEAR on the remote control until the tray closes. The disc is prepared for
                                 erasing.
                            4 Start recording as with an empty disc.


                           bThis message may appear if you instert a disc that was not finalised. DVD+R's that have not been
                            finalised are very sensitive to fingerprints, dust, or dirt. This may cause problems during recording.
                            To use the disc again, follow the next steps
                            1 Make sure that the surface of the disc is clean.
                            2 Open the disc tray with OPEN/CLOSE J . Insert the defect DVD+R but do not close
Other disc errors                 the tray.
(DVD+R), 'Disc              3 Hold down 5 on the remote control until the tray closes. The disc will be read ('READING'
                                  appears on the display) and the DVD recorder will start the repair process. This may take up
contains unknown                  to four times as much time as the recording, in which the error occurred.
data'                       4 If the disc is recovered, the index screen will appear.

                            Please observe the following:
                            Error during recording: The title may be missing.
                            Error while changing the title/index picture: The original title/index picture may be visible.
                            Error while finalising: The disc appears not to have been finalised.


                           bYou can finalise the disc using the following function:
                            1    Open the disc tray with OPEN/CLOSE J . Insert the defect DVD+R but do not close
The index screen                 the tray.
flickers when a DVD+R       2    Hold down 4 on the remote control until the tray closes.
is inserted                      'FINALIZE' appears in the display. Finalising begins. This may take up to three minutes.
                            3    If finalising has been successful, the index screen will appear.

                           bThe function 'Automatic Satellite Recording' is switched on.
                            If the DVD-Recorder is switched off, the symbol 'SAT' appears in the bottom left corner of the
                            display.
                            If the DVD-Recorder is switched on, instead of the clock, '__:__' appears with a red background
If I switch on a device,    in the 'Tuner-Info-Field' (bottom left corner of the screen)
connected to the EXT
                            To switch off the function procede as follows:
2 AUX-I/O socket, the
                            1 Press SYSTEM-MENU .
DVD Recorder starts a
                            2 Select with B the line 'Record settings' (second menu page)
recording.                  3 Select in line 'Sat record' with D 'Off' instead of 'EXT2'.
                            4 Confirm the change with OK .
                            5 End with SYSTEM-MENU .


                                                                                                                              105
3103 605 20991                                                    ENGLISH   DEUTSCH
3401/000         (Wwn N Nw n wWNnwNwnNnNwWnNwnwN) DVDR 77/00-02


 106
PHILIPS NORGE AS                      PHILIPS                                   PHILIPS PORTUGUESA, S.A.
                                     Sandstuveien 70,                      Philips Austria GmbH                      Consumer Information Centre
                                     PO Box 1, Manglerud                   Triesterstrasse 64                        Rua Dr. António Loureiro Borge, nr. 5
                                     N-0612 Oslo                           1101 Wien                                 Arquiparque, Miraflores
                                     NORWAY                                AUSTRIA                                   P-2795 L-A-VEHLA
                                     Phone: 2274 8250                      Tel: 0810 00 12 03                        PORTUGAL
                                                                                                                     Phone: 352-1-4163063


                                     OY PHILIPS AB                         PHILIPS INFO CENTER                       PHILIPS CE, The Philips Centre,
                                     Sinikalliontie 3,                     Alexanderstrasse 1                        420 - 430 London Road,
                                     02630 Espo                            20099 Hamburg                             Croydon, Surrey
                                     Helsinki                              GERMANY                                   CR9 3QR
                                     FINLAND                               Tel: 0180-535 6767                        UNITED KINGDOM
                                     puh. (09) 6158 0250                                                             Phone: 0870-900-9070


                                     PHILIPS KUNDTJÄNST                    SERVICE CONSOMMATEURS PHILIPS             PHILIPS KUNDECENTER
                                     Kollbygatan 7,                        BP 0101                                   Frederikskaj 6,
                                     Akalla,                               75622 Paris Cédex 13                      DK-1780 København V
                                     16485 Stockholm                       FRANCE                                    DENMARK
                                     SWEDEN                                Phone: 0825-889 789                       Tlf: 808 82814
                                     Phone: 08-5985 2250


                                     PHILIPS POLSKA                        PHILIPS ELECTRONICS IRELAND LIMITED       PHILIPS REPRESENTATION OFFICE
                                     AL. Jerozolimskie 195B                Consumer Information Centre               Ul. Usacheva 35a
                                     02-222 Warszawa                       Newstead, Clonskeagh                      119048 MOSCOW
                                     POLSKA                                DUBLIN 14                                 RUSSIA
                                     Tel.: (022)-571-0-571                 Phone: 01-7640292                         Phone: 095-937 9300


                                     PHILIPS SERVICE                       PHILIPS CONSUMER ELETRONICS               PHILIPS INFO CENTER
                                     V Mezihori 2                          Servizio Consumatori                      Fegistrasse 5
                                     180 00 Prage                          Via Casati 26                             8957 Spreitenbach
                                     CZECH REPUBLIC                        20052 Monza - Milano                      SUISSE
                                     Phone: (02)-3309 330                  ITALY                                     Tel.: 0844-800 544
                                                                           Phone: 800 820026


                                     PHILIPS Iberia, S.A.                  PHILIPS MÁRKASZERVIZ                      PHILIPS CUSTOMER CARE CENTER
                                     C/Martinez Villergas, 49              Kinizsi U 30-36                           Twee Stationsstraat 80/
                                     28027 MADRID                          Budapest 1119                             80 Rue des Deux Gares
                                     SPAIN                                 HUNGARY                                   1070 BRUSSEL/BRUXELLES
                                     Phone: 902-113 384                    Phone: (01)-382 1700                      BELGIUM (for BENELUX)
                                                                                                                     Tel: 070-222 303
(Wwn N Nw n wWNnwNwnNnNwWnNwnwN)


                                                   ΦΙΛΙΠΣ ΕΛΛAΣ AΕΒΕ                                 PHILIPS CONSUMENTENLIJN
                                                   25ΗΣ MAΡΤΙΟΥ 15                                   t.a.v. betreffende afdeling
                                                   177 78 ΤAΥΡΟΣ                                     Postbus 102 5600 AC Eindhoven
                                                   AΘΗΝA                                             NETHERLANDS
                                                   Τηλ. 0 0800 3122 1280                             Phone: 0900-8406
                          3103 605 20991
                          3401/000


                                                                           www.philips.com


                                     DVDR 77/00 02

Dvdr77 17b Dfu Aen

  • 1.
    Table of contents AIntroduction.................................... 3 FPlayback ........................................ 38 Dear Philips customer, .................................................................................... 3 General notes on playback ........................................................................... 38 Regional code .................................................................................................... 6 Inserting a disc ................................................................................................ 38 Technical data ................................................................................................... 6 Playing a DVD video disc .............................................................................. 39 Accessories ........................................................................................................ 6 Playing a DVD+RW/ +R disc ....................................................................... 40 Important ........................................................................................................... 7 Playing an audio CD ....................................................................................... 40 Cleaning the discs ............................................................................................. 8 Playing an MP3 CD ......................................................................................... 41 Special functions of your DVD recorder .................................................... 9 Playing a (Super) Video CD ......................................................................... 42 BConnecting the DVD recorder ... 11 GAdditonal playback features ........ 43 Preparing the remote control for operation ........................................... 11 Changing to another title/chapter .............................................................. 43 Connecting your DVD recorder to the TV set ...................................... 11 Searching a disc ............................................................................................... 43 Connecting with a scart cable and 'Easy Link' .......................................... 12 Still picture ....................................................................................................... 44 Connecting with a scart cable without 'Easy Link' .................................. 14 Slow motion .................................................................................................... 44 Connecting with an S-Video(Y/C)cable ..................................................... 15 Search by time ................................................................................................. 45 Connecting with video(CVBS) cable .......................................................... 16 Repeat/Shuffle play ......................................................................................... 45 Repeating a passage (A-B) ............................................................................ 46 CConnecting additional devices .... Scan feature ..................................................................................................... 46 18 Camera angle ................................................................................................... 46 Zoom feature .................................................................................................. 47 Connecting additional devices to the second scart socket ................... 18 Select the audio language .............................................................................. 47 Connecting a video recorder, DVD player. ............................................. 18 Subtitles ............................................................................................................ 47 Connecting an external receiver (satellite receiver, set-top box, HDisc Manager (DM) ...................... cable TV box,...) .............................................................................................. 19 Connecting additional devices only via aerial cable ................................ 19 Connect camcorder to the front sockets ................................................ 20 48 Connecting audio devices to the analogue audio sockets .................... 20 General information ...................................................................................... 48 Connecting audio devices to the digital audio sockets .......................... 21 Adding a disc to the Disc Manager ............................................................. 48 Removing discs from the Disc Manager .................................................... 49 DInstalling your DVD recorder ...... Searching for a title in the Disc Manager .................................................. 50 22 Searching discs ................................................................................................ 50 Searching for a blank section ....................................................................... 51 Initial installation ............................................................................................. 22 IThe 'Digital Photo Manager' ....... Using a satellite receiver ............................................................................... 24 Allocating a decoder ...................................................................................... 25 Connection using a component video (Y Pb Pr/YUV) cable ................ 26 52 Manual TV channel search ............................................................................ 27 The PC (PCMCIA) Card ............................................................................... 53 Sorting TV channels automatically (Follow TV) ...................................... 29 Inserting the PC Card ................................................................................... 53 Automatic TV channel search ..................................................................... 30 Removing the PC Card ................................................................................. 53 Sorting and deleting TV channels manually .............................................. 31 Showing JPEG pictures from a roll ............................................................. 54 Setting the language/country ........................................................................ 32 Editing JPEG pictures ..................................................................................... 55 'Recording audio' switching over (2-channel sound) .............................. 33 Slide show ........................................................................................................ 55 Setting the time and date .............................................................................. 34 Advanced editing of the JPEG pictures ...................................................... 56 Creating an album .......................................................................................... 58 EOn screen information ................ Adding pictures to an album ........................................................................ 58 35 Changing the picture order within an album ........................................... 59 Editing pictures in an album ......................................................................... 59 Symbols in the menu bar .............................................................................. 35 Making a 'DVD compatible' slide show ..................................................... 60 Menu bar 1 ....................................................................................................... 35 Making a slide show from an album ........................................................... 60 Menu bar 2 ....................................................................................................... 35 Making a slide show from a roll .................................................................. 60 Field for temporary messages ..................................................................... 35 Storing rolls/albums on a DVD+RW/+R .................................................. 61 Status field ........................................................................................................ 36 Preparing a DVD+RW/+R ........................................................................... 61 Disc type symbols .......................................................................................... 36 Transfer the photos to a DVD+RW/+R ................................................... 62 Operating mode symbols ............................................................................. 36 Changing roll settings .................................................................................... 63 Tuner information box ................................................................................. 37 Changing the rolls name ............................................................................... 63 'Live picture' in the 'Tuner information box' ........................................... 37 Changing the rolls date ................................................................................. 63 Timer information box ................................................................................. 37 Calling roll overview directly ....................................................................... 63 Deleting a roll .................................................................................................. 64 Table of contents
  • 2.
    Changing album settings............................................................................... 64 Changing the disc name ................................................................................ 84 Changing the cover picture .......................................................................... 64 Finishing editing ............................................................................................... 84 Changing the album name ............................................................................ 64 Finalising DVD+R discs ................................................................................. 85 Changing the album date .............................................................................. 65 Erase DVD+RW disks ................................................................................... 85 Calling the album overview directly ........................................................... 65 LProgramming a recording Copying an album ........................................................................................... 65 Erasing an album ............................................................................................. 66 Changing the media settings ........................................................................ 66 Problem solving for 'Digital Photo Manager' ............................................ 67 (TIMER) .............................................. 86 General ............................................................................................................. 86 JManual recording .......................... 68 Programming recordings with the ShowView® System ......................... Programming recordings without the ShowView® System ................... How to change or delete a programmed recording (TIMER) ............. 87 89 90 General ............................................................................................................. 68 'NexTView Link' ............................................................................................. 90 Recording without automatic switch-off ................................................... 69 Problem solving for programmed recordings .......................................... 91 Interrupt recording (Pause) ......................................................................... 70 Recording with automatic switch-off (OTR one-touch-recording) .... 71 Preventing accidental erasing of discs ........................................................ Lining up recordings within a title (assemble cut) .................................. 71 72 MUser preferences .......................... 92 Selecting the recording type (picture quality) .......................................... 73 Picture settings ................................................................................................ 92 Automatic recording from a satellite receiver (Sat recording) ............ 74 Sound settings ................................................................................................. 94 Direct Record ................................................................................................. 75 Language settings ............................................................................................ 95 Switching 'Direct Record' on or off ........................................................... 76 Additional settings .......................................................................................... 95 Remote Control settings .............................................................................. 96 KManaging the disc contents ......... 77 Disk feature menu .......................................................................................... 97 General ............................................................................................................. Favorite Scene Selection ............................................................................... 77 78 NAccess control (Child Lock) ........ 98 Insert chapter markers ................................................................................. 78 Child lock (DVD and VCD) ......................................................................... 98 Hiding chapters ............................................................................................... 78 Activating/deactivating child lock ................................................................ 98 Deleting chapter markers ............................................................................. 80 Authorising a disc ........................................................................................... 99 Changing the index picture .......................................................................... 80 Locking unlocked discs .................................................................................. 99 Changing the menu background ................................................................. 81 Parental level control (DVD video only) .................................................. 99 Dividing titles ................................................................................................... 81 Activating/deactivating parental level control .......................................... 99 Editing recording titles (name) .................................................................... 82 Changing the country .................................................................................. 100 Playing the entire title ................................................................................... 82 Changing the PIN code ............................................................................... 101 Erasing recordings/titles ................................................................................ 83 Disc settings .................................................................................................... 83 OBefore you call an engineer ....... 102 Table of contents
  • 3.
    The remote control REC/OTRn Record: Record the current TV channel ENGLISH STANDBY m Switch on or off: To switch set on or off, interrupt menu function, interrupt a programmed recording (TIMER) TIMER s TIMER: To make a TIMER programming with/without ShowView® or to alter or clear a programmed TIMER REC MODE Record type (Picture quality): To select the maximum possible record time PLAY MODE Playback type: Choose between repeat, shuffle play and intro-scan TV/DVD TV/DVD switch: Switches the scart socket EXT 2 AUX-I/O of the DVD recorder directly to the TV set. This lets you watch the picture from any unit connected to this scart socket (set-top box', video recorder or satellite receiver) and at the same time record from another source. If you have not connected a device to the EXT 2 AUX-I/O socket or the device is switched off, you can use this button to switch between TV reception and the signal of the DVD recorder. But this only works if you use a scart cable to connect the TV set to your DVD recorder ( EXT 1 TO TV-I/O socket) and your TV set responds to this switch-over. MONITOR Monitor: This button lets you switch between disc playback or the picture of the internal tuner (TV channel). DIM Dimmer: This button lets you change the brightness of the display to one of two levels or switch it off. RETURN Back: Return to previous menu on a video CD (VCD). This also works with some DVDs. T/C Title/Chapter: Choose the 'B'(Title)/'C'(Chapter) directly from the menu bar using B , A . If 'INFO' appears in the display, the index menu from a recorded disc or an introductory film will be shown. In this case, this function is not available. SUBTITLE Subtitle : Select the subtitle language AUDIO Audio: Selecting the audio language. For recording or during playback using the internal tuner ( MONITOR key), select language 1 or 2. ANGLE Angle: Select the camera angle ZOOM Zoom: Enlarge the picture DISC MANAGER Disc Manager: Call up or cancel the Disc Manager EDIT EDIT: For displaying the edit menu for DVD+RW/+R discs, for setting chapter markers, for editing the photos in the 'Digital Photo Manager' SELECT Select: Select function/value/photos PHOTO Digital Photo Manager: Open the 'Digital Photo Manager' DISC-MENU Disc menu: To show the DVD menu or the index screen, to leave the 'Digital Photo Mamger'
  • 4.
    SYSTEM-MENU System menu: Call up/cancel the main menu (menu bar at the top of the screen) D C A B Cursor keys : Cursor left, right, up, down CHANNEL q Plus : Next programme number CHANNEL r Minus : Previous programme number OK Store/confirm: To store or confirm entry PLAY G Playback: To play a recorded disc. N Select previous title/search backwards : Briefly press the button during playback: Previous chapter/film or previous title Hold down the button: Search backwards Hold down button during still picture, slow motion backwards STOP h Stop: Stop playback/recording, except with programmed recordings (TIMER) Hold down button, opens and closes the disc tray. PAUSE 9 Pause (still picture): If this button is pressed during playback, the DVD recorder switches to pause. You will see a still picture. If this button is pressed during recording, the DVD recorder will also switch to pause. O Select next title/search forwards : Briefly press the button during playback: Next chapter/film or next title Hold down the button: Search forwards Hold down button during still picture, slow motion forwards 0..9 Number /Letter buttons: To enter numbers or letters in appropriate entry fields CLEAR Delete: To delete last entry or clear programmed recording (TIMER) Additional TV functions This will only work with TV sets with the same remote control code *RC5) (e.g. Philips TV sets) TV VOLUME q TV volume: Increase TV volume TV VOLUME r TV volume: Reduce TV volume MUTE y TV sound off: Switch TV sound on/off For the following functions you need to hold down the button at the left side • TV and then select the function you need with the appropriate button. STANDBY m Switching the TV off 0..9 Number buttons: 0 - 9 CHANNEL q TV programme number: To select a higher programme number CHANNEL r TV programme number: To select a lower programme number
  • 5.
    Front of thedevice ENGLISH STANDBY-ON m Switch on or off: To switch off or on, interrupt a function, interrupt a programmed recording (TIMER) OPEN/CLOSE J Open/close disc tray: Open/close disc tray MEDIA SLOT Media Slot for PC (PCMCIA) cards (adapters) EJECT Eject PC (PCMCIA) card: RECORD Record: Record the current TV channel G Playback: To play a recorded disc N Select previous title/search backwards O Select next title/search forwards h Stop: Interrupt playback/recording Behind the flap at the right hand corner on the front Switching between the S-VIDEO and VIDEO sockets takes place automatically. If a signal is available at both sockets at the same time, the signal at the S-VIDEO socket has priority. S-VIDEO S Video socket: Connection of SVHS/Hi8 camcorders or SVHS/Hi8 video recorders (programme number 'CAM1') Yellow socket Video input socket: Connection of camcorders or video recorders VIDEO (programme number 'CAM1') White/red socket Audio input socket left/right : Connection of camcorders or video left AUDIO right recorders (programme number 'CAM1') DV IN i Link/DV socket (digital video input, IEEE 1394, FireWire): Connecting a digital camcorder or other suitable device (programme number 'CAM2').
  • 6.
    Back of thedevice 4MAINS Mains socket: Connection to the mains supply (230V/50Hz) ANTENNA IN Aerial input: Connection of the aerial TV OUT Aerial output: Connection of the TV set EXT 2 AUX-I/O Scart socket 2: Connection of an additional device (satellite receiver, set-top box, video recorder, camcorder, etc.). RGB input EXT 1 TO TV-I/O Scart socket 1: Connection of a TV set. RGB output Output sockets (AUDIO/VIDEO OUT) S-VIDEO (Y/C) OUT S Video output: Connection of an S-Video-compatible TV set VIDEO (CVBS) Video output (yellow socket): Connecting a TV set with a video OUT input (CVBS, Composite Video) AUDIO L/R OUT Analogue audio output (white/red socket): Connection of a TV set with audio input sockets or connection of an additional device COMPONENT Component Video output (red/blue/green socket): Connection VIDEO OUT of an additional device with Component Video input Output sockets (DIGITAL AUDIO OUT) COAX OUT Coaxial digital audio output OPTICAL AUDIO Optical digital audio output OUT
  • 7.
    The symbols onyour DVD recorder display ENGLISH These symbols can light up on your DVD recorder display: Multi-function display/text line •) Clock •) Disc/title playing time •) OTR switch-off time •) Title name •) Display of the programme number of the TV channel/playing time/channel name/function. •) Display of information and alerts IIIIIIIIIIIIIII Disc bar: Displays the current position on the disc (disc pointer). Play/Record: Single flashing segment at the current position. Pause: Flashing segment on both sides of the current position. Stop: Illuminated segment at the current position. SAT An automatic recording from a satellite receiver (SAT recording) has been programmed. TIMER A recording (timer) has been programmed o((( A remote control signal has been received VPS/PDC Video programming system / programme delivery control: A VPS or PDC code will be transmitted for the selected TV program LANG II During playback a 2-channel tone was detected or a 2-channel tone was received. 'I' or 'II' lights up depending on which sound channel has been selected (button AUDIO )
  • 8.
    Messages in theDVD recorder display READING The following messages may appear in your DVD recorder display IS TV ON? The DVD recorder is in initial installation mode. Switch the TV on, then read the paragraph on 'Initial installation' in 'Installing your DVD recorder'. NO SIGNAL No input signal available (signal inadequate or unstable) MENU The menu on the screen is active OPENING Disc tray opening TRAY OPEN Disc tray open CLOSING Disc tray closing READING Disc being read MENU UPDT Once recording has been successfully completed the table of contents is created. INIT MENU The menu structure is created after the first recording has been made on a new disc COPY PROT You received a copy-protected signal. This may come from a copy-protected DVD/videotape of a DVD/video player or from a TV channel. WAIT Please wait until this message disappears. The DVD recorder is busy performing a task. NO DISC A disc has not been inserted for recording. If a disc has been inserted, it cannot be read. INFO Information about the inserted DVD is displayed on the screen BUSY The DVD recorder is processing the changes to make them DVD compatible ERASING The entire disc is erased EMPTYDISC The disc inserted is either new or has been completely erased (no recordings). PROTECTED The disc is protected against recording. MAX TITLE The maximum number of titles per disc has been reached. The maximum number of titles on a disc is 48. MAX CHAP The maximum number of chapters within a title/or the disc has been reached. The maximum number of chapters within a title is 99, on a disc 124. DISC FULL The disc is full. There is no space for new recordings PAL DISC A disc with PAL recordings has been inserted. The machine is trying to record an NTSC signal. Insert a new disc or one that contains NTSC recordings.
  • 9.
    NTSC DISC A disc with NTSC recordings has been inserted. The machine is trying to record a PAL signal. Insert a new disc or one that contains PAL recordings. RECORDING An illegal action (e.g. OPEN/CLOSE J button) was attempted during recording. FREETITLE Playback was started for an empty title or the following title is empty. ENGLISH DISC LOCK An attempt has been made to record during playback of a protected disc. This message appears if an attempt is made to insert a chapter marker ( EDIT button). DISC ERR An error occurred when writing the title. If this error keeps occurring, please clean the disc or use a new one. For instructions on how to clean a disc see the section on 'Cleaning the discs' in the next chapter. DISC WARN An error occurred when writing the title. Recording was continued; the error was skipped SETUP After the automatic search the menu for setting the date/time will appear on the screen. WAIT 01 During the automatic channel search the TV channels found will be counted. BLOCKED The disc tray cannot be closed/opened. SAFE REC The new recording will be added at the end of all the other recordings (SAFE RECORD). EASYLINK Data transfer 'EasyLink' from the TV is in progress POST-FORMAT After the creation of the menu structure the disc is prepared PHILIPS The DVD-Recorder has been switched on STANDBY The DVD-Recorder has been switched off PHOTO The 'Digital Photo Manager' is switched on VIDEO The 'Digital Photo Manager' will be switched off SAVING Data will be written on the inserted memory card or on a DVD+RW/+R
  • 11.
    A Introduction Dear Philips customer, Instruction manuals are usually very dry since they are technically-oriented and often poorly translated. I have therefore been employed by Philips to help you. ENGLISH Allow me to introduce myself. My name is Phil. I will be guiding you through the instruction manual and helping you get to know your new DVD recorder. At appropriate points along the way, I will be providing you with the following information: Question: (?) Tip Problem Here I will be explaining Here I will be giving you Here I'll help you identify seemingly unimportant instructions on functions the cause of a problem and things. that will make it easier for find a solution. you to use your DVD recorder. I hope you have lots of fun. Phil P.S. If you have any problems operating the machine, please read the section entitled 'Before you call an engineer'. If this doesn't help you to resolve the problem, please call the customer support service for your country. The telephone numbers and e-mail addresses can be found on the last page of this instruction manual. You can also visit the website 'http://www.p4c.philips.com' . Introduction 3
  • 12.
    Welcome to thegrowing family of owners of PHILIPS equipment. Thank you for buying a DVDR 77/00-02 . Please take the time to read this operating manual before using your DVD recorder. It contains important information on how to set up and operate the machine. The DVD recorder should not be turned on immediately after transportation from a cold to a hot area or vice versa, or in conditions of extreme humidity. Wait at least three hours after transporting the machine. The DVD recorder needs this time to acclimatise to its new environment (temperature, relative humidity, etc.). Your Philips team hopes your new DVD recorder will bring you many years of enjoyment. What is a DVD? DVD (Digital Versatile Disc) is a storage medium that combines the convenience of the compact disc with the latest digital video technology. DVD video uses modern MPEG2 data compression technology that enables an entire feature film to be stored on a single five inch disc. How good is the resolution of DVD compared with VHS? The razor-sharp digital images have a resolution of more than 500 lines of 720 pixels per line. This is more than twice as high as VHS and is even better than the laser disc. Its picture quality is easily comparable to the digital masters produced in recording studios. What can DVD+RW do? DVD+ReWritable uses phase change media, the same technology on which rewritable CDs are based. A high-performance laser is used to change the reflective properties of the recording layer; this process can be repeated more than a thousand times. What can the DVD+R do? DVD+R (write-once DVD). Unlike a DVD+RW disc, this disc can only be written to once. If it is not finalised after a recording, further recordings can be added to it. Old recordings can be deleted but can no longer be overwritten. The deleted titles are marked 'Deleted title'. Before this disc can be played in a DVD player, it must be finalised in the DVD recorder. Once this process is complete, no further recordings can be added. What can my DVD recorder do? Your Philips DVD recorder is a machine for recording and playing back digital video discs with "two-way" compatibility with the universal DVD video standard. This means: •) existing DVD video discs can be played on the recorder. •) Recordings made on your DVD recorder can be played on other DVD video players and DVD ROM drives. ? 4 Introduction
  • 13.
    Discs you canuse The following discs can be used in your DVD recorder for playback and recording: ENGLISH Playback and recording DVD+RW (Digital Versatile Disc + rewritable) DVD+R (Digital Versatile Disc + Recordable) Playback only: DVD Video (Digital Versatile Disc) DVD-R (DVD-Recordable). These discs can only be played back if the recording was made in video mode and the recording was finalised. DVD-RW (DVD-Rewritable) These discs can only be played back if the recording was made in video mode and the recording was finalised. Audio CD (Compact Disc Digital Audio) Super Audio CD (Only plays the CD layer of a hybrid SACD disc) Video CD (Format 1.0, 1.1, 2.0) Super Video CD CD-R (CD-Recordable) Audio/MP3 content CD-RW (CD-Rewritable) Audio/MP3 content Picture CD, CD-R/RW with JPEG content Introduction 5
  • 14.
    Regional code Since DVD films are not normally released in all parts of the world at the same time, all DVD players have a specific regional code. Discs can be given a regional code. If the regional codes differ between the player and the disc, playback is not possible. DVDs must be marked 'ALL' for all regions or '2' for region 2 to work in this machine. If the DVD is marked with a different region, it cannot be played in this DVD recorder. The number within the globe represents the region. Regional code 2 represents: Europe, Japan, South Africa, Middle East (incl. Egypt). Technical data Voltage: 220-240V/50Hz Power consumption: 30W Power consumption (standby): less than 3W (clock display off) Measurements in cm (W/H/D): 43.5/7.6/33.5 (Disc tray closed), 47.2 (disc tray open) Weight without packaging approx.: 4.0kg Power outage/no power: Channel and timer information remain saved for up to 1 year, the time is saved for up to 12 hours. Operating position: maximum 10 degree inclination in all directions Ambient temperature: 15 C - 35 C Humidity: 25% - 75% Accessories Operating instructions Guarantee booklet Quick install guide Remote control and batteries Aerial cable Mains cable Scart cable (AV-Euro cable) 6 Introduction
  • 15.
    Important Caution: ENGLISH Visible and invisible laser radiation. If the cover is open, do not look at the beam. Because of the risk of eye injuries, only qualified service engineers should open the machine and carry out maintenance or repair work. LASER Type: Semiconductor lasers InGaAlP (DVD), AlGaAs(CD) Wavelength: 660nm (DVD), 780nm (CD) Output power (outside the lens): 20mW (DVD+RW write), 0.8mW (DVD read), 0.3mW (CD read). Beam divergence: 82 degrees (DVD), 54 degrees (CD) Danger. High voltage! Do not open. You run the risk of getting an electric shock. The machine does not contain any user-serviceable parts. Please leave all maintenance work to qualified personnel. There are some components in the DVD recorder that keep running as long as the recorder is connected to the power supply. To switch off the DVD recorder completely you must unplug it from the power supply. If you disconnect the DVD recorder from the mains, make sure to take the plug out of the wall socket and not just remove the connector from the 4MAINS socket at the back of the unit. Children could seriously injure themselves at the free, live end of the cable. These operating instructions have been printed on non-polluting paper. Please dispose of old batteries safely. Please take the packaging to your local recycling centre. This electronic equipment contains a large number of materials that can be recycled. If you are disposing of an old machine, please take it to a recycling centre. Introduction 7
  • 16.
    When installing therecorder in a cupboard ensure there is a gap of approximately 2.5 cm (1 inch) around the recorder to enable air to circulate freely and prevent overheating. Make sure that air can circulate freely through the ventilation slots on the machine. The machine should be placed on a firm surface. Make sure that no objects or liquids enter the video recorder. Do not place vases or similar on the DVD recorder. If you spill liquid in the recorder, immediately disconnect it from the power supply and call after-sales service for advice. Keep the DVD recorder away from radiators and other heat sources and protect from direct sunlight. Do not place any combustible objects on the device (candles, etc.). Make sure that children do not place any foreign objects in any of the openings. Cleaning the discs Some malfunctions (frozen or distorted picture and broken sound for example) are due to dirt on the disc. To avoid such problems you should clean your discs regularly. 1 Dirty discs should be cleaned with a soft cloth. Always wipe from the middle to the edge. 2 Do not use any solvents such as benzine, thinners, commercially available cleaning agents or antistatic sprays designed for vinyl records. Can I use a CD lens cleaner in the DVD recorder? This optical unit (laser) of the DVD recorder operates at a higher power level than the ones in normal DVDs and CD players so CD lens cleaner discs may actually damage it. CD lens cleaner discs should therefore not be used. ? 8 Introduction
  • 17.
    Special functions ofyour DVD recorder Your PhilipsDVD recorder has a number of special functions to make it easier to use and to enhance your enjoyment. ENGLISH Philips provides the best possible connection between your DVD recorder and other home cinema equipment. Using the 'Digital Photo Manager', you can view and modify JPEG pictures from a memory card, Picture CD, DVD, or a CD ROM. You can store them on a DVD+RW/+R or on the memory card. You can create slide shows and play them on a DVD player. The Type-2 PC Card slot (media slot) allows you to use an ATA Flash Card or other memory cards using a PC Card adapter. The DVD recorder is controlled by external devices (receivers, TV sets and so on) via Cinema Link and is automatically set to the right system settings. This function automatically transfers all the television channel settings onto your DVD recorder via the scart cable ( EXT 1 TO TV-I/O socket). Recordings made on your DVD recorder can be controlled from an external satellite receiver. At the touch of a button your DVD recorder, even though it is switched off, will check which channel is currently playing on your television and record it. This connector is also known as a 'FireWire' or 'IEEE 1394'. This connector is used to transmit wide digital broadband signals that are used for digital video camcorders. Audio and video signals are transmitted using a cable. In addition to DV and Hi8 camcorders, PCs with digital video output can also be connected to the digital input. This screen tells you what's on the disc. Each index screen represents a recording. On the right hand side of the screen you can also see a disc indicator that shows the position and length of the current recording on the disc in a graphic format. This function enables you to simply delete commercials or other scenes. The relevant scenes are marked and skipped as required. This information is stored on the DVD in such a way that other DVD players will skip the scenes. MP3 files are highly compressed music files. The data is compressed to 1/10 of the volume of the original audio material using a special process. This means that 10 hours of music can be stored on a single CD. These music CDs can be played on this machine. Normally a recording is made at the current disc position. This is the same as for a video cassette, in the middle of the tape for example. By holding down the REC/OTR n button, the recording will be made at the end of all the other recordings to avoid overwriting previous recordings. New recordings on DVD+R discs are always added after all existing recordings. Using your DVD recorder you can record from an RGB source such as a satellite receiver using a SCART input ( EXT 2 AUX-I/O socket). Video signals for the colours R(Red), G(Green) and B(Blue) are transmitted via separate channels. This reduces the interference that occurs with standard video cables. Introduction 9
  • 18.
    The Philips DVDrecorder can play back pre-recorded DVDs and CDs. DVDs recorded using this DVD recorder can be played back on current and future DVD players. Dolby Digital is a standard developed by Dolby Laboratories for transmitting from 1 to 5 full-range channels as well as a low frequency (.1) channel for a total of 5.1 discrete channels. The loudspeakers are arranged front left, front middle, front right, rear left and rear right. This system is currently the most common system and is used in cinemas. With this DVD recorder each soundtrack in 2-channel Dolby Digital is recorded onto a DVD+RW/+R. Manufactured under license from Dolby Laboratories. Dolby and the double-D symbol are trademarks of Dolby Laboratories. Transmission standard for 5.1 channels from Digital Theatre Systems Inc. This is the second most wide-spread system after Dolby Digital. This product contains copy protection technology, which is protected by US Patent Nos. 4631603, 4577216, 4819098 and 4907.093 and other intellectual property rights. Use of this copy protection technology from Macrovision Corporation requires the approval of Macrovision. It is intended exclusively for home use and other limited pay-per-view applications, unless Macrovision approves some other use in writing. Modifications to the equipment, removal of components and reverse engineering are prohibited. Simple programming system for DVD recorders. Simply enter the programming number associated with your television programme. You will find this number in your favourite listings magazine. ShowView is a registered trademark of Gemstar Development Corporation. ShowView is manufactured under licence from Gemstar Development Corporation. Enter the serial number here. You will need it for service queries or if your machine is stolen. The serial number (PROD. NO.) is printed on the type plate at the back. MODEL NO. DVDR 77/00-02 PROD. NO. .................. This product complies with the requirements of the following directives and guidelines: 73/23/EEC + 89/336/EEC + 93/68 EEC. 10 Introduction
  • 19.
    B Connecting the DVD recorder Preparing the remote control for operation ENGLISH The remote control and its batteries are packed separately in the original DVD recorder packaging. You must install the batteries in the remote control before use - described in the following section. 1 Take the remote control and the enclosed batteries (2 batteries). 2 Open the battery compartment, insert the batteries as shown and then close the battery compartment. The remote control is now ready to use. Its range is approximately 5 to 10 meters. 'Aim' correctly In the following sections, you will need the remote control for the first time. Aim the remote control at the DVD recorder and not at the TV set. Tip Connecting your DVD recorder to the TV set The necessary cable connections must be made before you can record or playback TV programmes using your DVD recorder. Connect the DVD recorder directly to your TV set. If there is a video recorder in between the picture quality may be poor. We recommend that you use a scart cable to connect your TV set and DVD recorder. What is a scart cable? The scart or Euro AV cable serves as the universal connector for picture, sound and control signals. With this type of connection, there is practically no loss of quality in picture or sound transmission. ? Connecting the DVD recorder 11
  • 20.
    When you installyour DVD recorder for the first time, select one of the following options: 'Connecting with a scart cable and Easy Link' If your TV set is equipped with 'Easy Link, Cinema Link, NexTView Link, Q-Link, Smart Link, Megalogic, Datalogic, ...' and you wish to use a scart cable. 'Connecting with a scart cable without Easy Link' If your TV set is not equipped with 'Easy Link, Cinema Link, NexTView Link, Q-Link, Smart Link, Megalogic, Datalogic, ...' and you wish to use a scart cable. 'Connecting with an S Video(Y/C)cable' If your TV set is equipped with an S-Video(SVHS) socket. 'Connecting with video(CVBS) cable' If your TV set is equipped only with an video(CVBS) socket. Connecting with a scart cable and 'Easy Link' Your DVD recorder can exchange information with your TV set using 'Easy Link'. Your TV channels can also be transferred in the same order from your TV set to your DVD recorder using 'Easy Link'. Please see your TV's operating instructions. Have the following cables ready: an aerial cable (1, supplied), a mains cable (2, supplied), a special scart cable (3, suitable for Easylink). 1 Switch off your TV set. 2 Remove the aerial cable plug from your TV set. Insert it into the ANTENNA IN socket at the back of the DVD recorder. 3 Insert one end of the supplied aerial cable into the TV OUT socket at the back of the DVD recorder and the other end into the aerial input socket at the back of the TV set. 4 Plug in a full-pin scart cable (all 21 contacts wired) into the scart socket EXT 1 TO TV-I/O at the back of the DVD recorder and the corresponding scart socket - suitable for Easylink - at the back of the TV set (see TV set operating instructions). 5 Read the next chapter 'Connecting additional devices' on how to connect additional devices (satellite receivers, videorecorders,...) to the input-/output sockets. 12 Connecting the DVD recorder
  • 21.
    6 Switch on the TV set. 7 Use the supplied mains cable to connect the mains socket 4MAINS at the back of the DVD recorder with the wall outlet. The most important features of the DVD recorder will appear in scrolling text on the display. After the first installation is completed this function will be switched off. How you switch on this function ENGLISH again, read in the chapter 'User preferences' in the section 'standby'. 8 Switch on the DVD recorder using STANDBY-ON m . A message appears on the screen announcing that the transfer has started. 'EASYLINK' appears on the display during transfer. EasyLink The TV set transfers all saved TV channels, in the same order, to the loading data from TV; DVD recorder please wait This may take several minutes. a 'Time', 'Year', 'Month', 'Date' appears on the TV screen 1 Check if the time in 'Time' is correct. 2 If required, change the time with the number buttons 0..9 on your remote control. 3 Select the next line with A or B . 4 Check if the displayed settings for 'Year', 'Month' and 'Date' are correct. 5 When all information is correct, save by pressing OK . Problem Virgin mode a I can see more installation menus on my TV set Not all the necessary data has been transferred. Please enter the settings Audio Language by hand as follows. For more information on the various functions see English 'Initial installation' in 'Installing your DVD recorder'. Español Français 1 Select the desired audio language using B or A and confirm with OK . Português 2 Select the desired subtitle language with B or A and confirm with Italiano OK . Press OK to continue 3 Select the desired screen format position using B or A . '4:3 letterbox' For a 4:3 TV set; cinema format (black bars above and below the picture) '4:3 panscan' For a 4:3 TV set; full height format with the sides cut off '16:9' For a 16:9 TV set 4 Confirm with OK . 5 Select the country of your residence with B or A . If your country does not appear, select 'Other'. 6 Confirm with OK . Problem Initial installation is now complete. Connecting the DVD recorder 13
  • 22.
    Connecting with ascart cable without 'Easy Link' Have the following cables ready: an aerial cable (1, supplied), a mains cable (2, supplied), a scart cable (3). 1 Remove the aerial cable plug from your TV set. Insert it into the ANTENNA IN socket at the back of the DVD recorder. 2 Insert one end of the supplied aerial cable into the TV OUT socket at the back of the DVD recorder and the other end into the aerial input socket at the back of the TV set. 3 Plug a scart cable into the scart socket EXT 1 TO TV-I/O at the back of the DVD recorder and the scart socket for the DVD recorder at the back of the TV set (see TV set operating instructions). My TV set has several scart sockets. Which one should I use? Select the scart socket that is suitable for both video output and for video input. My TV set shows me a selection menu for the scart socket Select 'VCR' as the source for this scart socket. ? 4 Read the next chapter 'Connecting additional devices' on how to connect additional devices (satellite receivers, videorecorders,...) to the input-/output sockets. 5 Switch on the TV set. 6 Insert one end of the supplied mains cable into the mains socket 4MAINS at the back of the DVD recorder and the other end into the wall socket. The most important features of the DVD recorder will appear in scrolling text on the display. After the first installation is completed this function will be switched off. How you switch on this function again, read in the chapter 'User preferences' in the section 'standby'. 7 Switch on the DVD recorder using STANDBY-ON m . 'IS TV ON?' will appear on the display. 14 Connecting the DVD recorder
  • 23.
    8 If the connection was properly made and your TV was automatically switched to the programme number for the scart socket, e.g. 'EXT', '0', 'AV', you will see the following picture: Virgin mode a My screen is empty. b Depending on the initializing period it can take some time before you see Menu Language the picture on the TV. ENGLISH English b Many TV sets are switched by the DVD recorder to the programme Español number for the scart socket by way of a control signal sent through the Français scart cable. Italiano b If the TV set does not automatically switch to the scart socket programme Deutsch number, manually change to the corresponding programme number on your Press OK to continue TV set (see your TV's operating instructions). b Check that the scart cable is connected from the TV set to the EXT 1 TO TV-I/O socket on the DVD recorder. The EXT 2 AUX-I/O socket is intended only for additional devices. Problem Then, read the paragraph on 'Initial installation' in 'Installing your DVD recorder'. Connecting with an S Video(Y/C)cable This connecting cable, also known as the SVHS cable, is used to transmit the brightness signal (Y signal) and colour signal (C signal) separately. This mini DIN socket/plug is also called a Hosiden socket/plug. Have the following cables ready: an aerial cable (1, supplied), a mains cable (2, supplied), an S-Video(SVHS) cable (3), an audio cable (4, supplied, red/white plug). 1 Remove the aerial cable plug from your TV set. Insert it into the ANTENNA IN socket at the back of the DVD recorder. 2 Insert one end of the supplied aerial cable into the TV OUT socket at the back of the DVD recorder and the other end into the aerial input socket at the back of the TV set. 3 Insert one end of an S-Video(SVHS) cable into the S-VIDEO (Y/C) OUT socket at the back of the DVD recorder and the other end into the S-Video (SVHS) input socket on the TV set (usually labelled 'S-Video in' or 'SVHS in'. See TV operating instructions). Connecting the DVD recorder 15
  • 24.
    4 Insert one end of the supplied audio (Cinch) cable into the red/white Cinch socket AUDIO L/R OUT at the back of the DVD recorder and the other end into the audio input socket (usually red/white) on the TV set (usually labelled 'Audio in' or 'AV in'. See TV operating instructions). 5 Switch on the TV set. Switch the TV set over to the SVHS input socket or select the relevant programme number. Please see your TV's operating instructions for the programme number you need. 6 Insert one end of the supplied mains cable into the mains socket 4MAINS at the back of the DVD recorder and the other end into the wall socket. The most important features of the DVD recorder will appear in scrolling text on the display. After the first installation is completed this function will be switched off. How you switch on this function again, read in the chapter 'User preferences' in the section 'standby'. 7 Switch on the DVD recorder using STANDBY-ON m . IS TV ON?' will appear on the display. Then, read the paragraph on 'Initial installation' in 'Installing your DVD recorder'. Connecting with video(CVBS) cable This cable, usually with yellow Cinch connectors, is used for transmitting the Composite Video signal (FBAS, CVBS). In this method of transmission the colour signal and the brightness signal are transmitted on the same cable. In certain circumstances, this can lead to problems with the picture, such as 'Moiré' patterns. Have the following cables ready: an aerial cable (1, supplied), a mains cable (2, supplied), a video (CVBS)cable (3, supplied, yellow plug), an audio cable (4, supplied, red/white plug). 1 Remove the aerial cable plug from your TV set. Insert it into the ANTENNA IN socket at the back of the DVD recorder. 2 Insert one end of the supplied aerial cable into the TV OUT socket at the back of the DVD recorder and the other end into the aerial input socket at the back of the TV set. 16 Connecting the DVD recorder
  • 25.
    3 Insert one end of the supplied video (CVBS) cable into the yellow Cinch socket VIDEO (CVBS) OUT at the back of the DVD recorder and the other end into the video input socket (usually yellow) on the TV set (usually labelled 'Video in' or 'AV in'. See TV operating instructions). 4 Insert one end of the supplied audio (Cinch) cable into the red/white Cinch socket AUDIO L/R OUT at the back of the DVD recorder ENGLISH and the other end into the audio input socket (usually red/white) on the TV set (usually labelled 'Audio in' or 'AV in'. See TV operating instructions). 5 Read the next chapter 'Connecting additional devices' on how to connect additional devices (satellite receivers, videorecorders,...) to the input-/output sockets. 6 Switch on the TV set. Switch the TV set over to the Video/Audio input socket or select the relevant programme number. Please see your TV's operating instructions for the programme number you need. 7 Insert one end of the supplied mains cable into the mains socket 4MAINS at the back of the DVD recorder and the other end into the wall socket. The most important features of the DVD recorder will appear in scrolling text on the display. After the first installation is completed this function will be switched off. How you switch on this function again, read in the chapter 'User preferences' in the section 'standby'. 8 Switch on the DVD recorder using STANDBY-ON m . 'IS TV ON?' will appear on the display. Then, read the paragraph on 'Initial installation' in 'Installing your DVD recorder'. Connecting the DVD recorder 17
  • 26.
    C Connecting additional devices Connecting additional devices to the second scart socket You can connect additional devices such as decoders, satellite receivers, camcorders, etc. to the EXT 2 AUX-I/O socket. When playback is started on this additional device the DVD recorder automatically connects the EXT 2 AUX-I/O scart socket with the EXT 1 TO TV-I/O scart socket. You will then see the picture from the additional device on your TV set, even if the DVD recorder is switched off. The TV/DVD button on the remote control allows you to switch between playback through the EXT 2 AUX-I/O scart socket and playback from the DVD recorder. The DVD recorder must be connected directly to the TV set ( EXT 1 TO TV-I/O socket directly to the TV set). If there is a video recorder in between the picture quality may be poor because of the copy protection system built into the DVD recorder. Connecting a video recorder, DVD player. You can connect a video recorder or a DVD player to the EXT 2 AUX-I/O input socket. If you already have an external receiver (satellite receiver, set-top box, cable TV box) connected to this socket, you can connect the video recorder to the 'VCR', 'TO VCR', ...socket of the external receiver. You can also use the front sockets S-VIDEO , VIDEO and the left AUDIO right audio sockets. Please note: Most prerecorded video cassettes and DVDs are copy-protected. If you try to copy them you will see the message 'COPY PROT' on the DVD recorder's display. a When copying video cassettes the display on the DVD recorder shows 'NO SIGNAL' b Check that the cable is plugged in firmly. b If a recording is made from a video recorder, change the tracking on the video recorder. b The DVD recorder may not be able to recognise the video input signal if this signal is poor or does not comply with relevant standards. a When I copy DVD video discs or prerecorded video cassettes the picture is fuzzy and the brightness varies b This happens if you try to copy DVDs or video cassettes that have been copy-protected. Even though the picture on the TV is fine the recording on a DVD+RW/+R is faulty. This interference is unavoidable with copy-protected DVDs or video cassettes. Problem 18 Connecting additional devices
  • 27.
    Connecting an externalreceiver (satellite receiver, set top box, cable TV box,...) You can connect external receivers to the EXT 2 AUX-I/O socket. For additional receivers, you can also use the EXT 1 TO TV-I/O socket (if the TV set is ENGLISH connected to the COMPONENT VIDEO OUT sockets), and VIDEO , S-VIDEO sockets at the front. Please observe that you also have to connect an audio cable to the IN AUDIO L/R or left AUDIO right socket. 1 Connect the scart socket of the receiver (satellite receiver) provided for the TV set (usually labelled 'TV', 'TO TV'), with the EXT 2 AUX-I/O socket of the DVD recorder. Why can't I use the 'VCR', 'TO VCR',... socket? In order to achieve the best possible picture quality, you must use the RGB (red-green-blue) signal of the receiver. As a rule, this signal is available at the 'TV', 'TO TV',... socket. The DVD recorder transfers the signal to the EXT 1 TO TV-I/O socket. Some receivers only provide a 'Video (CVBS/FBAS)' signal at the 'VCR', 'TO VCR'...socket. Read the instruction manual of the receiver on the signals available at the sockets. If you are satisfied with the picture quality of the 'VCR', 'TO VCR',... socket, you can also use this socket. ? 2 If your external receiver offers several options for the signal available at the 'TV', 'TO TV',... socket, choose the 'RGB' setting. Connecting additional devices only via aerial cable If you want to connect additional devices (e.g. satellite receiver...) only via aerial cable, please observe the following: The DVD-Recorder must be connected directly to the TV set. If there is a video recorder or an additional device in between, the picture quality may be poor because of the copy protection system built into the DVD-Recorder. The additional device (satellite receiver) must be connected before the DVD recorder (additional device - DVD recorder - TV set). Only the TV set must be connected to the TV OUT socket. •) If there is interference in the picture when the additional device is switched on, a TV broadcaster may be transmitting on the same channel or a channel very close to that of the additional device. (e.g.: TV broadcaster on channel 45, additional device (satellite receiver) also on channel 45). In this case, change the channel of the additional device (satellite receiver). Consult the instruction manual of the additional device. You must also store this channel on the DVD recorder to be able to record TV programmes from the additional device (satellite receiver). •) Switch on the additional device during the installation of the DVD recorder. During the automatic channel search, the channel on which the additional device is transmitting will be stored as a TV channel. Connecting additional devices 19
  • 28.
    Connect camcorder tothe front sockets To copy camcorder recordings, you can use the front sockets. These sockets are located behind the flap on the right hand side. Best picture quality If you have a DV or Digital 8 camcorder, connect the DV IN input of the DVD recorder to the appropriate DV output on the camcorder. When films are transferred the original recording date and time are stored as DVD subtitles. On playback, this data can be displayed on the TV screen by using the 'E' function (Subtitle). Choose 'CAM2' as a programme number for this input. Very good picture quality If you have a Hi8 or S-VHS(C) camcorder, connect the S-VIDEO input of the DVD recorder to the appropriate S-VHS output on the camcorder. You must also connect the audio input left AUDIO right on the DVD recorder to the audio output on the camcorder. Choose 'CAM1' as a programme number for this input. Good picture quality If you have a camcorder that only has a single video output (Composite Video, CVBS), connect the VIDEO input on the DVD recorder to the appropriate output on the camcorder. You must also connect the audio input left AUDIO right on the DVD recorder to the audio output on the camcorder. Choose 'CAM1' as a programme number for this input. Connecting audio devices to the analogue audio sockets Two audio output sockets AUDIO L/R OUT are located on the back of the DVD recorder (audio signal output left/right) These can be used to connect the following: •) a receiver with Dolby Surround Pro Logic •) a receiver with two channel analogue stereo Can I use the 'Phono' input on my amplifier? This socket (input) on the amplifier is designed only for record players without preamplifiers. Do not use this input for connecting the DVD recorder. The DVD recorder or the amplifier may be damaged as a result. ? 20 Connecting additional devices
  • 29.
    Connecting audio devicesto the digital audio sockets ENGLISH At the back of the DVD recorder there are two digital audio output sockets OPTICAL AUDIO OUT for an optical cable and COAX OUT for a coaxial cable (Cinch cable). These can be used to connect the following: •) an A/V receiver or an A/V amplifier with a digital multi channel sound decoder •) a receiver with two channel digital stereo (PCM) Digital multi channel sound Digital multi-channel sound offers the best possible sound quality. You will need a multi-channel A/V receiver or amplifier that supports at least one of the audio formats of the DVD recorder (MPEG2, Dolby Digital and DTS). Consult the operating instructions for your receiver to find out which audio formats it supports. ? a All I can hear from my loudspeakers is a loud distorted noise b The receiver is not compatible with the digital audio format of the DVD recorder. The audio format of the DVD disc is displayed in the status window when you switch to another language. Playback in six-channel digital surround sound is only possible if the receiver has a digital multi-channel sound decoder. Problem Connecting additional devices 21
  • 30.
    D Installing your DVD recorder Initial installation After successfully connecting your DVD recorder to the TV set and other additional devices as described in the previous chapters, this chapter will show you how to start the initial installation. The DVD recorder automatically seeks out and stores all available TV channels. Connecting additional devices If you have connected additional devices such as a satellite receiver to the aerial cable, switch them on. The automatic channel search will recognise it and save it. Please observe that you must switch on a "test signal" for some additional devices. No aerial connected Even if you only want to use the DVD recorder to play back or have only connected a satellite receiver, you must still complete the initial installation. This is necessary so that the basic settings are stored correctly. Once initial installation is complete you can use the DVD recorder as normal. Tip 1 Select the desired language for the on-screen menu by pressing B or Virgin mode A. Menu Language English What is an on screen menu? Español The multi-language on-screen menu takes the mystery out of using your new Français DVD recorder. All settings and/or functions are displayed on your TV screen Italiano in the relevant language. ? Deutsch Press OK to continue 2 Confirm with OK . 3 Select the desired audio language using B or A . Virgin mode Audio Language What is an audio language? English The DVD will play the sound in the language you select, provided this Español language is available on the disc. If it is not available on the disc the first Français language on the DVD will be used instead. The DVD Video Disc menu, if Português available, will also be displayed in the language you select. ? Italiano Press OK to continue 4 Confirm with OK . 5 Select the desired language for the subtitles by pressing B or A . Virgin mode Subtitle Language What is the subtitle language? English The subtitles will be displayed in the language you select, provided this Español language is available on the disc. If it is not available on the disc the fist Français language on the DVD will be used instead. ? Português Italiano Press OK to continue 6 Confirm with OK . 22 Installing your DVD recorder
  • 31.
    7 Select the desired screen format position using B or A . These Virgin mode settings will only be used if you insert a DVD that contains this information. TV Shape 4:3 letterbox 4:3 panscan Which screen formats can I select? 16:9 ENGLISH '4:3 letterbox' for a 'wide-screen' (cinema format) picture with black bars at the top and bottom. Press OK to continue '4:3 panscan' for a full-height picture with the sides trimmed. '16:9' for a wide-screen TV set (screen edge ratio 16:9) ? 8 Confirm with OK . 9 Select the country of your residence with B or A . Virgin mode If your country does not appear, select 'Other'. Country Austria Why do I have to select a country? Belgium To call up the specific settings for the respective country, you must first install Denmark the country. ? Finland France Press OK to continue 0 Confirm with OK . A After you connect the aerial (or cable TV, satellite receiver, etc.) to the DVD recorder, press OK . The automatic TV channel search starts. 'WAIT' will appear on the display. Installation Autom. search a The DVD recorder cannot find any TV stations b Select channel 1 on the TV set. Can you see the stored TV channel on the Searching for TV channels TV set? 00 Channels found If not, check the cable connection from the aerial (aerial socket) to the DVD recorder and to the TV set. b Please have patience. Please wait The DVD recorder searches the entire frequency range in order to find and save the largest possible number of TV channels. b If you have not connected an aerial, go through all the basic settings right to the end and then, if you wish, start the automatic search (see 'Automatic TV station search'). Problem B When the automatic TV channel search is complete, 'Autom. search complete' will appear on the TV screen. 'Time', 'Year', 'Month', 'Date' will then appear on the TV screen. Autom. search C Check if the time in 'Time' is correct. À If required, change the time with the number buttons 0..9 on your Autom. search complete 00 Channels found remote control. Time 20:01 Á Select the next line with A or B . Year 2003 Month 01 Date 01 Â Check if the displayed settings for 'Year', 'Month' and 'Date' are correct. To continue Press OK Ã When all information is correct, save by pressing OK . Installing your DVD recorder 23
  • 32.
    The initial installationis now complete. Satellite receiver If you are connecting a satellite receiver, please read the section on 'Using a satellite receiver'. Decoder If you are connecting a decoder, you must install it as described in the next section. Tip a Sound may be distorted on some TV channels. b If the sound is distorted on any of the stored TV channels or if there is no sound at all, the wrong TV system may have been stored for the TV channel. Read 'Manual TV channel search' for information on how to change the TV system. Problem Using a satellite receiver TV channels from a satellite receiver (connected to scart socket EXT 2 AUX-I/O ) are received on the DVD recorder on programme number 'EXT2' If necessary, use the MONITOR button to switch to the internal tuner. Select programme number 'EXT1' with 0 on the remote control and then select programme number 'EXT2' with CHANNEL r . You should select the TV channels to be received by the satellite receiver directly on the receiver itself. 24 Installing your DVD recorder
  • 33.
    Allocating a decoder Some TV channels send coded TV signals that can only be viewed properly with a purchased or rented decoder. You can connect such a decoder (descrambler) to your DVD recorder. The following function automatically activates the connected decoder for the TV channel you want to ENGLISH watch. How do I allocate the decoder for Easy Link? If your TV set supports 'Easy Link' the decoder must be assigned to the relevant TV channel on the TV set (see the operating instructions for your TV set). Settings cannot then be made in this menu. ? 1 Switch on the TV set. If required, select the programme number for the DVD recorder. 2 Switch on the DVD recorder using STANDBY-ON m . 3 Use the CHANNEL q and CHANNEL r buttons or the number buttons 0..9 on the remote control to select the TV channel for which you want to use the decoder. If necessary, use the MONITOR button to switch to the internal tuner. 4 Press the SYSTEM-MENU button on the remote control. The menu bar appears. 5 Select 'A' symbol with D or C . 6 Select 'Installation' using B or A and confirm with C . 7 Select 'Manual search' using B or A and confirm with C . Installation 8 Select 'Decoder' using B or A . Manual search 9 Select 'On' with D or C . Channel/freq. CH Entry/search 01 Programme number 01 TV channel name BBC1 How do I switch the decoder off again? Decoder Off ? Use C to select 'Off' in the 'Decoder' line on the screen (Decoder off). TV system PAL-BG NICAM On Fine tuning 0 To store 0 Confirm with OK . Press OK A To end, press SYSTEM-MENU . Your decoder has now been allocated to this TV channel. Installing your DVD recorder 25
  • 34.
    Connection using acomponent video (Y Pb Pr/YUV) cable Component video (Y Pb Pr) is the highest quality picture transmission option. This is achieved by dividing the video signal into a luminance signal (Y) and two colour difference signals - red minus luminance (V) and blue minus luminance (U). As a rule, "Cr" or "R-Y" is used to describe the red difference signal and "Cb" or "B-Y" the blue difference signal. These signals are transmitted through separate lines. The connectors of this cable and the corresponding sockets are usually green (luminance), blue (Pb, Cb, B-Y), and red (Pr, Cr, R-Y). If you choose this type of connection, the DVD recorder must already be connected and completely installed (initial installation complete). Switching of the signal to the COMPONENT VIDEO OUT sockets is carried out in a menu that is not yet available during the initial installation. 1 Switch on the TV set. If required, select the programme number for the DVD recorder. 2 Switch on the DVD recorder using STANDBY-ON m . 3 Press the SYSTEM-MENU button on the remote control. The menu bar appears. 4 Select 'A' using D oder C and confirm with B . 5 Select the 't' symbol using B or A and confirm with C . 6 Select the line 'Video output' using A or B and confirm with C . 7 Select your setting with B or A . Picture TV shape 16:9 Which setting should I choose? Black level shift Off Since YPbPr (YUV) signals are not transmitted simultaneously with Video shift ï S-video(Y/C) and video (FBAS/CVBS) signals, you can choose between the two RGB attenuation ï types. The 'RGB' signal is switched off. Video output RGB + CVBS 'S-video + YPbPr' Component Video (YUV) and S-Video(Y/C). 'CVBS + YPbPr'Component Video (YUV) and Video (FBAS/CVBS). With all other settings, the signal is switched off at the COMPONENT VIDEO OUT sockets. This will also be displayed as information on the screen. For more information on the other settings, read section 'Picture settings' ('Video output') in chapter 'User preferences'. ? 8 Confirm with OK . 26 Installing your DVD recorder
  • 35.
    9 Use a component video (Y Pb Pr) cable, connect the three cinch sockets (red, blue, green) COMPONENT VIDEO OUT at the back of the DVD recorder with the corresponding three component video input sockets of your TV set, usually labelled 'Component Video Input', 'YUV Input', 'YPbPr', 'YCbCr' or simply 'YUV'. Warning! ENGLISH Do not confuse these sockets with the five-component RGB sockets (if available) or the yellow video (CVBS/FBAS) socket and the two audio sockets (red/white). The five-component RGB sockets are only provided for the R-G-B-H-V signals (red, green, blue with horizontal and vertical synchronisation impulse). Please observe the colour sequence The colours of the sockets at the DVD recorder and the connectors must match those of the socket colours at the TV set (red-red/blue-blue/green-green). If they don't, the colours of the picture may get mixed up or the picture may not be visible. Tip 0 Use an audio (cinch) cable, connect the red/white cinch socket AUDIO L/R OUT at the back of the DVD recorder with the mostly red/white audio input socket of your TV set (usually labelled 'Audio in' or 'AV in'. See the instruction manual of your TV set.) A If necessary, switch your TV set to the component video input socket. Also consult the instruction manual of your TV set. B The menu of the DVD recorder should now appear on the TV screen. If not, check the cable connections and the settings on your TV set. Manual TV channel search In some cases, not all of the available TV channels may have been found and stored during initial installation. In this case, you will need to search for and store the missing or coded TV channels manually. Manual search with EasyLink With 'Easy Link', the DVD recorder will automatically download the TV channels stored on the TV set. This is why some lines have no function. To store new TV channels, they must first be stored on the TV set. The information will then be transferred to the DVD recorder automatically. Tip 1 Switch on the TV set. If required, select the programme number for the DVD recorder. 2 Switch on the DVD recorder using STANDBY-ON m . Installing your DVD recorder 27
  • 36.
    3 Press SYSTEM-MENU on the remote control. The menu bar appears. 4 Select 'A' symbol with D or C . 5 Select 'Installation' using B or A and confirm with C . 6 Select 'Manual search' using B or A and confirm with C . Installation 7 In 'Channel/freq.', select the desired display using C . Manual search 'Freq.'(Frequency), 'CH'(Channel), 'S-CH'(Special/hyperband channel) Channel/freq. CH Entry/search 01 8 In 'Entry/search', enter the frequency or channel of the TV station Programme number 01 using the number buttons 0..9 . TV channel name BBC1 Decoder Off TV system PAL-BG NICAM On a I don't know the channel for my TV station Fine tuning 0 b In this case, press C to start the automatic search. A changing channel To store number/frequency number will appear on the TV screen. Press OK Continue the automatic search until you have found the TV channel you are looking for. Problem 9 Using D or C in 'Programme number', select the programme number you want to use for the TV channel, e.g. '01'. How can I change the namel of a TV channel? 1 In 'TV channel name', press C . 2 Select the desired character position using D or C . 3 Change the character at the desired position with B or A . 4 Select the next character position in the same way. 5 Confirm with OK . Tip How can I change the TV system of the TV channel? In 'TV system', use D or C to select the TV system that produces the least distortion of picture and sound. What is NICAM? NICAM is a digital sound transmission system. Using NICAM, you can transmit either 1 stereo channel or 2 separate mono channels. However, if reception is poor and the sound distorted you can turn off NICAM. In 'NICAM', select 'Off' using D or C . How can I improve the automatic process for storing channels? To change the automatic process for storing channels (fine tuning), select 'Fine tuning'. Using D or C you can try to fine-tune the TV channelmanually. Tip 0 Press OK to store the TV channel. A To search for other TV channels, begin again at 8 . B To end, press SYSTEM-MENU . 28 Installing your DVD recorder
  • 37.
    Sorting TV channelsautomatically (Follow TV) When the automatic channel search function is activated, the TV channels are stored in a specific ENGLISH order. This may differ from the order in which the TV channels appear on your TV set. This function changes the order of the TV channels stored in your DVD recorder to match the order on the TV set. This only works if the DVD recorder ( EXT 1 TO TV-I/O socket) and the TV set are connected with a scart cable. My TV set has Easylink If your TV set supports 'Easylink,..', TV channels will be stored during initial installation in the same order as they appear on the TV set. To store the TV channels in a different order, you'll need to change the order on the TV set. When you start the Follow TV function the information is transferred again from the TV set. Tip 1 Switch on the TV set. If required, select the programme number for the DVD recorder. 2 Switch on the DVD recorder using STANDBY-ON m . 3 Press the SYSTEM-MENU button on the remote control. The menu bar appears. 4 Select 'A' symbol with D or C . 5 Select 'Installation' using B or A and confirm with C . 6 Select line 'Follow TV' with B or A . and confirm with the C button. 7 Confirm the message on the screen with OK . 'TV 01' will appear in the DVD recorder display. 8 Select programme number '1' on the TV set. TV 01 a I cannot switch my TV set to programme number '1' b If you have connected additional devices to the EXT 2 AUX-I/O socket, please disconnect these devices. Other connected devices may have switched the TV set to the programme number of the scart socket. Problem 9 Confirm with OK on the DVD recorder remote control. 'WAIT' will appear in the display. The DVD recorder compares the TV channels on the TV set and the DVD recorder. If the DVD recorder finds the same TV channel as on the TV set it stores it at 'P01'. Installing your DVD recorder 29
  • 38.
    a 'NOTV' willappear in the display. The DVD recorder is not receiving a video signal from the TV set. b Chech the connectors at both ends of the scart cable. b Check your TV's operating instructions to see which scart socket is used for video signals. b If the problem persists, you won't be able to use this feature. Please read 'Sorting and deleting TV channels manually'. Problem 0 Wait until for example 'TV 02' appears in the display. A Select the next programme number on the TV set, e.g. '2'. TV 02 B Confirm with OK on the DVD recorder remote control. Deleting sorting You can delete incorrect TV channel sorting by pressing D . Tip C Repeat steps 0 to B until you have assigned all the TV channels from your TV set. À To end, press SYSTEM-MENU . Automatic TV channel search During installation, all available TV channels are searched for and stored. If the channel assignments of your cable or satellite TV provider change or if you are reinstalling the DVD recorder, e.g. after moving house, you can start this procedure again. This will replace the stored TV channels with the new ones. My TV set has Easylink With Easylink, you can search for and store TV channels only on the TV set. These settings are accepted by the DVD recorder. Use this function to start the transfer of TV channels from the TV set. Tip 1 Switch on the TV set. If required, select the programme number for the DVD recorder. 2 Switch on the DVD recorder using STANDBY-ON m . 3 Press SYSTEM-MENU on the remote control. The menu bar appears. 4 Select 'A' symbol with D or C . 5 Select 'Installation' using B or A and confirm with C . 6 Select 'Autom. search' using B or A . 30 Installing your DVD recorder
  • 39.
    7 Press C . Installation 8 The automatic TV channel search starts. This allows the DVD Autom. search recorder to save all available TV channels. This procedure may take Searching for TV channels several minutes. 00 Channels found 9 When all the TV channels have been found, 'Autom. search ENGLISH complete' will appear on the TV screen. Please wait 0 To end, press SYSTEM-MENU . You can read about how to search for a TV channel manually in 'Manual TV channel search'. Sorting and deleting TV channels manually After you have performed the automatic channel search you may not agree with the sequence in which the individual TV channels have been allocated to the programme positions (programme numbers). You can use this function to rearrange the TV channels already stored or to delete TV channels you don't want or those with poor reception. EasyLink With Easylink, you can search for and store TV channels only on the TV set. These settings are then transferred to the DVD recorder. That is why you cannot select this function manually. Tip 1 Switch on the TV set. If required, select the programme number for the DVD recorder. 2 Switch on the DVD recorder. Press the SYSTEM-MENU button on the remote control. The menu bar appears. 3 Select 'A' symbol with D or C . 4 Select 'Installation' using B or A and confirm with C . 5 Select 'Sort TV channels' using B or A and confirm with C . Installation 6 Using B or A select the TV channel that you want to delete or Sort TV channels whose order you want to change. ... • P01 BBC1 P02 BBC2 7 Confirm with C . P03 ITV P04 P05 Deleting TV channels P06 ... Unwanted channels or those with poor reception can be deleted using CLEAR . Proceed at step 6 . Tip To sort To exit press Press › SYSTEM MENU Installing your DVD recorder 31
  • 40.
    8 Using B or A , shift the TV channel to the desired position and press the D button. The DVD recorder will insert the TV channel. 9 Repeat steps 6 to 8 until you have resorted/deleted all the TV channels you want. 0 To store, press OK . A To end, press SYSTEM-MENU . Setting the language/country You can select the country and, for the basic setting of DVD playback, the language for the subtitles and the audio language. Please note that with some DVDs the audio language and/or subtitle language can be changed only via the DVD menu. For bilingual shows, you can also select the sound channel of the TV station via the internal tuner ( MONITOR button) for recording or playback. You also have the option of setting one of the displayed languages for the on-screen menu (OSD). However, the DVD recorder display will only display English text regardless of this setting. 1 Switch on the TV set. If required, select the programme number for the DVD recorder. 2 Switch on the DVD recorder using STANDBY-ON m . 3 Press SYSTEM-MENU on the remote control. The menu bar appears. 4 Select 'A' symbol with D or C . 5 Select line 'Language' with B or A and confirm with the C button. 6 Select the appropriate line and confirm with C . Language Which settings can I choose? Audio Language English 'Audio Language' : The DVD will play back in the language you have chosen. Recording audio Language 1 'Recording audio': In the case of bilingual programmes, you can choose either Subtitle English 'Language 1' or 'Language 2' as the default setting Menu English 'Subtitle': Subtitle language Country Other 'Menu': Language of the OSD menu 'Country' : Location Tip 7 Select the appropriate setting using B or A and confirm with OK . 8 To end, press SYSTEM-MENU . 32 Installing your DVD recorder
  • 41.
    'Recording audio' switchingover (2 channel sound) Some TV programmes transmit an extra audio signal in stereo in addition to the normal audio signal (2-channel sound). In most cases this means that an additional language is available. If a TV ENGLISH programme is available in, say, English and German, German may be available as the second language. To record TV programmes in 2-channel sound, you can select the language you want as the default setting. This setting does not become active until the sound of a TV programme is transmitted in 2-channel sound. When you play back the recording you can play back the sound only in the language you used for the recording. 1 Switch on the TV set. If required, select the programme number for the DVD recorder. 2 Switch on the DVD recorder using STANDBY-ON m . 3 Press SYSTEM-MENU on the remote control. The menu bar appears. 4 Select 'A' symbol with D or C . 5 Select line 'Language' with B or A . and confirm with the C button. Language 6 Select line 'Recording audio' and confirm with C . Audio Language English Recording audio Language 1 7 Select 'Language 1' or 'Language 2' with B or A and confirm Subtitle English with OK . Menu English Country Other 8 To end, press SYSTEM-MENU . Installing your DVD recorder 33
  • 42.
    Setting the timeand date If the display shows an incorrect time or '--:--', the time and date must be reset manually. 'SMART CLOCK' automatically sets the time and date using the information transmitted by the TV channel. Normally the TV channel stored at programme number 'P01' is used. In the 'Clock preset' line you can select the programme number (channel name) whose TV channel transmits this information. If the time/date is not displayed correctly you need to choose the 'Off' setting in the 'Clock preset' line and set the date and time manually. 1 Press SYSTEM-MENU on the remote control. The menu bar appears. 2 Select 'A' symbol with D or C . 3 Select 'Installation' using B or A and confirm with C . 4 Select 'Time/Date' using B or A and confirm with C . Installation 5 Check if the time in 'Time' is correct. If required, change the time Time/Date with the number buttons 0..9 on your remote control. Time 20:00 Year 2003 6 Check 'Year', 'Month' and 'Date' in the same way. To move between Month 01 the fields, use B or A . Date 01 Clock preset 01 a Time/date is displayed incorrectly despite manual setting b With 'SMART CLOCK', time/date is transferred from the TV channel saved To exit press on 'P01' and automatically corrected. SYSTEM MENU You can either enter another TV channel for transferring the data or disable the function. In the line 'Clock preset' select the relevant TV channel with D or C . To disable, select 'Off'. Problem 7 Check the displayed settings and confirm with OK . 'Stored' will appear briefly on the screen. 8 To end, press SYSTEM-MENU . 34 Installing your DVD recorder
  • 43.
    E On screen information You can check or change many of the functions and settings of your DVD recorder via the system menu bar. The menu bar cannot be displayed during recording. Symbols in the menu bar Press SYSTEM-MENU to open and close the menu bar (main menu). Use D and C to select ENGLISH the relevant function. Use B to confirm the function and go either to another menu or execute the function directly. Some functions may not be available, depending on the disc inserted. Menu bar 1 A User preferences B Title/track C Chapter/index D Audio language E Subtitle language F Camera angle G Zoom Menu bar 2 While menu bar 1 is being displayed you can go to menu bar 2 by pressing C again. H Sound I Frame advance J Slow motion K Fast forward L Search by time Field for temporary messages The top left corner of the menu line contains a field for temporary messages relating to the various operating modes. This information appears briefly on the screen when certain disc functions have been activated: / Shuffle 6 Scan 5 Repeat entire disc 3 Repeat title 4 Repeat track On-screen information 35
  • 44.
    2 Repeat chapter 0 Repeat from A to the end 1 Repeat from A to B 7 Camera angle l Child lock enabled 8 Resume playback 9 Illegal action Status field The status field shows the current operating mode (status) of the DVD recorder and the type of disc inserted. This display can be disabled. Disc type symbols M DVD+RW W DVD+R N DVD Video O Video CD P No disc Q Error Operating mode symbols R Recording S Stop T Playback U Playback Pause V Record Pause X Search forwards (8x speed) Y Search backwards (8x speed) Z Slow motion 36 On-screen information
  • 45.
    Tuner information box This field is located in the bottom left-hand corner of the screen. The aerial signal, the TV channel and the TV channel name for the selected programme are displayed. ENGLISH a Current channel/selected input socket b No signal The TV channel is not available/the additional device is not connected or it is switched off c Copy protected signal 'Live picture' in the 'Tuner information box' Instead of the information about the aerial signal or the TV channel, you can watch the picture of the selected TV channel or the signal on the input socket. 1 In the system menu (button SYSTEM-MENU ) select the symbol 'w' and confirm with C 2 In the line 'Live source view' select 'On' to view this picture or 'Offto switch this picture off. 3 End with OK and then SYSTEM-MENU . Timer information box This box appears above the tuner information box. When a timer recording is set, it shows the timer icon and the start time or date of the first programme to be recorded. If no timer recording is scheduled, the current time is displayed. This box disappears during playback of a disc or after a recording starts. However, you can access it during an OTR recording by pressing SYSTEM-MENU . f Timer starts on the day/time shown g OTR recording runs until the stop time displayed h Current time No timer event programmed On-screen information 37
  • 46.
    F Playback General notes on playback With this DVD recorder you can play back the following systems: •) DVD Video •) (Super)Video CD Disc •) DVD+RW Disc •) DVD+R Disc •) DVD-RW (video mode, finalised) •) DVD-R •) CD-R •) CD-RW •) Audio CD •) MP3 CD •) Picture -CD (JPEG-data) You can operate the video recorder using the remote control or the buttons on the front of the DVD recorder. a The display will read 'PIN' b The child lock has been activated for the inserted disc. Read the sections on 'Child lock' and 'Releasing a disc' in the chapter on 'Access control (child lock). a The menu on the screen is showing an 'X' b Some DVD discs can be manufactured so that certain steps are required before the disc can be played, or so that only limited operation is possible during playback. When an 'X' appears on the screen the selected feature is not possible. a The screen is showing regional code information b Since DVD films are not normally released in all parts of the world at the same time, all DVD players have a specific regional code. Discs can be given a regional code. If the regional codes differ between the player and the disc, playback is not possible. b The regional code is shown on the label on the back of the machine. b The regional code does not apply to recordable DVDs. Problem Inserting a disc 1 Press the OPEN/CLOSE J button on the front. The disc tray will OPENING P01 open. While the disc tray is opening, 'OPENING' and then 'TRAY OPEN' when the tray is fully open. 2 Carefully place the disc in the tray with the label facing up and press PLAY G or OPEN/CLOSE J . 'CLOSING' and then 'READING' will appear in the display. The information on the disc will be read. How do I insert a double sided DVD? Double-sided discs do not have labelling over the whole surface. The labelling for each side is in the centre of the disc. To play a side its label must be facing up. ? 38 Playback
  • 47.
    Opening/closing the trayusing the remote control You can open and close the disc tray using the remote control. Press and hold the STOP h button on the remote control until the dialog box shows 'OPENING' or 'CLOSING'. Tip ENGLISH 3 Playback starts automatically. A menu may appear when a DVD is played back. If the titles and chapters are numbered, press a number button on the remote control. You can also use the D , C , A , B buttons or number buttons 0..9 to select a menu item and confirm with OK . You can also access the menu using DISC-MENU on the remote control. For further information see 'Playing a DVD video disc'. When a DVD+RW is played back the index overview appears. Using B , A , N , O select the title you want to play back. Confirm with OK . For further information see 'Playing back a DVD+RW/+R Disc'. If playback does not start automatically, press PLAY G . For further information see 'Playing an audio CD'. If the 'h' symbol appears on the screen, start playback by pressing PLAY G . If a menu appears on the screen, use the remote control buttons indicated on the screen to select the menu option you want (PREV= N , NEXT= O ) or with the number buttons 0..9 . For further information see ' Playing a (Super) Video CD'. Playing a DVD video disc 1 If playback does not start automatically, press PLAY G . C01 2:04 This will appear on the display: title/chapter number, elapsed time. 2 To stop playback, press STOP h on the remote control or h on the DVD recorder. 3 To eject the disc, press OPEN/CLOSE J on the front of the DVD recorder. Playback 39
  • 48.
    Playing a DVD+RW/+R disc 1 If the disc is write-protected or a finalised DVD+R disc, playback starts automatically. 2 If playback does not start automatically, use the B or A button to C01 ANNA P01 select the title you want to play on the index screen. You can also use the N or O button on the front. 3 Press the PLAY G button. This will appear on the display: title/chapter number, elapsed time. a I can see the message 'EMPTYDISC' b The disc does not contain any recordings. Problem 4 To stop playback, press STOP h on the remote control or h on the DVD recorder. 5 To eject the disc, press OPEN/CLOSE J on the front of the DVD recorder. What should I note when playing back different recording types (qualities)? The correct recording quality 'M1, M2, M2x, M3, M4, M6',M8' will automatically be selected during playback. For more information see the section on 'Selecting the recording type (picture quality)' in the chapter on 'Manual recording'. ? Playing an audio CD You can also use the DVD recorder to play audio CDs 1 Insert an audio CD. Playback starts automatically. Audio CD display' If the TV is on, the audio CD screen appears automatically. During playback, the current track number and its elapsed playing time will show on the TV screen and on the recorder display. Tip 2 Stop playback using STOP h . The number of tracks and the total time are displayed. 40 Playback
  • 49.
    Playing an MP3CD MP3 (MPEG1 Audio Layer-3) files are highly compressed music files. Using this technology the data volume can be compressed by a factor of 10. This means it is possible to record 10 hours of music in CD quality on a single CD-ROM. ENGLISH When creating MP3 CDs please note the following: File system: ISO9660 Directory structure: maximum of 8 levels Formats: *.mp3 Filenames: maximum of 12 characters (8+3) Maximum of 32 albums, 999 titles Supported sampling frequencies: 32, 44.1, 48 (kHz). Music with sampling frequencies other than these will be skipped. Supported bit rates: 32, 64, 96, 128, 192, 256 (kbit/s) ID3 Tag: Version 1, 1.1. In later versions the directory name is displayed as the album and the filename as the title. Important notes for playback: Only the first session of a multi-session CD will play back. 1 Insert an MP3 CD. Playback starts automatically. MP3 CD display If the TV is on, the MP3 CD screen appears automatically. During playback, the current track number and its elapsed playing time will show on the TV screen and on the recorder display. During stopped playback ( STOP h button) the numbers of the albums will show on the TV screen and on the display. Further information on the album, track and artist will also be displayed if included in the ID tag. Tip 2 Stop playback using STOP h . The number of albums is displayed in the display. Additional playback features Using N or O select the next or previous title. You can also use the T/C button to select titles and albums. 1 Press the T/C button and use the C or D button to select the 'T' symbol for title or 'C' for chapter. 2 Use the B or A buttons or the number buttons 0..9 on the remote control to select the number of the title/chapter. You can also use the repeat functions ( PLAY MODE button). Tip Playback 41
  • 50.
    Playing a (Super)Video CD (Super) Video CDs may be equipped with PBC (Play Back Control). This means that special playback functions (menus) can be directly selected. The video CD must be PBC compatible (see CD case). 'PBC' is active in the default settings. 1 Insert a (Super) Video CD. If the 'h' symbol appears in the display, start playback by pressing PLAY G . 2 If a menu appears on the screen, use the remote control buttons indicated on the screen to select the menu option you want (PREV= N , NEXT= O ) or with the number buttons 0..9 . If a PBC menu consists of a list of titles, you can select a title directly. 3 Use RETURN to go back to the previous menu 4 Stop playback using STOP h . 42 Playback
  • 51.
    G Additonal playback features Changing to another title/chapter If there is more than one title or chapter on a disc you can change to another title or chapter as follows. However if there are several chapters within a title, these will be selected. The title can then still be selected via the menu bar. ENGLISH 1 During playback, press O to go to the next title/chapter. Press N to return to the start of the current title/chapter. Press N twice to return to the start of the previous title/chapter. Use the T/C (title/chapter) button 1 Press T/C (title/chapter) and then use A or B to select the appropriate title. Make sure the symbol 'T' (title) is selected in the menu bar. 2 Use T/C to select chapters within a title. Press T/C and use C to select the 'C' symbol (chapter). Now select the appropriate chapter with A or B . Tip Searching a disc You can search the disc for a recording at 4x, 8x or 32x playback speed. Other speeds can only be selected via the menu bar ('K'). 1 During playback, press and hold N (reverse) or O (forwards) to switch to the search feature. You can switch between the playback speeds using N / O . 2 To continue playback, press PLAY G at your chosen location. a No sound b The sound is switched off in search mode. This is not a fault in your machine. Problem Search feature via menu bar 1 During playback press SYSTEM-MENU on the remote control. The menu bar will appear at the top of the screen. 2 Select the ' K ' symbol using C or D and confirm with B . 3 You can now use the D or C button to select different forward and backward search speeds. 4 If necessary, switch the menu bar off with the SYSTEM-MENU button. 5 To continue playback, press PLAY G . Tip Additonal playback features 43
  • 52.
    Still picture 1 During playback, press PAUSE 9 to stop playback and display a still C01 2:04 picture. Frame advance via menu bar 1 During a still picture press SYSTEM-MENU on the remote control. The menu bar will appear at the top of the screen. 2 Select the 'I ' symbol using C or D and confirm with B . 3 You can now use the D or C button to go forwards or backwards one frame at a time. 4 If necessary, switch the menu bar off with the SYSTEM-MENU button. Tip 2 To continue playback, press PLAY G . Slow motion 1 During playback press PAUSE 9 on the remote control. Now hold down N or O to switch to slow motion. 2 You can switch between different speeds using N or O . Slow motion via menu bar 1 During playback press PAUSE 9 and then SYSTEM-MENU on the remote control. The menu bar will appear at the top of the screen. 2 Select the ' ' symbol using C or D and confirm with B . J 3 You can now use the D or C button to select different forward and backward slow motion speeds. 4 If necessary, switch the menu bar off with the SYSTEM-MENU button. Tip 3 To continue playback, press PLAY G twice. 44 Additonal playback features
  • 53.
    Search by time Using this feature you can select where playback should start (select elapsed time). 1 ENGLISH During playback press SYSTEM-MENU on the remote control. The menu bar will appear at the top of the screen. 2 Select the 'L' symbol using C or D and confirm with B . Playback is stopped and a box appears on the screen showing the elapsed time. 3 Enter the start time with the digit keys 0..9 from where playback should start. 4 Confirm with OK . a The time entered will flash on the screen b The selected title is shorter than the time entered. Enter a new time or cancel the function by pressing SYSTEM-MENU . Problem 5 Playback starts at the time you entered. Repeat/Shuffle play You can mark entire sections or the whole disc for endless playback. Depending on the type of disc (DVD video, DVD+RW, video CD) you can select a chapter, title or the entire disc. 1 Select the desired chapter, title or the entire disc and start playback. 2 During playback, press PLAY MODE . By pressing PLAY MODE again you can chose from the following options: •) '2': repeat chapter (DVD only) •) '3': repeat track/title •) '5': repeat entire disc (Video CD, Audio CD only) •) '/': Shuffle •) Display disappears: no repeat 3 To end the repeat, press the STOP h button. You can also keep pressing the PLAY MODE button until the displays disappear. Additonal playback features 45
  • 54.
    Repeating a passage(A B) You can repeat a particular passage within a title/chapter. You need to indicate the start and end of the passage. 1 During playback press PAUSE 9 at the start point. You will see a still picture. 2 Keep pressing PLAY MODE until '0' appears on the screen. The start point is now saved. Press PLAY G to start playback. 3 When the end point is reached press OK . '1' appears on the TV screen. Playback now takes place within these points. 4 To end the repeat, press the STOP h button. You can also keep pressing the PLAY MODE button until the displays disappear. Scan feature This feature plays back the first 10 seconds of each chapter (DVD) or track (CD). 1 During playback, press PLAY MODE . Select '6' using PLAY MODE . 2 After 10 seconds the DVD recorder switches to the next chapter/index. To start playback at the relevant chapter/index press STOP h and then PLAY G . Camera angle If a DVD contains scenes that have been shot from different camera angles you can select these camera angles for playback. 1 During playback, press PAUSE 9 . You will see a still picture. 2 Press SYSTEM-MENU and select the 'F' icon using C . a The ' F ' symbol will be hidden b The selected scene has been shot from only one camera angle. This feature is therefore not available. For more information please read the cover of your DVD disc. Problem 3 Select the required camera angle with B or A . You can also directly enter the number with the number buttons 0..9 . 4 After a short time, playback will resume from the new camera angle. The 'F' symbol will remain visible until a scene starts for which there is only one camera angle. 46 Additonal playback features
  • 55.
    Zoom feature The Zoom feature allows you to enlarge the video image and pan through the enlarged image. 1 ENGLISH During playback, press ZOOM . The DVD recorder switches to 'PAUSE'. You will see a still picture. 2 Select the required zoom factor using B or A . 3 When 'press OK to pan' appears on the screen, the zoom process is complete. 4 Press OK . Using A , B , C , D select the part of the image you wish to view. 5 Confirm with OK . 6 To stop the feature, press PLAY G and then SYSTEM-MENU . Select the audio language Many pre-recorded DVD discs have more than one audio language. The language initially selected for playback will be the one you selected when you first set up the DVD recorder. However you can change the audio language of the inserted disc at any time. You can change the audio language either using the menu of the inserted disc ( DISC-MENU button) or the AUDIO button. The audio languages for DVD playback in the two menus may be different. Please note that with some DVDs the audio language and/or subtitle language can be changed only via the DVD menu. 1 During playback press AUDIO . 2 Select the required audio language using B or A . You can also enter the number directly using the number buttons 0..9 . 3 Play continues in the new audio language. Subtitles Many pre-recorded DVD discs have more than one subtitle language. The language initially selected for playback will be the one you selected when you first set up the DVD recorder. However you can change the subtitle language of the inserted disc at any time. You can change the subtitle language either using the menu of the inserted disc ( DISC-MENU button) or the SUBTITLE button. The subtitle languages in the menus may differ. 1 During playback press SUBTITLE . Select the required subtitle language using B or A . You can also enter the number directly using the number buttons 0..9 . You can switch off subtitles again with 0 or by pressing 'off'. 2 Playback continues in the new subtitle language. Additonal playback features 47
  • 56.
    H Disc Manager (DM) General information The 'Disc Manager' is an integrated database in the DVD recorder that remembers all recordings made by this DVD recorder. This gives you a complete overview of your entire video collection at the touch of a button. The Disc Manager gives you quick and easy access to every recording made with this DVD recorder. The Disc Manager also tells you which film was recorded on which disc and how many unrecorded minutes remain on the discs. And: You can go automatically to the beginning of the selected recording and start playback. How many discs can I save in the Disc Manager? You can store up to 999 discs on this DVD recorder. The maximum number of titles is more than 9,000. The maximum number of titles per disc is 49. ? Caution when recording with other DVD recorders Don't use a disc stored in the Disc Manager for recording on other DVD recorders. If you use a disc to record on another DVD recorder, then this disc will no longer be recognised by the Disc Manager. In this case, delete the disc from the Disc Manager's memory and then add it after it has been recorded. Adding 'child proof discs' If you want to add child-proof discs you need to enter the PIN code. Tip Adding a disc to the Disc Manager You can only add DVD+RW or DVD+R discs to the Disc Manager since other discs do not hold any information on the titles or lengths of the recordings. These discs have to be at least once recorded in the DVD-Recorder. A table of content have to be available. DVD+R discs can also be finalised. Other discs cannot be added to the Disc Manager. Recordings are saved automatically On a disc that has been added to the Disc Manager, you can make new recordings as often as you like using this DVD recorder. The titles of these recordings will be stored in the Disc Manager automatically. Tip 1 Switch on the TV set. If required, select the programme number for the DVD recorder. 48 Disc Manager (DM)
  • 57.
    2 Insert a DVD+RW/+R disc in the DVD recorder. Disc Manager Find title C04 a When I insert a disc I see a number on the screen in the index Browse discs Disc number001 Remove a disc Disc number001 picture screen in the top left hand corner Add current disc Next free disc number= 001 b You have inserted a disc that has already been registered by the Disc Problem ENGLISH Manager. 3 Press the DISC MANAGER button on the remote control. To exit press DM 4 Select 'Add current disc' using A or B and confirm with C . 5 Confirm with OK . The disc number will be added to the Disc Manager. 6 The disc number is then displayed and the disc tray opens automatically. 7 The disc is now stored in the Disc Manager under the displayed disc number. Please write this number on the disc and on the cover. Why do I need to label the discs? When searching for unrecorded free space or available recordings, you will asked to insert the appropriate discs (disc numbers). ? 8 To end, press DISC MANAGER . The DVD recorder will immediately recognise that this disc is saved in the Disc Manager. When this disc is inserted the disc number will appear in the title overview in the top left-hand corner. Removing discs from the Disc Manager Every DVD+RW/+R is stored with a number in the Disc Manager (DM). You can remove this disc number from the Disc Manager to use the Disc Manager's memory for new discs or to remove damaged discs from memory. 1 Press DISC MANAGER on the remote control. 2 Select 'Remove a disc' using A or B and confirm with C . Disc Manager 3 Select the disc number with A or B and confirm with OK . Find title C04 Browse discs Disc number001 Remove a disc Disc number001 Disc contents are not deleted. Add current disc Next free disc number= 001 The disc is only removed from the Disc Manager's memory. Its contents remain unchanged. Tip 4 To end, press DISC MANAGER . To exit press DM Disc Manager (DM) 49
  • 58.
    Searching for atitle in the Disc Manager This function can be used to quickly and easily find and play back a recording saved in the Disc Manager. 1 Press DISC MANAGER on the remote control. 2 Select 'Find title' using B or A and confirm with C . Disc Manager 3 A list of the titles of all recordings stored in the Disc Manager (DM) Find title Title Date Duration will appear on the TV screen. Charly 1 01/01/03 0:28 What do the displays on the screen mean? 'Title' = Title 'Date' = Date of the recording 'Duration' = Length of the recording Page1/1 Tip To select title press OK 4 Select the title that you want to play back with B or A . 5 Confirm with OK . The DVD recorder will jump to the start of the selected recording. a I see the message 'Insert disc number' on my screen b The selected recording is located on the Disc Manager disc with the displayed disc number. Please insert the appropriate disc. After a brief check, the DVD recorder will jump to the start of the selected recording. Problem Searching discs You can easily search for the title of a recording stored in the Disc Manager. To do this, the appropriate disc does not have to be in the DVD recorder. 1 Press DISC MANAGER on the remote control. 2 Select 'Browse discs' using B or A . 3 Confirm with C . The screen will show the contents of the last Disc Manager disc used. Disc Manager 4 Use A or B to select a different disc number if necessary and confirm with C . Disc number 001 Browse discs Title Date Duration Charly 1 01/01/03 0:28 What do the displays on the screen mean? 'Title' = Title 'Date' = Date of the recording 'Duration' = Length of the recording ? Page1/1 To select title press OK 50 Disc Manager (DM)
  • 59.
    5 Press A or B to select the desired title. 6 Confirm with OK . a I see the message 'Insert disc number' on my screen b The selected recording is located on the Disc Manager disc with the Problem ENGLISH displayed disc number. Please insert the appropriate disc. 7 The DVD recorder searches for the start of the appropriate recording. Searching for a blank section You can search for space for a new recording on the disc (at least 1 minute of blank space), for example at the end of existing recordings. This only works with discs which have already been stored in the Disc Manager. 1 Press DISC MANAGER on the remote control. 2 Select 'Browse discs' using A or B . 3 Confirm with OK . A list of the recordings on the disc you have selected will appear on the TV screen. 4 Use A or B to select a disc (disc number) on which there is enough space for the recording. How can I see how much space is available for the recording? The space available is designated as 'Empty'. The time is displayed next to the title 'Empty'. You can use the REC MODE button to change the recording mode (recording time). How can I choose the titlel 'Empty' if there were many recordings on the disc? In this case press C and then select with B , A the title 'Empty'. ? Disc Manager 5 Select the title 'Empty' with A or B . Browse discs Disc number 001 6 Confirm with OK . Title Date Duration Charly 1 01/01/03 0:28 a I see the message 'Insert disc number' on the screen. b The blank space is located on the Disc Manager disc with the displayed disc Page1/1 number. Please insert the appropriate disc. Problem To select title press OK The DVD recorder rewinds to the beginning of that particular part and automatically switches to Stop. Disc Manager (DM) 51
  • 60.
    I The 'Digital Photo Manager' Using the 'Digital Photo Manager', you can view and modify JPEG pictures from a memory card, Picture CD, DVD, or a CD ROM. You can store them on a DVD+RW/+R or on the memory card. In addition, you can store the pictures in a so-called album in a specific order, yet without changing the order in which the pictures are stored on the memory card. Moreover, you can view the pictures in a slide show at adjustable intervals. Store the slide show on a DVD+RW/+R so you can view them on a DVD player. How many pictures can be organized from the DVD Recorder? Since the storage size of a JPEG picture depends on different parameters (quality, picture information, JPEG compression, resolution of the camera,...) the limitation is only the available storage capacity. You can store up to a maximum of 999 photos in one album on a DVD+RW/+R or memory card. In case you want to store pictures on a medium that cannot be recorded by the DVD recorder (Picture CD, CD-ROM, finalised DVD+R, DVD), you can store up to a maximum of 100 pictures per album in 20 albums. These albums will be stored in the internal memory with the appropriate disc ID-number. With this number the allocation to the different disc is possible. ? Select from the following chapters: 'The PC (PCMCIA) card', to install or remove the memory card. 'Showing JPEG pictures from a roll' , in order to view and modify the pictures and create slide shows from the roll. 'Advanced editing of JPEG pictures, for advanced editing options such as color, sharpness... 'Creating an album ', to arrange pictures from different rolls in a definite order and to create a slideshow from the album. 'Making a 'DVD compatible' slide show', Make a slide show from the roll/album for viewing on a DVD-player. 'Storing rolls/albums on a DVD+RW/+R' , Store your JPEG pictures for archiving on a DVD+RW/+R. 'Changing roll settings' , to modify the rolls to your personal preferences. 'Changing album settings' , to modify the albums to your personal preferences. 'Changing the media settings', to modify the storage media (DVD+RW/+R, memory cards) to your personal preferences. What is the difference between a 'Roll' and 'Albums'? 'Roll' A folder containing JPEG pictures. It is comparable with a conventional 35mm film for cameras. Rolls will be created automatically from the digital cameras. 'Albums' A binary file containing references to the pictures on the rolls. It is comparable with a conventional photo album that may contain the pictures of different films (rolls). You can delete an album without deleting the pictures of the rolls. ? 52 The 'Digital Photo Manager'
  • 61.
    The PC (PCMCIA)Card In this DVD-Recorder you can use the following types of memory cards with an adapter: •) SD memory cards •) Multimedia Card ENGLISH •) CompactFlash •) SmartMedia •) Memory Stick/Memory Stick pro •) Micro Drive •) xD Picture Card The DVD-Recorder can read/write files, which were stored on memory cards using the file systems FAT 8, FAT 12, FAT16 and FAT 32. This means that it can handle memory cards larger than 2 GB. Inserting the PC Card 1 If necessary, insert the memory card into the PC Card adapter first. The label must be facing up. The contacts must be facing the device. 2 Insert the PC Card into the media slot in the front of the recorder until the EJECT button sticks out of the device front completely. Press this button only if you want to remove the PC Card. Removing the PC Card 1 Press the EJECT button next to the PC Card. 2 This will push the card out of its slot. If the card remains in the slot, insert the PC Card once again and press the EJECT button again. Warning ! Insert/Remove the PC Card only when there is no access to the memory card. This could damage the memory card. You can recognise the access by: •) A moving disc symbol lights up on the top left corner of the screen If you were not sure, press in the 'Digital Photo Manager' the button PHOTO . This will take you directly into the 'Media menu' screen. You can also switch the DVD Recorder off with the STANDBY m button. The 'Digital Photo Manager' 53
  • 62.
    Showing JPEG picturesfrom a roll The DVD recorder can read JPEG pictures stored on a CD-ROM, Picture CD, memory card, or a DVD and write them on a DVD+RW/+R or memory card. Please observe the following: •) The file extension has to be '*.JPG' and not '*.JPEG'. •) These pictures must be stored in the root directories or in a subfolder called 'DCIM' in folders. These will be recognized by the DVD recorder as rolls (comparable with a 35mm roll for cameras). You can select the directories (folders) as rolls in the 'Media menu'. •) This device is compatible with still pictures (JPEG) •) It can only display DCF-standard still pictures or JPEG pictures e.g. TIFF. It cannot play back moving pictures, Motion JPEG, and other formats, or pictures in formats other than JPEG, or pictures associated with sound e.g. AVI-files. 1 Insert the medium you want to use (CD, DVD+RW/+R, memory card). 2 Press PHOTO on the remote control. The 'Media menu' will appear. 3 Use B or A to select the medium you want to process (disc or memory card). If you did not insert the corresponding medium (disc or memory card), a warning sign will appear above the symbol on the left hand side of the screen. 4 Confirm with C . 5 Select 'Roll' using B or A and confirm with C . 6 You will see an overview with the first picture of each roll that contains pictures. The display and the description of the roll will depend on the camera or the computer program used to create this roll. 7 Select the desired roll using B or A and confirm with OK . 8 The data will be read and then an overview of the stored pictures will be displayed. 9 You can select a picture for viewing or editing with D , C , B , A. Fast browsing trough the pictures With O or N you can switch one page forward or backward. You can also select a picture with the number buttons 0..9 on the remote. Tip 0 Press OK to select the desired picture. A The picture will be displayed as a full picture on the screen. 54 The 'Digital Photo Manager'
  • 63.
    Editing JPEG pictures 1 On the corresponding pictures press SELECT to select them for editing. The picture frame appears in a different color. ENGLISH If you want to deselect the pictures, press SELECT on the selected pictures again. 2 Keep pressing A until the menu bar is selected. Select one of the displayed functions with the C or D button. Which options are available? 'Menu': leave the menu 'Play': Starts the slide show 'Erase': Erases the selected pictures 'Rotate': Rotates the selected pictures by 90° 'Copy': Copies the selected pictures on the other loaded media (from memory card to DVD+RW/+R or vice versa) 'Select all': Selects all pictures 'Cancel': Cancels the changes Using the buttons on the remote 'Play': Button PLAY G 'Erase': Button CLEAR and then OK 'Rotate': Button ANGLE Tip Slide show You can display JPEG pictures in the selected roll automatically one after the other at adjustable intervals. Starting the slide show 1 Press PLAY G to start the slide show. Interrupting the slide show 1 Press PAUSE 9 . This will stop the automatic display of the pictures. 2 Press PLAY G to resume the slide show. Closing the slide show 1 Press STOP h . The picture overview will appear. The 'Digital Photo Manager' 55
  • 64.
    Changing the slideshow settings 1 Press SYSTEM-MENU during playback of the slide show. 2 Select one of the displayed functions with the D or C button. Which options are available? 'Overview': Returns to the picture overview. Has the same function as STOP h 'Play': Resumes the slide show. Has the same function as PLAY G 'Timer': Select one of various speeds by pressing B Confirm with C . Start the slide show with PLAY G . 'Repeat': Switches repeat playback of the slide show on and off Using the buttons on the remote Repeat playback: Button PLAY MODE Enlarge pictures: Button ZOOM Edit pictures: Button EDIT Tip Advanced editing of the JPEG pictures You can edit the pictures in the DVD recorder and then store them back on the memory card or a DVD+RW/+R. The original picture remains unchanged, and the modified one is additionally stored on the medium. Please make sure the memory card or DVD+RW/+R is not write-protected and has enough storage space. 1 Press at the required picture the button EDIT . 2 Select one of the displayed functions with the D or C button. Using the buttons on the remote ANGLE : Rotates the picture ZOOM : Enlarge the picture STOP h : Returns to the picture overview CLEAR : Discard the changes. The picture will be reloaded. Tip 'Overview' Returns to the picture overview. 'Rotate' Rotates the picture by 90° each time you press OK . 'Flip' Mirrors the picture along its vertical axis when you press OK . 56 The 'Digital Photo Manager'
  • 65.
    'Zoom' Using this function, you can enlarge the picture and pan through the enlarged picture. 1 Press OK to activate the zoom function. 2 Select the area to be enlarged with D , C , B , A . ENGLISH 3 You can press ZOOM to enlarge the selected area at several steps. 4 Press OK to return to the normal picture size. 'Filters' Using this function, you can modify the picture properties. 1 Press B and select one of the displayed functions using B or A . Confirm with C . Which options are available? 'Sepia: Displays the entire picture in brown colors. It gives the picture an 'antique' appearance. 'Negative': Converts the picture into a black-and-white negative. 'Colour negative': Converts the picture into a color negative. Comparable to a color negative film. 'Black & white': Converts the picture into a black-and-white picture. 'Soften': Use this function to reduce picture sharpness in three steps, from edge blurring to a visible blur. Tip 2 Keep pressing A until the menu bar is selected. 'Colour' Using this function, you can change the red, green, and blue color components of the picture. 1 Press B . 2 Use B or A to select the corresponding color control. 3 Change the color using D or C . 4 Keep pressing A until the menu bar is selected. 'Reset' This setting will appear only if changes have already been made to the picture. If you want to discard the changes, confirm with OK . 'Save' This setting will appear only if changes have already been made to the picture. If you want to save the changes, confirm with OK . The 'Digital Photo Manager' 57
  • 66.
    Creating an album You can store pictures contained in a memory card or DVD+RW/+R in a so-called 'Albums' in a different order. Albums are binary files containing information on the orientation and storage location of the pictures. Albums from a medium that cannot be recorded by the DVD recorder (Picture CD, CD-ROM, finalised DVD+R), will be stored in the internal memory of the DVD recorder. You can store up to a maximum of 100 pictures per album in 20 albums. Adding pictures to an album 1 Select 'Albums' in the 'Media menu' using B or A and confirm with C . 2 An overview of the albums you already created will appear. Select 'New album' with B to create a new album. 3 Press C . The menu 'Album Settings' will appear. In a new album, the line 'Add photos' is already highlighted. 4 Confirm with OK . 5 The roll overview will appear. 6 Use B or A to select the roll from which you want to add pictures to the album. 7 Confirm with C . The picture overview will appear. 8 Use D , C , B , A to select the pictures you want to add to the album. 9 Confirm each selected picture with SELECT . Do not pay attention to the order of the pictures. You can change it later in the album. Select all pictures If you want to store many pictures in the album, select 'Select all'. Then use SELECT to select the pictures you don't want to add to the album. These pictures will be deselected. Tip 0 Keep pressing A until the menu bar is highlighted. A Select 'Done' with D or C to add all selected pictures to the album. B Confirm with OK . The album will be created. 'SAVING' will appear in the display while the album is created. Do not remove the medium from the device! C The menu 'Album Settings' will then automatically appear. À To add additional pictures, use B to select 'Add photos' and confirm with OK . Á Repeat steps 5 to À until the album contains all the desired pictures. 58 The 'Digital Photo Manager'
  • 67.
    Changing the pictureorder within an album You can change the order of the pictures within an album as you wish. The order of the pictures of the rolls remains unchanged. ENGLISH 1 Select 'Albums' in the 'Media menu' using B or A and confirm with C . An overview of the albums you already created will appear. 2 Press C to select the desired album. The 'Album Settings' menu will appear. 3 Select 'Overview' by pressing B . The 'Overview' option can be found on the second menu page 4 Confirm with OK . 5 Use B , A , D , C to select the picture you want to move to a different position. 6 Press SELECT . The picture frame appears in a different color. 7 Keep pressing A until the menu bar is highlighted. 8 Select 'Move' using D or C and confirm with OK . 9 Use B , A , D , C to select the position before which the desired picture is to be moved. 0 Confirm with OK . The picture will be inserted. Editing pictures in an album You can also erase, rotate, or hide pictures in an album. These changes will only affect the album. The pictures on the disc or the memory card will remain unchanged. 1 Select the pictures you want to change in the 'Album overview' using SELECT . 2 Keep pressing A until the menu bar is highlighted. 3 Select one of the displayed functions with the D or C button. What do the individual functions mean? 'Menu': Closes the current menu 'Play': Starts the slide show of the album 'Move': Changes the order of pictures within an album. 'Erase': Erases the pictures from an album. The picture on the media remains unchanged. 'Rotate: Rotates pictures by 90° 'Hide': Hides pictures for the slide show 'Select all': Selects all pictures 'Cancel': Discards all changes Using of the buttons on the remote 'Play': Button PLAY MODE 'Erase': Button CLEAR 'Rotate': Button ANGLE ? The 'Digital Photo Manager' 59
  • 68.
    Making a 'DVDcompatible' slide show Using this function, you can record the pictures in such a way, that you can view the slide show from a roll or an album on a DVD player. The slide show will be stored on the DVD+RW/+R as a video title. If you want to store the photos in the JPEG format in addition to the video title, you must prepare the DVD+RW so that you can store both pictures and videos. See section 'Preparing a DVD+RW/+R'. On a DVD+R you can only store either photos or videos. A combination of JPEG photos and video is not possible. Making a slide show from an album 1 Select the disc (top symbol) in the 'Media menu' and confirm with C. 2 Add pictures to the album as described in chapter 'Adding pictures to the album'. 3 You can change the order of the pictures, erase unwanted pictures, enter a new name for an album, or change the cover picture of the album, until the album corresponds to your personal preferences. 4 Select 'Make video title' in the menu 'Album Settings' using B , A. 5 Confirm with OK . 'SAVING' will appear in the display and the screen will show the time left until completion. The new album will be stored on the DVD+RW/+R as a video title (movie). It will appear in the index picture screen as a separate title. This video title will be recorded automatically after the last recording. No existing titles will be overwritten. Ensure that there is enough space on the disc. 6 To end, press DISC-MENU . Making a slide show from a roll Each roll will be stored as one video title on the DVD+RW/+R. If you want to make a video title from different rolls, you have to create an album first. Then you can store the album as a video title on the DVD+RW/+R. 1 In the 'Media menu' screen select the memory card (symbol in the middle) and confirm with C . 2 Select the line 'Rolls' and confirm with C . 3 Select with B , A , the roll from which you want to make a video title. 4 Press C the 'Roll Settings' menu will appear. 60 The 'Digital Photo Manager'
  • 69.
    5 Select the line 'Make video title' using B , A an confirm with OK . 'SAVING' will appear in the display and the screen will show the time left until completion. The new roll will be stored on the DVD+RW/+R as a video title (movie). It will appear in the index picture screen as a separate title. This video title will be recorded automatically after the last recording. ENGLISH No existing titles will be overwritten. Ensure that there is enough space on the disc. 6 To end, press DISC-MENU . Storing rolls/albums on a DVD+RW/+R If you want to store the JPEG pictures from the rolls/albums on a DVD+RW/+R, you must first prepare the disc. Preparing a DVD+RW/+R 1 Press PHOTO on the remote control. The media menu will appear. 2 Use B or A to select the disc alone as a medium. If you did not insert a disc, a warning sign will appear above the symbol on the left hand side of the screen. 3 Press C . 4 Select 'Media settings' using B and confirm with OK . 5 Use B or A to select whether you want to store 'Photo only'or 'Video & photo' together on this disc. Please note, that DVD+R's or memory cards can only be prepared for 'Photo only'. What is the difference? 'Photo only' The DVD+RW/+R will be prepared so that only pictures can be stored on the entire disc (4,4 GB). 'Video & photo' On the DVD+RW/+R a space (650 MB) will be reserved for storing pictures additionally to movies. So you can store the appropriate photos after the movie. A DVD+R can not be prepared for 'Video & photo' How long does this process last? To prepare a disc for 'Video & photo', a new DVD+RW has to be formattet first. This can take up to 25 minutes. You can speed up the process, if you use a prerecorded disc. ? 6 Confirm with OK . 7 WARNING! All data on the disc will be erased. If you want to continue, press OK . To cancel the process, press B or A . The 'Digital Photo Manager' 61
  • 70.
    8 'PREPARING' will appear in the display until the preparation is complete. 9 If the disc has been successfully prepared, the 'Media settings' menu will appear, indicating the available storage space. (4.4 GB for 'Photo only'/650MB for 'Video & photo') Transfer the photos to a DVD+RW/+R Using this function, you can store the pictures on the DVD+RW/+R in the same format as on a memory card. You can handle these pictures as if they were stored on a memory card. If you want to play this DVD on a computer drive, ensure that the operating system of your computer can handle the file system UDF 1.5 (Universal Disc Format). If you want to play back a DVD+RW/+R on a DVD player, read section ' Making a 'DVD compatible' slide show '. 1 Press PHOTO on the remote control. The 'Media menu' will appear. 2 Use B or A to select the disc with the memory card (last symbol). If you did not insert a disc, a warning sign will appear above the symbol on the left hand side of the screen. 3 Press C . 4 Use B or A to select whether you want to copy the complete memory card into a roll or to create additionally to the roll an album that contains the same pictures as the roll. The creation of the album makes edits easier. Attention! Ensure that the data of the memory card fits on the available space on the DVD+RW/+R. (4,4GB photo only/650MB photo and video). Storing the album will also store the corresponding pictures. 5 Confirm with OK . 'SAVING' will appear on the display. A bar with a time display will appear on the screen until the process has been completed. 62 The 'Digital Photo Manager'
  • 71.
    Changing roll settings You can adjust various roll settings to your individual needs. You can change the name and date of a roll. ENGLISH Changing the rolls name You can re-enter or change the name of an existing roll. The name on the storage media will not be changed. The new name will be stored additionally. 1 Select 'Roll name' in the menu 'Roll Settings' using B , A and confirm with C . 2 Type the new roll name using the 0..9 buttons like you would do on a cellular phone. You can also move to the position where you want to enter or change a character using D , C . 3 Enter the new name with the buttons B , A . Enter the characters with the buttons 0..9 Press a number button as often as the required character or the number appears. You can enter language dependent characters with the buttons N or O on the corresponding character e.g.: 'ä', button 2 for 'a' and then with O as often as 'ä' appears. For special characters press the button 1 repeatedly. The position for the following character will be selected automatically. To enter a space press the button 1 . To switch over to upper case characters press SELECT . To erase a character press CLEAR . Tip 4 To end, press OK . Changing the rolls date 1 Select 'Date' in the menu 'Roll Settings' using B , A and confirm with C . 2 Select the field you want to change using D , C . 3 Change the date using B , A or use the 0..9 buttons to enter the numbers. 4 Confirm the changes with OK . Calling roll overview directly 1 Select 'Overview' in the 'Roll Settings' using B , A , and confirm with OK . 2 This will take you directly into the roll overview where you can make changes. The 'Digital Photo Manager' 63
  • 72.
    Deleting a roll WARNING! This procedure cannot be reversed, since the rolls will also be erased from the corresponding media. Deleting a roll will also affect any album that uses pictures contained in this roll. Therefore, apply this function with particular care. 1 Select 'Erase roll' in the menu 'Roll Settings' using B , A , and confirm with OK . 2 If you really want to delete the roll, press OK to confirm, otherwise cancel the function using A . 3 The overview of all rolls will then be displayed. Changing album settings You can adjust various album settings to your individual needs. You can change the name and date of an album. Moreover, you can copy or delete the album. Changing the cover picture You can change the picture used to represent a certain album in the 'Album overview'. As a rule, the first picture of an album is used as the cover picture. However, you can use any picture in the album as a 'cover picture'. 1 Select 'New cover photo' in the 'Album Settings' using B , A and confirm with OK . The album will be read and a picture overview of the album will appear. 2 Use B , A , D , C to select the picture you want to use as the 'cover picture'. 3 Confirm with OK . The new 'cover picture' appears in the bottom left corner of the 'Album Settings'. Changing the album name You can re-enter or change the name of an existing album. 1 Select the 'Album name' in the 'Album Settings' using B , A and confirm with C . 2 Type the new album name using the 0..9 buttons like you would do on a cellular phone. You can also move to the position where you want to enter or change a character using D , C . Change the characters with B , A . 64 The 'Digital Photo Manager'
  • 73.
    How can Ienter the characters with the buttons 0..9 ? Press a number button as often as the required character or the number appears. You can enter language dependent characters with the buttons N or O on the corresponding character e.g.: 'ä', button 2 for 'a' and then with O as often as 'ä' appears. For special characters press the button 1 repeatedly. ENGLISH The position for the following character will be selected automatically. To enter a space press the button 1 once. To switch over to upper case characters press SELECT . To erase a character press CLEAR . ? 3 To end, press OK . Changing the album date 1 Select 'Date' in the 'Album Settings' using B , A and confirm with C . 2 Select the field you want to change using D , C . 3 Change the date using B , A or use the 0..9 buttons to enter the numbers. 4 Confirm the changes with OK . Calling the album overview directly 1 Select 'Overview' (second page) in the 'Album Settings' using B , A and confirm with OK . 2 This will take you directly into the album overview where you can make changes. Copying an album Using this function, you can: •) Copy albums created on a memory card to a DVD+RW/+R •) Copy albums created on a DVD or a CD-ROM to a memory card. This will also store the pictures used for the album. 1 Select 'Copy album' (second page) in the menu 'Album Settings' using B , A and confirm with OK . a It is not possible to select 'Copy album' b There is no media in the DVD-Recorder to store an album/'Roll'. Insert a DVD+RW/+R disc or insert a memory card. Problem The 'Digital Photo Manager' 65
  • 74.
    Erasing an album It is also possible to erase an album. The pictures within an album will not be deleted and shall remain on the storage medium (disc or memory card) unchanged. 1 Select 'Remove album' (second page) in the 'Album Settings' using B , A and confirm with OK . 2 If you really want to erase the album, press OK to confirm, otherwise cancel the function using A . 3 The overview of all albums will then be displayed. Changing the media settings You can adjust various settings for a DVD+RW/+R or a memory card. If a CD-R/RW is loaded no changes can be made, because this media cannot be recorded by the DVD recorder 1 Press PHOTO on the remote control. The 'Media menu' screen will appear. 2 Use B or A to select the medium you want to process (disc or memory card). If you did not insert the corresponding medium (disc or memory card), a warning sign will appear above the symbol on the left hand side of the screen. 3 Press C . 4 Select the line 'Media settings' and confirm with OK . 'Media name' The name of the media will be created by the digital camera. 'Protection' The write protection of the media can be switched on or off. You can use this function only if the write protection can be switched off by a software. You can not select this line if your memory card was equipped with a mechanically switch. 'Prepare media' The DVD+RW/+R will be prepared for the data transfer. Read further information in the section 'Preparing a DVD+RW/+R'. 'Finalise disc' You can select this line only if a 'not finalised' DVD+R is loaded. If you store pictures on a DVD+R, you have to finalise the disc to play it on a DVD-player. Once this process is complete, no further changes can be made. 'Erase media' With these setting all data (rolls and albums) can be erased on a recordable media (DVD+RW or memory card). This procedure cannot be reversed 66 The 'Digital Photo Manager'
  • 75.
    Problem solving for'Digital Photo Manager' ENGLISH PROBLEM SOLUTION b'Thumbnail not available' The photo does not have a associated thumbnail. In this case, the photo but not the thumbnail is viewable. b'Too large to display' The image is too large to be viewed in its thumbnail format. Messages instead of b'Hidden photo' the thumbnails: The corresponding (hidden) photo will not be shown during the slide show. You can unhide this photo in the album overview again. b'Photo not found' In the album overview a photo entry is found that no longer exists on the referenced source media. bOn the inserted media (disc or memory card) no photo can be found. bThe file extension has to be *.JPG and not *.JPEG. Error message 'Media bThe storage media should contain a subfolder 'DCIM'. Under that there should be folders so does not contain called 'Rolls'. Only pictures in these folders can be recognised photos': bPictures can also be stored in the root directory. bBefore you make changes to the storage media check the content of the media in a computer or in a digital camera. bCheck that your DVD drive on the computer can read DVD+RW/+R discs. My computer can not bCheck that your operating system of your computer support the file system UDF (Universal Disc read the DVD+RW/+R: Format). Install if necessary the required driver. The DVD+RW/+Rs were recorded in the format UDF 1.02 ('Video & photo') and UDF 1.50('Photo only'). bThe file extension has to be *.JPG and not *.JPEG. bThe disc should contain a subfolder 'DCIM'. Under that there should be folders so called 'Rolls'. The disc (CD ROM, Only pictures in these folders can be recognised. DVD) can not be read bPictures can also be stored in the root directory. by the DVD Recorder, bIf you create a CD-ROM, you have to store the photos in the same directory structure as on a DVD+RW/+R no pictures available: If you use a CD-ROM from a photo shop or something similar, the whole disc will be searched for the photos on the basis of the disc format. The memory card can bThe memory card should contain a subfolder 'DCIM'. Under that there should be folders so called not be read by the 'Rolls'. Only pictures in these folders can be recognised. DVD Recorder, no bPictures can also be stored in the root directory. bThe file extension has to be *.JPG and not *.JPEG. pictures available: The 'Digital Photo Manager' 67
  • 76.
    J Manual recording General Which discs can I use for recording? With this DVD recorder, you can record on two types of DVD: DVD+RW This disc can be written to and then the contents deleted. DVD+R This type of disc can only be recorded once. If you want to play this DVD in a DVD player it must be finalised using the 'Finalise disc' function. It is not possible to make further recordings using this disc. If this disc is to be played in a DVD recorder it must not be finalised. Recordings can be added and deleted. The disc space (playback time) from the deleted recording cannot be recovered for further recordings ? Use the 'Manual recording' function to spontaneously start recording (e.g. to record a TV show already in progress). In the 'index display' select the title to be overwritten or 'Empty title' with B , A . If you insert recordings between existing recordings, check the lengths of the old and new recordings. If the new recording is too long the subsequent recording (title/chapter) will be overwritten. Insert new recordings at the end of all existing recordings (Safe Record) To add a new recording at the end of the last recording on the disc, hold down the REC/OTR n button until the message 'SAFE REC' appears on the display. For DVD+R discs each new recording is always added at the end of all previous recordings as existing recordings cannot be overwritten. End of disc is reached If the end of a disc is reached during recording, recording will stop and the Recorder will turn itself off automatically. Tip Please refer to section 'Recording without automatic switch off', if you want to manually start and stop your own recording. If you want to start a recording manually but have it stopped automatically, read the section 'Recording with automatic switch off'. (e.g. not to record to the end of the disc) Read the section 'Automatic recording from a satellite receiver', if you want a recording to be controlled automatically by a satellite receiver. Read the section 'Direct record' if you want to record a programme currently being shown. 68 Manual recording
  • 77.
    Recording without automaticswitch off 1 Switch on the TV set and select the programme number for the DVD recorder. ENGLISH 2 Insert a disc on which the recording is to be made. This disc is then checked for content and system. READING' will appear on the display. a Index display b A DVD+RW disc has been inserted that already contains recordings. Use the A or B button to select the point where the recording is to start. a The message 'EMPTYDISC' appears in the display b The disc inserted is a blank DVD disc. a A dialog box appears asking you whether you want to delete the contents or eject the disc b The disc inserted is a DVD+RW but its contents are not DVD video-compatible (e.g. a data disc). Recordings on this disc can only be made if the entire disc is first deleted with the REC/OTR n button. a The message 'Title limit' appears on the screen if a recording is to be made b A disc may contain a maximum of 48 titles (including blank titles). Delete titles or change the disc. Problem 3 If necessary, use the MONITOR button on the remote control to switch to the internal tuner in the DVD recorder. 4 Use CHANNEL q or CHANNEL r to select the programme number (station name) you want to record. This will appear on the display: 1 FREETITLE P01 Programme numbers of the external inputs: 'EXT1' Scart socket at the back EXT 1 TO TV-I/O 'EXT2' Scart socket at the back EXT 2 AUX-I/O 'CAM1' Front SVHS/audio sockets S-VIDEO / left AUDIO right 'CAM1' Front video/audio sockets A/V S-VIDEO / left AUDIO right Switching between the S-VIDEO and VIDEO sockets takes place automatically. If a signal is available at both sockets at the same time, the signal at the S-VIDEO socket has priority. 'CAM2' Digital Video (i Link) front socket DV IN Tip 5 To start recording, press REC/OTR n on the remote control or RECORD on the DVD recorder. If you want to start the recording at the end of the existing recordings, hold down the REC/OTR n button until the message 'SAFE REC' appears on the display. For DVD+R discs each new recording is always added at the end of all previous recordings as existing recordings cannot be overwritten. This will, for example, appear in the display: Manual recording 69
  • 78.
    C01 1:16:51 P01 Insert chapter markers During recording you can mark scenes so you can find them or hide them later. During recording, press EDIT at the start point. 'Inserting marker' appears on the TV screen. In the display, the number of the 'CHAPTER' increases by one. For further information on titles and chapters, see the section on 'Changing to another title/chapter' in 'Playback'. Tip 6 Use the STOP h button on the remote control or h on the machine to stop the recording. 'MENU UPDT' will appear on the display. The DVD recorder is writing the list of contents. Wait until the message disappears from the display. The recording is then complete. a The display will read 'DISC ERR' b Recording could not be completed correctly because of a disc error. Check the disc and clean it if necessary. Problem Making recordings on DVD+R discs compatible If you want to play back the recording on a DVD player, you need to finalise the disc in the DVD recorder. You can prepare your DVD for use in a DVD player using the 'Finalising' feature. See 'Finalising DVD+R discs' in 'Managing the disc contents'. Tip Interrupt recording (Pause) 1 During recording press PAUSE 9 , for example to avoid recording the commercials. 2 To continue recording, press REC/OTR n . End recording To end the recording, press the STOP h button. Wait until 'MENU UPDT' disappears from the display. Tip 70 Manual recording
  • 79.
    Recording with automaticswitch off (OTR one touch recording) ENGLISH 1 Insert a disc. 2 If necessary, use the MONITOR button on the remote control to switch to the internal tuner in the DVD recorder. 3 Use CHANNEL q or CHANNEL r to select the programme number (channel name) you want to record. 4 Press REC/OTR n on the remote control. 5 Each time you press REC/OTR n you will add 30 minutes to the recording time. How can I cancel the recording time I have just entered? To delete an entry, press CLEAR while the display shows the recording time. How can I check the remaining recording time? Press SYSTEM-MENU while an OTR is in progress. The time at which the recording will end will appear on the TV screen in the timer info box. ? Preventing accidental erasing of discs To ensure you don't accidentally delete a recording you can protect the entire disc. You can only ever protect the entire disc. You cannot protect individual recordings. What happens with DVD+R discs? As long as these discs are not finalised, they can be protected against accidental erasure in the same way as DVD+RW discs. ? 1 Insert the disc to be protected. 2 While the index screen is displayed press STOP h on the remote control. The first title is highlighted. 3 Press A . This takes you to the disc info screen. 4 Press the C button. Select the 'Protection' line. Confirm with C . 5 Select 'Protected' with the B button and confirm with OK . Manual recording 71
  • 80.
    6 Press D and then DISC-MENU to terminate. The entire disc is now protected. If an attempt is made to record on a protected disc, 'DISC LOCK' will appear on the display and 'Disc locked' will appear on the screen. If you later decide to record on the disc, follow these steps but select 'Unprotected' at step 5 . Tip Lining up recordings within a title (assemble cut) On a recorded DVD+RW disc you can add another recording to an existing title. This recording is added to the title as a 'chapter'. The existing information will be overwritten starting from this point. Titles will also be overwritten that follow the current title depending on the length of the new recording. The recording type (Quality) will be taken from the current title. To play back this recording, press SYSTEM-MENU and use the C button to select the 'C' (Chapter) symbol. You can also use the T/C key. For further information, see 'Changing to another title/chapter' in 'Playback'. What happens with DVD+R discs? New recordings on 'DVD+R' discs can only be added after existing recordings. It is not possible to overwrite existing recordings on 'DVD+R' discs. ? 1 In the index display, find the title to which the new recording is to be added. 2 Look at the last minute of the old recording (playback) 3 Press PAUSE 9 on the remote control at the position where the new recording is to go. '9' will appear on the screen. 4 To monitor the recording you can press MONITOR to switch to the internal tuner. 5 Now start recording as usual by pressing REC/OTR n on the remote control. The new recording will be inserted. 6 Stop recording with STOP h . 72 Manual recording
  • 81.
    Selecting the recordingtype (picture quality) You can select the picture quality of the recording using the recording quality feature and hence ENGLISH the maximum recording time per disc. To check the quality of a recording mode you can make a 'test recording' with the desired recording mode. Check during playback the quality of this 'test recording'. During playback, the correct picture quality will automatically be selected. 1 Switch on the TV set. If required, select the programme number for the DVD recorder. Select the record mode with the button REC MODE on the remote control. Which recording types can I choose? Please observe, that you can not switch the recording type during recording. You have to interrupt the recording with the STOP h button. 'M1': High Quality offers the best picture quality and a recording time of 1 hour. 'M2': Standard Play (pre-recorded DVD quality) offers standard picture quality and a recording time of 2 hours. 'M2x': Standard Play plus (better than S-VHS quality) offers standard picture quality and a recording time of 2.5 hours. 'M3': Long Play (S-VHS picture quality). Recording time of 3 hours. 'M4': Extended Play (better than VHS picture quality). Recording time of 4 hours. 'M6': Super Long Play (VHS picture quality). Recording time of 6 hours. 'M8': Super Extended Play (VHS picture quality). Recording time of 8 hours. Can I select the recording type via a menu as well? 1 Press the SYSTEM-MENU button. 2 Select ' A' symbol with D or C . 3 Select 'Record settings' using B or A and confirm with C . 4 In the line 'Record mode' select the recording type with D or C . 5 Confirm using OK and SYSTEM-MENU . 6 If you have selected the recording mode 'M3', 'M4', 'M6' or 'M8', you can select the 'Stndrd' (Standard) or 'Sport' setting (for rapid movements) in the 'Filter mode' line. Tip Manual recording 73
  • 82.
    Automatic recording froma satellite receiver (Sat recording) You can use this function if your own a satellite receiver that can control other devices via a scart cable and a programming function (timer). For more information, please see the operating instructions for the satellite receiver. 1 Switch on the TV set. If required, select the programme number for the DVD recorder. 2 Press SYSTEM-MENU on the remote control. The menu bar appears. 3 Select 'A' symbol with D or C . 4 Select 'Record settings' using B or A and confirm with C . 5 Select 'Sat record' using B or A . 6 Select 'EXT2' with D or C . Switching off 'Sat Recording' To switch off the function, select 'Off' using C or D . Tip 7 Confirm with OK . 8 Use a scart cable to connect scart socket EXT 2 AUX-I/O on the DVD recorder to the corresponding scart socket on the satellite receiver. 9 To end, press SYSTEM-MENU . 0 Insert a disc you want to use for recording. A Programme the satellite receiver with the required information (programme number of the TV channel, start time, finish time). If necessary, please see the operating instructions for your satellite receiver. B Switch off the DVD recorder using STANDBY m . 'SAT' also appears in the display to indicate that the function is active. The DVD recorder is now ready to record. The start and end of the recording is controlled via scart cable EXT 2 AUX-I/O . 74 Manual recording
  • 83.
    Direct Record Can you record the right TV channel in seconds when the DVD recorder is switched off? No problem. If recording is started manually, the switched off DVD recorder takes the current TV channel from the TV set via the scart cable. ENGLISH You will find more information on how to switch 'Direct record' on or off in the next section 'Direct record'. How does Direct Record work? The DVD recorder compares the TV channel selected on the TV set with its stored TV channels via the scart cable. If the same TV channel is found, it switches the DVD recorder to the corresponding programme number and starts recording. Please do not change channel on the TV during the search. This could affect the tuning of the DVD recorder. ? 1 On the TV set, select the programme number you want make the recording from. 2 Press REC/OTR n with the DVD recorder switched off. a The display will read 'WAIT' b The DVD recorder is comparing its saved TV channels with those of the TV set. Please do not change the TV channel on the TV set while 'WAIT' is shown in the display. a 'NOTV' appears in the display b This TV channel could not be found in the DVD recorder's memory. Check that all TV channels saved on the TV set are available on the DVD recorder. If required, save any missing channels. Please read 'Manual TV channel search' in 'Installing your DVD recorder'. b Check the connectors at both ends of the scart cable. b Check your TV's operating instructions to see which scart socket is used for video signals. b If the problem persists, you won't be able to use this feature. Problem 3 Stop recording with STOP h . Manual recording 75
  • 84.
    Switching 'Direct Record'on or off 1 Switch on the TV set. If required, select the programme number for the DVD recorder. 2 Press SYSTEM-MENU on the remote control. The menu bar appears. 3 Select 'A' symbol with D or C . 4 Select 'Record settings' using B or A and confirm with C . 5 Select 'Direct Record' using B or A . 6 Select 'On' (Direct Record on) or 'Off' (Direct Record off) using D or C . 7 Confirm with OK . 8 To end, press SYSTEM-MENU . 9 Switch off with STANDBY m . 76 Manual recording
  • 85.
    K Managing the disc contents General Charly 1 00:29:59 • M1 Fri15/02/2003 When a recording is made to disc, the following additional information is also stored at the beginning of the recording: Empty title •) Name of the recording 01:30:01 If the TV station does not transmit a name, only the ENGLISH channel number and time will be stored as the name •) Length of the recording •) Record type (Quality) •) Date of the recording •) Index picture of the recording A marker will be set every 5-6 minutes if the 'Auto chapters' function is activated in the 'Record settings' menu. This marker is known as a 'chapter'. These markers can be changed when the recording has finished. Can markers be set on a DVD+R disc? Markers can be set on these discs if they have not been finalised. ? It is also possible to add 'chapters' later. This means that scenes you do not want to see during playback, such as commercials, can be hidden or skipped. During playback you can watch your recording as a continuous sequence without the hidden chapters. Select from the following chapters: 'Favorite Scene Selection', to divide the title into chapters or to manage the chapters. 'Editing recording titles (name)', to change the recording names. 'Play complete title', to play the entire title including the hidden chapters. 'Delete recording/title'to delete the relevant title and therefore also the recording. 'Disc settings'to change the general settings of the disc. Managing the disc contents 77
  • 86.
    Favorite Scene Selection In this menu you can adapt a title to suit your particular needs. You can insert/delete chapter markers, hide chapters, select a new index, or split up a title. Press EDIT on the remote control during recording to open this menu. Insert chapter markers During recording, you can set or delete chapter markers within a title. The maximum number of chapters per disc is 124 and 99 per title. If one of these limits is reached the following message will appear on the screen: 'Chapter limit'. You need to delete some markers before you can insert new ones or make recordings. 1 During playback, press EDIT on the remote control at the appropriate point. The 'Favorite Scene Selection' menu appears on the TV screen. 2 Confirm 'Insert marker' by pressing OK . 'Inserting marker' appears on the TV screen. Favorite Scene Selection Insert marker Press OK Delete marker Delete all markers 'X' will appear on the screen: Current chapter visible This DVD is write-protected or the disc is a finalised DVD-R. Subsequent changes cannot be made. Tip Press EDIT to exit 3 To stop this function, press EDIT . Hiding chapters Initially, all the chapters are visible. You can hide chapters for playback (e.g. advertisements) or make them visible again. In editing mode, hidden chapters are shown darker. A chapter always consists of a start marker and an end marker. To hide a certain scene, proceed as follows: 1 Search the beginning of the scene you want to hide. Press PAUSE 9 . 2 Press EDIT on the remote control to call the 'Favorite Scene Selection' editing menu. Favorite Scene Selection 3 Set the start marker using OK . Insert marker Press OK Delete marker The number of chapters ('C') in the menu line will increase by one. Delete all markers Current chapter visible 4 Search for the end of the scene. You can also use O or N to search faster for the end of the scene. Make sure that you do not jump into the next title (title number 'T' Press EDIT to exit must not change). Only chapters within a title can be hidden. 5 Press PAUSE 9 at the corresponding position. 78 Managing the disc contents
  • 87.
    6 Set the end marker with OK . This will also be the start marker of the next chapter. The number of chapters ('C') in the menu line increases by one. a The number of chapters ('C') has increased by two or more numbers b This is the case when you want to hide a chapter that, due to automatic chapter numbering (if switched on), stretches over two or more chapters. ENGLISH In this case, you must delete the start of the automatically generated chapter: 1 Press T/C twice while the editing menu is displayed to change the chapter number. 2 Select the chapter between the new markers using B or A . Press PAUSE 9 . 3 Select 'Delete marker' with B to delete the current chapter marker. Confirm with OK . The current chapter number decreases by one. Problem 7 Press T/C twice to change the chapter number 'C'. 8 Select the previous chapter with B , since you are already in the next chapter (end of the chapter is also the beginning of the next chapter). 9 Wait until the chapter has been played and press PAUSE 9 to stop playback. 0 Select 'Current chapter' using B or A . A Using C select 'hidden'. The picture is shown darker. Switching quickly You can switch between show chapters ('visible') and hide chapters ('hidden') quickly and easily using SELECT . This function is independent from the selected line. Tip B To end, press EDIT . During playback this chapter will be skipped. If the chapter is not visible, select 'visible' in step 3 with C . Managing the disc contents 79
  • 88.
    Deleting chapter markers Within a title you can delete either all markers or individual markers. 1 While the relevant chapter is playing, press EDIT on the remote control. The 'Favorite Scene Selection' menu appears on the TV Favorite Scene Selection screen. Insert marker Press OK Delete marker Delete all markers Current chapter visible How can I select different chapters? 1 Press the T/C button on the remote control. Titles and chapters are displayed at the top of the screen. Press EDIT to exit 2 Select title (T) or chapter (C) with C or D . 3 Use A or B to select the title/chapter channel you want to edit. Tip 2 Use B to select either 'Delete marker' for this chapter or 'Delete all markers' for all chapters within the selected title. 3 Confirm with OK . (You will be prompted to press OK again to make sure you really want to delete all markers. If you do not want to, press the D button.) 4 To end, press EDIT . Changing the index picture Normally the picture from the begin of a recording is used as the index picture. You can however choose any picture from the recording as the index picture. 1 During playback, search for location of the new index picture. Press the PAUSE 9 button. 2 Press the EDIT button. The 'Favorite Scene Selection' menu appears on the TV screen. Favorite Scene Selection 3 Select line 'New index picture' and confirm with OK . New index picture Press OK New background Divide title 4 Start the change with OK . 'Updating menu' appears on the TV screen. Press EDIT to exit Once the revision has been completed successfully the DVD recorder reverts to the index overview. 80 Managing the disc contents
  • 89.
    Changing the menubackground You can choose any frame from the recording as the menu background. This setting is stored on the inserted DVD. Please note that after the modification the 'original background' will be lost. If you erase the complete disc (close the disc tray with CLEAR and make a recording) the 'original background' will be restored. ENGLISH 1 During playback, search for the location that is to be used as the new menu background. Press the PAUSE 9 button. 2 Press the EDIT button. The 'Favorite Scene Selection' menu appears on the TV screen. Favorite Scene Selection 3 Select line 'New background' and confirm with OK . New index picture Press OK New background Divide title 4 Start the change with OK . 'Updating menu' appears on the TV screen. Press EDIT to exit Once the revision has been completed successfully the DVD recorder reverts to the index overview. Dividing titles You can divide a title into several sections (titles) of any size. Each of these sections (titles) is identified by its own index. Note: This division cannot be undone. Can I divide titles on DVD+R discs? As recordings on DVD+R discs cannot be overwritten, it is not possible to divide titles on DVD+R discs. ? 1 While the relevant title is playing, press EDIT on the remote control. The 'Favorite Scene Selection' menu appears on the TV screen. Favorite Scene Selection 2 Select 'Divide title' and confirm with the OK button. New index picture Press OK New background Divide title 3 If you are sure, press OK to start the process. 'Dividing title' appears on the TV screen. 4 Wait until the new title is displayed with an index picture in the index Press EDIT to exit picture overview. The process of splitting the title is now complete. Managing the disc contents 81
  • 90.
    Editing recording titles(name) Some TV stations transmit the title (name) of a programme. In this case, the name will be included automatically (e.g. 'ROCKY'). Otherwise, the only the programme number (programme name) and the time are stored as the name of the recording. The name of the recording can only be changed after the recording has been completed. 1 If required, press the STOP h button to interrupt playback. 2 Using A or B select the title whose name you want to edit and Settings for title Charly 1 confirm with C . The menu for editing names appears. Name Charly 1 Play full title 3 Select 'Name' using A or B and confirm with C . Erase this title 4 Using C or D select the position where the letter/number/icon is to be changed/re-entered. 5 Change the icon using A or B . You can switch between upper and lowercase using SELECT . You can delete the character using CLEAR . How can I enter the characters with the buttons 0..9 ? Press a number button as often as the required character or the number appears. You can enter language dependent characters with the buttons N or O on the corresponding character e.g.: ä, button 2 for 'a' and then with O as often as 'ä' appears. For special characters press the button 1 repeatedly. The position for the following character will be selected automatically. To enter a space press the button 1 . To switch over to upper case characters press SELECT . To erase a character press CLEAR . ? 6 Repeat 4 and 5 until you have made the changes you want. 7 Save the new name with OK . 'Storing name' appears on the TV screen for confirmation. 8 To end, press D . Playing the entire title If you have hidden certain sections (chapters) of a title, this setting lets you watch the entire title including the hidden sections. To do this, proceed as follows: 1 Press the STOP h button or during playback press DISC-MENU . 2 Using A or B select the title you want to play all of and confirm Settings for title Charly 1 with C . The title editing menu will appear. Name Charly 1 Play full title Press OK 3 Select 'Play full title' using A or B and confirm with OK . Erase this title 4 Playback starts automatically. The title is played in its entirety - including the hidden chapters. 82 Managing the disc contents
  • 91.
    Erasing recordings/titles You can erase specific recordings from a disc. To do this, proceed as follows: 1 Press the STOP h button or during playback press DISC-MENU . ENGLISH 2 Using A or B select the title you want to delete and confirm with Settings for title Charly 1 C . The title editing menu will appear. Name Charly 1 Play full title 3 Select 'Erase this title' using A or B and confirm with OK . Erase this title Press OK 'This will completely erase this title' appears on the TV screen. 'Press OK to confirm'. 4 If you want to delete this title, press OK to confirm. Otherwise press D. 5 'Erasing title' appears on the TV screen. 6 At this point 'Empty title' appears in the 'index picture display'. A new recording can now be made here. If the deleted title was very short (less than 1 minute) 'Empty title' will not appear at this point. Can titles be deleted from a DVD+R disc? Titles on DVD+R discs are only marked as deleted. 'Deleted title' will appear in the display instead of 'Empty title'. During playback the 'deleted' title is skipped. The space used for this title cannot be used again as the title has not been physically deleted. Once the disc has been finalised no further changes can be made. ? Disc settings Philips1 This screen appears beforethe first title and contains general information about the current disc. 00:35:59 used Fri15/02/2003 You can: PAL •) change the name of the disc •) activate or deactivate write protection on the disc DVD playback •) Finish editing (make the disc DVD compatible) •) finalise a DVD+R •) delete a DVD+RW To get to this display, proceed as follows: 1 Press the STOP h button or during playback press DISC-MENU . 2 Select the first title with A or press STOP h . 3 Press the A button. The disc info display will appear. Managing the disc contents 83
  • 92.
    Changing the discname 1 In the 'Disc info display' press C . The 'Settings for' menu appears on the TV screen. 2 Select 'Disc name' using A or B and confirm with C . Settings for Philips1 Disc name Philips1 3 Using C or D select the position where the letter/number/icon is to Protection Unprotected be changed/re-entered. Erase disc 4 Change the icon using A or B . You can switch between upper and lowercase using SELECT . You can delete the character using CLEAR . 5 Repeat 3 and 4 until you have made the changes you want. 6 Save the new title with OK . 'Storing name' appears on the TV screen for confirmation. 7 To end, press D . Finishing editing If one or more titles have been edited a DVD player may still display the original titles. You can prepare your DVD+RW disc in such a way that a DVD player will be able to play the edited version. 1 In the 'Disc info display' press C . The 'Settings for' menu appears on the TV screen. 2 Select 'Make edits compatible' using A or B and confirm with OK . a 'Make edits compatible' does not appear b Your disc is already compatible. There is no need for conversion. To end, press SYSTEM-MENU . Problem 3 The screen displays 'This will take' to show how long the process will last. 4 To confirm press OK . 'Working' appears on the TV screen. A bar will move from left to right indicating progress. 84 Managing the disc contents
  • 93.
    Finalising DVD+R discs This feature is required to play back a DVD+R disc in a DVD player. Once the disc has been finalised no further recordings or changes can be made. ENGLISH 1 In the 'Disc info display' press C . The 'Settings for' menu appears on the TV screen. 2 Select 'Finalise disc' using A or B and confirm with OK . a 'Finalise disc' does not appear b Either there is no DVD+R disc inserted or the disc is already finalised. To end, press SYSTEM-MENU . a The 'Settings for' menu does not appear b The menu may not appear if the disc has been recorded on another DVD recorder. In this case, use the 'Finalise disc' feature in the ' A ' menu, under 'Features'. Problem 3 The screen displays 'This will take...' to show how long the process will take. 4 To confirm press OK . 'Working' appears on the TV screen. A bar will move from left to right indicating progress. Erase DVD+RW disks 1 In the 'Disc info display' press C . The 'Settings for' menu appears on the TV screen. 2 Select 'Erase disc' using A or B and confirm with OK . 'This Settings for Philips1 will erase all titles' appears on the TV screen. Press OK to Disc name Philips1 confirm'. Protection Unprotected Erase disc Press OK 3 If you want to delete all the titles, press OK to confirm. Otherwise press D . 4 'Erasing disc' appears on the TV screen. 5 After deletion, the index picture display shows the free space on the disc. If the disc is empty already, you cannot select 'Erase disc'. Tip Managing the disc contents 85
  • 94.
    L Programming a recording (TIMER) General Use 'Programming a recording (TIMER)', to automatically start and stop a recording at a later date. The DVD recorder will switch to the right programme number and begin recording at the correct time. With this DVD recorder, you can pre-programme up to six recordings within a period of one month. To make a programmed recording, your DVD recorder needs to know: * the date you want to make the recording * the programme number of the TV channel * the start and stop time of the recording * VPS or PDC on or off * the recording mode (picture quality) ('M1/M2/M2x/M3/M4/M6/M8') Fit to space Recording You can select also the recording mode 'FR' . With these setting the recording mode (bit rate) will be automatically calculated to use the complete empty space (title 'Empty'). If the empty space is too small the recording will be stopped to prevent the following titles from being overwritten. Tip This information is saved in a 'TIMER block'. Before you begin, make sure the clock is set. If the clock is not set, the 'Time/Date' menu will appear when you press the TIMER s button. What is 'VPS/PDC'? 'VPS' (Video Programming System)/'PDC' (Programme Delivery Control) are used to control the start and duration of TV channel recordings. If a TV programme starts earlier or ends later than was scheduled, the DVD recorder will then turn on and off at the correct time. What do I need to know about 'VPS/PDC'? • Usually the start time is the same as the VPS or PDC time. If a different 'VPS/PDC time' is indicated, e.g.: '20.15 (VPS/PDC 20.14)', the VPS/PDC time '20.14' must be entered exactly to the minute during programming. If you want to programme a time that is different from the VPS or PDC time, you must switch off VPS or PDC. • Only one TV program of a TV channel can be controlled using 'VPS/PDC' at a time. If you want to record two or more TV programmes on a TV channel using 'VPS/PDC', you will need to programme these as two separate recordings. • Since the DVD recorder requires a certain lead time (for getting the disc up to speed and positioning the laser) before recording can start, it is possible that the recorder will miss the first few seconds of a TV show recorded with VPS/PDC. In this case, disable VPS/PDC and enter a start time one minute earlier. ? 86 Programming a recording (TIMER)
  • 95.
    Programming recordings withthe ShowView® System ENGLISH Thanks to this programming system, you no longer need to tediously enter the date, programme number, start and finish times. All the information needed by the DVD recorder for programming is contained in the ShowView® programming number. This 9-digit ShowView® number is found in most TV listings magazine. 1 Switch on the TV set. If required, select the programme number for the DVD recorder. 2 Press TIMER s on the remote control. The programming method selected last is marked. 3 Select 'ShowView system' using B or A and confirm with C . 4 Enter the entire ShowView number. This number is up to 9 digits long and can be found next to the start time of the TV programme in your TV listings magazine. e.g.: 5-312-4 or 5,312 4 Enter 53124 for the ShowView-number. If you make a mistake, you can clear your instructions with CLEAR . Timer ShowView system Selecting daily/weekly recordings ShowView number Using SELECT , select from the following options: --------- 'Mo-Fr': Repeated daily recordings (Monday to Friday). 'Weekly': Repeated weekly recordings (every week on the same day). Tip Mo-Fr/Weekly To store Press SELECT Press OK 5 Confirm with OK . Programming a recording (TIMER) 87
  • 96.
    a The followingmessage appears on the screen: 'Please enter programme number' b The programme number of the TV channel has not yet been assigned to the ShowView number. Use C , D or the number buttons 0..9 on the remote control to select the appropriate programme number (name) of the TV channel and confirm with OK . a The following message appears on the screen: 'ShowView number wrong' b The entered ShowView number is incorrect. Correct your entry or cancel using the SYSTEM-MENU button. b Check the time/date (see 'Setting the time & date' in 'Installing your DVD recorder'). a The following message appears on the screen: 'Weekend programming not possible' b A daily recording was entered for the wrong day. Daily programming can only be used for recordings to be made from Monday to Friday. Problem Timer 6 The decoded data appears after confirmation. You can go back and ShowView system change the data. Select the appropriate input field with C or D . If VPS Rec required, make changes using A , B or the number buttons 0..9 . Date Prog. Start PDC End Mode 01 BBC1 20:15 21:30 M2 'Switching on 'VPS/PDC' in the 'Start' input field Select the 'Start' input field using C . Using SELECT switch on 'VPS/PDC' ('*' lights up). If you press SELECT again, you will switch 'VPS/PDC' off ('*' goes out). Mo-Fr/Weekly To store Changing the recording mode in input field 'End' Press SELECT Press OK Select the 'End' input field using C . Use REC MODE to select the recording mode 'M1, M2, M2x, M3, M4, M6, M8'. Fit to space Recording You can select also the recording mode 'FR' . With these setting the recording mode (bit rate) will be automatically calculated to use the complete empty space (title 'Empty'). If the empty space is too small the recording will be stopped to prevent the following titles from being overwritten. Do not use this function under the following conditions: •) more then one programmed recording •) daily/weekly repeated recordings •) recordings with VPS/PDC May be the calculation of the recording mode can not function properly. Tip 7 If all information is correct, press the OK button. The programming information is stored in a TIMER block. 8 To end, press TIMER s . 9 Insert a recordable disc (one without write protection). The inserted disk is checked. 0 Search the position on the disc where the recording should begin. Press STOP h . A Switch the DVD recorder off with STANDBY m . The programmed recording will only function properly if the DVD recorder has been switched off using the STANDBY m button. If any of the TIMER blocks are in use, 'TIMER' will light up on the recorder display. 88 Programming a recording (TIMER)
  • 97.
    Programming recordings withoutthe ShowView® System ENGLISH 1 Switch on the TV set. If required, select the programme number for the DVD recorder. 2 Press TIMER s on the remote control. The programming method selected last is marked. Timer 3 Select line 'Timer programming' with B or A . and confirm with Timer programming the C button. VPS Rec The information will appear on the screen. Date Prog. Start PDC End Mode 01 BBC1 20:15 21:30 M1 4 Select the input field with D or C . 5 Enter information with B or A or with the number buttons 0..9 . Selecting daily/weekly recordings Mo-Fr/Weekly To store Press SELECT Press OK In 'Date' use SELECT to select from the following options: 'Mo-Fr': Repeated daily recordings from Monday to Friday 'Mon': Repeated weekly recordings (every week on the same day, e.g. Monday). Programme numbers of the 'EXT1' and 'EXT2'scart socket You can also programme recordings from external sources via scart socket EXT 1 TO TV-I/O ('EXT1') or EXT 2 AUX-I/O ('EXT2'). 'Switching on 'VPS/PDC' in the 'Start' input field Select the 'Start' input field using TIMER s . Using SELECT switch on 'VPS/PDC' ('*' lights up). If you press SELECT again, you will switch 'VPS/PDC' off ('*' goes out). Changing the recording quality in input field 'End' Select the 'End' input field using C . Use SELECT to select the recording mode. Tip 6 If all information is correct, press the OK button. The programming information is stored in a TIMER block. 7 To end, press TIMER s . The disc you have inserted will be checked. 8 Search the position on the disc where the recording should begin. 9 Switch off with STANDBY m . The programmed recording will only function properly if the DVD recorder has been switched off using the STANDBY m button. If any of the TIMER blocks are in use, 'TIMER' will light up on the recorder display. Programming a recording (TIMER) 89
  • 98.
    How to changeor delete a programmed recording (TIMER) 1 Switch on the TV set. If required, select the programme number for the DVD recorder. 2 Press TIMER s on the remote control. The programming mode selected last is marked. 3 Select 'Timer List' using B or A and confirm with C . Timer 4 Select the programmed recording (TIMER) you want to check, change Timer List or delete with B or A . VPS Rec Date Prog. Start PDC End Mode 01 BBC1 20:15 * 21:30 M2 -- ----- --:-- --:-- -- Delete programmed recording 1 Press the CLEAR button. 2 Confirm with OK . 'Timer Cleared' will briefly appear on the TV Total record time: 01:15 screen. '-- ---' appears rather than the displayed values To change To exit Press › Press TIMER 3 To end, press TIMER s . Tip 5 Press C . Select the input field with D or C . If required, change the information with A , B or the number buttons 0..9 . 6 Confirm with OK . 7 To end, press TIMER s . 8 Switch off with STANDBY m . 'NexTView Link' This DVD recorder is equipped with the 'NexTView Link' feature. If your television is also equipped with this function, you can mark TV programmes on the television for programming. These TV programmes will automatically be transmitted to a TIMER block on the DVD recorder. If you clear the marking of the TV programme on the television, the corresponding TIMER block on the DVD recorder will also be cleared. For more information, read the instruction manual of your TV set. 90 Programming a recording (TIMER)
  • 99.
    Problem solving forprogrammed recordings ENGLISH PROBLEM SOLUTION The DVD recorder is bWhile a programmed recording is being made, you cannot operate your DVD recorder manually. not responding If you want to cancel the programmed recording, press STANDBY m . 'Switch off, timer bThe DVD recorder was switched on a few minutes before the start of a programmed recording. recording' flashes on Switch off the DVD recorder using STANDBY m . A programmed recording (timer) will only the TV screen. function if the DVD recorder is switched off ( STANDBY m button). bEither a disc has not been inserted or the disc cannot be used for recording. Insert a disc on Error message: 'Insert which recordings can be made. recordable disc' Search the position on the disc where you want the recording to begin. Switch off the DVD recorder using STANDBY m . The error message bA write-protected disc has been inserted. Undo the write protection (see 'Preventing accidental 'Disc locked' appears erasing of discs' in 'Manual recording') or insert a different disc. briefly on the screen. bIf this error message appears after pressing TIMER s , then all TIMER blocks are already Error message: programmed. No more recordings can be programmed. Press the C button. If you want to clear 'Memory full' or check a programmed recording (TIMER block), select it with A or B . The 'Data error' bThe data for the recording could not be transferred. Please check date, start time and finish time message appears on of the programmed recording. the screen. bTwo programmed recordings overlap. The 'Collision' bIf you ignore this error message the show with the earlier start time will be recorded first. The message appears on start of the second show will not be recorded. bChange the setting for either of the two recordings. the screen. bClear either of the two recordings Programming a recording (TIMER) 91
  • 100.
    M User preferences In this section you will learn how to set your user preferences on the DVD recorder. The symbols have the following meanings: t Picture setting v Sound setting u Language setting w Additional settings x Remote control settings Control the DVD recorder using the remote control of your Philips TV set s Disc settings z Recording settings y Installation 1 Switch on the TV set. If required, select the programme number for the DVD recorder. 2 Press SYSTEM-MENU on the remote control. The menu bar appears. 3 Select 'A' using D or C and confirm with B . 4 Select the appropriate function with B or A and confirm with C . 5 Select the appropriate line using B or A and confirm with C . 6 Select the appropriate function using B or A or the setting with D or C . 7 Confirm the new setting by pressing OK . 8 To close the menu item, press D . Picture settings You can choose the following features in this menu: 'TV shape' The picture signal from your DVD Recorder can be set to match your TV screen. Picture TV shape 16:9 Black level shift Off '4:3 letterbox': for a 'wide-screen' picture with black bars at the top and bottom Video shift ï '4:3 panscan': for a full-height picture with the sides trimmed. RGB attenuation ï '16:9' : for a wide-screen TV set (screen edge ratio 16:9) Video output RGB + CVBS 'Black level shift' Adapts the colour dynamics for NTSC playback when switched to 'On' 92 User preferences
  • 101.
    'Video shift' Use this feature to adjust the position of the picture on your TV left or right using D , C to suit your TV set. 'RGB attenuation' ENGLISH With the buttons D , C you can attenuate or amplify the RGB-signal on the input socket EXT 2 AUX-I/O These setting concerns only the input signal. The RGB output signal on the socket EXT 1 TO TV-I/O leaves unchanged. 'Video output' Since RGB and S-Video signals sometimes use the same connections on a scart cable, the two signals cannot be transmitted simultaneously. With these settings, you can decide whether RGB or S-Video signals should be transmitted. This setting affects only the scart sockets of the DVD recorder ( EXT 1 TO TV-I/O output socket and EXT 2 AUX-I/O input socket). Please also observe which signals are available at which scart socket of the TV set or how the scart sockets need to be switched. If necessary, consult the instruction manual of your TV set. Which settings can I select? 'RGB + CVBS' Depending on the TV set you are using, switching between the 'RGB' and the 'Video(CVBS/FBAS)' signal is done automatically. If the picture scrolls to the side or the colour quality is poor on some TV sets when the setting is 'RGB + CVBS', you must select 'CVBS only'. 'S-video only' Both scart sockets ( EXT 1 TO TV-I/O output socket and EXT 2 AUX-I/O input socket) process only the S-Video signal. In case the scart socket of the TV set is not suitable for S-Video (Y/C) signals, you will only see a black-and-white picture, although the recording will be made in colour. Moreover, only the video (CVBS, FBAS) signal will be used for recordings via the EXT 1 TO TV-I/O scart socket. Please observe that when making recordings from a video recorder that transmits only video (CVBS/FBAS) signals through the scart cable, recordings via scart socket EXT 2 AUX-I/O may be made in black and white. Therefore, use this setting with caution. 'CVBS only' Only the video (CVBS/FBAS) signal is transmitted regardless of the video signals (RGB, Y/C) on the scart sockets. This setting is selected automatically when no 'RGB' or 'S-VIDEO' signal is detected at the scart socket. When selecting the settings 'S-video only' or 'CVBS only', the RGB signal is switched off. ? User preferences 93
  • 102.
    Sound settings Depending on which audio outputs are used, you can select the settings in this menu. If you only use the analogue audio output ( AUDIO L/R OUT ), select the settings 'Off' in the 'Digital output' menu. 'Digital output' You can select one of the following settings for devices that are connected to the COAX Sound Digital output All OUT or OPTICAL AUDIO OUT sockets: Analogue output Stereo Night mode Off 'All': Dolby Digital and DTS signals are fed unaltered to the digital output. MPEG-2 multi-channel signals are converted to PCM (Pulse Code Modulation). For receivers/amplifiers with digital multi channel sound decoders. 'PCM only: Dolby Digital and MPEG-2 multi-channel signals are converted to PCM (Pulse Code Modulation). For receivers/amplifiers without digital multi channel sound decoders. 'Off: Digital output switched off. For devices with analogue audio input. 'Analogue output' For devices connected to the analogue audio output ( AUDIO L/R OUT ), you can select from the following settings. 'Stereo': For devices without DolbySurround or TruSurround. Use this setting if the DVD recorder is only connected to a stereo TV set. 'Surround: Dolby Digital and MPEG-2 multi-channel are mixed down to a DOLBY surround-compatible two-channel output signal. For devices with Dolby Surround Pro Logic decoder . 'Night mode' Night mode optimises the sound for playback at low volume. You are therefore less likely to disturb your neighbours. This only works for Dolby Digital audio on DVD video discs. 94 User preferences
  • 103.
    Language settings You can choose the following settings in this menu: ENGLISH 'Audio Language' Playback audio language Language Audio Language English Recording audio Subtitle Language 1 English 'Recording audio' Menu English Country Other Selection of audio recording for bilingual programmes 'Subtitle' Subtitle language 'Menu' Screen menu language 'Country' Select the country you currently live from the list Additional settings You can select the following functions in this menu: 'Status box' Along with the on screen menu, the OSD (On Screen Display) also displays information on the Features Status box On current operating status (counter, playback, recording, TV channel, etc.) on the TV screen. Live source view On You can switch off the information about the operating status so that the on screen display Auto standby On (OSD) is not recorded during copying. Standby Normal Display Bright 'On': The OSD information appears in every selected mode for a few seconds and disappears again. 'Off': The OSD information is switched off. It is no longer displayed on the screen. 'Live source view' With this function you can switch between the live picture or the information of the selected TV channel/input socket in the 'Tuner information box' (left-hand corner of the screen). 'On': The live picture of the selected TV channel or signal on the input sockets is visible. 'Off': The information about the selected TV channel or signal on the input sockets is visible. User preferences 95
  • 104.
    'Auto standby' If you haven't used the DVD-recorder for a few minutes in certain modes (e.g.: STOP), it will switch to standby automatically. You can cancel this function to use the DVD-recorder as a television receiver. 'On': The DVD-Recorder leave switched on. 'Off': The DVD-Recorder will be switched to standby. 'Standby' To save power, you can switch off the clock display on the DVD recorder. Programmed (TIMER) recordings will still take place. In addition, you can present the most important features of the DVD recorder in scrolling text in the display (demo). 'Low power': If the DVD-Recorder is switched off (button STANDBY m ), the clock display is also switched off. 'Normal': If the DVD-Recorder is switched off (button STANDBY m ), the clock display is visible. 'Demo mode': If the DVD recorder is switched off with the STANDBY m button, a list of the most important features is shown in the display. 'Display' You can change the brightness of the display on the DVD recorder. This setting only affects the DVD recorder when it is switched on. You can also adjust this setting with the DIM button on the remote control. 'Bright': The display appears with normal brightness. 'Dimmed': The display appears less bright. 'Off': The display is switched off. Remote Control settings In this menu you can set the remote control type to which your DVD recorder should respond. 'DVD player': The DVD recorder responds to the supplied remote control and the remote control of a DVD player (remote control code RC-6). Choose this setting if your Philips TV remote supports DVD functions. 'DVD recorder': The DVD recorder only responds to the supplied remote control. 96 User preferences
  • 105.
    Disk feature menu In this menu you can make the changes that relate to the disc: ENGLISH 'Access control' Please read the next chapter on 'Access control (child lock)'. Disc features Access control Enter code… Auto resume On 'Auto resume' If playback of a pre-recorded DVD video disc or video CD is interrupted (button STOP h or OPEN/CLOSE J ) when the disc is reloaded (disc is started) playback starts at the precise location where it stopped. This applies not only to the current disc but to the last 20 discs played. This feature can be switched off if not required. 'PBC' This line appears only if a VCD is loaded. This function lets you activate or deactivate the PBC menu (Playback Control) for video CDs. See 'Playing a (Super) Video CD'. 'Finalise disc' This feature allows you to finalise DVD+R discs. If the disc has already been finalised this line will appear darker. 'Adapt disc format' If a DVD+RW has been recorded in a computer drive or in another DVD recorder the index screen may not be displayed correctly. This feature allows you to change the format of the disc. It is therefore only visible if the disc format is different. User preferences 97
  • 106.
    N Access control (Child Lock) Child lock (DVD and VCD) This feature enables discs to be locked for children. When Child Lock is on, a 4-digit code (PIN) needs to be entered before a disc can be played. You can also decide whether the inserted disc should always be played or should be played only once, despite the child lock •)'Play always': This disc is stored in a memory with space for 50 child-safe discs. If more than 50 discs are stored, the last disc in the list is removed and the new disc is added. The screen shows 'Child safe' at the start of playback. •)'Play once': This disc is only authorised for single playback. If the recorder is switched off, the PIN code must be re-entered. Activating/deactivating child lock 1 Switch on the TV set. If required, select the programme number for the DVD recorder. 2 Switch on the DVD recorder using STANDBY-ON m . 3 Press SYSTEM-MENU . The menu bar appears 4 Select the 'A' icon using D or C . 5 Select 's(Disc features)' using B or A and confirm with C . 6 Confirm 'Access control' using C . 7 Enter a 4-digit code of your choice. If the code is new, you may have Disc features to enter the code a second time as confirmation. Access control Enter code… Auto resume On 8 Select 'Child lock' using A or B and confirm with C . 9 Select the 'i' icon using B or A . 0 Confirm with OK . A Quit the feature using D and SYSTEM-MENU . Unauthorised discs can only be played by entering the four-digit PIN code. To deactivate the child lock, select the 'n' icon in 9 . 98 Access control (Child Lock)
  • 107.
    Authorising a disc 1 Insert a disc. The access control box will appear after a short delay. 2 Using A or B select 'Play once' or 'Play always'. ENGLISH 3 Enter your PIN code using the number buttons 0..9 . Double-sided DVDs may have a different ID for each side. For these discs, each side must be authorised. Video CDs may have a different ID for each disc. For these CDs, each disc must be authorised. Locking unlocked discs To lock a disc that was formerly authorised follow the instructions below 1 Insert a disc. Playback starts automatically. If the playback does not start automatically, press PLAY G . 2 Press the STOP h button while the 'm' icon is visible. The icon changes to 'l'. The disc is now locked. Parental level control (DVD video only) Films on pre-recorded DVD discs may contain scenes not suitable for children. Therefore, some discs may contain 'Parental Control' rating information that applies to the entire disc or to certain scenes on the disc. The appropriate scenes have filter values that reach from 1-8. If such a scene is detected during playback, the filter value set on the DVD recorder is compared to the scene. If the filter value is higher than the setting, an alternative scene will be played (if available). Most DVDs apply the rating to an entire DVD. Therefore, if certain scenes exceed the rating you select, the entire disc will be blocked from viewing. Activating/deactivating parental level control 1 Switch on the TV set. If required, select the programme number for the DVD recorder. 2 Switch on the DVD recorder using STANDBY-ON m . 3 Press SYSTEM-MENU . The menu bar appears 4 Select the 'A' icon using D or C . Access control (Child Lock) 99
  • 108.
    5 Select 's(Disc features)' using B or A and confirm with C . 6 Confirm 'Access control' using C . 7 Enter a 4-digit code of your choice. If the code is new, you may have Disc features to enter the code a second time as confirmation. Access control Enter code… Auto resume On 8 Select the 'Parental level' using A or B and confirm with C . A bar appears to select the parental level. 9 Select the appropriate rating using B , A or the number buttons 0..9 . What do the ratings mean? Rating 0 (displayed as '--') parental control not active. Rating 1 (suitable for children) Rating 8 (only suitable for adults) What happens if a DVD scene contains a higher level than the rating set? If the recorder does not find a suitable alternative, playback will stop and you must enter the four-digit code. Tip 0 Confirm with OK . Quit using D and SYSTEM-MENU . Changing the country The set filter values depend on the respective country. It is therefore necessary to enter the country to which these filter values apply. 1 Switch on the TV set. If required, select the programme number for the DVD recorder. 2 Switch on the DVD recorder using STANDBY-ON m . 3 Press SYSTEM-MENU . The menu bar appears 4 Select the 'A' icon using D or C . 5 Select line 's(Disc features)' using B or A and confirm with C . 6 Confirm the line 'Access control' using C . 7 Enter your four-digit code. If the code is new, you may have to enter Disc features the code a second time as confirmation. Access control Enter code… Auto resume On 8 Select 'Change country' using B or A and confirm with C . 9 Select the corresponding country using A or B and confirm with OK . 0 To end, press D and then SYSTEM-MENU . 100 Access control (Child Lock)
  • 109.
    Changing the PINcode 1 Switch on the TV set. If required, select the programme number for the DVD recorder. ENGLISH 2 Switch on the DVD recorder using STANDBY-ON m . 3 Press SYSTEM-MENU . The menu bar appears 4 Select the 'A' icon using D or C . 5 Select 's(Disc features)' using B or A and confirm with C . 6 Confirm 'Access control' using C . 7 Enter your four-digit PIN code. If the code is new, you may have to Disc features enter the code a second time as confirmation. Access control Enter code… Auto resume On 8 Select 'Change code' using A or B and confirm with C . 9 Enter the new code using the number buttons 0..9 . Enter the same code again as confirmation. 0 Quit using D and SYSTEM-MENU . I have forgotten my code Press STOP h four times (step 7 ), then press OK . Access control is now switched off. You can now enter a new code as described above. Tip Access control (Child Lock) 101
  • 110.
    O Before you call an engineer If you have any problems using this DVD recorder, the reason may be one of the following. You can also call the customer service centre in your country. The telephone numbers can be found on the back of this instruction manual. You can also visit our web page 'http://www.p4c.philips.com' . Have the model number (MODEL NO) and the production number (PROD.NO) of your recorder ready. The production number (PROD. NO.) is printed on the type plate at the back. PROBLEM SOLUTION Your recorder does not respond to any bRecorder in initial installation mode: Switch on the TV, switch over to the DVD recorder socket. button being pressed Now the menu for language selection should appear. Please read paragraph 'Initial Installation' in the chapter 'Installing your DVD Recorder'. and the display shows 'IS TV ON?': b'Dealer-Mode' is switched on: All buttons on the front of the set are locked. Switch off the function: The device does not 1 Pull out the mains plug from the wall outlet. react when you press a 2 Press and hold down h and OPEN/CLOSE J and put back the mains plug into the wall button, although the outlet. remote control works: 3 As soon as the time or '--:--' appears in the display (ca. 6 - 10 seconds), release h and OPEN/CLOSE J . Your DVD recorder bThere is no power supply: check the power supply bA programmed recording (Timer) is currently being made: If desired, cancel the programmed does not respond to recording (Timer) with STANDBY m . any button being bThere is a technical problem: disconnect from the mains power supply for 30 seconds, then pressed: connect again. If this doesn't help, you can reset your DVD recorder to the default factory settings. bImportant: All the information stored (TV channels, time and date, TIMER) will be lost. 1 Disconnect from the mains power supply. Resetting the machine 2 Press and hold down the STANDBY-ON m button on the device and reconnect to the to the default factory mains power supply. settings 3 Release the STANDBY-ON m button when 'IS TV ON?' appears on the display. All the information stored (TV channels, time and date, TIMER) will be lost. Please read paragraph 'Initial Installation' in the chapter 'Installing your DVD Recorder'. bRemote control not pointed toward the DVD recorder: Point the remote control at the machine. See if the 'o(((' appears on the display briefly each time you press a remote control button. If it Remote control does does, the Recorder is receiving information from the remote correctly. not work: bThere is a technical problem: Take out the batteries, wait for 10 seconds and put them in again. bBatteries are flat: Change the batteries. 102 Before you call an engineer
  • 111.
    PROBLEM SOLUTION bData transfer is controlled via pin nr. 10 of the scart cable. It is possible that the connection to this pin is interrupted or that the signal is distorted by an additional device connected to the EXT 2 AUX-I/O socket. bRemove any scart switch boxes, mixing consoles, signal amplifiers, ... connected between the DVD Data transfer from TV recorder and the TV set. Connect the DVD recorder directly to the TV set. ENGLISH bRemove any additional devices from the EXT 2 AUX-I/O socket. set via 'EASYLINK' bTry using another scart cable (all pins wired). does not work: bPlease observe the installation order: 1) Switch on the TV set 2) Connect the DVD recorder to the mains 3) Switch on the DVD recorder using STANDBY m 4) The data transfer should now work. bThere is no recording on the disc: Change disc. bYou inserted the wrong disc type: Your recorder can play back the following disc types: DVD Video, (Super)Video CD, DVD+R(W), Audio CD, , MP3-CD's bYou inserted the disc the wrong way: Insert the disc with the label facing upwards No playback on DVD bDisc is dirty: Clean the disc recorder: bWrong region code: The region code of the DVD and the DVD recorder must match. bParental control is on: Read chapter 'Access control (child lock)' bYou have selected the wrong programme number for the DVD recorder on the TV: on the TV, select the correct programme number for the DVD recorder. bThe cable connecting the TV set and the DVD recorder has come loose: check the cable. bIt is possible that this (Super) Video CD contains a menu and the 'PBC' is switched off. You can see this in status field 'PBC OFF'. To activate this function, proceed as follows: 1 Press SYSTEM-MENU while the (Super) Video-CD is inserted . I cannot playback 2 Select 'A' using D or C . (Super) Video CDs 3 Select line 'Features' using B or A and confirm with C . 4 Select 'On' in line 'PBC' using B or A . 5 Confirm with OK and end with SYSTEM-MENU . Poor playback on DVD bYour TV set is not properly adjusted. recorder: (distorted bDisc is dirty: Clean the disc picture/distorted bSometimes the picture may be temporarily distorted. This is not a defect of your DVD recorder. sound) bThe TV channel you want to record is not stored or you selected the wrong programme number: Check TV channels stored. No recording possible: bDisc write-protected (recording protected): Remove write-protection or change the disc. For more information, please see 'Preventing accidental erasing of discs' in chapter 'Manual Recording'. bAn already finalised DVD+R has been inserted: Change disc. bYou have programmed the wrong time or date: Check time/date. bIf the time and date are wrong despite setting them by hand, you can switch 'SMART CLOCK' Programmed (Clock preset) off. See 'Setting the time/date' in 'Installing your DVD recorder'. bYou have not set the TIMER properly: Check the programmed recordings (TIMER block). recording does not bLocked disc inserted: Remove disc lock. work: bAn already finalised DVD+R has been inserted: Change disc. b'VPS/PDC' switched on but 'VPS/PDCtime' wrong: 'Enter 'VPS/PDCtime exactly to the minute. Check the aerial. Before you call an engineer 103
  • 112.
    PROBLEM SOLUTION The wrong TV channel 1 Enter the ShowView programming number of the TV channel you want. was decoded 2 Confirm with OK . (recorded) after you 3 Check the programme number/channel name in the 'Prog.' input field. programmed a 4 If this does not correspond to the desired TV channel, select the input field and change the recording using programme number/channel name. ShowView System. 5 Confirm with OK . bBefore recording, select the recording mode as described in chapter 'Manual Recording', section There is picture or 'Selecting the recording mode (quality)'. sound interference on bHave your aerial checked. bYou will find information on how to change the TV system in 'Manual TV channel search' in TV reception: 'Installing your DVD recorder'. Distorted sound coming from a bThe DVD recorder is connected to the 'Phono-input' of your amplifier: This socket is provided connected hi fi only for record players without a preamplifier. Select a different audio input. amplifier The picture is bThe TV system of the disc does not match that of your TV set (PAL/NTSC). distorted or bThe recording can be made in colour only when the TV channels or the connected additional black and white during device send a colour signal. Black-and-white signals containing no color information (colour subcarriers) cannot be recorded. playback No sound signal at the bCheck whether the sound settings match the selected inputs and connected additional devices. digital output For more information, see section 'Sound setting' in chapter 'User preferences'. bIf a recording is too short, it is possible that a DVD player cannot detect it: Please observe the following 'Minimum recording times': Recording mode 'M1': 5 minutes, 'M2': 10 minutes, 'M2x': 13 minutes, 'M3': 15 minutes, 'M4': 20 minutes, 'M6': 30 minutes, 'M8': 30minutes, bSome DVD players cannot play back DVD+RW recordings. You can solve this problem by using a special function: A DVD+RW disc 1 Open the disc tray with OPEN/CLOSE J . Insert the disc but do not close the tray. 2 Hold down the number button 2 on the remote control until the tray closes. The disc is cannot be played on modified. certain DVD players 3 If this fails to produce the desired result, repeat the procedure using the number button 3 on the remote control. 4 You can restore the disc to its original condition by pressing 1 . Warning! There is a risk that you can no longer play the disc on other DVD players after this procedure. Therefore, apply this function with particular care. 104
  • 113.
    PROBLEM SOLUTION bIf it is impossible to play back a disc, you can try and repair it for new recordings using the following function. This will only prepare the disc for erasing. It will not be erased, however, until the recording has been completed. Other disc errors 1 Clean the disc 2 Open the disc tray with OPEN/CLOSE J . Insert the disc but do not close the tray. (DVD+RW) ENGLISH 3 Hold down CLEAR on the remote control until the tray closes. The disc is prepared for erasing. 4 Start recording as with an empty disc. bThis message may appear if you instert a disc that was not finalised. DVD+R's that have not been finalised are very sensitive to fingerprints, dust, or dirt. This may cause problems during recording. To use the disc again, follow the next steps 1 Make sure that the surface of the disc is clean. 2 Open the disc tray with OPEN/CLOSE J . Insert the defect DVD+R but do not close Other disc errors the tray. (DVD+R), 'Disc 3 Hold down 5 on the remote control until the tray closes. The disc will be read ('READING' appears on the display) and the DVD recorder will start the repair process. This may take up contains unknown to four times as much time as the recording, in which the error occurred. data' 4 If the disc is recovered, the index screen will appear. Please observe the following: Error during recording: The title may be missing. Error while changing the title/index picture: The original title/index picture may be visible. Error while finalising: The disc appears not to have been finalised. bYou can finalise the disc using the following function: 1 Open the disc tray with OPEN/CLOSE J . Insert the defect DVD+R but do not close The index screen the tray. flickers when a DVD+R 2 Hold down 4 on the remote control until the tray closes. is inserted 'FINALIZE' appears in the display. Finalising begins. This may take up to three minutes. 3 If finalising has been successful, the index screen will appear. bThe function 'Automatic Satellite Recording' is switched on. If the DVD-Recorder is switched off, the symbol 'SAT' appears in the bottom left corner of the display. If the DVD-Recorder is switched on, instead of the clock, '__:__' appears with a red background If I switch on a device, in the 'Tuner-Info-Field' (bottom left corner of the screen) connected to the EXT To switch off the function procede as follows: 2 AUX-I/O socket, the 1 Press SYSTEM-MENU . DVD Recorder starts a 2 Select with B the line 'Record settings' (second menu page) recording. 3 Select in line 'Sat record' with D 'Off' instead of 'EXT2'. 4 Confirm the change with OK . 5 End with SYSTEM-MENU . 105
  • 114.
    3103 605 20991 ENGLISH DEUTSCH 3401/000 (Wwn N Nw n wWNnwNwnNnNwWnNwnwN) DVDR 77/00-02 106
  • 116.
    PHILIPS NORGE AS PHILIPS PHILIPS PORTUGUESA, S.A. Sandstuveien 70, Philips Austria GmbH Consumer Information Centre PO Box 1, Manglerud Triesterstrasse 64 Rua Dr. António Loureiro Borge, nr. 5 N-0612 Oslo 1101 Wien Arquiparque, Miraflores NORWAY AUSTRIA P-2795 L-A-VEHLA Phone: 2274 8250 Tel: 0810 00 12 03 PORTUGAL Phone: 352-1-4163063 OY PHILIPS AB PHILIPS INFO CENTER PHILIPS CE, The Philips Centre, Sinikalliontie 3, Alexanderstrasse 1 420 - 430 London Road, 02630 Espo 20099 Hamburg Croydon, Surrey Helsinki GERMANY CR9 3QR FINLAND Tel: 0180-535 6767 UNITED KINGDOM puh. (09) 6158 0250 Phone: 0870-900-9070 PHILIPS KUNDTJÄNST SERVICE CONSOMMATEURS PHILIPS PHILIPS KUNDECENTER Kollbygatan 7, BP 0101 Frederikskaj 6, Akalla, 75622 Paris Cédex 13 DK-1780 København V 16485 Stockholm FRANCE DENMARK SWEDEN Phone: 0825-889 789 Tlf: 808 82814 Phone: 08-5985 2250 PHILIPS POLSKA PHILIPS ELECTRONICS IRELAND LIMITED PHILIPS REPRESENTATION OFFICE AL. Jerozolimskie 195B Consumer Information Centre Ul. Usacheva 35a 02-222 Warszawa Newstead, Clonskeagh 119048 MOSCOW POLSKA DUBLIN 14 RUSSIA Tel.: (022)-571-0-571 Phone: 01-7640292 Phone: 095-937 9300 PHILIPS SERVICE PHILIPS CONSUMER ELETRONICS PHILIPS INFO CENTER V Mezihori 2 Servizio Consumatori Fegistrasse 5 180 00 Prage Via Casati 26 8957 Spreitenbach CZECH REPUBLIC 20052 Monza - Milano SUISSE Phone: (02)-3309 330 ITALY Tel.: 0844-800 544 Phone: 800 820026 PHILIPS Iberia, S.A. PHILIPS MÁRKASZERVIZ PHILIPS CUSTOMER CARE CENTER C/Martinez Villergas, 49 Kinizsi U 30-36 Twee Stationsstraat 80/ 28027 MADRID Budapest 1119 80 Rue des Deux Gares SPAIN HUNGARY 1070 BRUSSEL/BRUXELLES Phone: 902-113 384 Phone: (01)-382 1700 BELGIUM (for BENELUX) Tel: 070-222 303 (Wwn N Nw n wWNnwNwnNnNwWnNwnwN) ΦΙΛΙΠΣ ΕΛΛAΣ AΕΒΕ PHILIPS CONSUMENTENLIJN 25ΗΣ MAΡΤΙΟΥ 15 t.a.v. betreffende afdeling 177 78 ΤAΥΡΟΣ Postbus 102 5600 AC Eindhoven AΘΗΝA NETHERLANDS Τηλ. 0 0800 3122 1280 Phone: 0900-8406 3103 605 20991 3401/000 www.philips.com DVDR 77/00 02