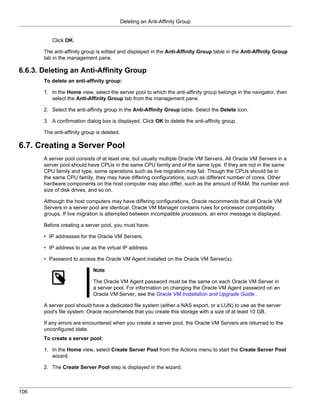
This document is the user's guide for Oracle VM release 3.0.3. It provides an overview of Oracle VM and instructions for common management tasks like setting up storage, networks, server pools, and virtual machines. It also covers converting physical hosts to virtual machines using Oracle's P2V utility and includes troubleshooting guidance.
![Conventions
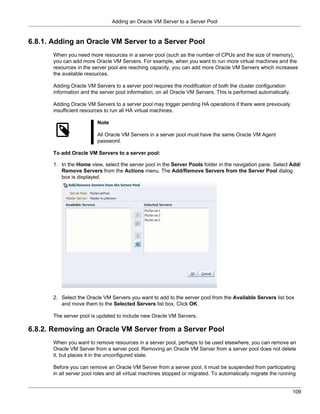
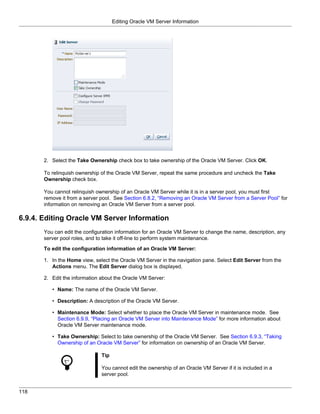
Convention Description
dd if=/dev/rdsk/c0t1d0s6 of=/dev/rst0 bs=10b
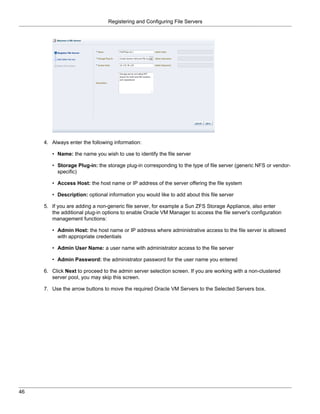
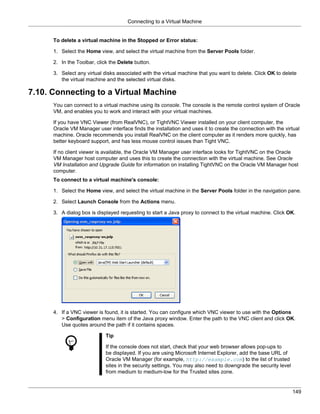
count=10000
braces { } Braces indicate required items:
.DEFINE {macro1}
brackets [ ] Brackets indicate optional items:
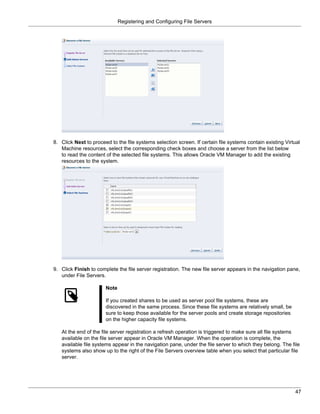
cvtcrt termname [outfile]
ellipses ... Ellipses indicate an arbitrary number of similar items:
CHKVAL fieldname value1 value2 ... valueN
italics Italic type indicates a variable. Substitute a value for the variable:
library_name
vertical line | A vertical line indicates a choice within braces or brackets:
FILE filesize [K|M]
5. Conventions
The following text conventions are used in this document:
Convention Meaning
boldface Boldface type indicates graphical user interface elements associated with an
action, or terms defined in text or the glossary.
italic Italic type indicates book titles, emphasis, or placeholder variables for which
you supply particular values.
monospace Monospace type indicates commands within a paragraph, URLs, code in
examples, text that appears on the screen, or text that you enter.
viii](https://image.slidesharecdn.com/ovmusersguide-121123051632-phpapp01/85/Ovm-user-s-guide-8-320.jpg)


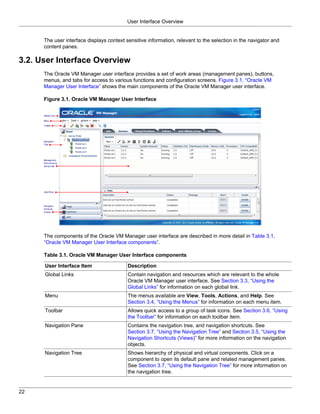
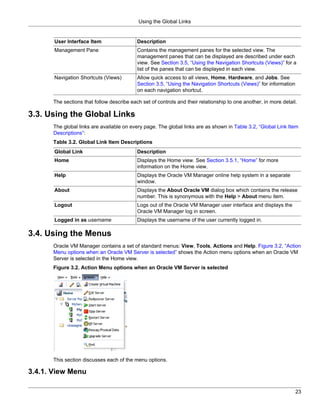
![Chapter 3. Using Oracle VM Manager
Table of Contents
3.1. Logging into the User Interface .................................................................................................. 21
3.2. User Interface Overview ............................................................................................................ 22
3.3. Using the Global Links .............................................................................................................. 23
3.4. Using the Menus ....................................................................................................................... 23
3.4.1. View Menu ..................................................................................................................... 23
3.4.2. Tools Menu .................................................................................................................... 24
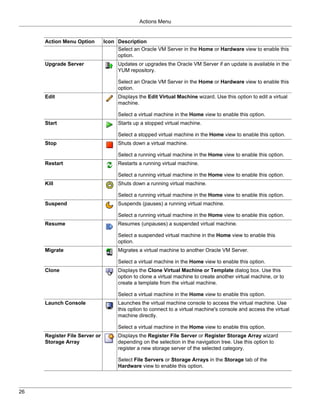
3.4.3. Actions Menu ................................................................................................................. 24
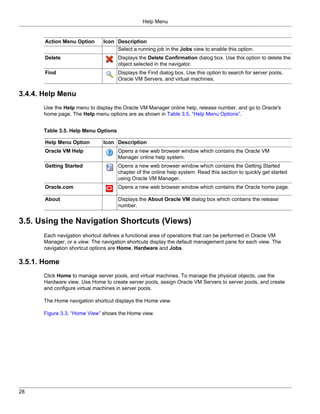
3.4.4. Help Menu ..................................................................................................................... 28
3.5. Using the Navigation Shortcuts (Views) ...................................................................................... 28
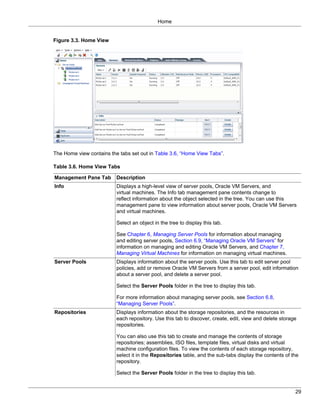
3.5.1. Home ............................................................................................................................. 28
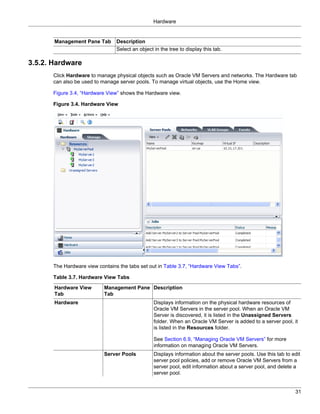
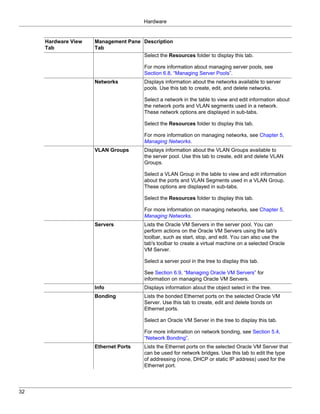
3.5.2. Hardware ....................................................................................................................... 31
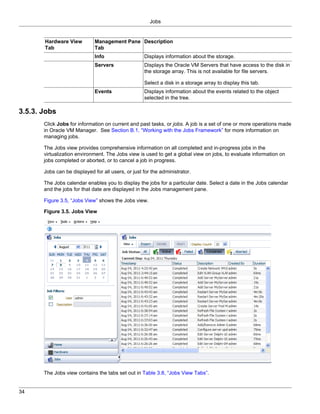
3.5.3. Jobs .............................................................................................................................. 34
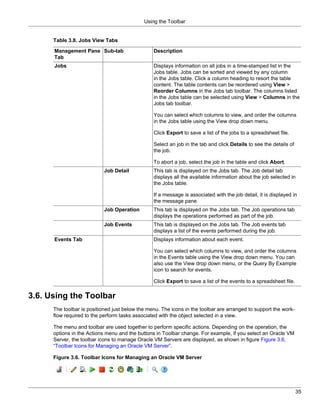
3.6. Using the Toolbar ..................................................................................................................... 35
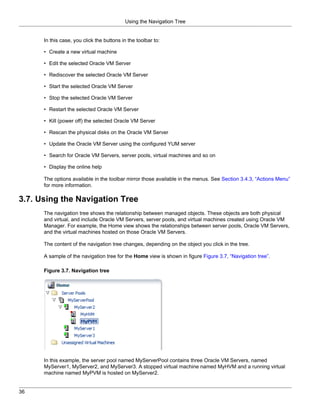
3.7. Using the Navigation Tree ......................................................................................................... 36
3.8. Object Icon Colors .................................................................................................................... 37
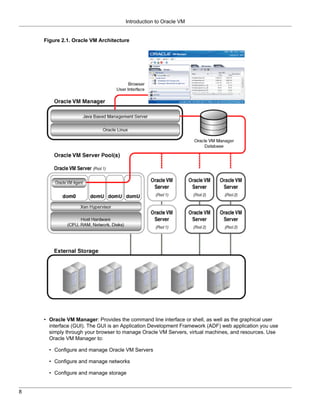
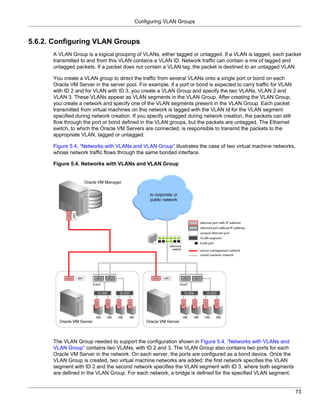
Management for the Oracle VM environment is provided by Oracle VM Manager, a transaction-based
framework that also includes an integrated database and a web-based management user interface.
This chapter discusses using the Oracle VM Manager user interface.
3.1. Logging into the User Interface
To open the Login page of Oracle VM Manager, enter the following address in a Web browser:
http[s]://hostname:port/ovm/console
Where, hostname refers to the host name or IP address of the Oracle VM Manager host, and port refers
to the port number on which Oracle VM Manager is listening.
To connect to Oracle VM Manager using Secure Sockets Layer (SSL) on a host named example.com, use:
https://example.com:7002/ovm/console
To connect to Oracle VM Manager on a host named example.com, use:
http://example.com:7001/ovm/console
Enter your Oracle VM Manager administration username in the Username field. This is the administration
username you create during the Oracle VM Manager install. Enter the password for the Oracle VM
Manager administration username in the Password field.
To manage the local instance of Oracle VM Manager (installed on localhost), leave the Management
Server URI field as the default, tcp://localhost. If you want to manage a remote instance of Oracle
VM Manager, enter the hostname or IP address for that machine, for example:
tcp://example.com
Now you are logged in, you can create storage repositories, server pools, add Oracle VM Servers, and
create virtual machines, import resources, and so on.
21](https://image.slidesharecdn.com/ovmusersguide-121123051632-phpapp01/85/Ovm-user-s-guide-29-320.jpg)


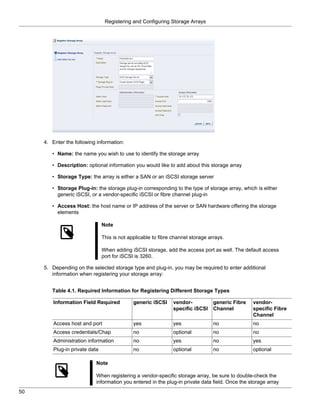

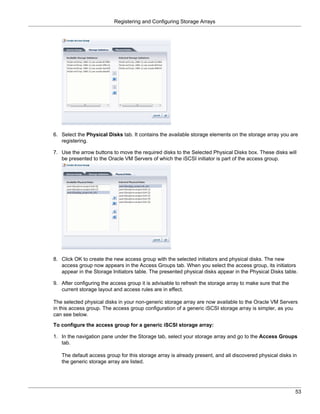
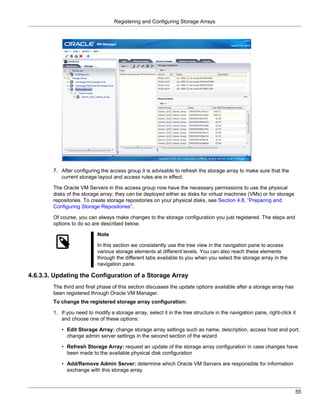
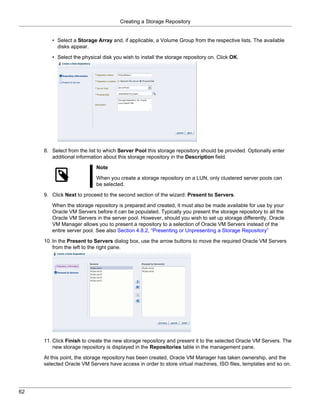
![Creating a Storage Repository
Operation Description
to a different address – you can click Discover to detect pre-existing storage
repository contents on the storage providers controlled by Oracle VM Manager.
4.8.1. Creating a Storage Repository
After you complete the preparation phase described above in Section 4.6.1, “Registering and Configuring
File Servers” and Section 4.6.3, “Registering and Configuring Storage Arrays”, Oracle VM Manager is fully
aware of the underlying physical storage providers available for use as a storage repository.
To create a storage repository for your server pool:
1. In Oracle VM Manager, open the Home view and select Server Pools in the navigator.
2. In the management pane, open the Repositories tab.
3. Click Create to create a new storage repository.
4. In the Create Repository dialog box, enter the following information:
• Repository Name: the name you wish to use to identify the repository
• Repository Location: either a network file server or a physical disk
5. If you selected Physical Disk as location, proceed to Physical Disk as the Repository Location [61].
If you selected Network File Server as location, click the search icon to select a location in the Select
Network File System dialog box:
• Select a Network File Server from the list. The available file systems appear. Note that only a
refreshed file system can be used.
• Select the file system you wish to install the storage repository on. Click OK.
6. Optionally provide this additional information:
• Share Path: path to a subdirectory on the selected file system
• Description: information you would like to add about this storage repository
• Proceed to Present the storage repository to servers [62].
7. If you selected Physical Disk as the Repository Location, click the search icon to select a location in the
Select Physical Disk dialog box:
61](https://image.slidesharecdn.com/ovmusersguide-121123051632-phpapp01/85/Ovm-user-s-guide-69-320.jpg)

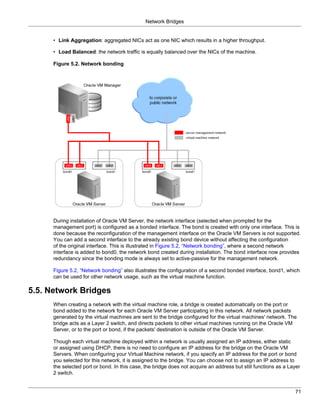
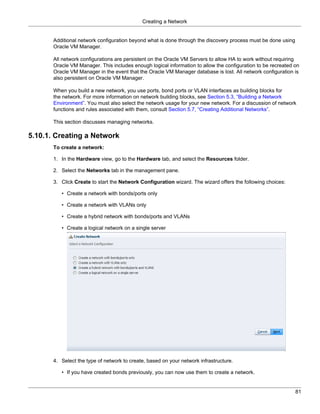
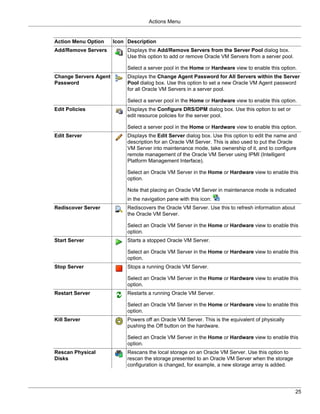
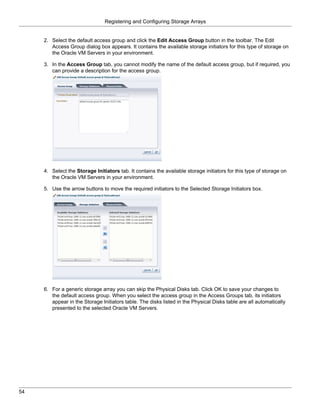
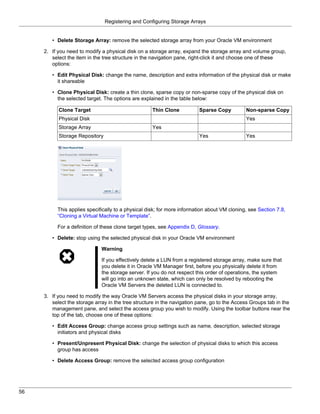
![Creating a Network
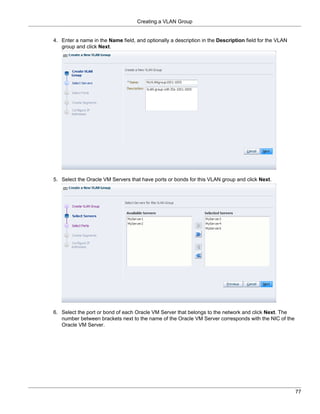
• If you select to create a network with VLANs only, you must have created a VLAN Group previously.
See Section 5.8, “Managing Bonded Interfaces” for details on how to create a VLAN Group.
• You can also choose to create a network with a combination of bonds and ports, and VLANs.
• The last selection, to create a logical network on a single server, creates an intra-server on a single
Oracle VM Server. See Section 5.3, “Building a Network Environment” for information about intra-
server networks. To create a logical network on a single server, proceed with creating a logical
network for a single Oracle VM Server [86]. For all other network types, continue with entering
network information [82].
5. Enter the following network information:
• Name: A name for the network.
• Description: A description of the network. This is an optional field.
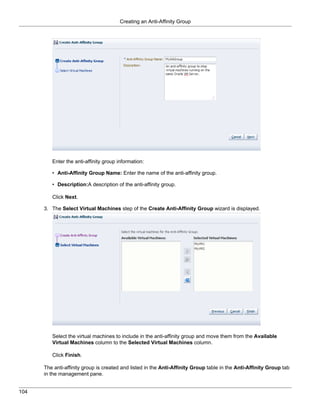
• Network Usage: Select one or more network functions:
• Server Management
• Live Migrate
• Cluster Heartbeat
• Virtual Machine
• Storage
See Section 5.2, “Network Usage” for more information regarding network functions.
6. Depending on the network type you selected to create, fill out the applicable screens in the wizard as
described below:
• Select Servers screen
82](https://image.slidesharecdn.com/ovmusersguide-121123051632-phpapp01/85/Ovm-user-s-guide-90-320.jpg)
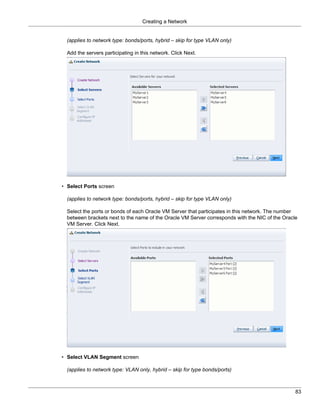
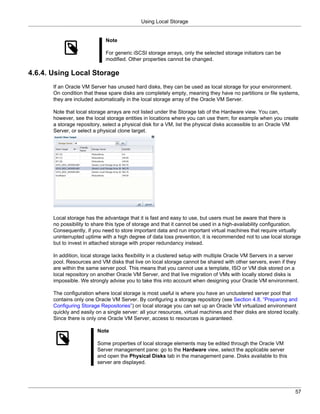
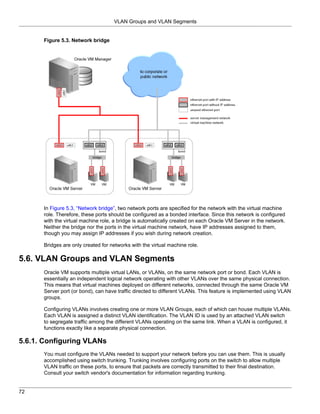
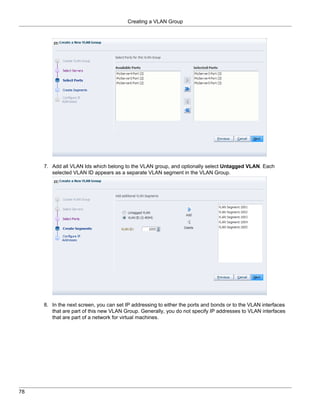
![Editing a Network
Select or deselect the ports or bonds of each Oracle VM Server that participates in this network. The
number between brackets next to the name of the Oracle VM Server corresponds with the NIC of the
Oracle VM Server. Click Next.
• Select VLAN Segment screen
(applies to network type: VLAN only, hybrid – skip for type bonds/ports)
Select the VLAN Group from the list, then select the VLAN segment from the list. All VLAN Groups
are available for selection, but VLAN segments already in use do not appear in the drop-down list.
Click Next.
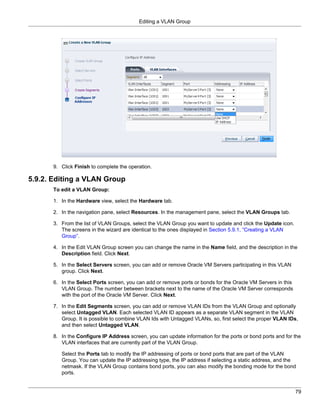
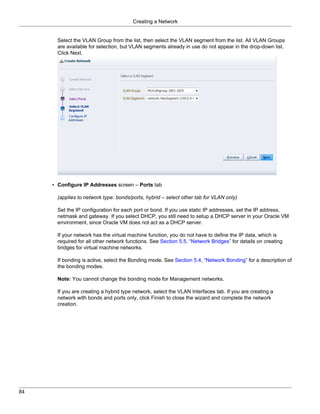
• Configure IP Addresses screen – Ports tab
(applies to network type: bonds/ports, hybrid – select other tab for VLAN only)
Set or update the IP configuration for each port or bond. If you use static IP addresses, set the IP
address, netmask and gateway. If you select DHCP, you still need to setup a DHCP server in your
Oracle VM environment, since Oracle VM does not act as a DHCP server.
If your network has the virtual machine function, you do not have to define the IP data, which is
required for all other network functions. See Section 5.5, “Network Bridges” for details on creating
bridges for virtual machine networks.
If bonding is active, select the Bonding mode. See Section 5.4, “Network Bonding” for a description of
the bonding modes.
Note: You cannot change the bonding mode for Management networks.
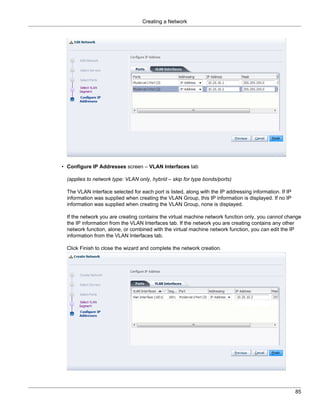
If you are editing a hybrid type network, select the VLAN Interfaces tab. If you are editing a network
with bonds and ports only, skip the second tab and proceed completing the network updates [87].
• Configure IP Addresses screen – VLAN Interfaces tab
(applies to network type: VLAN only, hybrid – skip for type bonds/ports)
The VLAN interface selected for each port is listed, along with the IP addressing information. If IP
information was supplied when creating the VLAN Group, this IP information is displayed. If no IP
information was supplied when creating the VLAN Group, none is displayed.
If the network you are creating contains the virtual machine network function only, you cannot change
the IP information from the VLAN Interfaces tab. If the network you are creating contains any other
network function, alone, or combined with the virtual machine network function, you can edit the IP
information from the VLAN Interfaces tab.
5. After verifying or making the necessary changes to the network, click Finish to complete the network
updates.
Note
For logical networks on a single Oracle VM Server, you can only edit the
Description field. If you want to change servers, delete the network and re-create it
with a different server.
87](https://image.slidesharecdn.com/ovmusersguide-121123051632-phpapp01/85/Ovm-user-s-guide-95-320.jpg)


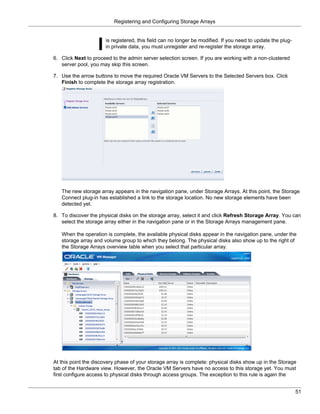
![Setting Hard Partitioning for Virtual Machine CPUs
To install the paravirtual drivers for Windows operating systems, see the Oracle VM Windows Paravirtual
Drivers Installation Guide .
To install paravirtual drivers on an Oracle Linux guest operating system:
1. Download the paravirtualized kernel on the virtual machine, for example for an Oracle Enterprise Linux
5.5 64-bit guest, download:
http://public-yum.oracle.com/repo/EnterpriseLinux/EL5/5/base/x86_64/kernel-
xen-2.6.18-194.el5.x86_64.rpm
2. Install the paravirtualized kernel on the virtual machine:
# rpm -ivh kernel-xen-version.type.rpm
Preparing... ########################################### [100%]
1:kernel-xen ########################################### [100%]
3. Back up the old initrd file, and make the new one with xennet, xenblk driver:
# mv initrd-oldversion.el5xen.img initrd-oldversion.el5xen.img.old
# mkinitrd initrd-newversion.el5xen.img newversion.el5xen --with=xenblk --with=xennet
--preload=xenblk --preload=xennet
4. Edit the /boot/grub/grub.conf file to be:
default=0
timeout=5
splashimage=(hd0,0)/grub/splash.xpm.gz
hiddenmenu
title Enterprise Linux Enterprise Linux Server (version.el5xen)
root (hd0,0)
kernel /vmlinuz-version.el5xen ro root=LABEL=/
initrd /initrd-version.el5xen.img
5. Modify the /etc/modprobe.conf file to include:
alias scsi_hostadapter xenblk
alias eth0 xennet
6. Shut down the virtual machine. See Section 7.9.5, “Shutting Down a Virtual Machine” for information on
shutting down a virtual machine.
7. Edit the virtual machine and change the Domain Type to Xen PVM. See Section 7.9.9, “Editing a
Virtual Machine” for information on editing a virtual machine.
8. Start the virtual machine. See Section 7.9.1, “Starting a Virtual Machine” for information on starting a
virtual machine.
7.12. Setting Hard Partitioning for Virtual Machine CPUs
Oracle VM offers an advanced feature for hard partitioning, also known as CPU pinning. Hard partitioning
means binding a virtual machine CPU to a physical CPU or core, and preventing it from running on other
physical cores than the ones specified. This is done for Oracle CPU licensing purposes, since Oracle VM is
licensed on a per-CPU basis.
Warning
Hard partitioning is the ONLY case where you are allowed to modify the virtual
machine configuration file manually. For all other changes to a virtual machine, use
the Oracle VM Manager user interface.
151](https://image.slidesharecdn.com/ovmusersguide-121123051632-phpapp01/85/Ovm-user-s-guide-159-320.jpg)
![Setting Hard Partitioning for Virtual Machine CPUs
Note
For more information about special Oracle licensing policies, please consult
the Oracle Technology Network and open the PDF document on the subject of
Partitioning.
To set hard partitioning for a virtual machine:
1. In the the Home view of Oracle VM Manager, use the navigation pane to select the virtual machine you
wish to pin to the Oracle VM Server.
2. In the Info tab of the management pane, look up the virtual machine ID and the storage repository
containing the virtual machine configuration file.
3. In the navigation pane, select Server Pools. In the management pane, open the Repositories tab.
Look up the file system path of the storage repository containing the virtual machine configuration file.
4. Log into the server hosting the storage repository.
5. Using a text editor, open the virtual machine configuration file, which is located in this directory: /
<repository file system path>/VirtualMachines/<virtual machine ID>/. For
example, using the vi text editor, you open the vm.cfg file as follows:
# vi /<repository file system path>/VirtualMachines/<virtual machine ID>/vm.cfg
disk = ['file:/OVS/Repositories/0004fb0000030000a3ff6bbfe68511a6/VirtualDisks/
0004fb0000120000dbafadb0e1e4115f.img,xvda,w']
vif = ['mac=00:21:f6:00:00:00']
uuid = '0004fb00-0006-0000-ebed-b32c30706fad'
OVM_description = 'Oracle Linux 5 64bit quad-core 8GB'
guest_os_type = 'Oracle Linux 5'
OVM_simple_name = 'MyOL5VM'
on_poweroff = 'destroy'
vfb = ['type=vnc,vncunused=1,vnclisten=127.0.0.1']
on_crash = 'restart'
on_reboot = 'restart'
vcpus = 4
cpu_weight = 27500
OVM_os_type = 'Oracle Linux 5'
memory = 8192
cpu_cap = 0
OVM_high_availability = False
bootloader = '/usr/bin/pygrub'
maxmem = 2048
name = '0004fb0000060000ebedb32c30706fad'
6. To pin the virtual CPUs to specific physical cores of the host Oracle VM Server, make sure the vm.cfg
file contains a line containing the parameter cpus = 'value'. For example:
cpus = '0-3'
-- or --
cpus = '0,1'
In the first case, only CPUs or cores 0, 1, 2 and 3 can be used for the virtual machine. In the second
case, cores 0 and 1. If the virtual machine has 4 virtual CPUs, and you put cpus = '0' in the vm.cfg
file, then all 4 virtual CPUs will be scheduled on the same physical core.
7. Save vm.cfg the file. The virtual machine is now set up with hard partitioning.
152](https://image.slidesharecdn.com/ovmusersguide-121123051632-phpapp01/85/Ovm-user-s-guide-160-320.jpg)

![Chapter 8. Converting Hosts
Table of Contents
8.1. Converting a Host ................................................................................................................... 155
8.1.1. Using the P2V Utility .................................................................................................... 155
8.1.2. Using the P2V Utility with a Kickstart File ....................................................................... 160
This chapter discusses creating hardware virtualized guest images from existing physical computers
running any of the operating systems supported by Oracle VM.
8.1. Converting a Host
You can convert the operating system and application software on a computer to an Oracle VM hardware
virtualized guest image using the Physical to Virtual (P2V) conversion utility. The P2V utility is included on
the Oracle VM Server CD. The operating system must be one of the Oracle VM supported guest operating
systems. See the Oracle VM Release Notes for a list of the supported guest operating systems. To perform
a P2V conversion, the host computer must have a CPU that supports PAE (Physical Address Extension).
The P2V conversion process creates a virtual machine configuration file (vm.cfg), allows you to make
some modifications in terms of sizing of the virtual machine hardware, and then replicates the physical
image and transfers it over the network to a storage repository using Oracle VM Manager. The image on
your physical computer is not changed in any way.
The P2V utility converts disks on the computer to virtual disk images. The first four virtual disk images are
created as IDE disks (hda, hdb, hdc, and hdd) on the guest, using the original disk names. Up to seven
additional disks are created as SCSI devices (sda, sdb, sdc, and so on). The disk entries in the vm.cfg file
look similar to:
disk = ['file:System-sda.img,hda,w',
'file:System-sdb.img,hdb,w',
'file:System-sdc.img,hdc,w',
'file:System-sdd.img,hdd,w',
'file:System-sde.img,sda,w',
'file:System-sdf.img,sdb,w',
'file:System-sdg.img,sdc,w',
'file:System-sdh.img,sdd,w',
'file:System-sdi.img,sde,w',
'file:System-sdj.img,sdf,w',
'file:System-sdk.img,sdg,w',
]
The hardware virtualized guest created by the P2V utility must have it's own network configuration. If
you use the same network configuration as the original computer, a network clash may occur as two
computers on the network may have the same IP and MAC address. When the guest is started, make sure
the network device is detected and a new network device is configured.
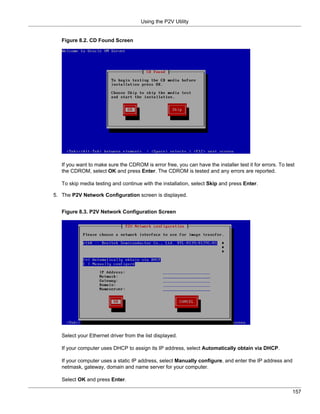
You can run the P2V utility interactively, or as an automated process using a kickstart configuration file.
When you use the P2V utility with a kickstart file, no user intervention is required.
8.1.1. Using the P2V Utility
When you use the P2V utility, you are prompted for all required information.
To create a virtual machine image of a computer:
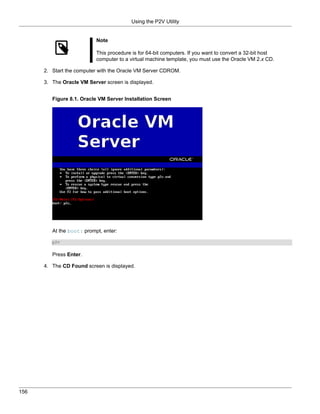
1. Insert the Oracle VM Server CDROM into the CDROM drive of the computer you want to image.
155](https://image.slidesharecdn.com/ovmusersguide-121123051632-phpapp01/85/Ovm-user-s-guide-163-320.jpg)

![Options
Example A.1. Suppressing the P2V Network Configuration Screen
To suppress the P2V Network Configuration screen, supply the Ethernet device on the command line, for
example:
p2v ks=http://example.com/ks.cfg ksdevice=eth0
Example A.2. Suppressing the Language Selection Screen
To suppress the Language selection screen, supply the language kickstart parameter, for example:
lang en_US.UTF-8
Example A.3. Suppressing the Keyboard Selection Screen
To suppress the Keyboard selection screen, supply the keyboard kickstart parameter, for example:
keyboard us
Example A.4. Suppressing the Installation Source Screen
To suppress the Installation source screen, supply the source kickstart parameter, for example:
cdrom
Example A.5. P2V Kickstart File
An example P2V kickstart file follows:
p2v
cdrom
lang en_US.UTF-8
keyboard us
target --ovmmanager
network --device eth0 --bootproto dhcp
diskimage --device /dev/sda --type IDE
vm_options --name myGuest --mem 1024 --vcpus 1 --consolepasswd mypassword
A.1.1. Options
The following parameters are accepted in a P2V kickstart file.
p2v Indicates the kickstart file is intended to automate a P2V conversion.
This parameter is required in order to perform an automated P2V
conversion and should be supplied at the Oracle VM Server boot:
prompt instead of install, update, or rescue. It accepts no
parameters.
target [option] Sets the end destination for the guest image.
The option parameter can only contain the following:
--ovmmanager
Sets the P2V utility to operate in HTTPS server mode to transfer the
guest image to a running instance of Oracle VM Manager.
diskimage [option...] Denotes a disk to be included in the guest image. The P2V utility uses
device mapper-based snapshotting to copy the disk as a system-
*.img file on the target computer. There may be multiple diskimage
directives in a P2V kickstart file, each resulting in a disk image in the
guest image. The --device parameter must always be used with the
diskimage directive to indicate which device should be imaged.
164](https://image.slidesharecdn.com/ovmusersguide-121123051632-phpapp01/85/Ovm-user-s-guide-172-320.jpg)
![Options
The option parameter is one or more of the following:
--device path
The device to image. path must be the full path to the device. For
example:
diskimage --device /dev/sda
--type [IDE | SCSI | LVM | MDRAID]
Sets the type of disk. Must be one of IDE, SCSI, LVM, or MDRAID.
Devices /dev/hda, /dev/hdb, /dev/hdc, and /dev/hdd should be IDE.
Devices /dev/sd[a-zz] should be SCSI. A logical volume should be LVM.
Devices /dev/md[a-zz] should be MDRAID. For example:
diskimage --device /dev/hda --type IDE
network [option...] Configures network information for the computer.
The option parameter is one or more of the following:
--bootproto [dhcp | bootp | static]
Sets the method by which the network configuration is determined. Must
be dhcp, bootp, or static. The default is dhcp. bootp and dhcp are
treated as the same.
dhcp uses a DHCP server to obtain the networking configuration, for
example:
network --bootproto dhcp
static requires all the necessary networking information. As the
name implies, this information is static and is used during and after the
installation. The entry for static networking is more complex, as you
must include all network configuration information on one line. You
must specify the IP address, netmask, gateway, and nameserver, for
example:
network --bootproto static --ip 10.0.2.15 --netmask 255.255.255.0
--gateway 10.0.2.254 --nameserver 10.0.2.1
The static method has the following restrictions:
• All static networking configuration information must be specified on
one line; you cannot wrap lines using a backslash.
• You can only specify one nameserver.
--ip ipaddress
The IP address for the computer.
--gateway ipaddress
165
The IP address for the default gateway.](https://image.slidesharecdn.com/ovmusersguide-121123051632-phpapp01/85/Ovm-user-s-guide-173-320.jpg)
![Options
--nameserver ipaddress
The IP address for the primary nameserver.
--netmask netmask
The netmask for the computer.
vm_options [option...] Sets the configuration options for the guest.
--name name
The name of the guest.
--mem size
The memory allocation for the guest in Mb.
--vcpus number
The number of VCPUs for the guest.
--consolepasswd password
The console password for the guest. For example:
vm_options --name myGuest --mem 1024 --vcpus 1
--consolepasswd mypassword
166](https://image.slidesharecdn.com/ovmusersguide-121123051632-phpapp01/85/Ovm-user-s-guide-174-320.jpg)