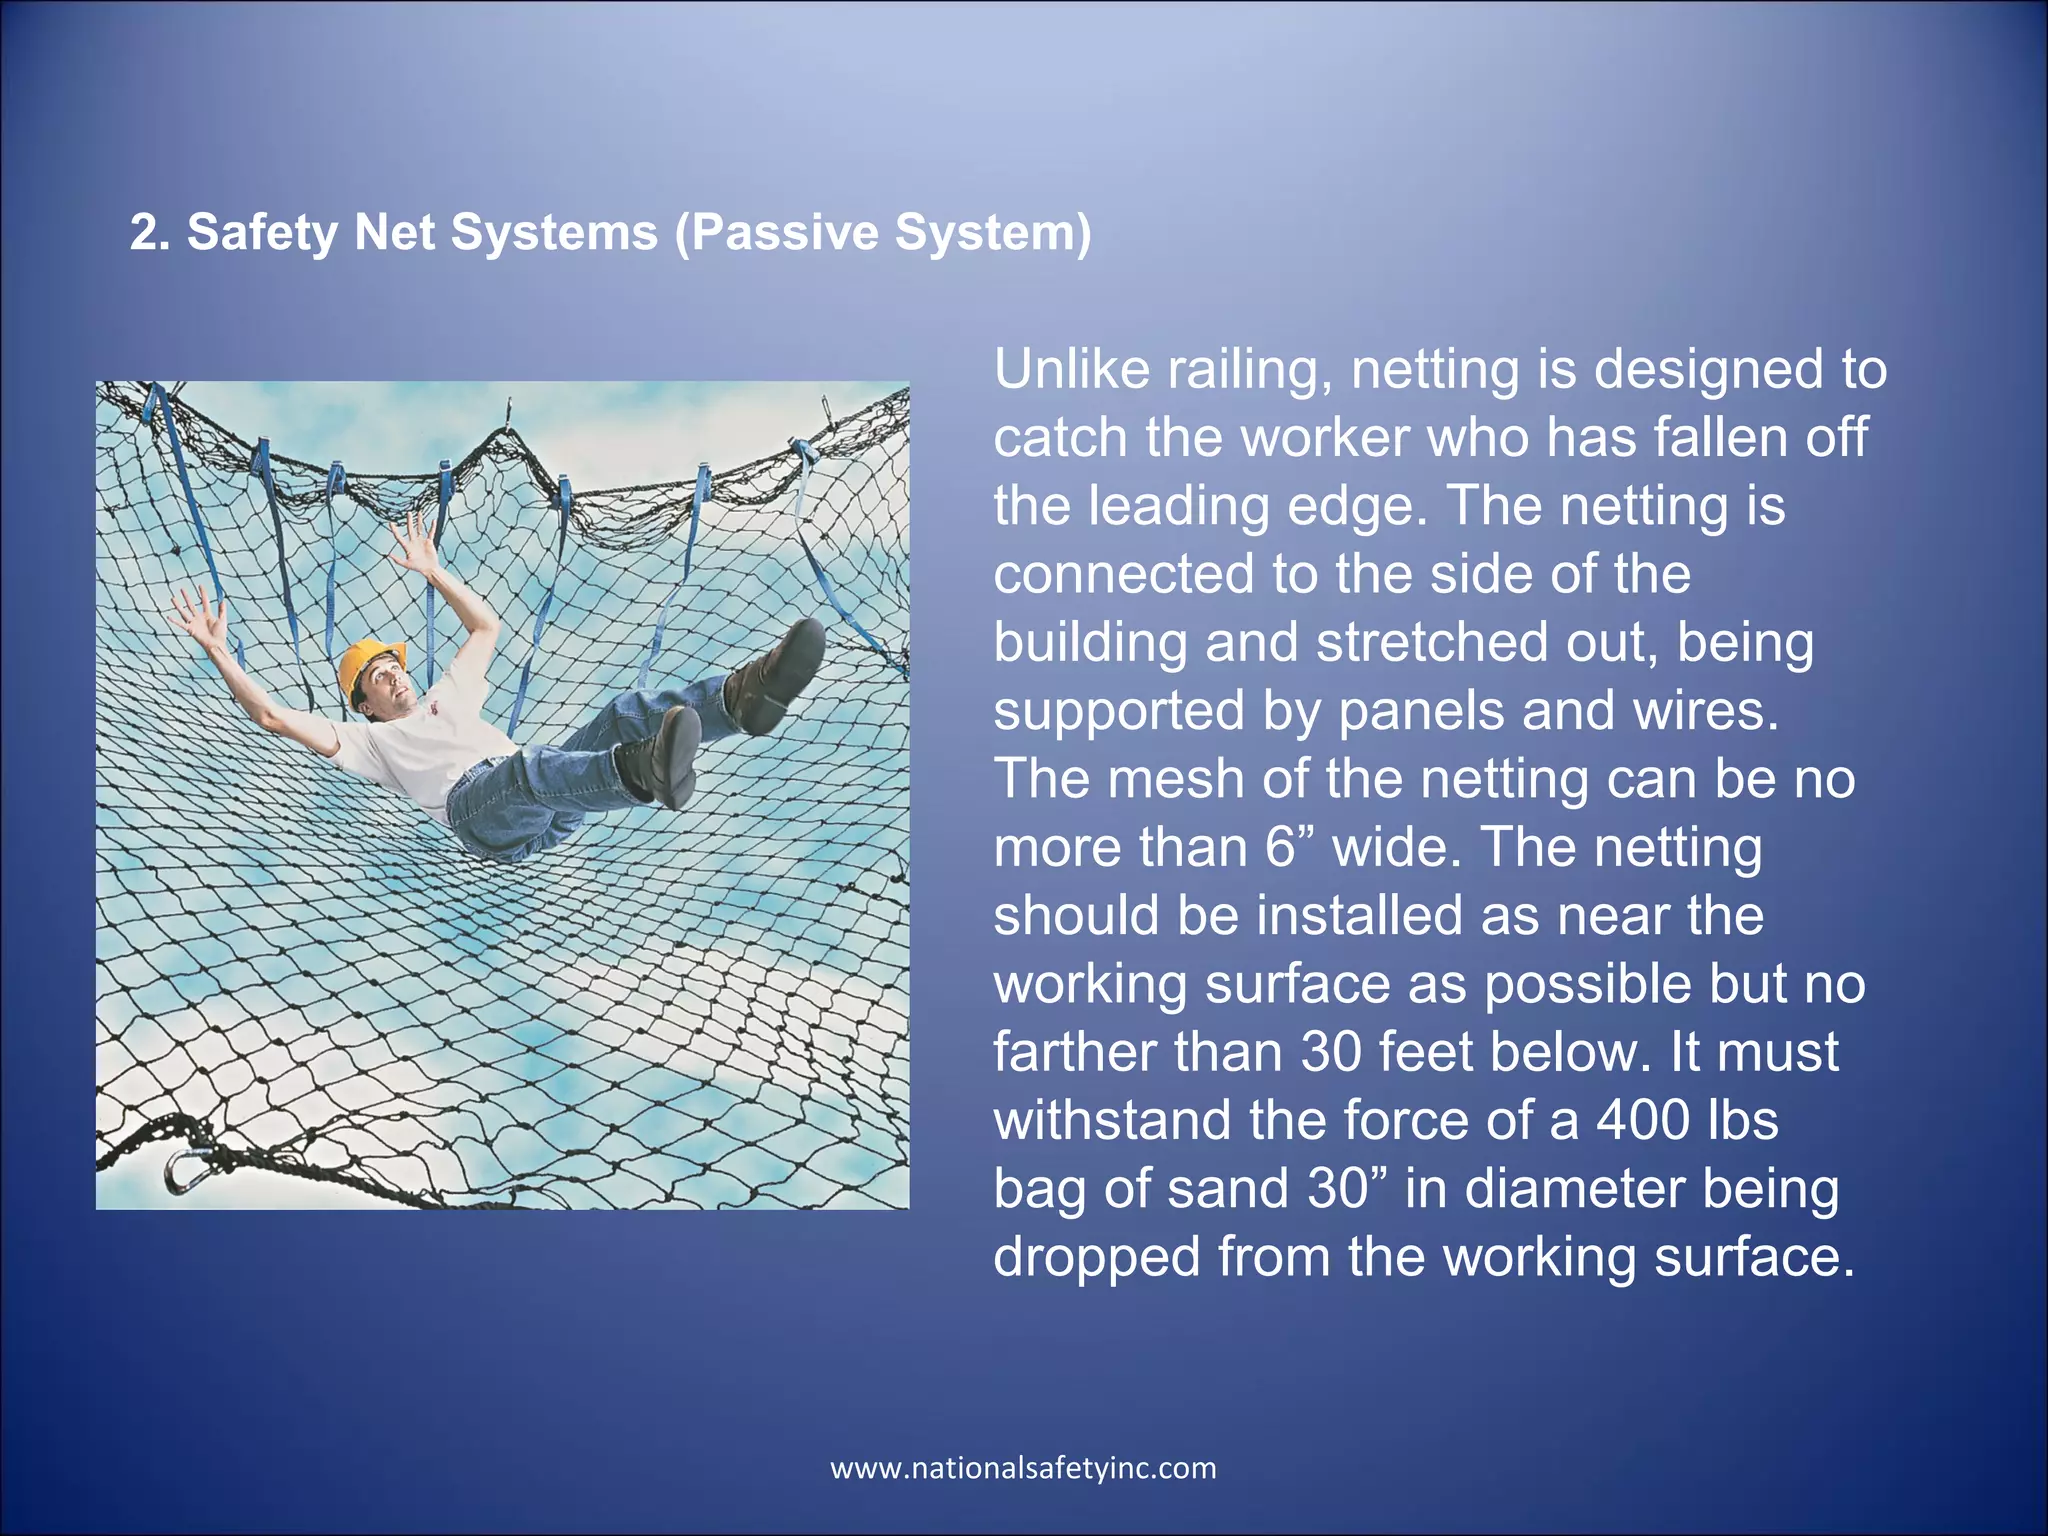
The Basics of Fall Protection
Fall protection and confined space, perhaps more than
any other area of safety, tends to seem overwhelming.
There is no room for error and miscalculations are most
often fatal. The pull of gravity cannot be
underestimated.
Fall protection, however, doesn’t need to be so
frightening if some basic principles are applied and
some basic rules followed. The purpose of this paper is
to try to make fall protection as simple as hand
protection or head protection.
www.nationalsafetyinc.com
First of all, we need to know what is required and why.
According to subpart M of the OSHA 1926.502 Code of Federal Regulations:
“Each employee on a walking/working surface (horizontal and vertical
surface) with an unprotected side or edge which is 6 feet (1.8 m) or more
above a lower level shall be protected from falling by the use of guardrail
systems, safety net systems, or personal fall arrest systems.”
www.nationalsafetyinc.com
1. Guardrail Systems (Passive System)
Guardrail systems rails made up
of vertical rails, top rails and mid
rails. They are designed to keep
workers from getting too close to
the leading edge. They must be
42” (+ or – 3”) above the
walking/working level and must be
able to withstand a force of at
least 200 lbs as applied 2” from its
top edge. Additionally, it must be
able to withstand a force of 150
lbs downward or in any direction .
Intermediate vertical members,
between posts, must be no more
than 19 inches apart.
www.nationalsafetyinc.com
2. Safety Net Systems (Passive System)
Unlike railing, netting is designed to
catch the worker who has fallen off
the leading edge. The netting is
connected to the side of the
building and stretched out, being
supported by panels and wires.
The mesh of the netting can be no
more than 6” wide. The netting
should be installed as near the
working surface as possible but no
farther than 30 feet below. It must
withstand the force of a 400 lbs
bag of sand 30” in diameter being
dropped from the working surface.
www.nationalsafetyinc.com
Horizontal and vertical safety net distances form a working surface
Net distance below the working surface Minimum horizontal distance of net from the
edge of the working surface
Up to 5 feet 8 feet
More than 5 up to 10 feet 10 feet
More than 10 feet 13 feet
The distance from the edge of the working surface to the outer
edge of the netting is shown in the table below:
The net needs to be inspected and damaged sections replaced
at least once a week. Any debris that has fallen into the netting
must be removed before the next work shift.
www.nationalsafetyinc.com
3. Personal Fall Arrest Systems (Active System)
Personal Fall Arrest Systems refer to any number of anchor-connector-
harness combinations. This is perhaps the most common type of fall
protection on the market and we will spend the rest of this presentation
addressing all the components of this system.
Understanding the ABCs of Fall Protection
While “ABC” is usually used to refer to the basics, in the case of fall
protection it also stands for the three basic components of fall
protection.
Additionally we will add D & E.
A is for Anchor
Also known as the tie-off point, this is the point of attachment for the
lanyard, the lifeline or the deceleration device. The anchor must
support 5,000 lbs of pressure or twice the expected load when in fall
arrest mode (requirements are different for work positioning anchor
points which must support 3,000 lbs of static strength and restraint
and travel restriction anchor points must support 1,000 lbs of static
strength). That’s a lot of pressure! 2 x 4s, pipes or chimneys will not
do. There are a number of good anchor points designed by various
manufacturers some are permanent (and can be used again if and
when needed), others are removed once the work is finished.
Anchor points can be fixed point anchors (FPAs) or Mobile Anchorage
Points. Systems such as Horizontal Lifelines (HLLs) and trolleys are
examples of mobile anchor points.
www.nationalsafetyinc.com
B is for Body Harness
The body harness is the combination of straps
that distribute the fall arrest force over the
chest, thighs, waist, pelvis and shoulders. Body
harnesses come in a variety of styles and
configurations with a corresponding range in
pricing. Harnesses have buckles and adjustable
straps for proper fitting. Some are sized (small,
medium, large, XL, etc…) while others are
universal. Whichever harness you choose,
make sure that it is properly tightened and fitted
to your body. While a harness that is too tight is
restricting and uncomfortable to work in, a loose
fitting harness can be extremely dangerous,
particularly in the pelvic region (a fall in a loose
harness can result in serious and even
permanent damage to genital area).
The connecting D-Ring in a properly fitted harness
should be located right between the shoulder
blades. Make sure that the harness you are using is
approved for industrial work.
Recreational harness (rock climbing harnesses) are
not approved.
Belts can only be used for positioning or restraint,
NEVER for fall arrest.
www.nationalsafetyinc.com
C is for Connectivity
The connector refers to the device used to link the body
harness to the anchor point. Lanyards, Self-Retracting
Lifelines (SRLs) and Shock-Absorbing Lifelines are all
different types of connectors.
The gate strength requirements for snaphooks and
carabiners was revised as of 2009 to 3,600 lbs in all
directions.
Note: It is essential that the user understand the nature of
the “compatibility of connectors”. Compatibility is defined
such that connecting elements work together so that their
size and shape does not cause the gate or snaphook to
inadvertently open or roll out, no matter how they get
turned while in use (see example graphic below).
In order to ensure connector compatibility, the connector should
fit through the anchor point (e.g. the gate on the shock
absorbing lanyard should fit through the steel ring of the cross
arm strap it will be connected to).
www.nationalsafetyinc.com
(Source: Capital Safety’s “Thinking about fall protection”)
A deceleration device is a type of connector that is
designed to limit the amount of force exerted on the
body. The amount of force exerted cannot exceed 1800
lbs according to OSHA (900 lbs according to the ANSI
standard). Self-Retracting Lifelines work like a seatbelt
in the car, by locking up as soon as the cable or
webbing is rapidly pulled through as would be the case
with a fall. Shock-Absorbing Lanyards work by “tearing
out” in order to reduce the amount of force.
www.nationalsafetyinc.com
D is for Descent
E is for Escape
D & E are often the neglected pieces of fall protection but they are,
nonetheless, as important as AB & C. Suspension trauma, or
"orthostatic intolerance," results when blood circulating in the body is
reduced or trapped in the legs. This can be extremely harmful to the
brain, the heart and to other organs that might not get enough blood.
Additionally, the heart is often unable to cope effectively with the
sudden rush of “dirty” blood that occurs once the suspended person is
rescued. Serious injury and fatality can occur after a relatively short
time of being suspended. It is therefore crucial to have an effective
rescue plan outlined to get a suspended person down immediately.
Again there are a number of SRL’s, trauma suspension straps and
other fall protection products that are specifically designed to aid in
this step.
www.nationalsafetyinc.com
Calculating the Fall Distance
Many people simply don’t realize how far a person
will actually fall when he or she takes a fall. The
proper fall clearance is reached when all the
measurements are added up.
6 ft (length of lanyard) + 3 ½ ft (deceleration or free
fall distance) + 1 ft (harness stretch) + 5 ft (average
distance from back D-ring to the sole of the foot on
6 ft worker) + 3 ft (safety factor) = 18 ½ feet
www.nationalsafetyinc.com
How to Put on a Harness
www.nationalsafetyinc.com
Step 1
Hold harness by back D-ring. Shake harness to allow
all straps to fall in place.
Step 2
If chest, leg and/or waist straps are buckled,
release straps and unbuckle at this time.
www.nationalsafetyinc.com
Step 3
Slip straps over shoulders so D-ring is located in middle
of back between shoulder blades.
Step 4
Pull leg strap between legs and connect to
opposite end. Repeat with second leg strap. If
belted harness, connect waist strap after leg
straps.
www.nationalsafetyinc.com
Step 5
Connect chest strap and position in midchest area.
Tighten to keep shoulder straps taut.
Step 6
After all straps have been buckled, tighten all
buckles so that harness fits snug but allows full
range of movement. Pass excess strap through loop
keepers.
A Complete Fall Protection
Program
In order to put together a complete fall protection program there are
several steps that you need to implement.
1. Make sure you understand all the rules and regulations. This paper
is just a guide to try to make fall protection a little easier to
understand. For a complete fall protection program it is important to
read and understand the standard (www.osha.gov) as well as the
recommendations put out by ANSI (www.asse.org).
2. Assess all potential fall hazards. A proper assessment involves
identifying the nature of the work that will be done in order to
properly understand where the risks are greatest. The assessment
should also include other potential hazards (respiratory, heat, impact,
etc…)
www.nationalsafetyinc.com
3. Devise effective solutions to address the hazards. Make
use of manufacturer reps, safety suppliers or other
professionals to help you find effective solutions. They
might be able to recommend something that you wouldn’t
have thought about or didn’t know existed. If there is no
other solution available they can also help you design a
custom fall arrest system specifically for your own unique
challenges.
4. Purchase the products.
5. Training
www.nationalsafetyinc.com
6. Maintain and inspect all systems and fall protection products on a
regular basis for wear, tear and deterioration. Though there is no
“expiration date” on a harness, many manufacturers recommend
retiring it after 5 years of normal use. Additionally all equipment
should be inspected to make sure that there is no visual damage,
exposure to chemicals, excessive heat or ultraviolet light.
7. Rescue Plan. As mentioned above under the ABCD & Es of fall
protection, any fall protection program that does not have an
emergency rescue plan designed to retrieve the suspended worker in a
timely manner is incomplete. Capital Safety’s website has a
downloadable fall protection Program Rescue Plan that can serve as a
example or template for your own rescue plan.
8. Put it all down in writing. An effective fall protection program is a
written program.

The basics of fall protection

  • 1.
    The Basics ofFall Protection
  • 2.
    Fall protection andconfined space, perhaps more than any other area of safety, tends to seem overwhelming. There is no room for error and miscalculations are most often fatal. The pull of gravity cannot be underestimated. Fall protection, however, doesn’t need to be so frightening if some basic principles are applied and some basic rules followed. The purpose of this paper is to try to make fall protection as simple as hand protection or head protection. www.nationalsafetyinc.com
  • 3.
    www.nationalsafetyinc.com First of all,we need to know what is required and why. According to subpart M of the OSHA 1926.502 Code of Federal Regulations: “Each employee on a walking/working surface (horizontal and vertical surface) with an unprotected side or edge which is 6 feet (1.8 m) or more above a lower level shall be protected from falling by the use of guardrail systems, safety net systems, or personal fall arrest systems.”
  • 4.
    www.nationalsafetyinc.com 1. Guardrail Systems(Passive System) Guardrail systems rails made up of vertical rails, top rails and mid rails. They are designed to keep workers from getting too close to the leading edge. They must be 42” (+ or – 3”) above the walking/working level and must be able to withstand a force of at least 200 lbs as applied 2” from its top edge. Additionally, it must be able to withstand a force of 150 lbs downward or in any direction . Intermediate vertical members, between posts, must be no more than 19 inches apart.
  • 5.
    www.nationalsafetyinc.com 2. Safety NetSystems (Passive System) Unlike railing, netting is designed to catch the worker who has fallen off the leading edge. The netting is connected to the side of the building and stretched out, being supported by panels and wires. The mesh of the netting can be no more than 6” wide. The netting should be installed as near the working surface as possible but no farther than 30 feet below. It must withstand the force of a 400 lbs bag of sand 30” in diameter being dropped from the working surface.
  • 6.
    www.nationalsafetyinc.com Horizontal and verticalsafety net distances form a working surface Net distance below the working surface Minimum horizontal distance of net from the edge of the working surface Up to 5 feet 8 feet More than 5 up to 10 feet 10 feet More than 10 feet 13 feet The distance from the edge of the working surface to the outer edge of the netting is shown in the table below: The net needs to be inspected and damaged sections replaced at least once a week. Any debris that has fallen into the netting must be removed before the next work shift.
  • 7.
    www.nationalsafetyinc.com 3. Personal FallArrest Systems (Active System) Personal Fall Arrest Systems refer to any number of anchor-connector- harness combinations. This is perhaps the most common type of fall protection on the market and we will spend the rest of this presentation addressing all the components of this system. Understanding the ABCs of Fall Protection While “ABC” is usually used to refer to the basics, in the case of fall protection it also stands for the three basic components of fall protection. Additionally we will add D & E.
  • 8.
    A is forAnchor Also known as the tie-off point, this is the point of attachment for the lanyard, the lifeline or the deceleration device. The anchor must support 5,000 lbs of pressure or twice the expected load when in fall arrest mode (requirements are different for work positioning anchor points which must support 3,000 lbs of static strength and restraint and travel restriction anchor points must support 1,000 lbs of static strength). That’s a lot of pressure! 2 x 4s, pipes or chimneys will not do. There are a number of good anchor points designed by various manufacturers some are permanent (and can be used again if and when needed), others are removed once the work is finished. Anchor points can be fixed point anchors (FPAs) or Mobile Anchorage Points. Systems such as Horizontal Lifelines (HLLs) and trolleys are examples of mobile anchor points. www.nationalsafetyinc.com
  • 9.
    www.nationalsafetyinc.com B is forBody Harness The body harness is the combination of straps that distribute the fall arrest force over the chest, thighs, waist, pelvis and shoulders. Body harnesses come in a variety of styles and configurations with a corresponding range in pricing. Harnesses have buckles and adjustable straps for proper fitting. Some are sized (small, medium, large, XL, etc…) while others are universal. Whichever harness you choose, make sure that it is properly tightened and fitted to your body. While a harness that is too tight is restricting and uncomfortable to work in, a loose fitting harness can be extremely dangerous, particularly in the pelvic region (a fall in a loose harness can result in serious and even permanent damage to genital area).
  • 10.
    The connecting D-Ringin a properly fitted harness should be located right between the shoulder blades. Make sure that the harness you are using is approved for industrial work. Recreational harness (rock climbing harnesses) are not approved. Belts can only be used for positioning or restraint, NEVER for fall arrest. www.nationalsafetyinc.com
  • 11.
    www.nationalsafetyinc.com C is forConnectivity The connector refers to the device used to link the body harness to the anchor point. Lanyards, Self-Retracting Lifelines (SRLs) and Shock-Absorbing Lifelines are all different types of connectors. The gate strength requirements for snaphooks and carabiners was revised as of 2009 to 3,600 lbs in all directions. Note: It is essential that the user understand the nature of the “compatibility of connectors”. Compatibility is defined such that connecting elements work together so that their size and shape does not cause the gate or snaphook to inadvertently open or roll out, no matter how they get turned while in use (see example graphic below).
  • 12.
    In order toensure connector compatibility, the connector should fit through the anchor point (e.g. the gate on the shock absorbing lanyard should fit through the steel ring of the cross arm strap it will be connected to). www.nationalsafetyinc.com (Source: Capital Safety’s “Thinking about fall protection”)
  • 13.
    A deceleration deviceis a type of connector that is designed to limit the amount of force exerted on the body. The amount of force exerted cannot exceed 1800 lbs according to OSHA (900 lbs according to the ANSI standard). Self-Retracting Lifelines work like a seatbelt in the car, by locking up as soon as the cable or webbing is rapidly pulled through as would be the case with a fall. Shock-Absorbing Lanyards work by “tearing out” in order to reduce the amount of force. www.nationalsafetyinc.com
  • 14.
    D is forDescent E is for Escape D & E are often the neglected pieces of fall protection but they are, nonetheless, as important as AB & C. Suspension trauma, or "orthostatic intolerance," results when blood circulating in the body is reduced or trapped in the legs. This can be extremely harmful to the brain, the heart and to other organs that might not get enough blood. Additionally, the heart is often unable to cope effectively with the sudden rush of “dirty” blood that occurs once the suspended person is rescued. Serious injury and fatality can occur after a relatively short time of being suspended. It is therefore crucial to have an effective rescue plan outlined to get a suspended person down immediately. Again there are a number of SRL’s, trauma suspension straps and other fall protection products that are specifically designed to aid in this step. www.nationalsafetyinc.com
  • 15.
    Calculating the FallDistance Many people simply don’t realize how far a person will actually fall when he or she takes a fall. The proper fall clearance is reached when all the measurements are added up. 6 ft (length of lanyard) + 3 ½ ft (deceleration or free fall distance) + 1 ft (harness stretch) + 5 ft (average distance from back D-ring to the sole of the foot on 6 ft worker) + 3 ft (safety factor) = 18 ½ feet www.nationalsafetyinc.com
  • 16.
    How to Puton a Harness www.nationalsafetyinc.com Step 1 Hold harness by back D-ring. Shake harness to allow all straps to fall in place. Step 2 If chest, leg and/or waist straps are buckled, release straps and unbuckle at this time.
  • 17.
    www.nationalsafetyinc.com Step 3 Slip strapsover shoulders so D-ring is located in middle of back between shoulder blades. Step 4 Pull leg strap between legs and connect to opposite end. Repeat with second leg strap. If belted harness, connect waist strap after leg straps.
  • 18.
    www.nationalsafetyinc.com Step 5 Connect cheststrap and position in midchest area. Tighten to keep shoulder straps taut. Step 6 After all straps have been buckled, tighten all buckles so that harness fits snug but allows full range of movement. Pass excess strap through loop keepers.
  • 19.
    A Complete FallProtection Program In order to put together a complete fall protection program there are several steps that you need to implement. 1. Make sure you understand all the rules and regulations. This paper is just a guide to try to make fall protection a little easier to understand. For a complete fall protection program it is important to read and understand the standard (www.osha.gov) as well as the recommendations put out by ANSI (www.asse.org). 2. Assess all potential fall hazards. A proper assessment involves identifying the nature of the work that will be done in order to properly understand where the risks are greatest. The assessment should also include other potential hazards (respiratory, heat, impact, etc…) www.nationalsafetyinc.com
  • 20.
    www.nationalsafetyinc.com 3. Devise effectivesolutions to address the hazards. Make use of manufacturer reps, safety suppliers or other professionals to help you find effective solutions. They might be able to recommend something that you wouldn’t have thought about or didn’t know existed. If there is no other solution available they can also help you design a custom fall arrest system specifically for your own unique challenges. 4. Purchase the products. 5. Training
  • 21.
    www.nationalsafetyinc.com 6. Maintain andinspect all systems and fall protection products on a regular basis for wear, tear and deterioration. Though there is no “expiration date” on a harness, many manufacturers recommend retiring it after 5 years of normal use. Additionally all equipment should be inspected to make sure that there is no visual damage, exposure to chemicals, excessive heat or ultraviolet light. 7. Rescue Plan. As mentioned above under the ABCD & Es of fall protection, any fall protection program that does not have an emergency rescue plan designed to retrieve the suspended worker in a timely manner is incomplete. Capital Safety’s website has a downloadable fall protection Program Rescue Plan that can serve as a example or template for your own rescue plan. 8. Put it all down in writing. An effective fall protection program is a written program.

Editor's Notes

  • #2 Note: This PowerPoint is provided free. Feel free to use it as is or adapt it in any way you need to. The materials available on this presentation are for informational purposes only and not for the purpose of providing legal advice. National Safety, Inc. does not warrant the accuracy of information and will not be held responsible to any accidents or any misuse of information. Please confirm all information prior to training. The trainer presenting this information is responsible to make sure that it is accurate.
  • #4 The standard additionally addresses issues with falls from: unprotected sides and edges 1926.501(b)(1) leading edges1926.501(b)(2) walking and working surfaces where leading edges are under construction1926.501(b)(2)(ii) hoist areas1926.501(b)(3) holes in walking and working surfaces 1926.501(b)(4) formwork and reinforcing steel 1926.501(b)(5) ramps, runaways, and other walkways 1926.501(b)(6) excavations 1926.501(b)(7) dangerous equipment 1926.501(b)(8) overhand bricklaying and related work1926.501(b)(9) low-slope and steep roofs 1926.501(b)(10) Steep roofs 1926.501(b)(11) precast concrete erection; 1926.501(b)(12) Residential Construction 1926.501(b)(13) Wall Openings 1926.501(b)(14) Walking/Working surfaces not otherwise addressed 1926.501(b)(15)
  • #5 Answer: All of these are considered confined spaces.
  • #17 (taken from www.millerfallprotection.com)
  • #18 (taken from www.millerfallprotection.com)
  • #19 (taken from www.millerfallprotection.com)