Download to read offline

![Using Marking Guides in Moodle 4
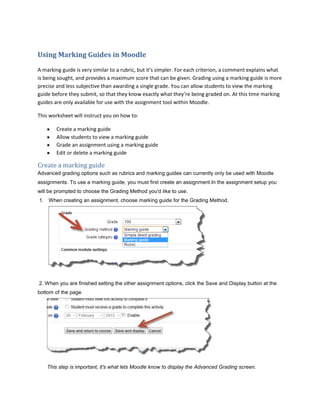
2. Open the course.
3. On the course home page, click the assignment link.
4. On the submission page, in the Navigation block, select Submissions grading below the
assignment link.
5. The marking criteria display and, if they were permitted during setup, the guide definition and
the maximum marks.
Mark an assignment using a marking guide
1. On the course home page, click the assignment's link.
2. On the assignment's home page, click the View [number] submitted assignments.
3. On the Submissions page, in the Status column (at the far right), click the Grade link (or icon) for
the first submitted assignment.
The Feedback page for the student displays, containing:
a link to the submission
in the Grades section, the marking guide criteria (with comment boxes and score fields for
you to complete), Frequently used comments for you to click to add to boxes, and the
option to hide criterion descriptions if you want a less cluttered page.
in the Feedback section, a box where you can add feedback text and a space for you to
add/drag any Response files you want to use in response to the submission.
You can also select the Send notifications check box to let the student know their
assignment has been graded.
4. Complete the Feedback page and either:
click Save to return to the Submissions page, or
Save and show next to save your changes and move on to marking the next submission.
Edit or delete a marking guide
5. In the Moodle course home page, click the assignment's link.
6. On the assignment's home page, in the Settings block, under Assignment administration
selectAdvanced grading.
7. In the resulting page:
To edit the guide, either click the Edit the current form definition or, in the Settings block,
under Assignment administration > Advanced grading, select Define marking guide.
To delete the existing guide, click Delete the currently defined form.
8. When an assignment has been marked using a marking guide you are editing, when you click
Save you will see a message, asking whether the assignments require regrading as a result of
your changes.](https://image.slidesharecdn.com/usingmarkingguidesinmoodle-130929193113-phpapp02/85/Using-marking-guides-in-moodle-4-320.jpg)

1) A marking guide is similar to a rubric but simpler, providing a comment and maximum score for each criterion to grade assignments in a precise way. 2) Instructors can create marking guides in Moodle by defining criteria based on the assignment, adding comments, and setting point values for each criterion. 3) Students can view the marking guide before submitting to know what they will be graded on, and instructors can grade submissions using the guide.


