SlideShare a Scribd company logo
1
TENSILE TEST M.MANOGO
AIM
The aim of a tensile test is to determine some certain material properties like yield
strength, modulus of elasticity, ultimate tensile strength, elongation till fracture and
reduction in area of the specimen after it has been deformed.
Tension tests provide information on the ductility and strength of materials under
uniaxial tensile stress. The test is performed at room temperature (10°C - 38°C). The
measurement of the ductility of a material is simply the reduction of area and we
acquire that after the specimen has been deformed.
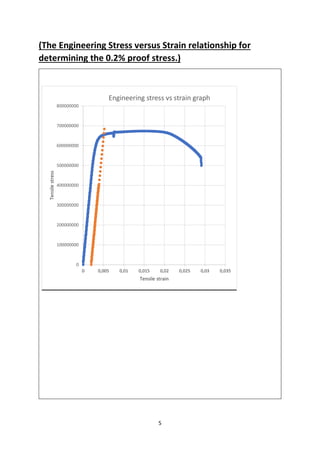
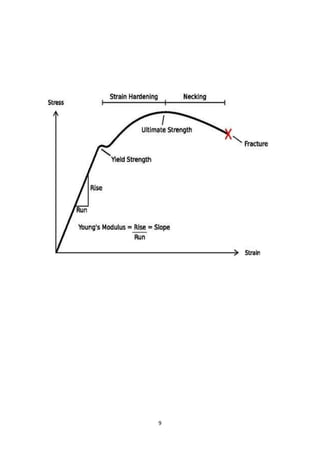
The test is going to produce the stress-strain relationship and explain how the
material properties make up the curve, like the yield point as the point where strain
increases and the material experiences some amount of permanent deformation and
the point where the curve begins to fall, the material’s ultimate tensile strength has
been reached. This point is the maximum stress that can be applied to a material
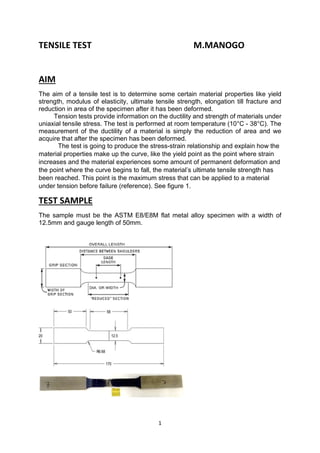
under tension before failure (reference). See figure 1.
TEST SAMPLE
The sample must be the ASTM E8/E8M flat metal alloy specimen with a width of
12.5mm and gauge length of 50mm.
2
APPARATUS
TENSILE TESTING MACHINE
The tensile is performed using an 8801 Instron testing machine. The machine has
proper capabilities to test the flat specimen. The machine has four main parameters:
force capacity, speed, precision and accuracy. Force capacity refers to the fact that
the machine must generate enough force to fracture the specimen.
The machine has the capabilities to properly align the specimen before the test
begins. Alignment for the specimen is critical, if the specimen is misalignment, the
machine will apply a bending force, this is bad for brittle materials because the results
will be skewed. (reference).
EXTENSOMETER
An extensometer measures the test specimen elongation to characterize strain. Using
the strain and the effective stress you can calculate the modulus of elasticity. The
extensometer has a specific software that enables it to record data.
VERNIER CALIPER
An instrument that can be used to measure internal and external distances extremely
accurately. Its scale has an accuracy of 0.01mm. It is used to measure dimeters and
length of the specimen.
SPECIMEN
An ASTM E8/E8M flat type specimen with a 50mm gauge length.
TEST PROCEDURE
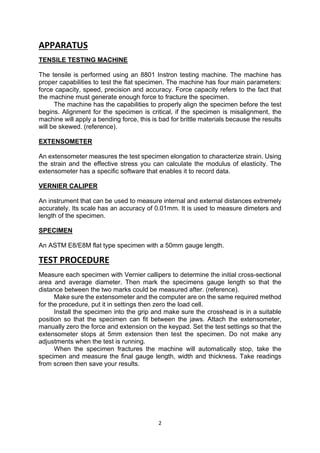
Measure each specimen with Vernier callipers to determine the initial cross-sectional
area and average diameter. Then mark the specimens gauge length so that the
distance between the two marks could be measured after. (reference).
Make sure the extensometer and the computer are on the same required method
for the procedure, put it in settings then zero the load cell.
Install the specimen into the grip and make sure the crosshead is in a suitable
position so that the specimen can fit between the jaws. Attach the extensometer,
manually zero the force and extension on the keypad. Set the test settings so that the
extensometer stops at 5mm extension then test the specimen. Do not make any
adjustments when the test is running.
When the specimen fractures the machine will automatically stop, take the
specimen and measure the final gauge length, width and thickness. Take readings
from screen then save your results.
3
SAFETY MEASURES
The ASTM E8/E5M standard have a lot of safety precautions. Here are some
precautions:
 The grips of the testing machine must be serrated so that there is no slippage
of the specimen.
 If the specimen breaks due to any reason other than the tensile stress, the
results should be discarded, and a new test should be performed on a new
specimen.
 The misalignment of the specimen should not be allowed.
 Thickness of the specimen should be according to the related standard.
 Safety boots should always be worn.
RESULTS
MATERIAL IDENTFICATION: Steel
Sample Identification
ASTM E8M
Flat
specimen
Data
Specimen details before testing
Width mm 12.51 +- 0.01
Thickness mm 2.95 +- 0.01
Cross sectional Area mm2 36.90
Gauge length to be marked on specimen mm 50 +- 0.01
Specimen details after testing
Final Gauge Length mm 54.97
Width (final) mm 10.77
Thickness (final) mm 2.01
Final Area mm2 21.61
Comments: The width and thickness of the specimen
decreases as the test proceeds, this causes the
cross
sectional area to also decrease. The gauge length
increases.
4
0
100000000
200000000
300000000
400000000
500000000
600000000
700000000
800000000
0 0,005 0,01 0,015 0,02 0,025 0,03 0,035
Tensilestress
Tensile strain
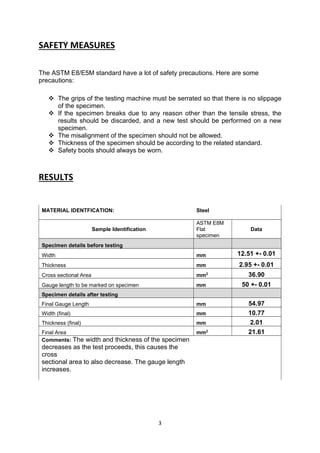
Engineering stress vs strain graph
5
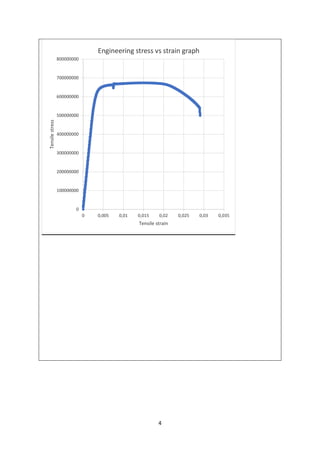
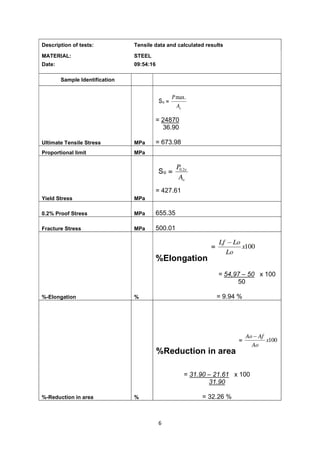
(The Engineering Stress versus Strain relationship for
determining the 0.2% proof stress.)
0
100000000
200000000
300000000
400000000
500000000
600000000
700000000
800000000
0 0,005 0,01 0,015 0,02 0,025 0,03 0,035
Tensilestress
Tensile strain
Engineering stress vs strain graph
6
Description of tests: Tensile data and calculated results
MATERIAL: STEEL
Date: 09:54:16
Sample Identification
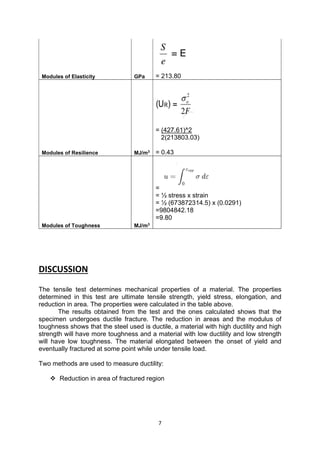
Ultimate Tensile Stress MPa
= 24870
36.90
= 673.98
Proportional limit MPa
Yield Stress MPa
= 427.61
0.2% Proof Stress MPa 655.35
Fracture Stress MPa 500.01
%-Elongation %
%Elongation
= 54,97 – 50 x 100
50
= 9.94 %
%-Reduction in area %
%Reduction in area
= 31.90 – 21.61 x 100
31.90
= 32.26 %
7
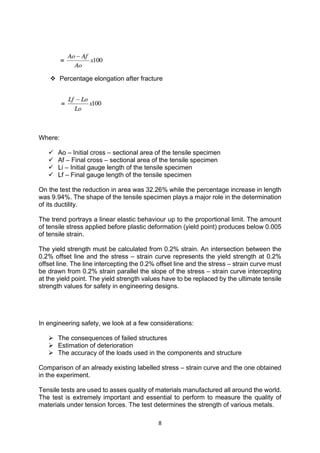
Modules of Elasticity GPa = 213.80
Modules of Resilience MJ/m3
= (427.61)^2
2(213803.03)
= 0.43
Modules of Toughness MJ/m3
=
= ½ stress x strain
= ½ (673872314.5) x (0.0291)
=9804842.18
=9.80
DISCUSSION
The tensile test determines mechanical properties of a material. The properties
determined in this test are ultimate tensile strength, yield stress, elongation, and
reduction in area. The properties were calculated in the table above.
The results obtained from the test and the ones calculated shows that the
specimen undergoes ductile fracture. The reduction in areas and the modulus of
toughness shows that the steel used is ductile, a material with high ductility and high
strength will have more toughness and a material with low ductility and low strength
will have low toughness. The material elongated between the onset of yield and
eventually fractured at some point while under tensile load.
Two methods are used to measure ductility:
 Reduction in area of fractured region
8
 Percentage elongation after fracture
Where:
 Ao – Initial cross – sectional area of the tensile specimen
 Af – Final cross – sectional area of the tensile specimen
 Li – Initial gauge length of the tensile specimen
 Lf – Final gauge length of the tensile specimen
On the test the reduction in area was 32.26% while the percentage increase in length
was 9.94%. The shape of the tensile specimen plays a major role in the determination
of its ductility.
The trend portrays a linear elastic behaviour up to the proportional limit. The amount
of tensile stress applied before plastic deformation (yield point) produces below 0.005
of tensile strain.
The yield strength must be calculated from 0.2% strain. An intersection between the
0.2% offset line and the stress – strain curve represents the yield strength at 0.2%
offset line. The line intercepting the 0.2% offset line and the stress – strain curve must
be drawn from 0.2% strain parallel the slope of the stress – strain curve intercepting
at the yield point. The yield strength values have to be replaced by the ultimate tensile
strength values for safety in engineering designs.
In engineering safety, we look at a few considerations:
 The consequences of failed structures
 Estimation of deterioration
 The accuracy of the loads used in the components and structure
Comparison of an already existing labelled stress – strain curve and the one obtained
in the experiment.
Tensile tests are used to asses quality of materials manufactured all around the world.
The test is extremely important and essential to perform to measure the quality of
materials under tension forces. The test determines the strength of various metals.
9
10
REFERENCES
Clausin, D. P., 1966. The Tensile Fracture of Mild Steel, California: Carlifonia
Institute of Technology.
COLLINS, D., 2019. Linear Motiontips. [Online]
Available at: http://www.linearmotiontips.com
[Accessed 19 april 2020].
Commitee, A., 2016. Standard Test Methods for Tension Testing of Metallic
Metarials, West Coshohoken: ASTM International.
Davis, J. R., 2004. Tensile testing. 2nd ed. Ohio: ASM International.
Hibbeler, R. C., 2011. Mechanics of materials. 8th ed. New York: Cloth.
Spiret, M., 2019. How to perfom a tension strength test on metals according to
ASTM
E8/E8M. The definitive guide to ASTM E8/E8M tension testing of metals, iii(11), p.
90.
Spiret, M., 2020. INSTRON. [Online]
Available at: http://www.instron.com
[Accessed 21 APRIL 2020].
Wikipedia, 2019. wikipedia. [Online]
Available at: http://www.wikipedia.com
[Accessed 26 April 2020].

More Related Content

What's hot

Compression and Torsion Testing.pptx
Compression and Torsion Testing.pptxCompression and Torsion Testing.pptx
Compression and Torsion Testing.pptx
PRASANNA NAGASAI BELLAMKONDA
 
Tensile test
Tensile testTensile test
Tensile test
Saif al-din ali
 
Tensile
TensileTensile
Tensile
Ammour Omrane
 
Fracture toughness measurement testing
Fracture toughness measurement testingFracture toughness measurement testing
Fracture toughness measurement testing
khileshkrbhandari
 
Material Hardness Testers
Material Hardness TestersMaterial Hardness Testers
Material Hardness Testers
Bilal
 
Lab 8 tensile testing
Lab 8 tensile testing  Lab 8 tensile testing
Lab 8 tensile testing
elsa mesfin
 
Impact test
Impact testImpact test
Impact test
kidist w.
 
Mechanical properties
Mechanical propertiesMechanical properties
Mechanical properties
Prem Kumar Soni
 
Materials testing
Materials testingMaterials testing
Materials testing
Chetan vadodariya
 
Tensile testing ppt
Tensile testing pptTensile testing ppt
Tensile testing ppt
Rahul Yadav
 
Tensile, Impact and Hardness Testing of Mild Steel
Tensile, Impact and Hardness Testing of Mild SteelTensile, Impact and Hardness Testing of Mild Steel
Tensile, Impact and Hardness Testing of Mild Steel
Gulfam Hussain
 
Material testing
Material testingMaterial testing
Material testing
Prem Kumar Soni
 
Universal testing machines
Universal testing machinesUniversal testing machines
Universal testing machinesShivam Tiwari
 
Mechanical properties of Materials
Mechanical properties of MaterialsMechanical properties of Materials
Mechanical properties of Materials
Muthukumar V
 
Fatigue testing
Fatigue testing Fatigue testing
Fatigue testing
BIPIN KUMAR MISHRA
 
IMPACT TEST REPORT ...
IMPACT TEST REPORT                                                           ...IMPACT TEST REPORT                                                           ...
IMPACT TEST REPORT ...
musadoto
 
Mechanical Testing of Materials
Mechanical Testing of Materials Mechanical Testing of Materials
Mechanical Testing of Materials
JJ Technical Solutions
 
Rockwell hardnes testing
Rockwell hardnes testingRockwell hardnes testing
Rockwell hardnes testingUsman
 
Stress strain analysis of metals using UTM.
Stress strain analysis of metals using UTM.Stress strain analysis of metals using UTM.
Stress strain analysis of metals using UTM.
Sandeep Gupta
 

What's hot (20)

Compression and Torsion Testing.pptx
Compression and Torsion Testing.pptxCompression and Torsion Testing.pptx
Compression and Torsion Testing.pptx
 
Tensile test
Tensile testTensile test
Tensile test
 
Tensile
TensileTensile
Tensile
 
Fracture toughness measurement testing
Fracture toughness measurement testingFracture toughness measurement testing
Fracture toughness measurement testing
 
Material Hardness Testers
Material Hardness TestersMaterial Hardness Testers
Material Hardness Testers
 
Lab 8 tensile testing
Lab 8 tensile testing  Lab 8 tensile testing
Lab 8 tensile testing
 
Impact test
Impact testImpact test
Impact test
 
Impact test
Impact testImpact test
Impact test
 
Mechanical properties
Mechanical propertiesMechanical properties
Mechanical properties
 
Materials testing
Materials testingMaterials testing
Materials testing
 
Tensile testing ppt
Tensile testing pptTensile testing ppt
Tensile testing ppt
 
Tensile, Impact and Hardness Testing of Mild Steel
Tensile, Impact and Hardness Testing of Mild SteelTensile, Impact and Hardness Testing of Mild Steel
Tensile, Impact and Hardness Testing of Mild Steel
 
Material testing
Material testingMaterial testing
Material testing
 
Universal testing machines
Universal testing machinesUniversal testing machines
Universal testing machines
 
Mechanical properties of Materials
Mechanical properties of MaterialsMechanical properties of Materials
Mechanical properties of Materials
 
Fatigue testing
Fatigue testing Fatigue testing
Fatigue testing
 
IMPACT TEST REPORT ...
IMPACT TEST REPORT                                                           ...IMPACT TEST REPORT                                                           ...
IMPACT TEST REPORT ...
 
Mechanical Testing of Materials
Mechanical Testing of Materials Mechanical Testing of Materials
Mechanical Testing of Materials
 
Rockwell hardnes testing
Rockwell hardnes testingRockwell hardnes testing
Rockwell hardnes testing
 
Stress strain analysis of metals using UTM.
Stress strain analysis of metals using UTM.Stress strain analysis of metals using UTM.
Stress strain analysis of metals using UTM.
 

Similar to Tensile test

Experiment 4 - Testing of Materials in Tension Object .docx
Experiment 4 - Testing of Materials in Tension  Object .docxExperiment 4 - Testing of Materials in Tension  Object .docx
Experiment 4 - Testing of Materials in Tension Object .docx
SANSKAR20
 
TENSILE TEST REPORT
TENSILE TEST REPORTTENSILE TEST REPORT
TENSILE TEST REPORT
musadoto
 
1-tension.pdf
1-tension.pdf1-tension.pdf
1-tension.pdf
ssuserf48c97
 
Mechanics of solids_1_lab_report
Mechanics of solids_1_lab_report Mechanics of solids_1_lab_report
Mechanics of solids_1_lab_report
HammadShoaib4
 
Page 6 of 8Engineering Materials ScienceMetals LabLEEDS .docx
Page 6 of 8Engineering Materials ScienceMetals LabLEEDS .docxPage 6 of 8Engineering Materials ScienceMetals LabLEEDS .docx
Page 6 of 8Engineering Materials ScienceMetals LabLEEDS .docx
bunyansaturnina
 
fdocuments.in_tensile-test-presentation-55845f0fef46d.ppt
fdocuments.in_tensile-test-presentation-55845f0fef46d.pptfdocuments.in_tensile-test-presentation-55845f0fef46d.ppt
fdocuments.in_tensile-test-presentation-55845f0fef46d.ppt
RanjithAk38
 
Determination of physical properties of steel, ductility etc
Determination of physical properties of steel, ductility etcDetermination of physical properties of steel, ductility etc
Determination of physical properties of steel, ductility etc
SoniaVerma71
 
Testing the Tensile Properties of Rigid and Semi-rigid Plastics (ASTM D638 an...
Testing the Tensile Properties of Rigid and Semi-rigid Plastics (ASTM D638 an...Testing the Tensile Properties of Rigid and Semi-rigid Plastics (ASTM D638 an...
Testing the Tensile Properties of Rigid and Semi-rigid Plastics (ASTM D638 an...
Shimadzu Scientific Instruments
 
Tensile testing-laboratory
Tensile testing-laboratoryTensile testing-laboratory
Tensile testing-laboratory
Mike Robicon
 
mechanical properties
mechanical propertiesmechanical properties
mechanical properties
Kum Visal
 
Chpr3 experimental
Chpr3 experimentalChpr3 experimental
Chpr3 experimentalRaj Shekaran
 
Mech CE6315 som lab_manual
Mech CE6315 som lab_manualMech CE6315 som lab_manual
Tension Lab Report editting
Tension Lab Report edittingTension Lab Report editting
Tension Lab Report edittingSiddhesh Sawant
 
Tensile Testing Of Polymers
Tensile Testing Of PolymersTensile Testing Of Polymers
Tensile Testing Of Polymers
saketmulge
 
AMERICAN SOCIETY OF TESTING METALS (ASTM) E09
AMERICAN SOCIETY OF TESTING METALS (ASTM) E09AMERICAN SOCIETY OF TESTING METALS (ASTM) E09
AMERICAN SOCIETY OF TESTING METALS (ASTM) E09
darshit1671998
 
Compression.docx
Compression.docxCompression.docx
Compression.docx
belalamer3
 
Compression ahmad sarbast.docx
Compression ahmad sarbast.docxCompression ahmad sarbast.docx
Compression ahmad sarbast.docx
belalamer3
 
1.SM_LAB_TENSION_TEST_MS.pdf
1.SM_LAB_TENSION_TEST_MS.pdf1.SM_LAB_TENSION_TEST_MS.pdf
1.SM_LAB_TENSION_TEST_MS.pdf
Arun Kumar Battu
 
0 exp no.4 bending test experiment
0 exp no.4 bending test experiment0 exp no.4 bending test experiment
0 exp no.4 bending test experiment
Muhammed Fuad Al-Barznji
 
ASTME8-04_TensionTestingofMetallic.pdf
ASTME8-04_TensionTestingofMetallic.pdfASTME8-04_TensionTestingofMetallic.pdf
ASTME8-04_TensionTestingofMetallic.pdf
imawanBadranaya1
 

Similar to Tensile test (20)

Experiment 4 - Testing of Materials in Tension Object .docx
Experiment 4 - Testing of Materials in Tension  Object .docxExperiment 4 - Testing of Materials in Tension  Object .docx
Experiment 4 - Testing of Materials in Tension Object .docx
 
TENSILE TEST REPORT
TENSILE TEST REPORTTENSILE TEST REPORT
TENSILE TEST REPORT
 
1-tension.pdf
1-tension.pdf1-tension.pdf
1-tension.pdf
 
Mechanics of solids_1_lab_report
Mechanics of solids_1_lab_report Mechanics of solids_1_lab_report
Mechanics of solids_1_lab_report
 
Page 6 of 8Engineering Materials ScienceMetals LabLEEDS .docx
Page 6 of 8Engineering Materials ScienceMetals LabLEEDS .docxPage 6 of 8Engineering Materials ScienceMetals LabLEEDS .docx
Page 6 of 8Engineering Materials ScienceMetals LabLEEDS .docx
 
fdocuments.in_tensile-test-presentation-55845f0fef46d.ppt
fdocuments.in_tensile-test-presentation-55845f0fef46d.pptfdocuments.in_tensile-test-presentation-55845f0fef46d.ppt
fdocuments.in_tensile-test-presentation-55845f0fef46d.ppt
 
Determination of physical properties of steel, ductility etc
Determination of physical properties of steel, ductility etcDetermination of physical properties of steel, ductility etc
Determination of physical properties of steel, ductility etc
 
Testing the Tensile Properties of Rigid and Semi-rigid Plastics (ASTM D638 an...
Testing the Tensile Properties of Rigid and Semi-rigid Plastics (ASTM D638 an...Testing the Tensile Properties of Rigid and Semi-rigid Plastics (ASTM D638 an...
Testing the Tensile Properties of Rigid and Semi-rigid Plastics (ASTM D638 an...
 
Tensile testing-laboratory
Tensile testing-laboratoryTensile testing-laboratory
Tensile testing-laboratory
 
mechanical properties
mechanical propertiesmechanical properties
mechanical properties
 
Chpr3 experimental
Chpr3 experimentalChpr3 experimental
Chpr3 experimental
 
Mech CE6315 som lab_manual
Mech CE6315 som lab_manualMech CE6315 som lab_manual
Mech CE6315 som lab_manual
 
Tension Lab Report editting
Tension Lab Report edittingTension Lab Report editting
Tension Lab Report editting
 
Tensile Testing Of Polymers
Tensile Testing Of PolymersTensile Testing Of Polymers
Tensile Testing Of Polymers
 
AMERICAN SOCIETY OF TESTING METALS (ASTM) E09
AMERICAN SOCIETY OF TESTING METALS (ASTM) E09AMERICAN SOCIETY OF TESTING METALS (ASTM) E09
AMERICAN SOCIETY OF TESTING METALS (ASTM) E09
 
Compression.docx
Compression.docxCompression.docx
Compression.docx
 
Compression ahmad sarbast.docx
Compression ahmad sarbast.docxCompression ahmad sarbast.docx
Compression ahmad sarbast.docx
 
1.SM_LAB_TENSION_TEST_MS.pdf
1.SM_LAB_TENSION_TEST_MS.pdf1.SM_LAB_TENSION_TEST_MS.pdf
1.SM_LAB_TENSION_TEST_MS.pdf
 
0 exp no.4 bending test experiment
0 exp no.4 bending test experiment0 exp no.4 bending test experiment
0 exp no.4 bending test experiment
 
ASTME8-04_TensionTestingofMetallic.pdf
ASTME8-04_TensionTestingofMetallic.pdfASTME8-04_TensionTestingofMetallic.pdf
ASTME8-04_TensionTestingofMetallic.pdf
 

Recently uploaded

The Benefits and Techniques of Trenchless Pipe Repair.pdf
The Benefits and Techniques of Trenchless Pipe Repair.pdfThe Benefits and Techniques of Trenchless Pipe Repair.pdf
The Benefits and Techniques of Trenchless Pipe Repair.pdf
Pipe Restoration Solutions
 
weather web application report.pdf
weather web application report.pdfweather web application report.pdf
weather web application report.pdf
Pratik Pawar
 
Architectural Portfolio Sean Lockwood
Architectural Portfolio Sean LockwoodArchitectural Portfolio Sean Lockwood
Architectural Portfolio Sean Lockwood
seandesed
 
WATER CRISIS and its solutions-pptx 1234
WATER CRISIS and its solutions-pptx 1234WATER CRISIS and its solutions-pptx 1234
WATER CRISIS and its solutions-pptx 1234
AafreenAbuthahir2
 
Quality defects in TMT Bars, Possible causes and Potential Solutions.
Quality defects in TMT Bars, Possible causes and Potential Solutions.Quality defects in TMT Bars, Possible causes and Potential Solutions.
Quality defects in TMT Bars, Possible causes and Potential Solutions.
PrashantGoswami42
 
Student information management system project report ii.pdf
Student information management system project report ii.pdfStudent information management system project report ii.pdf
Student information management system project report ii.pdf
Kamal Acharya
 
ethical hacking-mobile hacking methods.ppt
ethical hacking-mobile hacking methods.pptethical hacking-mobile hacking methods.ppt
ethical hacking-mobile hacking methods.ppt
Jayaprasanna4
 
road safety engineering r s e unit 3.pdf
road safety engineering  r s e unit 3.pdfroad safety engineering  r s e unit 3.pdf
road safety engineering r s e unit 3.pdf
VENKATESHvenky89705
 
Industrial Training at Shahjalal Fertilizer Company Limited (SFCL)
Industrial Training at Shahjalal Fertilizer Company Limited (SFCL)Industrial Training at Shahjalal Fertilizer Company Limited (SFCL)
Industrial Training at Shahjalal Fertilizer Company Limited (SFCL)
MdTanvirMahtab2
 
Nuclear Power Economics and Structuring 2024
Nuclear Power Economics and Structuring 2024Nuclear Power Economics and Structuring 2024
Nuclear Power Economics and Structuring 2024
Massimo Talia
 
Standard Reomte Control Interface - Neometrix
Standard Reomte Control Interface - NeometrixStandard Reomte Control Interface - Neometrix
Standard Reomte Control Interface - Neometrix
Neometrix_Engineering_Pvt_Ltd
 
MCQ Soil mechanics questions (Soil shear strength).pdf
MCQ Soil mechanics questions (Soil shear strength).pdfMCQ Soil mechanics questions (Soil shear strength).pdf
MCQ Soil mechanics questions (Soil shear strength).pdf
Osamah Alsalih
 
LIGA(E)11111111111111111111111111111111111111111.ppt
LIGA(E)11111111111111111111111111111111111111111.pptLIGA(E)11111111111111111111111111111111111111111.ppt
LIGA(E)11111111111111111111111111111111111111111.ppt
ssuser9bd3ba
 
Hybrid optimization of pumped hydro system and solar- Engr. Abdul-Azeez.pdf
Hybrid optimization of pumped hydro system and solar- Engr. Abdul-Azeez.pdfHybrid optimization of pumped hydro system and solar- Engr. Abdul-Azeez.pdf
Hybrid optimization of pumped hydro system and solar- Engr. Abdul-Azeez.pdf
fxintegritypublishin
 
CFD Simulation of By-pass Flow in a HRSG module by R&R Consult.pptx
CFD Simulation of By-pass Flow in a HRSG module by R&R Consult.pptxCFD Simulation of By-pass Flow in a HRSG module by R&R Consult.pptx
CFD Simulation of By-pass Flow in a HRSG module by R&R Consult.pptx
R&R Consult
 
Cosmetic shop management system project report.pdf
Cosmetic shop management system project report.pdfCosmetic shop management system project report.pdf
Cosmetic shop management system project report.pdf
Kamal Acharya
 
ethical hacking in wireless-hacking1.ppt
ethical hacking in wireless-hacking1.pptethical hacking in wireless-hacking1.ppt
ethical hacking in wireless-hacking1.ppt
Jayaprasanna4
 
AKS UNIVERSITY Satna Final Year Project By OM Hardaha.pdf
AKS UNIVERSITY Satna Final Year Project By OM Hardaha.pdfAKS UNIVERSITY Satna Final Year Project By OM Hardaha.pdf
AKS UNIVERSITY Satna Final Year Project By OM Hardaha.pdf
SamSarthak3
 
Democratizing Fuzzing at Scale by Abhishek Arya
Democratizing Fuzzing at Scale by Abhishek AryaDemocratizing Fuzzing at Scale by Abhishek Arya
Democratizing Fuzzing at Scale by Abhishek Arya
abh.arya
 
Event Management System Vb Net Project Report.pdf
Event Management System Vb Net  Project Report.pdfEvent Management System Vb Net  Project Report.pdf
Event Management System Vb Net Project Report.pdf
Kamal Acharya
 

Recently uploaded (20)

The Benefits and Techniques of Trenchless Pipe Repair.pdf
The Benefits and Techniques of Trenchless Pipe Repair.pdfThe Benefits and Techniques of Trenchless Pipe Repair.pdf
The Benefits and Techniques of Trenchless Pipe Repair.pdf
 
weather web application report.pdf
weather web application report.pdfweather web application report.pdf
weather web application report.pdf
 
Architectural Portfolio Sean Lockwood
Architectural Portfolio Sean LockwoodArchitectural Portfolio Sean Lockwood
Architectural Portfolio Sean Lockwood
 
WATER CRISIS and its solutions-pptx 1234
WATER CRISIS and its solutions-pptx 1234WATER CRISIS and its solutions-pptx 1234
WATER CRISIS and its solutions-pptx 1234
 
Quality defects in TMT Bars, Possible causes and Potential Solutions.
Quality defects in TMT Bars, Possible causes and Potential Solutions.Quality defects in TMT Bars, Possible causes and Potential Solutions.
Quality defects in TMT Bars, Possible causes and Potential Solutions.
 
Student information management system project report ii.pdf
Student information management system project report ii.pdfStudent information management system project report ii.pdf
Student information management system project report ii.pdf
 
ethical hacking-mobile hacking methods.ppt
ethical hacking-mobile hacking methods.pptethical hacking-mobile hacking methods.ppt
ethical hacking-mobile hacking methods.ppt
 
road safety engineering r s e unit 3.pdf
road safety engineering  r s e unit 3.pdfroad safety engineering  r s e unit 3.pdf
road safety engineering r s e unit 3.pdf
 
Industrial Training at Shahjalal Fertilizer Company Limited (SFCL)
Industrial Training at Shahjalal Fertilizer Company Limited (SFCL)Industrial Training at Shahjalal Fertilizer Company Limited (SFCL)
Industrial Training at Shahjalal Fertilizer Company Limited (SFCL)
 
Nuclear Power Economics and Structuring 2024
Nuclear Power Economics and Structuring 2024Nuclear Power Economics and Structuring 2024
Nuclear Power Economics and Structuring 2024
 
Standard Reomte Control Interface - Neometrix
Standard Reomte Control Interface - NeometrixStandard Reomte Control Interface - Neometrix
Standard Reomte Control Interface - Neometrix
 
MCQ Soil mechanics questions (Soil shear strength).pdf
MCQ Soil mechanics questions (Soil shear strength).pdfMCQ Soil mechanics questions (Soil shear strength).pdf
MCQ Soil mechanics questions (Soil shear strength).pdf
 
LIGA(E)11111111111111111111111111111111111111111.ppt
LIGA(E)11111111111111111111111111111111111111111.pptLIGA(E)11111111111111111111111111111111111111111.ppt
LIGA(E)11111111111111111111111111111111111111111.ppt
 
Hybrid optimization of pumped hydro system and solar- Engr. Abdul-Azeez.pdf
Hybrid optimization of pumped hydro system and solar- Engr. Abdul-Azeez.pdfHybrid optimization of pumped hydro system and solar- Engr. Abdul-Azeez.pdf
Hybrid optimization of pumped hydro system and solar- Engr. Abdul-Azeez.pdf
 
CFD Simulation of By-pass Flow in a HRSG module by R&R Consult.pptx
CFD Simulation of By-pass Flow in a HRSG module by R&R Consult.pptxCFD Simulation of By-pass Flow in a HRSG module by R&R Consult.pptx
CFD Simulation of By-pass Flow in a HRSG module by R&R Consult.pptx
 
Cosmetic shop management system project report.pdf
Cosmetic shop management system project report.pdfCosmetic shop management system project report.pdf
Cosmetic shop management system project report.pdf
 
ethical hacking in wireless-hacking1.ppt
ethical hacking in wireless-hacking1.pptethical hacking in wireless-hacking1.ppt
ethical hacking in wireless-hacking1.ppt
 
AKS UNIVERSITY Satna Final Year Project By OM Hardaha.pdf
AKS UNIVERSITY Satna Final Year Project By OM Hardaha.pdfAKS UNIVERSITY Satna Final Year Project By OM Hardaha.pdf
AKS UNIVERSITY Satna Final Year Project By OM Hardaha.pdf
 
Democratizing Fuzzing at Scale by Abhishek Arya
Democratizing Fuzzing at Scale by Abhishek AryaDemocratizing Fuzzing at Scale by Abhishek Arya
Democratizing Fuzzing at Scale by Abhishek Arya
 
Event Management System Vb Net Project Report.pdf
Event Management System Vb Net  Project Report.pdfEvent Management System Vb Net  Project Report.pdf
Event Management System Vb Net Project Report.pdf
 

Tensile test

  • 1. 1 TENSILE TEST M.MANOGO AIM The aim of a tensile test is to determine some certain material properties like yield strength, modulus of elasticity, ultimate tensile strength, elongation till fracture and reduction in area of the specimen after it has been deformed. Tension tests provide information on the ductility and strength of materials under uniaxial tensile stress. The test is performed at room temperature (10°C - 38°C). The measurement of the ductility of a material is simply the reduction of area and we acquire that after the specimen has been deformed. The test is going to produce the stress-strain relationship and explain how the material properties make up the curve, like the yield point as the point where strain increases and the material experiences some amount of permanent deformation and the point where the curve begins to fall, the material’s ultimate tensile strength has been reached. This point is the maximum stress that can be applied to a material under tension before failure (reference). See figure 1. TEST SAMPLE The sample must be the ASTM E8/E8M flat metal alloy specimen with a width of 12.5mm and gauge length of 50mm.
  • 2. 2 APPARATUS TENSILE TESTING MACHINE The tensile is performed using an 8801 Instron testing machine. The machine has proper capabilities to test the flat specimen. The machine has four main parameters: force capacity, speed, precision and accuracy. Force capacity refers to the fact that the machine must generate enough force to fracture the specimen. The machine has the capabilities to properly align the specimen before the test begins. Alignment for the specimen is critical, if the specimen is misalignment, the machine will apply a bending force, this is bad for brittle materials because the results will be skewed. (reference). EXTENSOMETER An extensometer measures the test specimen elongation to characterize strain. Using the strain and the effective stress you can calculate the modulus of elasticity. The extensometer has a specific software that enables it to record data. VERNIER CALIPER An instrument that can be used to measure internal and external distances extremely accurately. Its scale has an accuracy of 0.01mm. It is used to measure dimeters and length of the specimen. SPECIMEN An ASTM E8/E8M flat type specimen with a 50mm gauge length. TEST PROCEDURE Measure each specimen with Vernier callipers to determine the initial cross-sectional area and average diameter. Then mark the specimens gauge length so that the distance between the two marks could be measured after. (reference). Make sure the extensometer and the computer are on the same required method for the procedure, put it in settings then zero the load cell. Install the specimen into the grip and make sure the crosshead is in a suitable position so that the specimen can fit between the jaws. Attach the extensometer, manually zero the force and extension on the keypad. Set the test settings so that the extensometer stops at 5mm extension then test the specimen. Do not make any adjustments when the test is running. When the specimen fractures the machine will automatically stop, take the specimen and measure the final gauge length, width and thickness. Take readings from screen then save your results.
  • 3. 3 SAFETY MEASURES The ASTM E8/E5M standard have a lot of safety precautions. Here are some precautions:  The grips of the testing machine must be serrated so that there is no slippage of the specimen.  If the specimen breaks due to any reason other than the tensile stress, the results should be discarded, and a new test should be performed on a new specimen.  The misalignment of the specimen should not be allowed.  Thickness of the specimen should be according to the related standard.  Safety boots should always be worn. RESULTS MATERIAL IDENTFICATION: Steel Sample Identification ASTM E8M Flat specimen Data Specimen details before testing Width mm 12.51 +- 0.01 Thickness mm 2.95 +- 0.01 Cross sectional Area mm2 36.90 Gauge length to be marked on specimen mm 50 +- 0.01 Specimen details after testing Final Gauge Length mm 54.97 Width (final) mm 10.77 Thickness (final) mm 2.01 Final Area mm2 21.61 Comments: The width and thickness of the specimen decreases as the test proceeds, this causes the cross sectional area to also decrease. The gauge length increases.
  • 4. 4 0 100000000 200000000 300000000 400000000 500000000 600000000 700000000 800000000 0 0,005 0,01 0,015 0,02 0,025 0,03 0,035 Tensilestress Tensile strain Engineering stress vs strain graph
  • 5. 5 (The Engineering Stress versus Strain relationship for determining the 0.2% proof stress.) 0 100000000 200000000 300000000 400000000 500000000 600000000 700000000 800000000 0 0,005 0,01 0,015 0,02 0,025 0,03 0,035 Tensilestress Tensile strain Engineering stress vs strain graph
  • 6. 6 Description of tests: Tensile data and calculated results MATERIAL: STEEL Date: 09:54:16 Sample Identification Ultimate Tensile Stress MPa = 24870 36.90 = 673.98 Proportional limit MPa Yield Stress MPa = 427.61 0.2% Proof Stress MPa 655.35 Fracture Stress MPa 500.01 %-Elongation % %Elongation = 54,97 – 50 x 100 50 = 9.94 % %-Reduction in area % %Reduction in area = 31.90 – 21.61 x 100 31.90 = 32.26 %
  • 7. 7 Modules of Elasticity GPa = 213.80 Modules of Resilience MJ/m3 = (427.61)^2 2(213803.03) = 0.43 Modules of Toughness MJ/m3 = = ½ stress x strain = ½ (673872314.5) x (0.0291) =9804842.18 =9.80 DISCUSSION The tensile test determines mechanical properties of a material. The properties determined in this test are ultimate tensile strength, yield stress, elongation, and reduction in area. The properties were calculated in the table above. The results obtained from the test and the ones calculated shows that the specimen undergoes ductile fracture. The reduction in areas and the modulus of toughness shows that the steel used is ductile, a material with high ductility and high strength will have more toughness and a material with low ductility and low strength will have low toughness. The material elongated between the onset of yield and eventually fractured at some point while under tensile load. Two methods are used to measure ductility:  Reduction in area of fractured region
  • 8. 8  Percentage elongation after fracture Where:  Ao – Initial cross – sectional area of the tensile specimen  Af – Final cross – sectional area of the tensile specimen  Li – Initial gauge length of the tensile specimen  Lf – Final gauge length of the tensile specimen On the test the reduction in area was 32.26% while the percentage increase in length was 9.94%. The shape of the tensile specimen plays a major role in the determination of its ductility. The trend portrays a linear elastic behaviour up to the proportional limit. The amount of tensile stress applied before plastic deformation (yield point) produces below 0.005 of tensile strain. The yield strength must be calculated from 0.2% strain. An intersection between the 0.2% offset line and the stress – strain curve represents the yield strength at 0.2% offset line. The line intercepting the 0.2% offset line and the stress – strain curve must be drawn from 0.2% strain parallel the slope of the stress – strain curve intercepting at the yield point. The yield strength values have to be replaced by the ultimate tensile strength values for safety in engineering designs. In engineering safety, we look at a few considerations:  The consequences of failed structures  Estimation of deterioration  The accuracy of the loads used in the components and structure Comparison of an already existing labelled stress – strain curve and the one obtained in the experiment. Tensile tests are used to asses quality of materials manufactured all around the world. The test is extremely important and essential to perform to measure the quality of materials under tension forces. The test determines the strength of various metals.
  • 9. 9
  • 10. 10 REFERENCES Clausin, D. P., 1966. The Tensile Fracture of Mild Steel, California: Carlifonia Institute of Technology. COLLINS, D., 2019. Linear Motiontips. [Online] Available at: http://www.linearmotiontips.com [Accessed 19 april 2020]. Commitee, A., 2016. Standard Test Methods for Tension Testing of Metallic Metarials, West Coshohoken: ASTM International. Davis, J. R., 2004. Tensile testing. 2nd ed. Ohio: ASM International. Hibbeler, R. C., 2011. Mechanics of materials. 8th ed. New York: Cloth. Spiret, M., 2019. How to perfom a tension strength test on metals according to ASTM E8/E8M. The definitive guide to ASTM E8/E8M tension testing of metals, iii(11), p. 90. Spiret, M., 2020. INSTRON. [Online] Available at: http://www.instron.com [Accessed 21 APRIL 2020]. Wikipedia, 2019. wikipedia. [Online] Available at: http://www.wikipedia.com [Accessed 26 April 2020].