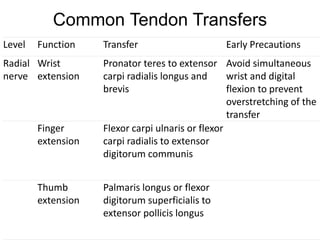
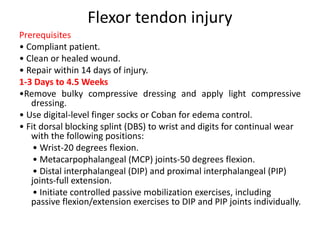
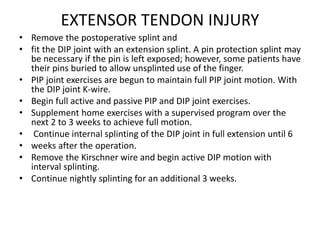
Post Operative Management of
tendon Transfer
DR.SIMRANJEET KAUR (PT)
ASSISTANT PROFESSOR
MMIPR,MMDU
• Tendon transfer surgery is define as moves a
working /healthy muscle and tendon to replace a
non-working/unhealthy muscle and tendon.
Principles of Tendon Transfer Procedures
• The principles of successful tendon transfer
procedures have been identified and refined over
the last century. They are 1) supple joints prior to
transfer, 2) soft tissue equilibrium, 3) donor of
adequate excursion, 4) donor of adequate
strength, 5) expendable donor, 6) straight line of
pull, 7) synergy, and 8) single function per
transfer.
Postoperative Treatment by Phase
Treatment after surgery consists of three
phases:
• (1) immobilization,
• (2) activation of the transfer, and
• (3) strengthening/return to previous function
Phase Goals Methods
1 Protect repair site Cast, then change to static orthosis
in position that minimizes tension
on the tendon transfer
Manage edema Elevation, compression, active
movement of noninvolved joints
Protect areas of
diminished or absent
sensibility
Education
Encourage active
movement of noninvolved
joints
Active ROM exercises and tasks
2 Regain active
ROM
Active ROM exercises and tasks incorporating
involved structures
Activation of
tendon
transfer
Use former function of the transferred tendon and
the new function simultaneously; perform desired
motion with contralateral limb first, then both
limbs together; use of place-and-hold techniques;
work in gravity-eliminated plane at first
Enhance
sensorimotor
control
Practice grasping and manipulating objects of
various shapes, sizes, and textures; complex
manipulative tasks
Sensory
reeducation
Desensitization and active somatosensory training;
use of “sensor glove”
Enhance function while maintaining
appropriate biomechanical positioning
at involved & noninvolved joints
Custom orthoses; practice
prehensile and ADL tasks
with and without orthoses
Maintain passive ROM at involved and
surrounding joints
Passive ROM exercises,
myofascial release
3 Improve strength Theraputty, Thera-Band, cuff
weights, exercise machines, work
simulators aquatic therapy,
Biometrics device
Enhance aerobic conditioning Aerobic activities (e.g., arm
ergometer)
Return to previous level of
function
Work simulation; simulation of
difficult ADL tasks
Reevaluate current status
regarding; compensatory
strategies; capacity for
continued improvement and
need for surgical intervention
Issue adaptive equipment/splints,
preoperative conditioning
Common Tendon Transfers
Level Function Transfer Early Precautions
Radial
nerve
Wrist
extension
Pronator teres to extensor
carpi radialis longus and
brevis
Avoid simultaneous
wrist and digital
flexion to prevent
overstretching of the
transfer
Finger
extension
Flexor carpi ulnaris or flexor
carpi radialis to extensor
digitorum communis
Thumb
extension
Palmaris longus or flexor
digitorum superficialis to
extensor pollicis longus
Median
nerve
Opposition Flexor digitorum
superficialis, palmaris
longus, or extensor digiti
minimi
Avoid
simultaneous
wrist, thumb,
and finger
extension
Thumb IP
flexion (high
lesions); DIP
flexion of
index (high
lesions)
Brachioradialis to flexor
pollicis longus; flexor
digitorum profundus of
the long, ring, and small
fingers to the flexor
digitorum profundus of
the index finger
Ulnar
nerve
Correct claw
(control MCP joint
hyperextension)
Flexor digitorum
superficialis,
extensor indicis
proprius, extensor
digiti minimi to
intrinsic
Avoid full MCP joint
extension; avoid
simultaneous
finger, thumb, and
wrist extension
Thumb adduction Flexor digitorum superficialis or extensor
carpi radialis longus to adductor pollicis
Index abduction Abductor pollicis longus, extensor carpi
radialis longus, or extensor indicis
proprius to first dorsal interossei
DIP flexion of the
long, ring, and small
fingers (high lesions)
Side-to-side tenodesis of flexor digitorum
profundus of index finger
Flexor tendon injury
Prerequisites
• Compliant patient.
• Clean or healed wound.
• Repair within 14 days of injury.
1-3 Days to 4.5 Weeks
•Remove bulky compressive dressing and apply light compressive
dressing.
• Use digital-level finger socks or Coban for edema control.
• Fit dorsal blocking splint (DBS) to wrist and digits for continual wear
with the following positions:
• Wrist-20 degrees flexion.
• Metacarpophalangeal (MCP) joints-50 degrees flexion.
• Distal interphalangeal (DIP) and proximal interphalangeal (PIP)
joints-full extension.
• Initiate controlled passive mobilization exercises, including
passive flexion/extension exercises to DIP and PIP joints individually.
• 4.5 weeks :
• Continue the exercises and begin active ROM for fingers and wrist
flexion, allowing active wrist extension toneutral or 0 degrees of
extension only.
• Patient should perform hourly exercise with the splint removed,
including composite fist, wrist flexion and extension to neutral, and
composite finger flexion with the wrist immobilized.
• Have the patient perform fist to hook fist (intrinsic minus position)
exercise to extended fingers .
• Watch for PIP joint flexion contractures. If an extension lag is
present, add protected passive extension of the PIP joint with the
MCP joint held in flexion. This should be done only by reliable
patients or therapists. The PIP joint should be blocked to 30 degrees
of flexion for 3 weeks if a concomitant distal nerve repair is done.
• Patients may reach a plateau in ROM 2 months after surgery, but
maximal motion is usually achieved by 3 months after surgery.
• 5 Weeks
Functional electrical stimulation (FES) can be used
to improve tendon excursion. Consider the
patient's quality of primary repair, the nature of
the injury, and the medical history before
initiating PES.
• Add blocking exercises for PIP and DIP joints to
previous home program
• Focus on gaining full passive ROM for flexion. Do
not begin passive extension stretching at this
time. A restraining extension splint can be used
and positioned in the available range if tightness
is noted.
• 6th Weeks to 8th week
• Begin passive extension exercises of wrist and
digits.
• Fit extension resting pan splint in maximal
extension if extrinsic flexor tendon tightness is
significant; frequently the patient may need
only an extension gutter splint for night wear.
• Begin resistive exercises with sponges or a
Nerf ball and progress to putty and a hand-
helper.
• Allow use of the hand in light work activities,
but no lifting or heavy use of the hand.
EXTENSOR TENDON INJURY
• Remove the postoperative splint and
• fit the DIP joint with an extension splint. A pin protection splint may
be necessary if the pin is left exposed; however, some patients have
their pins buried to allow unsplinted use of the finger.
• PIP joint exercises are begun to maintain full PIP joint motion. With
the DIP joint K-wire.
• Begin full active and passive PIP and DIP joint exercises.
• Supplement home exercises with a supervised program over the
next 2 to 3 weeks to achieve full motion.
• Continue internal splinting of the DIP joint in full extension until 6
• weeks after the operation.
• Remove the Kirschner wire and begin active DIP motion with
interval splinting.
• Continue nightly splinting for an additional 3 weeks.
• Discontinue splinting at appro. On 6th week
unless an extensor lag develops at the MCP
joint.
• Use passive wrist flexion exercises as
necessary.
Tendon transfer.pptx

Tendon transfer.pptx

  • 1.
    Post Operative Managementof tendon Transfer DR.SIMRANJEET KAUR (PT) ASSISTANT PROFESSOR MMIPR,MMDU
  • 2.
    • Tendon transfersurgery is define as moves a working /healthy muscle and tendon to replace a non-working/unhealthy muscle and tendon. Principles of Tendon Transfer Procedures • The principles of successful tendon transfer procedures have been identified and refined over the last century. They are 1) supple joints prior to transfer, 2) soft tissue equilibrium, 3) donor of adequate excursion, 4) donor of adequate strength, 5) expendable donor, 6) straight line of pull, 7) synergy, and 8) single function per transfer.
  • 3.
    Postoperative Treatment byPhase Treatment after surgery consists of three phases: • (1) immobilization, • (2) activation of the transfer, and • (3) strengthening/return to previous function
  • 4.
    Phase Goals Methods 1Protect repair site Cast, then change to static orthosis in position that minimizes tension on the tendon transfer Manage edema Elevation, compression, active movement of noninvolved joints Protect areas of diminished or absent sensibility Education Encourage active movement of noninvolved joints Active ROM exercises and tasks
  • 5.
    2 Regain active ROM ActiveROM exercises and tasks incorporating involved structures Activation of tendon transfer Use former function of the transferred tendon and the new function simultaneously; perform desired motion with contralateral limb first, then both limbs together; use of place-and-hold techniques; work in gravity-eliminated plane at first Enhance sensorimotor control Practice grasping and manipulating objects of various shapes, sizes, and textures; complex manipulative tasks Sensory reeducation Desensitization and active somatosensory training; use of “sensor glove”
  • 6.
    Enhance function whilemaintaining appropriate biomechanical positioning at involved & noninvolved joints Custom orthoses; practice prehensile and ADL tasks with and without orthoses Maintain passive ROM at involved and surrounding joints Passive ROM exercises, myofascial release
  • 7.
    3 Improve strengthTheraputty, Thera-Band, cuff weights, exercise machines, work simulators aquatic therapy, Biometrics device Enhance aerobic conditioning Aerobic activities (e.g., arm ergometer) Return to previous level of function Work simulation; simulation of difficult ADL tasks Reevaluate current status regarding; compensatory strategies; capacity for continued improvement and need for surgical intervention Issue adaptive equipment/splints, preoperative conditioning
  • 8.
    Common Tendon Transfers LevelFunction Transfer Early Precautions Radial nerve Wrist extension Pronator teres to extensor carpi radialis longus and brevis Avoid simultaneous wrist and digital flexion to prevent overstretching of the transfer Finger extension Flexor carpi ulnaris or flexor carpi radialis to extensor digitorum communis Thumb extension Palmaris longus or flexor digitorum superficialis to extensor pollicis longus
  • 9.
    Median nerve Opposition Flexor digitorum superficialis,palmaris longus, or extensor digiti minimi Avoid simultaneous wrist, thumb, and finger extension Thumb IP flexion (high lesions); DIP flexion of index (high lesions) Brachioradialis to flexor pollicis longus; flexor digitorum profundus of the long, ring, and small fingers to the flexor digitorum profundus of the index finger
  • 10.
    Ulnar nerve Correct claw (control MCPjoint hyperextension) Flexor digitorum superficialis, extensor indicis proprius, extensor digiti minimi to intrinsic Avoid full MCP joint extension; avoid simultaneous finger, thumb, and wrist extension Thumb adduction Flexor digitorum superficialis or extensor carpi radialis longus to adductor pollicis Index abduction Abductor pollicis longus, extensor carpi radialis longus, or extensor indicis proprius to first dorsal interossei DIP flexion of the long, ring, and small fingers (high lesions) Side-to-side tenodesis of flexor digitorum profundus of index finger
  • 11.
    Flexor tendon injury Prerequisites •Compliant patient. • Clean or healed wound. • Repair within 14 days of injury. 1-3 Days to 4.5 Weeks •Remove bulky compressive dressing and apply light compressive dressing. • Use digital-level finger socks or Coban for edema control. • Fit dorsal blocking splint (DBS) to wrist and digits for continual wear with the following positions: • Wrist-20 degrees flexion. • Metacarpophalangeal (MCP) joints-50 degrees flexion. • Distal interphalangeal (DIP) and proximal interphalangeal (PIP) joints-full extension. • Initiate controlled passive mobilization exercises, including passive flexion/extension exercises to DIP and PIP joints individually.
  • 12.
    • 4.5 weeks: • Continue the exercises and begin active ROM for fingers and wrist flexion, allowing active wrist extension toneutral or 0 degrees of extension only. • Patient should perform hourly exercise with the splint removed, including composite fist, wrist flexion and extension to neutral, and composite finger flexion with the wrist immobilized. • Have the patient perform fist to hook fist (intrinsic minus position) exercise to extended fingers . • Watch for PIP joint flexion contractures. If an extension lag is present, add protected passive extension of the PIP joint with the MCP joint held in flexion. This should be done only by reliable patients or therapists. The PIP joint should be blocked to 30 degrees of flexion for 3 weeks if a concomitant distal nerve repair is done. • Patients may reach a plateau in ROM 2 months after surgery, but maximal motion is usually achieved by 3 months after surgery.
  • 13.
    • 5 Weeks Functionalelectrical stimulation (FES) can be used to improve tendon excursion. Consider the patient's quality of primary repair, the nature of the injury, and the medical history before initiating PES. • Add blocking exercises for PIP and DIP joints to previous home program • Focus on gaining full passive ROM for flexion. Do not begin passive extension stretching at this time. A restraining extension splint can be used and positioned in the available range if tightness is noted.
  • 14.
    • 6th Weeksto 8th week • Begin passive extension exercises of wrist and digits. • Fit extension resting pan splint in maximal extension if extrinsic flexor tendon tightness is significant; frequently the patient may need only an extension gutter splint for night wear. • Begin resistive exercises with sponges or a Nerf ball and progress to putty and a hand- helper. • Allow use of the hand in light work activities, but no lifting or heavy use of the hand.
  • 15.
    EXTENSOR TENDON INJURY •Remove the postoperative splint and • fit the DIP joint with an extension splint. A pin protection splint may be necessary if the pin is left exposed; however, some patients have their pins buried to allow unsplinted use of the finger. • PIP joint exercises are begun to maintain full PIP joint motion. With the DIP joint K-wire. • Begin full active and passive PIP and DIP joint exercises. • Supplement home exercises with a supervised program over the next 2 to 3 weeks to achieve full motion. • Continue internal splinting of the DIP joint in full extension until 6 • weeks after the operation. • Remove the Kirschner wire and begin active DIP motion with interval splinting. • Continue nightly splinting for an additional 3 weeks.
  • 16.
    • Discontinue splintingat appro. On 6th week unless an extensor lag develops at the MCP joint. • Use passive wrist flexion exercises as necessary.