1) Projects involve creating tasks to be completed within a specified time period. Tasks can be manually or automatically scheduled depending on project needs.
2) Manually scheduled tasks allow full control over duration, start and finish dates. Automatically scheduled tasks are assigned an estimated duration and dates are automatically calculated.
3) Tasks can be linked to define dependencies between them using finish-to-start, start-to-start, finish-to-finish, or start-to-finish links. Linking tasks creates relationships that impact scheduling.
Software engineering modeling lab lectures
engineering+ education purpose
This series of lectures was prepared for the third class of software engineering / Aliraqia University/ Baghdad/ Iraq.
In prepared these lectures, I depend on the YouTube to make it, the programs of the lectures are designed and executed by vb.net, discussions are also found here
These lectures are not finished yet, i will improve it in the future
Forgive me for anything wrong by mistake, I wish you can profit from these lectures
My regard
Marwa Moutaz/ M.Sc. studies of Communication Engineering / University of Technology/ Bagdad / Iraq.
Hi, i am Nahid turjo from Bangladesh. i am a professional Photoshop editor. today i share with you 10 secrets of Photoshop. Hopefully its very helpful to all Photoshop users.
Best of Luck.....
MS Project - Lesson #1B - Basics of Project Scheduling - Part 2Obj.docxrosemarybdodson23141
MS Project - Lesson #1B - Basics of Project Scheduling - Part 2Objectives - MS Project 2010
· Creating a summary task
· Working with subtasks
· Establishing task dependencies
· Specify lead and lag times
A project task list can be as few as 10 or as many as several hundred tasks. With a large project, it can become difficult to locate a specific task. Using MS Project, you can organize the task list by creating a hierarchical structure. This process of structuring a task list is known as outlining. Outlining is used to organize common tasks into groups within the task list. The groups can represent phases of the project.
In this lab, we will first use outlining to group the tasks of our project into phases. We will create a main summary task to represent the entire project and then several levels of summary tasks below the main summary task to represent the phases of the project.
Creating an Outline
1. Log onto Windows. Open MS Project.
2. Open your project file that you created in Lesson 1, Part A (MyLab1a_XXX.mpp, where XXX are your initials.)
3. Save this file, using Save As, as MyLab1b_XXX.mpp, where XXX are your initials.
Creating a hierarchical outline organizes the project tasks list into groups of tasks. Each group of tasks is preceded by a summary task, which describes the tasks within each group.
The outline of a project generally begins with a main summary task. The main summary task is a brief description of the project and all tasks are subordinate to the main summary task. This main summary task is also helpful in generation of summary reports and cumulative totals in budgeting and resource management.
4. Click in the task namefield for task 1, Inventory current equipment.
5. Right click and select Insert Task. A new blank task row is inserted above and the task list is renumbered.
6. Type in (Student's Name) New System, where you enter your first and last name for student name. For example, if you are John Smith, your task will read John Smith's New System. Got it?
7. Do not worry about duration.
8. Since this is our main summary task, we need to indent all the other tasks to indicate that they are subtasks or subordinate tasks.
9. We need to select all the tasks below our summary task (from Inventory Equipment up to and including Project Meeting). One way to do this is to click in the task name field for task 2, Inventory Equipment. Click and drag so that all the task names are selected. (Similar to Excel). (You can also click in task 2 name field, hold down the shift key and then click in the last task name field.)
10. On the Task tab, you should see the following icons:
This is the Schedule Ribbon. The left arrow outdents a task to a higher level; the right arrow indents a task lower level task, thus creating a summary task above.
11. Press the Indent button (the right arrow). The selected tasks are indented one level within the outline. Also notice the duration for your main summary task. How .
MS Project - Lesson #1A - Basics of Project Scheduling - Part 1O.docxrosemarybdodson23141
MS Project - Lesson #1A - Basics of Project Scheduling - Part 1
Objectives - MS Project 2010
· Understanding Project Scheduling
· Introduction to Microsoft Project
· Working with Project Tasks
· Basic views, time scales and reports
Whether you are a project manager or not, project management techniques are extremely helpful in meeting goals and objects. Project management techniques define a path to a specified goal and then supervise the implementation.
MS Project can help you establish your initial plan as well as monitor progress. MS Project can quickly produce reports and other information that will help keep management, customers, and your project team informed. To get the most from MS Project, not only do you need to understand project management terminology, you also need to be familiar with the software itself. Therefore, do not attempt to quickly finish the lab, but take your time and read all instructions carefully.
Understanding Project Scheduling
A typical project is composed of tasks and resources. After tasks are identified, you organize the tasks in a logical hierarchy, also called a Work Breakdown Structure (WBS). Eventually, this sequence will show the interdependencies of each task. Then each task is given a duration. In MS Project, this can be in weeks, days, hours or minutes. You can also specify a milestone, which will represent an event that marks the completion of a group of related tasks.
To accomplish any task, you need resources. Resources can include people, equipment, material or special facilities necessary to complete a task. Resource availability and scheduling are important constraints to completing a task.
Once you establish a plan, complete with tasks and resources, you will often need to refine the plan before saving it as a baseline. The baseline is your guideline to help manage the project.
MS Project Basics
When you first start MS Project, a blank project file is displayed in Gantt Chart View. (If you need to open an existing MS Project file, the file extension is .mpp.) Let's take a look at the main window:
Select All
Entry Table
Task ID
Gantt Chart
Divider
View Bar
The above image is the default screen for MS Project 2010. The right side of the screen consists of the area for the Gantt Chart. The left side of the screen is the Entry table where tasks, durations, and other task information is entered. The Entry Table and Gantt Chart are separated by a moveable Divider
Pay particular attention to this layout. The Entry table is where we enter our tasks and durations. The Gantt chart will eventually show our tasks and durations in a graphical bar chart. The other part of significance is the divider. This allows you to show more or less of the Entry table/Gantt chart.
In Project 2010 the menu bar is set up into Ribbons. To access the various ribbons, Tabs are selected across the top of the menu bar. Within the ribbon the various sections are divided into groups:
.
Techniques to create tasks from the file menu in Outlook & also organize To-Do items in an effectual manner with the help of inbuilt features of Microsoft Outlook. http://www.msoutlooktools.com/category/tasks/
Microsoft® Project Painting Exercise CPMGT303 Version 111DioneWang844
Microsoft® Project Painting Exercise
CPMGT/303 Version 11
1
University of Phoenix Material
Microsoft® Project Painting Exercise
Microsoft® Project
Microsoft® Project (also called “MS-Project”) is one of the most popular tools for project planning projects today. It is relatively easy to use and makes it easier to manage projects.
Microsoft® Project Exercise: The Painting Project
This is a simple exercise in Microsoft® Project. These instructions are brief and only cover the basics. The objective of this exercise is to prepare you for Week 3 Learning Team assignment. This exercise only covers how to log into Microsoft® Project, set up a simple schedule, and log out. The exercise is not concerned with monitoring or controlling the execution of a plan.
Start Microsoft® Project
To start Microsoft® Project; click through “Start > Programs > Microsoft Office 2013 > Microsoft Project” Microsoft® Project should start up, with a blank “Gantt chart” view of a new project.
Saving Microsoft® Project
It is recommended that you save your project immediately. So please Save your project now using the following format ‘Last Name_Paint_Project’. If you last name is Allen, your Microsoft® Project file name will be ‘Allen_Paint_Project’.
If you are prompted to save the project with a baseline, click Yes. You may continue to work on the baseline until you have completed the exercise and turned it in as the final baseline.
Microsoft® Project Settings
Before getting into the details of the Painting Project, it is beneficial to enter a few Microsoft® Project settings. These settings are:
· Duration Unit of Measure. The normal default for duration is the day (day) which consist of 8 hours. There are other unit of measures that you may decide to use. The most popular are minute (min), hour (hr), and week (wk). For this exercise we will use the default setting.
The working calendar. There is a default Standard Calendar which consists of a 5-day work week (Monday through Friday) with Saturday and Sunday set as non-working days. A day is made up of 8 hours. It is recommended for this exercise that you leave Microsoft® Project set to the Standard Calendar. If you want to explore other calendars or how to set up your own calendar, click as follows “Project > Project Information”. The following pop up menu will appear with Calendar showing as ‘Standard’.
Available resources. It is beneficial to set up your known resources pool at the start of the project. Note. You may change the resources in the pool at any time, as resources are added to and subtracted from the project. To set up the resource pool click as follows “Resource> Resource Sheet”. You’ll get a table in which you can define the names of resources that you wish to be available.
Simply type a name in the “Name” field, and use a new line for each different resource. For the Painting Project, the following are the resources.
Jackie Smith – Standard Rate $25.00; Overtime Rate $37.00
Tom Bu ...
Microsoft Project for Professionals - 5 Simple & Practical Steps to Mastering...DeltaBahn
This series of posts is a guide master Microsoft Project 2013 and increase productivity for overall Project Management.
The slides contain only the steps to follow allow and getting started with task management.
View the whole blog post with explanations:
http://deltabahn.com/project-2013-microsoft-project-for-professionals-5-simple-and-practical-steps-to-mastering-task-basics-in-under-30-minutes/
Microsoft® Project Painting Exercise
Microsoft® Project
· Microsoft® Project (also called “MS-Project”) is one of the most popular tools for project planning projects today. It is relatively easy to use and makes it easier to manage projects.
· Microsoft® Project Exercise: The Painting Project
· This is a simple exercise in Microsoft® Project. These instructions are brief and only cover the basics. The objective of this exercise is to prepare you for Week 3 Learning Team assignment. This exercise only covers how to log into Microsoft® Project, set up a simple schedule, and log out. The exercise is not concerned with monitoring or controlling the execution of a plan.
Start Microsoft® Project
To start Microsoft® Project; click through “Start > Programs > Microsoft Office 2013 > Microsoft Project” Microsoft® Project should start up, with a blank “Gantt chart” view of a new project.
Saving Microsoft® Project
It is recommended that you save your project immediately. So please Save your project now using the following format ‘Last Name_Paint_Project’. If you last name is Allen, your Microsoft® Project file name will be ‘Allen_Paint_Project’.
If you are prompted to save the project with a baseline, click Yes. You may continue to work on the baseline until you have completed the exercise and turned it in as the final baseline.
Microsoft® Project Settings
Before getting into the details of a the Painting Project, it is beneficial to enter a few Microsoft® Project settings. These settings are:
· Duration Unit of Measure. The normal default for duration is the day (day) which consist of 8 hours. There are other unit of measures that you may decide to use. The most popular are minute (min), hour (hr), and week (wk). For this exercise we will use the default setting.
· The working calendar. There is a default Standard Calendar which consists of a 5-day work week (Monday through Friday) with Saturday and Sunday set as non-working days. A day is made up of 8 hours. It is recommended for this exercise that you leave Microsoft® Project set to the Standard Calendar. If you want to explore other calendars or how to set up your own calendar, click as follows “Project > Project Information”. The following pop up menu will appear with Calendar showing as ‘Standard’.
· Available resources. It is beneficial to set up your known resources pool at the start of the project. Note. You may change the resources in the pool at any time, as resources are added to and subtracted from the project. To set up the resource pool click as follows “Resource> Resource Sheet”. You’ll get a table in which you can define the names of resources that you wish to be available.
Simply type a name in the “Name” field, and use a new line for each different resource. For the Painting Project, the following are the resources.
Jackie Smith – Standard Rate $25.00; Overtime Rate $37.00
Tom Busch – Standard Rate $20.00; Overtime Rate $30.00
Alan Jacobs – Standard Rate $15.00; Overti ...
A macro is a set of commands that can be played back at will to perform a given task. These tasks can be something simple such as inserting your name and address into a word processor to something more complex such as launching a program, copying data from it, activating another program, pasting the data into it and repeating this several times. Tasks performed by macros are typically repetitive in nature allowing significant savings in time by executing the macro instead of manually repeating the commands.
Work Breakdown Structure (WBS) ActivityYour organisati.docxambersalomon88660
Work Breakdown Structure (WBS) Activity
Your organisation is a leading television broadcaster. Your viewing ratings have been static for a number of years and this has impacted the amount of marketing spent with your network. You want to create a new television programme that is going to engage audiences.
The project sponsor has commissioning a new family TV show that is to be shown in prime time Saturday evening slot. It will start broadcasting in 6 months time .
You are members of the project team for this project. It is your role to enable this project to be planned out within the time frame requested. Your activity today is to create an effective WBS outlining the structure, activities, order and resources of the work.
Having viewed the resources concerning MS Project and project planning, this is an exercise to help get you familiar with the basics of using MS Project.
Part of the assignment report when you are creating your Project Initiation Document (PID) is that it should contain a work breakdown structure (WBS) and a ‘project schedule’ using a Gantt chart.
This exercise will give you experience of inputting a WBS into MS Project and to create a simple Gantt chart.
The tasks will require that you do the following:
1. Create a new blank project in MS Project.
2. Create a correctly ordered WBS and input this into the task pane within MS Project. To limit the time this will take, please copy and paste the list of tasks on page 2 of this document and insert them into MS Project.
3. Add accurate durations (in days) for each activity. Please just use your best estimate.
4. Link and indent activities based on their relationships to each other.
5. Add milestones for each phase of the project.
6. Create yourself as a resource and attach yourself to any work that you will do within the project.
7. Change the schedule if required so that you are not working weekends. By default MS Project does this automatically but you may be required to change this if you are using non-standard settings in your copy of MS Project.
8. Set as a baseline to schedule against.
Note: Refer to the WBS diagram supplied in page 3.
There are a variety of ways to perform these tasks in MS Project depending on user preference. Please use the walk through guide (MS Project Activity Companion found in Moodle), which will guide you step by step for how to complete this exercise. Please try using this before watching the solution video.
(Please copy and paste below from ‘1.1 Select Topic’ to ‘1.4.4.2 Analyse’ and insert into MS Project Task Pane)
1.1 Select Topic
1.1.1 Define Problem
1.1.2 Contextualise
1.1.3 Develop Aims
1.1.4 Agree with Supervisor
1.2 Plan Research
1.2.1 Plans
1.2.1.1 Schedule
1.2.1.2 Budget
1.2.1.3 Risks
1.2.1.4 Assumptions & Constraints
1.2.2 Aims
1.2.2.1 Objectives
1.2.2.2 Deliverables
1.2.3 Initial Literature Review
1.2.3.1 Propositions
1.2.4 Initial Methodology
1.2.4.1 Tools
1.2.4.2 Data Collection
1.2.4.3 Sample
1.3 Literatu.
With Planner, you can go from your project outline to sharing project status instantly. Other project management tools take hours to accomplish the same workflow. Get the Planner Blender App today and experience it for yourself.
In 2015, I used to write extensions for Joomla, WordPress, phpBB3, etc and I ...Juraj Vysvader
In 2015, I used to write extensions for Joomla, WordPress, phpBB3, etc and I didn't get rich from it but it did have 63K downloads (powered possible tens of thousands of websites).
More Related Content
Similar to Tasks manual automatic_linking_summary_progress_microsoft_project_2016
MS Project - Lesson #1A - Basics of Project Scheduling - Part 1O.docxrosemarybdodson23141
MS Project - Lesson #1A - Basics of Project Scheduling - Part 1
Objectives - MS Project 2010
· Understanding Project Scheduling
· Introduction to Microsoft Project
· Working with Project Tasks
· Basic views, time scales and reports
Whether you are a project manager or not, project management techniques are extremely helpful in meeting goals and objects. Project management techniques define a path to a specified goal and then supervise the implementation.
MS Project can help you establish your initial plan as well as monitor progress. MS Project can quickly produce reports and other information that will help keep management, customers, and your project team informed. To get the most from MS Project, not only do you need to understand project management terminology, you also need to be familiar with the software itself. Therefore, do not attempt to quickly finish the lab, but take your time and read all instructions carefully.
Understanding Project Scheduling
A typical project is composed of tasks and resources. After tasks are identified, you organize the tasks in a logical hierarchy, also called a Work Breakdown Structure (WBS). Eventually, this sequence will show the interdependencies of each task. Then each task is given a duration. In MS Project, this can be in weeks, days, hours or minutes. You can also specify a milestone, which will represent an event that marks the completion of a group of related tasks.
To accomplish any task, you need resources. Resources can include people, equipment, material or special facilities necessary to complete a task. Resource availability and scheduling are important constraints to completing a task.
Once you establish a plan, complete with tasks and resources, you will often need to refine the plan before saving it as a baseline. The baseline is your guideline to help manage the project.
MS Project Basics
When you first start MS Project, a blank project file is displayed in Gantt Chart View. (If you need to open an existing MS Project file, the file extension is .mpp.) Let's take a look at the main window:
Select All
Entry Table
Task ID
Gantt Chart
Divider
View Bar
The above image is the default screen for MS Project 2010. The right side of the screen consists of the area for the Gantt Chart. The left side of the screen is the Entry table where tasks, durations, and other task information is entered. The Entry Table and Gantt Chart are separated by a moveable Divider
Pay particular attention to this layout. The Entry table is where we enter our tasks and durations. The Gantt chart will eventually show our tasks and durations in a graphical bar chart. The other part of significance is the divider. This allows you to show more or less of the Entry table/Gantt chart.
In Project 2010 the menu bar is set up into Ribbons. To access the various ribbons, Tabs are selected across the top of the menu bar. Within the ribbon the various sections are divided into groups:
.
Techniques to create tasks from the file menu in Outlook & also organize To-Do items in an effectual manner with the help of inbuilt features of Microsoft Outlook. http://www.msoutlooktools.com/category/tasks/
Microsoft® Project Painting Exercise CPMGT303 Version 111DioneWang844
Microsoft® Project Painting Exercise
CPMGT/303 Version 11
1
University of Phoenix Material
Microsoft® Project Painting Exercise
Microsoft® Project
Microsoft® Project (also called “MS-Project”) is one of the most popular tools for project planning projects today. It is relatively easy to use and makes it easier to manage projects.
Microsoft® Project Exercise: The Painting Project
This is a simple exercise in Microsoft® Project. These instructions are brief and only cover the basics. The objective of this exercise is to prepare you for Week 3 Learning Team assignment. This exercise only covers how to log into Microsoft® Project, set up a simple schedule, and log out. The exercise is not concerned with monitoring or controlling the execution of a plan.
Start Microsoft® Project
To start Microsoft® Project; click through “Start > Programs > Microsoft Office 2013 > Microsoft Project” Microsoft® Project should start up, with a blank “Gantt chart” view of a new project.
Saving Microsoft® Project
It is recommended that you save your project immediately. So please Save your project now using the following format ‘Last Name_Paint_Project’. If you last name is Allen, your Microsoft® Project file name will be ‘Allen_Paint_Project’.
If you are prompted to save the project with a baseline, click Yes. You may continue to work on the baseline until you have completed the exercise and turned it in as the final baseline.
Microsoft® Project Settings
Before getting into the details of the Painting Project, it is beneficial to enter a few Microsoft® Project settings. These settings are:
· Duration Unit of Measure. The normal default for duration is the day (day) which consist of 8 hours. There are other unit of measures that you may decide to use. The most popular are minute (min), hour (hr), and week (wk). For this exercise we will use the default setting.
The working calendar. There is a default Standard Calendar which consists of a 5-day work week (Monday through Friday) with Saturday and Sunday set as non-working days. A day is made up of 8 hours. It is recommended for this exercise that you leave Microsoft® Project set to the Standard Calendar. If you want to explore other calendars or how to set up your own calendar, click as follows “Project > Project Information”. The following pop up menu will appear with Calendar showing as ‘Standard’.
Available resources. It is beneficial to set up your known resources pool at the start of the project. Note. You may change the resources in the pool at any time, as resources are added to and subtracted from the project. To set up the resource pool click as follows “Resource> Resource Sheet”. You’ll get a table in which you can define the names of resources that you wish to be available.
Simply type a name in the “Name” field, and use a new line for each different resource. For the Painting Project, the following are the resources.
Jackie Smith – Standard Rate $25.00; Overtime Rate $37.00
Tom Bu ...
Microsoft Project for Professionals - 5 Simple & Practical Steps to Mastering...DeltaBahn
This series of posts is a guide master Microsoft Project 2013 and increase productivity for overall Project Management.
The slides contain only the steps to follow allow and getting started with task management.
View the whole blog post with explanations:
http://deltabahn.com/project-2013-microsoft-project-for-professionals-5-simple-and-practical-steps-to-mastering-task-basics-in-under-30-minutes/
Microsoft® Project Painting Exercise
Microsoft® Project
· Microsoft® Project (also called “MS-Project”) is one of the most popular tools for project planning projects today. It is relatively easy to use and makes it easier to manage projects.
· Microsoft® Project Exercise: The Painting Project
· This is a simple exercise in Microsoft® Project. These instructions are brief and only cover the basics. The objective of this exercise is to prepare you for Week 3 Learning Team assignment. This exercise only covers how to log into Microsoft® Project, set up a simple schedule, and log out. The exercise is not concerned with monitoring or controlling the execution of a plan.
Start Microsoft® Project
To start Microsoft® Project; click through “Start > Programs > Microsoft Office 2013 > Microsoft Project” Microsoft® Project should start up, with a blank “Gantt chart” view of a new project.
Saving Microsoft® Project
It is recommended that you save your project immediately. So please Save your project now using the following format ‘Last Name_Paint_Project’. If you last name is Allen, your Microsoft® Project file name will be ‘Allen_Paint_Project’.
If you are prompted to save the project with a baseline, click Yes. You may continue to work on the baseline until you have completed the exercise and turned it in as the final baseline.
Microsoft® Project Settings
Before getting into the details of a the Painting Project, it is beneficial to enter a few Microsoft® Project settings. These settings are:
· Duration Unit of Measure. The normal default for duration is the day (day) which consist of 8 hours. There are other unit of measures that you may decide to use. The most popular are minute (min), hour (hr), and week (wk). For this exercise we will use the default setting.
· The working calendar. There is a default Standard Calendar which consists of a 5-day work week (Monday through Friday) with Saturday and Sunday set as non-working days. A day is made up of 8 hours. It is recommended for this exercise that you leave Microsoft® Project set to the Standard Calendar. If you want to explore other calendars or how to set up your own calendar, click as follows “Project > Project Information”. The following pop up menu will appear with Calendar showing as ‘Standard’.
· Available resources. It is beneficial to set up your known resources pool at the start of the project. Note. You may change the resources in the pool at any time, as resources are added to and subtracted from the project. To set up the resource pool click as follows “Resource> Resource Sheet”. You’ll get a table in which you can define the names of resources that you wish to be available.
Simply type a name in the “Name” field, and use a new line for each different resource. For the Painting Project, the following are the resources.
Jackie Smith – Standard Rate $25.00; Overtime Rate $37.00
Tom Busch – Standard Rate $20.00; Overtime Rate $30.00
Alan Jacobs – Standard Rate $15.00; Overti ...
A macro is a set of commands that can be played back at will to perform a given task. These tasks can be something simple such as inserting your name and address into a word processor to something more complex such as launching a program, copying data from it, activating another program, pasting the data into it and repeating this several times. Tasks performed by macros are typically repetitive in nature allowing significant savings in time by executing the macro instead of manually repeating the commands.
Work Breakdown Structure (WBS) ActivityYour organisati.docxambersalomon88660
Work Breakdown Structure (WBS) Activity
Your organisation is a leading television broadcaster. Your viewing ratings have been static for a number of years and this has impacted the amount of marketing spent with your network. You want to create a new television programme that is going to engage audiences.
The project sponsor has commissioning a new family TV show that is to be shown in prime time Saturday evening slot. It will start broadcasting in 6 months time .
You are members of the project team for this project. It is your role to enable this project to be planned out within the time frame requested. Your activity today is to create an effective WBS outlining the structure, activities, order and resources of the work.
Having viewed the resources concerning MS Project and project planning, this is an exercise to help get you familiar with the basics of using MS Project.
Part of the assignment report when you are creating your Project Initiation Document (PID) is that it should contain a work breakdown structure (WBS) and a ‘project schedule’ using a Gantt chart.
This exercise will give you experience of inputting a WBS into MS Project and to create a simple Gantt chart.
The tasks will require that you do the following:
1. Create a new blank project in MS Project.
2. Create a correctly ordered WBS and input this into the task pane within MS Project. To limit the time this will take, please copy and paste the list of tasks on page 2 of this document and insert them into MS Project.
3. Add accurate durations (in days) for each activity. Please just use your best estimate.
4. Link and indent activities based on their relationships to each other.
5. Add milestones for each phase of the project.
6. Create yourself as a resource and attach yourself to any work that you will do within the project.
7. Change the schedule if required so that you are not working weekends. By default MS Project does this automatically but you may be required to change this if you are using non-standard settings in your copy of MS Project.
8. Set as a baseline to schedule against.
Note: Refer to the WBS diagram supplied in page 3.
There are a variety of ways to perform these tasks in MS Project depending on user preference. Please use the walk through guide (MS Project Activity Companion found in Moodle), which will guide you step by step for how to complete this exercise. Please try using this before watching the solution video.
(Please copy and paste below from ‘1.1 Select Topic’ to ‘1.4.4.2 Analyse’ and insert into MS Project Task Pane)
1.1 Select Topic
1.1.1 Define Problem
1.1.2 Contextualise
1.1.3 Develop Aims
1.1.4 Agree with Supervisor
1.2 Plan Research
1.2.1 Plans
1.2.1.1 Schedule
1.2.1.2 Budget
1.2.1.3 Risks
1.2.1.4 Assumptions & Constraints
1.2.2 Aims
1.2.2.1 Objectives
1.2.2.2 Deliverables
1.2.3 Initial Literature Review
1.2.3.1 Propositions
1.2.4 Initial Methodology
1.2.4.1 Tools
1.2.4.2 Data Collection
1.2.4.3 Sample
1.3 Literatu.
With Planner, you can go from your project outline to sharing project status instantly. Other project management tools take hours to accomplish the same workflow. Get the Planner Blender App today and experience it for yourself.
In 2015, I used to write extensions for Joomla, WordPress, phpBB3, etc and I ...Juraj Vysvader
In 2015, I used to write extensions for Joomla, WordPress, phpBB3, etc and I didn't get rich from it but it did have 63K downloads (powered possible tens of thousands of websites).
How Recreation Management Software Can Streamline Your Operations.pptxwottaspaceseo
Recreation management software streamlines operations by automating key tasks such as scheduling, registration, and payment processing, reducing manual workload and errors. It provides centralized management of facilities, classes, and events, ensuring efficient resource allocation and facility usage. The software offers user-friendly online portals for easy access to bookings and program information, enhancing customer experience. Real-time reporting and data analytics deliver insights into attendance and preferences, aiding in strategic decision-making. Additionally, effective communication tools keep participants and staff informed with timely updates. Overall, recreation management software enhances efficiency, improves service delivery, and boosts customer satisfaction.
Paketo Buildpacks : la meilleure façon de construire des images OCI? DevopsDa...Anthony Dahanne
Les Buildpacks existent depuis plus de 10 ans ! D’abord, ils étaient utilisés pour détecter et construire une application avant de la déployer sur certains PaaS. Ensuite, nous avons pu créer des images Docker (OCI) avec leur dernière génération, les Cloud Native Buildpacks (CNCF en incubation). Sont-ils une bonne alternative au Dockerfile ? Que sont les buildpacks Paketo ? Quelles communautés les soutiennent et comment ?
Venez le découvrir lors de cette session ignite
Navigating the Metaverse: A Journey into Virtual Evolution"Donna Lenk
Join us for an exploration of the Metaverse's evolution, where innovation meets imagination. Discover new dimensions of virtual events, engage with thought-provoking discussions, and witness the transformative power of digital realms."
TROUBLESHOOTING 9 TYPES OF OUTOFMEMORYERRORTier1 app
Even though at surface level ‘java.lang.OutOfMemoryError’ appears as one single error; underlyingly there are 9 types of OutOfMemoryError. Each type of OutOfMemoryError has different causes, diagnosis approaches and solutions. This session equips you with the knowledge, tools, and techniques needed to troubleshoot and conquer OutOfMemoryError in all its forms, ensuring smoother, more efficient Java applications.
Accelerate Enterprise Software Engineering with PlatformlessWSO2
Key takeaways:
Challenges of building platforms and the benefits of platformless.
Key principles of platformless, including API-first, cloud-native middleware, platform engineering, and developer experience.
How Choreo enables the platformless experience.
How key concepts like application architecture, domain-driven design, zero trust, and cell-based architecture are inherently a part of Choreo.
Demo of an end-to-end app built and deployed on Choreo.
Globus Connect Server Deep Dive - GlobusWorld 2024Globus
We explore the Globus Connect Server (GCS) architecture and experiment with advanced configuration options and use cases. This content is targeted at system administrators who are familiar with GCS and currently operate—or are planning to operate—broader deployments at their institution.
Software Engineering, Software Consulting, Tech Lead.
Spring Boot, Spring Cloud, Spring Core, Spring JDBC, Spring Security,
Spring Transaction, Spring MVC,
Log4j, REST/SOAP WEB-SERVICES.
OpenFOAM solver for Helmholtz equation, helmholtzFoam / helmholtzBubbleFoamtakuyayamamoto1800
In this slide, we show the simulation example and the way to compile this solver.
In this solver, the Helmholtz equation can be solved by helmholtzFoam. Also, the Helmholtz equation with uniformly dispersed bubbles can be simulated by helmholtzBubbleFoam.
Into the Box Keynote Day 2: Unveiling amazing updates and announcements for modern CFML developers! Get ready for exciting releases and updates on Ortus tools and products. Stay tuned for cutting-edge innovations designed to boost your productivity.
Experience our free, in-depth three-part Tendenci Platform Corporate Membership Management workshop series! In Session 1 on May 14th, 2024, we began with an Introduction and Setup, mastering the configuration of your Corporate Membership Module settings to establish membership types, applications, and more. Then, on May 16th, 2024, in Session 2, we focused on binding individual members to a Corporate Membership and Corporate Reps, teaching you how to add individual members and assign Corporate Representatives to manage dues, renewals, and associated members. Finally, on May 28th, 2024, in Session 3, we covered questions and concerns, addressing any queries or issues you may have.
For more Tendenci AMS events, check out www.tendenci.com/events
Code reviews are vital for ensuring good code quality. They serve as one of our last lines of defense against bugs and subpar code reaching production.
Yet, they often turn into annoying tasks riddled with frustration, hostility, unclear feedback and lack of standards. How can we improve this crucial process?
In this session we will cover:
- The Art of Effective Code Reviews
- Streamlining the Review Process
- Elevating Reviews with Automated Tools
By the end of this presentation, you'll have the knowledge on how to organize and improve your code review proces
Enterprise Resource Planning System includes various modules that reduce any business's workload. Additionally, it organizes the workflows, which drives towards enhancing productivity. Here are a detailed explanation of the ERP modules. Going through the points will help you understand how the software is changing the work dynamics.
To know more details here: https://blogs.nyggs.com/nyggs/enterprise-resource-planning-erp-system-modules/
Developing Distributed High-performance Computing Capabilities of an Open Sci...Globus
COVID-19 had an unprecedented impact on scientific collaboration. The pandemic and its broad response from the scientific community has forged new relationships among public health practitioners, mathematical modelers, and scientific computing specialists, while revealing critical gaps in exploiting advanced computing systems to support urgent decision making. Informed by our team’s work in applying high-performance computing in support of public health decision makers during the COVID-19 pandemic, we present how Globus technologies are enabling the development of an open science platform for robust epidemic analysis, with the goal of collaborative, secure, distributed, on-demand, and fast time-to-solution analyses to support public health.
A Comprehensive Look at Generative AI in Retail App Testing.pdfkalichargn70th171
Traditional software testing methods are being challenged in retail, where customer expectations and technological advancements continually shape the landscape. Enter generative AI—a transformative subset of artificial intelligence technologies poised to revolutionize software testing.
Exploring Innovations in Data Repository Solutions - Insights from the U.S. G...Globus
The U.S. Geological Survey (USGS) has made substantial investments in meeting evolving scientific, technical, and policy driven demands on storing, managing, and delivering data. As these demands continue to grow in complexity and scale, the USGS must continue to explore innovative solutions to improve its management, curation, sharing, delivering, and preservation approaches for large-scale research data. Supporting these needs, the USGS has partnered with the University of Chicago-Globus to research and develop advanced repository components and workflows leveraging its current investment in Globus. The primary outcome of this partnership includes the development of a prototype enterprise repository, driven by USGS Data Release requirements, through exploration and implementation of the entire suite of the Globus platform offerings, including Globus Flow, Globus Auth, Globus Transfer, and Globus Search. This presentation will provide insights into this research partnership, introduce the unique requirements and challenges being addressed and provide relevant project progress.
1. Working with Tasks
Projects have some tasks that needs to be completed within specified time period. First, you list your task
and analyze possible relationships between the tasks. Then you are ready to create tasks. Tasks can be
automatically or manually scheduled, depending on the needs of the project and the information currently
available. At any point during a project, you can change a task from manual scheduling to automatic
scheduling, or vice versa.
Creating a Manually ScheduledTask
By default, all new tasks in Project 2016 are set for manual scheduling. With manual scheduling, you can
fully control the task’s duration, start date, and finish date. The duration can be entered in minutes (m),
hours (h), days (d), weeks (w), or months (mo.). Manually scheduled tasks are marked with the pushpin
icon in the Task Mode field.
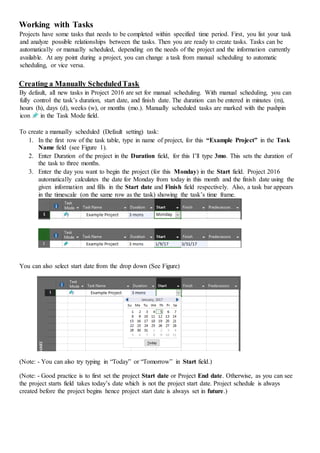
To create a manually scheduled (Default setting) task:
1. In the first row of the task table, type in name of project, for this “Example Project” in the Task
Name field (see Figure 1).
2. Enter Duration of the project in the Duration field, for this I’ll type 3mo. This sets the duration of
the task to three months.
3. Enter the day you want to begin the project (for this Monday) in the Start field. Project 2016
automatically calculates the date for Monday from today in this month and the finish date using the
given information and fills in the Start date and Finish field respectively. Also, a task bar appears
in the timescale (on the same row as the task) showing the task’s time frame.
You can also select start date from the drop down (See Figure)
(Note: - You can also try typing in “Today” or “Tomorrow” in Start field.)
(Note: - Good practice is to first set the project Start date or Project End date. Otherwise, as you can see
the project starts field takes today’s date which is not the project start date. Project schedule is always
created before the project begins hence project start date is always set in future.)
2. Creating an Automatically Scheduled Task
A complete project has a lot of tasks that can further have subtasks. Let’s create an automatically scheduled
task.
(Note:- Automatically scheduled tasks are marked with the Gantt bar icon in the Task Mode field.)
To create an automatically scheduled task:
1. In the second row of the task table, enter “Task 1” in the Task Name field (see Figure).
2. Click in the Task Mode field, click the down arrow that appears, and then click Auto Scheduled.
By default, Project 2016 assigns the task an estimated duration of one day and automatically fills in
the Duration, Start, and Finish fields. Also, a task bar appears in the timescale showing the task’s
time frame.
3. Now let’s put a duration to “Task1” for this, enter 25d in the Duration field. Project 2016
recalculates the finish date and updates the Finish field.
4. Here the Task in 1st row has same level of hierarchy with the 2nd row, so need to indent task. To
indent task, with the task selected, click on the icon in the task tab.
3. (Note: - In this example: Task in 1st row “Example Project” is the Main Task i.e. the project itself
and there are 3 summary tasks namely Task1, Task2 & Task3. Each has different subtasks namely
Subtask1, Subtask2 & Subtask3.)
(Tip: To make the full Timescale visible drag the bar in Timeline.)
5. After creating Task1 under Example Project. Similarly, create Subtasks under it. Then create Task2
& Task3 and out-dent it by using icon in Task tab. Alternatively, you can create summary tasks
of same hierarchy using icon in Task tab and then create subtasks. You can insert tasks using
icon in Task tab within Insert panel.
(Tip: You can anytime change default settings of new tasks creating from Manual Scheduling to Automatic
Scheduling by clicking on the left corner of screen.)
(Tip: If you have list of tasks in Excel the you can import directly into project. How to do that effectively is
covered in Miscellaneous: How to? chapter of this document.)
Drag this bar.
4. Linking Tasks
In a project each task may have certain relation with another. When you link tasks, you create a relationship
between them called a task dependency. Project 2016 supports four types of task dependencies (*FS, SS,
FF & SF). By default, Project 2016 creates finish-to-start (FS) links, which means the first task needs to
finish before the second task can start. Depending upon the relation (between tasks and constraints) the
tasks are linked under Predecessors column (here appears the Task ID and type of dependency) of Task
Table.
To link tasks:
1. In the Task Name column, click to select the tasks of same hierarchy, for this select Task1, and then
hold down the Ctrl key and click to select the remaining two tasks (Task2 & Task3). After selecting
click on the icon ( Shortcut: Ctrl+F2) on the Task tab. Similarly, link each Subtasks under each
Task. You must select the order in which they will execute, the selection order is significant. Now
you’ll see arrow line linking three tasks. (Notice that Task2 and Task3 is Auto Scheduled while Task1
is Manually Scheduled. You may try altering them. ). Similarly link other subtasks to each other.
5. 1. Select Sub-task 3 under Task1 and double click in Predecessors column. You’ll see a pop like below.
In the ID row enter 3 (Task ID of Sub-task1). This is a way to link task to one another. Here we have
Sub-Task3 with FS with 0d lag dependency with Sub-Task1 & Sub-Task2. You can choose different
task dependencies based on the task execution schedule.
2. Now, let’s assign durations to Subtasks as in screenshot below.
The faint line highlighted in image above shows the current date i.e. also indicates the tasks and what
should be their progress in order to finish as scheduled. Above we can see Sub-Task1 of Task1 must
have already finished and in the same Sub-Task2 must have been finished around 25% so we need to
update task progress. To show the progress, select Sub-Task1 and choose 100% from
icon located in Task tab. Alternatively, you can input manually in Task
Information.
Notice the dark line in
task bar.