This document discusses integrating AutoCAD VBA with Microsoft Excel. It describes how to establish basic links between the two programs by opening and closing an Excel session from within AutoCAD VBA. Code examples are provided to launch Excel, close Excel, and quit the AutoCAD VBA program. The code dimensions variables to represent the Excel application, workbook, and worksheet objects. It checks if Excel is already running and either uses the existing instance or launches a new one. Buttons are added to a user form to test the code.
When it comes to learning the art and science of Catia Drafting, it is not that difficult provided you are well acquainted with the way it is really done. When it to drafting in Catia, then you can rest assured that it is not particularly difficult as such is provided that you know how to go about doing it, that is.
When it comes to learning the art and science of Catia Drafting, it is not that difficult provided you are well acquainted with the way it is really done. When it to drafting in Catia, then you can rest assured that it is not particularly difficult as such is provided that you know how to go about doing it, that is.
.NET Fest 2018. Владимир Крамар. Многопоточное и асинхронное программирование...NETFest
Раскрывается тема проектирования и реализации многопоточных и асинхронных приложений для платформы .NET. Обсуждаются вопросы создания потоков, их дальнейшего использования и синхронизации в контексте масштабируемости и быстродействия. Рассматриваются общие ошибки и заблуждения при проектировании многопоточности, а также способы повышения производительности.
Working with CATIA V5 in 3DEXPERIENCE 2017x updated platform. Learn how to access commands and functions.
Get more free 3DEXPERIENCE apps demo here:
http://www.mecanicasolutions.com/3dexperience-webinar-ondemand/
CATIA is an acronym for Computer Aided Three-Dimensional Interactive Application. It is the most proficient, powerful and highly popular CAD i.e. computer aided design software. It is created, developed and owned by Dassault Systemes of France.
Presented by,
Ms. Nandana S V
Team Lead, Sr Software Engineer, Livares Technologies
Facade design pattern
Facade is a part of Gang of Four design pattern (23 others).
As the name suggests, it means the face of the building.
The people walking past the road can only see this glass face of the building.
They do not know anything about it, the wiring, the pipes and other complexities.
It hides all the complexities of the building and displays a friendly face.
Facade design pattern
Same goes for the Facade Design Pattern. It hides the complexities of the system and provides an interface to the client from where the client can access the system.
[Kho tài liệu ngành may] giáo trình vẽ mỹ thuật trang phụcTÀI LIỆU NGÀNH MAY
Giá 10k Liên hệ: www.facebook.com/garmentspace Chỉ với 10k THẺ CÀO VIETTEL bạn có ngay 5 lượt download tài liệu bất kỳ do Garment Space upload, hoặc với 100k THẺ CÀO VIETTEL bạn được truy cập kho tài liệu chuyên ngành vô cùng phong phú
Liên hệ: www.facebook.com/garmentspace
Cuốn sách Bí Mật Trí Tuệ của Người Do Thái.
Các bạn vào link https://goo.gl/avSKlA để đăng ký nhận ebook, Hoàng sẽ gửi tặng miễn phí vào trực tiếp email của bạn nhé!
Ở giáo trình này chúng ta sẽ cùng nhau tìm hiểu cách thể hiện các loại kết cấu cơ bản: kết cấu bê tông, gỗ và kết cấu thép . Giáo trình cung cấp kiến thức cơ bản để đọc và thể hiện được những bản vẽ liên quan
A macro is a set of commands that can be played back at will to perform a given task. These tasks can be something simple such as inserting your name and address into a word processor to something more complex such as launching a program, copying data from it, activating another program, pasting the data into it and repeating this several times. Tasks performed by macros are typically repetitive in nature allowing significant savings in time by executing the macro instead of manually repeating the commands.
Es un estudio de excel estudio para el uso de los macros y las herramientas de visual basic nos funciona para aprender acerca de programacion en excel realizar macros y hacer botenes que faciliten el uso de la excel que estoy seguro que con esta video podran aprender hacer el uso de excel avanzado
Software engineering modeling lab lectures
engineering+ education purpose
This series of lectures was prepared for the third class of software engineering / Aliraqia University/ Baghdad/ Iraq.
In prepared these lectures, I depend on the YouTube to make it, the programs of the lectures are designed and executed by vb.net, discussions are also found here
These lectures are not finished yet, i will improve it in the future
Forgive me for anything wrong by mistake, I wish you can profit from these lectures
My regard
Marwa Moutaz/ M.Sc. studies of Communication Engineering / University of Technology/ Bagdad / Iraq.
GDG Cloud Southlake #33: Boule & Rebala: Effective AppSec in SDLC using Deplo...James Anderson
Effective Application Security in Software Delivery lifecycle using Deployment Firewall and DBOM
The modern software delivery process (or the CI/CD process) includes many tools, distributed teams, open-source code, and cloud platforms. Constant focus on speed to release software to market, along with the traditional slow and manual security checks has caused gaps in continuous security as an important piece in the software supply chain. Today organizations feel more susceptible to external and internal cyber threats due to the vast attack surface in their applications supply chain and the lack of end-to-end governance and risk management.
The software team must secure its software delivery process to avoid vulnerability and security breaches. This needs to be achieved with existing tool chains and without extensive rework of the delivery processes. This talk will present strategies and techniques for providing visibility into the true risk of the existing vulnerabilities, preventing the introduction of security issues in the software, resolving vulnerabilities in production environments quickly, and capturing the deployment bill of materials (DBOM).
Speakers:
Bob Boule
Robert Boule is a technology enthusiast with PASSION for technology and making things work along with a knack for helping others understand how things work. He comes with around 20 years of solution engineering experience in application security, software continuous delivery, and SaaS platforms. He is known for his dynamic presentations in CI/CD and application security integrated in software delivery lifecycle.
Gopinath Rebala
Gopinath Rebala is the CTO of OpsMx, where he has overall responsibility for the machine learning and data processing architectures for Secure Software Delivery. Gopi also has a strong connection with our customers, leading design and architecture for strategic implementations. Gopi is a frequent speaker and well-known leader in continuous delivery and integrating security into software delivery.
DevOps and Testing slides at DASA ConnectKari Kakkonen
My and Rik Marselis slides at 30.5.2024 DASA Connect conference. We discuss about what is testing, then what is agile testing and finally what is Testing in DevOps. Finally we had lovely workshop with the participants trying to find out different ways to think about quality and testing in different parts of the DevOps infinity loop.
State of ICS and IoT Cyber Threat Landscape Report 2024 previewPrayukth K V
The IoT and OT threat landscape report has been prepared by the Threat Research Team at Sectrio using data from Sectrio, cyber threat intelligence farming facilities spread across over 85 cities around the world. In addition, Sectrio also runs AI-based advanced threat and payload engagement facilities that serve as sinks to attract and engage sophisticated threat actors, and newer malware including new variants and latent threats that are at an earlier stage of development.
The latest edition of the OT/ICS and IoT security Threat Landscape Report 2024 also covers:
State of global ICS asset and network exposure
Sectoral targets and attacks as well as the cost of ransom
Global APT activity, AI usage, actor and tactic profiles, and implications
Rise in volumes of AI-powered cyberattacks
Major cyber events in 2024
Malware and malicious payload trends
Cyberattack types and targets
Vulnerability exploit attempts on CVEs
Attacks on counties – USA
Expansion of bot farms – how, where, and why
In-depth analysis of the cyber threat landscape across North America, South America, Europe, APAC, and the Middle East
Why are attacks on smart factories rising?
Cyber risk predictions
Axis of attacks – Europe
Systemic attacks in the Middle East
Download the full report from here:
https://sectrio.com/resources/ot-threat-landscape-reports/sectrio-releases-ot-ics-and-iot-security-threat-landscape-report-2024/
Connector Corner: Automate dynamic content and events by pushing a buttonDianaGray10
Here is something new! In our next Connector Corner webinar, we will demonstrate how you can use a single workflow to:
Create a campaign using Mailchimp with merge tags/fields
Send an interactive Slack channel message (using buttons)
Have the message received by managers and peers along with a test email for review
But there’s more:
In a second workflow supporting the same use case, you’ll see:
Your campaign sent to target colleagues for approval
If the “Approve” button is clicked, a Jira/Zendesk ticket is created for the marketing design team
But—if the “Reject” button is pushed, colleagues will be alerted via Slack message
Join us to learn more about this new, human-in-the-loop capability, brought to you by Integration Service connectors.
And...
Speakers:
Akshay Agnihotri, Product Manager
Charlie Greenberg, Host
Slack (or Teams) Automation for Bonterra Impact Management (fka Social Soluti...Jeffrey Haguewood
Sidekick Solutions uses Bonterra Impact Management (fka Social Solutions Apricot) and automation solutions to integrate data for business workflows.
We believe integration and automation are essential to user experience and the promise of efficient work through technology. Automation is the critical ingredient to realizing that full vision. We develop integration products and services for Bonterra Case Management software to support the deployment of automations for a variety of use cases.
This video focuses on the notifications, alerts, and approval requests using Slack for Bonterra Impact Management. The solutions covered in this webinar can also be deployed for Microsoft Teams.
Interested in deploying notification automations for Bonterra Impact Management? Contact us at sales@sidekicksolutionsllc.com to discuss next steps.
UiPath Test Automation using UiPath Test Suite series, part 4DianaGray10
Welcome to UiPath Test Automation using UiPath Test Suite series part 4. In this session, we will cover Test Manager overview along with SAP heatmap.
The UiPath Test Manager overview with SAP heatmap webinar offers a concise yet comprehensive exploration of the role of a Test Manager within SAP environments, coupled with the utilization of heatmaps for effective testing strategies.
Participants will gain insights into the responsibilities, challenges, and best practices associated with test management in SAP projects. Additionally, the webinar delves into the significance of heatmaps as a visual aid for identifying testing priorities, areas of risk, and resource allocation within SAP landscapes. Through this session, attendees can expect to enhance their understanding of test management principles while learning practical approaches to optimize testing processes in SAP environments using heatmap visualization techniques
What will you get from this session?
1. Insights into SAP testing best practices
2. Heatmap utilization for testing
3. Optimization of testing processes
4. Demo
Topics covered:
Execution from the test manager
Orchestrator execution result
Defect reporting
SAP heatmap example with demo
Speaker:
Deepak Rai, Automation Practice Lead, Boundaryless Group and UiPath MVP
GraphRAG is All You need? LLM & Knowledge GraphGuy Korland
Guy Korland, CEO and Co-founder of FalkorDB, will review two articles on the integration of language models with knowledge graphs.
1. Unifying Large Language Models and Knowledge Graphs: A Roadmap.
https://arxiv.org/abs/2306.08302
2. Microsoft Research's GraphRAG paper and a review paper on various uses of knowledge graphs:
https://www.microsoft.com/en-us/research/blog/graphrag-unlocking-llm-discovery-on-narrative-private-data/
Generating a custom Ruby SDK for your web service or Rails API using Smithyg2nightmarescribd
Have you ever wanted a Ruby client API to communicate with your web service? Smithy is a protocol-agnostic language for defining services and SDKs. Smithy Ruby is an implementation of Smithy that generates a Ruby SDK using a Smithy model. In this talk, we will explore Smithy and Smithy Ruby to learn how to generate custom feature-rich SDKs that can communicate with any web service, such as a Rails JSON API.
LF Energy Webinar: Electrical Grid Modelling and Simulation Through PowSyBl -...DanBrown980551
Do you want to learn how to model and simulate an electrical network from scratch in under an hour?
Then welcome to this PowSyBl workshop, hosted by Rte, the French Transmission System Operator (TSO)!
During the webinar, you will discover the PowSyBl ecosystem as well as handle and study an electrical network through an interactive Python notebook.
PowSyBl is an open source project hosted by LF Energy, which offers a comprehensive set of features for electrical grid modelling and simulation. Among other advanced features, PowSyBl provides:
- A fully editable and extendable library for grid component modelling;
- Visualization tools to display your network;
- Grid simulation tools, such as power flows, security analyses (with or without remedial actions) and sensitivity analyses;
The framework is mostly written in Java, with a Python binding so that Python developers can access PowSyBl functionalities as well.
What you will learn during the webinar:
- For beginners: discover PowSyBl's functionalities through a quick general presentation and the notebook, without needing any expert coding skills;
- For advanced developers: master the skills to efficiently apply PowSyBl functionalities to your real-world scenarios.
JMeter webinar - integration with InfluxDB and GrafanaRTTS
Watch this recorded webinar about real-time monitoring of application performance. See how to integrate Apache JMeter, the open-source leader in performance testing, with InfluxDB, the open-source time-series database, and Grafana, the open-source analytics and visualization application.
In this webinar, we will review the benefits of leveraging InfluxDB and Grafana when executing load tests and demonstrate how these tools are used to visualize performance metrics.
Length: 30 minutes
Session Overview
-------------------------------------------
During this webinar, we will cover the following topics while demonstrating the integrations of JMeter, InfluxDB and Grafana:
- What out-of-the-box solutions are available for real-time monitoring JMeter tests?
- What are the benefits of integrating InfluxDB and Grafana into the load testing stack?
- Which features are provided by Grafana?
- Demonstration of InfluxDB and Grafana using a practice web application
To view the webinar recording, go to:
https://www.rttsweb.com/jmeter-integration-webinar
Builder.ai Founder Sachin Dev Duggal's Strategic Approach to Create an Innova...Ramesh Iyer
In today's fast-changing business world, Companies that adapt and embrace new ideas often need help to keep up with the competition. However, fostering a culture of innovation takes much work. It takes vision, leadership and willingness to take risks in the right proportion. Sachin Dev Duggal, co-founder of Builder.ai, has perfected the art of this balance, creating a company culture where creativity and growth are nurtured at each stage.
Dev Dives: Train smarter, not harder – active learning and UiPath LLMs for do...UiPathCommunity
💥 Speed, accuracy, and scaling – discover the superpowers of GenAI in action with UiPath Document Understanding and Communications Mining™:
See how to accelerate model training and optimize model performance with active learning
Learn about the latest enhancements to out-of-the-box document processing – with little to no training required
Get an exclusive demo of the new family of UiPath LLMs – GenAI models specialized for processing different types of documents and messages
This is a hands-on session specifically designed for automation developers and AI enthusiasts seeking to enhance their knowledge in leveraging the latest intelligent document processing capabilities offered by UiPath.
Speakers:
👨🏫 Andras Palfi, Senior Product Manager, UiPath
👩🏫 Lenka Dulovicova, Product Program Manager, UiPath
Dev Dives: Train smarter, not harder – active learning and UiPath LLMs for do...
Autocad excel vba
1. This article is the third in a series on integrating the programming power of
AutoCAD® VBA with the functionality found in other Windows applications—
specifically, Microsoft Excel. In the first segment we discussed what was possible, in
the second segment we discussed how to establish a basic link with Excel through
AutoCAD VBA to open an Excel session and close it down, and in this session we
discuss how to port formatted data from AutoCAD VBA to Excel worksheets.
Objects of Our Desire
Now that you know how to make an AutoCAD VBA routine speak "Excel-ese," and
how to launch a session of Excel, let's examine the Workbook and the Worksheet
objects in Excel.
You can study the properties of these and other Excel objects through the AutoCAD
VBA IDE (integrated development environment) by:
1. Running the IDE (use the VBAIDE command).
2. Using the Tools/References pulldown menu option to activate a Microsoft
Excel Object Library reference by placing a check next to this entry in the
References listbox.
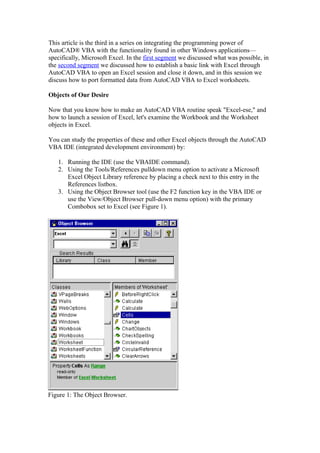
3. Using the Object Browser tool (use the F2 function key in the VBA IDE or
use the View/Object Browser pull-down menu option) with the primary
Combobox set to Excel (see Figure 1).
Figure 1: The Object Browser.
2. View Larger
Figure 2: Create a UserForm as shown.
The Object Browser reports the properties, classes, and variable types associated with
objects. For example, if you select a Worksheet class, it has a Cells property as a
Range class. If you select the Range class, it has a Value property, which holds a
variant value. Let's use this information to pump different types of values (integers,
real numbers, and text) into cells in an opened spreadsheet.
1. Use the process outlined in the last tutorial to create a UserForm as shown in Figure
2.
2. Add a Microsoft Excel Object Library reference to the form.
3. Stretch the UserForm and CommandButtons so that they can accommodate the
button text.
4. Apply the following code to the top button, CommandButton1, and bottom button,
CommandButton3:
3. We added an End command to the code for CommandButton3 so that when this
button is clicked, not only is the current spreadsheet closed, but the VBA routine is
also exited, thus returning us to the VBA IDE. You can run the routine at this point,
but remember, once the Excel spreadsheet appears on your screen, you must toggle
back to your AutoCAD session (use ALT+TAB to move back and forth between the
current Excel session and AutoCAD software) to see your UserForm. Let's examine
the code for CommandButton2.
Going Out for the Pass
The code for this CommandButton assumes that Excel is already running. Three
variables are established to hold an integer, a real number, and a text value. These
values are passed to the Excel Worksheet object cell-value property using
(row,column) format and notation.
1. Apply the following code to CommandButton2:
2. Run the application now.
3. Click on the top button to open a spreadsheet.
4. Click on the middle button to fill the first column with values.
5. Click the third button to shut down the application and the spreadsheet.
Note: Excel will not completely close down until after you've told it not to
save the spreadsheet.
Excel VBA IDE
AutoCAD software isn't the only application with a VBA IDE. Microsoft Excel also
has a VBA IDE, which you can access from the Excel main menu by selecting Tools
> Macro > Visual Basic Editor (see Figure 3).
4. View Larger
Figure 3: Accessing the Excel VBA IDE.
What if you want to close down the Excel spreadsheet without having to click a
DisplayAlert dialog box that asks you if you want to save the workbook? Go to the
Excel VBA IDE Help facility to find this information (DisplayAlert property of an
Application object).
1. Replace the code for CommandButton3 with the following code, which completely
closes Excel without first calling a DisplayAlert prompt:
2. Run the application again, clicking on the top button and then the middle button.
Did you notice that the value 1.5 was not reported properly in cell 2,1? This is
because each cell has default formatting, and we have not instructed Excel to change
its formatting once data has been passed to its cells. With the Format function you can
set the formatting for any cell by passing formatted values to the cell.
3. Quit the application.
4. Replace the code for CommandButton2 with the following code:
5. 5. Restart the application.
6. Use the top and middle buttons to send the new values to the spreadsheet.
7. Remember to stretch the column width of the first column to accommodate the
values passed to it.
The resulting values passed to the spreadsheet should look like those shown in Figure
4.
6. Figure 4: The values are passed to the spreadsheet.
Keeping Up Appearances
In addition to cell value formatting, you can also control cell sizing, boldfacing,
italicizing, and column widths.
1. Replace the code in CommandButton2 with the following code:
2. Run the application again to see how to control the appearance of values.
7. Home on the Range
Sometimes you will want to pass a value to many cells or to pass a function to a cell
for a spreadsheet calculation. So let's end this segment by examining the code that
accomplishes this.
2. Run the application again to see the effect.
Not much needs to be said here. The code uses the Range class of the object with a
cell range format value and the Formula property of the Range class to assign a
formula to a cell.
The value of 4 is passed to four cells, and the average, sum, and a subtraction of
values is calculated in adjacent cells.
Next time, we'll discuss pulling values from an Excel spreadsheet into AutoCAD
VBA objects such as ListBoxes and ComboBoxes, and we'll also get our first look at
code to survey counts of objects within an AutoCAD drawing and report them in a
spreadsheet.
VBA: Integrating with Microsoft Excel - Part 2
By dave espinosa-aguilar
This article is the second in a series on integrating the programming power of
AutoCAD® VBA with the functionality found in other Windows applications—
specifically, Microsoft® Excel. In the first article, we discussed what is possible; now
it's time to examine how it's possible. And that begins with a quick overview of the
AutoCAD VBA Integrated Development Environment (or IDE).
The IDE
At the command prompt, enter the command VBAIDE. This initializes the IDE in a
separate window. You can use the ALT+TAB keys to switch back and forth between
the IDE and your AutoCAD session. If you close AutoCAD, the IDE window closes
with it. The IDE is used to develop and debug your program code and your dialogs
8. and to view the information your program is processing (see Figure 1). Once you have
finished using the IDE (usually after saving your programming work), you can close
the IDE window without closing AutoCAD.
View Larger
Figure 1: The IDE enables you to simultaneously view your application user forms,
code, the object browser, the toolbox, object properties, references and more.
The VBA Manager
You can also bring up the IDE through the use of the VBAMAN command. Unlike
VBAIDE, the VBAMAN command enables you to load (and unload) existing VBA
project files to/from memory before jumping to the IDE to develop or modify them.
You can work with several project files open at once. When you use the VBAMAN
command, the VBA Manager dialog box opens. The Visual Basic Editor button in this
dialog box takes you to the IDE (see Figure 2). The VBA Manager is also where you
create new project files, develop macros to run your project files, or embed your
programs in any of your open drawings.
Figure 2: The VBA Manager Dialog loads, unloads, and exports application code.
Our First User Program
Rather than try to explain every button and function in these interfaces, we're going to
go straight to developing our very first program. It's objective is simple enough: open
and close Excel. Make sure you have Excel already installed on your system, and then
follow along as we begin to develop our first application:
9. 1. Start by making sure you're in a brand new AutoCAD session.
2. Use the VBAMAN command to bring up the VBA Manager dialog box.
3. Click the New button. This creates a new project with a default project name
(ACADProject)
4. Click the Visual Basic Editor button to go to the IDE.
5. Enter Control+R or select Project Explorer from the View pull-down menu to view
the Project Explorer. It may be docked to one side of your window or it may be a
floating window. In either case, it should be reporting your ACADproject.
6. If the project name displays a + (plus) sign to the left, click on the plus sign to see
subitem ThisDrawing (see Figure 3).
Figure 3: The project window reports projects loaded, and UserForms included in a
project.
View Larger
Figure 4: A UserForm is created for the application. The Project window and
Toolbox are organized for easy object placement.
7. From the Insert pull-down menu, select UserForm pull-down to insert a UserForm
into this project. Stretch the UserForm dialog box and the window the UserForm sits
in so that they take up approximately the space shown in Figure 4.
8. From the View pull-down menu select Toolbox, which opens the Toolbox dialog
box. You can also stretch the Toolbox dialog box.
Setting Up an Excel Reference
Once you've added the UserForm to the project, the next step is telling AutoCAD
software how to speak Excel-ese. References expand AutoCAD VBA to include new
10. tools and capabilities, and for this application we need to be able to speak in terms of
worksheets, cells, ranges, and other concepts associated with spreadsheets. Here's
how we do it:
1. From the Tools pull-down menu, select References, which brings up the References
dialog box.
2. Several references at the top of the Available References list may already be
selected. Leave them as they are, and search down through the list of available
references until you see one that looks like Microsoft Excel 9.0 Object Library (this
assumes Microsoft Excel 2000 is already installed). Select the box to the left of the
Library as shown in Figure 5. When you do this, the Location label at the bottom of
the dialog box should report a path similar to c:Program FilesMicrosoft
OfficeOfficeEXCEL9.OLB.
Figure 5: Adding the Microsoft Excel 9.0 Object Library reference enables your
application to speak "Excel-ese."
3. Click the OK button, which returns you to the IDE.
That's all it takes to expand our application to speak in Excel terms.
Adding Buttons to the UserForm
Now that you've told the application how to speak Excel-ese, let's create some buttons
on our UserForm dialog box that launch Excel, close Excel, and Quit out of our
application. Here we go:
1. Move your cursor over the various objects in the Toolbox dialog box and pay close
attention to the tooltips. Find the tool with tooltip CommandButton and click it. Your
cursor changes to CommandButton draw mode.
11. View Larger
Figure 6: You can re-organize the look and layout of your application and
development interfaces at any time.
2. Move your cursor over the UserForm and pick an upper-left point. This will spot a
button on the UserForm. Click and drag on the button grips to stretch it into any size
you like. Create two more buttons and stretch them so that they appear similar to those
shown in Figure 6.
3. Slowly click twice over a button to move the cursor inside the button, enabling you
to change the button's label.
If you click twice too quickly, a code window will appear instead. Close out any code
windows that appear and try again if necessary, clicking slowly inside each button to
move the cursor into the button text.
4. Change the label for each button so that CommandButton1 text reads Launch Excel,
CommandButton2 text reads Close Excel, and CommandButton3 text reads Quit as
shown in Figure 7.
Figure 7: It is a helpful practice to include a Quit button in your primary UserForm to
provide an easy means to stop your application when it is running.
Your First Coded Object
Now that you have finished the dialog box, it's time assign code to each button.
Again, we're going to start very simple by writing the code for the Quit button.
1. Double-click the Quit button to bring up the button's code window.
The code window shows a combo box with the value CommandButton3 in the upper-
left corner so you know the code you're writing will pertain to this button only. In the
upper-right corner of the code window is another combo box with value Click, which
tells you that the code will be called up when this button is clicked while the
12. application is running. In the main part of the code window are two already typed
statements:
Private Sub CommandButton3_Click()
End Sub
2. Click between these two statements and enter the word End so that the code
statement now appears as:
Private Sub CommandButton3_Click()
End
End Sub
Each button acts as a routine unto itself. The END command in Visual Basic
terminates a running application. We're going to run our little program and use this
button to stop it. The indenting of the command isn't vital to the program running
correctly, but it does help keep command statements visually organized.
3. Close the code window.
4. From the Run pull-down menu, select Run Sub > UserForm menu item to launch
our program.
Your dialog box should appear over your AutoCAD session. Clicking on the upper
two buttons will do nothing, but if you click the Quit button, you should return to the
IDE.
5. Click the Quit button to terminate the program.
You just ran your first program! You can also run a program by typing the F5 key
when you are in the IDE.
Launching and Closing Excel
This next part is going to take some explaining. But first, let's get the code for the top
two buttons assigned.
1. Double-click the Launch Excel button to bring up its code window and type the
following code into it:
13. 2. Likewise, double-click the Close Excel button to bring up its code window and type
the following code into it:
Let's take a closer look at the code for the Launch Excel button. The code for this
object begins by dimensioning variable excelApp as an Excel application object type,
variable wbkObj as an Excel Workbook object type, and variable shtObj as an Excel
Worksheet object type (all three of which are types now available to us with the excel
9.0 Object Library referenced). If any error occurs, the code is instructed to continue
on instead of stopping at the error. The UserForm is hidden from view and the error
state variable is cleared (set to a value of zero). Here's the relevant code:
Next, the application variable is set to a currently running session of Excel. This may
seem a little weird at first, but the code does not start by launching Excel. Now, if
Excel isn't running, this statement generates an error (which has a nonzero value). If
an error is generated, then we know that Excel isn't running yet. So we clear the error
state and use the CreateObject function to launch an Excel session. So we're
essentially saying "If Excel is already running, set the variable to what is running.
Otherwise, start up Excel." If launching Excel generates an error, we know that Excel
isn't even installed. We report this through a message box exclamation function and
end the program. Here's that code:
14. Once the application variable is set to either the currently running session of Excel or
a new session of Excel, the UserForm is made visible again, and the workbook and
worksheet variables are set to the first workbook and the first worksheet in that
session. This done, the UserForm is made visible again so that we can click the
buttons to close Excel down or quit our VBA program. Here's that code:
The code for the Close Excel button is fairly imitative of that for the Launch Excel
button. Variable excelApp is dimensioned from scratch again in this procedure as an
Excel application object type. The code is instructed again to continue if an error is
encountered, the UserForm is hidden, and the error state is cleared. Variable
excelAPP is set to an assumed already running session of Excel. If Excel isn't running
(someone may click Close Excel first—after all, you have to consider every
possibility), an error is generated, and we are told Excel isn't running. If no error is
generated, then the application quits. The UserForm is made visible again so that we
can click our three buttons:
When running this VBA routine, it helps to use ALT+TAB to switch between Excel
and AutoCAD after Excel has been launched. Viewing the Windows Task Manager
(CTL+ALT+DEL) is also helpful to check if you've left any Excel application open.
The code in the Close Excel button does shut down the currently running session, but
if you check the Task Manager after using Close Excel, you should see an icon for the
currently running Excel session. You can always shut down any Excel sessions
through the Task Manager if needed. What happens if you press Launch Excel twice
in a row? What happens if you then press Close Excel?
In Conclusion
In future segments we'll discuss how to pass information to Excel from our VBA
routine, how to format that passed information, and how to channel it to a single cell
or multiple cells and ranges. We'll also look at how to pull information from a
15. spreadsheet into a UserForm list box, edit box, combo box, and so on. For now, make
sure you understand clearly how to make the Excel connection.
•