2. What is an SWR/Wattmeter?What is an SWR/Wattmeter?
An SWR/Wattmeter is an electronic testingAn SWR/Wattmeter is an electronic testing
device used by ham radio operators todevice used by ham radio operators to
measure the strength and quality ofmeasure the strength and quality of
transmissions. An SWR/Wattmeter is used totransmissions. An SWR/Wattmeter is used to
measure the following values:measure the following values:
• Forward PowerForward Power
• Reflected PowerReflected Power
• Standing Wave Ratio (SWR)Standing Wave Ratio (SWR)
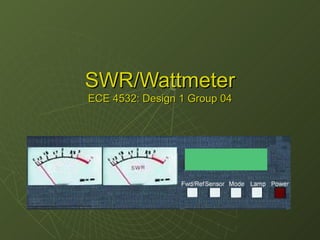
4. User InterfaceUser Interface
Power Meter
Displays the forward and
reflected power calculated by the
microprocessor
SWR Meter
Displays the SWR
calculated by the
microprocessor
LCD Display (3 Modes)
2. Forward power, reflected
power, and SWR numerical
readings
3. SWR numerical reading and bar
graph
4. Forward power and reflected
power numerical values and
bar graph
Forward/Reflected Switch
Switches the power meter
between forward and reflective
power readings
Mode Switch
Switches the
LCD between
the three
modes
Sensor Switch
Switches
between the
two sensor
input ports
Lamp Switch
Activates the
power and
SWR meter
lamps
5. Hardware Design: Directional CouplerHardware Design: Directional Coupler
Description and ConstraintsDescription and Constraints
Connects in-line between the radio and theConnects in-line between the radio and the
antennaantenna
Samples forward and reflected powerSamples forward and reflected power
Several different designsSeveral different designs
Constraint 1: Must measure forward and reflectedConstraint 1: Must measure forward and reflected
power within 10% of full-scale (SWR also)power within 10% of full-scale (SWR also)
Constraint 2: Must maintain accuracy at allConstraint 2: Must maintain accuracy at all
frequencies between 1.8 MHz and 30 MHzfrequencies between 1.8 MHz and 30 MHz
Constraint 3: Must maintain accuracy at all powerConstraint 3: Must maintain accuracy at all power
levels up to the legal limit (1500W)levels up to the legal limit (1500W)
6. Hardware Design: Directional CouplerHardware Design: Directional Coupler
Choosing the Right DesignChoosing the Right Design
noyesnoThruline Principle
yesnoyesStripline
yesnonoResistive Bridge
yesyesnoReflectometer
Low Cost?
Handles
High Power?
Frequency
Sensitive?
Model
8. Hardware Design: Directional CouplerHardware Design: Directional Coupler
TestingTesting
0
20
40
60
80
100
120
1 2 3 4 5 6 7 8 9
0
0.2
0.4
0.6
0.8
1
1.2
1.4
1.6
FWD
PWR
REF
PWR
SWR
Tested at 9
different bands in
the HF range from
1.8-28.4 MHz
Power values were
within constraints
for all frequencies
at all tested power
levels
SWR values were
accurate for all
power values
9. Hardware Design: Voltage RegulationHardware Design: Voltage Regulation
Description and Design ConstraintsDescription and Design Constraints
Need to regulate 12-18V DC supply to 5V DC forNeed to regulate 12-18V DC supply to 5V DC for
the microprocessor circuit and LCDthe microprocessor circuit and LCD
Constraint 1: Must accept 12-18V DC powerConstraint 1: Must accept 12-18V DC power
source and use less than 1Asource and use less than 1A
Constraint 2: Voltage regulation must be accurateConstraint 2: Voltage regulation must be accurate
within 10% of 5Vwithin 10% of 5V
10. Hardware Design: Voltage RegulationHardware Design: Voltage Regulation
Choice and SchematicChoice and Schematic
78M05 regulator is the best option78M05 regulator is the best option
• Output current in excess of 0.5AOutput current in excess of 0.5A
• Output voltage between 4.75V and 5.25VOutput voltage between 4.75V and 5.25V
• Internal thermal overload protectionInternal thermal overload protection
• Cheap ($.30)Cheap ($.30)
11. Hardware Design: Voltage RegulationHardware Design: Voltage Regulation
TestingTesting
78M05 rated from 7.25-35V78M05 rated from 7.25-35V
Tested from 6-20VTested from 6-20V
Output voltages were wellOutput voltages were well
within tolerances (-1%)within tolerances (-1%)
3.226
4.9120
4.9319
4.9518
4.9617
4.9716
4.9715
4.9814
4.9813
4.9912
4.9911
4.9910
4.999
5.008
4.677
Avg. Output VoltageInput Voltage
0
1
2
3
4
5
6
0 5 10 15 20 25
Input Voltage
OutputVoltage
12. Hardware Design: Cost of PartsHardware Design: Cost of Parts
Description and Design ConstraintDescription and Design Constraint
SWR/Wattmeters typically cost between $30 andSWR/Wattmeters typically cost between $30 and
$300$300
• Projected retail price for our meter: $300Projected retail price for our meter: $300
Typical MFJ retail price: 2X cost of partsTypical MFJ retail price: 2X cost of parts
• Cost of parts should be less than $150 for MFJ to makeCost of parts should be less than $150 for MFJ to make
a profita profit
Constraint: Cost of parts must beConstraint: Cost of parts must be ≤≤ $125$125
• Cost of parts should be ¼ retail price = $75Cost of parts should be ¼ retail price = $75
13. Hardware Design: Cost of PartsHardware Design: Cost of Parts
$2.50$0.505Variable Resistor
$20.00$10.002Board
$2.50$0.505Switch
$10.00$5.002Analog Meter
$6.00$6.001Microprocessor
$15.00$15.001LCD
$10.00$10.001Case
$75.90X1TOTAL COST
$0.15$0.151Processor Socket
$5.00$5.001Speaker
$0.30$0.301Voltage Regulator
$0.10$0.052Ferrite Bead
$0.50$0.501Toroid
$0.80$0.402Variable Capacitor
$0.05$0.015Diode
$2.00$0.1020Capacitor
$1.00$0.0520Resistor
Total Cost
Unit Cost per
thousand
QuantityMaterials
15. Software Design: MicroprocessorSoftware Design: Microprocessor
16C76 Pinout and Usage16C76 Pinout and Usage
• 2 A/D channels used to
measure sampled power
values
• 3 PWM channels used
to control the meters
• 6 pins to control the
LCD
16. Software Design: CodeSoftware Design: Code
Calculations and ControlCalculations and Control
Calculate forward and reflected power using aCalculate forward and reflected power using a
look-up table (LUT).look-up table (LUT).
Calculate SWR using forward and reflected powerCalculate SWR using forward and reflected power
valuesvalues
• Used a LUT to measure square root of powerUsed a LUT to measure square root of power
Control meters using PWM value read from LUTControl meters using PWM value read from LUT
• Calibrated LUT for the meter (non-linear)Calibrated LUT for the meter (non-linear)
Control LCDControl LCD
• Average readings to minimize flickerAverage readings to minimize flicker
• Control LCD modesControl LCD modes
• Convert binary values to ascii numbersConvert binary values to ascii numbers
• Display labels, values, and bar graph on LCDDisplay labels, values, and bar graph on LCD
17. Software Design: CodeSoftware Design: Code
TestingTesting
Tested using a voltageTested using a voltage
source vs. directionalsource vs. directional
couplercoupler
Values were correct forValues were correct for
the LCD and meter,the LCD and meter,
demonstratingdemonstrating
accuracy of the LUT foraccuracy of the LUT for
power measurementpower measurement
and meter controland meter control
Calculated SWR valuesCalculated SWR values
by hand to verify SWRby hand to verify SWR
calculation algorithmcalculation algorithm
109.59.5/0.5
160163163/3.5
260264262/4.5
151616/1.0
333433/1.5
555655/2.0
5.0
4.0
3.0
2.5
0.2
Input
Voltage
310320*320/
200209207/
120122120/
858585/
11.21.2/
Meter
Values
LCD
Values
LUT
Fwd/Ref
18. SummarySummary
Working Features on PrototypeWorking Features on Prototype
• Accurately measures forward power, reflected powerAccurately measures forward power, reflected power
and SWRand SWR
• Correctly displays forward and reflected power on aCorrectly displays forward and reflected power on a
cross-needle metercross-needle meter
• Correctly displays power and SWR measurements to anCorrectly displays power and SWR measurements to an
LCDLCD
Improvements for Packaged ProductImprovements for Packaged Product
• Accurately measure high-power levelsAccurately measure high-power levels
• Implement auto-range functionalityImplement auto-range functionality
• Use separate meters for power and SWRUse separate meters for power and SWR
• Choose and implement SWR alarmChoose and implement SWR alarm
• Move hardware to PCBMove hardware to PCB
• Design aluminum caseDesign aluminum case
19. AcknowledgementsAcknowledgements
We would like to thank the following people forWe would like to thank the following people for
their support:their support:
Mr. Martin F. Jue, President of MFJ EnterprisesMr. Martin F. Jue, President of MFJ Enterprises
Harry Wong, project engineer for MFJ EnterprisesHarry Wong, project engineer for MFJ Enterprises
Dr. J. Patrick Donohoe, faculty advisorDr. J. Patrick Donohoe, faculty advisor
Dr. PiconeDr. Picone
Jordan GoulderJordan Goulder
21. ReferencesReferences
[1] Kelson, Francis, “Calibration and Repair for Bird[1] Kelson, Francis, “Calibration and Repair for Bird
Wattmeter Elements,” Amateur Radio, pp.48, AprilWattmeter Elements,” Amateur Radio, pp.48, April
1980.1980.
[2] McCoy, Lewis G, “Meet the SWR Bridge,” QST, March[2] McCoy, Lewis G, “Meet the SWR Bridge,” QST, March
1955.1955.
[3] Gray, John J, “How to Build a Simple SWR Bridge,” CQ,[3] Gray, John J, “How to Build a Simple SWR Bridge,” CQ,
pp.36-39, Sept. 1987.pp.36-39, Sept. 1987.
[4] Bruene, Warren, “An Inside Picture of Directional[4] Bruene, Warren, “An Inside Picture of Directional
Wattmeters,” QST, pp.24-28, April 1959.Wattmeters,” QST, pp.24-28, April 1959.
[5] Kemper, John Greben, “The Tandem Match - An[5] Kemper, John Greben, “The Tandem Match - An
Accurate Directional Wattmeter,” QST, pp.Accurate Directional Wattmeter,” QST, pp. 18-26, Jan.18-26, Jan.
1987.1987.