This document provides information about color numbers used in the automatic software system for knitting machines. It lists color numbers for various knitting methods like knit, tuck, miss, knit and transfer, etc. and explains the function of each color number. Key points include that color numbers 1-3 are for different types of knitting, numbers 51-52 knit without links process, and numbers 118-119 knit without auto-transfer. Option lines can be used to specify racking, carriage speed and other functions.
![SHIMA SEIKI MFG.,LTD.
AUTOMATIC SOFTWARE SYSTEM
SWG 041
Second edition, May 2006
Shima Seiki maintains a policy of continuous improvement for its products.
Therefore, the content of this manual is subject to change without prior notice
and our obligation.
Contact your Shima Seiki sales representative for the latest information.
No part of this document may be reprinted or reproduced in any form or by any
means without the prior written permission of SHIMA SEIKI.
This edition is intended for version [A]-49 of SDS-ONE Knit Pint.](https://image.slidesharecdn.com/swg041e-130201011505-phpapp02/85/Swg041-2-320.jpg)


![IV. LIST OF OPTION LINE FUNCTION
(Continues from previous page)
0 Normal transfer (hook of needle to hook)
Transfer using slider (color no. of stitch move)
1 Holding the loop on the slider of opposite bed
(color no. of transfer)
3 Return (slider of needle to hook)
31 Front Back, (front body), Back Front
32 Back Front, (back body), Front Back
Front Back, (front body), Back Front/Stitch
51
move code using HD
L13 Transfer / holding Back Front, (back body), Front Back/Stitch
52
move code using HD
Front Back, (front body), Back Front
81
[compulsive transfer]
Back Front, (back body), Front Back
82 [compulsive transfer]
Front Back, (front body), Back Front
91 [compulsive transfer + stitch move w ith HD]
Back Front, (back body), Front Back
92 [compulsive transfer + stitch move w ith HD]
Elastic yarn advancing
L14 1-31 Elastic yarn advancing amount Nos.1-31
amount
L17 Racking adjustment 11, 12 Racking adjustment pages 1 and 2
21](https://image.slidesharecdn.com/swg041e-130201011505-phpapp02/85/Swg041-27-320.jpg)


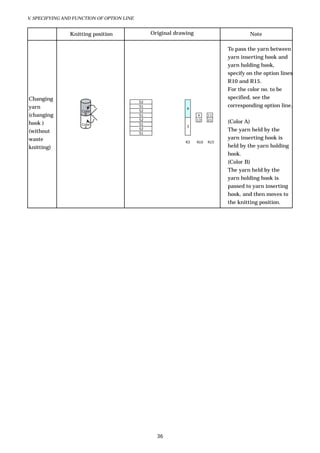
![V. SPECIFYING AND FUNCTION OF OPTION LINE
4) R5: Knit Cancel Command
[Knit cancel command]
C OLOR NO. CONTENTS
1 Knit cancel
Purpose
Specification for omitting a knit process from knit & transfer, knit & stitch move, and knit & cross to
perform only transfer.
Point
- The row with knit cancel command is processed within even no. course.
[Carriage move command]
C OLOR NO. CONTENTS
2 Carriage move
Purpose
Specification for adding an empty traverse. Carriage moves to the opposite side of the machine before
knitting the next course.
Point
- Carriage move command activates before knitting the line in which the command is specified.
- Carriage move command is specified to move the carriage to the opposite side when knit with other
yarn is required but the carriage is on the opposite side.
25](https://image.slidesharecdn.com/swg041e-130201011505-phpapp02/85/Swg041-31-320.jpg)
![V. SPECIFYING AND FUNCTION OF OPTION LINE
[Independent carrier movement]
C OLOR NO. CONTENTS
6 Independent carrier movement right
7 Independent carrier movement left
Point
- Specify on the line only with the color no. 216 or 217.
- Specify the yarn carrier for independent carrier movement on the option line R3.
- Specify the direction of carrier movement regardless of carriage direction.
(Drawing example)
1
3
216 6
1
4
1
216 7
3
1
R3 R5
4 3
Independent carrier
movement 4
3 4
Independent carrier
movement 3
When the carrier moves independently, it moves before the
control block with independent carrier movement
command.
For the details of independent carrier movement, see “Synchronous/Independent Carrier Movement”
described later.
26](https://image.slidesharecdn.com/swg041e-130201011505-phpapp02/85/Swg041-32-320.jpg)


![V. ASSIGNING AND FUNCTION OF OPTION LINE
19) L13: Transfer, Holding Command
C OLOR NO. CONTENTS
0 Normal transfer (hook of needle to hook)
Transfer using slider (color no. of stitch move)
1
Holding the loop on the slider of opposite bed (color no. of transfer)
3 Return (slider of needle to hook)
31 Front Back, (front body), Back Front
32 Back Front, (back body), Front Back
51 Front Back, (front body), Back Front/Stitch move code using HD
52 Back Front, (back body), Front Back/Stitch move code using HD
81 Front Back, (front body), Back Front [compulsive transfer]
82 Back Front, (back body), Front Back [compulsive transfer]
Front Back, (front body), Back Front
91
[compulsive transfer + stitch move with HD]
Back Front, (back body), Front Back
92
[compulsive transfer + stitch move with HD]
Purpose
- Specify the procedure of transfer.
Point
- Order of transfer: left racking with smaller racking has priority.
(L13=1)
- When specifying on the line of stitch move (color nos. 6, 7, 8, 9, etc.), transfer using slider is performed.
- When specifying on the line of transfer (color nos. 20, 21, 30, 31, etc.), loop is kept on the slider on the bed
of the opposite side. (It is called holding.)
(L13=3)
- Activates for the line with color no. of transfer (color nos. 20, 21, 30, 31, etc.). (only for the knit cancel
line)
- If having a loop with holding, knitting cannot be performed to all needles. Slider of the needle with
holding and carrier may interfere. Perform “return (L13=3)” before knit.
(e.g.) To draw the cable pattern for tubular knitting (without color nos. 4 and 5)
51
52
3 35
1 1
1 20 62
51
52
L13 R5 R9
48](https://image.slidesharecdn.com/swg041e-130201011505-phpapp02/85/Swg041-54-320.jpg)


![VII. AUTO PROCESS
VII. AUTO PROCESS
SET
(Gauge)
Selects the gauge pitch to be used for knitting.
(Bed Length)
Selects the bed length to be used for knitting.
7G 10G 15G
40cm (16 inches) 120 needles 160 needles 240 needles
(Type)
This manual is for auto yarn carrier.
(Subroutines [Max. 31])
Specifies the maximum no. of sub routine. (Normal: 31)
(Speed No. of Empty Course)
Specifies the speed no. of course without knit or transfer. (Available data: 0-15)
53](https://image.slidesharecdn.com/swg041e-130201011505-phpapp02/85/Swg041-59-320.jpg)


![VII. AUTO PROCESS
YARN INSERT
[1]
[3] [5] [6] [7] [8]
[2]
[9] [4]
[10]
[1] Hide yarn end for start
Hides the yarn end on the set up part and yarn end after changing the colors.
Yarn end of color B
Color B
Color A
[2] Hide yarn end for end
Hides the yarn end when finishing the knitting specified in a certain course.
Color B
Color A Yarn end of color A
[3] Draws the color no. to be knitted before “Hide yarn end for start.”
Color nos. cannot be specified for the frame of 10. Only inserting is processed.
Knitting before inserting yarn end can be drawn for the frame of 11-19.
In the above example, 10 and 11 are the same. Set as shown above to change the value for Course
(marked with [6]) without drawing for knitting.
58](https://image.slidesharecdn.com/swg041e-130201011505-phpapp02/85/Swg041-64-320.jpg)
![VII. AUTO PROCESS
[4] Draws the color no. to be knitted before “Hide yarn end for end.”
Color nos. cannot be specified for the frame of 20. Only inserting is processed.
To make the other color nos. same as 20, draw the color no. 16 (color no. 0) for the frame of [4].
Knitting before inserting yarn end can be drawn for the frame of 21-29.
Auto output only for pattern data
52 21 Process is specified immediately above the
51 line of option line R15.
52
51
R15
(e.g.)
21 11 16 12
No specification
(Right-going course) 11 16 12 Data is converted to
21 necessary pattern
code for pattern
data.
After process
(Original draw ing) R15 (Pattern data)
(Left-going course) 11 16 12
21
After process
(Original draw ing) R15 (Pattern data)
[5] Stitch No.
Specify the stitch no. for knitting.
(NOTE)
When using the yarn inserting hook, make sure to set 0 for stitch value of Stitch no. 50.
On the part drawing tuck with [3] or [4], however, knitting can be performed with other stitch values.
In this case, specify other value and input the stitch value on the knitting machine.
59](https://image.slidesharecdn.com/swg041e-130201011505-phpapp02/85/Swg041-65-320.jpg)
![VII. AUTO PROCESS
[6] Specify how many courses after the line with R15=10 to insert the yarn end. You can specify the for
starting yarn inserting.
(To change “Course” for each knitting part)
Course
Inserting to 8th course
10 8
(R15=10)
Course 4
Inserting to 4th course 11
(R15=11) (No specification)
When drawing the color no. to knit with [3], you cannot specify in the course to be inserted.
(NOTE)
You cannot specify the next yarn holding hook command (R15) in the line specified here + 2 courses.
You cannot specify on this line. Specify
on another line or change to "Course" 4.
8 21
7
6 (In case of "Course" 6)
Next yarn holding hook
5
command (R15) is not
4 available in this range.
3
2
1
10
R15
60](https://image.slidesharecdn.com/swg041e-130201011505-phpapp02/85/Swg041-66-320.jpg)
![VII. AUTO PROCESS
[7] Type
Normal Hides the yarn end in the fabric.
Outside Makes the yarn end out of the fabric.
Hold down Hides the yarn end in the fabric.
Ensures to hides the yarn end in the fabric comparing to Normal.
51
(B) 52
(A) 51
52
51
52
52
3 10
R15
When setting “6” for “Course” to insert the yarn end, yarn end is inserted with line (B). Knitting to hide
the yarn end in the fabric is automatically performed with the lines (A) and (B).
* 52 (B)
16 (B)
Holds down the
)
52 (B)
yarn end with
51 (A)
prolongation
before inserting.
Kick back is processed on the line
(B) in case of auto process. (Internal
process)
61](https://image.slidesharecdn.com/swg041e-130201011505-phpapp02/85/Swg041-67-320.jpg)
![VII. AUTO PROCESS
[8] Air
Air is blown not to raise the yarn end when inserting the yarn. (only for hold down type)
[9] Auto
With check mark here, only the needles holding the loop are automatically selected to perform the
knitting for the specified insertion.
You can use for the pattern with all needle pattern and 1x1 pattern with the same specification.
[10] Reverse
With check mark here, knitting specified in “Hide edge yarn for start” and “Hide edge yarn for end” is
performed in consideration of carriage direction. With only one setting, edge yarn process for left-going
and right-going is automatically performed.
Hide edge yarn for start
4
4
(Original drawing)
3
3
R3 R15 R3 R15
Reverse
(Edge yarn setting) A B C D …
Reverse
Reverse (No check mark)
(Process image) A B C D
D C B A A B C D
Hide edge yarn for end
4
(Original drawing) 4
3
3
R3 R15 R3 R15
Reverse
(Edge yarn setting) A B C D …
Reverse
Reverse (No check mark)
(Process image) A B C D
D C B A A B C D
[11] Deletes the color no. drawn for [3] and [4] with check mark here.
62](https://image.slidesharecdn.com/swg041e-130201011505-phpapp02/85/Swg041-68-320.jpg)


