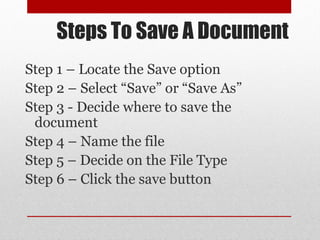
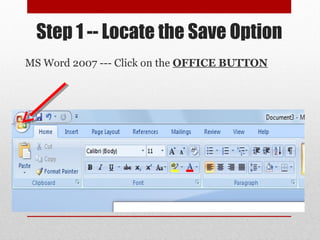
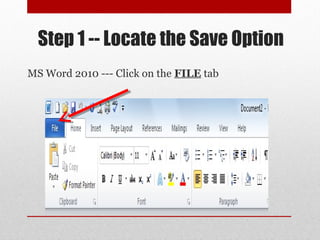
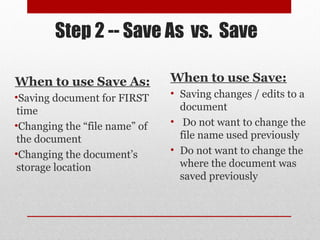
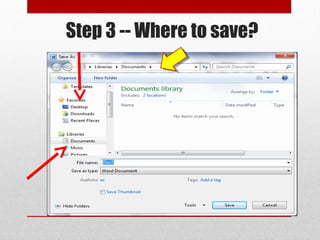
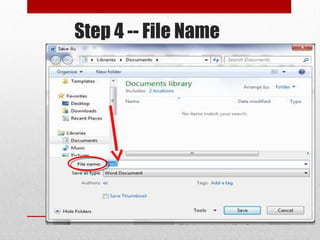
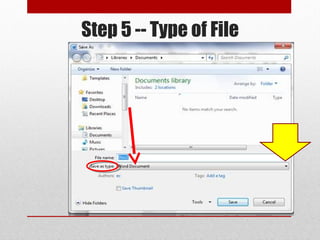
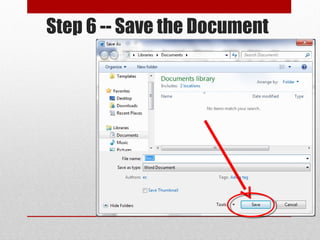
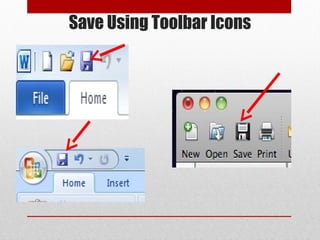
The document provides instructions for saving a document in 6 steps: locate the Save option, select either Save or Save As, choose a location to save, name the file, select a file type, and click the Save button. It explains the differences between Save and Save As and recommends using Save As for a first save or changing file attributes, and Save for subsequent saves without changes. Screenshots demonstrate the steps in Word 2007, 2010, Notepad, and Wordpad.
Introduction to Computer Hardware
Case
Power switch
Reset switch
Hard drive
Floppy
CD/DVD
Zip drive
Serial ports
Parallel port
USB port
Keyboard/mouse
Network card
Modem
Sound card
Video card
RAM
Motherboard
Bus
Fan
Cables
Learn to identify parts of a computer, hardware and software, operate the mouse and keyboard and become familiar with the MS Windows X/P Operating System.
1. How to Save A Document
Operating System – Windows 7
Word Processing Applications– 2007 /
2010
2. Steps To Save A Document
Step 1 – Locate the Save option
Step 2 – Select “Save” or “Save As”
Step 3 - Decide where to save the
document
Step 4 – Name the file
Step 5 – Decide on the File Type
Step 6 – Click the save button
3. Step 1 -- Locate the Save Option
MS Word 2007 --- Click on the OFFICE BUTTON
4. Step 1 -- Locate the Save Option
MS Word 2010 --- Click on the FILE tab
5. Step 1 -- Locate the Save Option
Notepad --- Click
on FILE on the
Menu Bar
Wordpad 2010
Click on BLUE tab
6. Step 2 -- Save As vs. Save
When to use Save As: When to use Save:
•Saving document for FIRST • Saving changes / edits to a
time document
•Changing the “file name” of • Do not want to change the
the document file name used previously
•Changing the document’s • Do not want to change the
storage location where the document was
saved previously
How to Save a document. This tutorial will teach you how to save a document created in M.S. Word 2007, M.S. word 2010, Wordpad and Notepad. The operating system is Windows 7.
There are 6 easy steps to saving a document Step 1 – Locate the Save option. The location will depend on what software version you are using. Step 2 – Select “Save” or “Save As”. Step 3 - Decide where you want to save the document Step 4 – Give the file a name that describes the document Step 5 – Decide on the File Type. The default file type is usually okay. Step 6 – Click on the save button
The save option in Microsoft Word 2007 is find by clicking on the Office Button as depicted on this slide.
The location of the save option will vary depending on the software application used. Microsoft Word 2010 the user will click on the blue tab labeled File.
Notepad and Wordpad prior to 2010 have menus where you will click on the word File to see the Save option. Wordpad 2010 will have a blue tab that you will click on to view your save options.
The “Save As” dialog box will appear for a first time save when you select SAVE or SAVE
Decide where to save the document by clicking on the location of your choice in the right panel. Once you make the select the location should appear on the directory bar annotated by the yellow arrow.
Once the creator decides where to save the file , the file will need to be given a unique name.
The file save as type default setting is normally the software application that was used to create the document. The user can change from the default setting by clicking on the black arrow and choosing from the dropdown list. The most common selection from this list is PDF.
To finalize the saving process the creator will click the SAVE button. Once this has been done the Save As dialog box will close and the user will be returned to the document that was created and saved. The creator will know that the document has been saved because it will now have the FILE NAME on the bar at the top of the document.
This video will show the saving process from the beginning to the end.
This slide shows other ways to save a document by using the save icon that maybe placed on a toolbar at the top of the document. The save icon when selected for a document that has been saved previously the icon will function as the SAVE AS option; if the icon is selected for a document that has not been saved previously then the icon will function as the SAVE option.