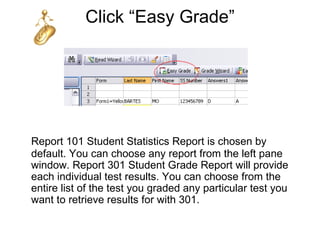
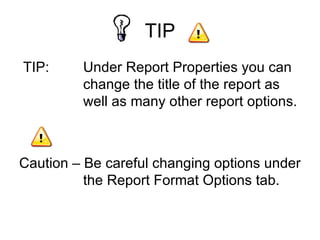
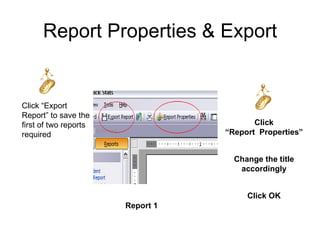
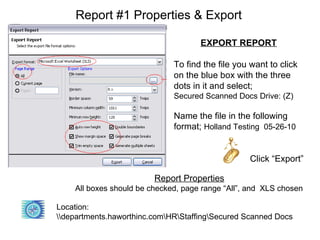
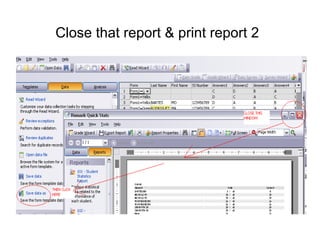
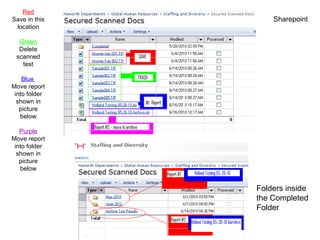
Remark Office OMR
    Steps to grade the
    Math & Reading test

  Scan Test ~ Read Data ~
Export Data ~ Manage Data ~
Scan the documents
      To scan the hard copy of the test follow this procedure
• Place hard copies in the tray face up & in the same direction
• Select “email”
• Select “To”
• Type the letter “S”
• Select “Change Address book”
• Select “Add” & “Enter”
• Staffing Secure Scan should appear & be highlighted
• Select “Done”
• Select “Options”
• Select “file format”
• Choose “Tiff”
• Click “Save”
• Then begin your scanning by clicking “Copy”
*See note
**See note
Choose Template
 Open the “Data Center”
            Start ~ All Programs
              Remark Office OMR 07
               Remark Office OMR Data Center


Open the form template
Choose the template that has already been created
                          <<Math-Reading score sheet.omr>>


It may be present in the “open” task pane
or you may need to retrieve it from
its original location


                    Click on “Browse” to find the location


           Location:   C:Documents and SettingsUser*DesktopHR DeptOriginals
                                 OR      Location: departments.haworthinc.comHR

   StaffingSecured Scanned Docs
Read Data
Click on “Read Wizard”

The Read Method window should have the following buttons selected;
       To choose directly from “Secured Scanned Docs” on Sharepoint

       1. Read from image files & server mode


                                                            Click “Next”
On the Image Filters & Directories Selection
                      screen select

In the left pane you                                        Select “Tiff” in the right pane
should choose
where it is you
want to retrieve
your file from.

To find the drive
that Secured Docs”
is locate on select
“Add Directory”.
Then select “My
Computer”. And
choose the “Z”
     drive & click
     “OK”


                                                                         Click NEXT
Now you should see the “Z” drive in the left pane window.
TIP
Tip: If there is another location in this window, you
     will want to select it and remove it by clicking
     on “Delete Directory”

Tip: If you choose “Read” instead of “Next” it will bypass the next
     screen and go directly to reading the images in secured scanned
     docs folder.

     If you choose “Next” you will have the choice to select/unselect
   the
     button for “Activate review exceptions”.

   This is a step that is chosen based on your preferences. If selected, you will be
   shown each exception as it occurs in the reading mode. So you will be able to verify
   the answers as it grades each answer for each test. If unselected, you will not be
   given this option until after all test are read.
Click “Read”

Next you will see it working by the green bar
going side to side in the bottom right corner. It will
automatically continue searching until you select the
“End server mode” button located at the top middle
indicated by the button in “red”.


You will not be able to do anything in the software
until you have selected to end server mode.

Now you should see all tests that you have scanned
along with the two test answer keys that reside in
the secured docs folder.
TIP
TIP: Compare the number of test to ensure all are
  accounted for. In other words if you had 15 test
  scanned make sure you have those 15 and the 2
  answer keys for a total of 17.


   You need to fix all exceptions
    before you export the data.
TIP
                              TIP:
Before starting be sure that you have the two answer keys in rows 1
& 2. You can use the usual commands as you would in a word
processor.


                         Caution:
You need to have the same number of empty rows/columns
available in order to paste into those rows/columns. In other words if
you want to take 2 rows from the bottom of the list and place them to
be the first 2 rows, you need to “insert row” twice and then paste
those two rows into the new inserted rows. See examples to follow.
Moving a Row
1. Select cell & right click                         2. Insert row twice


3. Select rows to move & right click & cut   4. Select first cell & right click & paste
Check all exceptions
You will want to visually look at the form in
the bottom right window pane for every
exception and select the answer that
applies.
            Exceptions
         Blank = zero points
         Multi = zero points
         A, B, C, D = 1 point
Export Data
Click “Easy Grade”


Report 101 Student Statistics Report is chosen by
default. You can choose any report from the left pane
window. Report 301 Student Grade Report will provide
each individual test results. You can choose from the
entire list of the test you graded any particular test you
want to retrieve results for with 301.
TIP
TIP:     Under Report Properties you can
         change the title of the report as
         well as many other report options.


Caution – Be careful changing options under
          the Report Format Options tab.
Report Properties & Export


Click “Export
Report” to save the
first of two reports                     Click
required                          “Report Properties”


                                    Change the title
                                     accordingly


                                       Click OK
                       Report 1
Report #1 Properties & Export

                                     EXPORT REPORT

                              To find the file you want to click
                              on the blue box with the three
                              dots in it and select;
                              Secured Scanned Docs Drive: (Z)

                              Name the file in the following
                              format; Holland Testing 05-26-10


                                                  Click “Export”

                         Report Properties
    All boxes should be checked, page range “All”, and XLS chosen

Location:
departments.haworthinc.comHRStaffingSecured Scanned Docs
Close that report & print report 2
TIP
• TIP: Be sure to use 2 digits in each part of
  the date

• TIP: You can also copy & paste the
  location into the file name box which is to
  the left of the box with three dots in it. It is
  grey but is an interactive field.
Report # 2
Click “Save data as” in the left window
pane to save the second of the two
reports
     Look in: Secured Scanned Docs drive: (Z)
          Completed folder
                    Archive Test Results Folder

 Name the file with the following format
             Holland Testing 05-26-10 Archive
Close or minimize Remark Office

                   TIP:
If you minimize the window for now, that
information will be readily available to you
if you need to run the report again. An
example might be that you missed a
correction of an exception or you want to
change the date or title of the report.
Manage Data
Retrieve the results ~ Maintenance
Retrieve the results
Open Report #1
  Open the file saved on Secured
Scanned Docs as in this example
     Holland Testing 05-26-10.xls


                  Location:
  departments.haworthinc.comHRStaffingSecured Scanned Docs
Candidate Results
Enter data into Successfactors
     Locate each candidate in Successfactors
     Enter the number correct into the appropriate field

Protect the xls sheet
  Click on Tools
      » Protect Sheet
      » Check mark the following;

     »      Protect worksheet and contents of locked cells
     »      Select locked cells
     »      Select unlocked cells
Save & Close
Save the file inside the appropriate folder (month and
date) located inside the folder labeled “Completed” in
Secured Scanned Docs in Sharepoint


                     Save & Close
Maintenance
Clean Up
Open the Secured Scanned Docs folder in
 Sharepoint

Location:
 departments.haworthinc.comHRStaffingSecure
 d Scanned Docs

TIP: You may want to open this page in Windows
     Explorer view to be able to move items easily.
     This is an option under the “Actions” tab.
      * See note
Remove the trash &
                 Move the last file
Select all the docs that you just finished grading & delete
them. These would be the individual test that you scanned.
* See note

Select the xls file that you created as Report #2 as
in; Holland Testing 05-26-10 Archive * See note

Move this to the Archive Test Results folder located
inside the “Completed” folder * See note

TIP: Be sure to not select the 2 answer keys, Completed folder
             or any that you do not recognize
Red
Save in this       Sharepoint
 location

  Green
  Delete
 scanned
   test

    Blue
Move report
 into folder
  shown in
   picture
   below

   Purple
Move report
 into folder
  shown in
   picture
   below


               Folders inside
               the Completed
               Folder
You’ve crossed the finish line!

Remark office OMR

  • 1.
    Remark Office OMR Steps to grade the Math & Reading test Scan Test ~ Read Data ~ Export Data ~ Manage Data ~
  • 2.
    Scan the documents To scan the hard copy of the test follow this procedure • Place hard copies in the tray face up & in the same direction • Select “email” • Select “To” • Type the letter “S” • Select “Change Address book” • Select “Add” & “Enter” • Staffing Secure Scan should appear & be highlighted • Select “Done” • Select “Options” • Select “file format” • Choose “Tiff” • Click “Save” • Then begin your scanning by clicking “Copy” *See note **See note
  • 3.
    Choose Template Openthe “Data Center” Start ~ All Programs Remark Office OMR 07 Remark Office OMR Data Center Open the form template
  • 4.
    Choose the templatethat has already been created <<Math-Reading score sheet.omr>> It may be present in the “open” task pane or you may need to retrieve it from its original location Click on “Browse” to find the location Location: C:Documents and SettingsUser*DesktopHR DeptOriginals OR Location: departments.haworthinc.comHR StaffingSecured Scanned Docs
  • 5.
  • 6.
    Click on “ReadWizard” The Read Method window should have the following buttons selected; To choose directly from “Secured Scanned Docs” on Sharepoint 1. Read from image files & server mode Click “Next”
  • 7.
    On the ImageFilters & Directories Selection screen select In the left pane you Select “Tiff” in the right pane should choose where it is you want to retrieve your file from. To find the drive that Secured Docs” is locate on select “Add Directory”. Then select “My Computer”. And choose the “Z” drive & click “OK” Click NEXT Now you should see the “Z” drive in the left pane window.
  • 8.
    TIP Tip: If thereis another location in this window, you will want to select it and remove it by clicking on “Delete Directory” Tip: If you choose “Read” instead of “Next” it will bypass the next screen and go directly to reading the images in secured scanned docs folder. If you choose “Next” you will have the choice to select/unselect the button for “Activate review exceptions”. This is a step that is chosen based on your preferences. If selected, you will be shown each exception as it occurs in the reading mode. So you will be able to verify the answers as it grades each answer for each test. If unselected, you will not be given this option until after all test are read.
  • 9.
    Click “Read” Next youwill see it working by the green bar going side to side in the bottom right corner. It will automatically continue searching until you select the “End server mode” button located at the top middle indicated by the button in “red”. You will not be able to do anything in the software until you have selected to end server mode. Now you should see all tests that you have scanned along with the two test answer keys that reside in the secured docs folder.
  • 10.
    TIP TIP: Compare thenumber of test to ensure all are accounted for. In other words if you had 15 test scanned make sure you have those 15 and the 2 answer keys for a total of 17. You need to fix all exceptions before you export the data.
  • 11.
    TIP TIP: Before starting be sure that you have the two answer keys in rows 1 & 2. You can use the usual commands as you would in a word processor. Caution: You need to have the same number of empty rows/columns available in order to paste into those rows/columns. In other words if you want to take 2 rows from the bottom of the list and place them to be the first 2 rows, you need to “insert row” twice and then paste those two rows into the new inserted rows. See examples to follow.
  • 12.
    Moving a Row 1.Select cell & right click 2. Insert row twice 3. Select rows to move & right click & cut 4. Select first cell & right click & paste
  • 13.
    Check all exceptions Youwill want to visually look at the form in the bottom right window pane for every exception and select the answer that applies. Exceptions Blank = zero points Multi = zero points A, B, C, D = 1 point
  • 14.
  • 15.
    Click “Easy Grade” Report101 Student Statistics Report is chosen by default. You can choose any report from the left pane window. Report 301 Student Grade Report will provide each individual test results. You can choose from the entire list of the test you graded any particular test you want to retrieve results for with 301.
  • 16.
    TIP TIP: Under Report Properties you can change the title of the report as well as many other report options. Caution – Be careful changing options under the Report Format Options tab.
  • 17.
    Report Properties &Export Click “Export Report” to save the first of two reports Click required “Report Properties” Change the title accordingly Click OK Report 1
  • 18.
    Report #1 Properties& Export EXPORT REPORT To find the file you want to click on the blue box with the three dots in it and select; Secured Scanned Docs Drive: (Z) Name the file in the following format; Holland Testing 05-26-10 Click “Export” Report Properties All boxes should be checked, page range “All”, and XLS chosen Location: departments.haworthinc.comHRStaffingSecured Scanned Docs
  • 19.
    Close that report& print report 2
  • 20.
    TIP • TIP: Besure to use 2 digits in each part of the date • TIP: You can also copy & paste the location into the file name box which is to the left of the box with three dots in it. It is grey but is an interactive field.
  • 21.
    Report # 2 Click“Save data as” in the left window pane to save the second of the two reports Look in: Secured Scanned Docs drive: (Z) Completed folder Archive Test Results Folder Name the file with the following format Holland Testing 05-26-10 Archive
  • 22.
    Close or minimizeRemark Office TIP: If you minimize the window for now, that information will be readily available to you if you need to run the report again. An example might be that you missed a correction of an exception or you want to change the date or title of the report.
  • 23.
    Manage Data Retrieve theresults ~ Maintenance
  • 24.
  • 25.
    Open Report #1 Open the file saved on Secured Scanned Docs as in this example Holland Testing 05-26-10.xls Location: departments.haworthinc.comHRStaffingSecured Scanned Docs
  • 26.
    Candidate Results Enter datainto Successfactors Locate each candidate in Successfactors Enter the number correct into the appropriate field Protect the xls sheet Click on Tools » Protect Sheet » Check mark the following; » Protect worksheet and contents of locked cells » Select locked cells » Select unlocked cells
  • 27.
    Save & Close Savethe file inside the appropriate folder (month and date) located inside the folder labeled “Completed” in Secured Scanned Docs in Sharepoint Save & Close
  • 28.
  • 29.
    Clean Up Open theSecured Scanned Docs folder in Sharepoint Location: departments.haworthinc.comHRStaffingSecure d Scanned Docs TIP: You may want to open this page in Windows Explorer view to be able to move items easily. This is an option under the “Actions” tab. * See note
  • 30.
    Remove the trash& Move the last file Select all the docs that you just finished grading & delete them. These would be the individual test that you scanned. * See note Select the xls file that you created as Report #2 as in; Holland Testing 05-26-10 Archive * See note Move this to the Archive Test Results folder located inside the “Completed” folder * See note TIP: Be sure to not select the 2 answer keys, Completed folder or any that you do not recognize
  • 31.
    Red Save in this Sharepoint location Green Delete scanned test Blue Move report into folder shown in picture below Purple Move report into folder shown in picture below Folders inside the Completed Folder
  • 32.

Editor's Notes

  • #3 *When the documents are scanned they will automatically be placed into Sharepoint in the Secured Scanned Docs folder. There is nothing else that you are required to do to access them. ** Everytime you press the “Start” button you are creating a new file
  • #4 6/15/2010 Jacque Stojanovich x 3191 The Remark Office OMR software is only on one laptop computer (zero desktops) and that is laptop #029548. This laptop is assigned to Amy McCarty x 3599.
  • #30 * To open the folder in Windows Explorer 1. On the drop down menu for “Actions” select “Open in Windows Explorer” 2. You can change the view by selecting “View” at the top of the screen
  • #31 *View of site page on next screen