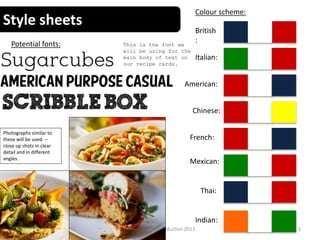
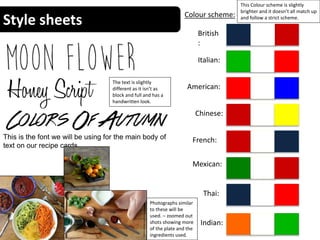
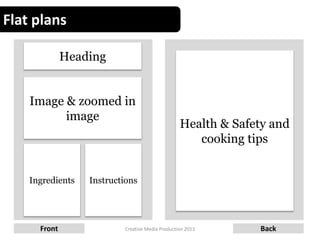
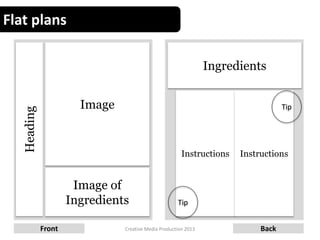
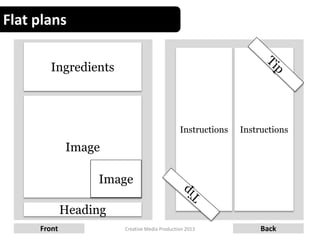
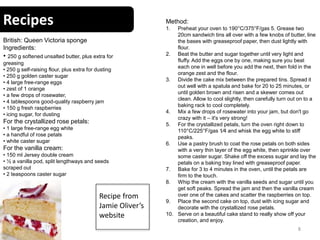
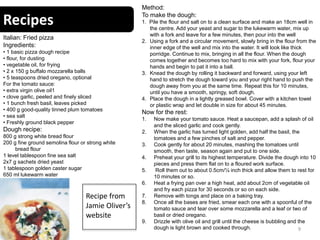
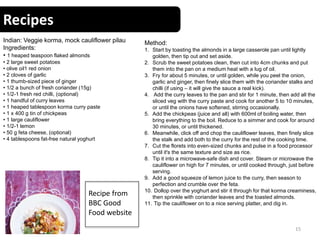
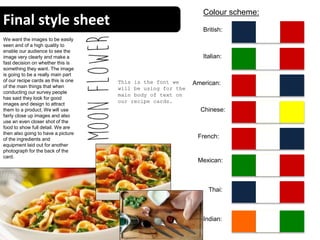
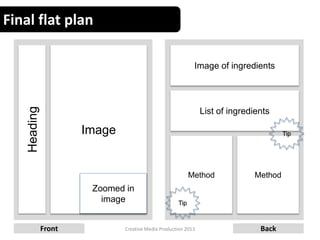
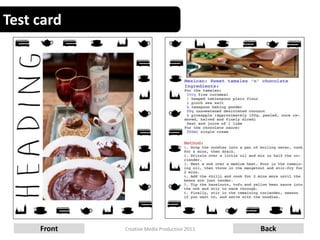
These recipes will have you baking your own donuts right from your own home! In honor of National Donut Day, enjoy these treats and enjoy this terrific day!
Bread is a staple eaten all over the world and comes in many forms. In Brazil, it is commonly eaten in a cheese bun called Pao de Queijo. The French-speaking Canadian province of Quebec enjoys it as a plain white loaf, while India prefers baked flat bread. Different types of bread are crafted with different recipes.
No-knead bread is a simple recipe widely appreciated by cooks because of its delicate, crispy crust and soft, tart interior. It is relatively easy to bake at home, and it requires no stand mixer, no unique skills, and no kneading of dough.
To begin making no-knead bread, the baker should mix the dough in a bowl into a rough, wet ball before covering it and leaving it overnight to rise in a warm environment. After the dough has been given time to rise, bake it in a dutch oven for 30 minutes uncovered and 15 minutes covered. This last step keeps the heat in a tight space, ensuring the steam creates the beloved crispy crust.
Top 10 Paleo Dessert Recipes To Indulge In
You won't have to sacrifice your Paleo lifestyle just to eat your favorite dessert. Enjoy 10 awesome Paleo Dessert Recipes you can definitely indulge in. They're low in carb and healthy too. And lastly, these recipes won't sabotage your diet!
Here are just a few Paleo recipes included:
Blueberry Upside-Down Paleo Cake
Paleo Mini Apple Pie Cupcakes
Paleo Banana Nut Chocolate Chip Muffins
and a lot more!
#desserts #recipes #paleo #lowcarb #diet
Sign Up for Free Weight Loss Starter Kit: http://goo.gl/VZxIOs
Consider incorporating delicious recipes like toffee caramel apple dip, bacon-wrapped apricots, caramel apple cheesecakes, and sweet potato crostini into your holiday party. Bon appetit!
Print-your-own UX activity recipe cards. The set includes:
- Opportunity Statement
- Persona 4x4
- Six-Up
- Project Brief
- Customer Conversations
- Wireframe Walkthrough
Instructions: Print two sided on 8x5"x11" card stock. Cut in four pieces. Produces two sets of six cards. Keep one, share one with a friend!
You can find template worksheets for the opportunity statement and persona 4x4 at bit.ly/uxl-worksheets
These materials are part of the "The Collaborative UX Designer's Toolkit" workshop presented at UX London, May 30 2014.
http://2014.uxlondon.com/speakers/lane/#workshop
The undisputed taste of homemade carrot cake 25 carrot cake recipesRyaaaDina
You have probably tried out carrot cake, so you can testify to the exquisiteness that is imbued in it. But chances are that you have never made it at home all by yourself. If you have, there is no harm in trying out some additional recipes, and there are varieties to choose from in this book.
This book packs 25 homemade carrot cakes in its pages. With these recipes and the accompanying instructions, you will make nothing but amazing carrot cakes with minimal effort. Your experience does not matter, not at all. Just get this book, and let us get started!
Recipes of the 10 traditional dishes from Lithuania.
Made by Akniste Secondary school students Form 6.
eTwinning project "My and Your country traditional dishes"
2016/2017
Comenius UE-g(old)en future 2012-2014, 4th reunion - Greek traditional recipesStamatachi Anca
Multilateral Comenius Project ”The fairytale of the European G(old)en future” 2012-2014
Presentation of traditional recipes that meets the criteria of a healthy life.
This project has been funded with support from the European Commission.
This publication reflects the views only of the author, and the Commission cannot be held responsible for any use which may be made of the information contained therein.
Have you ever tried sweet candied smoked paprika cherry berries, cranberry orange Christmas ham, or pumpkin chocolate chip cookies? Enjoy all of these festive recipes from our Home for the Holidays Handbook, plus more this holiday with your family and friends!
Download for FREE 100+ Classic French Recipes e-book!
French cuisine at its finest!
Recipes ranges from sweet + savory crepes, delicious stews, fresh seafood and all the amazing dishes we enjoy today.
How to Split Bills in the Odoo 17 POS ModuleCeline George
Bills have a main role in point of sale procedure. It will help to track sales, handling payments and giving receipts to customers. Bill splitting also has an important role in POS. For example, If some friends come together for dinner and if they want to divide the bill then it is possible by POS bill splitting. This slide will show how to split bills in odoo 17 POS.
Welcome to TechSoup New Member Orientation and Q&A (May 2024).pdfTechSoup
In this webinar you will learn how your organization can access TechSoup's wide variety of product discount and donation programs. From hardware to software, we'll give you a tour of the tools available to help your nonprofit with productivity, collaboration, financial management, donor tracking, security, and more.
The Art Pastor's Guide to Sabbath | Steve ThomasonSteve Thomason
What is the purpose of the Sabbath Law in the Torah. It is interesting to compare how the context of the law shifts from Exodus to Deuteronomy. Who gets to rest, and why?
Instructions for Submissions thorugh G- Classroom.pptxJheel Barad
This presentation provides a briefing on how to upload submissions and documents in Google Classroom. It was prepared as part of an orientation for new Sainik School in-service teacher trainees. As a training officer, my goal is to ensure that you are comfortable and proficient with this essential tool for managing assignments and fostering student engagement.
Model Attribute Check Company Auto PropertyCeline George
In Odoo, the multi-company feature allows you to manage multiple companies within a single Odoo database instance. Each company can have its own configurations while still sharing common resources such as products, customers, and suppliers.
This is a presentation by Dada Robert in a Your Skill Boost masterclass organised by the Excellence Foundation for South Sudan (EFSS) on Saturday, the 25th and Sunday, the 26th of May 2024.
He discussed the concept of quality improvement, emphasizing its applicability to various aspects of life, including personal, project, and program improvements. He defined quality as doing the right thing at the right time in the right way to achieve the best possible results and discussed the concept of the "gap" between what we know and what we do, and how this gap represents the areas we need to improve. He explained the scientific approach to quality improvement, which involves systematic performance analysis, testing and learning, and implementing change ideas. He also highlighted the importance of client focus and a team approach to quality improvement.
The French Revolution, which began in 1789, was a period of radical social and political upheaval in France. It marked the decline of absolute monarchies, the rise of secular and democratic republics, and the eventual rise of Napoleon Bonaparte. This revolutionary period is crucial in understanding the transition from feudalism to modernity in Europe.
For more information, visit-www.vavaclasses.com
Read| The latest issue of The Challenger is here! We are thrilled to announce that our school paper has qualified for the NATIONAL SCHOOLS PRESS CONFERENCE (NSPC) 2024. Thank you for your unwavering support and trust. Dive into the stories that made us stand out!
The Roman Empire A Historical Colossus.pdfkaushalkr1407
The Roman Empire, a vast and enduring power, stands as one of history's most remarkable civilizations, leaving an indelible imprint on the world. It emerged from the Roman Republic, transitioning into an imperial powerhouse under the leadership of Augustus Caesar in 27 BCE. This transformation marked the beginning of an era defined by unprecedented territorial expansion, architectural marvels, and profound cultural influence.
The empire's roots lie in the city of Rome, founded, according to legend, by Romulus in 753 BCE. Over centuries, Rome evolved from a small settlement to a formidable republic, characterized by a complex political system with elected officials and checks on power. However, internal strife, class conflicts, and military ambitions paved the way for the end of the Republic. Julius Caesar’s dictatorship and subsequent assassination in 44 BCE created a power vacuum, leading to a civil war. Octavian, later Augustus, emerged victorious, heralding the Roman Empire’s birth.
Under Augustus, the empire experienced the Pax Romana, a 200-year period of relative peace and stability. Augustus reformed the military, established efficient administrative systems, and initiated grand construction projects. The empire's borders expanded, encompassing territories from Britain to Egypt and from Spain to the Euphrates. Roman legions, renowned for their discipline and engineering prowess, secured and maintained these vast territories, building roads, fortifications, and cities that facilitated control and integration.
The Roman Empire’s society was hierarchical, with a rigid class system. At the top were the patricians, wealthy elites who held significant political power. Below them were the plebeians, free citizens with limited political influence, and the vast numbers of slaves who formed the backbone of the economy. The family unit was central, governed by the paterfamilias, the male head who held absolute authority.
Culturally, the Romans were eclectic, absorbing and adapting elements from the civilizations they encountered, particularly the Greeks. Roman art, literature, and philosophy reflected this synthesis, creating a rich cultural tapestry. Latin, the Roman language, became the lingua franca of the Western world, influencing numerous modern languages.
Roman architecture and engineering achievements were monumental. They perfected the arch, vault, and dome, constructing enduring structures like the Colosseum, Pantheon, and aqueducts. These engineering marvels not only showcased Roman ingenuity but also served practical purposes, from public entertainment to water supply.
Operation “Blue Star” is the only event in the history of Independent India where the state went into war with its own people. Even after about 40 years it is not clear if it was culmination of states anger over people of the region, a political game of power or start of dictatorial chapter in the democratic setup.
The people of Punjab felt alienated from main stream due to denial of their just demands during a long democratic struggle since independence. As it happen all over the word, it led to militant struggle with great loss of lives of military, police and civilian personnel. Killing of Indira Gandhi and massacre of innocent Sikhs in Delhi and other India cities was also associated with this movement.
2. Style sheets
2Creative Media Production 2013
Colour scheme:
British
:
Italian:
Chinese:
American:
Indian:
Mexican:
Thai:
French:
Potential fonts: This is the font we
will be using for the
main body of text on
our recipe cards.
Photographs similar to
these will be used. –
close up shots in clear
detail and in different
angles.
3. Style sheets Colour scheme:
British
:
Italian:
Chinese:
American:
Indian:
Mexican:
Thai:
French:
This Colour scheme is slightly
brighter and it doesn’t all match up
and follow a strict scheme.
This is the font we will be using for the main body of
text on our recipe cards.
The text is slightly
different as it isn’t as
block and full and has a
handwritten look.
Photographs similar
to these will be
used. – zoomed out
shots showing more
of the plate and the
ingredients used.
4. Style sheets Colour scheme:
British
:
Italian:
Chinese:
American:
Indian:
Mexican:
Thai:
French:
This text is much
thinner than the rest
which gives it a
slightly more modern
look.
This is the font we will be using for the main body
of text on our recipe cards.
Photographs similar to these
will be used. – zoomed out
shots and also zoomed in, to
show the food in more detail.
5. Flat plans
5Creative Media Production 2013Front Back
Heading
Health & Safety and
cooking tips
Image & zoomed in
image
Ingredients Instructions
6. Flat plans
6Creative Media Production 2013Front Back
Heading
Image
Ingredients
Instructions Instructions
Tip
Tip
Image of
Ingredients
7. Flat plans
7Creative Media Production 2013Front Back
Heading
Ingredients
Image
Image
Instructions Instructions
8. Recipes
8
British: Queen Victoria sponge
Ingredients:
• 250 g softened unsalted butter, plus extra for
greasing
• 250 g self-raising flour, plus extra for dusting
• 250 g golden caster sugar
• 4 large free-range eggs
• zest of 1 orange
• a few drops of rosewater,
• 4 tablespoons good-quality raspberry jam
• 150 g fresh raspberries
• icing sugar, for dusting
For the crystallized rose petals:
• 1 large free-range egg white
• a handful of rose petals
• white caster sugar
For the vanilla cream:
• 150 ml Jersey double cream
• ½ a vanilla pod, split lengthways and seeds
scraped out
• 2 teaspoons caster sugar
Method:
1. Preheat your oven to 190°C/375°F/gas 5. Grease two
20cm sandwich tins all over with a few knobs of butter, line
the bases with greaseproof paper, then dust lightly with
flour.
2. Beat the butter and sugar together until very light and
fluffy. Add the eggs one by one, making sure you beat
each one in well before you add the next, then fold in the
orange zest and the flour.
3. Divide the cake mix between the prepared tins. Spread it
out well with a spatula and bake for 20 to 25 minutes, or
until golden brown and risen and a skewer comes out
clean. Allow to cool slightly, then carefully turn out on to a
baking rack to cool completely.
4. Mix a few drops of rosewater into your jam, but don't go
crazy with it – it's very strong!
5. For the crystallized petals, turn the oven right down to
110°C/225°F/gas 1⁄4 and whisk the egg white to stiff
peaks.
6. Use a pastry brush to coat the rose petals on both sides
with a very thin layer of the egg white, then sprinkle over
some caster sugar. Shake off the excess sugar and lay the
petals on a baking tray lined with greaseproof paper.
7. Bake for 3 to 4 minutes in the oven, until the petals are
firm to the touch.
8. Whip the cream with the vanilla seeds and sugar until you
get soft peaks. Spread the jam and then the vanilla cream
over one of the cakes and scatter the raspberries on top.
9. Place the second cake on top, dust with icing sugar and
decorate with the crystallized rose petals.
10. Serve on a beautiful cake stand to really show off your
creation, and enjoy.
Recipe from
Jamie Oliver’s
website
9. Recipes
9
Italian: Fried pizza
Ingredients:
• 1 basic pizza dough recipe
• flour, for dusting
• vegetable oil, for frying
• 2 x 150 g buffalo mozzarella balls
• 5 teaspoons dried oregano, optional
For the tomato sauce:
• extra virgin olive oil1
• clove garlic, peeled and finely sliced
• 1 bunch fresh basil, leaves picked
• 400 g good-quality tinned plum tomatoes
• sea salt
• Freshly ground black pepper
Dough recipe:
800 g strong white bread flour
200 g fine ground semolina flour or strong white
bread flour
1 level tablespoon fine sea salt
2x7 g sachets dried yeast
1 tablespoon golden caster sugar
650 ml lukewarm water
Method:
To make the dough:
1. Pile the flour and salt on to a clean surface and make an 18cm well in
the centre. Add your yeast and sugar to the lukewarm water, mix up
with a fork and leave for a few minutes, then pour into the well
2. Using a fork and a circular movement, slowly bring in the flour from the
inner edge of the well and mix into the water. It will look like thick
porridge. Continue to mix, bringing in all the flour. When the dough
comes together and becomes too hard to mix with your fork, flour your
hands and begin to pat it into a ball.
3. Knead the dough by rolling it backward and forward, using your left
hand to stretch the dough toward you and your right hand to push the
dough away from you at the same time. Repeat this for 10 minutes,
until you have a smooth, springy, soft dough.
4. Place the dough in a lightly greased bowl. Cover with a kitchen towel
or plastic wrap and let double in size for about 45 minutes.
Now for the rest:
1. Now make your tomato sauce. Heat a saucepan, add a splash of oil
and the sliced garlic and cook gently.
2. When the garlic has turned light golden, add half the basil, the
tomatoes and a few pinches of salt and pepper.
3. Cook gently for about 20 minutes, mashing the tomatoes until
smooth, then taste, season again and put to one side.
4. Preheat your grill to its highest temperature. Divide the dough into 10
pieces and press them flat on to a floured work surface.
5. Roll them out to about 0.5cm/¼ inch thick and allow them to rest for
10 minutes or so.
6. Heat a frying pan over a high heat, add about 2cm of vegetable oil
and fry each pizza for 30 seconds or so on each side.
7. Remove with tongs and place on a baking tray.
8. Once all the bases are fried, smear each one with a spoonful of the
tomato sauce and tear over some mozzarella and a leaf or two of
basil or dried oregano.
9. Drizzle with olive oil and grill until the cheese is bubbling and the
dough is light brown and cooked through.
Recipe from
Jamie Oliver’s
website
10. Recipes
American: NYC cheesecake
Ingredients:
• 350 g digestive biscuits
• 120 g unsalted butter, melted, plus extra
for greasing
• 900 g light or low-fat cream cheese,
softened
• 150 g caster sugar
• 5 large eggs, preferably free-range or
organic
• Juice of 6 limes, (approx. 125ml)
• 1 vanilla pod, halved lengthways and
seeds scraped out, or 1 tablespoon good-
quality vanilla extract
• Finely grated zest of 1 lime
For the meringue topping:
• 3 large egg whites, preferably free-range
or organic (the yolks can be used for
making scrambled eggs)
• 110 g caster sugar
• 40 g desiccated coconut
Method:
1. Preheat the oven to 160°C/310°F/gas 2½ and grease a 24cm loose-bottomed
cake tin.
2. Put your biscuits into a food processor and whiz until you've got really fine
crumbs, then mix in your melted butter. If you don't have a food processor, just
wrap your biscuits in a tea towel and bash them up with a rolling pin until fine.
3. Spread the biscuit mixture around the base of your greased tin, making sure you
get it right to the edges, then press it with your hands to pack it down.
4. Place the tin on a baking sheet and pop it into the fridge while you make the
filling.
5. Whiz the cream cheese in a food processor until smooth, then gradually add the
sugar. Add the eggs one at a time, mixing well after each one.
6. Pour in the lime juice and vanilla seeds or extract and whiz again until just
combined. Again, if you don't have a food processor, just do this by hand.
7. Don't worry if the mixture seems too thin – it's supposed to be like that. Tip it
over your chilled biscuit base, spread it out evenly, and bake in the oven for
around 45 to 55 minutes – you want the cheesecake to still have a slight loose
wobble.
8. Remove from the oven and set aside for 15 minutes to cool slightly. Turn the
oven up to 220°C/425°F/gas 7.
9. To make the meringue topping, put your egg whites into a clean bowl and beat
until they form soft peaks – an electric whisk is quite handy here.
10. Gradually add the caster sugar and beat until thick and glossy. Finally, fold in the
coconut.
11. Spoon this meringue mixture on to the middle of the cooled cheesecake and
spread it to the edges, using the back of a spoon, so it just covers the filling.
12. It should be about 2cm thick. I like to make a few ripples and peaks in the top so
it looks impressive.
13. Bake in the oven for 5 minutes, or until the meringue is starting to turn golden in
colour and is crisp to touch. Let it cool down, then place it in the fridge for a few
hours (this is important) to chill before serving.
14. Carefully remove it from the tin, transfer it to a nice platter and sprinkle over the
lime zest.
Recipe
from
Jamie
Oliver’s
website
11. Recipes
11Creative Media Production 2013
Chinese: Chinese noodles with
tofu & hazelnuts
Ingredients:
• 250g packet medium egg noodle
•2 tbsp olive oil
•handful coriander, roughly chopped
•300g mangetout
•1 red chili, seeded and finely
chopped
•handful toasted hazelnuts, roughly
chopped
•349g pack silken tofu, cut into cubes
•3 tbsp Chinese yellow beans sauce
Method:
1. Drop the noodles into a pan of boiling water, cook for
4 mins, then drain.
2. Drizzle over a little oil and mix in half the coriander.
3. Heat a wok over a medium heat. Pour in the
remaining oil, then throw in the mangetout and stir-
fry for 2 mins.
4. Add the chilli and cook for 2 mins more until the
beans are just tender.
5. Tip the hazelnuts, tofu and yellow bean sauce into
the wok and stir to warm through.
6. Finally, stir in the remaining coriander, season if you
want to, and serve with the noodles.
Recipe from
BBC Good
Food website
12. Recipes
12Creative Media Production 2013
French: DIY chocolate truffles
Ingredients:
• 300 ml double cream
• 1 knob unsalted butter
• finely grated zest of 1 clementine
• 300 g good-quality dark
chocolate (70% cocoa solids),
broken into small pieces
• 1 pinch sea salt
• 1 handful mixed nuts, (Brazil
nuts, toasted almonds and
hazelnuts)
• 3 tablespoons cocoa powder, to
serve
• 1 pack biscotti, to serve
Method:
1. Put the cream in a pan over a medium heat and let it heat up. You don't want it
boiling, just hot. As soon as tiny bubbles start to appear, add the knob of butter
and the clementine zest.
2. Once the butter has melted, pour this hot mixture over the chocolate pieces,
whisking as you go, so the chocolate melts nice and slowly.
3. If the mixture splits slightly, don't worry, you can bring it right by adding a splash of
boiling water.
4. Add a pinch of salt to the mixture; it may sound bonkers, but the smallest pinch of
salt actually makes chocolate taste even chocolatier!
5. Once completely melted and smooth, pour your melted chocolate mixture into a
nice little serving dish or bowl.
6. Pop this in the fridge for about 2 hours to set.
7. About 30 minutes before you're ready to make your truffles, pull the bowl out of
the fridge and let the chocolate warm up to room temperature.
8. Put your mixed nuts into a plastic bag and use a rolling pin to bash them up quite
finely, place in bowl, along with a separate bowl for some cocoa powder and
another for the truffle mixture.
9. Boil some water and pour in a bowl with spoons to scoop up the truffles easily.
10.You are now ready to scoop up the truffle and create the shape you are happy
with, next roll in the cocoa powder and finally in the mixed nuts.
Recipe
from
Jamie
Oliver’s
website
13. Recipes
Mexican: Sweet tamales ‘n’ chocolate
Ingredients:
For the tamales:
• 200g fine cornmeal
• 1 heaped tablespoon plain flour
• 1 pinch sea salt
• ½ teaspoon baking powder
• 50g unsweetened desiccated coconut
• ½ pineapple (approximately 150g, peeled, core
removed, halved and finely diced)
• Zest and juice of 1 lime
For the chocolate sauce:
• 200ml single cream
•100g good quality dark chocolate (70% cocoa solids)
– broken in to small pieces
• 1 tablespoon unsalted butter – cubed
• 1 pinch sea salt
Method:
1. Soak cornhusks in a bowl of warm water, or if you’re using greaseproof
paper, cut yourself 16 pieces roughly 12x20cm.
2. In a separate bowl, mix the cornmeal, flour, salt, baking powder, sugar,
coconut and chopped pineapple.
3. Add the lime zest and juice and pour in 200ml of water to bring
everything together. Mix well, until you’ve got a thick paste.
4. Put a large pan of water on to the boil (pan should be big enough to fit a
colander).
5. Take a soaked cornhusk or piece of greaseproof paper and spoon a
heaped tablespoon of your pineapple into the middle of the husk or
paper; if the husks are thin you might have to layer two on top of each
other.
6. Fold the sides in to cover the filling, then twist the ends and use the
string to tie them so they look like Christmas crackers.
7. Lay your prepared tamales in a large colander or steamer, making sure
they’re all in one layer and not overlapping.
8. Cover the top of the colander with tin foil and seal it tightly.
9. Put the colander on top of your pan of boiling water and steam for about
20-25 minutes. (About 5 minutes before they’re due to be ready, start
making your chocolate sauce).
10. Gently bring the cream to the boil in a pan on a medium heat. As soon
as it stares to boil take the pan off the heat and stir in chocolate pieces
until melted and combined.
11. Add the cubes of butter and a pinch of salt and stir well until the butter is
melted.
12. Open one of the tamales to check it is perfectly cooked – it should be
solid and the wrapping should peel away from it easily. Take them off the
heat and let them cool (so they’re cool enough to touch).
13. Pour on your chocolate sauce and enjoy…
Recipe from
Jamie Oliver’s
website
14. Recipes
14
Thai: Pea, feta & quinoa spring rolls with
roast tomato nam prik
Ingredients:
• 50g quinoa
• 200g frozen petits pois
• 85g feta cheese – crumbled
• Small bunch of mint leaves – chopped
• 3 spring onions – finely chopped
• Zest and juice of 1 lemon
• 6 sheets filo pastry (270g pack)
• 1 egg – beaten
• Sunflower oil- for frying
For the Nam prik:
• 6 large tomatoes – halved
• 4 tablespoons extra-virgin olive oil
• 1 garlic clove – chopped
• ½ red chilli – chopped
• 2 teaspoons grated ginger
• ½ bunch of coriander – including stalks,
roughly chopped
• ¼ bunch of mint leaves – roughly chopped
• 1 tablespoon of lime juice
• 1 tablespoon of tamarind paste
• 1 teaspoon palm sugar
Method:
1. Heat oven to 160c/140c fan/gas3. To make the nam prik, place
tomatoes, cut side up, on a baking sheet. Drizzle with 1 tablespoon
olive oil, season, then roast for 1 ½ - 2 hours until semi dried.
2. Remove from oven, let cool, then tip into a food processor with the
remaining ingredients and blitz to a puree.
3. Cook the quinoa in a pan of boiling salted water following the pack
instructions. -Tip in to a bowl and set aside to cool.
4. Cook the peas for 1 min in boiling water, then drain and run under
cold water for a few mins, drain thoroughly, tip in to food processor
and pulse to a chunky puree.
5. Add this to the cooled quinoa along with the feta, mint, spring
onions and lemon zest and juice.
6. Mix well to combine and season to taste, adding more lemon juice if
required.
7. Lay a sheet of filo in front of you, keeping the remainder covered
with a damp tea towel. Cut the filo in half across the width to make
2 squares.
8. With one corner pointing towards you (so you are looking at the
diamond shape rather than a square), spoon 2 tablespoons of the
filling just below the centre line and shape in to a log.
9. Brush the pastry edges with egg, then fold in the 2 side corners.
Keeping your fingers on the corners, bring the bottom corner up
over the filling towards the centre, then roll up tightly towards the
top corner.
10. Repeat with the remaining filo sheets. Heat about 3cm sunflower oil
in a large pan or wok and fry the spring rolls, in batches, for 2-3
mins or until golden brown.
11. Remove with a slotted spoon and drain on kitchen roll/paper.
12. Transfer the spring rolls to a plate and serve with the nam prik.
Recipe from
BBC Good
Food website
15. Recipes
15
Indian: Veggie korma, mock cauliflower pilau
Ingredients:
• 1 heaped teaspoon flaked almonds
• 2 large sweet potatoes
• olive oil1 red onion
• 2 cloves of garlic
• 1 thumb-sized piece of ginger
• 1/2 a bunch of fresh coriander (15g)
• 1/2-1 fresh red chilli, (optional)
• 1 handful of curry leaves
• 1 heaped tablespoon korma curry paste
• 1 x 400 g tin of chickpeas
• 1 large cauliflower
• 1/2-1 lemon
• 50 g feta cheese, (optional)
• 4 tablespoons fat-free natural yoghurt
Method:
1. Start by toasting the almonds in a large casserole pan until lightly
golden, then tip out and set aside.
2. Scrub the sweet potatoes clean, then cut into 4cm chunks and put
them into the pan on a medium heat with a lug of oil.
3. Fry for about 5 minutes, or until golden, while you peel the onion,
garlic and ginger, then finely slice them with the coriander stalks and
chilli (if using – it will give the sauce a real kick).
4. Add the curry leaves to the pan and stir for 1 minute, then add all the
sliced veg with the curry paste and cook for another 5 to 10 minutes,
or until the onions have softened, stirring occasionally.
5. Add the chickpeas (juice and all) with 600ml of boiling water, then
bring everything to the boil. Reduce to a simmer and cook for around
30 minutes, or until thickened.
6. Meanwhile, click off and chop the cauliflower leaves, then finely slice
the stalk and add both to the curry for the rest of the cooking time.
7. Cut the florets into even-sized chunks and pulse in a food processor
until it's the same texture and size as rice.
8. Tip it into a microwave-safe dish and cover. Steam or microwave the
cauliflower on high for 7 minutes, or until cooked through, just before
serving.
9. Add a good squeeze of lemon juice to the curry, then season to
perfection and crumble over the feta.
10. Dollop over the yoghurt and stir it through for that korma creaminess,
then sprinkle with coriander leaves and the toasted almonds.
11. Tip the cauliflower on to a nice serving platter, and dig in.
Recipe from
BBC Good
Food website
16. Final style sheet
16
Colour scheme:
British:
Italian:
Chinese:
American:
Indian:
Mexican:
Thai:
French:
We want the images to be easily
seen and of a high quality to
enable our audience to see the
image very clearly and make a
fast decision on whether this is
something they want. The image
is going to be a really main part
of our recipe cards as this is one
of the main things that when
conducting our survey people
has said they look for good
images and design to attract
them to a product. We will use
fairly close up images and also
use an even closer shot of the
food to show full detail. We are
then also going to have a picture
of the ingredients and
equipment laid out for another
photograph for the back of the
card.
This is the font we
will be using for the
main body of text on
our recipe cards.
17. Final flat plan
17Creative Media Production 2013Front Back
Heading
Image
Zoomed in
image
Image of ingredients
List of ingredients
Method Method
Tip
Tip