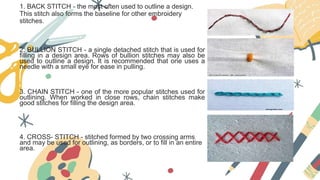
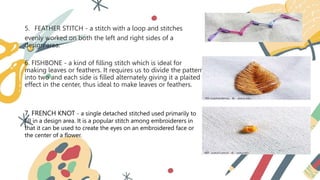
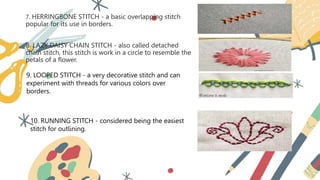
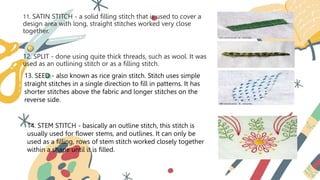
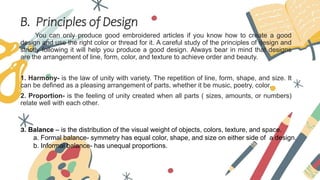
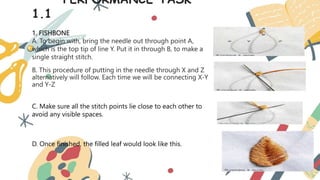
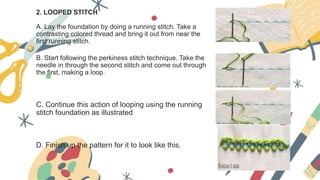
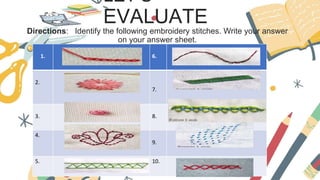
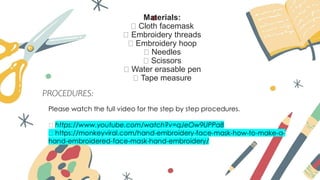
Technology and
Livelihood Education
HANDICRAFT
PRODUCTION
Quarter 3 – Module 1
PRODUCE EMBROIDERED
ARTICLE
(Week 1 - 4)
QUARTER 3 – WEEK 2
L.O. 2 - Create Embroidered Article
OBJECTIVES:
1. Students must be able to understand and perform different kinds of stitches
2. Observed safety precautions while performing the job.
A. Embroidery Stitches
There are various embroidery stitches that you can
can choose from when you do embroidery work.
For you to gain more skill on this line, below are
the illustration of some of the embroidery stitches
stitches which will help and guide you as you
enjoy working on this lovely craft.
1. BACK STITCH - the most often used to outline a design.
This stitch also forms the baseline for other embroidery
stitches.
2. BULLION STITCH - a single detached stitch that is used for
filling in a design area. Rows of bullion stitches may also be
used to outline a design. It is recommended that one uses a
needle with a small eye for ease in pulling.
3. CHAIN STITCH - one of the more popular stitches used for
outlining. When worked in close rows, chain stitches make
good stitches for filling the design area.
4. CROSS- STITCH - stitched formed by two crossing arms
and may be used for outlining, as borders, or to fill in an entire
area.
5. FEATHER STITCH - a stitch with a loop and stitches
evenly worked on both the left and right sides of a
design area.
6. FISHBONE - a kind of filling stitch which is ideal for
making leaves or feathers. It requires us to divide the pattern
into two and each side is filled alternately giving it a plaited
effect in the center, thus ideal to make leaves or feathers.
7. FRENCH KNOT - a single detached stitched used primarily to
fill in a design area. It is a popular stitch among embroiderers in
that it can be used to create the eyes on an embroidered face or
the center of a flower.
7. HERRINGBONE STITCH - a basic overlapping stitch
popular for its use in borders.
8. LAZY DAISY CHAIN STITCH - also called detached
chain stitch, this stitch is work in a circle to resemble the
petals of a flower.
9. LOOPED STITCH - a very decorative stitch and can
experiment with threads for various colors over
borders.
10. RUNNING STITCH - considered being the easiest
stitch for outlining.
11. SATIN STITCH - a solid filling stitch that is used to cover a
design area with long, straight stitches worked very close
together.
12. SPLIT - done using quite thick threads, such as wool. It was
used as an outlining stitch or as a filling stitch.
13. SEED - also known as rice grain stitch. Stitch uses simple
straight stitches in a single direction to fill in patterns. It has
shorter stitches above the fabric and longer stitches on the
reverse side.
14. STEM STITCH - basically an outline stitch, this stitch is
usually used for flower stems, and outlines. It can only be
used as a filling, rows of stem stitch worked closely together
within a shape until it is filled.
WEEK 3
L.O. 2 – Create Embroidered Articles
OBJECTIVES:
1. Students must be able to create Embroidered Articles based
on the Principles and Elements of Design.
2. Good Working Habits must be Observed
B. Principles of Design
You can only produce good embroidered articles if you know how to create a good
design and use the right color or thread for it. A careful study of the principles of design and
strictly following it will help you produce a good design. Always bear in mind that designs
are the arrangement of line, form, color, and texture to achieve order and beauty.
1. Harmony- is the law of unity with variety. The repetition of line, form, shape, and size. It
can be defined as a pleasing arrangement of parts, whether it be music, poetry, color.
2. Proportion- is the feeling of unity created when all parts ( sizes, amounts, or numbers)
relate well with each other.
3. Balance – is the distribution of the visual weight of objects, colors, texture, and space.
a. Formal balance- symmetry has equal color, shape, and size on either side of a design.
b. Informal balance- has unequal proportions.
4. Rhythm- is a smooth related movement. It is created when
one or more elements of design are used repeatedly to create a
feeling of organize movement.
5. Emphasis- is the part of the design that catches the viewer's
attention. Usually, the artist will make one area stand out by contrasting
it with other areas. The area will be different in size, color, texture,
shape, etc.
6. Design – is the arrangement of line, form, color and texture with the
purpose of achieving order and beauty.
C. Elements of Design
1. Line – is a mark with a greater length than width. Lines can be horizontal,
vertical or diagonal, straight or curved, thick, or thin.
2. Texture- is the surface quality that can be seen and felt. Texture can be
rough or smooth, soft, or hard.
3. Color- color may be cool, warm, bright, or dull. Choosing the right color will
greatly affect the appearance of your finished project.
a. Primary colors- red, yellow, and blue.
b. Secondary colors- colors formed by mixing the primary colors.
c. Tertiary colors- colors formed by mixing a primary and a secondary color.
4. Shape- is a closed line. Shapes can be geometric, like squares and
circles; or organic, like free-formed shapes or natural shapes. Shapes are
flat and can express length and width
5. Forms – are three- dimensional shapes, expressing length, width, and depth.
Balls, cylinders, boxes, and triangles are forms.
6. Space – is the area between and around objects. Space can also refer to the
feeling of depth. In visual art when we can create the feeling or illusion of depth we
call it space.
D. Transferring Design
Ways of Transferring Designs:
1. Hot Iron Transfer- the easiest method which is
done by removing the excess paper around the design,
place the design on the fabric, then pin at the corners.
Make sure your flatiron is at a low setting before pressing
it over an area of the design. Do not glide the iron over the
design as this can ruin the design.
2. Tracing Method - designs may be transferred by using
a tracing wheel and preferably a dressmaker’s carbon
paper. When no carbon paper of this type is available,
ordinary carbon may be used.
3. Stamping- you will need soft absorbent cloth, indigo,
kerosene or petroleum, sheets of newspaper, your perforated
design and the fabric on which you want to stamp your
design. A perforated pattern of your design is made by
pricking holes along the lines of the design.
Good Working Habits:
1. Have a clean sewing box with complete sewing tools.
2. Wash your hand before working.
3. Assemble all needed materials.
4. Clip or tie your hair while working so you can see your work.
5. Use the appropriate needle for the right kind of cloth.
6. Put your scraps of cloth and thread in a plastic bag.
7. Use embroidery scissors in cutting the thread, not your teeth.
8. An elbow-length of a thread is appropriate to use for easier sewing.
9. Work with your hands and not with your lips.
10. Follow the step–by–step procedure.
11. Fold correctly and keep your fabric in plastic after working each day.
12. Clean your working area before living the room.
Let’s dig in
Directions: Identify the word or group of words that best describes the
following statement.
__________1. Color in between three spaces in the color wheel.
__________2. Two neighboring colors and their opposite.
__________3. Three neighboring colors one of which is dominant.
__________4. Colors opposite each other in the color wheel.
__________5. One color of different shade.
__________6. It is the arrangement of line, form, color, and texture with the purpose of achieving
beauty or order.
__________7. A principle that infers repetition of line, form, shape and size.
__________8. This is referred to as the center of interest of a design.
__________9. Refers to the surface appearance which is either rough or smooth, dull or lossy,
thick or thing
_________10. It is the easiest way of transferring a design onto the fabric.
Let’s remember
Embroidery is the ornamentation of textiles and other materials with needlework for
personal use and decoration not only at home but for offices as well.
The term embroidery is an English word derived from the old French embroiders
meaning edge and border.
A needle is the main stitching tool in embroidery and comes in various sizes and
types. The fabrics and yarns used in traditional embroidery vary from place to place.
Wool, linen, and silk have been in use for thousands of years for both fabric and yarn.
Today, embroidery thread is manufactured in cotton, rayon, and novelty yarns as well
as in traditional wool, linen, and silk. Ribbon embroidery uses a narrow ribbon in silk
or blends ribbon.
Contemporary embroidery work is stitched with a computerized embroidery machine
using patterns “digitized” with embroidery software. Machine embroidery is used to
add logos and monograms to business shirts. Many people are choosing
embroidered logos placed on shirts and jackets to promote their company.
Embroidery has come a long way, both style, technique, and use.
QUARTER 3 – WEEK 4
PERFORMANCE TASKS
Show that you learned something by doing
this Activity
LET’S APPLY
PERFORMANCE TASK 1.1
OBJECTIVES:
At the end of the Session, the
students are expected to
perform Performance Task 1.1
and 1.2
PERFORMANCE TASK
1.1
1. FISHBONE
A. To begin with, bring the needle out through point A,
which is the top tip of line Y. Put it in through B, to make a
single straight stitch.
B. This procedure of putting in the needle through X and Z
alternatively will follow. Each time we will be connecting X-Y
and Y-Z
C. Make sure all the stitch points lie close to each other to
avoid any visible spaces.
D. Once finished, the filled leaf would look like this.
2. LOOPED STITCH
A. Lay the foundation by doing a running stitch. Take a
contrasting colored thread and bring it out from near the
first running stitch.
B. Start following the perkiness stitch technique. Take the
needle in through the second stitch and come out through
the first, making a loop.
C. Continue this action of looping using the running
stitch foundation as illustrated
D. Finish up the pattern for it to look like this.
LET’S
EVALUATE
Directions: Identify the following embroidery stitches. Write your answer
on your answer sheet.
1. 6.
2.
7.
3. 8.
4.
9.
5. 10.
LET’S EXTEND
Performance Task: 1.2
Directions: Make your own quarantine craft face mask with a
touch of embroidery.
Embroidered Face Mask
Materials:
Cloth facemask
Embroidery threads
Embroidery hoop
Needles
Scissors
Water erasable pen
Tape measure
PROCEDURES:
SCORECARD FOR EMBROIDERY
Find out your Score by Accomplishing the Scoring Rubric Honestly and Sincerely
DESIGN AND COLOR 25%ss Perfect Score Total Score
A. The Color used is Appropriate for the mask 10
B. Simple and Appropriate Design 8
C. Properly placed Design 7
WORKMANSHIP 50%
A. Good Working Habits 20
B. Used Appropriate Tools 15
C. Different Stitches are Applied to the Design following the Correct Procedure 15
NEATNESS 10%
A. No Stain or Dirt 5
B. Starting and Closing Stitches not Noticeable, No Ravels or Hanging Threads 5
GENERAL APPEARANCE 15%
A. Beautiful Finished Article 8
B. Worthy of the Time, Effort, and Materials Used 7

Q3-WEEK-2-HANDICRAFT-PRODUCTION-.ppt

  • 1.
    Technology and Livelihood Education HANDICRAFT PRODUCTION Quarter3 – Module 1 PRODUCE EMBROIDERED ARTICLE (Week 1 - 4)
  • 2.
    QUARTER 3 –WEEK 2 L.O. 2 - Create Embroidered Article OBJECTIVES: 1. Students must be able to understand and perform different kinds of stitches 2. Observed safety precautions while performing the job.
  • 3.
    A. Embroidery Stitches Thereare various embroidery stitches that you can can choose from when you do embroidery work. For you to gain more skill on this line, below are the illustration of some of the embroidery stitches stitches which will help and guide you as you enjoy working on this lovely craft.
  • 4.
    1. BACK STITCH- the most often used to outline a design. This stitch also forms the baseline for other embroidery stitches. 2. BULLION STITCH - a single detached stitch that is used for filling in a design area. Rows of bullion stitches may also be used to outline a design. It is recommended that one uses a needle with a small eye for ease in pulling. 3. CHAIN STITCH - one of the more popular stitches used for outlining. When worked in close rows, chain stitches make good stitches for filling the design area. 4. CROSS- STITCH - stitched formed by two crossing arms and may be used for outlining, as borders, or to fill in an entire area.
  • 5.
    5. FEATHER STITCH- a stitch with a loop and stitches evenly worked on both the left and right sides of a design area. 6. FISHBONE - a kind of filling stitch which is ideal for making leaves or feathers. It requires us to divide the pattern into two and each side is filled alternately giving it a plaited effect in the center, thus ideal to make leaves or feathers. 7. FRENCH KNOT - a single detached stitched used primarily to fill in a design area. It is a popular stitch among embroiderers in that it can be used to create the eyes on an embroidered face or the center of a flower.
  • 6.
    7. HERRINGBONE STITCH- a basic overlapping stitch popular for its use in borders. 8. LAZY DAISY CHAIN STITCH - also called detached chain stitch, this stitch is work in a circle to resemble the petals of a flower. 9. LOOPED STITCH - a very decorative stitch and can experiment with threads for various colors over borders. 10. RUNNING STITCH - considered being the easiest stitch for outlining.
  • 7.
    11. SATIN STITCH- a solid filling stitch that is used to cover a design area with long, straight stitches worked very close together. 12. SPLIT - done using quite thick threads, such as wool. It was used as an outlining stitch or as a filling stitch. 13. SEED - also known as rice grain stitch. Stitch uses simple straight stitches in a single direction to fill in patterns. It has shorter stitches above the fabric and longer stitches on the reverse side. 14. STEM STITCH - basically an outline stitch, this stitch is usually used for flower stems, and outlines. It can only be used as a filling, rows of stem stitch worked closely together within a shape until it is filled.
  • 8.
    WEEK 3 L.O. 2– Create Embroidered Articles OBJECTIVES: 1. Students must be able to create Embroidered Articles based on the Principles and Elements of Design. 2. Good Working Habits must be Observed
  • 9.
    B. Principles ofDesign You can only produce good embroidered articles if you know how to create a good design and use the right color or thread for it. A careful study of the principles of design and strictly following it will help you produce a good design. Always bear in mind that designs are the arrangement of line, form, color, and texture to achieve order and beauty. 1. Harmony- is the law of unity with variety. The repetition of line, form, shape, and size. It can be defined as a pleasing arrangement of parts, whether it be music, poetry, color. 2. Proportion- is the feeling of unity created when all parts ( sizes, amounts, or numbers) relate well with each other. 3. Balance – is the distribution of the visual weight of objects, colors, texture, and space. a. Formal balance- symmetry has equal color, shape, and size on either side of a design. b. Informal balance- has unequal proportions.
  • 10.
    4. Rhythm- isa smooth related movement. It is created when one or more elements of design are used repeatedly to create a feeling of organize movement. 5. Emphasis- is the part of the design that catches the viewer's attention. Usually, the artist will make one area stand out by contrasting it with other areas. The area will be different in size, color, texture, shape, etc. 6. Design – is the arrangement of line, form, color and texture with the purpose of achieving order and beauty.
  • 11.
    C. Elements ofDesign 1. Line – is a mark with a greater length than width. Lines can be horizontal, vertical or diagonal, straight or curved, thick, or thin. 2. Texture- is the surface quality that can be seen and felt. Texture can be rough or smooth, soft, or hard. 3. Color- color may be cool, warm, bright, or dull. Choosing the right color will greatly affect the appearance of your finished project. a. Primary colors- red, yellow, and blue. b. Secondary colors- colors formed by mixing the primary colors. c. Tertiary colors- colors formed by mixing a primary and a secondary color.
  • 12.
    4. Shape- isa closed line. Shapes can be geometric, like squares and circles; or organic, like free-formed shapes or natural shapes. Shapes are flat and can express length and width 5. Forms – are three- dimensional shapes, expressing length, width, and depth. Balls, cylinders, boxes, and triangles are forms. 6. Space – is the area between and around objects. Space can also refer to the feeling of depth. In visual art when we can create the feeling or illusion of depth we call it space.
  • 13.
    D. Transferring Design Waysof Transferring Designs: 1. Hot Iron Transfer- the easiest method which is done by removing the excess paper around the design, place the design on the fabric, then pin at the corners. Make sure your flatiron is at a low setting before pressing it over an area of the design. Do not glide the iron over the design as this can ruin the design. 2. Tracing Method - designs may be transferred by using a tracing wheel and preferably a dressmaker’s carbon paper. When no carbon paper of this type is available, ordinary carbon may be used.
  • 14.
    3. Stamping- youwill need soft absorbent cloth, indigo, kerosene or petroleum, sheets of newspaper, your perforated design and the fabric on which you want to stamp your design. A perforated pattern of your design is made by pricking holes along the lines of the design. Good Working Habits: 1. Have a clean sewing box with complete sewing tools. 2. Wash your hand before working. 3. Assemble all needed materials. 4. Clip or tie your hair while working so you can see your work. 5. Use the appropriate needle for the right kind of cloth. 6. Put your scraps of cloth and thread in a plastic bag. 7. Use embroidery scissors in cutting the thread, not your teeth. 8. An elbow-length of a thread is appropriate to use for easier sewing. 9. Work with your hands and not with your lips. 10. Follow the step–by–step procedure. 11. Fold correctly and keep your fabric in plastic after working each day. 12. Clean your working area before living the room.
  • 15.
    Let’s dig in Directions:Identify the word or group of words that best describes the following statement. __________1. Color in between three spaces in the color wheel. __________2. Two neighboring colors and their opposite. __________3. Three neighboring colors one of which is dominant. __________4. Colors opposite each other in the color wheel. __________5. One color of different shade. __________6. It is the arrangement of line, form, color, and texture with the purpose of achieving beauty or order. __________7. A principle that infers repetition of line, form, shape and size. __________8. This is referred to as the center of interest of a design. __________9. Refers to the surface appearance which is either rough or smooth, dull or lossy, thick or thing _________10. It is the easiest way of transferring a design onto the fabric.
  • 16.
    Let’s remember Embroidery isthe ornamentation of textiles and other materials with needlework for personal use and decoration not only at home but for offices as well. The term embroidery is an English word derived from the old French embroiders meaning edge and border. A needle is the main stitching tool in embroidery and comes in various sizes and types. The fabrics and yarns used in traditional embroidery vary from place to place. Wool, linen, and silk have been in use for thousands of years for both fabric and yarn. Today, embroidery thread is manufactured in cotton, rayon, and novelty yarns as well as in traditional wool, linen, and silk. Ribbon embroidery uses a narrow ribbon in silk or blends ribbon. Contemporary embroidery work is stitched with a computerized embroidery machine using patterns “digitized” with embroidery software. Machine embroidery is used to add logos and monograms to business shirts. Many people are choosing embroidered logos placed on shirts and jackets to promote their company. Embroidery has come a long way, both style, technique, and use.
  • 17.
    QUARTER 3 –WEEK 4 PERFORMANCE TASKS Show that you learned something by doing this Activity LET’S APPLY PERFORMANCE TASK 1.1
  • 18.
    OBJECTIVES: At the endof the Session, the students are expected to perform Performance Task 1.1 and 1.2
  • 19.
    PERFORMANCE TASK 1.1 1. FISHBONE A.To begin with, bring the needle out through point A, which is the top tip of line Y. Put it in through B, to make a single straight stitch. B. This procedure of putting in the needle through X and Z alternatively will follow. Each time we will be connecting X-Y and Y-Z C. Make sure all the stitch points lie close to each other to avoid any visible spaces. D. Once finished, the filled leaf would look like this.
  • 20.
    2. LOOPED STITCH A.Lay the foundation by doing a running stitch. Take a contrasting colored thread and bring it out from near the first running stitch. B. Start following the perkiness stitch technique. Take the needle in through the second stitch and come out through the first, making a loop. C. Continue this action of looping using the running stitch foundation as illustrated D. Finish up the pattern for it to look like this.
  • 21.
    LET’S EVALUATE Directions: Identify thefollowing embroidery stitches. Write your answer on your answer sheet. 1. 6. 2. 7. 3. 8. 4. 9. 5. 10.
  • 22.
    LET’S EXTEND Performance Task:1.2 Directions: Make your own quarantine craft face mask with a touch of embroidery. Embroidered Face Mask
  • 23.
    Materials: Cloth facemask Embroidery threads Embroideryhoop Needles Scissors Water erasable pen Tape measure PROCEDURES:
  • 24.
    SCORECARD FOR EMBROIDERY Findout your Score by Accomplishing the Scoring Rubric Honestly and Sincerely DESIGN AND COLOR 25%ss Perfect Score Total Score A. The Color used is Appropriate for the mask 10 B. Simple and Appropriate Design 8 C. Properly placed Design 7 WORKMANSHIP 50% A. Good Working Habits 20 B. Used Appropriate Tools 15 C. Different Stitches are Applied to the Design following the Correct Procedure 15 NEATNESS 10% A. No Stain or Dirt 5 B. Starting and Closing Stitches not Noticeable, No Ravels or Hanging Threads 5 GENERAL APPEARANCE 15% A. Beautiful Finished Article 8 B. Worthy of the Time, Effort, and Materials Used 7