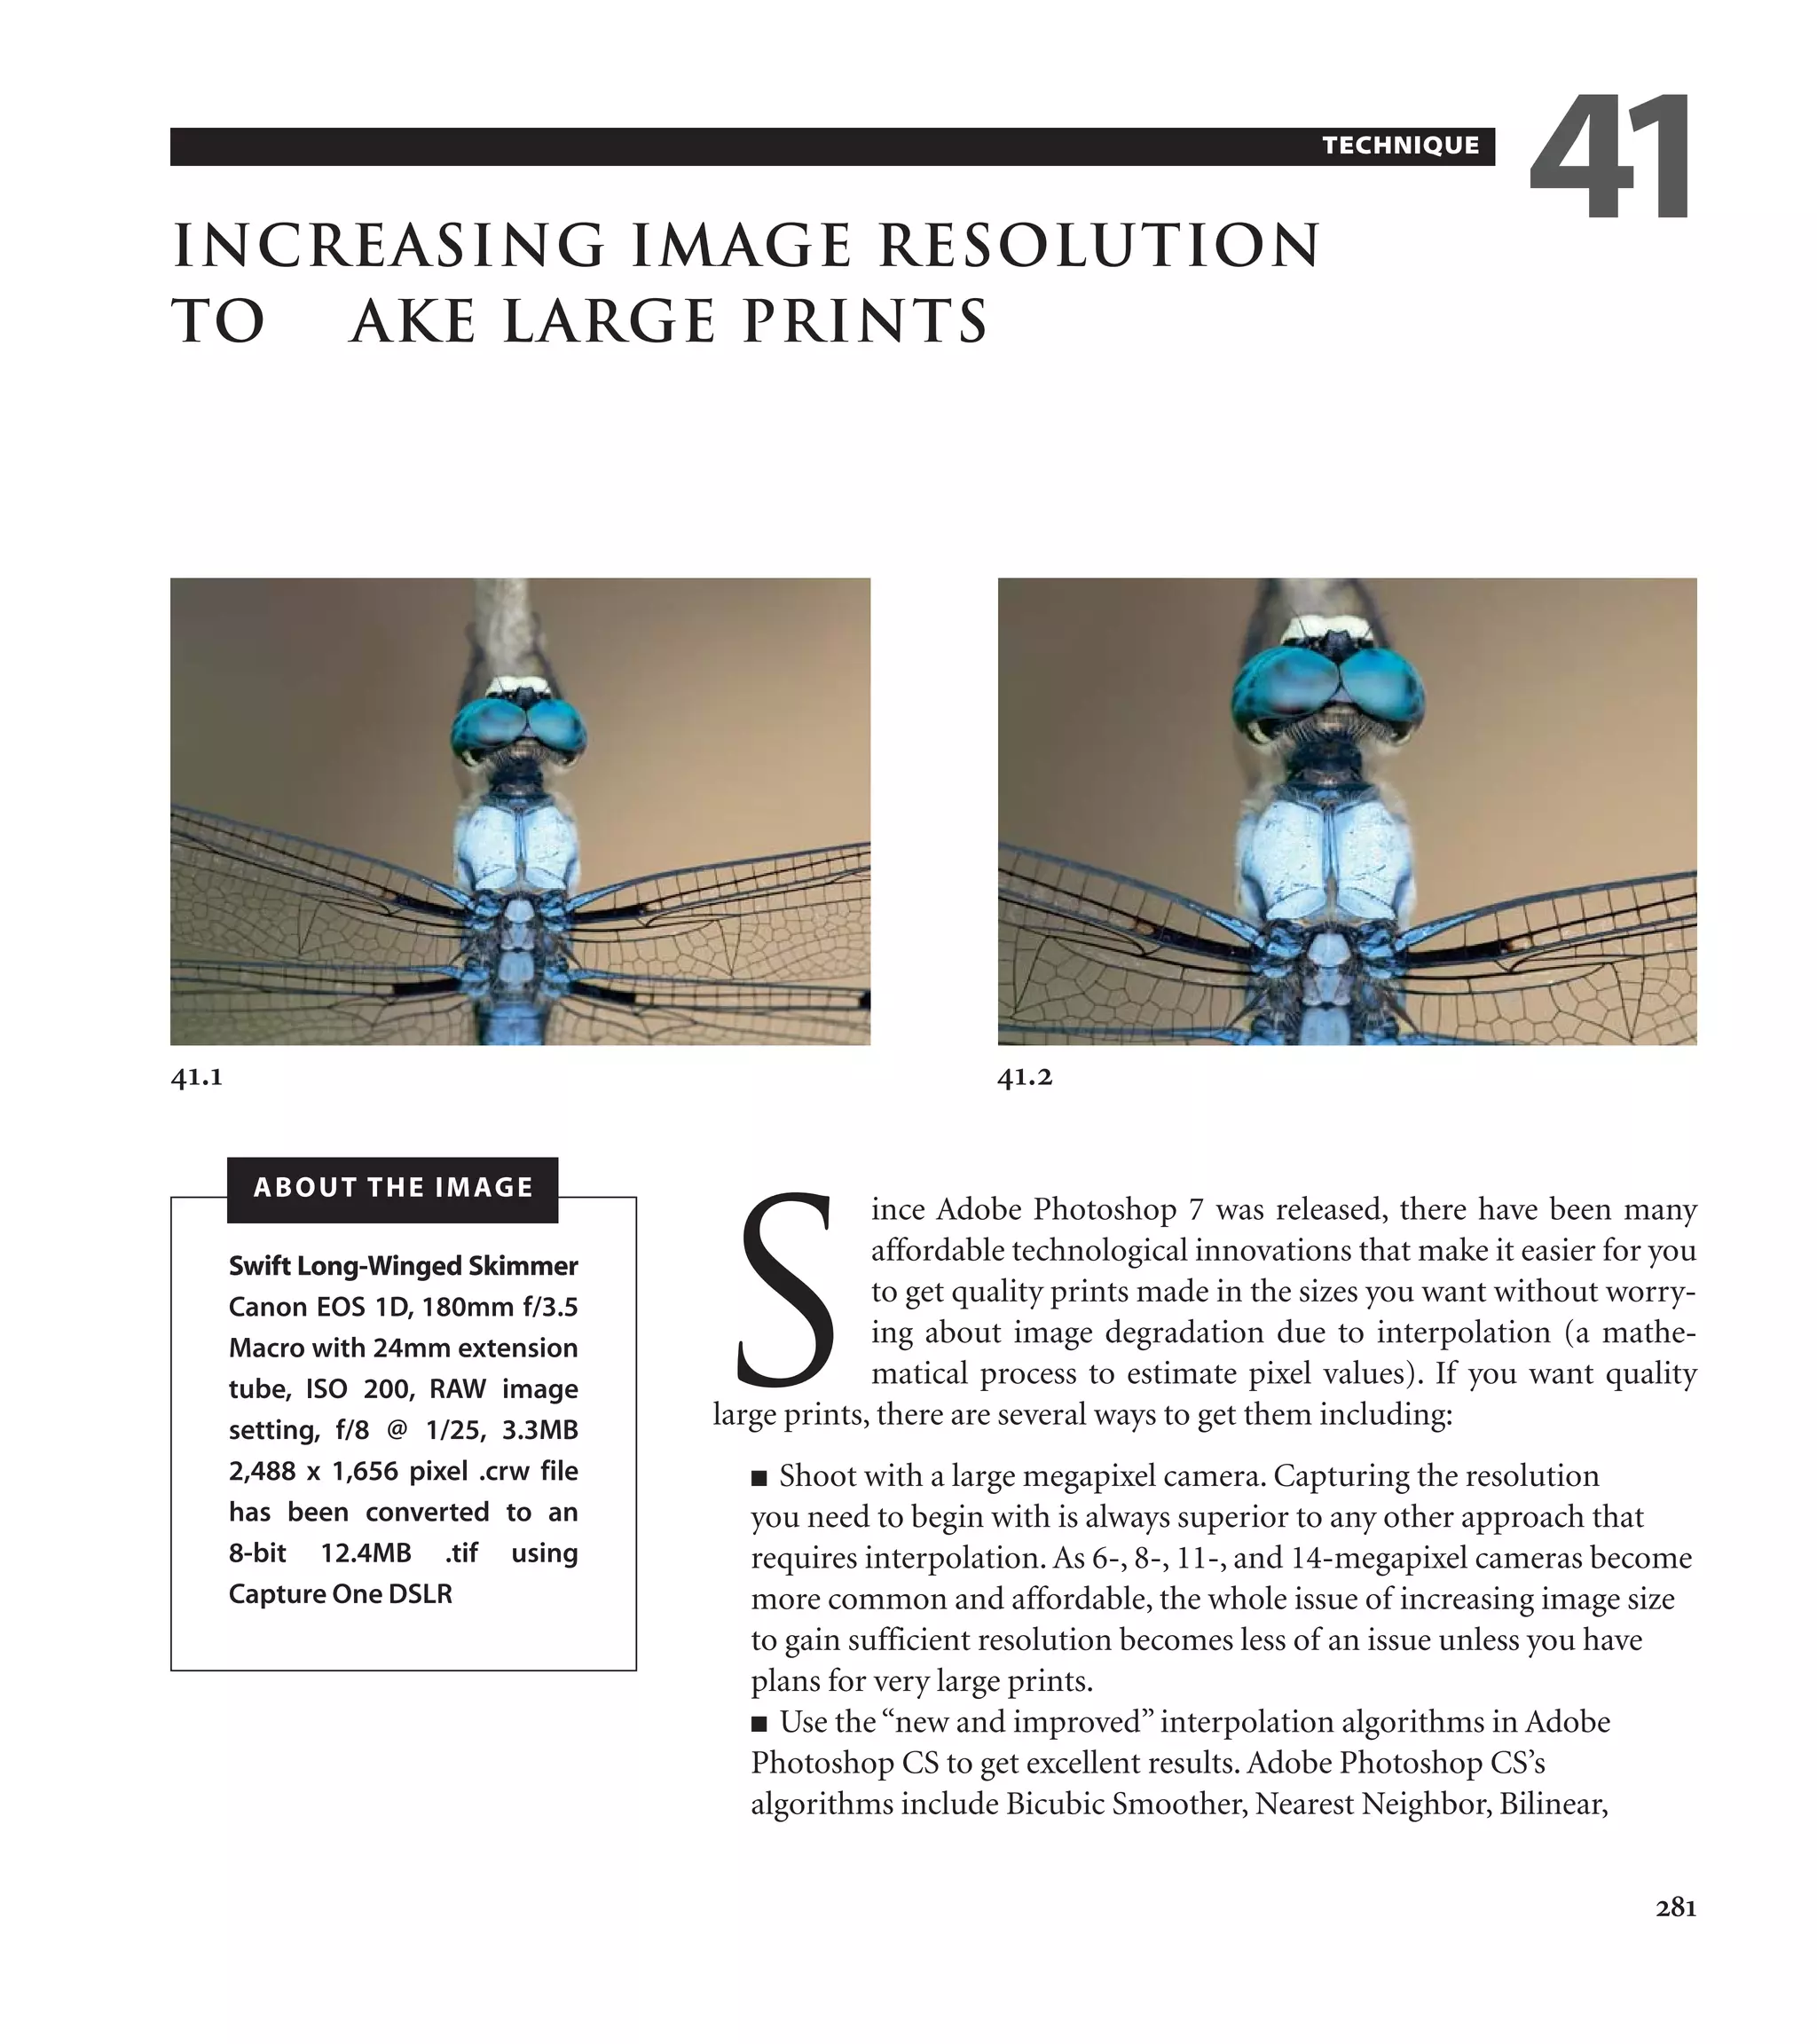
Increasing Image Resolution
to M ake Large Prints
S
ince Adobe Photoshop 7 was released, there have been many
affordable technological innovations that make it easier for you
to get quality prints made in the sizes you want without worry-
ing about image degradation due to interpolation (a mathe-
matical process to estimate pixel values). If you want quality
large prints, there are several ways to get them including:
■ Shoot with a large megapixel camera. Capturing the resolution
you need to begin with is always superior to any other approach that
requires interpolation. As 6-, 8-, 11-, and 14-megapixel cameras become
more common and affordable, the whole issue of increasing image size
to gain sufficient resolution becomes less of an issue unless you have
plans for very large prints.
■ Use the“new and improved”interpolation algorithms in Adobe
Photoshop CS to get excellent results. Adobe Photoshop CS’s
algorithms include Bicubic Smoother, Nearest Neighbor, Bilinear,
281
41.1 41.2
Swift Long-Winged Skimmer
Canon EOS 1D, 180mm f/3.5
Macro with 24mm extension
tube, ISO 200, RAW image
setting, f/8 @ 1/25, 3.3MB
2,488 x 1,656 pixel .crw file
has been converted to an
8-bit 12.4MB .tif using
Capture One DSLR
ABOUT THE IMAGE
TECHNIQUE
41
08 541749 Ch08.qxd 1/8/04 3:40 PM Page 281
comes from adding pixels in places where there were
previously no pixels.
While there are many rules or recommendations
about when and how to use different techniques and
software products to increase the size of an image, I
strongly recommend that you learn to get the best
results you can with the features found in Adobe
Photoshop CS and with any capabilities that might
be found in your target printer. Without question,
many of the new digital SLRs and prosumer-level
digital cameras have greatly changed my view of how
far you can res-up an image. Many digital cameras
create nearly noise-free digital photos when lower
ISO settings are used. If a digital picture is in focus
and it is noise-free, it can be enlarged much more
than a scanned image that contains both film grain
and digital noise that gets created during the scan-
ning process. Soft blurred digital photos can also have
a remarkable smoothness to them that allows such a
photo to be increased many times its original size. A
good example of a soft image is the iris found in
Technique 45. Good editing techniques can be used
to make 30" x 40" prints and larger from this image
that was taken with a 3-megapixel Canon D30.
One other factor that can limit how large an image
can be increased is how much the image needs to be
sharpened. In Technique 11, you learned that an
image should not be sharpened until it has been sized
for its intended use. The process of up-sampling an
image will at some point create visible pixelization;
sharpening an image with moderate pixelization can
result in a wholly unsatisfactory image. Likewise, up-
sampling an image that has already been sharpened
can cause an even nastier problem — up-sampled
sharpening! Remember that you can’t actually
sharpen an image; you can only increase the percep-
tion that an image is sharp by creating more contrast
along the “edges” of an image and this increase in
contrast normally does not res-up well.
Okay — enough talk; it is time to increase the size of
the digital photo of a dragonfly to make a print to fit
on Super B-sized paper, which is 13" x 19". Super B
282 Chapter 8 Making Photographic Prints
Bicubic (new and improved since Adobe Photoshop
7), and Bicubic Sharper.
■ Use software specifically designed for increasing
image resolution. Camera RAW found in Adobe
Photoshop CS allows you to increase image size
as does Phase One’s Capture One DSLR. There
are also plug-ins such as LizardTech’s Genuine
Fractals Print Pro, Extensis’s pxl SmartScale,
and S-Spline from Shortcut Software to name just
three. Other software products including image
viewers and editors contain interpolation algo-
rithms that are often touted as being superior
(but may or may not be) to the original Bicubic
found in earlier versions of Photoshop. These
programs include Qimage Pro and IrfanView 32,
and Photo Cleaner.
■ Keep your images at their captured resolution
and leave any necessary resampling to the driver
of the target printer. In Technique 45 you will
learn that the Lightjet 5000 printer can print
exceptional images as large as 30" x 40" from a
3-megapixel or larger camera if the photo is an
excellent photo. Many of the new under-$1,000
photographic printers made by Canon, Epson,
HP, and other printer vendors are quite capable
of increasing image size with minimal image
degradation. If you want to improve the results
you get from such printers, you can purchase
RIP software such as ImagePrint (www.
colorbytesoftware.com), which in
some cases can even improve on image quality
when image resolution is increased.
With all those choices, the multi-million-dollar
question remains: How should you increase the size
of an image without causing unacceptable image
degradation? There are many answers (and opinions)
to that question and in my opinion, each good answer
always starts with “it depends.” How far you can
“res-up” an image depends on a number of image
characteristics and how critical it is to have a sharp,
in-focus image instead of one with the dreaded (or
sometimes desirable) pixelization or softness that
08 541749 Ch08.qxd 1/8/04 3:40 PM Page 282
paper is the largest paper that can be used in most of
the desktop inkjet printers such as the Epson 1280
and 2200.
The dragonfly photo is a good one to use to learn
about increasing image size as some of the areas of
the image are sharply focused and other areas are soft
and out of focus due to the extremely shallow depth
of field.
STEP 1: OPEN FILE
■ Choose File ➢ Open (Ctrl+O PC, Cmd+O
Mac) to display the Open dialog box. Double-
click the 41 folder to open it and then click the
dragonfly-before.tif file to select it. Click Open to
open the file. This image has been converted from
a RAW file without any sharpening and without
increasing resolution. Some basic image enhance-
ment has been done with Adobe Photoshop CS.
No sharpening has yet been applied.
STEP 2: INCREASE IMAGE SIZE
■ Choose Image ➢ Image Size to get the Image
Size dialog box shown in Figure 41.3. Make sure
there is a checkmark in the box next to Constrain
Proportions to keep the proportions of the image
the same when the image size is changed.
Click in the box next to Resample Image if there
is not already a checkmark; then select Bicubic
Smoother as the interpolation algorithm. Bicubic
Smoother is almost always the best method to
select for enlarging images and it is superior to the
“step or stair interpolation”in which you increase
an image by a small percent many times until you
get the image size you want. Bicubic in Adobe
Photoshop CS is a new version, but it generally
produces poorer results than Bicubic Smoother.
If you are in need of down-sampling an image,
you should try Bicubic Sharper.
Increasing Image Resolution to Make Large Prints 283
To get a 1
⁄2" border on 13" x 19" paper, type 18 in
the Width box in the Document Size area. Notice
that the 11.8MB file is now a 35.5MB file with
dimensions of 4,320 x 2,875 pixels. While we have
only increased the width and height about 175
percent, we have increased the total pixel count by
300 percent (35.5/11.8 = 300 percent).
■ Click OK to increase image size by 300%.
If you are planning on making a print on a specific
printer, then make any judgment calls on how far you
can increase image resolution by making prints — not
by looking at the image on your computer screen.
After you make a few prints, go back and look at the
images on your screen and you are likely to be sur-
prised to see that what looks like a “not so good”
image makes a beautiful print.
STEP 3: SHARPEN IMAGE
Now — and only after the image has been sized to its
final size — should you sharpen the image. You can
learn more about sharpening images in Techniques
11 and 39.
41.3
08 541749 Ch08.qxd 1/8/04 3:40 PM Page 283
284 Chapter 8 Making Photographic Prints
Next time you need to increase the size of an image
remember: the best approach to increasing image res-
olution “depends” on the quality and characteristics
of your image. Experiment and don’t judge the effects
of up-sampling or sharpening by looking at your
monitor if you are printing the image. Print it — then
judge the results. My bet is that you will more often
than not get the best results using Adobe Photoshop
CS’s new Bicubic Smoother algorithm found in the
Image Size box; plus, it is so fast compared to just
about any other approach or software product you
may use. Try it — I’m betting you’ll be happy with the
results you get.
08 541749 Ch08.qxd 1/8/04 3:40 PM Page 284

Ps efects

  • 1.
    Increasing Image Resolution toM ake Large Prints S ince Adobe Photoshop 7 was released, there have been many affordable technological innovations that make it easier for you to get quality prints made in the sizes you want without worry- ing about image degradation due to interpolation (a mathe- matical process to estimate pixel values). If you want quality large prints, there are several ways to get them including: ■ Shoot with a large megapixel camera. Capturing the resolution you need to begin with is always superior to any other approach that requires interpolation. As 6-, 8-, 11-, and 14-megapixel cameras become more common and affordable, the whole issue of increasing image size to gain sufficient resolution becomes less of an issue unless you have plans for very large prints. ■ Use the“new and improved”interpolation algorithms in Adobe Photoshop CS to get excellent results. Adobe Photoshop CS’s algorithms include Bicubic Smoother, Nearest Neighbor, Bilinear, 281 41.1 41.2 Swift Long-Winged Skimmer Canon EOS 1D, 180mm f/3.5 Macro with 24mm extension tube, ISO 200, RAW image setting, f/8 @ 1/25, 3.3MB 2,488 x 1,656 pixel .crw file has been converted to an 8-bit 12.4MB .tif using Capture One DSLR ABOUT THE IMAGE TECHNIQUE 41 08 541749 Ch08.qxd 1/8/04 3:40 PM Page 281
  • 2.
    comes from addingpixels in places where there were previously no pixels. While there are many rules or recommendations about when and how to use different techniques and software products to increase the size of an image, I strongly recommend that you learn to get the best results you can with the features found in Adobe Photoshop CS and with any capabilities that might be found in your target printer. Without question, many of the new digital SLRs and prosumer-level digital cameras have greatly changed my view of how far you can res-up an image. Many digital cameras create nearly noise-free digital photos when lower ISO settings are used. If a digital picture is in focus and it is noise-free, it can be enlarged much more than a scanned image that contains both film grain and digital noise that gets created during the scan- ning process. Soft blurred digital photos can also have a remarkable smoothness to them that allows such a photo to be increased many times its original size. A good example of a soft image is the iris found in Technique 45. Good editing techniques can be used to make 30" x 40" prints and larger from this image that was taken with a 3-megapixel Canon D30. One other factor that can limit how large an image can be increased is how much the image needs to be sharpened. In Technique 11, you learned that an image should not be sharpened until it has been sized for its intended use. The process of up-sampling an image will at some point create visible pixelization; sharpening an image with moderate pixelization can result in a wholly unsatisfactory image. Likewise, up- sampling an image that has already been sharpened can cause an even nastier problem — up-sampled sharpening! Remember that you can’t actually sharpen an image; you can only increase the percep- tion that an image is sharp by creating more contrast along the “edges” of an image and this increase in contrast normally does not res-up well. Okay — enough talk; it is time to increase the size of the digital photo of a dragonfly to make a print to fit on Super B-sized paper, which is 13" x 19". Super B 282 Chapter 8 Making Photographic Prints Bicubic (new and improved since Adobe Photoshop 7), and Bicubic Sharper. ■ Use software specifically designed for increasing image resolution. Camera RAW found in Adobe Photoshop CS allows you to increase image size as does Phase One’s Capture One DSLR. There are also plug-ins such as LizardTech’s Genuine Fractals Print Pro, Extensis’s pxl SmartScale, and S-Spline from Shortcut Software to name just three. Other software products including image viewers and editors contain interpolation algo- rithms that are often touted as being superior (but may or may not be) to the original Bicubic found in earlier versions of Photoshop. These programs include Qimage Pro and IrfanView 32, and Photo Cleaner. ■ Keep your images at their captured resolution and leave any necessary resampling to the driver of the target printer. In Technique 45 you will learn that the Lightjet 5000 printer can print exceptional images as large as 30" x 40" from a 3-megapixel or larger camera if the photo is an excellent photo. Many of the new under-$1,000 photographic printers made by Canon, Epson, HP, and other printer vendors are quite capable of increasing image size with minimal image degradation. If you want to improve the results you get from such printers, you can purchase RIP software such as ImagePrint (www. colorbytesoftware.com), which in some cases can even improve on image quality when image resolution is increased. With all those choices, the multi-million-dollar question remains: How should you increase the size of an image without causing unacceptable image degradation? There are many answers (and opinions) to that question and in my opinion, each good answer always starts with “it depends.” How far you can “res-up” an image depends on a number of image characteristics and how critical it is to have a sharp, in-focus image instead of one with the dreaded (or sometimes desirable) pixelization or softness that 08 541749 Ch08.qxd 1/8/04 3:40 PM Page 282
  • 3.
    paper is thelargest paper that can be used in most of the desktop inkjet printers such as the Epson 1280 and 2200. The dragonfly photo is a good one to use to learn about increasing image size as some of the areas of the image are sharply focused and other areas are soft and out of focus due to the extremely shallow depth of field. STEP 1: OPEN FILE ■ Choose File ➢ Open (Ctrl+O PC, Cmd+O Mac) to display the Open dialog box. Double- click the 41 folder to open it and then click the dragonfly-before.tif file to select it. Click Open to open the file. This image has been converted from a RAW file without any sharpening and without increasing resolution. Some basic image enhance- ment has been done with Adobe Photoshop CS. No sharpening has yet been applied. STEP 2: INCREASE IMAGE SIZE ■ Choose Image ➢ Image Size to get the Image Size dialog box shown in Figure 41.3. Make sure there is a checkmark in the box next to Constrain Proportions to keep the proportions of the image the same when the image size is changed. Click in the box next to Resample Image if there is not already a checkmark; then select Bicubic Smoother as the interpolation algorithm. Bicubic Smoother is almost always the best method to select for enlarging images and it is superior to the “step or stair interpolation”in which you increase an image by a small percent many times until you get the image size you want. Bicubic in Adobe Photoshop CS is a new version, but it generally produces poorer results than Bicubic Smoother. If you are in need of down-sampling an image, you should try Bicubic Sharper. Increasing Image Resolution to Make Large Prints 283 To get a 1 ⁄2" border on 13" x 19" paper, type 18 in the Width box in the Document Size area. Notice that the 11.8MB file is now a 35.5MB file with dimensions of 4,320 x 2,875 pixels. While we have only increased the width and height about 175 percent, we have increased the total pixel count by 300 percent (35.5/11.8 = 300 percent). ■ Click OK to increase image size by 300%. If you are planning on making a print on a specific printer, then make any judgment calls on how far you can increase image resolution by making prints — not by looking at the image on your computer screen. After you make a few prints, go back and look at the images on your screen and you are likely to be sur- prised to see that what looks like a “not so good” image makes a beautiful print. STEP 3: SHARPEN IMAGE Now — and only after the image has been sized to its final size — should you sharpen the image. You can learn more about sharpening images in Techniques 11 and 39. 41.3 08 541749 Ch08.qxd 1/8/04 3:40 PM Page 283
  • 4.
    284 Chapter 8Making Photographic Prints Next time you need to increase the size of an image remember: the best approach to increasing image res- olution “depends” on the quality and characteristics of your image. Experiment and don’t judge the effects of up-sampling or sharpening by looking at your monitor if you are printing the image. Print it — then judge the results. My bet is that you will more often than not get the best results using Adobe Photoshop CS’s new Bicubic Smoother algorithm found in the Image Size box; plus, it is so fast compared to just about any other approach or software product you may use. Try it — I’m betting you’ll be happy with the results you get. 08 541749 Ch08.qxd 1/8/04 3:40 PM Page 284