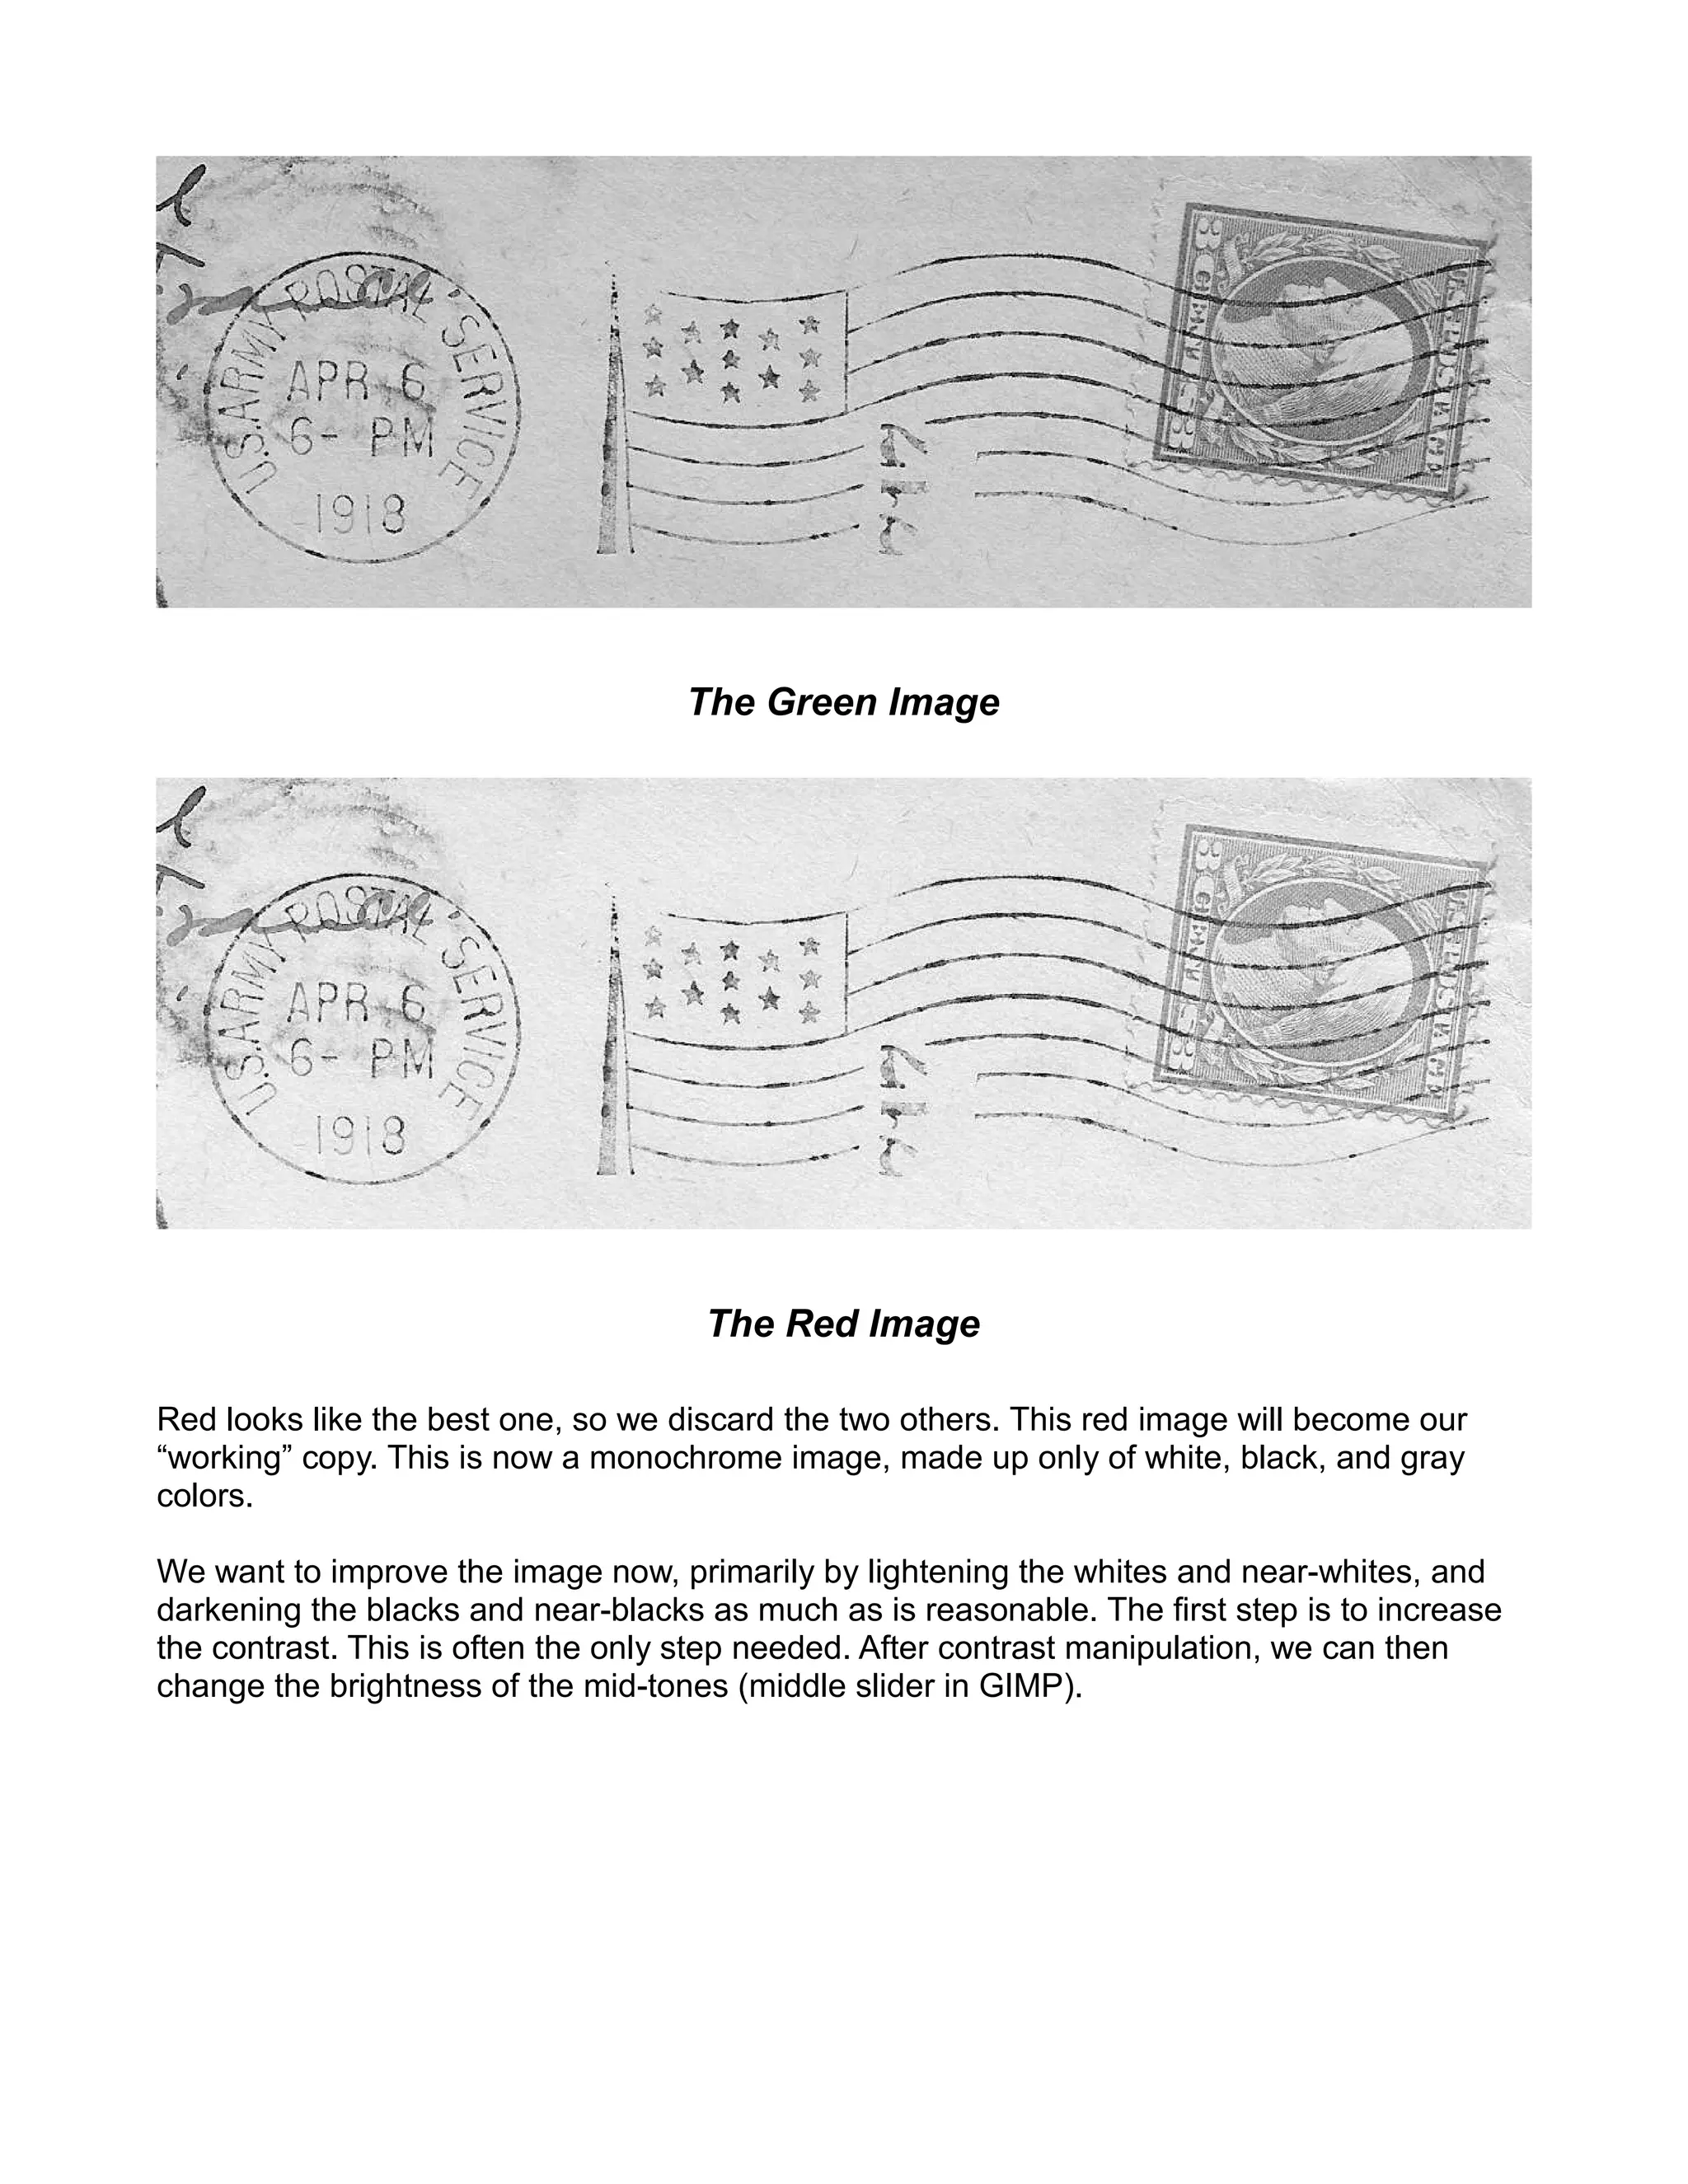
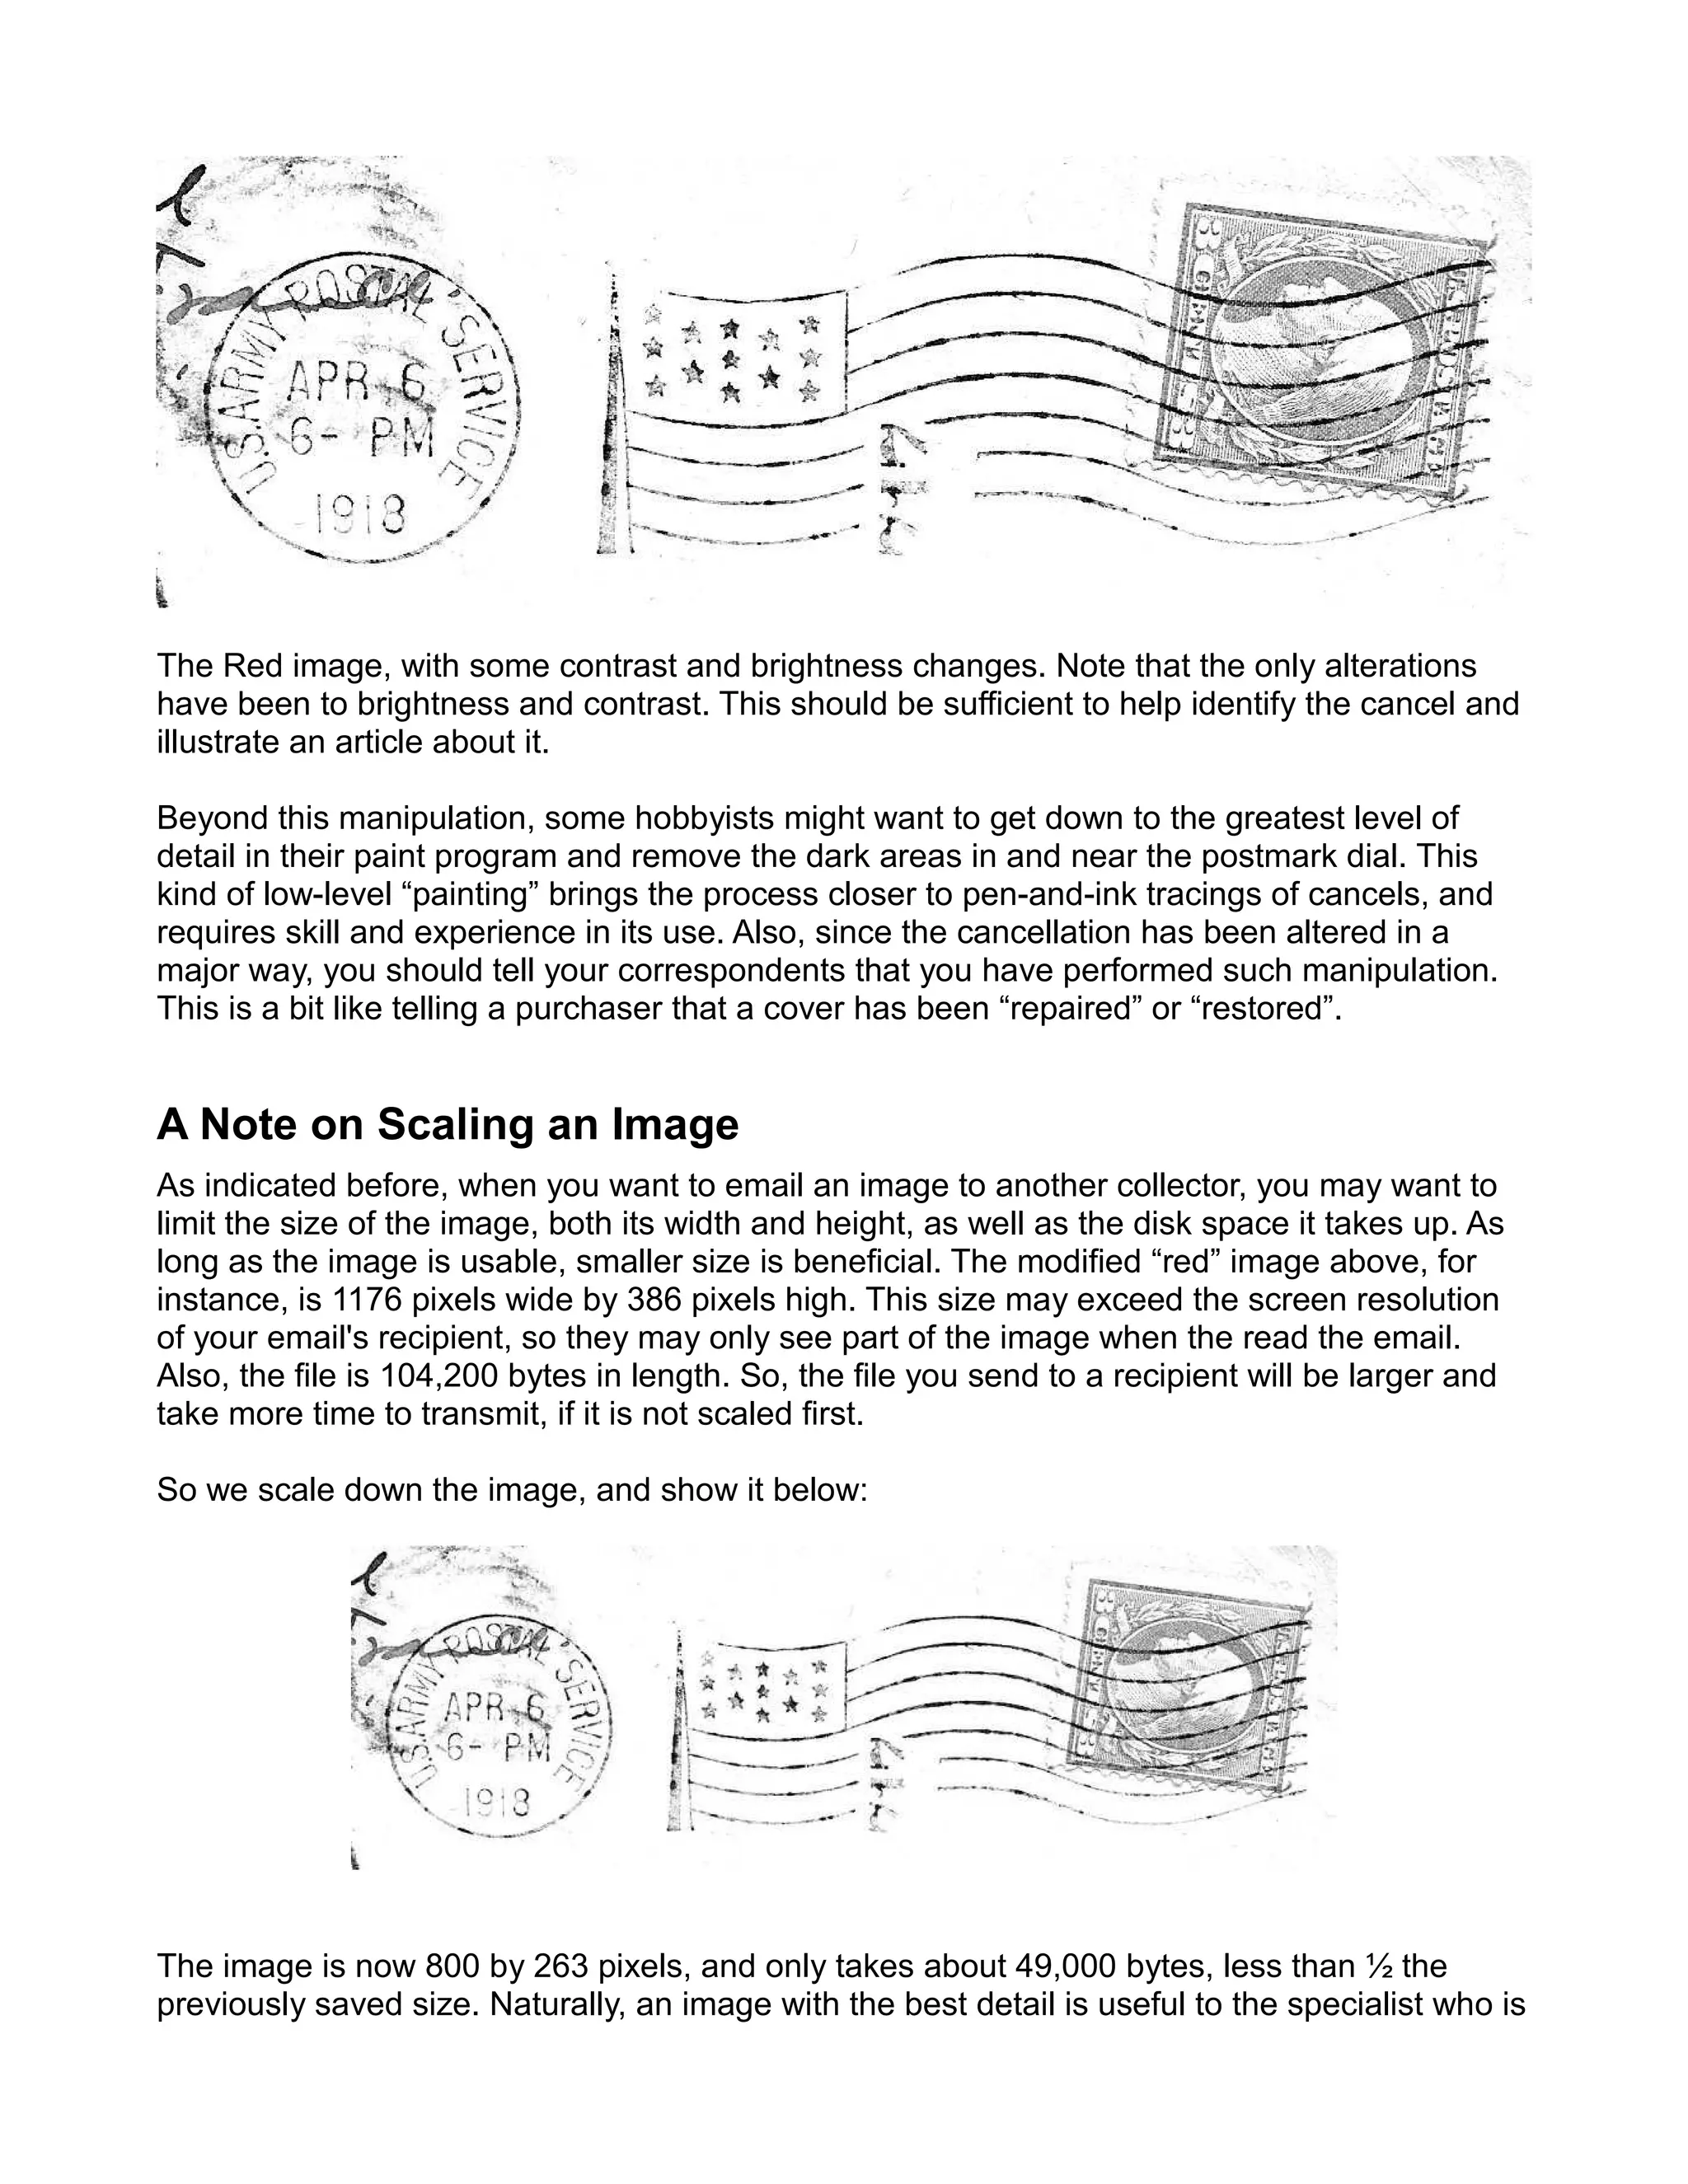
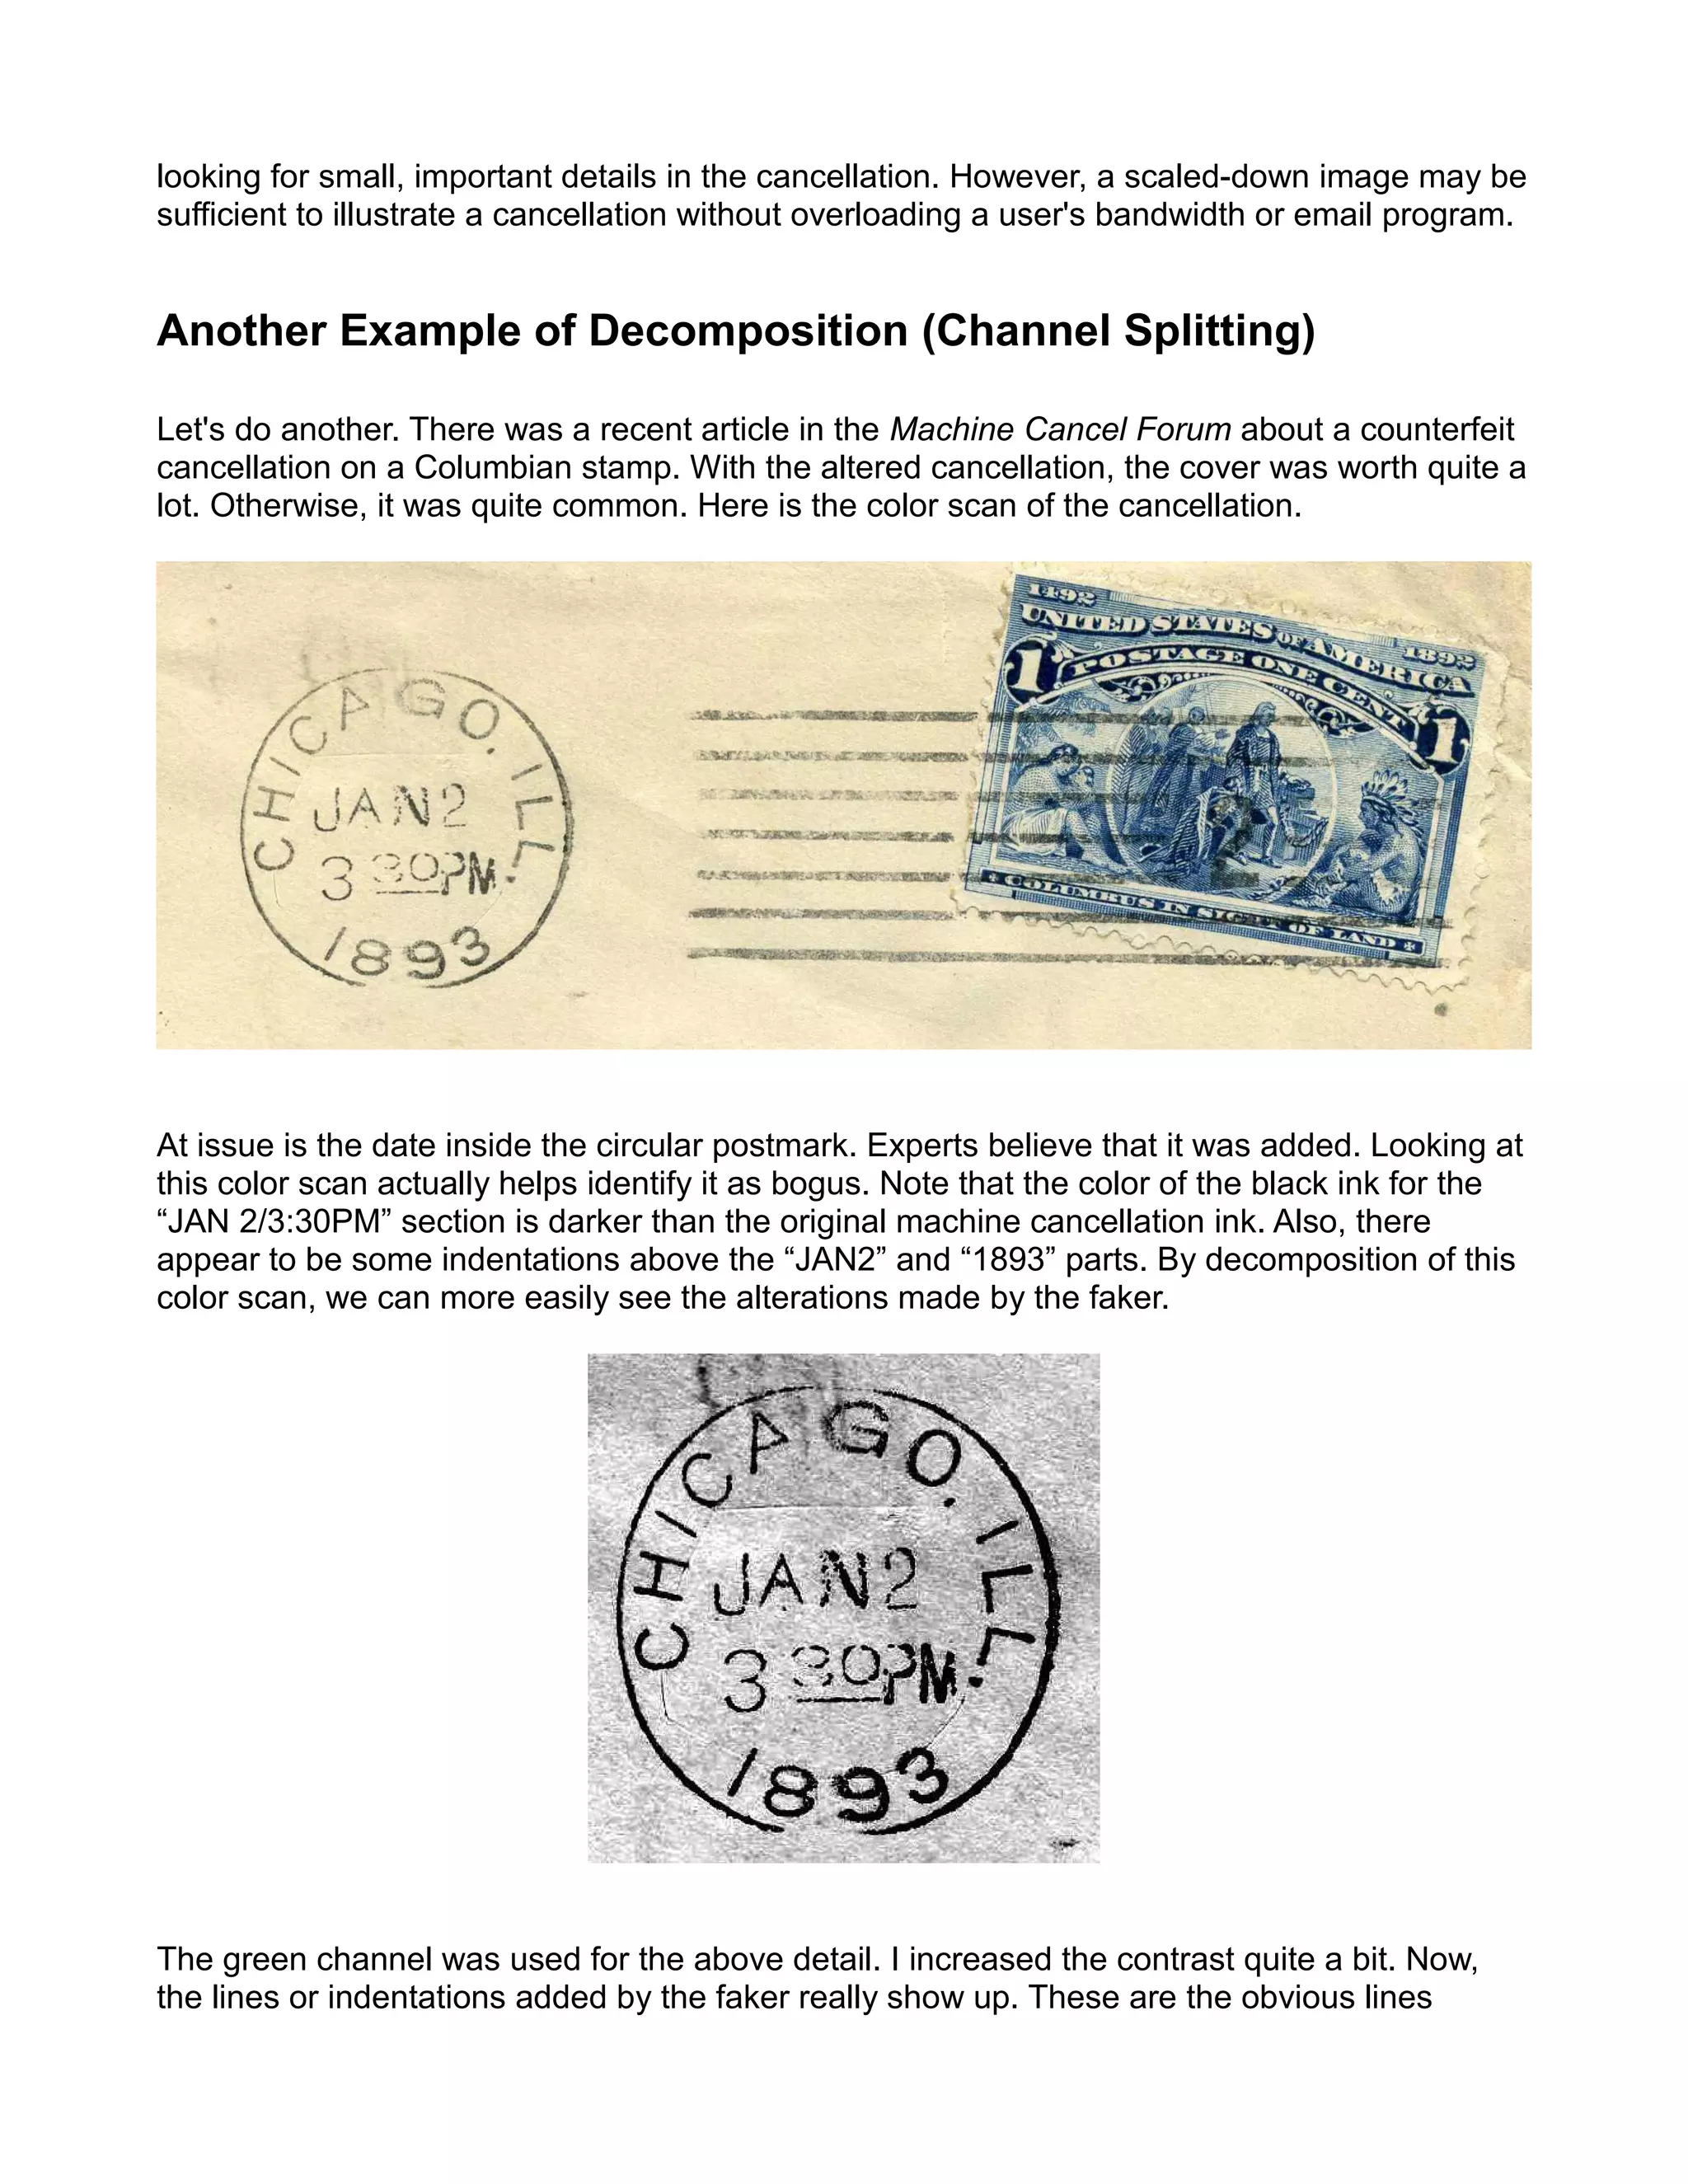
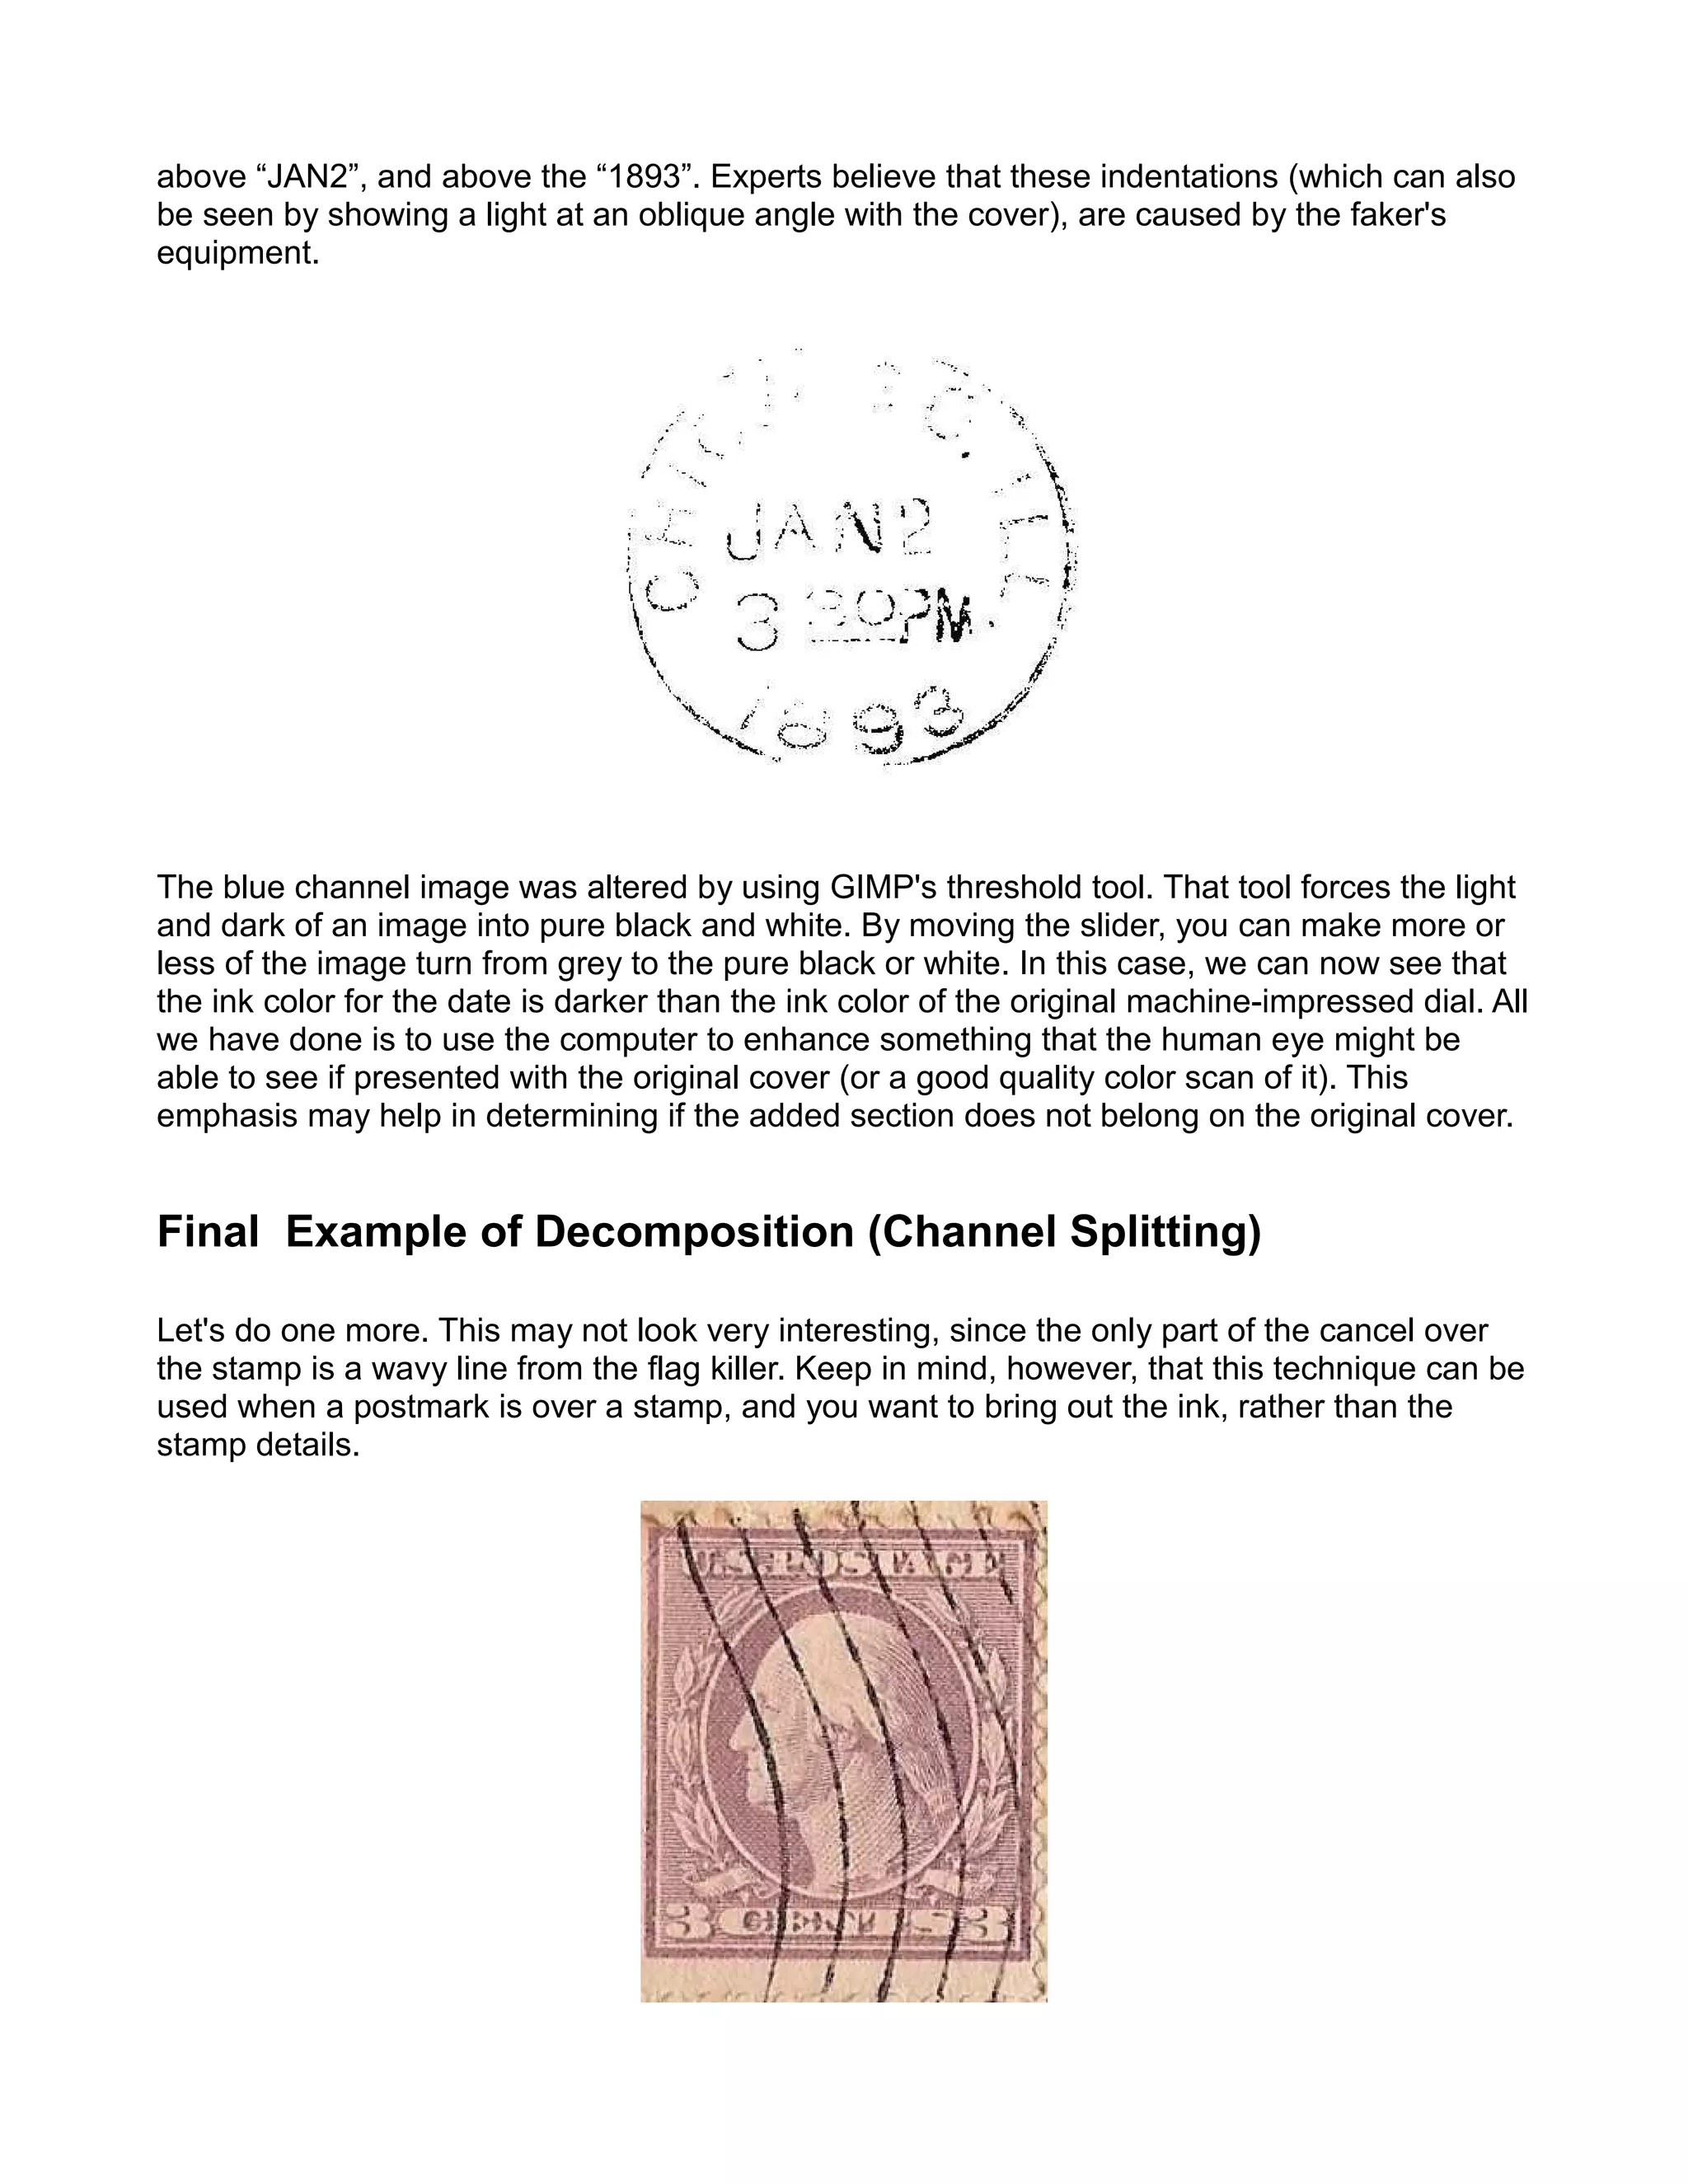
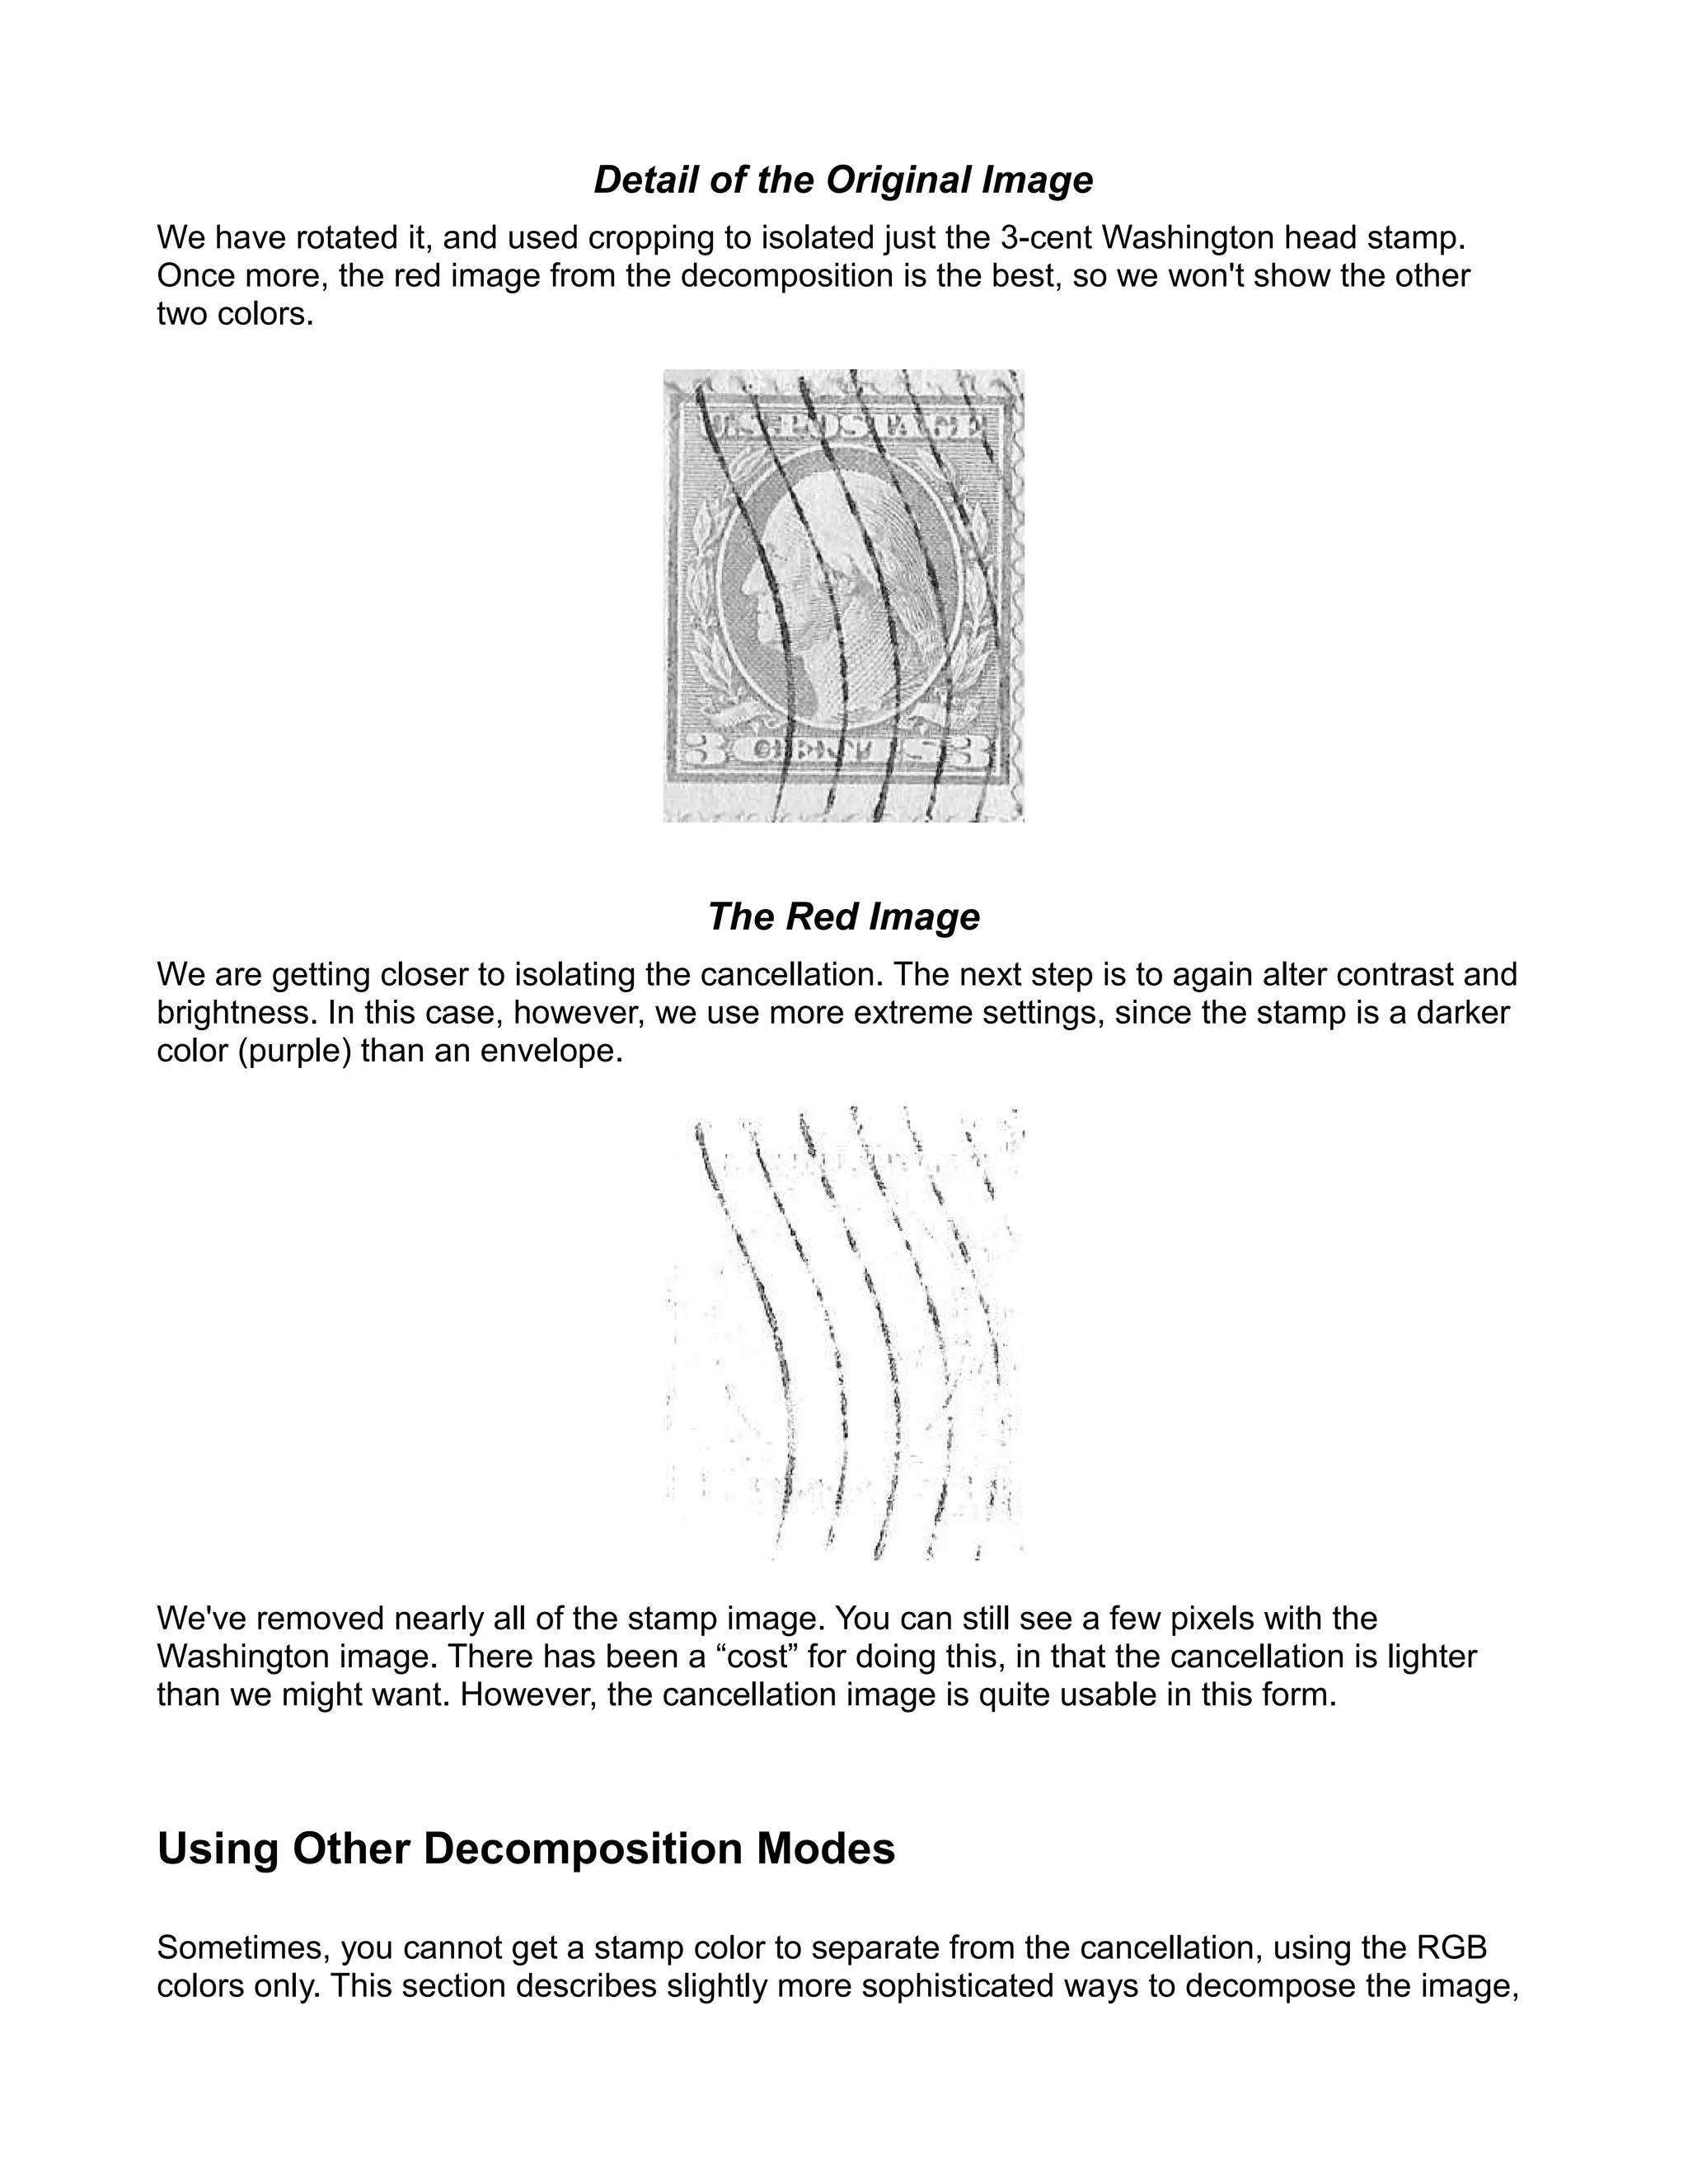
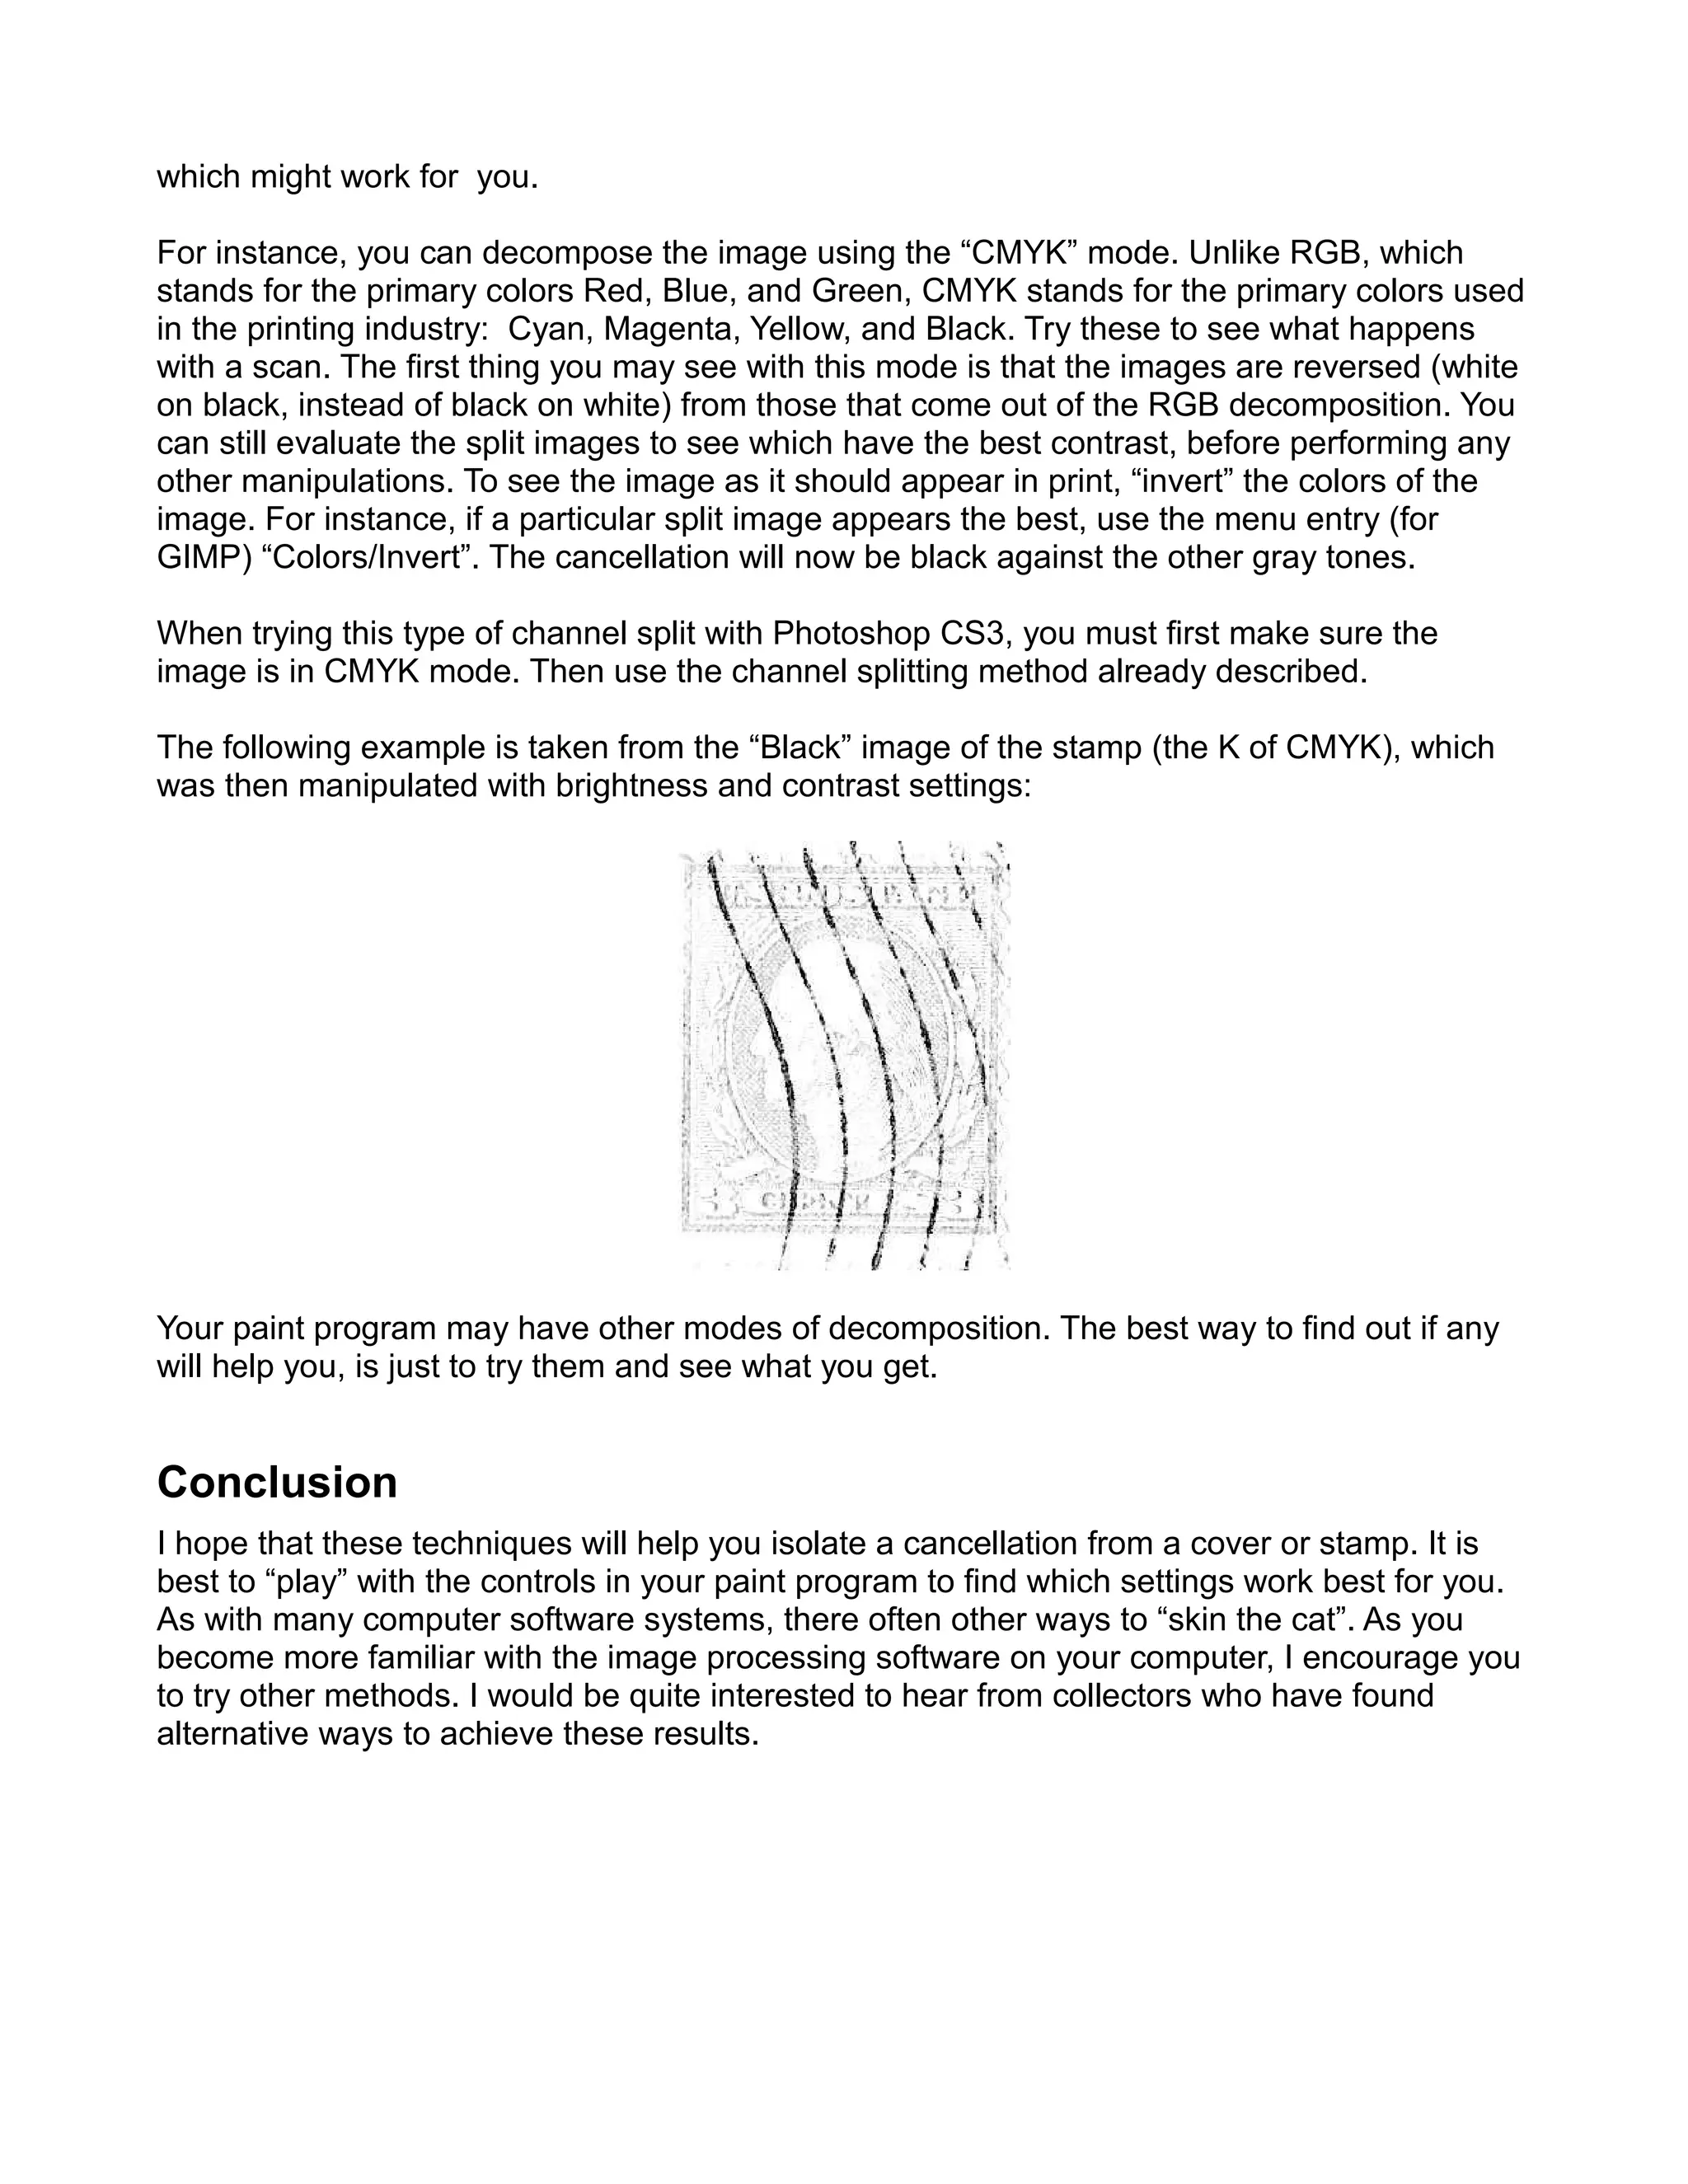
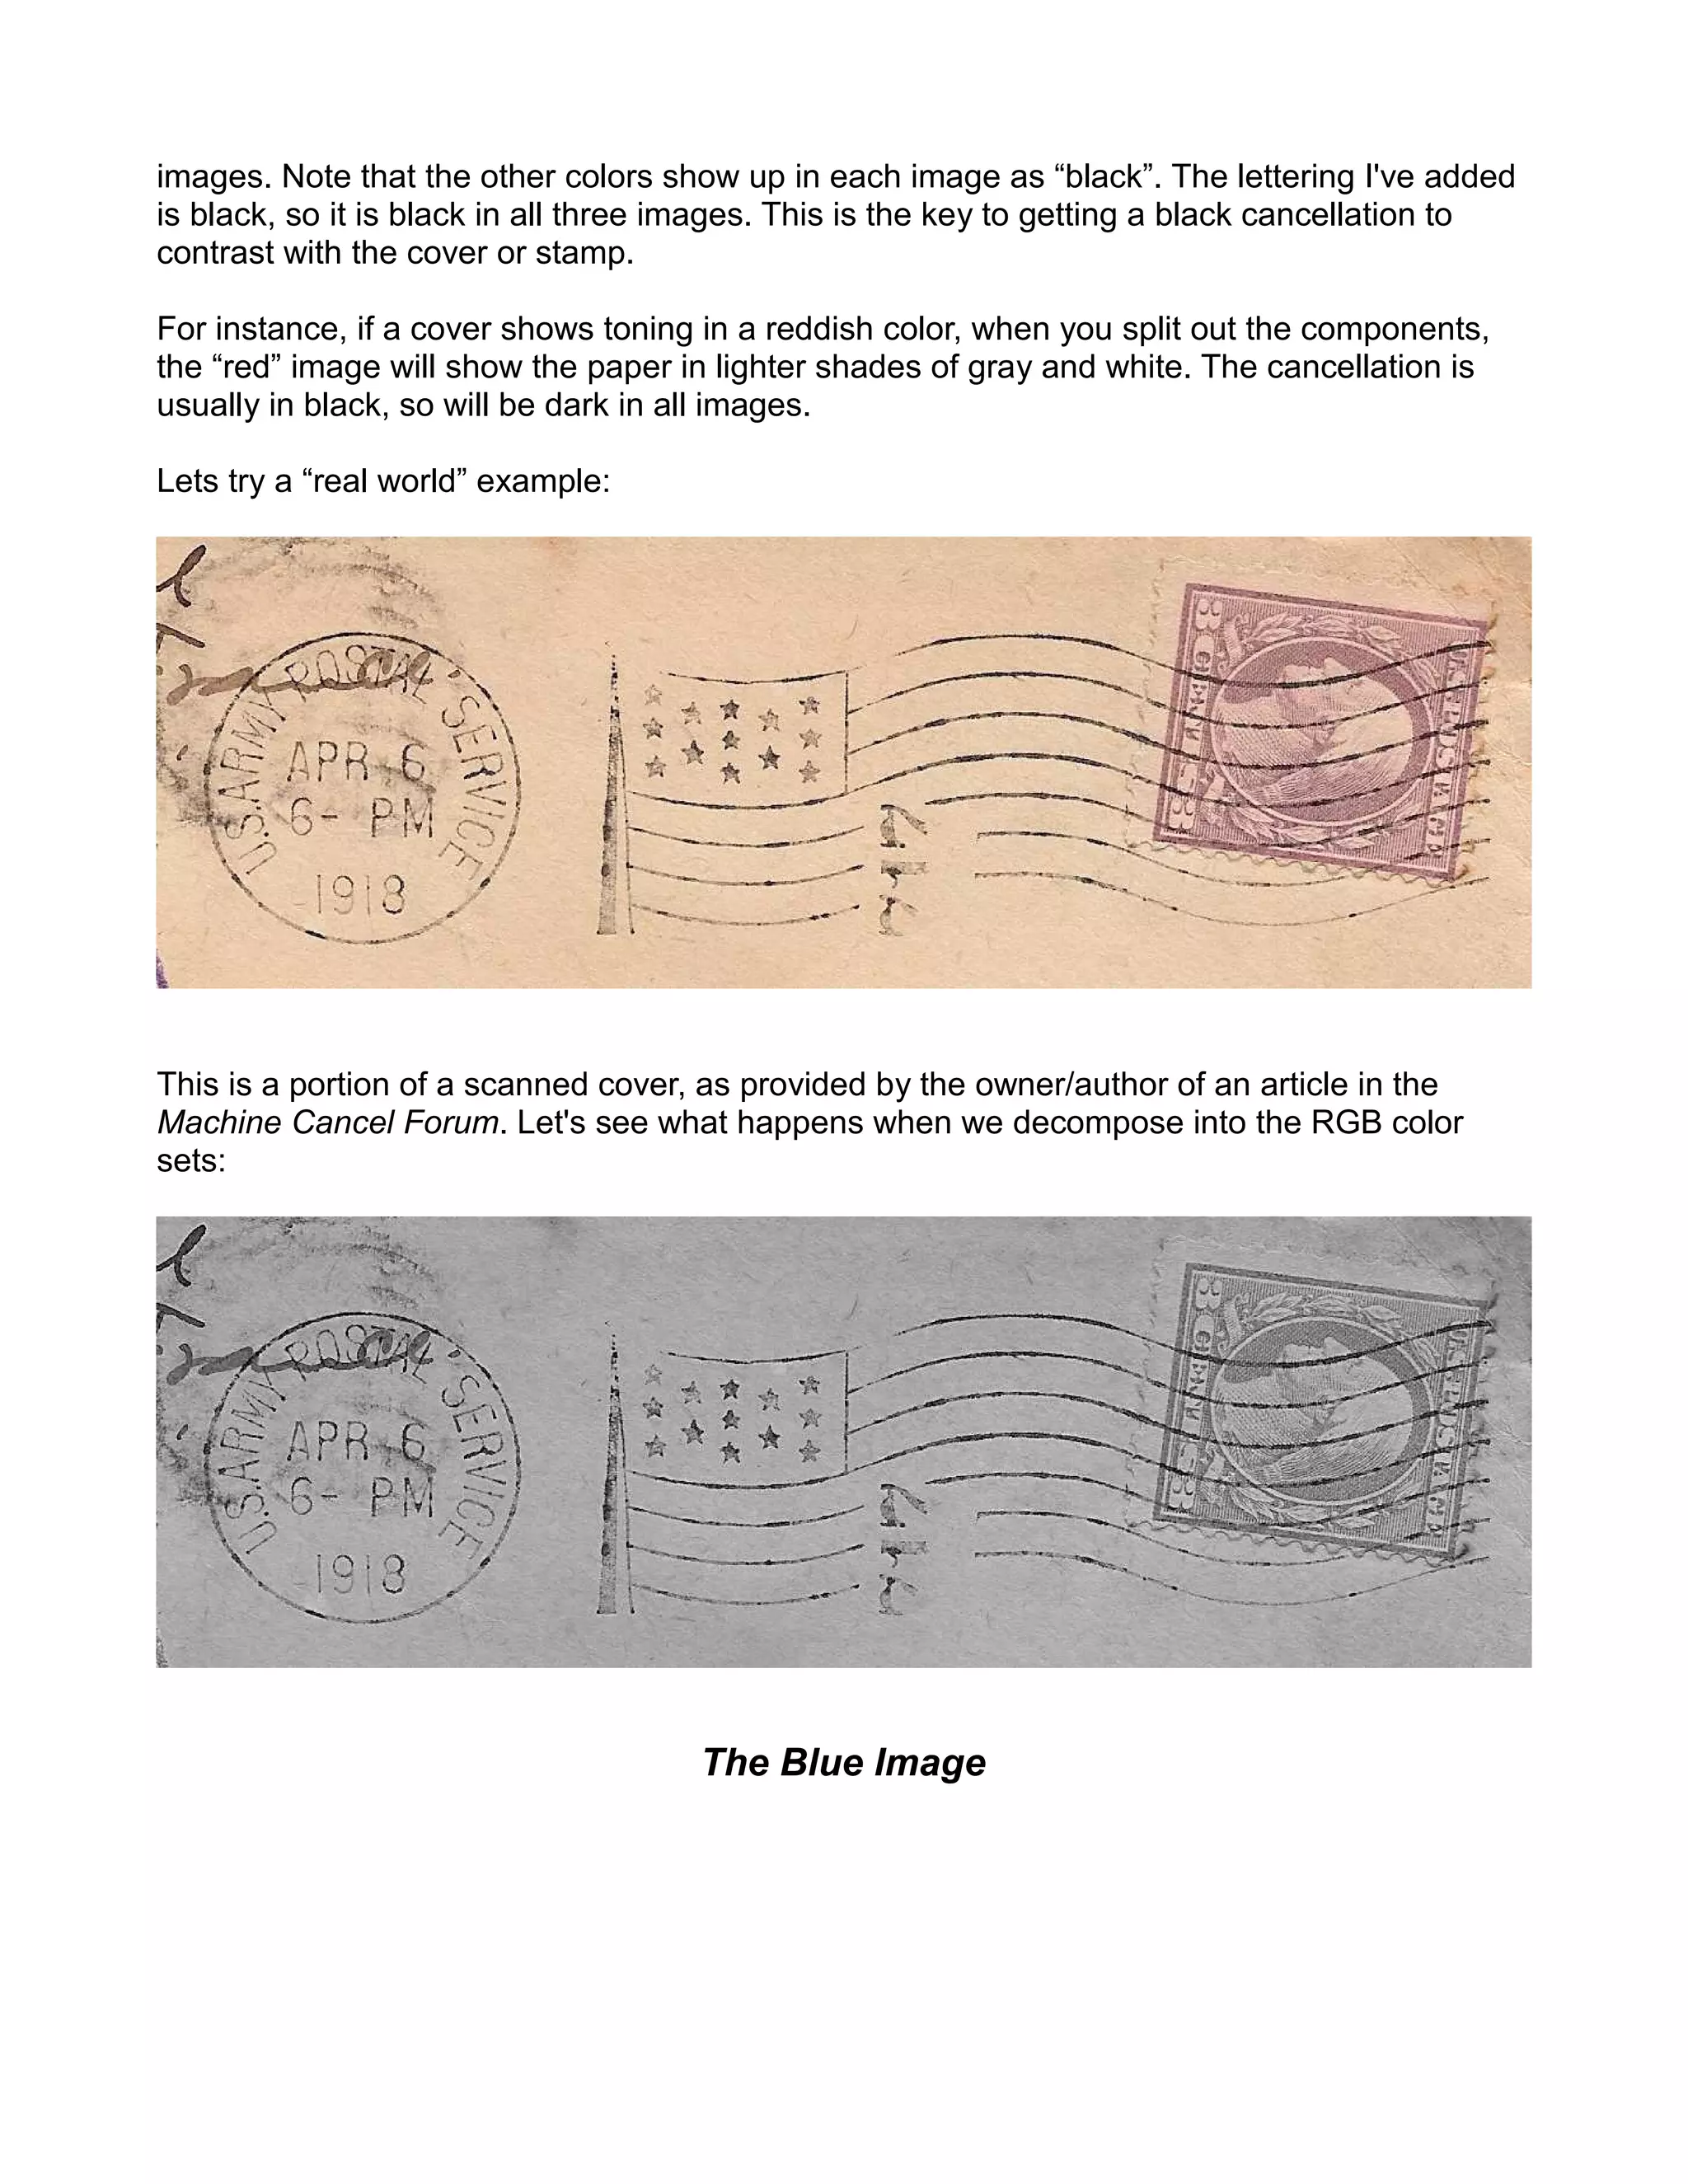
Collectors of cancellations, postal markings, and covers often wish to illustrate only the
cancellation or marking as it appears on a cover or stamp. Historically, this operation has
been performed by hand, and is called “tracing”. It is literally an artistic activity, and great skill
is required to create a good facsimile of a cancel for research purposes.
The document provides information about an upcoming Cambridge Darkroom Meetup on colour management. It will give attendees the basics of colour concepts, colour management fundamentals, and an overview of how colour is represented and interpreted across different devices and colour spaces. The slides for the meetup will be made available as a PDF. Attendees are encouraged to ask questions and provide feedback to help improve future meetups.
The document discusses several topics related to digital images including resolution, pixels, vector and raster images, file formats, image capture, optimization, and storage/asset management. Resolution refers to the number of pixels per inch in an image, with higher resolution providing more detail. Pixels are the smallest controllable elements that make up an image. Vector images use mathematical descriptions while raster images use a pixel grid. Common file formats include JPG, TIF, GIF, PNG and RAW, each with advantages for different uses. Image capture involves lighting, organization and cleaning. Optimization improves image quality and preparation for delivery. Storage and asset management involves collecting, detailing and storing digital images and metadata at the highest resolution.
This document provides a tutorial for submitting artwork to MorphiusDisc Manufacturing for production. It covers topics such as recommended software, file formats, image resolution and size, color modes, importing images into page layouts, and common mistakes to avoid. The goal is to help customers prepare their artwork properly to avoid delays and ensure high quality finished products.
This document provides an introduction and overview of Adobe Photoshop. It discusses the history and development of Photoshop from its initial version in 1988 to modern versions. It also outlines some of Photoshop's main uses cases including photo editing, graphic and web design, engineering, science, and film/video. Finally, it demonstrates some basic tools in Photoshop like the Red Eye Tool, Healing Brush Tool, and Liquify filter.
This document discusses Photoshop and creating headers in Photoshop. It provides an introduction to Photoshop, describing it as image editing software. It then gives step-by-step instructions for making a header in Photoshop, including adding layers, images, text and formatting. Examples of completed headers are shown. Advantages of Photoshop include improving photo editing skills and pursuing careers in photography or design. Disadvantages include the cost and large file sizes requiring computer resources.
By taking a media studies course, the student learned about various software, hardware, and online tools used for video production. They gained experience shooting with a Canon 50D camera, using tripods, lighting equipment like red-head lights and diffusers, and an audio recorder. The student also learned how to edit video using Adobe Premiere Pro, becoming proficient with transitions, effects, and creating a polished final product. Through completing their video project, the student developed their technical skills with various equipment and got comfortable with the full video production process.
This document discusses key concepts in digital imaging including raster vs vector graphics, resolution, anti-aliasing, aspect ratios, and common file formats. Raster images use pixels on a grid and can lose quality when enlarged, while vector images use mathematical relationships and remain smooth at any size. Higher resolution means more image detail but larger file size. Anti-aliasing reduces jagged edges. Aspect ratios determine image dimensions for different display formats. Common file formats include JPEG, TIFF, EPS, and PDF.
The document discusses different types of digital file formats including raster graphics, vector graphics, and various file formats used for images, graphics, and other media. It covers raster file formats like JPEG, TIFF, GIF, and BMP and vector formats like AI, PSD, and WMF. It also discusses topics like file compression, optimizing images, capturing images digitally, file sizes, naming conventions, and organizing assets into folders.
The document discusses technologies learned through constructing a media product using Adobe Photoshop and Final Cut software. The author learned how to edit images, create posters, import and edit video clips, apply visual and audio effects, cut clips together, modify sound, and use color correction to maintain consistent lighting across clips filmed at different times. YouTube was also used for research, comparison, and textual analysis of film clips.
Raster graphics are digital images composed of pixels that store color information. They are represented as a grid of pixels and have file formats like JPEG, GIF, TIFF, and BMP. Vector graphics use mathematical relationships between points to describe flexible, scalable images ideal for logos. Common vector formats include AI, WMF, and PSD. File compression reduces size by decreasing pixel information, and images are optimized for fast online viewing by reducing file sizes through resizing, lowering bit depth and resolution, and compression.
Creating stop-motion animations with iStopMotion software allows students to bring models and drawings to life. The software captures frames from a digital camera or iSight camera connected to a Mac. Students can plan stories, create simple models and backdrops, then manipulate the models between frames to create the illusion of movement when played back at 12 frames per second. Captured animation clips can be edited and exported from iStopMotion to use in iMovie projects.
This document provides an introduction to using Adobe Photoshop for photography. It discusses key skills like asset management, file types and sizes, cropping tools, and dodging and burning tools. It also covers transferring images into Photoshop, opening and browsing files, checking file sizes, and using selection, zoom and adjustment tools to manipulate images. The document concludes with instructions on saving edited files separately from originals.
Raster graphics are made up of pixels and have a set resolution, so they can appear distorted when resized. Vector graphics are made up of mathematical paths between points, so they can be resized without distortion. Common raster file formats include JPEG, TIFF, GIF and BMP, which vary in compression, quality and file size. Common vector file formats are PSD, AI, FLA and WMF, which allow editing layers, transparency and scaling. Files can be optimized and compressed to reduce file sizes for sharing online, but this can reduce quality. Larger files have more pixels and layers, and naming files accurately helps organization. Folders are useful for storing and organizing assets in projects.
Photoshop is an image editing program developed by Adobe that allows users to create and manipulate images. It was created in 1987 by Thomas Knoll as a program called Display to view grayscale images on a Macintosh computer. Photoshop uses layers to allow independent editing of image elements without affecting other parts. Common file formats for Photoshop include PSD, JPG, PNG, EPS and TIFF.
The document provides definitions and information about different types of digital graphics file formats including raster graphics, vector graphics, and specific file formats like JPEG, TIFF, GIF, BMP, PSD, AI, FLA, and WMF. It also discusses topics like image capture methods, file compression, optimizing images for the web, file size considerations, file naming conventions, and asset management.
BTec Level 3 Extended Diploma in Creative Media Production covers key concepts in digital media including raster images, vector images, anti-aliasing, resolution, aspect ratio, file formats, color models, and Adobe software applications like Photoshop, Illustrator, and InDesign. Raster images use pixels on a grid and are resolution dependent while vector images use mathematical relationships between points and can scale smoothly. Anti-aliasing reduces jagged edges to make images appear smoother. Resolution and aspect ratio impact image quality, and different file formats like JPG, TIFF, EPS are suited to different editing software and purposes.
This document provides an overview of basic Photoshop concepts and tools for manipulating digital images, including opening, cropping, resizing and saving images, as well as using layers, transparency, and other image editing functions. It includes instructions and screenshots to illustrate Photoshop's interface and common image editing tasks.
This document discusses different types of file formats for digital graphics. It describes raster graphics, which are original images that become pixelated when enlarged, and vector graphics which can be resized while maintaining quality as they are made of geometric shapes. It then provides details on common file formats for both raster (JPEG, TIFF, GIF, BMP) and vector (PSD, AI, FLA, WMF) graphics, outlining what they stand for, common uses, and advantages and disadvantages. The document also discusses image capture methods, compression, and optimizing files.
Getting started with adobe photoshop 7.0 https://archicrewindia.com/2021/09/a...ArchiCrew India
This document provides an introduction to using Photoshop by summarizing its key interface elements and functions. It explains that Photoshop uses a layered workspace and defines key terms like layers, selections, resolution and color modes. It describes the main toolbar and menu options, highlighting tools for making selections, adjustments and basic image editing. Functions from the Image menu like size, mode, adjustments and cropping are demonstrated. The importance of layers for non-destructive editing is emphasized. In under 3 sentences, the document orients new Photoshop users to its interface and basic image editing capabilities.
Photoshop is a math program that allows users to create art by editing pixels. Pixels make up bitmapped images and determine image quality, with more pixels resulting in higher quality. Photoshop edits pixels using tools, filters and adjustments to change pixels' brightness, color, and other properties. It is important to set the correct file resolution and size in pixels per inch to ensure quality when images are printed or scaled.
This document provides an overview of key photography concepts including pixels, megapixels, resolution, color modes, histograms, and preparing images for print in Photoshop. It defines pixels and megapixels, explains how to calculate megapixels from image dimensions. It also outlines the differences between screen and print resolution, RGB and CMYK color modes, and how histograms can be used to analyze image exposure. The goal is for the learner to understand these essential digital photography and editing fundamentals.
This document provides information about working with digital images, including choosing appropriate image resolution and file format, understanding images commonly found online, and basic image manipulation in Photoshop. It discusses resolution and file format, describes common image issues like blurriness or exposure problems that can be fixed in Photoshop, and provides an overview of the scanners available in the Olin Library Arc for scanning photos, documents, and other materials.
The document discusses several potential problems that could arise during a creative project and solutions to address them. It notes that missing or damaged equipment would significantly impact work and proposes having backup equipment or planning alternative tasks. Storage issues like damaged drives or insufficient space could cause data loss, so it recommends cloud backups or external storage. Using copyrighted images without permission could result in legal penalties, so planning to only use owned or licensed content is suggested. The document also covers file formats, resolution settings, and techniques for achieving retro or low poly aesthetics.
DAY 1 - Introduction to Photo Editing and Photoshop CS6Sef Cambaliza
Photo editing is the process of altering digital or analog images. It involves basic techniques like cropping, resizing, correcting, sharpening, and softening images. Adobe Photoshop CS6 is a tool that allows users to create, modify, combine, and optimize digital photos. It was created in 1987 and later purchased by Adobe in 1988. Photoshop uses layers, selections, resolution, and color modes to edit images. The Photoshop window displays menus, tools, panels, and more to help users modify photos.
This document discusses what the author has learned about filming techniques, video editing, sound manipulation, and integrating images and software. The author learned when the best times are for filming, how important lighting is and that scenes sometimes need to be adapted or reshot. They also learned to edit and render videos more efficiently, manipulate sound to improve films, and integrate images from Photoshop into other software and further adapt them.
Raster graphics are made up of pixels and have a fixed resolution, so changing their size results in quality loss. Vector graphics use mathematical equations to describe paths, lines and shapes, allowing them to be scaled freely without quality loss. Common file formats include JPEG for photos, GIF for animations, TIFF for print quality images, and PNG for images with transparency. File formats can be optimized for web use by choosing the right format, compressing size and only including necessary details. This improves loading speed without compromising quality too much.
Η παρουσίαση που κάναμε στα πλαίσια της υποστήριξης από τη WEDIA του AllThingsFacebook '12 event που διοργανώθηκε από την Boussias Communications το Δεκέμβριο του 2012.
Δείτε περισσότερα: http://www.allthingsfacebook.gr/
The Beijing Axis combines research and insight with practical experience from the field to produce a range of knowledge tools on China's economic engagement with the rest of the world, which are all available free of charge.
The document is a company profile for The Beijing Axis Ltd, which provides cross-border business solutions between China and other countries/regions. It operates through three synergistic businesses: the China Strategy Group assists with cross-border China strategies; the China Sourcing Unit supports sourcing in China; and China Capital Advisors provides financial advisory services for cross-border investments. The Beijing Axis focuses on key industries like mining/resources and manufacturing, and key markets like Africa, Russia, and Australia. It aims to facilitate Sino-global economic integration with professionalism and a commitment to sustainability.
This document is the September 2011 issue of The China Analyst, a publication by The Beijing Axis that provides analysis on China's business and economic engagement with other countries and regions. The issue focuses on China's growing role in the developing world.
The first article examines China's role in infrastructure development projects across Africa in exchange for natural resources. The second article discusses how China-Latin America trade is shifting toward higher value added sectors. The third article profiles China's top construction machinery manufacturers that are expanding globally. The fourth article analyzes China and other BRICS nations' increasing investments and projects across Africa.
1) The document discusses the opportunity for technology to improve organizational efficiency and transition economies into a "smart and clean world."
2) It argues that aggregate efficiency has stalled at around 22% for 30 years due to limitations of the Second Industrial Revolution, but that digitizing transport, energy, and communication through technologies like blockchain can help manage resources and increase efficiency.
3) Technologies like precision agriculture, cloud computing, robotics, and autonomous vehicles may allow for "dematerialization" and do more with fewer physical resources through effects like reduced waste and need for transportation/logistics infrastructure.
Image Editing for Beginners - Training HandoutTeresa Beary
This document provides an overview of image editing for beginners. It discusses common image file formats like JPEG, PNG, GIF and TIFF as well as when each format is best used. It also covers software like PowerPoint, GIMP and screenshot tools to edit and work with images. Key concepts covered include layers, transparency, resolution for on-screen vs print images, and the difference between raster and vector graphics. Additional online resources are provided for further learning.
This document defines 26 common graphic design terms for designers to know, including alignment, bleed, CMYK, concept, crop marks, and layers. It explains terms like negative space, orphan, Pantone system, proof, raster image, resolution, RGB, slug, typography, and vector graphic. Understanding these basic terms is important for designers to communicate effectively and establish credibility in the industry.
This report summarizes the key differences between bitmap and vector images. Bitmaps are composed of pixels that become pixelated when resized, while vectors can be resized without loss of quality. The report also discusses advantages and disadvantages of different methods for capturing and organizing digital images and graphics. These include scanning, digital photography, and drawing with a graphics tablet. Organizing files by subject in folders is presented as an effective way to keep digital work organized.
Basic Concepts in Photo Editing
Explore and examine the basic concepts and underlying principles of Photo Editing specifically using the Adobe Photoshop
The document discusses several methods for increasing image resolution to make large prints without degradation, including:
1) Using cameras with high megapixel counts to capture sufficient original resolution.
2) Employing improved interpolation algorithms in Photoshop CS, such as Bicubic Smoother, to enlarge images with excellent results.
3) Software designed specifically for increasing resolution, such as Capture One DSLR or plug-ins like Fractals Print Pro, can also be used.
4) Letting the printer driver handle any necessary resizing to minimize degradation.
It recommends experimenting with different techniques, as the best approach depends on the image characteristics and intended print size. Enlarging should only be judged
The document discusses different file formats and their properties. It compares vector and bitmap images, explaining that vector images can be resized easily while bitmaps always look the same. It also compares GIF and JPEG formats, noting that GIF is for simple images while JPEG compresses photos. Embedded graphics are part of a document while linked graphics only reference an external file. A color palette assigns numbers to a limited subset of colors in an image. Lossless compression allows exact reconstruction of original data. PNG is presented as a better alternative to GIF for photos. BMP format is not suitable for web images as browsers do not support it. Flickr is described as a photo sharing site mainly used by bloggers.
The document provides a review of the top 10 reasons to own Adobe Photoshop CS3 Extended. It summarizes new and improved features in CS3 including non-destructive smart filters, improved selection tools, enhanced black and white adjustments, faster performance, and additional advanced tools in the Extended version for photographers, video editors, and other creative professionals. The review recommends CS3 Extended for those who work with video, 3D graphics, or scientific/medical imaging and highlights its improved photo merging and alignment features.
This document provides a summary of the top 10 reasons to own Adobe Photoshop CS3 Extended according to the author. Some key highlights include improved tools for black and white photos, selection tools, non-destructive smart filters, faster performance, an updated interface, and enhanced Camera Raw functionality. The new features aim to make Photoshop more intuitive and efficient for photographers and other users.
This document provides a tutorial for submitting artwork to MorphiusDisc Manufacturing for production. It covers topics such as recommended software, file formats, image resolution and size, color modes, importing images into page layouts, and common mistakes to avoid. The goal is to help customers prepare their artwork properly to avoid delays and ensure high quality finished products.
This document discusses digital graphics technology, describing features of vector and bitmap images. Vector images are resolution-independent and scalable without quality loss, using mathematical expressions to represent lines and shapes. Bitmap images are made up of pixels that lose quality when resized. The document provides examples of how vector and bitmap images differ when resized, and discusses image capturing, output methods for print and screen, storage considerations like file size and organization, and naming conventions.
The document provides guidance on best practices for creating clean Photoshop (PSD) files for web design projects. It recommends starting with good file organization habits like logical naming and non-destructive editing using layers and masks. Adjustment layers and effects are preferable to allow easy changes later. Templates can then be reused each month. Specific tips covered include using the "Save for Web" feature to optimize file size, embedding fonts and images to ensure others can open the file properly, and using layer groups to organize elements.
Syllabus and tutorials on how to use Adobe Photoshop Elements. Covers the differences between program versions, basic layers, brushes, and masks. Walks through several exercises such as skin retouching and extracting unwanted elements froma scene.
This document summarizes different types of digital graphics, including bitmaps and vectors. Bitmaps are composed of pixels and are best for photos with many colors. They are easy to create but large in file size. Vectors use mathematical expressions to represent shapes and objects and are smaller in file size, but more difficult to create. Factors like compression and resolution can impact image quality. Both scanning and digital photography are discussed as methods to capture images, each with advantages and disadvantages. Common file formats, programs used, and organizing digital assets are also summarized.
An overview of and best practices for digitization, digital images, scanners, filetypes, and software. (c) 2008 Michael Sheyahshe & Mary Skaggs www.alternativemedia.biz
This document provides information about Francesco Marzoli, the author of the Camera Raw User's Guide. It discusses Marzoli's background and experience in digital photography and photo editing. It also includes biographical details such as Marzoli's role as an Adobe Certified Expert in Photoshop, Beta Tester for X-Rite products, and founder of photography organizations. Finally, it lists Marzoli's social media and website links where readers can find his tutorials and courses.
Computer displays are made up of grids of small rectangular pixels that together form images. The smaller and closer together the pixels are, the higher the display's resolution and image quality. However, higher resolution requires larger file sizes to store more pixel data. Common file formats for raster graphics include BMP, PNG, GIF, TIFF and JPEG, which use different types and levels of compression to reduce file sizes. Compression can decrease file sizes but may also lower image quality or slow opening times if decompression is required. Optimization aims to improve how efficiently systems use resources like processing time, memory and power.
Vector images use mathematical formulas of lines and curves to create shapes without using pixels, allowing them to stay smooth when zoomed in or out. Raster images are made up of pixels that become visible as jagged edges when zoomed in. Antialiasing reduces jagged edges by surrounding pixel borders with intermediate shades, making lines appear smoother. Image resolution, measured in DPI or PPI, determines image quality and file size, with higher resolution images having more pixels and better quality but larger file sizes. Common file formats for images include TIFF, JPEG, PNG, and GIF, each suited for different uses.
Vector images use mathematical formulas of lines and curves to create shapes without using pixels, allowing them to stay smooth when zoomed in or out. Raster images are made up of pixels that become visible when zoomed in, revealing the image to be made of a series of dots. Higher resolution images have more pixels and result in better quality printing but larger file sizes. Aspect ratio refers to the width-to-height ratio of an image.
The document discusses how to theme various components of Fedora, including:
- Install-time graphics like boot media splash and installer banners use specific file formats, packages, and paths.
- Boot-up graphics like the OS selection menu and graphical boot screen also have standardized formats and locations.
- Ubiquitous desktop elements like the wallpaper, icons, window manager, and screensaver dialog can be customized following freedesktop specifications.
- Resources for help include the Fedora Art mailing list and IRC channel. Proper testing and design principles like usability and licensing should be followed.
Procrastination is a common challenge that many individuals face when it comes to completing tasks and achieving goals. It can hinder productivity and lead to feelings of stress and frustration.
However, with the right strategies and mindset, it is possible to overcome procrastination and increase productivity.
In this article, we will explore the causes of procrastination, how to recognize the signs of procrastination in oneself, and effective strategies for overcoming procrastination and boosting productivity.
Inspire: Igniting the Spark of Human Potentialgauravingole9
Inspire: Igniting the Spark of Human Potential
Inspiration is the force that propels individuals from ordinary to extraordinary. It transforms ideas into innovations, dreams into realities, and individuals into icons. This article delves into the multifaceted nature of inspiration, exploring its sources such as nature, art, personal experiences, and the achievements of others, and its profound impact on personal growth, societal progress, and cultural evolution. Through the lens of historical figures and timeless quotes, we uncover how inspiration fuels creativity, drives societal change, and ignites the spark of human potential.
As we navigate through the ebbs and flows of life, it is natural to experience moments of low motivation and dwindling passion for our goals.
However, it is important to remember that this is a common hurdle that can be overcome with the right strategies in place.
In this guide, we will explore ways to rekindle the fire within you and stay motivated towards your aspirations.
You may be stressed about revealing your cancer diagnosis to your child or children.
Children love stories and these often provide parents with a means of broaching tricky subjects and so the ‘The Secret Warrior’ book was especially written for CANSA TLC, by creative writer and social worker, Sally Ann Carter.
Find out more:
https://cansa.org.za/resources-to-help-share-a-parent-or-loved-ones-cancer-diagnosis-with-a-child/
Understanding of Self - Applied Social Psychology - Psychology SuperNotesPsychoTech Services
A proprietary approach developed by bringing together the best of learning theories from Psychology, design principles from the world of visualization, and pedagogical methods from over a decade of training experience, that enables you to: Learn better, faster!
Understanding of Self - Applied Social Psychology - Psychology SuperNotes
Isolating Cancellations from Scanned Stamps and Postal History
1. Isolating Cancellations from Scans of Covers and/or Postage Stamps
Bob Swanson
07/06/09
Introduction
Collectors of cancellations, postal markings, and covers often wish to illustrate only the
cancellation or marking as it appears on a cover or stamp. Historically, this operation has
been performed by hand, and is called “tracing”. It is literally an artistic activity, and great skill
is required to create a good facsimile of a cancel for research purposes.
We now have a newer technique available to us, thanks to the computer and image scanner.
This type of image is different from a tracing, of course, and each method offers both
advantages and disadvantages to the collector and researcher.
I am going to try to describe in this article, how you can take a color scan of a cover, card, or
stamp, and create a monochrome (gray) image of just the cancellation. Note that this method
does not work for every stamp, postmark, or envelope color. However, I have had good
results even with old covers that are toned or stained. The technique works for many (but not
all) stamp colors.
Consider that if the cancellation is poor to start with, no computer-based method can
automatically create images where there are none, or return ink to a portion of a cover where
it was not impressed. In that case, the creation of a cancellation image falls back to the
human artist. The artist may use a computer or pencil and pen and ink, but the image is
constructed using their eye and mind working together.
The basic computer operations are:
● Scan the cover/card in color.
● Process the scanned image in an Image Processing Program, by first decomposing (or
splitting) the image into Red/Green/Blue (RGB) images .
● Select the best image of the resulting monochrome set, discarding the others.
● Adjust the brightness and contrast of the image and save it.
While this description of the operations seems simple (and it is, once you are used to
performing it), there is a bit of technology behind the processing. You will need a color
scanner, a computer, and image processing software.
The following paragraphs describe in greater detail what you need, and the issues associated
with using the hardware and software I've listed.
Scan Technology
2. The process starts with a color scan of a stamp, cover, or card with the cancellation or
marking to be extracted. Use the highest quality you can afford and store the image on the
computer's hard drive. Most scanners these days can easily create a scan at 2400 dots per
inch (DPI) or better, which works for most markings.
When I use the word “afford” I mean that you should experiment to find out just how much
disk space is needed to hold the image (and new generations of images), how much memory
is needed to process the image quickly in your computer, and how much computing power is
required to manipulate the images. If the original image is too large for your computer, it will
take too long to process, or run the computer out of memory during processing. In addition,
the image files, or intermediate files, may fill up the hard drive of the computer. Ask any
graphic artist who uses a computer and they will tell you that there is never enough memory,
disk space, or compute power. Therefore, you have to experiment to determine a compromise
image size that fits your computer's capabilities.
Scanned File Formats (VERY IMPORTANT, PLEASE READ!)
The storage format for the primary scanned image MUST be a non-lossy format. Rather than
provide an entire treatise on formats, I'll just recommend that you save the scanned image as
TIFF (filename ends in “.tif”) or PNG (filename ends in “.png”). DO NOT USE “JPG” (or JPEG)
format for primary scans, if you plan to manipulate the image for any reason! The JPEG
format was designed to be used only for the final output version of an image, primarily
photographs.
To repeat: Capturing, manipulating, and storing a JPEG image on a computer causes loss of
image quality; hence, the word “lossy” for this format. Every time a JPEG format image is re-
saved by an image manipulation program, more quality is lost. If you modify and re-save a
JPEG image enough times, the image will eventually degrade to blotchy uselessness. The
previous two mentioned formats should therefore be used for the primary and “working”
images. A final image, however, to be transmitted to a publication or fellow collector can be in
the JPEG format.
Image Manipulation Programs
I am going to first describe the cancellation extraction using a free, commonly-available image
program called the GNU Image Manipulation Program, or GIMP for short. GIMP has the
advantage of being free and readily available for any computer operating system. For
instance, there is a generic Windows version, a MAC version, and versions for various Unix
systems, including Linux. See the website “http://www.gimp.org” for free downloads of the
program.
For the purposes of this discussion, the program has sufficient features to perform the work
needed. Many people can (and will) argue that a particular image manipulation program is
better than GIMP, or better than another program such as Adobe Photoshop, Paintshop Pro,
Corel, etc., etc. The point is, GIMP performs very well for the job I'm describing here. Note
3. that GIMP has many, many additional features, and because of this feature richness, can be
quite confusing to use. This steep learning curve is no different from that of a sophisticated
commercial program such as Adobe Photoshop. If you perform a lot of image processing,
particularly photographs, you may already have a favorite image program.
Next, I will describe the process using Photoshop CS3. This is a popular, but costly product. I
have tried to use these techniques with Photoshop Elements, but that program does not
appear to have the desired features. My previous experience with the “Paintshop Pro”
program is that it should work correctly, but I do not have a working copy of the program
available for experimentation. Look for “channel splitting” in Paintshop, if you use this
popularly-priced product.
After describing the entire process, I will provide a “cookbook” for the GIMP and Photoshop
processing needed. In the introduction, I gave the scheme in a more generic fashion, in hopes
that the method can be used successfully with the many other brands of image programs.
Please read and understand the description of the image processing, before you try to use a
computer program to do the task.
The Process
The actual processing to extract a cancellation is pretty simple to describe. With the working
image loaded in the program, you will “decompose” the image into its component colors.
Images on computers are stored and displayed in RGB format. That is, for each pixel in an
image, there is a Red, Green, and Blue value. If you use the program to split any color image
into the red, green, and blue components, you will get three new images, each a
monochrome (gray-scale image) that reflects the intensity of the color values. For instance, if
you decomposed a photo showing only a nice blue sky, the Blue image would be nearly white,
since there is so much blue in the photo. The Green and Red images would be much darker,
indicating that those colors are less common in a blue sky photo.
Don't worry too much about the technical details of decomposition, but keep that word in mind
when evaluating your image software. If you already have an image program on your
computer, check the “Help” topics in the program to see if it can perform decomposition. Note
that another term used for decomposition is “channel splitting”. If you find that your paint
program has this feature (e.g., Photoshop), you can perform the same action as I will describe
for GIMP.
There are several modes available for decomposition, but I find that the “RGB” option is the
simplest. There are others, which I will discuss later for the more advanced user.
Once decomposition has been performed by the program, you will have three gray-scale
images, each displayed as a separate new image. If you don't see each image on your
screen, go to the “Window” menu pulldown. Each new image should be listed, usually with the
color channel as part of the name. For instance, the red channel may have the world “red” or
the capital letter “R” in the newly-created image name.
4. Once you can view the decomposed images, it becomes a simple matter to view all three,
and choose the image that has the most contrast and seems to show the cancellation in its
best condition. Delete the other two images that don't display the cancellation as well.
Sometimes, one of the images will simply be a mass of gray; that is actually good news,
because it usually means that one of the other images will be good quality.
What if none of the images look any good? Check later for a more detailed discussion of
decomposition. As I noted at the start, some stamp or cover colors just won't break out
correctly.
Anyway, that is step #1. Not much to it, but your image manipulation program must have the
ability to “channel split” or “decompose” into the three component colors of images.
Step #2 uses the gray-scale image that appeared to be the best. It is a good idea to save the
image, now that you've reached this point. Pick a new file name, perhaps one using the word
“working” in it. Be sure to use TIF or PNG formats to save it!
For the next step, we will make the image look better by increasing the contrast, and possibly
the brightness. If the color of the paper of a cover or card can be altered to be nearly white,
and the cancel left in a nearly black color, we should have a good image to keep for
reference, or share with other collectors.
All image manipulation programs allow you to alter the lightness and darkness of an image.
This operation is usually called “brightness and contrast setting”. It is possible to alter the
brightness and contrast of the new gray-scale image using these settings, and many users
find this quite acceptable. Start by increasing the contrast and see how it works. Sometimes,
increasing contrast may make the image look darker. Try increasing the brightness a bit after
increasing the contrast. You may go back and forth between brightness and contrast, sliding
the settings one way or another to get the appearance you want in the cancellation.
If altering the brightness and contrast work for you, then you are done. You should then save
the image again for future reference. Do use a new filename for the improved image,
probably using the word “final” in the name. Be sure to use TIF or PNG formats to save it!
In order to publish the image, or email it to another collector, you will probably want to alter
the physical size and convert the image to JPG. Here is where you use the “lossy” format to
publish an image, but not before! Image manipulation programs all have a “scale image”
capability. Use this to shrink the image to a more manageable size. An example size might be
800 pixels along the long axis.
It is important that you allow the program to maintain the aspect ratio to the same value as the
original image. Most programs do this by default. It is not a good idea to change the aspect
ratio while altering the image size, because the image will become distorted. Such a distorted
image could mislead another collector into thinking that the cancellation is longer or shorter
than it really is.
When the “published” image looks the way you want it, save it in the JPG format (filename
ends in “.jpg”). It is a good idea to maintain higher quality (less loss of image details) when
performing this save process. Most programs let you set the JPG quality. I recommend 90-
5. 100% quality for cancellations.
GIMP Processing Cookbook
Here is the entire process as a “cookbook” for users of GIMP:
● Load the original scan. Use the menu “File/Open” and select the file with the scanned
image.
● Decompose, by using the menu “Colors/Components/Decompose”. A new dialog will
appear. Before clicking on “OK”, make sure that the decomposition model is “RGB”,
and the checkbox for “Decompose to Layers” is UN-checked.
● Pick the most desirable of the three images produced. Close the other two, by clicking
on the “X” in the upper right corner (or using the menu “File/Close”).
● Save the best gray-scale image by using the “File/Save As” menu option. Pick a name
for the file that includes the word “working”. Be sure that the filename ends in “.tif” or
“.png”. When you click on “OK” for the file save there may be another dialog pop-up
with several options. Just click on “OK” for that dialog.
● Prepare to alter the contrast of the new gray-scale image by using the menu
“Colors/Levels”. A new dialog will pop up that lets you alter the contrast and brightness
in a graphical manner.
● First, try to auto-level the image by clicking on the “Auto” button in this dialog. In many
cases, this automated operation is enough to make the image look very good. If that is
the case, you are done. Perform another “File/Save As” operation, and give the altered
file a new name with the word “final” in it. (Use PNG or TIF formats).
● If auto-level does not work, or the image looks bad, just click on the “Reset” button to
return the image to its original appearance. In this situation, we will use the sliders
located near the top of the dialog, just under the “Input Levels” box. You will see three
little triangles, one at the right, one in the middle and one on the left. If you click on and
slide the rightmost triangle, you will further lighten the whites and near-whites in the
image. This is good, because the whites are what is left of the envelope (or stamp)
color, and you want to make these lighter without affecting the cancellation color.
● Continuing the “level” processing, try clicking and sliding the leftmost triangle to the
right. This action should further darken the cancellation colors. This is good, because
we want to emphasize the cancellation by making it darker. There is an ideal location
for both the left (dark) and right (light) tones. Just try moving the sliders around. You
can then correct the overall appearance by moving the middle slider to the left or right.
Experiment with these settings to enhance the image. If you get stuck, just click on the
“Reset” button, and the image will return to the original appearance.
● When you are satisfied with the brightness and contrast of the image, click on the “Ok”
button in the levels dialog, and save the image using the “File/Save As” menu item. It is
probably a good idea to have the new name include the word “final” at this point. Use
the PNG or TIF format. During any future processing, so NOT re-save over this file,
unless you are completely satisfied with the appearance. If you want to try other
manipulations, be sure to save as new “working” file versions. This technique prevents
you from losing previous work, as you make multiple changes over time.
● If you want to send this image to a fellow collector, you should now check the size of
the image. If it is too large, both in terms of the width and height, as well as the disk
6. space it requires, you may want to scale down the image, before the “save” step
described in the next paragraph. You use the “Image/Scale Image” menu selection to
perform this action. A dialog will appear that lets you alter the size. Note the little
“chain” icons in the dialog. They indicate that the aspect ratio is “locked”, a setting you
definitely want to have. Look at the image width and height. Whichever is larger, alter
the value to something more manageable, such as 800 pixels. Click on the “Ok” button
to perform the scaling action. Now you can perform the final save for email
transmission. See the example later for some information on the benefit of scaling an
image.
● With the image scaled or not, you now perform another “File/Save As” operation on the
image. Be sure the filename you NOW specify ends in the letters “.jpg” to make a
JPEG image. When you click on “Ok” in the save menu, you will be shown another
dialog that lets you set the quality of the JPEG image. (You might see a dialog that
requires you to “Export” the image. Just click on the “Export” button, if you see this
popup.) Once in the JPEG save dialog, try a quality setting from 90 to 100%. Clicking
on “Ok” here will save the image and you can email that image or embed it into a
document, and so on.
Photoshop CS3 Processing Cookbook
Here is the entire process as a “cookbook” for users of Photoshop. I am using the CS3
version:
● Load the original scan. Use the menu “File/Open” and select the file with the scanned
image.
● Channel split, by first ensuring that the image is RGB. You do this by pulling down the
menu item “Image-->Mode”. The “RGB Color” option should be checked. If not, click on
it, to ensure it is checked. The “Layers, Channels, Paths” tabs should appear on the
right of the image. If they don't show up, make them appear by looking at the pulldown
for “Window” and ensuring that “Channels” is checked. There is a small icon near the
right side of the channels display that opens a menu just for channels (see illustration).
The “channel split” option appears in this menu, and you want to click on it to cause the
split to occur.
● Pick the most desirable of the three images produced. Note that the red image will
have the capital “R” in the image name (see “Window” menu), the green will have “G”,
and the blue will have “B”. Close the other two, by clicking on the “X” in the upper right
corner (or using the menu “File/Close”).
● Save the best gray-scale image by using the “File/Save As” menu option. Pick a name
for the file that includes the word “working”. Be sure that the filename ends in “.tif” or
“.png”. When you click on “OK” for the file save there may be another dialog pop-up
with several options. Just click on “OK” for that dialog.
● Prepare to alter the contrast of the new gray-scale image by using the menu
“Image/Adjustments/Levels”. A new dialog will pop up that lets you alter the contrast
and brightness in a graphical manner.
● First, try to auto-level the image by clicking on the “Auto” button in this dialog. In many
7. cases, this automated operation is enough to make the image look very good. If that is
the case, you are done. Perform another “File/Save As” operation, and give the altered
file a new name with the word “final” in it. (Use PNG or TIF formats).
● If auto-level does not work, or the image looks bad, just click on the “Cancel” button to
stop the process and redisplay the image using the “Image/Adjustments/Levels” menu
entry. That will return the image to its original appearance. In this situation, we will use
the sliders located near the top of the dialog, just above the “Output Levels” box. You
will see three little triangles, one at the right, one in the middle and one on the left. If
you click on and slide the rightmost triangle, you will further lighten the whites and
near-whites in the image. This is good, because the whites are what is left of the
envelope (or stamp) color, and you want to make these lighter without affecting the
cancellation color.
● Continuing the “level” processing, try clicking and sliding the leftmost triangle to the
right. This action should further darken the cancellation colors. This is good, because
we want to emphasize the cancellation by making it darker. There is an ideal location
for both the left (dark) and right (light) tones. Just try moving the sliders around. You
can then correct the overall appearance by moving the middle slider to the left or right.
Experiment with these settings to enhance the image. If you get stuck, just click on the
“Cancel” button. You will have to re-select the “Image/Adjustments/Levels” menu, and
the image will return to the original appearance.
● When you are satisfied with the brightness and contrast of the image, click on the “Ok”
button in the levels dialog, and save the image using the “File/Save As” menu item. It is
probably a good idea to have the new name include the word “final” at this point. Use
the PNG or TIF format. During any future processing, so NOT re-save over this file,
unless you are completely satisfied with the appearance. If you want to try other
manipulations, be sure to save as new “working” file versions. This technique prevents
you from losing previous work, as you make multiple changes over time.
● If you want to send this image to a fellow collector, you should now check the size of
the image. If it is too large, both in terms of the width and height, as well as the disk
space it requires, you may want to scale down the image, before the “save” step
described in the next paragraph. You use the “Image/Image Size” menu selection to
perform this action. A dialog will appear that lets you alter the size. Note the little
“chain” icons in the dialog. They indicate that the aspect ratio is “locked”, a setting you
definitely want to have. Look at the image width and height. Whichever is larger, alter
the value to something more manageable, such as 800 pixels. Click on the “Ok” button
to perform the scaling action. Now you can perform the final save for email
transmission. See the example later for some information on the benefit of scaling an
image.
● With the image scaled or not, you now perform another “File/Save As” operation on the
image. Be sure the filename you NOW specify ends in the letters “.jpg” to make a
JPEG image. When you click on “Ok” in the save menu, you will be shown another
dialog that lets you set the quality of the JPEG image. Once in the JPEG save dialog,
try a higher quality setting. Clicking on “Ok” here will save the image and you can email
that image or embed it into a document, and so on.
8. Photoshop CS3 screen showing the “Channels” tab. The small icon just below the “X”
displays a menu with the “split” command.
The menu in the channels display that allows you to perform a “split”.
9. Example of Decomposition (Channel Splitting).
Original Color Image
We've used balls colored in the three primary colors, to make it easier to see what
decomposition actually does.
Red Image Green Image Blue Image
Note that the Red image displays the red ball as “white”. This is true because the red ball is
made only of red color with no other colors used. This is a bit like looking through a red plastic
colored filter at an object; red becomes white. The same is true for the green and blue
10. images. Note that the other colors show up in each image as “black”. The lettering I've added
is black, so it is black in all three images. This is the key to getting a black cancellation to
contrast with the cover or stamp.
For instance, if a cover shows toning in a reddish color, when you split out the components,
the “red” image will show the paper in lighter shades of gray and white. The cancellation is
usually in black, so will be dark in all images.
Lets try a “real world” example:
This is a portion of a scanned cover, as provided by the owner/author of an article in the
Machine Cancel Forum. Let's see what happens when we decompose into the RGB color
sets:
The Blue Image
11. The Green Image
The Red Image
Red looks like the best one, so we discard the two others. This red image will become our
“working” copy. This is now a monochrome image, made up only of white, black, and gray
colors.
We want to improve the image now, primarily by lightening the whites and near-whites, and
darkening the blacks and near-blacks as much as is reasonable. The first step is to increase
the contrast. This is often the only step needed. After contrast manipulation, we can then
change the brightness of the mid-tones (middle slider in GIMP).
12. The Red image, with some contrast and brightness changes. Note that the only alterations
have been to brightness and contrast. This should be sufficient to help identify the cancel and
illustrate an article about it.
Beyond this manipulation, some hobbyists might want to get down to the greatest level of
detail in their paint program and remove the dark areas in and near the postmark dial. This
kind of low-level “painting” brings the process closer to pen-and-ink tracings of cancels, and
requires skill and experience in its use. Also, since the cancellation has been altered in a
major way, you should tell your correspondents that you have performed such manipulation.
This is a bit like telling a purchaser that a cover has been “repaired” or “restored”.
A Note on Scaling an Image
As indicated before, when you want to email an image to another collector, you may want to
limit the size of the image, both its width and height, as well as the disk space it takes up. As
long as the image is usable, smaller size is beneficial. The modified “red” image above, for
instance, is 1176 pixels wide by 386 pixels high. This size may exceed the screen resolution
of your email's recipient, so they may only see part of the image when the read the email.
Also, the file is 104,200 bytes in length. So, the file you send to a recipient will be larger and
take more time to transmit, if it is not scaled first.
So we scale down the image, and show it below:
The image is now 800 by 263 pixels, and only takes about 49,000 bytes, less than ½ the
previously saved size. Naturally, an image with the best detail is useful to the specialist who is
13. looking for small, important details in the cancellation. However, a scaled-down image may be
sufficient to illustrate a cancellation without overloading a user's bandwidth or email program.
Another Example of Decomposition (Channel Splitting)
Let's do another. There was a recent article in the Machine Cancel Forum about a counterfeit
cancellation on a Columbian stamp. With the altered cancellation, the cover was worth quite a
lot. Otherwise, it was quite common. Here is the color scan of the cancellation.
At issue is the date inside the circular postmark. Experts believe that it was added. Looking at
this color scan actually helps identify it as bogus. Note that the color of the black ink for the
“JAN 2/3:30PM” section is darker than the original machine cancellation ink. Also, there
appear to be some indentations above the “JAN2” and “1893” parts. By decomposition of this
color scan, we can more easily see the alterations made by the faker.
The green channel was used for the above detail. I increased the contrast quite a bit. Now,
the lines or indentations added by the faker really show up. These are the obvious lines
14. above “JAN2”, and above the “1893”. Experts believe that these indentations (which can also
be seen by showing a light at an oblique angle with the cover), are caused by the faker's
equipment.
The blue channel image was altered by using GIMP's threshold tool. That tool forces the light
and dark of an image into pure black and white. By moving the slider, you can make more or
less of the image turn from grey to the pure black or white. In this case, we can now see that
the ink color for the date is darker than the ink color of the original machine-impressed dial. All
we have done is to use the computer to enhance something that the human eye might be
able to see if presented with the original cover (or a good quality color scan of it). This
emphasis may help in determining if the added section does not belong on the original cover.
Final Example of Decomposition (Channel Splitting)
Let's do one more. This may not look very interesting, since the only part of the cancel over
the stamp is a wavy line from the flag killer. Keep in mind, however, that this technique can be
used when a postmark is over a stamp, and you want to bring out the ink, rather than the
stamp details.
15. Detail of the Original Image
We have rotated it, and used cropping to isolated just the 3-cent Washington head stamp.
Once more, the red image from the decomposition is the best, so we won't show the other
two colors.
The Red Image
We are getting closer to isolating the cancellation. The next step is to again alter contrast and
brightness. In this case, however, we use more extreme settings, since the stamp is a darker
color (purple) than an envelope.
We've removed nearly all of the stamp image. You can still see a few pixels with the
Washington image. There has been a “cost” for doing this, in that the cancellation is lighter
than we might want. However, the cancellation image is quite usable in this form.
Using Other Decomposition Modes
Sometimes, you cannot get a stamp color to separate from the cancellation, using the RGB
colors only. This section describes slightly more sophisticated ways to decompose the image,
16. which might work for you.
For instance, you can decompose the image using the “CMYK” mode. Unlike RGB, which
stands for the primary colors Red, Blue, and Green, CMYK stands for the primary colors used
in the printing industry: Cyan, Magenta, Yellow, and Black. Try these to see what happens
with a scan. The first thing you may see with this mode is that the images are reversed (white
on black, instead of black on white) from those that come out of the RGB decomposition. You
can still evaluate the split images to see which have the best contrast, before performing any
other manipulations. To see the image as it should appear in print, “invert” the colors of the
image. For instance, if a particular split image appears the best, use the menu entry (for
GIMP) “Colors/Invert”. The cancellation will now be black against the other gray tones.
When trying this type of channel split with Photoshop CS3, you must first make sure the
image is in CMYK mode. Then use the channel splitting method already described.
The following example is taken from the “Black” image of the stamp (the K of CMYK), which
was then manipulated with brightness and contrast settings:
Your paint program may have other modes of decomposition. The best way to find out if any
will help you, is just to try them and see what you get.
Conclusion
I hope that these techniques will help you isolate a cancellation from a cover or stamp. It is
best to “play” with the controls in your paint program to find which settings work best for you.
As with many computer software systems, there often other ways to “skin the cat”. As you
become more familiar with the image processing software on your computer, I encourage you
to try other methods. I would be quite interested to hear from collectors who have found
alternative ways to achieve these results.